Working in Solution Window
Most of the project/solution management tasks in Rider are performed in the Solution window. If you close this window, you can always bring it to view by pressing Alt+2 or choosing in the main menu.
As a .NET IDE, Rider organizes your code in the Project/Solution structure, which is fully compatible with Visual Studio. Similarly to Visual Studio, Rider can handle multiple projects simultaneously as long as they belong to the same solution, but you cannot have more than one solution in a single session. If necessary, you can simultaneously work with multiple solutions in different windows.
However, in contrast to Visual Studio, Rider lets you extend your working environment beyond the solution. For example, you can have your test data, logs, or any other files and folders right next to your solution. These additional items in the solution are not saved in project or solution configs, but rather in Rider's own settings.
Opening existing projects and solutions
To open an existing project or solution, choose the corresponding item on the welcome screen. If Rider is already running, press Ctrl+Shift+O or choose , or alternatively, choose one of the resent solutions under .
Rider will generate an .sln file and an .xproj file if necessary.
Rider also allows opening a project from source control. It can, for example, log in to GitHub, and clone a repo to the local file system. Once done, it will prompt to open the folder.
When opening a .NET Core project, Rider will automatically restore all packages. Rider will also detect the list of target frameworks from .sproj, and display them in a chooser in the status bar. Selecting the current target framework sets the context for the editor — what compiler defines are active, and what packages and assemblies are referenced.
Rider allows opening several solutions simultaneously in different windows. By default, each time you open a solution while another one is opened, it prompts you to choose whether to open the project in the same window or in a new window. If necessary, you can set the default way of opening projects on the page of JetBrains Rider settings (Ctrl+Alt+S).
Creating projects and solutions
You can create a new project in a new solution using or add a new project to the existing solution by right-clicking the solution or solution folder node in the Solution Explorer, and choosing
Rider provides a number of templates for creating a new project. The New Project/ New Solution dialog has templates to create an empty project, standard .NET class libraries and applications, as well as test projects. It will also create .NET Core projects, as console applications, testing and class libraries. Simply enter the solution and project name, select a location, and click Create.
Once a project has been created, files can be added or removed by right-clicking on the project node in the Solution Explorer.
Project and assembly references
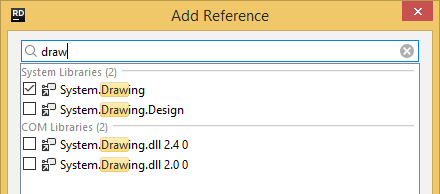
Rider supports adding references to other projects in your solution as well as to standard .NET Framework assemblies by right clicking a project node and selecting Add Reference. The resulting dialog can be searched, just by typing, or the Add From... button can be used to reference a file on disk.

This dialog is not available in .NET Core projects. Instead, references should be added by directly editing the .sproj file. Rider will automatically reload the project and restore the new package references. (This dialog does not exist because Microsoft is replacing the project.json file with a traditional .csproj file, at which point, Rider will add the appropriate support).
Extending your solution
With Rider, you can extend solutions by adding external files and folders. For example, you can have your test data, logs, or any other files and folders right next to your solution. These additional items in the solution are not saved in project or solution configs, but rather in Rider's own settings.
External items in the solution are indexed by Rider, so you can enjoy instant search (Ctrl+Shift+F) and navigation (Ctrl+T) among other things for those items. However, external solution items will stay beyond the scope of your solution when you perform any of the solution-wide refactorings.
For external solution items that share their VCS root with the solution, all version-control features will also be available.
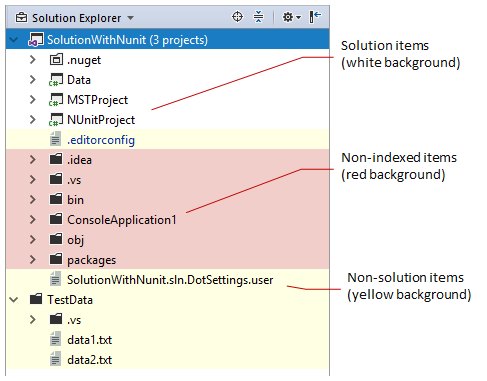
To add an external folder to the current solution, right-click on the solution in the Solution window, choose Attach Existing Folder, and then select a folder. Rider will turn on the Show All Files mode in the Solution Explorer so that you can start exploring the attached folder:

Please note the difference between adding external folders to your solution and adding existing files/folders/projects to your solution.
The latter is done by choosing Add Existing Project from the context menu on the solution or solution folder, or by choosing Add Existing Item from the context menu on a project or folder — these kinds of modifications are saved in solution and project configs so you will also see the added items if you open the solution in Visual Studio.
When working with external items in the extended solution, note the following:
- You can always hide the external items by right-clicking on the Solution Explorer title bar and clearing the Show All Files check box.
- To remove an external directory or any of its subdirectories from the solution, right-click on that item and choose Exclude from Solution Structure. An original external directory will be just removed, but a subdirectory will be marked red as non-indexed — in any case the directories will not be removed from disk.
- If external items contain any .NET solutions or projects, code analysis in those items will not be available. To work with multiple solutions simultaneously, open them in different windows.
- If external items contain XML-like or web code (HTML, JavaScript, TypeScript, CSS, etc.), most of code analysis and coding assistance features will be available in that code.
- You can attach any external folder that is a parent directory with respect to your solution location. In this case, your solution will be displayed inside the hierarchy of that folder as long as the Solution Explorer is in the Show All Files mode.
Managing recent solutions
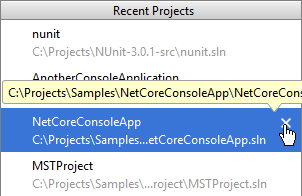
Each time you open a new solution, Rider saves it in its history and lets you quickly reopen it from the menu. If you want to remove a solution from your history, choose in the menu, then click x next to that solution or press Delete when it is selected.

Browsing non-solution files and folders
One way of exploring non-solution items is to add external items to your solution. But Rider also allows you to open and explore any files and folders even without any solution being open. This way you can work on web projects that do not have a Solution file or just study any text file in Rider's editor.
To open a file or a folder, press Ctrl+O or choose from the main menu.
A file will be just opened in the editor but not added to the solution view. If you choose to open a folder while a solution is loaded, Rider will suggest two options: you can either add it as an external folder to the solution or open the folder in a new application window.