Working with the Database tool window
Overview
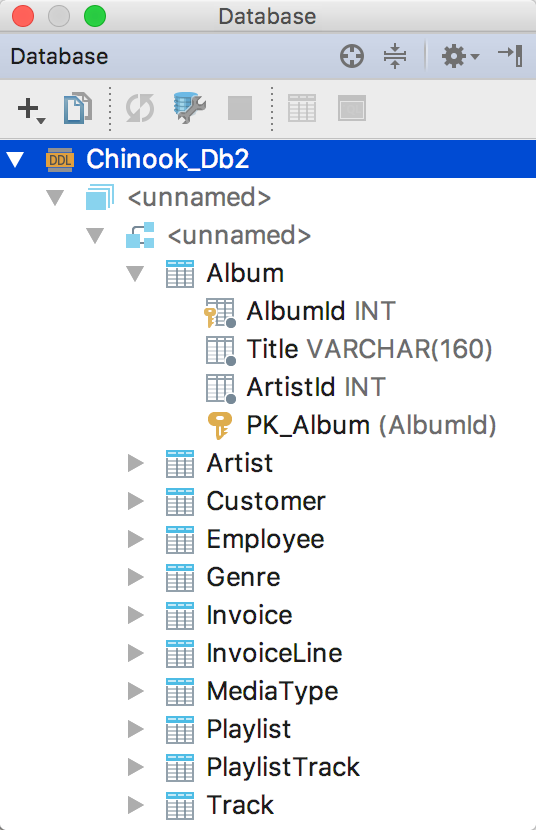
The Database tool window provides access to functions for working with databases and DDL data sources. It lets you view and modify data structures in your databases, and perform other associated tasks.

Opening the Database tool window
Do one of the following:
- Select .
- Point to
 or
or  in lower-left corner of the workspace, and then click Database.
 - Click Database on the right-hand tool window bar (if the tool window bars are currently shown).
Creating a data source
To start creating a data source, you can use the New command when the Database tool window is active, e.g.:
-
 on the toolbar
 - New in the context menu
- Ctrl+N
The DDL Data Source option is for creating a DDL data source. Other data source options correspond to different scenarios of creating a DB data source:
- Data Source. A "usual way" of creating a data source. In this scenario, you start by selecting your DBMS.
- Data Source from URL. In this scenario, you start by specifying your database URL.
- Data Source from Path. In this scenario, you start by specifying your database location (a local file or folder). This option is appropriate only for Derby, H2, HSQLDB and SQLite.
- Import from sources. If you have files that contain database connection settings, you can create data sources by importing those settings. See .
You can also start creating a data source in the Data Sources and Drivers dialog. Open the dialog (e.g. ![]() ) and use the Add command there: Add from the context menu,
) and use the Add command there: Add from the context menu, ![]() on the toolbar, or Ctrl+N.
on the toolbar, or Ctrl+N.
For more information, see Managing data sources.
Synchronizing the view of a DB data source
If the Auto sync option for a DB data source if off, the only way to synchronize its view in the Database tool window with the actual state of the database is by using the Synchronize command.
- Select the item whose view you want to synchronize. This may be a DB data source, schema or table.
- Do one of the following:
- Press Ctrl+Alt+Y.
- Click
 on the toolbar.
 - Select Synchronize from the context menu.
Resolving visualization problems
If what you see in the Database tool window is somewhat problematic (e.g. no data structures are shown, the objects below the schema level are missing, etc.), try the following to resolve the problem:
- Synchronize the view of your data source (
 ).
). - Make sure that at least one of the available schemas is selected for viewing: check the Schemas popup. See .
- Switch to using the JDBC-based introspector:
 , select the Introspect using JDBC metadata check box. Then synchronize the view.
 - Clear the JetBrains Rider schema cache (Database Tools | Forget Cached Schema from the context menu for the data source) and then synchronize the view.
Adjusting the view by means of view options
You can adjust the view in the tool window by turning the corresponding view options on and off. To access those options, click ![]() on the title bar.
on the title bar.
Adjusting the view by means of object filters
You can limit the set of tables and other database objects shown in the Database tool window by specifying object filters. The object filter is set for each DB data source individually, in the Data Sources and Drivers dialog (![]() ), on the Options tab. The object filter syntax is described underneath the Object filter field.
), on the Options tab. The object filter syntax is described underneath the Object filter field.
Filter examples
f.* Only the objects whose names start with f will be shown.
table:[gh].* The tables whose names start with g or h and all the objects in other categories will be shown.
view:new_.*||routine:-[ps].* The views whose names start with new_, the routines whose names start with the letters other than p or s, and all the objects in the categories other than views and routines will be shown.
Showing and hiding schemas
To show or hide schemas:
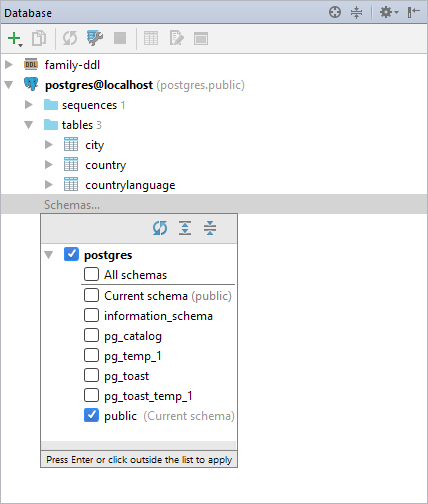
- Within the DB data source of interest, double-click Schemas, or select Schemas and press Enter. (Alternatively, right-click any element within the corresponding data source, point to Database Tools and select Manage Shown Schemas.)
- Select the schemas you want to show and press Enter.

To hide schemas, use the Schemas popup or the context menu command.
Finding items
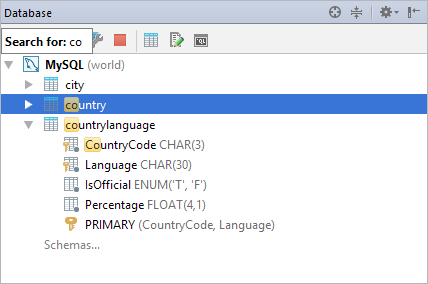
To find an item of interest, simply start typing its name. The specified text within item names is highlighted, and the first of the items that contains the specified text is selected.

Finding usages of database objects
You can search for usages of database objects in your files and consoles, and also in the source code of other objects (if loaded, see ). For example, you can look for references to a table or view in the code of other views, stored procedures and functions.
- Select the item of interest.
- Do one of the following:
- Press Shift+F12.
- Select Find Usages from the context menu.
- Select Edit | Find | Find Usages in the main menu.
Creating a copy of a data source
- Select the data source of interest.
- Do one of the following:
- Click
 on the toolbar.
 - Select Duplicate from the context menu.
- Press Ctrl+D.
- Click
Creating a database or schema
- Select any element within the DB data source of interest.
- Do one of the following:
- Select or .
- Click
 and select Schema or Database.
 - In the context menu, select or .
- Press Ctrl+N and select Schema or Database.
- In the dialog that opens, specify the name of the schema or database. If necessary, under SQL Script, edit the statement to be executed. Click Execute.
- If you have created a PostgreSQL database and want to see it in the Database tool window, create a data source for that database.
Creating a table, a column, an index, or a primary or foreign key
- Depending on what you are going to create:
- To create a table, select a schema, table or column within the target DB data source.
- To create a column, select the target table or a column within that table.
- To create an index, or a primary or foreign key, select the column or columns for which you want to create an index, or a primary or foreign key constraint.
- Carry out the New command and select the item to be created. E.g. for a table, do one of the following:
- Select .
- Click
 and select Table.
 - In the context menu, select .
- Press Ctrl+N and select Table.
- In the dialog that opens, specify the item definition.
Modifying templates for generated index and key names
When you create indexes, and primary and foreign key constraints, their default names are generated according to corresponding templates. For a primary key, for example, the template is {table}_{columns}_pk.
You can view and modify these templates in the Settings / Preferences dialog: Ctrl+Alt+S .
The templates can contain variables (e.g. {table}) and text. When generating a name, the specified text is reproduced literally.
To get the info about the variables and how you should use them, place the cursor into the field of interest and press Ctrl+Shift+F1.
{columns} and {ref_columns}, depending on the situation, are the name of the column, or a list where the column names are separated with the underscore (_).
{unique?u:} checks if the index is unique (unique?), and, if it is, inserts the sequence of characters specified between ? and : (in this example, it's u). If the index is not unique, the sequence between : and } is inserted (in this example, it's nothing).
Example. Using the template {table}_{columns}_{unique?u:}index, you are creating an index on the columns FirstName and LastName in the table persons. If the index is unique, its name, by default, will be persons_FirstName_LastName_uindex. If the index is not unique, its name will be persons_FirstName_LastName_index.
Viewing basic info about an item
You can view basic info about an item in the quick documentation view. For a table, for example, the first ten rows and the table definition (the CREATE TABLE statement) are shown.
To open the quick documentation view, select the item of interest and do one of the following:
- Select .
- Press Ctrl+Shift+F1.
Renaming items
- Select the item to be renamed.
- Do one of the following:
- Select .
- Select Rename from the context menu.
- Press Ctrl+R, R.
- Use the dialog that opens to specify a new name and associated options.
Previewing changes
Changes to database objects sometimes assume associated changes to SQL script files and statements in database consoles. For example, you may be changing the name of a table, and this name may be used in your files and consoles.
In such cases, you can look at potential changes, and decide where those changes are desirable and where aren't.
Potentially affected code fragments are shown in the Find tool window when you click Preview in the corresponding dialogs. Here is an overview of some of the available controls:
- Exclude (Delete) and Remove (Ctrl+R, D). Use these context menu commands for the items that shouldn't be changed.
- Execute SQL Script. If this option is on, and you click Do Refactor, the corresponding SQL statements are run to modify the corresponding database objects.
- Open in Console. Use this button to open the corresponding SQL statements in a database console.
- Do Refactor. Click this button to change the corresponding code fragments and, if the Execute SQL Script option is on, to run the corresponding SQL statements.
Modifying the definition of a table, column, index, or a primary or foreign key
- Select the item whose definition you want to change. This may be a table, a column, an index, or a primary or foreign key.
- Do one of the following:
- Select Modify <item_type> from the context menu (e.g. Modify Table).
- Press Ctrl+R, S.
- Use the dialog that opens to change the item definition.
Opening DDL definitions of database objects in the editor
- Select the object whose definition you want to view or edit.
- Do one of the following:
- Click
 on the toolbar.
 - Press F12.
- Click
Generating DDL definitions on the clipboard
- Select the item or items of interest. These may be data sources, schemas, tables, views, stored procedures or functions, etc.
- Do one of the following:
- Select Generate and Copy DDL from the context menu.
- Press Ctrl+Shift+C.
Now you can paste the definitions into a database console or an SQL file.
Comparing table structures
- Select two data sources, schemas or tables.
- Do one of the following:
- Select Compare from the context menu.
- Press Ctrl+D.
The comparison results are shown in the differences viewer.
Copying a table to another database or schema
You can copy (export) a table along with all its data to another schema or database. This is possible even when the source and target databases belong to different DBMSs, e.g. PostgreSQL and MySQL.
To copy a table:
- Drag the table to the destination schema or database.
- In the dialog that opens, specify the settings for your new table.
Importing delimiter-separated values into a database
To import a text file containing delimiter-separated values (CSV, TSV, etc.) into your database, use drag-and-drop or the Import from File context menu command.
If you drag a file into a schema (or carry out the Import from File command for a schema), JetBrains Rider will create a new table for the data that you are importing. If you drag a file into an existing table (or perform the command for a table), JetBrains Rider will try to add the data to that table.
- Do one of the following:
- Drag a file from the Solution tool window (the file may be a .zip archive) onto a schema or table in the Database tool window.
- Right-click the target schema or table in the Database tool window, select Import from File and then select the file to import the data from (this file may be a .zip archive).
- In the dialog that opens, specify the data conversion settings, and, if a new table is to be created, the table name and structure.
Opening the data editor
- Select the table of interest.
- Do one of the following:
- Click
 on the toolbar.
 - Select Open Editor from the context menu.
- Press F4.
- Click
For more information, see Working with the data editor.
Copying data from one table to another one
- Drag the source table to the destination table.
- In the dialog that opens, specify the data mapping info and other settings for the destination table.
Saving data in files in various forms and formats
You can save database data in files as SQL INSERT and UPDATE statements, TSV and CSV, HTML tables and JSON data. A separate file is created for each individual table or view.
- Select the data source or the schemas, tables and views of interest.
- In the context menu, point to Dump Data to File(s) and select the output format (e.g. Comma Separated Values (CSV)).
- In the dialog that opens, specify the destination directory and, if a single file is going to be created, the file name.
Configuring data output formats and options
To configure the output formats for the Dump Data to File(s) command (see ), select one of the following from the menu associated with the command:
- Configure CSV Formats. This command opens the CSV Formats dialog that lets you manage your delimiter-separated values formats (e.g. CSV, TSV).
- Go to Scripts Directory. This command lets you switch to the directory where the scripts that convert table data into various output formats are stored.
For SQL INSERTs and UPDATEs, there are additional options: Add Table Definition and Skip Generated Columns. Those can be set in a data editor or the result pane of a database console. See e.g. .
Creating database backups with mysqldump or pg_dump
You can create backups for database objects by running mysqldump for MySQL or pg_dump for PostgreSQL.
- Within a MySQL or PostgreSQL data source, select the items of interest (e.g. schemas, tables and views).
- From the context menu, select Dump with "mysqldump" or Dump with "pg_dump".
- In the dialog that opens, specify the location of
mysqldumporpg_dumpexecutable, and the settings for performing the dump. If necessary, edit the command-line options in the lower part of the dialog (autocompletion is available).
Restoring data dumps with mysql, pg_restore or psql
You can restore data dumps by means of the mysql client utility for MySQL, or pg_restore or psql for PostgreSQL.
- Select the target MySQL or PostgreSQL data source, database or schema. For PostgreSQL, you can also select a table.
- From the context menu, select Restore with "mysql", Restore with "psql" or Restore.
- In the dialog that opens, specify the location of the utility executable, the options for restoring the data, and the path to the dump file. If necessary, edit the command-line options in the lower part of the dialog (autocompletion is available).
Opening a default database console
- Select the DB data source of interest or any node within it.
- Do one of the following:
- Click
 on the toolbar.
 - Select Open Console from the context menu.
- Press Ctrl+Shift+F10.
- Click
For more information, see Working with database consoles.
Creating and opening a new database console
- Select the DB data source of interest or any node within it.
- Do one of the following:
- Select Open New Console from the context menu.
- Click
 and select Console File.
For more information, see Working with database consoles.
Generating Java entity classes for tables and views
- Select the tables and views of interest.
- In the context menu, point to Scripted Extensions and click Generate POJOs.clj or Generate POJOs.groovy.
- In the dialog that opens, specify the directory in which you want to create your
.javaclass files.
Closing database connections
JetBrains Rider connects to databases automatically, when needed. (The names of the data sources with open database connections are shown in the Database tool window in bold.)
To close unnecessary database connections, select the corresponding data sources and do one of the following:
- Click
 on the toolbar.
 - Select Disconnect from the context menu.
- Press Shift+F5.
Removing items
Depending on what you are going to remove:
- Data source. Use the Remove command (, Remove from the context menu, or Delete on the keyboard).
- Schema, table, column, index, a primary or foreign key constraint, stored procedure or function, etc. Use the Drop command (, Drop from the context menu, or Delete on the keyboard).
- Primary or foreign key constraint. For removing primary and foreign key constraints, in addition to Drop, there are the following context menu commands: and . Note that the Drop Foreign Key command is available only when a column with the corresponding foreign key constraint is selected (
 ).
). - All rows in a table. Use the context menu command for the corresponding table.