Get Started with Run/Debug Configurations
To run or debug your code, JetBrains Rider uses the concept of run/debug configurations. In this tutorial, you will learn how to setup and use these configurations.
Step 1. Understand run/debug configurations
Run/debug configuration is a set of properties that define how to run and debug code in the current solution. You can have several run/debug configurations in each solution to launch your code in different ways.
You can access run/debug configurations from the menu and on the toolbar. When you create a new project that targets an executable (for example, a console application), a suitable run/debug configuration is added automatically from the project template.
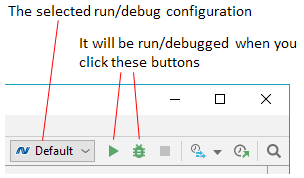
So let's create a new project in a new solution using the Console Application template. When the new project is created, take a look at the top right corner — a configuration named Default is created and selected:

Let's study the default configuration.
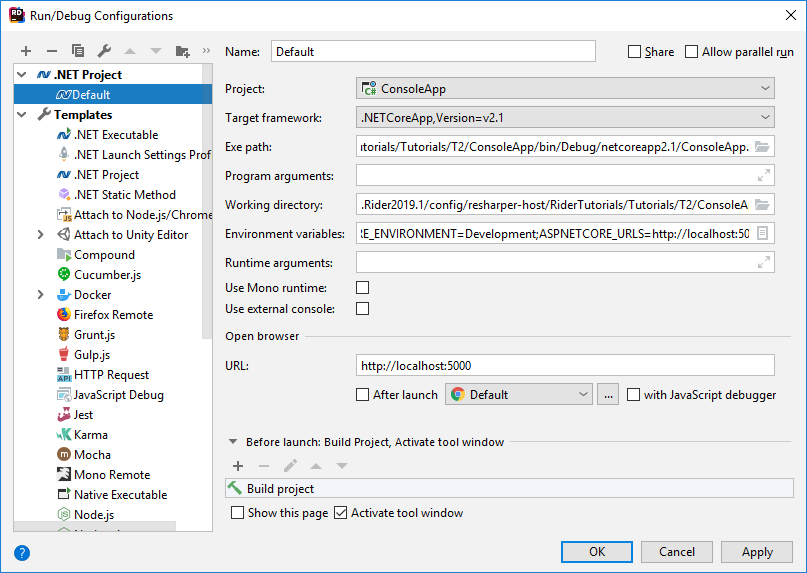
Click the configuration selector and choose Edit Configurations to open the configurations editor. The Default configuration is selected on the left.
Notice the parent node of the Default configuration — it shows the type of this configuration, .NET Project. There can be multiple configurations of the same type and of different types. In this dialog, configurations are grouped by their types. You can expand the Templates node to see all available configuration types.
Take a look at the properties of the selected configuration. All necessary ones are filled automatically when the configuration is created. For example:
Project — defines which project to execute. If your solution contains multiple executable projects, you can create multiple configurations that will launch these projects.
Target Framework — defines what version of .NET Framework will be used to execute your code.
Exe path — defines which assembly should be executed. If you're targeting a .NET Core application, it could be an .dll file rather than .exe.
Program arguments — this optional field lets you pass arguments to your program.
Notice the Before launch properties group, these define what should be done before launching the code. In our case, it's Build project to build the project each time you start the configuration and Activate tool window to bring up the Run window or Debug window. However, you can use these properties for much more complex scenarios, like running some external tool, another run/debug configuration, Gulp or Grant, and many others.
Now, when you have an idea of what a run/debug configuration is, you can close the configurations window.

Step 2. Try out the default configuration
To make our application do something, let's add the following code inside the Main() method:
Now we can run the Default configuration to see how it works with our simple "Hello World" console app. As we saw in its properties, it executes the code without any arguments.
To run the currently selected configuration, which is the Default now, do one of the following:
Press Shift+F10,
Choose from the main menu.
Click Run 'Default'
 next to the configuration selector on the toolbar.
As defined in the configuration properties, JetBrains Rider will build your solution, bring up the Run window, and then execute the Main() method of the Console Application project without any arguments.
In the Run window, you will see a new tab for the Default configuration and the output of our program there — Hello World!

Step 3. Use multiple run/debug configurations
As mentioned above, you can have any number of run/debug configurations in your solution. Let's add a new configuration that runs our console app with the DE argument:
Click the configuration selector and choose Edit Configurations to open the configurations editor. The Default configuration is selected on the left.
Copy the Default configuration by clicking Copy Configuration
 or pressing Ctrl+D.
Rename the copied configuration to Default DE.
Leave all properties of Default DE as is, but add
DEto Program arguments.Click OK to close the dialog.
Now we can choose Default DE in the configuration selector and run it as described above. Our Console Application will receive the DE argument and you will see Hallo Welt! in the output.

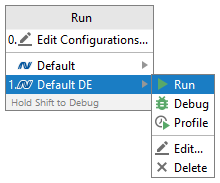
When you have multiple run/debug configurations, the Run/debug quick list comes in handy. You can press Alt+Shift+F10 or choose from the main menu to bring up the list of run/debug configurations that you have in the current solution. You can launch or manage your configurations right from this list:
