Refactoring JavaScript
Refactoring means updating the source code without changing the behaviour of the application. Refactoring helps you keep your code solid, dry, and easy to maintain.
Move Symbol refactoring
Besides moving files and folders, JetBrains Rider lets you move JavaScript top-level symbols. The Move Symbol Refactoring works for classes, functions, and variables in ES6 modules.
Move a class, a function, or a variable
Select the symbol to move.
Press F6 or choose from the context menu or from the main menu. Alternatively, choose or press Ctrl+Alt+Shift+T, then choose from the list.
The Move Module Members dialog opens.

Specify the destination file and select the members to move.
By default, JetBrains Rider automatically raises the visibility of the members to the required level. If you want to keep the visibility level unchanged, click As is in the Visibility.
Pull Class Members Up refactoring
The Pull Class Members Up refactoring moves class methods upwards in the class hierarchy – from the current class to a superclass.
Example: moving a class method to a superclass
Suppose you have a class AccountingDepartment that extends an abstract class Department. In this example, the Pull Class Members Up refactoring moves the printMeeting() method from AccountingDepartment to its superclass Department.
Move the methods of a class to a superclass
Position the caret anywhere inside the class from which you want to pull the members up.
Choose from the main menu or from the context menu. The Pull Members Up dialog opens.
From the list, choose the superclass where you want to move the methods.
To pull a method up, select the checkbox next to it in the Members to be pulled up list.
Rename refactorings
Besides Renaming files and folders, which is available in the context of any language, you can also rename classes, methods, functions, variables, and parameters. JetBrains Rider changes the name of the symbol in its declaration and by default all its usages in the current project.
Rename classes and their methods
In the editor, place the caret or select the class or method to rename and press Shift+F6 or choose from the context menu or from the main menu.
In the Rename dialog that opens, type the new name of the class or method.
Optionally:
Select the Search in comments and strings and Search for text occurrences checkboxes to rename the usages of the class or method in comments, string literals, and text.
By default, the class or method is renamed in the entire project. You can select another scope from the list.
Keep the names of classes and containing files in compliance
When you rename a class, JetBrains Rider also suggests renaming the file if it has the same name. If you accept the suggestion, JetBrains Rider updates the name of this file in import statements in other files.
If you reject this suggestion, you can rename the file at any time later using the Rename file... intention action. Another intention action suggests moving the class to a new file with the corresponding name. The format of the suggested name is determined by the style chosen from the Filename convention list on the Code Style: JavaScript page.

This is useful if you have just created a new file but then came up with a better name when started typing a class or interface in it. To invoke the intention actions, position the caret at the name of the class of interest and press Alt+Enter.
Rename functions, variables, and parameters
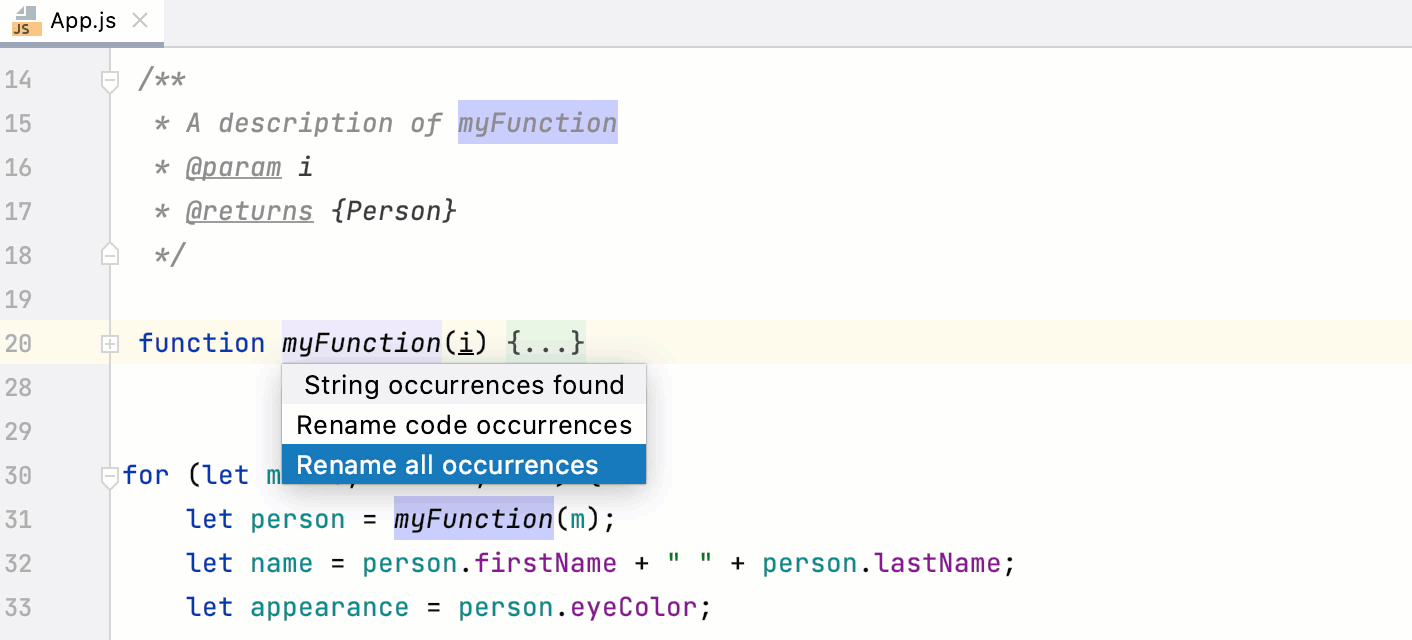
The Rename refactoring for functions, variables, and parameters is performed inplace, but you can press Shift+F6 to configure the refactoring scope in the Rename dialog.
To open the Rename dialog by default, open the Settings/Preferences dialog Ctrl+Alt+S, go to , and select the In modal dialogs option in the Specify refactorings options area.

In the editor, place the caret or select the function, variable, or parameter to rename and press Shift+F6 or choose from the context menu or from the main menu.
If JetBrains Rider detects usages of the symbol in comments or strings, specify whether you want these usages also renamed or not.
In the field with canvas, type the new name of the function, variable, or parameter.
Alternatively:
Press Shift+F6 once more to open the Rename dialog.
Select the Search in comments and strings and Search for text occurrences checkboxes to rename the usages of the symbol in comments, string literals, and text.
By default, the symbol is renamed in the entire project. You can select another scope from the list.
Rename constants
In the editor, place the caret or select the constant to rename and press Shift+F6 or choose from the context menu or from the main menu.
In the Rename dialog that opens, type the new name of the constant.
Optionally:
Select the Search in comments and strings and Search for text occurrences checkboxes to rename the usages of the constant in comments, string literals, and text.
By default, the constant is renamed in the entire project. You can select another scope from the list.
Rename dynamic usages of symbols
Because of the dynamic nature of JavaScript, in some cases a dynamic reference is a valid usage and should be renamed. However, often renaming dynamic usages is not the expected behavior. In the example below, changing test() to test1() in rename.test() is correct while in hello.test() it would be an error.
Therefore JetBrains Rider always shows the Preview window before applying a complex refactoring.

Extract refactorings
JetBrains Rider provides various Extract refactorings to introduce parameters, variables, constants, fields, methods, and functions. To run any of these refactorings, select the expression to refactor and choose . You can select an entire expression or position the caret anywhere inside it and JetBrains Rider will help you with the selection.
Introduce Parameter
Use the Introduce Parameter refactoring to replace an expression in the calls of a function with a parameter. JetBrains Rider will update the declaration and the calls of the function accordingly. The default value of the new parameter can be initialized inside the function body or passed through function calls.
Suppose you have a piece of code with a hardcoded 1 in the function calculate_sum(i). With the Introduce Parameter refactoring, you can replace this hardcoded 1 with a i2 parameter. The new i2 parameter can be extracted as optional or as required.
Example 1: Introducing an optional parameter
A new parameter i2 is extracted as an optional parameter. The new parameter is initialized in the body of calculate_sum(i) and the call of calculate_sum(i) in show_sum() is not changed.
See Choosing the parameter type (optional) below.
Example 2: Introducing a required parameter
A new parameter i2 is extracted as a required parameter, the call of calculate_sum(i) in show_sum() is changed accordingly.
See Choosing the parameter type (required) below.
Introduce a parameter
In the editor, position the caret within the expression that you want to convert into a parameter and press Ctrl+Alt+P or select Refactor | Introduce Parameter from the context menu.
Alternatively, do one of the following:
Press Ctrl+Alt+Shift+T and select .
From the main menu, select .
If several expressions are detected in the current cursor location, select the required one from the Expressions list.

If more than one occurrence of the selected expression is found, select Replace this occurrence only or Replace all occurrences from the Multiple occurrences found list.

Finally, the popup for configuring the refactoring appears.

Select the Generate JSDoc to have a JSDoc comment block generated. This may be helpful if you need to specify a custom default parameter value. Learn more from the JSDoc official website.
Choose the type of the new parameter (optional or required) and specify its default value, if applicable:
If the Optional parameter checkbox is selected, the parameter will be initialized with the default value in the function body.
See Introduce Parameter example 1 above.
If the Optional parameter checkbox is cleared, the default parameter value will be passed through the existing function calls. All the function calls will change according to the new function signature and a parameter initialization will be added to the function body.
See Introduce Parameter example 2 above.
Initially, JetBrains Rider accepts the expression where the refactoring is invoked as the default value. In most cases you do not need to change it. If it is still necessary, specify another default value in the JSDoc comment in the format
@param <parameter name> - <default value>.Accept one of the suggested parameter names by double-clicking it in the list or specify a custom name in the field with red canvas. Press Enter when ready.

Also note that in the ES6 code, the new default function parameter syntax
function calculate_sum(i, i2 = 1)will be applied instead ofi2 = i2 || 1;. Learn more about default function parameters from the https://developer.mozilla.org website.
Choosing the refactoring mode
You can extract a parameter right in the editor (in the in-place mode) as described above or use the Introduce Parameter dialog. These two approaches are rather similar, the difference is as follows:
Previewing the results of the refactoring.
In the dialog, you can click Preview and examine the expected changes in the dedicated tab of the Find tool window. In the in-place mode, this functionality is not available.Specifying the default parameter value.
In the dialog, JetBrains Rider suggests the default parameter value in the Value field where you can accept the suggestion or specify another value. In the in-place mode, JetBrains Rider treats the expression where the refactoring is invoked as the default parameter value. To specify another value, you have to use a JSDoc comment block.
By default, JetBrains Rider runs the Introduce Parameter refactoring in the in-place mode. To use the Extract Parameter dialog, open the Settings/Preferences dialog Ctrl+Alt+S, go to Editor | Code Editing, and select the In modal dialogs option in the Refactorings area.
Introduce Variable
Use the Introduce Variable refactoring to replace an expression with a function-scoped variable (var) or a block-scoped variable (let). This refactoring makes your source code easier to read and maintain.
Suppose you have a function with a partially hardcoded expression in the return statement:
'(' + this.getValue() + ')' expression with a variable, for example, string. The scope of the extracted variable depends on the statement used in its declaration var or let and the context in which the new variable is declared (inside or outside a function).Example 1: Introducing a block-scoped variable with a let statement declaration
A variable string is extracted from the '(' + this.getValue() + ')' expression in the return statement. The new variable is declared with a let statement inside Parenizor.method('toString', function ()).
Example 2: Introducing a variable and declaring it outside any function
A variable appName is extracted from the navigator.appName expression and declared with a var statement outside any function.
Introduce a variable
In the editor, select the expression to convert into a variable and press Ctrl+Alt+V or select from the context menu.
Alternatively, do one of the following:
Press Ctrl+Alt+Shift+T and select .
From the main menu, select .
If several expressions are detected in the current cursor location, select the required one from the Expressions list.

If more than one occurrence of the selected expression is found, select Replace this occurrence only or Replace all occurrences from the Multiple occurrences found list.

Finally, the popup for configuring the refactoring appears.
From the list, choose the statement to use in the declaration of the new variable:
Choose var to introduce a function-scoped variable.
Choose let to introduce a block-scoped variable, see Example 2 above.
Choose const to introduce a constant.

Accept one of the suggested parameter names by double-clicking it in the list or specify a custom name in the field with red canvas. Press Enter when ready.
Choosing the refactoring mode
You can extract a variable right in the editor (in the in-place mode) as described above or use the Extract Variable dialog. By default, JetBrains Rider runs the Introduce Variable refactoring in the in-place mode. To use the Extract Variable dialog, open the Settings/Preferences dialog Ctrl+Alt+S, go to Editor | Code Editing, and select the In modal dialogs option in the Refactorings area.
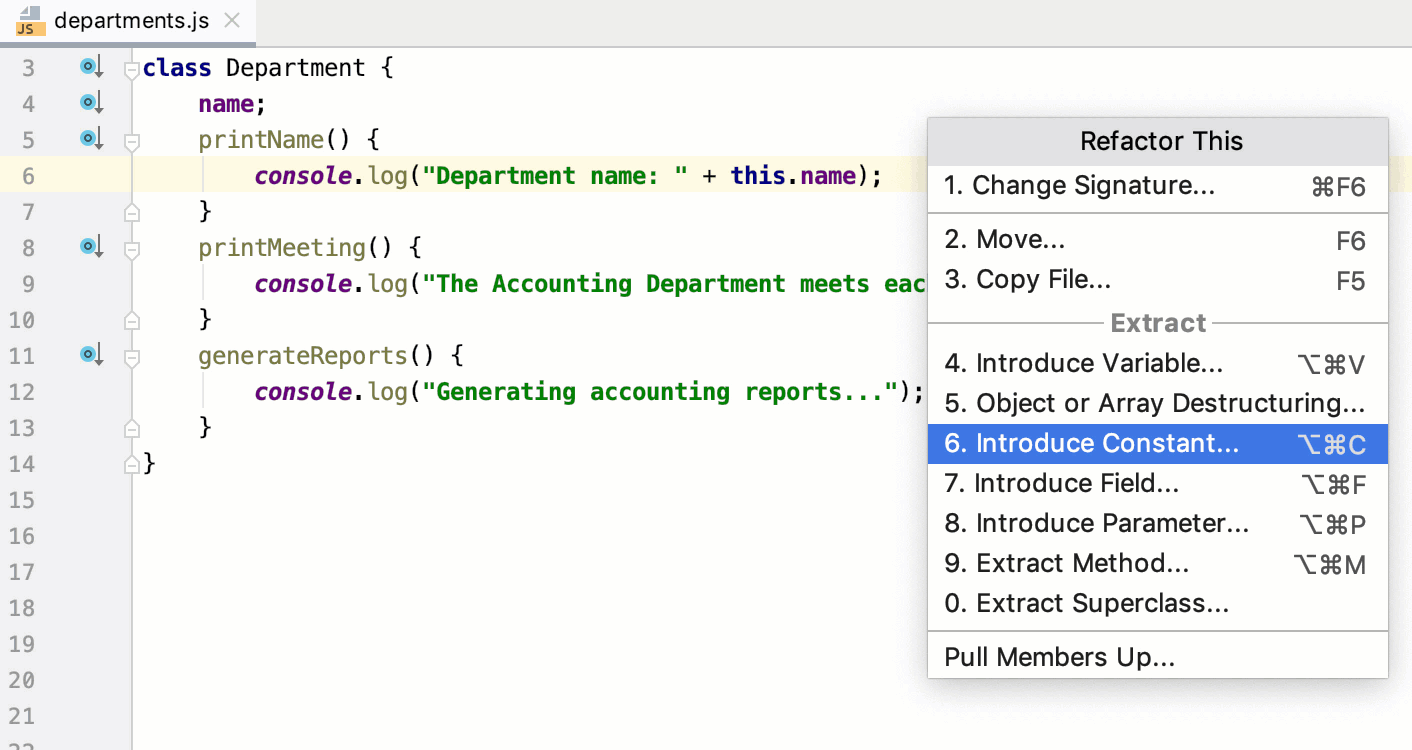
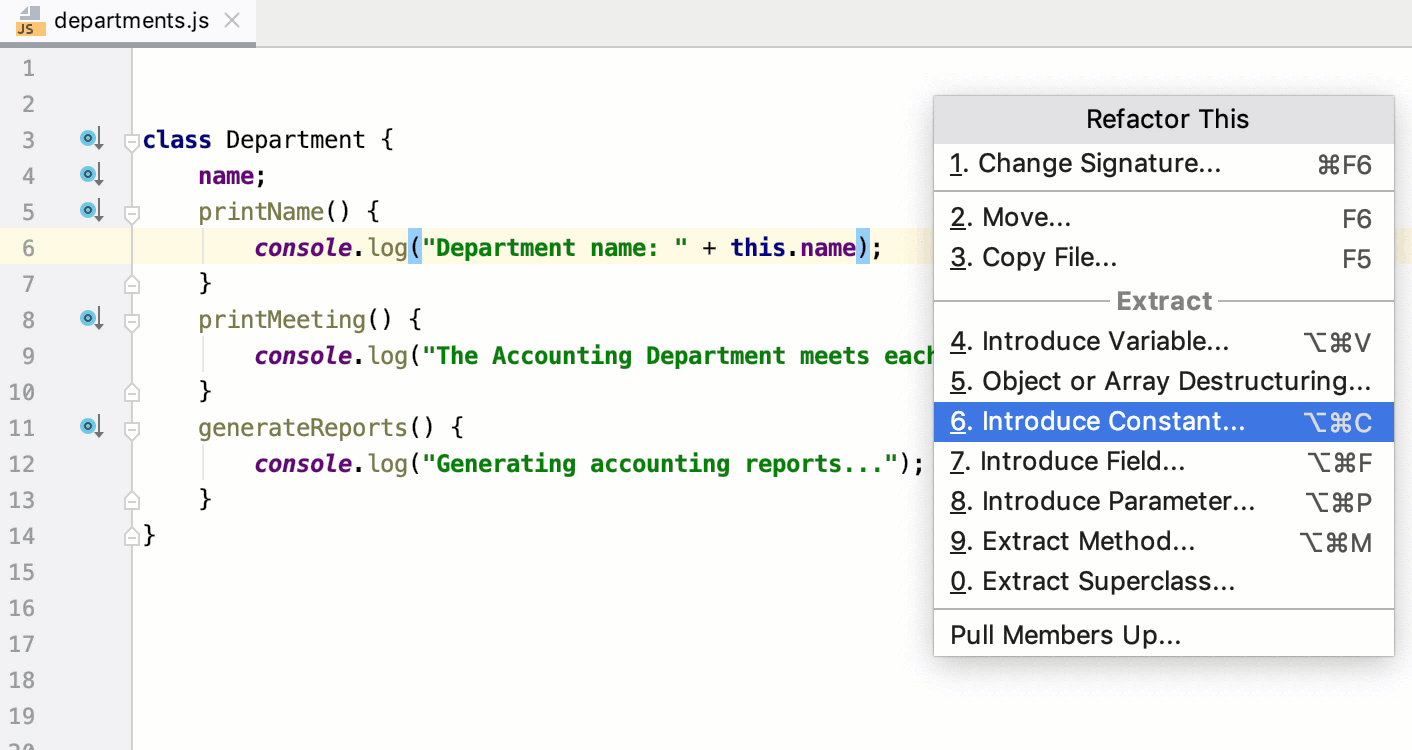
Introduce Constant
Use the Introduce Constant refactoring to replace an expression with a constant. This refactoring makes your source code easier to read and maintain. It also helps you avoid using hardcoded constants without any explanations about their values or purposes.
Inside classes, you can introduce a readonly field or select a scope if several scopes are suitable. In other contexts, JetBrains Rider introduces only local constants.
Example 1: Selecting a scope for introduced constant
Suppose you have class AccountingDepartment with method printName() where "Department name :" is hardcoded.
JetBrains Rider can introduce a new constant as local and declare it inside the printName() function or as global or module and declare it outside the class.
Example 2: Introducing a constant without selecting a scope
If the Introduce Constant refactoring is invoked from outside any class, JetBrains Rider automatically introduces a local variable and declares it inside the current function or block.
Introduce a constant
In the editor, select the expression to convert into a constant and press Ctrl+Alt+C or select from the context menu.
Alternatively, do one of the following:
Press Ctrl+Alt+Shift+T and select .
From the main menu, select .

If several expressions are detected in the current cursor location, select the required one from the Expressions list.

If refactoring is invoked from inside a class, introduce a readonly field or select the scope of the new constant, see Example 1.

For global constants, several occurrences of the selected expression can be found. Select Replace this occurrence only or Replace all occurrences from the Multiple occurrences found list.

Accept one of the suggested parameter names by double-clicking it in the list or specify a custom name in the field with red canvas. Press Enter when ready.

Introduce Field
The Introduce Field refactoring declares a new field and initializes it with the selected expression. The original expression is replaced with the usage of the field.
In the examples below, the same field, _calcArea, is introduced. The examples illustrate three different ways to initialize the introduced field.
Example 1: The introduced field is initialized in the enclosing method
Example 2: The extracted field is initialized in its declaration
Example 3: The extracted field is initialized in the constructor of the class
Introduce a field
In the editor, select the expression to convert into a field and press Ctrl+Alt+F or choose from the context menu.
Alternatively, do one of the following:
Press Ctrl+Alt+Shift+T and select .
From the main menu, select .
In the popup, choose where the new field will be initialized:
Current method, see Example 1 above.
Field declaration, see Example 2 above.
Constructor, see Example 3 above.

Accept one of the suggested parameter names by double-clicking it in the list or specify a custom name in the field with red canvas. Press Enter when ready.
Choosing the refactoring mode
By default, JetBrains Rider runs the Introduce Field refactoring right in the editor (in the in-place mode), as described above.
To use the , open the Settings/Preferences dialog Ctrl+Alt+S, go to Editor | Code Editing, and select the In modal dialogs option in the Refactorings area.
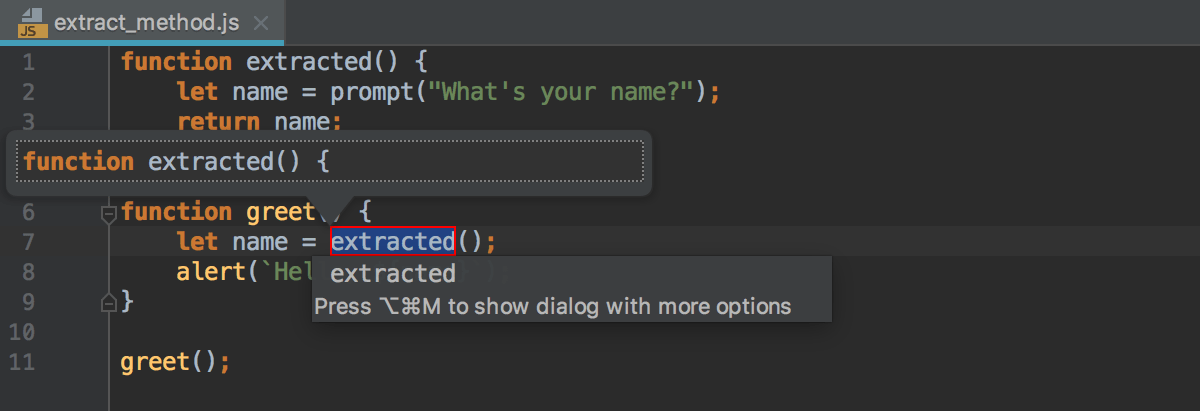
Extract Method
The Extract Method refactoring lets you create a named method or function with the extracted code. When the Extract Method refactoring is invoked, JetBrains Rider detects the variables that are the input for the selected code fragment and the variable that is the output for it. The detected output variable is used as the return value for the extracted method or function.
In the examples below, a function is extracted from the c = a + b; expression.
Example 1: Extracting a globally scoped function from an expression inside another function
The c = a + b; expression, where the refactoring is invoked, is inside the MyFunction() function. The global destination scope is chosen.
Example 1.1: A function declaration is generated
Example 1.2: The extracted function is declared inside an expression
Example 2: Extracting a globally scoped function from an expression outside any function
The c = a + b; expression, where the refactoring is invoked, is outside any function. Therefore no choice of the destination scope is available.
Example 2.1: A function declaration is generated
Example 2.2: The extracted function is declared inside an expression
Example 3: Extracting a function with a definition inside the enclosing function
The c = a + b; expression, where the refactoring is invoked, is inside the MyFunction() function. The function MyFunction destination scope is chosen.
Extract a function
In the editor, select a code fragment to convert into a function and press Ctrl+Alt+M or choose from the context menu.
Alternatively, do one of the following:
Press Ctrl+Alt+Shift+T and select .
From the main menu, select .
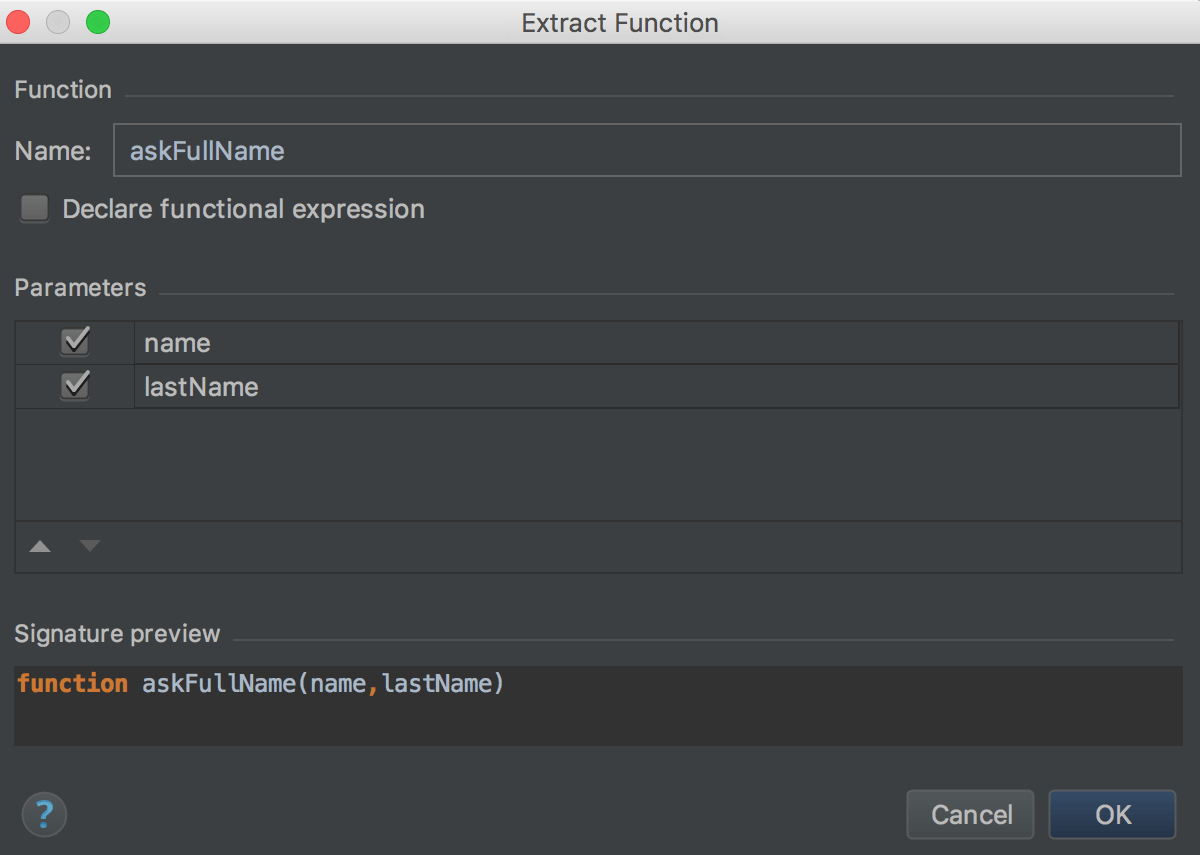
If the selected expression is inside a function, choose the destination scope from the list:
If you choose global, the extracted function will be declared outside any function. See Example 1 above.
To define the extracted function inside the current enclosing function, choose function <current enclosing function name>. See Example 3 above.
To open the Extract Function dialog with more options, press Ctrl+Alt+M once again. In this dialog, you can choose whether the extracted function will be declared through a generated function declaration or inside an expression. See Examples above.
Open the Extract Function dialog by default
open the Settings/Preferences dialog Ctrl+Alt+S, go to Editor | Code Editing, and select the In modal dialogs option in the Refactorings area.
Extract Superclass
The Extract Superclass refactoring creates a new abstract class based on the members of the current class. The created class is extended automatically.
Suppose you have a class AccountingDepartment and you expect that the printName() method from it will be re-used.
Department and include the printName and the Name field in it. Extract a superclass
Position the caret anywhere inside the class from which you wfrom the context menuperclass.
Select from the main menu or from the context menu. The Extract Superclass dialog opens.
Specify the name of the new superclass and select the checkboxes next to the class members you want to include in it. Optionally, mark the members that you want to make abstract.
In the Destination file field, specify the location of the file where the new class will be. By default, the field shows the path to the current file where the refactoring was invoked.
Choose Extract Superclass. JetBrains Rider creates a new class and marks the source class with
extends.
To create a superclass and replace the references to the source class with references to the superclass in parameters of methods, choose Extract superclass and use it where possible. JetBrains Rider shows the proposed changes in the Refactoring Preview pane of the Find tool window.
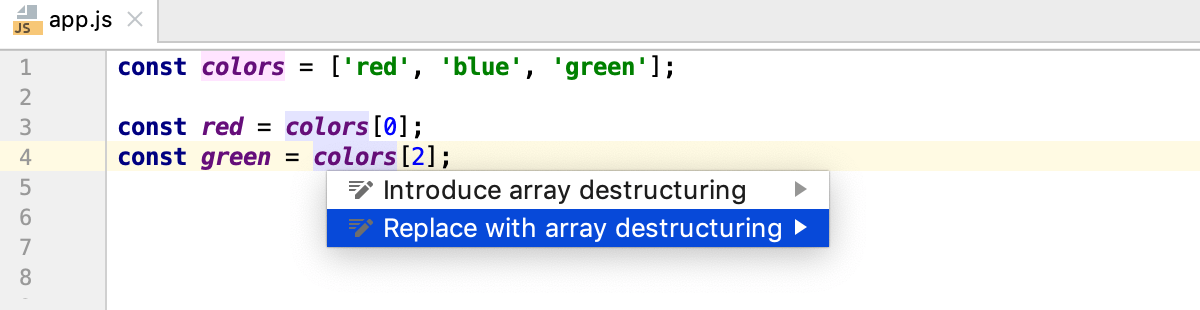
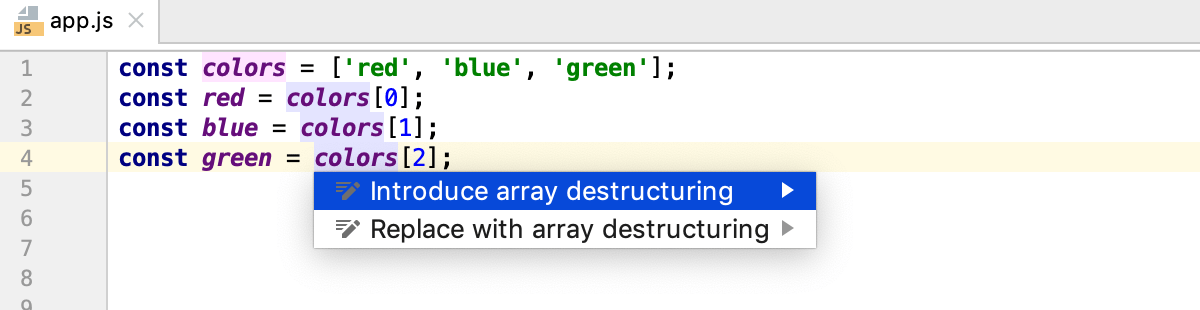
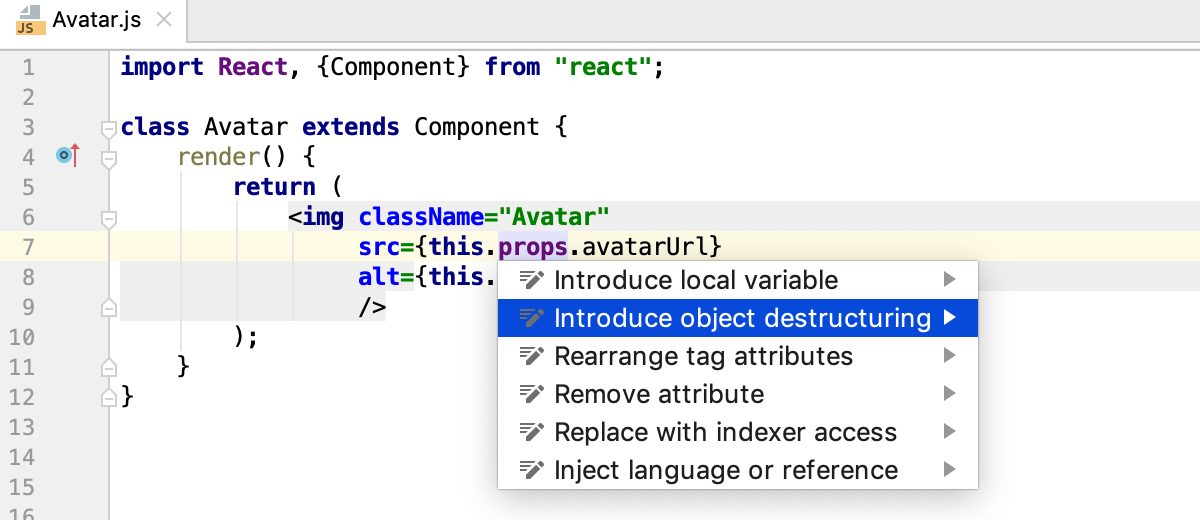
Introduce object or array destructuring
Destructuring lets you easily unpack values from arrays and objects into variables. This functionality has a very concise syntax that is often used when you need to pass data in your application. See Exploring ES6 for details.
In JetBrains Rider, you can invoke destructuring using an intention action (Alt+Enter. With the Replace with object/array destructuring action, the original assignment is removed. To keep the assignment, use Introduce object/array destructuring.
Replace the original assignment
Position the caret at a value from an array or an object and press Alt+Enter.
From the list, select Replace with object destructuring or Replace with array destructuring.
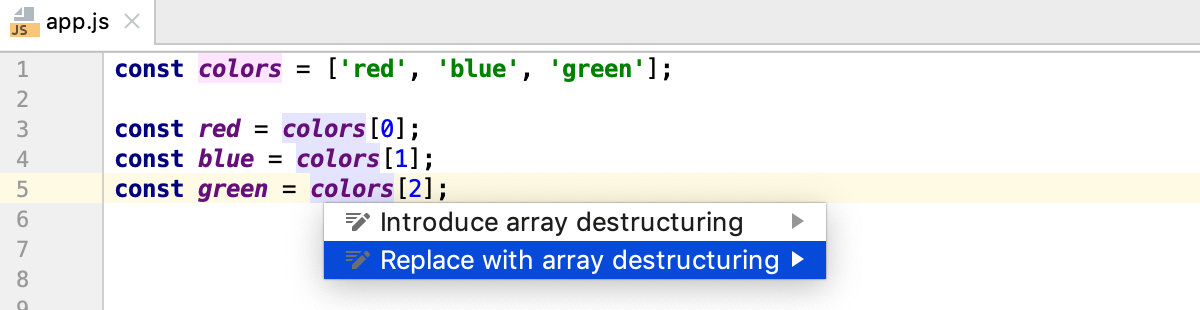
If some of the values from an array or an object are not used, these elements will be skipped:
Keep the original assignment
Position the caret at a value from an array or an object and press Alt+Enter.
From the list, select Introduce object destructuring or Introduce array destructuring.
This intention action can be very handy when working with React class components:
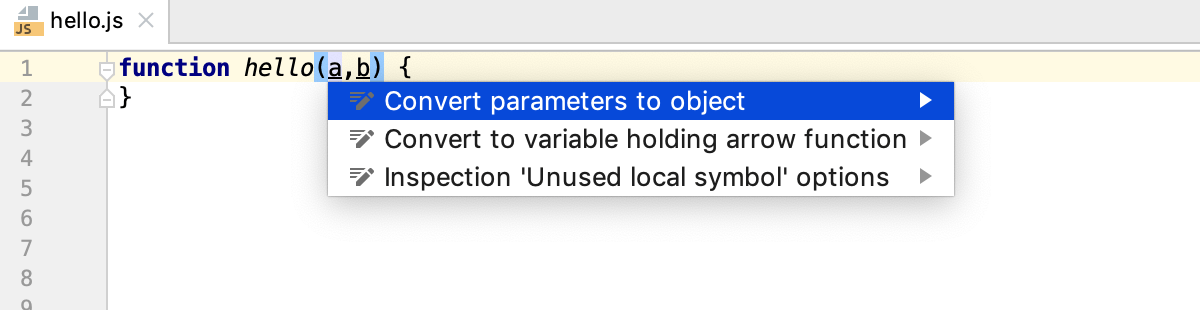
Generate destructuring parameters for a function
Position the caret at the parameters of a function and press Alt+Enter.
From the list, select Convert parameters to object.
Extract Vue Component
The Extract Vue Component refactoring lets you extract new Vue.js components from existing ones without any copying and pasting. Note that this refactoring works only in-place, so make sure the In the editor refactoring option is selected on the the Editor | Code Editing page of the IDE settings Ctrl+Alt+S.
Extract a Vue.js component
Select the code fragment to extract and choose from its context menu or from the main menu.
Alternatively, use the dedicated intention action: select the template fragment to extract, press Alt+Enter, and then choose Extract Vue Component from the list.
Type the name of the new component. If this name is already used or invalid, JetBrains Rider shows a warning. Otherwise a new single-file component is created and imported into the parent component.
Inline refactorings
Inline refactorings are opposite to Extract refactorings.
Example 1: Inline Variable
The Inline Variable refactoring replaces a redundant usage of a variable or a constant with its initializer. This type of refactoring is available only for block-scoped and function-scoped variables.
Example 2: Inline Function
The Inline Method/ Inline Function refactoring results in placing the body of a method or a function into the body of its caller(s); the method/function itself is deleted.
In the example below, the body of Sum() is placed in the body of Multiplication() and Division().
Run an Inline refactoring
In the editor, position the caret at the symbol to be inlined and press Ctrl+Alt+N or choose from the context menu or from the main menu.
Change Signature refactoring
Use the Change Signature refactoring to change the function name, to add, remove, reorder, and rename parameters, and to propagate new parameters through the hierarchy of calls.
You can also add a parameter using the Introduce Parameter refactoring.
The examples below show different ways to run the Change Signature refactoring. In all the cases, the function result() is renamed to generate_result() and a new parameter input is added to this function. The examples show how the function call, the calling function show_result(), and other code fragments may be affected depending on the refactoring settings.
Example 1: Renaming a function, adding a parameter, and passing its value through the function call
In this example, the function result() is renamed to generate_result(), a parameter input is added, and the value 100 is passed as a parameter in the function call.
Example 2: Renaming a function and adding a default parameter
In this example, the function result() is renamed to generate_result(). A default parameter input is added with the value 100. The new parameter is initialized in the generate_result() in the format function generate_result(input = 100) {} for ES6 language level or input = input || 100 for ES5.
Example 3: Renaming a function, adding a default parameter, and propagating the parameter to the function call
In this example, the function result() is renamed to generate_result(). A default parameter input is added with the value 100. The new parameter is initialized in the generate_result() in the format function generate_result(input = 100) {} for ES6 language level or input = input || 100 for ES5. The input parameter is propagated through the calling function show_result() so the function call is changed accordingly.
Invoke Change Signature
In the editor, position the caret within the name of the function to refactor and press Ctrl+F6 or choose Refactor | Change Signature from the context menu or from the main menu. The Change Signature dialog opens.
Rename a function
In the Change Signature dialog Ctrl+F6, edit the Name field.
Manage the function parameters
In the Change Signature dialog Ctrl+F6, use the table of parameters and the buttons to the right of it:
To add a new parameter, click
 Alt+Insert and specify the name of the new parameter and its default value or the value to be passed through function calls.
To remove a parameter, click any of the cells in the corresponding row and click
 Alt+Delete.
To reorder the parameters, use
 Alt+Up and
  Alt+Down.
To rename a parameter, edit the Name field.
If necessary, propagate the new parameter to the functions that call the current function.
Propagate a parameter along the hierarchy of calls
In the Change Signature dialog Ctrl+F6, select the parameter and click
 . The Select Methods to Propagate New Parameters dialog opens. The left-hand pane shows the hierarchy of function calls. When you select a function, the right-hand pane shows its code and the code of the function it calls in the Caller Method and Callee Method fields respectively.
See Example 3 above.
In the left-hand pane, select the checkboxes next to the functions where you want to propagate the parameter and click OK.
Preview the changes and complete the refactoring
In the Change Signature dialog, click Preview.
In the Refactoring Preview tab of the Find tool window, view the expected changes, make the necessary adjustments, and click Do Refactor when ready.