Unit Test Sessions
You can group unit tests that target specific parts of your application into multiple unit test sessions. A unit test session can contain tests of different supported frameworks, from different projects. You can have multiple test sessions and run them separately as needed. A single test /test class can be included into several different test sessions.
Access unit test sessions
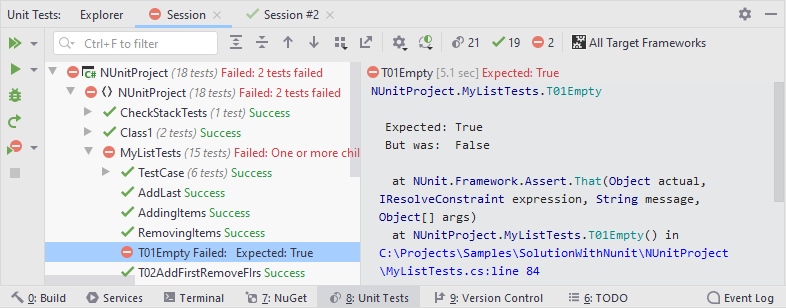
Unit test sessions management is done in the session tabs of the Unit Tests window. To open this window, press Alt+Shift+8 or choose from the main menu. The window also opens automatically each time you run, debug, or cover unit tests from the current document or from the project/solution, create a new test session, or add tests to a test session.
All existing unit test sessions are displayed in tabs of the Unit Tests window, where you can execute tests and analyze results.

The Unit Tests window also visualizes the test runner activity: it displays execution progress as well as status and output of the executed tests. Each time you run, debug, or cover tests they are either added to the current test session or a new unit test session is created for them.
To search tests, start typing a test name or its CamelHumps abbreviation as soon as your focus is in this window.
When your focus is in the Unit Tests window, you can use simplified shortcuts for unit testing actions. For example, you can use Ctrl+D instead of Ctrl+;, D for debugging selected tests. Here is the full list of extra shortcuts that work in the Unit Tests window:
Shift+Enter — Run Selected Tests
Ctrl+D — Debug Selected Tests
Ctrl+Y — Run Current Session
Alt+Shift+Insert — Create New Session
Ctrl+Alt+Insert — Append Selected Tests to Session
Delete — Remove Selected Tests
Ctrl+L — Run All Tests from Solution
Create and close unit test sessions
There are several ways to create a new test session:
Just run, debug, or cover unit tests from the current document or from the project/solution. If there is an open unit test session, the executed tests are added to that session. If there are no test sessions or the existing ones are locked, then a new tests session is created.
In the editor, click an action indicator next to a test or test class, and then choose Create New Session in the action list. A new session with this test/test class will be created.
In the Unit Tests window, select tests/test classes for the new session and choose Create New Session
 from the context menu or press Ctrl+;, N.
In the main menu, choose or press Ctrl+;, N. If the focus is in the editor or in the Unit Tests window and some tests/test classes are selected, or the caret is at or inside a test/test class, the new test session is created with the corresponding items. Otherwise, an empty test session is created.
If you want to prevent adding new tests to the session, you can lock this session.
To close a unit test session, close the corresponding tab in the Unit Test Sessions window. The closed session will not be available anymore.
Add and remove items in a test session
By default, if you run, debug, or cover tests that are not included into any session the tests are added to the current session.
If you want to prevent adding new tests to the session, you can lock this session.
There are other ways to add tests/test classes to a session:
In the editor, click an action indicator next to a test or test class, and then choose Append to [current session] in the action list. If you want to add the item to another section, click the small arrow next to this command and choose any of the existing test sessions in a sub-menu: You can also choose in the main menu or press Ctrl+;, A to add the selected items to a session.
In the Unit Tests window, select tests/test classes that you want to add and press Ctrl+;, A. If there are more than one session, choose the target session in the popup that appears.
To remove tests from the session, select the tests or grouping items that you want to remove and click Remove Selected Tests ![]() on the toolbar.
on the toolbar.
Rename test sessions
By default, the first test/class that you add to a new test session is used as the session's name.
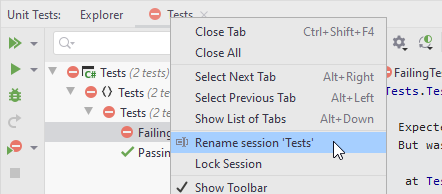
To rename a session, right-click the session's tab and choose Rename session from the context menu and then specify a new name for the session in the appeared dialog.

Lock and unlock unit tests sessions
By default, if you run, debug, or cover tests that are not included into any session the tests are added to the current session.
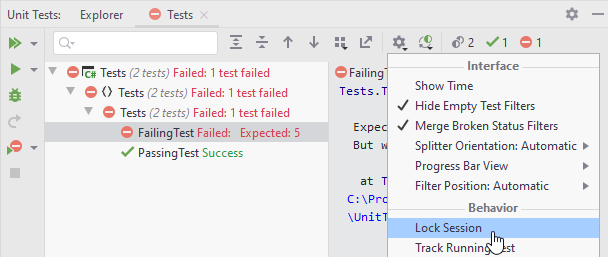
If necessary, you can prevent adding new tests to a session. To do so, in the Unit Tests window switch to the tab of the session that you want to lock, click Options ![]() on the toolbar, and then select Lock Session.
on the toolbar, and then select Lock Session.

To unlock the session, repeat the same actions.
Save and restore unit test sessions
By default, unit test sessions are saved automatically for each solution; JetBrains Rider keeps them even if you close and reopen the solution. If necessary, you choose not to keep unit test sessions by clearing the Save and restore Unit Test Sessions checkbox on the page of JetBrains Rider settings Ctrl+Alt+S.
If necessary, you can also save any test session in a file and then open it when needed. To save a session, select the corresponding tab in the Unit Tests window and click Export Session ![]() on the toolbar and then choose where to save the session file.
on the toolbar and then choose where to save the session file.
To open a saved session, click Import Session ![]() in the Explorer tab of the Unit Tests window and then select a .testsession file.
in the Explorer tab of the Unit Tests window and then select a .testsession file.