Extend and organize your solution
The project/solution management tasks in Rider, such as browsing files and opening them in the editor, creating new items (directories, files, classes, and so on), are performed in the Explorer window. If you close this window, you can always bring it to view by pressing Alt+1 or choosing in the main menu. You can use the switcher at the top of this window to switch between different views:
Solution view, which contains the solution node with an organized logical view of projects and project items in the current solution, as defined in its .sln file.
FileSystem view, which shows you all files and subdirectories starting from the directory where the current solution file is located.
Unity view, which provides an organized view of all assets in a Unity project (you see exactly the same project tree as in the Unity editor). This view is only available for Unity projects.
Rename projects
To rename projects in your solution, use the Rename refactoring (Shift+F6 or ). You will also be able to rename the project folder and the project's root namespace as well as all its usages in the solution.
Add code and resources
In JetBrains Rider, all code and resource files are added using editable file templates. When you choose the node in the Solution Explorer where you want to add a new file, just press Ctrl+Alt+Insert or right-click and choose Add, and then pick the desired template for the new file.
File templates are configurable on language-specific pages under the page of JetBrains Rider settings Ctrl+Alt+S.
Add project and assembly references
To add references to other projects in your solution and to .NET assemblies, right-click a project node and select . In the dialog that opens, you can start typing to search known references, or click Add From... to reference an assembly from a file.
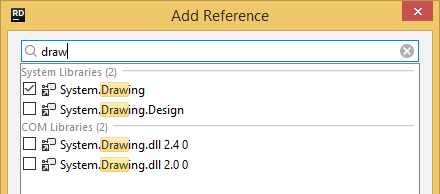
Add external files and folders
With Rider, you can extend solutions by adding external files and folders. For example, you can have your test data, logs, or any other files and folders right next to your solution. These additional items in the solution are not saved in project or solution configs, but rather in Rider's own settings.
External items in the solution are indexed by Rider, so you can enjoy instant search Ctrl+Shift+F and navigation Ctrl+T among other things for those items. However, external solution items will stay beyond the scope of your solution when you perform any of the solution-wide refactorings.
For external solution items that share their VCS root with the solution, all version-control features will also be available.
To add an external folder to the current solution, right-click the solution in the Explorer window, choose , and then select a folder. The folder will appear in the Solution Explorer marked as attached:
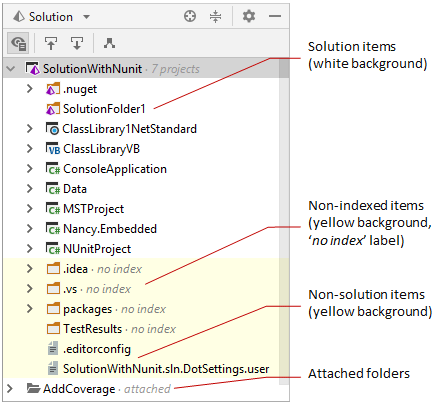
Note the difference between attaching external folders to your solution and adding existing files/folders/projects to your solution.
The latter is done by choosing Add | Add Existing Project from the context menu on the solution or solution folder, or by choosing Add | Add Existing Item from the context menu on a project or folder — these kinds of modifications are saved in solution and project configs so you will also see the added items if you open the solution in Visual Studio.
When working with external items in the extended solution, note the following:
To remove an external directory from the solution, right-click it and choose Detach Folder. The external directory will be removed from the solution view, but not from disk.
If external items contain any .NET solutions or projects, Code analysis in those items will not be available. To work with multiple solutions simultaneously, open them in different windows.
If external items contain XML-like or web code (HTML, JavaScript, TypeScript, CSS, and so on), most of Code analysis and Coding assistance features will be available in that code.
Search the Explorer window
There are two ways to search items in the Explorer window: speed search and full search.
Speed search
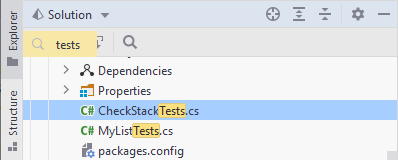
Speed search works in all views of the window — start typing when the application focus is in the Explorer window and JetBrains Rider will highlight all items that match your query in the opened nodes.
Full search
Full search works in the Solution and File System views — press Ctrl+F or click Find ![]() on the toolbar and start typing the search query. If there are matching items, JetBrains Rider will expand the tree at the first match and highlight it.
on the toolbar and start typing the search query. If there are matching items, JetBrains Rider will expand the tree at the first match and highlight it.
You can then press F3 and Shift+F3 or click the arrow buttons on the search panel to navigate between the matches.
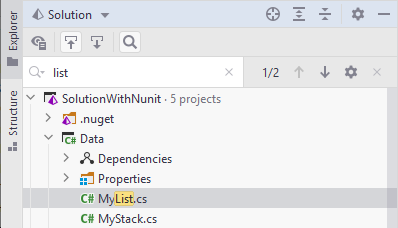
In the Solution view, you can optionally click Search Settings ![]() on the search panel and choose to include dependencies (referenced assemblies, imports, NuGet packages, and so on) in the search.
on the search panel and choose to include dependencies (referenced assemblies, imports, NuGet packages, and so on) in the search.
Group related files
It is often very convenient to group related files — for example layout and code-behind files in WinForms, WPF, ASP.NET projects — within a single collapsible item in the Solution Explorer.
JetBrains Rider provides two ways of grouping related files:
Using the
DependentUponelement in the project file.You can use drag-n-drop in the Solution Explorer to arrange related files in any way you see fit. JetBrains Rider will make necessary changes in the project file to keep the desired nesting layout.
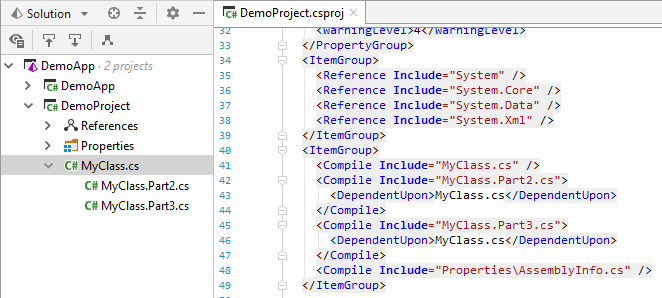
As the
DependentUponis the standard project property, your nesting layout will be preserved if you open the project in Visual Studio. On the downside, you have to make the necessary arrangements manually.Using file nesting preferences.
JetBrains Rider provides a default configuration of file types and typical suffixes that are used for related file types — for example, a file with the .map.ts suffix is normally related to a file having the same name and the .ts extension — such files will be automatically grouped in the Solution Explorer.
You can configure these relations or disable logical nesting altogether by clicking
 on the toolbar of the Solution Explorer.
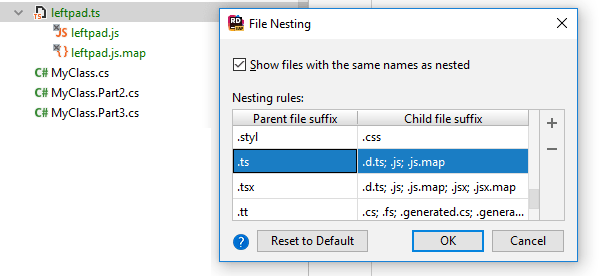
Grouping of files in this way will not make any changes in your project/solution config files.
Browse non-solution files and folders
One way of exploring non-solution items is to add external items to your solution. But JetBrains Rider also allows you to open and explore any files and folders even without any solution being open. This way you can work on web projects that do not have a .sln file or just study any text file in the editor.
To open a file or a folder, press Ctrl+O or choose from the main menu. Depending on what you choose, JetBrains Rider will do one of the following:
A file will be just opened in the editor but not added to the solution view.
If you choose to open a folder while a solution is loaded, JetBrains Rider will suggest that you either close the current solution and open it in the current window or open the folder in a new application window.
If the selected folder or any of its subfolders contains a .NET solution (.sln file), you will be able to pick one of them and open the solution instead of folder.
But if you still want to browse the folder, click Just open the directory. In this case JetBrains Rider will not analyze .NET code.