Other
To create a data source, you need a JDBC driver. There are two types of drivers in JetBrains Rider: with Complete Support and with Basic Support. You can see a list of database vendors with complete and basic support on the Drivers tab in the Data Sources and Drivers dialog. Also, note that user-created drivers are considered as drivers with basic support.
Complete Support includes such features as enhanced code completion and better retrieval of database objects (introspection). For example, with complete support, you will see the following objects in the corresponding databases: user-defined types in Apache Cassandra, macros in Apache Hive, extensions in PostgreSQL. Also, all inspections, quick-fixes, and other code assistance features are available for databases with the complete support.
Basic Support has code highlighting and displays objects that were retrieved by the JDBC driver. JetBrains Rider uses JDBC metadata for database introspection and the SQL 2016 dialect for code highlighting. No errors are detected and highlighted.
The introspection with JDBC metadata means that some specific database objects will not appear in the database tree view. Code completion will not include objects that were not retrieved during introspection.

Creating data sources from drivers with basic support
There are two ways to create data sources from drivers with basic support.
Using the Other submenu
Using user driver files
Using the Other submenu
In the Database tool window (), click the Data Source Properties icon
 .
.In the Data Sources and Drivers dialog, you can use Data Sources and Drivers tabs to create a data source.
Data Sources: click the Add icon (
 ) and navigate to Other. In this submenu, select the driver that you want to use for the data source creation.
Drivers: click the Drivers tab and select the necessary driver. In the settings of this driver, click Create Data Source.
At the bottom of the data source settings area, click the Download missing driver files link. As you click this link, JetBrains Rider downloads drivers that are required to interact with a database. The IDE does not include bundled drivers in order to have a smaller size of the installation package and to keep driver versions up-to-date for each IDE version.
You can specify your drivers for the data source if you do not want to download the provided drivers. For more information about creating a database connection with your driver, see Add a user driver to an existing connection.
Specify database connection details. Alternatively, paste the JDBC URL in the URL field.
To delete a password, right-click the Password field and select Set Empty.
To ensure that the connection to the data source is successful, click the Test Connection link.

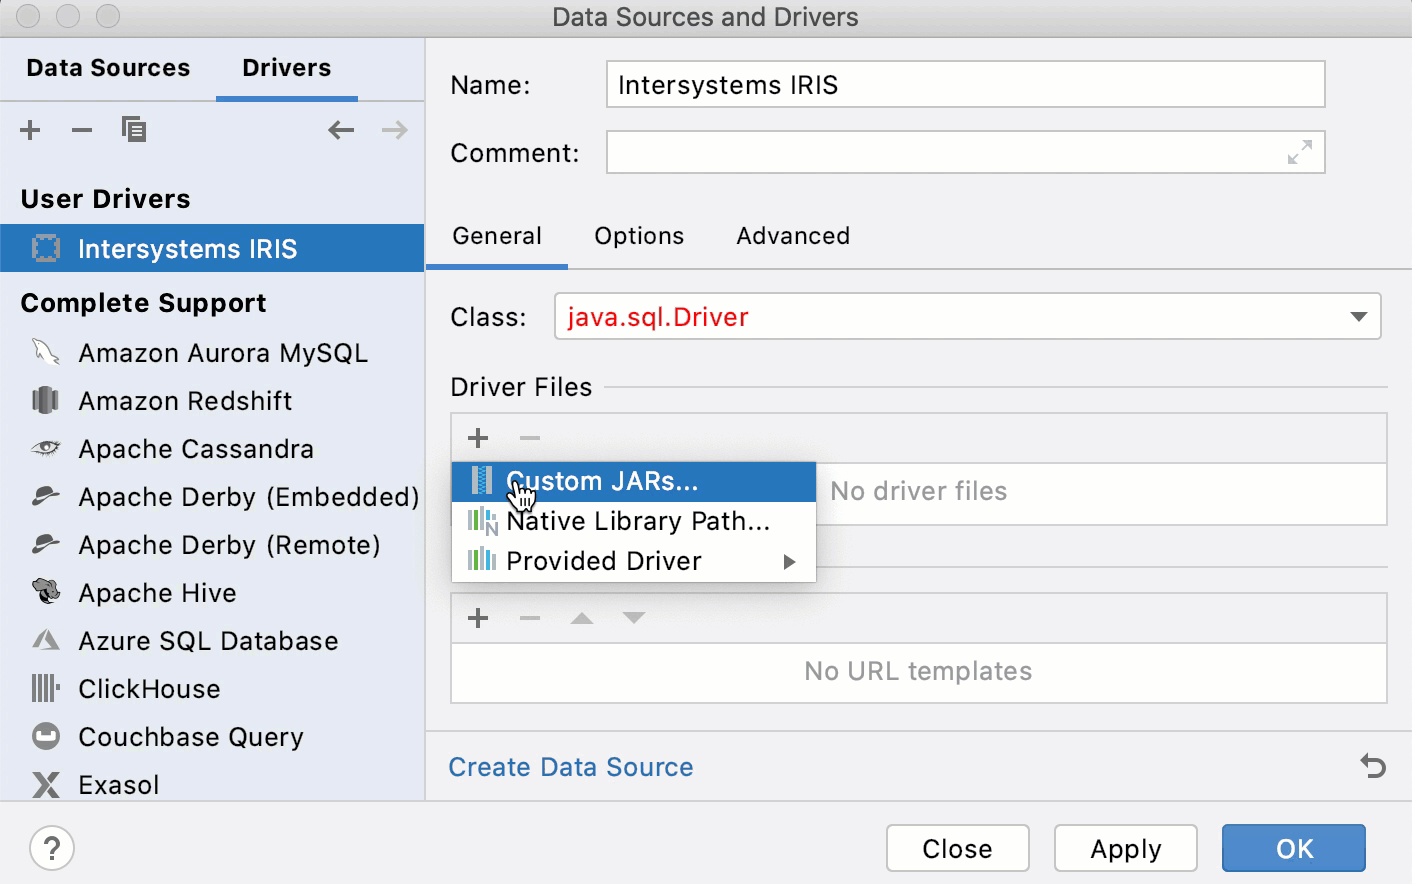
Using user driver files
In the Database tool window (), click the Data Source Properties icon
.In the Data Sources and Drivers dialog, ensure that you are on the Drivers tab.
In the Data Sources and Drivers dialog, click the Add icon (
).In the Name field, type the name of the driver.
In the Driver Files pane, click the Add icon (
) and select Custom JARs.Navigate to the JAR file of the JDBC driver, select it, and click OK.
In the Class field, specify the value that you want to use for the driver.
Click Apply.
To create a data source from the driver's dialog, click Create Data Source.
Library paths for user drivers
To work properly, some JDBC drivers require a path to library files along with the driver.
For example, to determine if the application should operate in the Instant Client mode, Oracle Instant Client (OCI) applications look for library files in the runtime library search path (LD_LIBRARY_PATH on Linux or PATH on Windows). You can set these paths in the Data Sources and Drivers dialog.
Adding library paths
In the Database tool window (), click the Data Source Properties icon
.In the Data Sources and Drivers dialog, click the driver entry to which you want to add a path to library files.
(Optional) Add a driver for which you want to add library files. If the existing driver does not meet the requirements, replace the existing driver. To delete the existing driver entry, select the driver and click Remove. For more information about adding a driver, see create a connection to a database with a JDBC driver.
In the Driver files pane, click the Add icon (
) and select Native Library Path.Navigate to the folder with library files. Ensure that the driver version corresponds to the version of these library files. For example, if you use the driver version 19.6, the attached library files must also have the 19.6 version.

Productivity tips
Create a data source from the JDBC URL
In the Database tool window (), click the Data Source Properties icon
.In the Data Sources and Drivers dialog, click the Add icon (
) and select Data Source from URL.In the URL field, paste the JDBC URL.
From the Driver list, select the necessary driver for the data source.
In the Data Sources and Drivers dialog, enter credentials.
To ensure that the connection to the data source is successful, click the Test Connection link.
