ASP.NET Scaffolding
Scaffolding is a tool that helps you quickly create controllers, views, and other items for your ASP.NET projects.
Add a new scaffolded item
In the Solution Explorer, right-click the desired node and choose .
In the popup that opens, select the type of the scaffolding that you want to add and enter a name for it.
JetBrains Rider will add all necessary directories and files with the boilerplate code to your project.
JetBrains Rider provides the following scaffolded items:
Scaffolding option | Description |
|---|---|
MVC Area | Scaffolds an Area Areas in ASP.NET MVC are a way to group related functionality together. Doing this allows views or Razor Pages to share a common folder structure and namespace for routing. |
MVC Controller - Empty | Use this scaffold option when the controller needs to return only JSON or XML, or has another purpose. This scaffolded item contains a |
MVC Controller with read/write actions | Produces the same scaffolded output as MVC Controller – Empty, plus method stubs for all read/write actions, including methods for |
MVC Controller with views, using Entity Framework | Creates everything you need for CRUD operations on a controller, including the controller itself with all the CRUD action methods ( |
API Controller - Empty | Produces only a
[Route("api/[controller]")]
[ApiController]
public class ApiEmptyController : ControllerBase { }
|
API Controller with read/write actions | Generates the skeleton code for |
API Controller with views, using Entity Framework | Creates an API controller with full CRUD operations matching the |
MVC View | Scaffolds a view. Make sure that you right-click the appropriate folder (Views/Home or Views/Shared) before selecting this option. |
Razor Page | Use this option to create a simple Razor Page with or without a model. Be sure to right-click the appropriate folder, most often Pages\SubFolder, because scaffolding will create the page where you right-click. The scaffolding generates both the .cshtml and .cshtml.cs files. |
Razor Page using Entity Framework | Use this option to create a Razor Page that connects to a database and have CRUD actions. |
Razor Page using Entity Framework (CRUD) | This option creates the full set of CRUD pages: |
Identity | Creates all the assets necessary for securing your ASP.NET application. With ASP.NET Core Identity, users of your apps can manage logins, passwords, profile data, roles, claims, tokens, and email confirmations. Identity scaffolding works in every kind of ASP.NET app — ASP.NET MVC, Razor Pages, ASP.NET Web API, and Blazor. You'll need a For more information, refer to Scaffold Identity in ASP.NET Core projects on Microsoft Docs. |
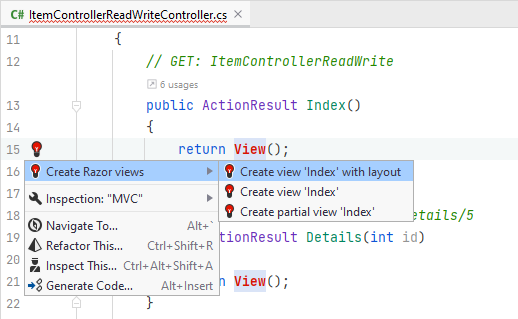
Some scaffolding options create no views, but JetBrains Rider highlights usages of the missing views, and you can create those views individually from the controller — place the caret at the highlighted View(); and press Alt+Enter and choose one of the options for creating a view:
