Accessibility features
JetBrains Rider lets you enable various accessibility features to accommodate your needs. You can use a screen reader or adjust font size, colors, and the behavior of certain UI elements to make the process of working with JetBrains Rider easier.
Set up a screen reader
JetBrains Rider fully supports screen readers on both Windows and macOS.
Enable a screen reader
Download and enable your preferred screen reader:
NVDA: use the NVDA 2019.3 or later version for compatibility with 64-bit Java applications, such as JetBrains Rider.
Download, install, and enable NVDA.
JAWS: use the JAWS 12.0.1158 64-bit or later version for compatibility with 64-bit Java applications, such as JetBrains Rider.
Download the version you need and restart your computer to enable the JAWS screen reader.
Enable the VoiceOver screen reader since it is already built into the system.
Ensure you have installed Java Access Bridge and the proper Java version for your screen reader, as follows:
To enable Java Access Bridge, open the command prompt and type [JRE_HOME]\bin\jabswitch -enable, where [JRE_HOME] is the directory of the JRE on your machine. For Java version 1.8, Java Access Bridge is part of JDK and you don't need to download it separately. Use the control panel to enable the Java Access Bridge.
If your screen reader is 32-bit, install the 32-bit JRE version 1.7 or later. If your screen reader is 64-bit, install the 64-bit JRE version 1.7 or later.
Your computer may have multiple versions of some important components of Java Access Bridge, and they may not be compatible across versions. You need to verify that your Java Access Bridge configuration is correct.
If your screen reader is 32-bit, ensure that C:\Windows\SysWOW64\WindowsAccessBridge-32.DLL is present and has a version number of 7.x.x.x or later. The file's description should read "Java(TM) Platform SE 7".
JetBrains Rider automatically shows a prompt suggesting enabling the screen reader support if its installation was detected.
In the dialog that opens, click Enable when you first launch JetBrains Rider.
The screen reader support can also be activated later or manually for already installed and configured versions of JetBrains Rider.
Install and set up JetBrains Rider
Download and install JetBrains Rider.
To enable screen reader support before the initial launch of JetBrains Rider, do the following:
Open the configuration directory that contains personal settings, such as, keymaps, color schemes, and so on.
- Syntax
%APPDATA%\JetBrains\<product><version>
- Example
C:\Users\JohnS\AppData\Roaming\JetBrains\Rider2026.1
- Syntax
~/Library/Application Support/JetBrains/<product><version>
- Example
~/Library/Application Support/JetBrains/Rider2026.1
Create a file called idea.properties.
Add the
ide.support.screenreaders.enabled=trueproperty to the file you have created.
Launch JetBrains Rider. The Support screen readers option located in will be enabled.
Customize the IDE
You can customize the IDE depending on your accessibility needs.
Adjust colors for red-green color vision deficiency
You can adjust IDE and editor colors if you have red-green color vision deficiency. In this case, code notifications such as errors that are usually highlighted in red or strings that are usually green, will be displayed with neutral colors.
Press Ctrl+Alt+S to open settings and then select .
Select Adjust colors for red-green vision deficiency and save your changes.
Note that special colors for the red-green color vision deficiency are only supported in IntelliJ Light and Darcula color themes.


Add the contrast color for scrollbars
You can make scrollbars in the editor more visible.
Press Ctrl+Alt+S to open settings and then select .
From the options on the right, under the Accessibility section, select Use contrast scrollbars.
Configure colors for code elements, editor, scrollbar, hyperlinks, and so on
You can adjust colors for code elements, errors, elements of the editor, and tool windows. You can also configure a color for the vertical scrollbar in the editor.
Press Ctrl+Alt+S to open settings and then select .
From the list on the right, select an element for which you want to adjust the color. For example, you can select Code and adjust colors for injected language fragments or matched braces, and so on. Click OK to save the changes.
You can also adjust colors for the debugger, consoles and other parts of the IDE: select the appropriate node in the list of options located in .

Change the default UI font
You can adjust the font and its size in menus, sidebars, and tool windows to improve navigation readability without altering your editor's appearance.
Press Ctrl+Alt+S to open settings and then select .
From the options on the right, from the Use custom font list, select a font and specify the font size in the Size field.
Click OK to save the changes.

As a result, the size of icons and texts in the UI will be adjusted.
Resize tool windows
You can resize the actual tool windows vertically or horizontally using shortcuts.
To resize vertically up or down, press Ctrl+Alt+Shift+Up or Ctrl+Alt+Shift+Down.
To resize horizontally left or right, press Ctrl+Alt+Shift+Left or Ctrl+Alt+Shift+Right.
Adjust font size in the editor
You can change the font and the size of the text in the editor.
Press Ctrl+Alt+S to open settings and then select .
From the options on the right, select the Change font size (Zoom) with Ctrl+Mouse Wheel option to quickly change the text size (turning the mouse wheel) while you are working in the editor.
If you need to specify the exact font size, select .
From the options on the right, specify the font, its size, line spacing, and other available options. Click OK to save changes.
Set the zoom level for all UI elements
You can set the zoom level for the entire IDE, making it smaller or larger than the default scale, depending on your needs.
Go to and select Zoom IDE.
To preview different zoom levels, hover over the options in the popup.

Click the preferred zoom level to apply the changes.
Press Ctrl+Alt+S to open settings and then select .
In the Accessibility section, click the Zoom field and enter your value.
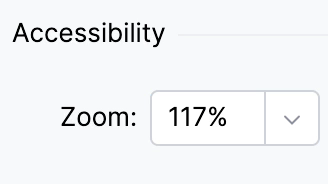
Click OK to apply the changes.
Customize shortcuts
You can configure custom shortcuts to actions that you frequently use.
Press Ctrl+Alt+S to open settings and then select .
From the list of options on the right, such as menus, actions, and tools, select the action you need.
Right-click the selected item and from the context menu, select the action you want to perform, for example, Add Keyboard Shortcut, Add Mouse Shortcut, or Add Abbreviation.

In the dialog that opens, specify a shortcut. If necessary, select the Second stroke option and specify an additional key for the shortcut. To save the changes, click OK with the mouse (if you press Enter, JetBrains Rider will consider it a shortcut).
Navigate the main menu with the keyboard
On Windows, you can navigate the main menu using the keyboard, the same way as in other Windows applications.
Press Alt to focus on the main menu bar.
Read gutter icons and line numbers in the editor
You can configure a screen reader to read line numbers, VCS annotations, debugger, and other icons that are located in the left gutter of your editor.
Open your file in the editor.
Press Alt+Shift+6, F to focus on the gutter. JetBrains Rider starts reading from the line where your caret is currently located.
Use the Up and Down arrow keys to move between lines. If you need to move to the next or previous gutter element in the line, use the Right and Left arrow keys respectively.
While the focus is in the gutter, the screen reader can read the gutter icon tooltip if it is available.
To access a tooltip, press the double shortcut Alt+Shift+6, T. To browse through the tooltip's content (symbol by symbol), use the Right and Left arrow keys.
Press Escape to switch the focus back to the editor.
Set a high-contrast color theme
You can set a high-contrast interface theme to work in JetBrains Rider. The interface theme defines the appearance of windows, dialogs, and controls.
Press Ctrl+Alt+S to open settings and then select .
From the Theme list, select High Contrast, and click OK to apply changes.
Set a high-contrast color scheme
You can set a high-contrast color scheme for your editor. JetBrains Rider uses color schemes to help you define the preferred colors and fonts in the editor.
Press Ctrl+Alt+S to open settings and then select .
On the Color Scheme Font page, from the Scheme list, select High Contrast.
Click OK to apply your changes.
Switch to a simplified splash screen
The simplified splash screen provides an alternative to the standard startup image, minimizing visual triggers such as bright colors or complex graphics for users with photosensitivity or sensory preferences.
Press Ctrl+Alt+S to open settings and then select .
In the Accessibility section, select Use simplified splash screen.