JetBrains Rider 2024.2 Help

Exploring the HTTP request syntax

This section describes the HTTP request format. For more information about sending HTTP requests and viewing HTTP responses, refer to HTTP Client.

To compose an HTTP request in the JetBrains Rider code editor, use the following general syntax:

Method Request-URI HTTP-Version Header-field: Header-value Request-Body

Use comments in HTTP requests

  • Within a request, start any line with // or # to make it a comment line.

    // A basic request GET http://example.com/a/

Set names for HTTP requests

To quickly find your request in run/debug configurations, Search Everywhere, and Run Anything, you can give it a name.

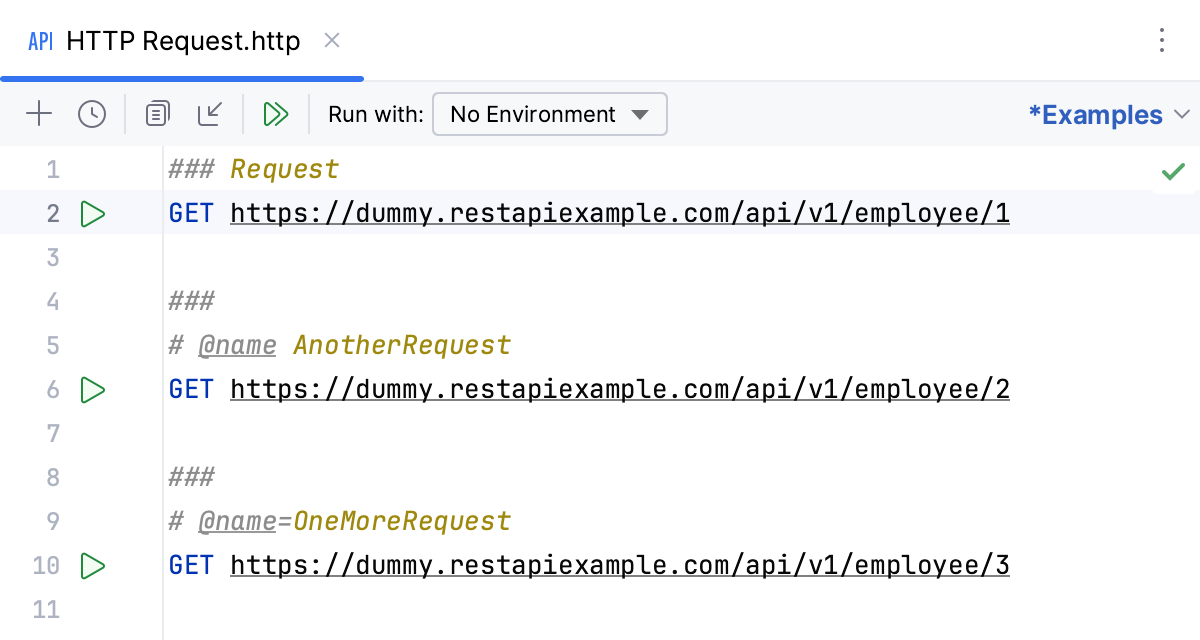
  • Type a name above the request next to ###, # @name, or # @name =.

    Enter the HTTP request name

If a request does not have a name, JetBrains Rider will use its position in the request file (such as #1) as the request name. If a request file contains multiple requests with the same name, JetBrains Rider will append the request position number to each of the names. This will make each request name unique so that you can easily find the needed one in the Services tool window, run/debug configurations, and so on.
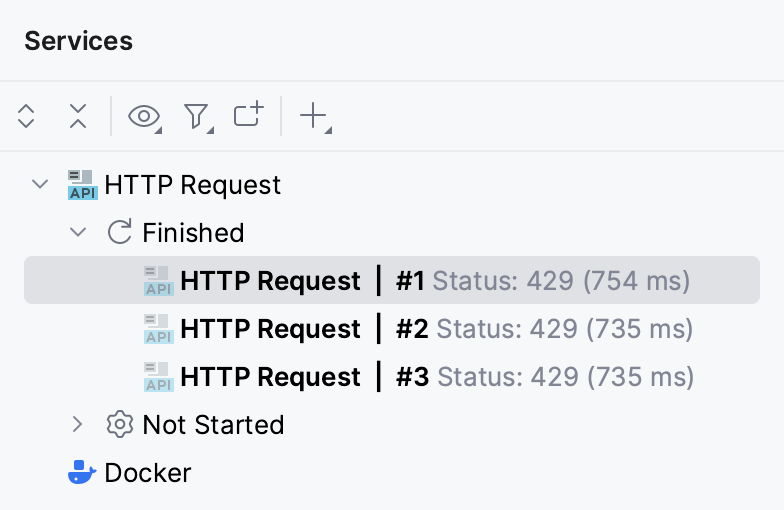
HTTP requests in Services tool window

Use short form for GET requests

  • For GET requests, you can omit the request method and only specify the URI.

    // A basic request https://example.com/a/

Compose several requests in a single file

  1. Mark the end of a request by typing the ### separator below it.

    // A basic request https://example.com/a/ ###
  2. Compose another request below the separator.

    // A basic request https://example.com/a/ ### // A second request using the GET method https://example.com:8080/api/html/get?id=123&value=content

Break long requests into several lines

  • Indent all query string lines but the first one.

    // Using line breaks with indent GET http://example.com:8080 /api /html /get ?id=123 &value=content
  • If the URL is too long because of the query string, you can use the dedicated context action to put each query parameter on a new line. Place the caret at the query string part, press Alt+Enter (Show Context Actions), and select Put query parameters on separate lines.

    GET https://example.com:8080/api/get/html?firstname=John&lastname=Doe&planet=Tatooine&town=Freetown
    GET https://example.com:8080/api/get/html? firstname=John& lastname=Doe& planet=Tatooine& town=Freetown
  • Similarly, you can format the body in requests with Content-Type: application/x-www-form-urlencoded. Place the caret at the body, press Alt+Enter (Show Context Actions), and select Put form-urlencoded parameters on separate lines.

    POST https://ijhttp-examples.jetbrains.com/post Content-Type: application/x-www-form-urlencoded key1=value1&key2=value2&key3=value3&key4=value4&key5=value5
    POST https://ijhttp-examples.jetbrains.com/post Content-Type: application/x-www-form-urlencoded key1 = value1 & key2 = value2 & key3 = value3 & key4 = value4 & key5 = value5

    To configure wrapping for the x-www-form-urlencoded body, use Settings | Editor | Code Style | HTTP Request | Wrapping and Braces | Form-urlencoded parameters wrap. To configure spaces before and after = and before &, use Settings | Editor | Code Style | HTTP Request | Spaces.

Access a web service with authentication

  • Depending on the web service you are accessing, provide the basic or digest Authorization header.

    // Basic authentication GET http://example.com Authorization: Basic username password ### // Digest authentication GET http://example.com Authorization: Digest username password

Provide the request message body

Inside the request, prepend the request body with a blank line and do one of the following:

  • Type the request body in place:

    // The request body is provided in place POST https://example.com:8080/api/html/post HTTP/1.1 Content-Type: application/json Cookie: key=first-value { "key" : "value", "list": [1, 2, 3] }

    If you set the Content-Type header field value to one of the languages supported by JetBrains Rider, then the corresponding language fragment will be auto-injected into the HTTP request message body. If Content-Type is not specified, you can inject a language fragment manually.

  • To read the request body from a file, type the < symbol followed by the path to the file.

    // The request body is read from a file POST https://example.com:8080/api/html/post Content-Type: application/json < ./input.json

Use multipart/form-data content type

  • Set the request's Content-Type to multipart/form-data. To send a file as part of the multipart/form-data message, include the filename parameter in the Content-Disposition header.

    POST https://example.com/api/upload HTTP/1.1 Content-Type: multipart/form-data; boundary=boundary --boundary Content-Disposition: form-data; name="first"; filename="input.txt" // The 'input.txt' file will be uploaded < ./input.txt --boundary Content-Disposition: form-data; name="second"; filename="input-second.txt" // A temporary 'input-second.txt' file with the 'Text' content will be created and uploaded Text --boundary Content-Disposition: form-data; name="third"; // The 'input.txt' file contents will be sent as plain text. < ./input.txt --boundary--

Disable following redirects

When an HTTP request is redirected (a 3xx status code is received), the redirected page response is returned. In the Services tool window, you can view the redirected page response as well as all redirections that happened during the request.

You may want to disable following redirects. In this case, the actual redirect response header (such as 301 or 302) is returned.

  • Before the request, add a comment line with the @no-redirect tag.

    // @no-redirect example.com/status/301

If you already have a redirected request, you can click Disable next to the Redirections list in the Services tool window. This will add the @no-redirect tag to the initial request.

HTTP response with redirections

Disable saving requests to requests history

If necessary, you can prevent saving a request to the requests history. This can be helpful in case a request contains some sensitive data, and you don't want to log it.

  • Before the request, add a comment line with the @no-log tag.

    // @no-log GET example.com/api

Disable saving received cookies to the cookies jar

If necessary, you can prevent saving the received cookie to the cookies jar. This way you will avoid removing the unwanted cookies from the http-client.cookies file manually.

  • Before the request, add a comment line with the @no-cookie-jar tag.

    // @no-cookie-jar GET example.com/api

Customize HTTP request timeouts

The HTTP Client has a timeout of 60 seconds for establishing a connection with a server, and a separate 60 seconds timeout for awaiting new packets in ongoing connections. You can customize both of these timeouts.

  • To set a timeout for new packets in established connections, add a comment line with the @timeout tag before the request.

    # @timeout 600 GET example.com/api
  • To set a connection timeout, add a comment line with the @connection-timeout tag before the request.

    // @connection-timeout 2 m GET example.com/api

By default, the timeout values are in seconds, but you can add an explicit unit of time after the value: ms for milliseconds, s for seconds, m for minutes, for example 100 ms or 5 m.

Use variables

When composing an HTTP request, you can parametrize its elements by using variables. A variable can hold the values for the request's host, port, and path, query parameter or value, header value, or arbitrary values used inside the request body or in an external file.

Use a variable inside the request

  • Enclose the variable in double curly braces as {{variable}}.

The variable's name may contain letters, digits, the underscore symbols _, the hyphen symbols -, or the dot symbol ..

There are several types of variables in the HTTP Client:

Environment variables

Environment variables let you store a set of environment definitions inside your project. For example, instead of providing a hostname in your request explicitly, you can create the {{host}} variable in different environments: a local hostname in the development environment and a public hostname in the production environment. You can then use the Run with list on the top of the current .http file editor to select an environment:

  • No Environment: if this option is selected, no environment will be used when you run requests in the current file. Select it if your request does not contain any variables.

  • Environment name (such as production or development): the selected environment will be used for all requests in the current file, and you won't need to select it when you click The Run button. This can be helpful if you want to run multiple requests with the same environment and don't want to select it each time you run a request.

  • <Select Environment Before Run>: with this option selected, you'll have to choose an environment each time you click The Run button. This can be convenient if you often switch environments and want to explicitly select them for each run to make sure you execute requests with the needed environments.

Run request: select environment

The selected environment will be used as the default one when Viewing a structure of the request, opening the request in the browser, executing the request, and creating a run/debug configuration for it.

Define environment variables

Environment variables are defined in the environment files.

  1. On top of the request's editor panel, in the Run with list, select where you want to add an environment:

    • Select Add Environment to Public File… if you want the environment to be public. This will add the environment to the http-client.env.json file. This file can contain common variables such as host name, port, or query parameters, and is meant to be distributed together with your project.

    • Select Add Environment to Private File… if you want the environment to be private. This will add the environment to the http-client.private.env.json file. This file might include passwords, tokens, certificates, and other sensitive information. The values of variables that are specified in the http-client.private.env.json file override the values in the public environment file.

  2. Populate the created files with the desired variables.

    The following sample http-client.env.json environment file defines two environments: development and production. The additional http-client.private.env.json file holds the sensitive authorization data.

    { "development": { "host": "localhost", "id-value": 12345, "username": "", "password": "", "my-var": "my-dev-value" }, "production": { "host": "example.com", "id-value": 6789, "username": "", "password": "", "my-var": "my-prod-value" } }
    { "development": { "username": "dev-user", "password": "dev-password" }, "production": { "username": "user", "password": "password" } }

    The example HTTP request is as follows:

    GET http://{{host}}/api/json/get?id={{id-value}} Authorization: Basic {{username}} {{password}} Content-Type: application/json { "key": "{{my-var}}" }

    Before you execute the request, JetBrains Rider lets you choose an execution environment using the Run with list on top of the request's editor panel.

    Depending on your choice, the resulting request will be one of the following:

    GET http://localhost/api/json/get?id=12345 Authorization: Basic dev-user dev-password Content-Type: application/json { "key": "my-dev-value" }
    GET http://example.com/api/json/get?id=6789 Authorization: Basic user password Content-Type: application/json { "key": "my-prod-value" }

If a variable is unresolved when executing a request, JetBrains Rider displays a notification letting you quickly create, update, or choose a different execution environment.

Unresolved Variable in HTTP request notification

Manage multiple environment files

Your project may have multiple directories with HTTP request files and corresponding environment files in them. In this case, the following sections can be available while selecting an environment for a request:

  • For File shows environments stored in the current and parent directories.

    If you select an environment from this list, the HTTP Client tries to find it in the files (public and private) stored in the current directory. If there is no file with this environment, it checks the parent directory.

  • From Whole Project shows environments stored in all other places of your project (other than the current and parent directory). If files from these directories contain an environment with the same name as an environment from the For File section, it won't be shown in the list.

    You can give an environment a unique name if you want it to be seen everywhere in your project.

HTTP Client environments

Let's illustrate this with an example. Suppose you have the following project structure:

root/http-client.env.json # public file with 'dev' environment and 'host' variable root/service1/http-client.private.env.json # private file with 'dev' environment and "key": "myKey1" variable root/service2/http-client.private.env.json # private file with 'dev' environment and "key": "myKey2" variable

An .http file stored in the service1 directory will use the myKey1 value for the key variable when you select the dev environment. An .http file stored in the service2 directory will use the myKey2 value for the key variable.

If the private files contain the host variable, the .http files will use its value because private files take precedence over public files. Otherwise, they will use the value from the public file.

In-place variables

The scope of an in-place variable is an .http file, in which it was declared. Use in-place variables if you want to refer to the same variable in multiple requests within the same file.

To create an in-place variable, type @ followed by the name of the variable above the HTTP method section. For example:

@myhost = example.org GET {{myhost}}/users ### GET {{myhost}}/stats

Per-request variables

You can use the request.variables.set(variableName, variableValue) method to set values of variables used in HTTP requests. Write it in a pre-request script wrapped in {% ... %} above your HTTP request. For example:

< {% request.variables.set("firstname", "John") %} GET http://example.org/{{firstname}}

Variables defined in a pre-request script are available only within a single request that follows the script.

Use the Initialize variable context action (Alt+Enter) to quickly add an in-place or environment variable or to initialize a variable in the pre-request handler script.

Initialize variable intention action

In pre-request scripts, you can also use HTTP Client Crypto API to generate HTTP signatures based on cryptographic hash functions, such as SHA-1, SHA-256, SHA-512, MD5, and pass them as variable to your requests. For example:

< {% const signature = crypto.hmac.sha256() .withTextSecret(request.environment.get("secret")) // get variable from http-client.private.env.json .updateWithText(request.body.tryGetSubstituted()) .digest().toHex(); request.variables.set("signature", signature) const hash = crypto.sha256() .updateWithText(request.body.tryGetSubstituted()) .digest().toHex(); request.variables.set("hash", hash) %} POST https://httpbin.org/post X-My-Signature: {{signature}} X-My-Hash: {{hash}} Content-Type: application/json

Dynamic variables

Dynamic variables generate a value each time you run a request. Their names start with $:

  • $uuid or $random.uuid: generates a universally unique identifier (UUID-v4)

  • $timestamp: generates the current UNIX timestamp

  • $isoTimestamp: generates the current timestamp in ISO-8601 format for the UTC timezone.

  • $randomInt: generates a random integer between 0 and 1000.

  • $random.integer(from, to): generates a random integer between from (inclusive) and to (exclusive), for example random.integer(100, 500). If you provide no parameters, it generates a random integer between 0 and 1000.

  • $random.float(from, to): generates a random floating point number between from (inclusive) and to (exclusive), for example random.float(10.5, 20.3). If you provide no parameters, it generates a random float between 0 and 1000.

  • $random.alphabetic(length): generates a sequence of uppercase and lowercase letters of length length (must be greater than 0).

  • $random.alphanumeric(length): generates a sequence of uppercase and lowercase letters, digits, and underscores of length length (must be greater than 0).

  • $random.hexadecimal(length): generates a random hexadecimal string of length length (must be greater than 0).

  • $random.email: generates a random email address.

  • $exampleServer: is replaced with the JetBrains Rider built-in web server, which can be accessed using HTTP Client only. The variable is used in GraphQL and WebSocket examples.

Use dynamic variables in request parts, such as URL parameters or body:

POST http://localhost/api/post?id={{$uuid}} { "time": {{$timestamp}}, "price": {{$random.integer(10, 1000)}}, }

You can also use them in pre-request handler scripts and response handler scripts (similarly to JavaScript variables, without curly braces):

< {% const longUUID = $random.uuid request.variables.set("generatedQuery", longUUID) %} GET https://examples.http-client.intellij.net/get ?generatedQuery={{generatedQuery}} > {% client.log(`Today is ${$isoTimestamp}`) %}

Iterate over collections in variables

Environment variables and variables initialized in pre-request scripts can represent a collection of elements, for example, a list of IDs or usernames. When such a variable is used in an HTTP request, the HTTP Client sends a separate request for each element from this list. JetBrains Rider also supports JSONPath expressions for such variables, which lets you access specific elements or a subset of elements and send requests for each of them.

For example, if you have a server that returns information about a book by its ID, you can assign a JSON array [1,2,3,4,5] to a variable id, and then use it in the body or URL part.

< {% request.variables.set("id", [1,2,3,4,5]) %} GET http://localhost:8080/books/{{id}}

The HTTP Client will send five consecutive requests, replacing the variable with the subsequent item from the collection for each request.

Similarly, you can use collections in the request body. In the following example, the HTTP Client will send three requests with different values in the body: name: Alice, name: Bob, and name: Charlie.

< {% request.variables.set("name", ["Alice", "Bob", "Charlie"]) %} GET http://localhost:8080/users Content-Type: application/json { "name": {{name}} }

Using JSONPath, you can also access specific parameters of JSON objects in an array. For example, in the following query, the HTTP Client will send requests for each name value for all objects within a variable called users.

To make it easier to use JSONPath in variables, JetBrains Rider provides you with JSONPath coding assistance, including completion for known JSON object parameters, validation, and highlighting. The JSONPath language is injected in all HTTP Client variables (enclosed in double curly braces) except for dynamic variables.

GET http://localhost:8080/users/{{users[*].name}}
Iterate over collections in variables

To get the current index in the loop in pre-request scripts and in response handler scripts, use the request.iteration() method. For example, 0 indicates that the first item of the array is being processed, and the first request is being sent.

Example of request.iteration()

### Use request.iteration() < {% request.variables.set("clients", [ // test data {"id": 1, "firstName": "George", "lastName": "Franklin", balance: 100}, {"id": 2, "firstName": "John", "lastName": "Doe", balance: 1500}, {"id": 3, "firstName": "Eduardo", "lastName": "Rodriquez", balance: 10} ]) %} POST https://examples.http-client.intellij.net/post Content-Type: application/json { "clientId": {{$.clients..id}}, "firstName": "{{$.clients..firstName}}", "lastName": "{{$.clients..lastName}}", "balance": "{{$.clients..balance}}" } > {% client.log(request.iteration()) // prints 0 for 1st request, 1 for 2nd, 2 for 3rd let current = request.variables.get("clients")[request.iteration()] client.test(`Account ${current.lastName} has initial balance ${current.balance}`, () => { let responseBalance = jsonPath(response.body, "$.json.balance") client.assert(responseBalance == current.balance) }) %}

To get the value by its index in the loop in pre-request scripts and in response handler scripts, use the request.templateValue(Integer) method.

Example of request.templateValue()

### Use templateValue < {% request.variables.set("books", [{ "books": { "title": "Ulysses", "year": 1922 } }, { "books": { "title": "Dune", "year": 1965 }}]) %} GET http://localhost:8080/books Content-Type: application/json { "bookTitle": "{{$.books..title}}", "bookYear": "{{$.books..year}}" } > {% let bookTitle = request.templateValue(0) client.log(`book title is: ${bookTitle}`) // prints Ulysses in 1st request, Dune in 2nd client.log(request.iteration()) let bookYear = request.templateValue(1) client.log(`book year is: ${bookYear}`) // prints 1922 in 1st request, 1965 in 2nd %}

Handle the response

You can handle the response using JavaScript. Type the > character after the request and specify the path and name of the JavaScript file or put the response handler script code wrapped in {% ... %}.

GET https://httpbin.org/get > /path/to/responseHandler.js
GET https://httpbin.org/get > {% client.global.set("my_cookie", response.headers.valuesOf("Set-Cookie")[0]); %}

For more information, refer to HTTP Response handling API reference.

Redirect the response

You can redirect a response to a file. Use >> to create a new file with a suffix if it already exists and >>! to rewrite the file if it exists. You can specify an absolute path or relative to the current HTTP Request file. You can also use variables in paths, including environment variables and the following predefined variables:

  • {{$projectRoot}} points to the project root directory

  • {{$historyFolder}} points to .idea/httpRequests/

The following example HTTP request creates myFile.json in myFolder next to the HTTP Request file and redirects the response to it. If the file already exists, it creates myFile-1.json.

POST https://httpbin.org/post Content-Type: application/json { "id": 999, "value": "content" } >> myFolder/myFile.json

The following example HTTP request creates myFile.json in .idea/httpRequests/. If the file already exists, it overwrites the file. It also handles the response with the handler.js script that resides in the project root.

POST https://httpbin.org/post Content-Type: application/json { "id": 999, "value": "content" } > {{$projectRoot}}/handler.js >>! {{$historyFolder}}/myFile.json
Last modified: 30 August 2024