Create and install custom project templates
Rider supports the template system used by the .NET tooling dotnet new, which allows you to use project templates from the dotnet templates gallery as well as custom templates that you can create on your own.
There are two ways to install new project templates.
You can run
dotnet new --install [template package]in the command line, where[template package]is the template id from the dotnet templates gallery.In the New Project/New Solution dialog, click More Templates on the left, then click Install Template, and then choose a folder or a package file with the custom project template.
When the path to the template appears in the list, click Reload.
Create custom project template
Create a project with the desired structure. You can take any project as a starting point or create a new one using any of the existing templates.
To illustrate this, we take the simplest project that contains just one file.
ConsoleAppAsyncMain ├── bin ├── obj ├── MyProject.csproj ├── Program.csProgram.cs contains
async mainmethod as the default application entry point:using System; using System.Threading.Tasks; namespace MyProject { class Program { static async Task Main(string[] args) { Console.WriteLine("Hello World!"); } } }Copy the project folder to a location from which you will use it as a template.
Remove bin, obj, and any other directories and files that are not related to the source code of the template.
In the copied project directory (which is now the template directory), add a folder named .template.config and a file named template.json inside it.
Now the template structure should look as follows:
MyTemplates ├── ConsoleAppAsyncMain ├── .template.config ├── template.json ├── MyProject.csproj ├── Program.csSpecify template properties in the template descriptor template.json
The minimal descriptor can look as shown below, but you can provide a much more detailed configuration if necessary. You can find more information and examples in this Microsoft .NET Blog article.
{ "author": "Your Name", "name": "Async Main Console Application", "description": "A project for creating a command-line application that can run on .NET on Windows, Linux and macOS, and has an async Main method.", "identity": "YourName.ConsoleApp.1.0", "shortName": "consoleasync", "tags": { "language": "C#", "type": "project" }, "sourceName": "MyProject", "symbols": { "Framework": { "type": "parameter", "description": "The target framework for the project.", "datatype": "choice", "choices": [ { "choice": "netcoreapp2.0" }, { "choice": "netcoreapp3.0" } ], "defaultValue": "netcoreapp2.0" } } }Properties in the above configuration are self-explanatory, except
"sourceName": "MyProject".When you create projects using this template, the value of this property will be replaced everywhere with the name you specify for the new project.
In our example, the new name will replace the project file name and the namespace in Program.cs.
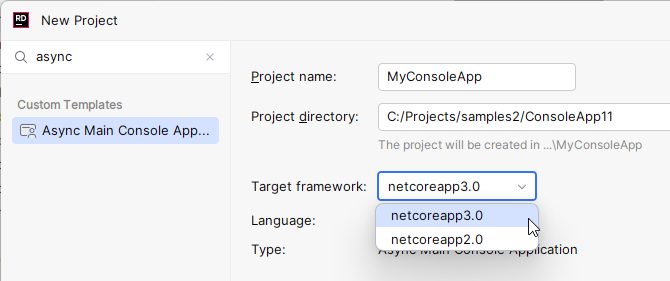
Your new project template is ready, you can install it in the New Project/New Solution dialog — click More Templates on the left, then click Install Template, and then choose the ConsoleAppAsyncMain folder wherever you saved it.
When the path to the template appears in the list, click Reload.
As soon as the template is installed, you can find it in the list on the left and use it to create new projects:
