Localization Manager
Localization Manager will assist you in localizing applications. It lets you view and edit localizable resources in a single grid, helping you add and edit localizable strings and spot missing localized values.
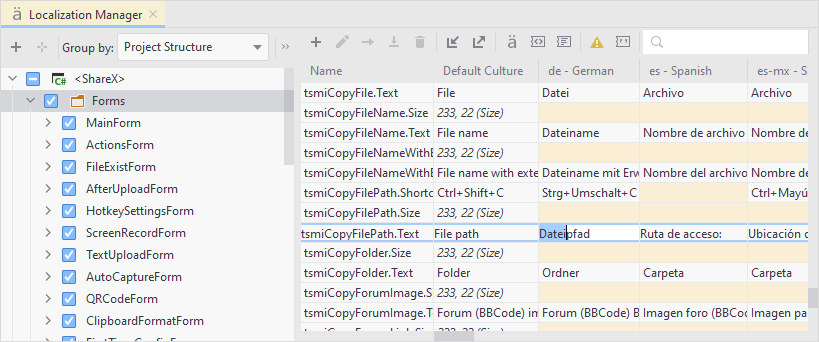
When you select a resource in the grid, you can use the toolbar buttons to invoke the Rename , Move
, Inline
, and Safe Delete
refactorings for that resource.
Open Localization Manager
Choose from the main menu.
Double-click a resource file in the Solution Explorer.
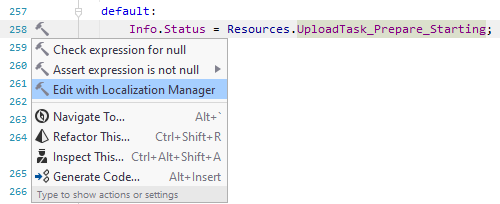
Place the caret at the declaration or usage of a resource in the editor, press Alt+Enter and choose Edit with Localization Manager.
Choose target resource bundles
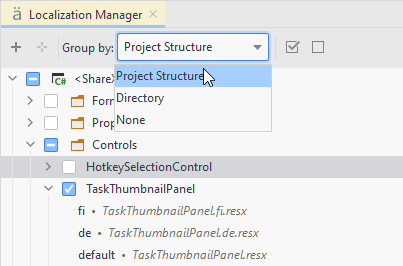
Localization Manager scans all resource files (.resx) in your solution, groups them by the resource bundle and displays them on the left-hand side of the window.
Use checkboxes in the left-hand side view to choose bundles that should be added to the working grid. The Group by selector on the toolbar will help you regroup the bundles so that you can select entire grouping nodes, such as projects or solution folders.
Understand the working grid
Rows of the working grid list all resources from the bundles selected on the left. Resources are combined and sorted alphabetically.
Columns of the working grid list all cultures found in the selected bundles. For example, if one of the selected bundles has culture-specific files for de and es, and another has de and fr, then columns for de, es, and fr will be added.
Double-click the resource name to open the corresponding declaration in the .resx file of the default culture.
To locate the culture-specific resource definition, right-click a culture-specific cell and choose Edit with Text Editor or press F4.
To hide some cultures from the working grid, click Choose Cultures ![]() on the toolbar and use the dialog that appears to specify the desired cultures.
on the toolbar and use the dialog that appears to specify the desired cultures.
Each resource in specific culture is color-coded:
Grey with text — resource has a culture-specific value
Yellow with text — resource has a culture-specific value that is the same as in the default culture
Yellow empty — resource has no culture-specific value
Names of resources that have usages within the solution are highlighted with bold.
If you want to see only those resources, where culture-specific values are missing, toggle Show Only Problems on the toolbar.
Add new resources
In the Localization Manager, you can add new resources by clicking Add New above the working grid. In the dialog that opens, specify a name for the resource and choose the resource bundle where it should be added.

If the target resource bundle is selected on the left, the new resource will appear in the grid and you can proceed with specifying resource values in different cultures.
Add cultures
You can add a new culture-specific files to all resource bundles in your solution — click Add New Culture above the tree view in the left part, and then specify a culture tag in the dialog that opens.
You can also add culture-specific files that are missing in some bundles. Such files are displayed as strikethrough in the tree view on the left.
Share project resources with localization teams
When you work on localization, some localization team members might not have an IDE or project sources. In this case, you can share the necessary resources using .csv files. Here is a workflow that you can follow:
Select the resources you want to share: Use checkboxes in the left-hand side view to choose bundles that should be added to the working grid. The Group by selector on the toolbar will help you regroup the bundles so that you can select entire grouping nodes, such as projects or solution folders.
By default, everything that you see on the working grid will be exported.
If you want to export only specific cultures, hide some cultures from the working grid — click Choose Cultures
.png) on the toolbar and use the dialog that appears to select the desired cultures.
on the toolbar and use the dialog that appears to select the desired cultures.Optionally, you can filter the grid by a substring — type it in the search field.
Click Export to CSV
on the toolbar.
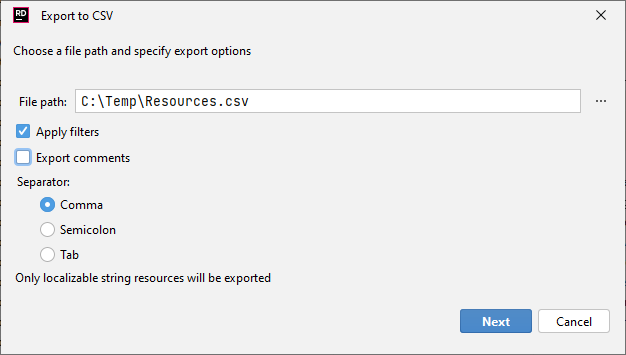
In the dialog that opens, specify where to save the .csv file.
If you have hidden some cultures or filtered the grid by a substring, make sure that Apply filters is selected, otherwise all resources selected in the left-hand side view will be exported.
Click Next to save the resources to the selected .csv file.
Share the exported .csv file with your localization team. They can use any software that works with the CSV format (such as Microsoft Excel or Google Sheets) to review the resources and make necessary corrections.
After the review is finished, and you have received the updated .csv file, click Import from CSV
on the toolbar.
In the dialog that opens, specify the file location.
By default, if a resource in a project has a non-empty value and the same resource in the imported .csv file has an empty value, the empty value will be ignored. If you want existing resources to be replaced with empty values in such cases, clear the Ignore empty values checkbox.
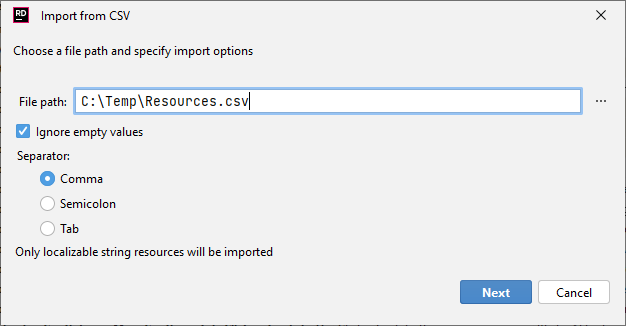
All differences and newly added resources will be applied in the corresponding .resx files of your project.