Database connection
To issue a query to a database, you must create a data source connection. Data source is the location of your data and can be a server or a DDL file. The data source includes a name and connection settings that are dependent on the data source type.
Amazon Redshift
In your Redshift dashboard, create a Redshift cluster.
For more information about the Amazon Redshift cluster, read Getting Started with Amazon Redshift.
In settings of the Redshift cluster, copy the JDBC URL.
In the Database tool window (), click the Data Source Properties icon
 . Alternatively, press Shift+Enter.
 In the Data Sources and Drivers dialog, click the Add icon (
 ) and select Amazon Redshift.
At the bottom of the data source settings area, click the Download missing driver files link. Alternatively, you can specify user drivers for the data source. For more information about user drivers, see Add a user driver to an existing connection.
Paste the JDBC URL from the Redshift cluster settings to the URL field in RubyMine.
In User and Password fields, specify your Redshift credentials.
To ensure that the connection to the data source is successful, click Test Connection.

Apache Cassandra
In the Database tool window (), click the Data Source Properties icon
. Alternatively, press Shift+Enter. In the Data Sources and Drivers dialog, click the Add icon (
) and select Apache Cassandra.At the bottom of the data source settings area, click the Download missing driver files link. Alternatively, you can specify user drivers for the data source. For more information about user drivers, see Add a user driver to an existing connection.
Specify database connection details. Alternatively, paste the JDBC URL in the URL field.
To delete a password, right-click the Password field and select Set empty.
To ensure that the connection to the data source is successful, click Test Connection.

Apache Derby
In the Database tool window (), click the Data Source Properties icon
. Alternatively, press Shift+Enter. In the Data Sources and Drivers dialog, click the Add icon (
) and select Apache Derby.From the Driver list, select the type of the JDBC driver that you want to use. For remote connections, select Apache Derby (Remote). For embedded databases, select Apache Derby (Embedded).
At the bottom of the data source settings area, click the Download missing driver files link. Alternatively, you can specify user drivers for the data source. For more information about user drivers, see Add a user driver to an existing connection.
Specify database connection details. Alternatively, paste the JDBC URL in the URL field.
To delete a password, right-click the Password field and select Set empty.
To ensure that the connection to the data source is successful, click Test Connection.

Apache Hive
In the Database tool window (), click the Data Source Properties icon
. Alternatively, press Shift+Enter. In the Data Sources and Drivers dialog, click the Add icon (
) and select Apache Hive.At the bottom of the data source settings area, click the Download missing driver files link. Alternatively, you can specify user drivers for the data source. For more information about user drivers, see Add a user driver to an existing connection.
Specify database connection details. Alternatively, paste the JDBC URL in the URL field.
To delete a password, right-click the Password field and select Set empty.
To ensure that the connection to the data source is successful, click Test Connection.

Azure SQL Database
Microsoft Azure supports PostgreSQL, MySQL, MariaDB, and other Database Management Systems (DBMS). If you want to connect to these data sources, create data source connections that correspond to these DMBS. In RubyMine, these connections already include necessary JDBC drivers. So, if you want to connect to the Azure database for PostgreSQL, create the PostgreSQL connection.
In your Microsoft Azure account, create an SQL data source. For more information about the Azure SQL Database, read Azure SQL Database Documentation.
In RubyMine, navigate to Shift+Enter.
In the Data Sources and Drivers dialog, click the Add icon (
) and select Azure SQL Database.At the bottom of the data source settings area, click the Download missing driver files link.
Specify database connection details. Alternatively, paste the JDBC URL in the URL field.
To delete a password, right-click the Password field and select Set empty.
To ensure that the connection to the data source is successful, click Test Connection.
To use Azure Active Directory Authentication, select Use Windows domain authentication. To use SQL Authentication, clear the checkbox, and specify your Microsoft Azure credentials in User and Password fields.
Note: the Use Windows domain authentication checkbox is available only on Windows.

ClickHouse
In the Database tool window (), click the Data Source Properties icon
. Alternatively, press Shift+Enter. In the Data Sources and Drivers dialog, click the Add icon (
) and select ClickHouse.At the bottom of the data source settings area, click the Download missing driver files link. Alternatively, you can specify user drivers for the data source. For more information about user drivers, see Add a user driver to an existing connection.
Specify database connection details. Alternatively, paste the JDBC URL in the URL field.
To delete a password, right-click the Password field and select Set empty.
To ensure that the connection to the data source is successful, click Test Connection.

Exasol
In the Database tool window (), click the Data Source Properties icon
. Alternatively, press Shift+Enter. In the Data Sources and Drivers dialog, click the Add icon (
) and select Exasol.At the bottom of the data source settings area, click the Download missing driver files link. Alternatively, you can specify user drivers for the data source. For more information about user drivers, see Add a user driver to an existing connection.
Specify database connection details. Alternatively, paste the JDBC URL in the URL field.
To delete a password, right-click the Password field and select Set empty.
To ensure that the connection to the data source is successful, click Test Connection.

Greenplum
In the Database tool window (), click the Data Source Properties icon
. Alternatively, press Shift+Enter. In the Data Sources and Drivers dialog, click the Add icon (
) and select Greenplum.At the bottom of the data source settings area, click the Download missing driver files link. Alternatively, you can specify user drivers for the data source. For more information about user drivers, see Add a user driver to an existing connection.
Specify database connection details. Alternatively, paste the JDBC URL in the URL field.
To delete a password, right-click the Password field and select Set empty.
To ensure that the connection to the data source is successful, click Test Connection.

H2
In the Database tool window (), click the Data Source Properties icon
. Alternatively, press Shift+Enter. In the Data Sources and Drivers dialog, click the Add icon (
) and select H2.At the bottom of the data source settings area, click the Download missing driver files link. Alternatively, you can specify user drivers for the data source. For more information about user drivers, see Add a user driver to an existing connection.
Specify database connection details. Alternatively, paste the JDBC URL in the URL field.
To delete a password, right-click the Password field and select Set empty.
To ensure that the connection to the data source is successful, click Test Connection.

HSQLDB
In the Database tool window (), click the Data Source Properties icon
. Alternatively, press Shift+Enter. In the Data Sources and Drivers dialog, click the Add icon (
) and select HSQLDB.At the bottom of the data source settings area, click the Download missing driver files link. Alternatively, you can specify user drivers for the data source. For more information about user drivers, see Add a user driver to an existing connection.
Specify database connection details. Alternatively, paste the JDBC URL in the URL field.
To delete a password, right-click the Password field and select Set empty.
To ensure that the connection to the data source is successful, click Test Connection.

IBM Db2
In the Database tool window (), click the Data Source Properties icon
. Alternatively, press Shift+Enter. In the Data Sources and Drivers dialog, click the Add icon (
) and select IBM Db2.At the bottom of the data source settings area, click the Download missing driver files link. Alternatively, you can specify user drivers for the data source. For more information about user drivers, see Add a user driver to an existing connection.
Specify database connection details. Alternatively, paste the JDBC URL in the URL field.
To delete a password, right-click the Password field and select Set empty.
To ensure that the connection to the data source is successful, click Test Connection.

MariaDB
In the Database tool window (), click the Data Source Properties icon
. Alternatively, press Shift+Enter. In the Data Sources and Drivers dialog, click the Add icon (
) and select MariaDB.At the bottom of the data source settings area, click the Download missing driver files link. Alternatively, you can specify user drivers for the data source. For more information about user drivers, see Add a user driver to an existing connection.
Specify database connection details. Alternatively, paste the JDBC URL in the URL field.
To delete a password, right-click the Password field and select Set empty.
To ensure that the connection to the data source is successful, click Test Connection.

Microsoft SQL Server
In the Database tool window (), click the Data Source Properties icon
. Alternatively, press Shift+Enter. In the Data Sources and Drivers dialog, click the Add icon (
) and select Microsoft SQL Server.At the bottom of the data source settings area, click the Download missing driver files link. Alternatively, you can specify user drivers for the data source. For more information about user drivers, see Add a user driver to an existing connection.
Specify database connection details. Alternatively, paste the JDBC URL in the URL field.
To delete a password, right-click the Password field and select Set empty.
To ensure that the connection to the data source is successful, click Test Connection.
The Instance field is optional.

MongoDB
In MongoDB, for authentication, you must provide a username, password, and the authentication database that is associated with this username. If the authentication database differs from the database to which you want to connect, specify the authentication database with the authSource parameter in the URL. If no authentication database is specified, MongoDB uses the admin database by default.
For example, you want to connect to the local database but your authentication database is admin. In this case, the connection URL will look like: mongodb://localhost:27017/local?authSource=admin.
In the Database tool window (), click the Data Source Properties icon
. Alternatively, press Shift+Enter. In the Data Sources and Drivers dialog, click the Add icon (
) and select MongoDB.At the bottom of the data source settings area, click the Download missing driver files link. Alternatively, you can specify user drivers for the data source. For more information about user drivers, see Add a user driver to an existing connection.
From the Connection type list, select your connection type:
default: standard connection string format (for example,
mongodb://localhost:27021/admin). Read more about standard connection string format in Standard Connection String Format at docs.mongodb.com.MongoDB Atlas (SRV protocol): DNS seedlist connection format (for example,
mongodb+srv://unit1.test.net:27121,unit2.test.com:27021). Read more about standard connection string format in DNS Seedlist Connection Format at docs.mongodb.com.
Specify database connection details: a login, a password, and the database that you want to connect to. To set an empty password, right-click the Password field and select Set empty.
To ensure that the connection to the data source is successful, click Test Connection.

MySQL
In the Database tool window (), click the Data Source Properties icon
. Alternatively, press Shift+Enter. In the Data Sources and Drivers dialog, click the Add icon (
) and select MySQL.At the bottom of the data source settings area, click the Download missing driver files link. Alternatively, you can specify user drivers for the data source. For more information about user drivers, see Add a user driver to an existing connection.
Specify database connection details. Alternatively, paste the JDBC URL in the URL field.
To delete a password, right-click the Password field and select Set empty.
To ensure that the connection to the data source is successful, click Test Connection.

Oracle
In the Database tool window (), click the Data Source Properties icon
. Alternatively, press Shift+Enter. In the Data Sources and Drivers dialog, click the Add icon (
) and select Oracle.At the bottom of the data source settings area, click the Download missing driver files link.
From the Connection Type list, select a connection type:
SID: to use a unique name of an Oracle instance (a process that runs on the workstation).
Service name: to use an alias to an Oracle instance (or many instances).
TNS: to use tnsnames.ora configuration file. In the TNSADMIN field, specify a path to the folder with tnsnames.ora. In the TNS name field, specify what service name to use (see a value of
net_service_namein tnsnames.ora) if you have more than one service.URL only: to use the JDBC URL.
Specify database connection details. Alternatively, paste the JDBC URL in the URL field.
To delete a password, right-click the Password field and select Set empty.
From the Driver list, specify the driver type. For more information about driver types, see Oracle JDBC FAQ.
At the bottom of the data source settings area, click the Download missing driver files link. Alternatively, you can specify user drivers for the data source. For more information about user drivers, see Add a user driver to an existing connection.
To ensure that the connection to the data source is successful, click Test Connection.

PostgreSQL
In the Database tool window (), click the Data Source Properties icon
. Alternatively, press Shift+Enter. In the Data Sources and Drivers dialog, click the Add icon (
) and select PostgreSQL.At the bottom of the data source settings area, click the Download missing driver files link. Alternatively, you can specify user drivers for the data source. For more information about user drivers, see Add a user driver to an existing connection.
Specify database connection details. Alternatively, paste the JDBC URL in the URL field.
To delete a password, right-click the Password field and select Set empty.
(Optional) If you want to use the pgpass password file. From the Authentication list, select pgpass. You can read more about the password file in The Password File at postgresql.org.
To ensure that the connection to the data source is successful, click Test Connection.

Snowflake
In the Database tool window (), click the Data Source Properties icon
. Alternatively, press Shift+Enter. In the Data Sources and Drivers dialog, click the Add icon (
) and select Snowflake.At the bottom of the data source settings area, click the Download missing driver files link. Alternatively, you can specify user drivers for the data source. For more information about user drivers, see Add a user driver to an existing connection.
Specify database connection details. Alternatively, paste the JDBC URL in the URL field.
To delete a password, right-click the Password field and select Set empty.
To ensure that the connection to the data source is successful, click Test Connection.

SQLite
In the Database tool window (), click the Data Source Properties icon
. Alternatively, press Shift+Enter. In the Data Sources and Drivers dialog, click the Add icon (
) and select SQLite.At the bottom of the data source settings area, click the Download missing driver files link. Alternatively, you can specify user drivers for the data source. For more information about user drivers, see Add a user driver to an existing connection.
To connect to an existing SQLite database, specify a file path to the database file in the File field.
To ensure that the connection to the data source is successful, click Test Connection.

Sybase ASE
In the Database tool window (), click the Data Source Properties icon
. Alternatively, press Shift+Enter. In the Data Sources and Drivers dialog, click the Add icon (
) and select Sybase ASE.At the bottom of the data source settings area, click the Download missing driver files link. Alternatively, you can specify user drivers for the data source. For more information about user drivers, see Add a user driver to an existing connection.
Specify database connection details. Alternatively, paste the JDBC URL in the URL field.
To delete a password, right-click the Password field and select Set empty.
To ensure that the connection to the data source is successful, click Test Connection.

Vertica
In the Database tool window (), click the Data Source Properties icon
. Alternatively, press Shift+Enter. In the Data Sources and Drivers dialog, click the Add icon (
) and select Vertica.At the bottom of the data source settings area, click the Download missing driver files link. Alternatively, you can specify user drivers for the data source. For more information about user drivers, see Add a user driver to an existing connection.
Specify database connection details. Alternatively, paste the JDBC URL in the URL field.
To delete a password, right-click the Password field and select Set empty.
To ensure that the connection to the data source is successful, click Test Connection.

Other
Currently, RubyMine supports vendors that are mentioned previously. The support includes such features as enhanced code completion and better retrieval of database objects (introspection). If your vendor is not in the list, you still can connect to the database with a JDBC driver.
Create a connection to a database with a JDBC driver
If you cannot find a name of a database vendor in the list of data sources, download a JDBC driver for the database management system (DBMS), and create a connection in RubyMine. With the JDBC driver, you can connect to DBMS and start working.
In the Database tool window (), click the Data Source Properties icon
. Alternatively, press Shift+Enter. In the Data Sources and Drivers dialog, click the Add icon (
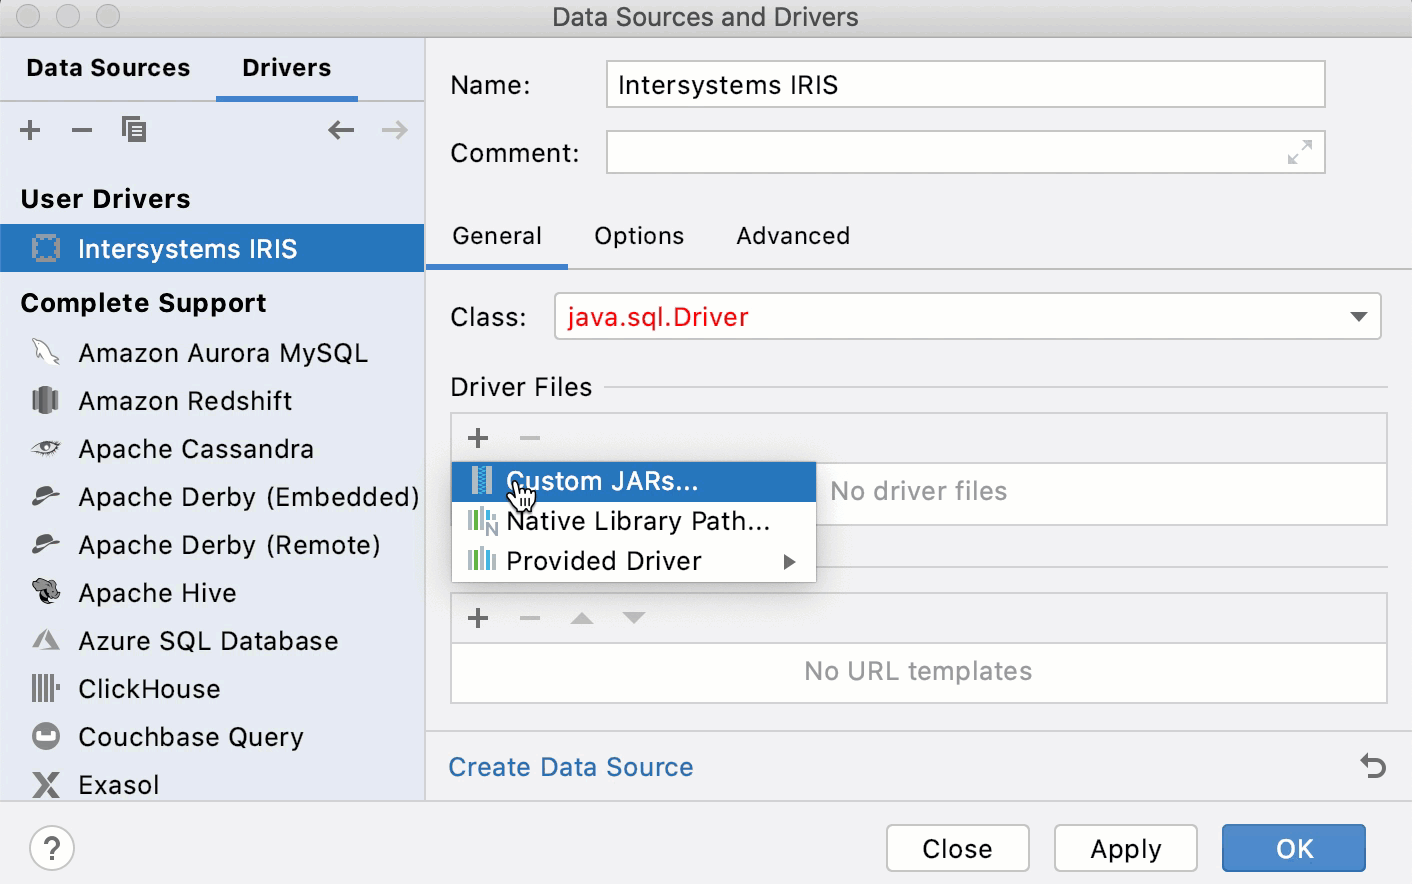
) and select Driver and Data Source.Click the User Driver link.
In the Driver files pane, click the Add icon (
) and select Custom JARs.Navigate to the JAR file of the JDBC driver, select it, and click OK.
In the Class field, specify the value that you want to use for the driver.
Click Apply.
Return to the created data source connection.
Specify database connection details. Alternatively, paste the JDBC URL in the URL field.
To delete a password, right-click the Password field and select Set empty.
To ensure that the connection to the data source is successful, click Test Connection.
Specify a library path for a driver
To work properly, some JDBC drivers require a path to library files along with the driver.
For example, to determine if the application should operate in the Instant Client mode, Oracle Instant Client (OCI) applications look for library files in the runtime library search path (LD_LIBRARY_PATH on Linux or PATH on Windows). You can set these paths in the Data Sources and Drivers dialog.
In the Database tool window (), click the Data Source Properties icon
. Alternatively, press Shift+Enter. In the Data Sources and Drivers dialog, click the driver entry to which you want to add a path to library files.
(Optional) Delete the existing driver. To delete the existing driver entry, select the driver and click Remove.
(Optional) Add a driver with which you want to work. For more information about adding a driver, see Create a connection to a database with a JDBC driver.
In the Driver files pane, click the Add icon (
) and select Native Library Path.Navigate to the folder with library files. Ensure that the driver version corresponds to the version of these library files. For example, if you use the driver version 19.6, the attached library files must also have the 19.6 version.

DDL data source
SQL files that contain data definition language statements (DDL statements) can be used as data sources. As a result, you can reference all tables, columns and other objects defined in such files in the editor.
In the Database tool window (), click the Data Source Properties icon
. Alternatively, press Shift+Enter. In the Data Sources and Drivers dialog, click the Add icon (
) and select DDL Data Source.In the DDL Files pane, click the Add button
. In the file browser, navigate to the SQL file or files with DDL statements and click Open.
Click Apply.
In the SQL Dialects dialog, select a dialect that you want to use for the added SQL file.
Apply settings and click OK.

Productivity tips
Create a data source from the JDBC URL
In the Database tool window (), click the Data Source Properties icon
. Alternatively, press Shift+Enter. In the Data Sources and Drivers dialog, click the Add icon (
) and select Data Source from URL.In the URL field, paste the JDBC URL.
From the Driver list, select the necessary driver for the data source.
In the Data Sources and Drivers dialog, enter credentials.
To ensure that the connection to the data source is successful, click Test Connection.
