JavaScript
With RubyMine, you can develop modern web, mobile, and desktop applications with JavaScript and Node.js.
RubyMine also supports React, Angular, Vue.js, and other frameworks and provides tight integration with various tools for web development.
JavaScript-aware coding assistance includes completion for keywords, labels, variables, parameters, and functions, error and syntax highlighting, formatting, numerous code inspections and quick-fixes, as well as common and JavaScript-specific refactoring. RubyMine also integrates with JavaScript linters and the Flow type checker.
With RubyMine built-in debugger, you can debug both your client-side and server-side code and even run JavaScript code snippets in the interactive debugger console. Learn more from Debug JavaScript in Chrome.
RubyMine integrates with Jest, Karma, Protractor, Cucumber, and Mocha testing frameworks. RubyMine supports running and debugging tests as well as navigation between tests and subjects or between a failed test and the fragment of code that caused the problem.
On this page you will find a short Getting Started Guide that will walk you step by step from creating a web application to debugging and testing it.
Before you start
Make sure the JavaScript and TypeScript plugin is enabled on the Settings/Preferences | Plugins page, tab Installed, see Managing plugins for details.
Creating a new application
Click Create New Project on the Welcome screen or select from the main menu. The New Project dialog opens.
In the left-hand pane, choose Empty Project.
In the right-hand pane, specify the path to the folder where the project-related files will be stored. Click Create.
Starting with an existing JavaScript application
If you are going to continue developing an existing JavaScript application, open it in RubyMine, choose the JavaScript version to use, and configure the libraries in it. Optionally download the required npm dependencies.
Open the application sources that are already on your machine
Click Open on the Welcome screen or select from the main menu. In the dialog that opens, select the folder where your sources are stored.
Check out the application sources from your version control
Click Get from VCS on the Welcome screen or select from the main menu.
In the invoked dialog, select your version control system from the list and specify the repository to check out the application sources from.
Choosing the JavaScript language version
To get reliable and efficient coding assistance, you need to specify the language version that will be used in all JavaScript files of your project by default.
In the Settings/Preferences dialog Ctrl+Alt+S, go to . The JavaScript page opens.
From the list, choose one of the supported JavaScript language versions:
ECMAScript 6+: This version adds support for the features introduced in ECMAScript 2015-2020 and for JSX syntax as well as some current proposals to the standard.
Flow: This version adds support for the Flow syntax.
Using multiple JavaScript versions
If you are working on an application that uses both ECMAScript 5.1 and a newer version of ECMAScript, the easiest way is to choose the highest language version for the whole project from the list on the JavaScript page.
On the JavaScript page, click
 next to the JavaScript language version list. The JavaScript Language Versions dialog opens.
Click
 and in the dialog that opens select the folder where you need a custom language version. RubyMine brings you back to the JavaScript Language Versions dialog where the selected folder is shown in the Path field.
From the Language list, choose the language version for the files in the selected folder. In all the other JavaScript files in the project RubyMine will use the version chosen on the JavaScript page.

JSX syntax in JavaScript code
If you are using JSX syntax in your JavaScript code, enable ECMAScript 6+.
In the Settings/Preferences dialog Ctrl+Alt+S, go to , and select ECMAScript 6+ from the JavaScript language version list.
To be warned when JSX syntax is used by mistake, open the Settings/Preferences dialog Ctrl+Alt+S, go to , and enable the React JSX syntax inspection under JavaScript and TypeScript | General node. Use the search field to locate the inspection.

Optionally, configure the inspection severity and scope. Learn more from Code inspections.
Downloading project dependencies
If your application uses some tools, libraries, or frameworks, download the required packages. To manage your project dependencies, you can use npm, Yarn 1, or Yarn 2, see npm and Yarn for details.
Install a package in an empty project
In the embedded Terminal(Alt+F12), type:
npm install <package name>.
If you already have a package.json file in your project
Right-click the package.json file in the editor or in the Project tool window and choose Run 'npm install' from the context menu.
Alternatively, run
npm installin the Terminal Alt+F12.
Configuring code completion for project dependencies
To provide code completion for project dependencies, RubyMine automatically creates a node_modules library. In RubyMine, a library is a file or a set of files whose functions and methods are added to RubyMine's internal knowledge in addition to the functions and methods that RubyMine retrieves from the project code that you edit. See Configure JavaScript libraries and Code completion for details and examples.
Viewing parameter hints
Parameter hints show the names of parameters in methods and functions to make your code easier to read. By default, parameter hints are shown only for values that are literals or function expressions but not for named objects.

Configure parameter hints
Open the Settings/Preferences dialog Ctrl+Alt+S and go to .
Select Parameter hints from the list, make sure the Show parameter hints checkbox is selected, and then specify the context where you want parameter hints shown.
For some methods and functions, RubyMine does not show parameter hints in any context. Click Exclude list... to view these methods and functions, possibly enable parameter hints for them, or add new items to the list.
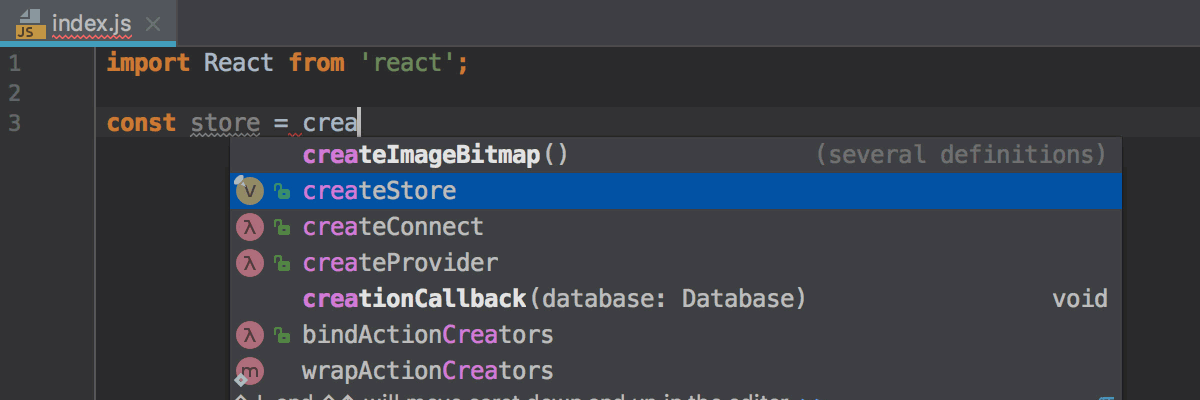
Auto-import in JavaScript
RubyMine can generate import statements for modules, classes, components, and any other symbols that are exported. If you are using ES6 in your project, RubyMine can add missing import statements on the fly, when you complete ES6 symbols.
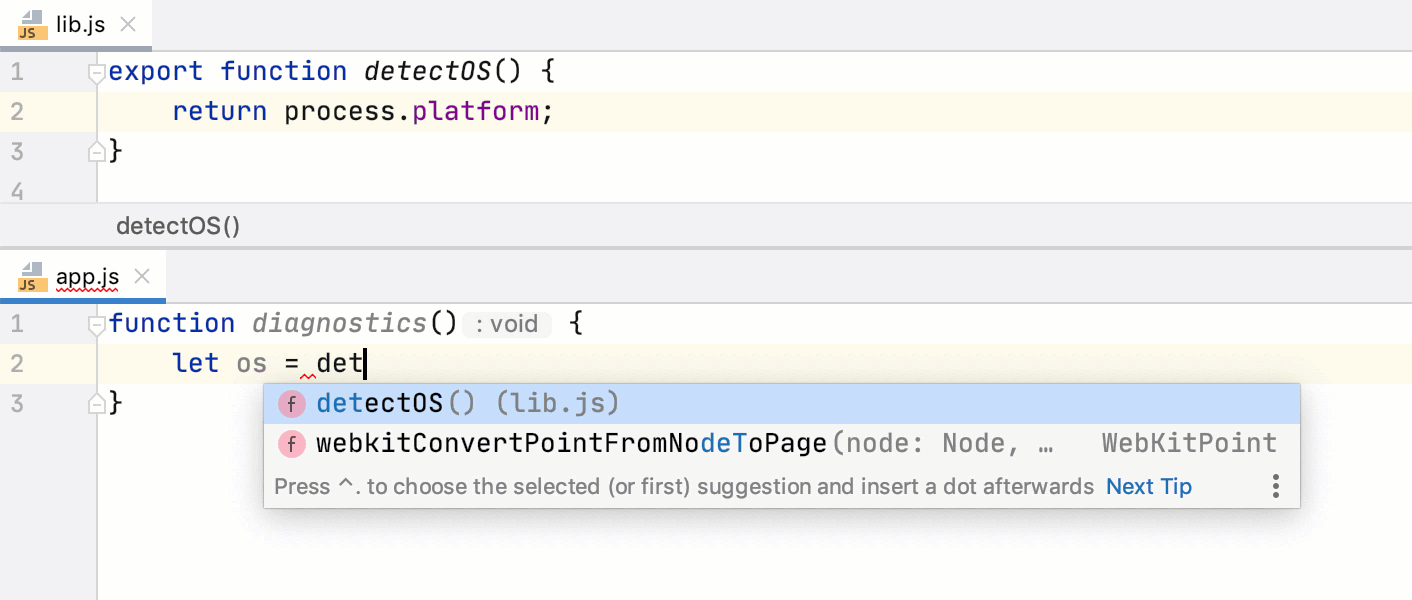
For earlier JavaScript versions or when auto-import on completion is disabled, RubyMine marks the symbol as unresolved and shows a tooltip with the suggested quick-fix:

Alternatively, press Alt+Enter:

If there's more than one possible source of import, RubyMine shows a list of suggestions:

Learn more from Choosing the JavaScript language version.
RubyMine can also generate import statements for symbols defined in the project’s dependencies. Auto-import works for symbols from packages that contain TypeScript definition files (like in moment or redux) or sources written as ES modules.
Configure auto-import
To automatically add ES6 import statements on code completion, open the Settings/Preferences dialog Ctrl+Alt+S, go to , and select the Add ES6 imports on code completion checkbox in the TypeScript/JavaScript area.
To configure the appearance of
importstatements, open the Settings/Preferences dialog Ctrl+Alt+S, go to , and use the controls in the Imports tab, see Imports tab for details.
Configuring syntax highlighting
You can configure JavaScript-aware syntax highlighting according to your preferences and habits.
In the Settings/Preferences dialog Ctrl+Alt+S, go to .
Select the color scheme, accept the highlighting settings inherited from defaults or customize them as described in Configure colors and fonts.
Running JavaScript in browser
In the editor, open the HTML file with the JavaScript reference. This HTML file does not necessarily have to be the one that implements the starting page of the application.
- Do one of the following:
Choose from the main menu or press Alt+F2. Then select the desired browser from the list.
Hover your mouse pointer over the code to show the browser icons bar:


 . Click the icon that indicates the desired browser.
Debugging JavaScript
RubyMine provides a built-in debugger for your client-side JavaScript code that works with Chrome.
You can also debug your client-side JavaScript in Firefox, version 36 and later. However it is strongly recommended that you use Chrome or any other browser of the Chrome family. With RubyMine, you can debug JavaScript applications running on the built-in server, on an external server, or on a remote server. For details, see Debug JavaScript in Chrome and Debug JavaScript in Firefox.