Live templates
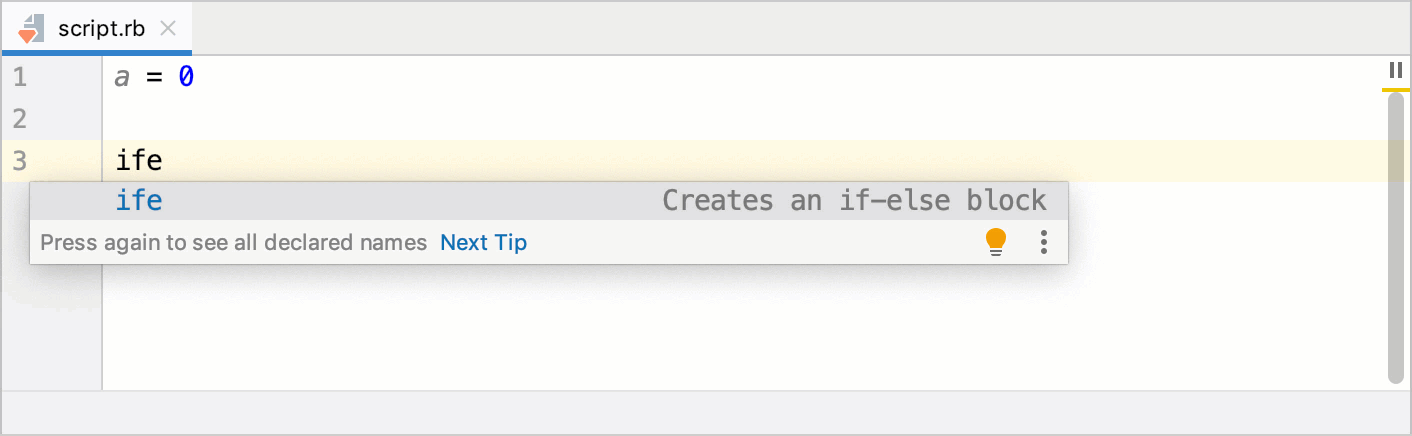
Live templates (or code snippets) allow you to insert frequently-used constructions into your code. These can be conditions, blocks, loops, and so on. For example, the animation below shows how to quickly insert the if-else block by using the predefined ife abbreviation.
RubyMine provides numerous predefined templates for various languages and frameworks, including Ruby, Rails, RSpec, JavaScript, and so on. If necessary, you can customize predefined templates or add new ones.
There are three types of live templates:
Simple templates contain only predefined code. When you expand a simple template, the text is automatically inserted into your source code, replacing the abbreviation.
Parameterized templates contain variables that enable user input. When you expand a parameterized template, you can replace variables manually or provide an expression to calculate them automatically.
Surround templates wrap a block of the selected code with the text specified by the user.
Expand a live template
Expand simple and parameterized templates
To expand a live template, type the corresponding template abbreviation and press Tab. Let's see on how to insert the if-else block using the predefined ife template.
In the editor, type
ifeand press Tab.Specify the required condition and press Tab to move to the next statement.
Type code executed if the condition is
trueand press Tab to move theelseclause.Type code executed if the condition is
falseand press Tab again to finish.(Optional) Before finishing, you can press Shift+Tab to move to the previous clause and change it.
Expand surround templates
Surround templates can be useful to wrap a piece of HTML code with tags. Perform the following steps to do this:
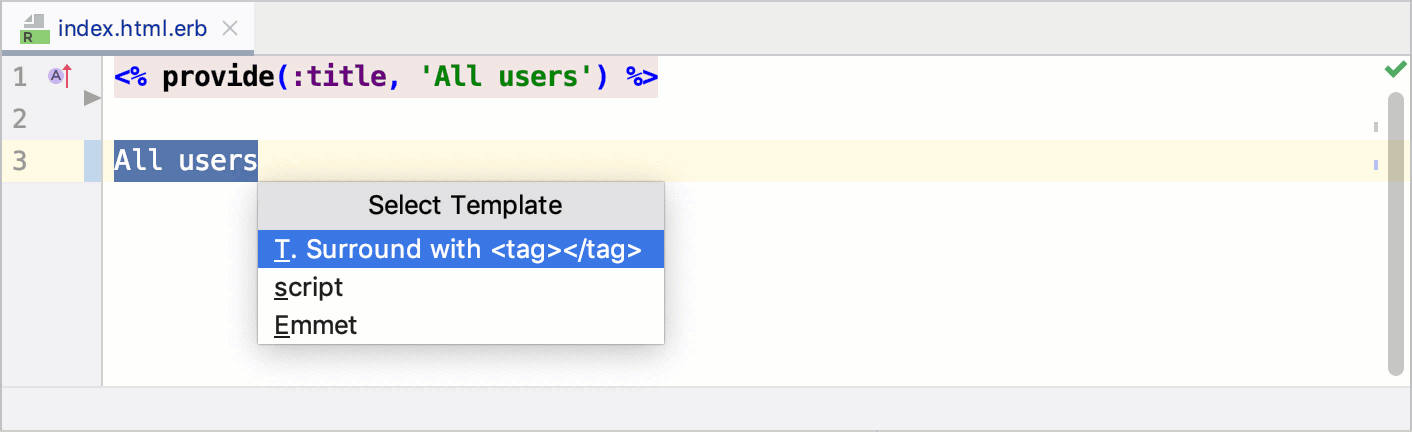
Select the desired code fragment and press Ctrl+Alt+J.
From the invoked popup, select the Surround with template and press Enter.
Type the desired tag and press Enter.
Create a simple template
Let's add a simple template that contains code without any template variables. For example, we have the editor opened with the following TODO comment:
To save this code as a template, do the following:
Create a simple template from a code fragment
Select code in the editor.
From the main menu, select .
In the invoked dialog, specify the following settings.

Abbreviation: Specifies the template abbreviation used to expand a template in the editor. Here we use
todo.Description: Contains template description that will be displayed in the completion popup.
Template text: Template body containing code to be inserted.
Applicable in: Specifies the languages or pieces of code where you can expand the created code snippet. Click Change to specify the required context.
Click OK.
To try the created template in action, type
todoin the editor, and press Tab.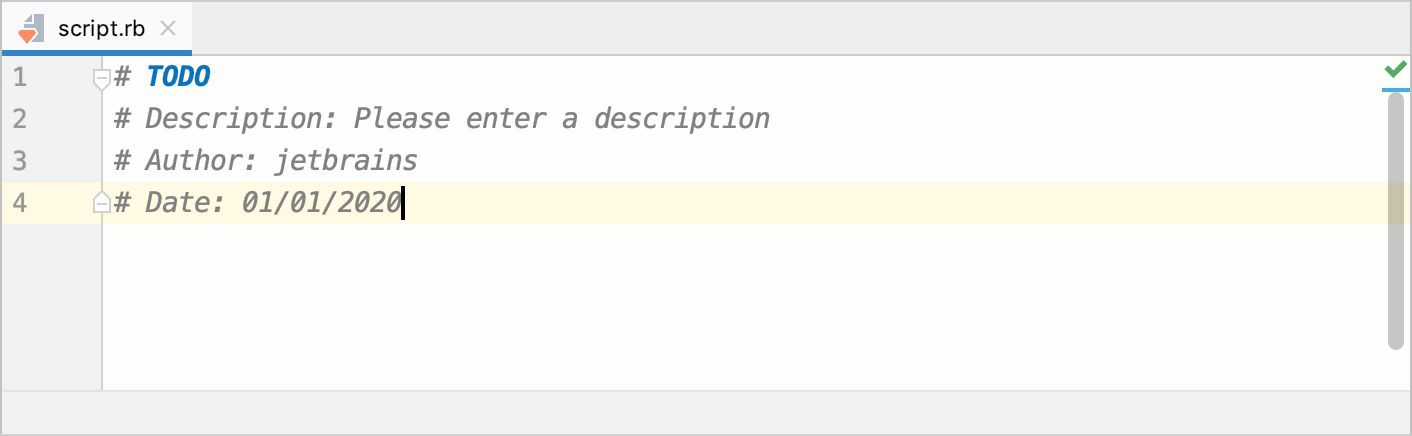
Add template variables
Live templates allow you to add variables that can be used for different purposes, for example:
Provide a hint on what you need to specify at the current caret position
Provide a static default value to insert
Provide an expression to calculate a value to insert
Let's modify a simple live template created in the previous chapter and add hints to make input more convenient.
Add default values for template variables
Open Settings/Preferences and go to the page.
Select the
todotemplate created in the previous chapter.Add the
$DESCRIPTION$,$AUTHOR$, and$DATE$variables in Template text, as shown below. # TODO # Description: $DESCRIPTION$ # Author: $AUTHOR$ # Date: $DATE$
Click the Edit variables button. In the invoked Edit Templates Variable dialog, provide default values enclosed in quotes in the Default value column.

Click OK in this dialog and then click OK in Settings/Preferences.
To try the customized template in action, type
todoin the editor and press Tab. Use Tab to jump between variables.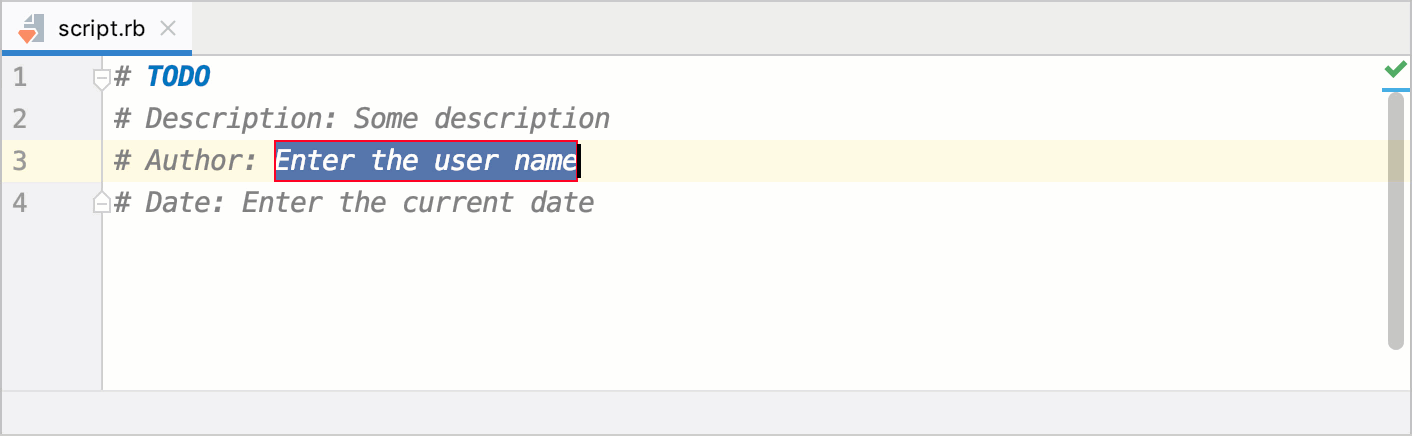
If necessary, press Shift+Tab to move to the previous variable.
Calculate variables using expressions
RubyMine allows you to calculate live templates variables using expressions and insert the calculated values automatically. Let's modify our custom todo template created in the previous procedure.
In the page, select the
todotemplate and click the Edit variables button.In the invoked Edit Templates Variable dialog, specify settings, as shown below.

DESCRIPTION: Leave a static Default value specified in the previous procedure.AUTHOR: Expand Expression next toAUTHORand select theuserfunction from the list. This function returns the name of the current user.DATE: Expand Expression next toDATEand selectdatefrom the list. This function returns the current system date in the specified format.For both
AUTHORandDATEvariables, enable the Skip if defined option. In this case, RubyMine won’t suggest that you specify these variables when expanding a template.
Click OK in this dialog and then click OK in Settings/Preferences.
In the editor, type
todo, and press Tab to expand a template.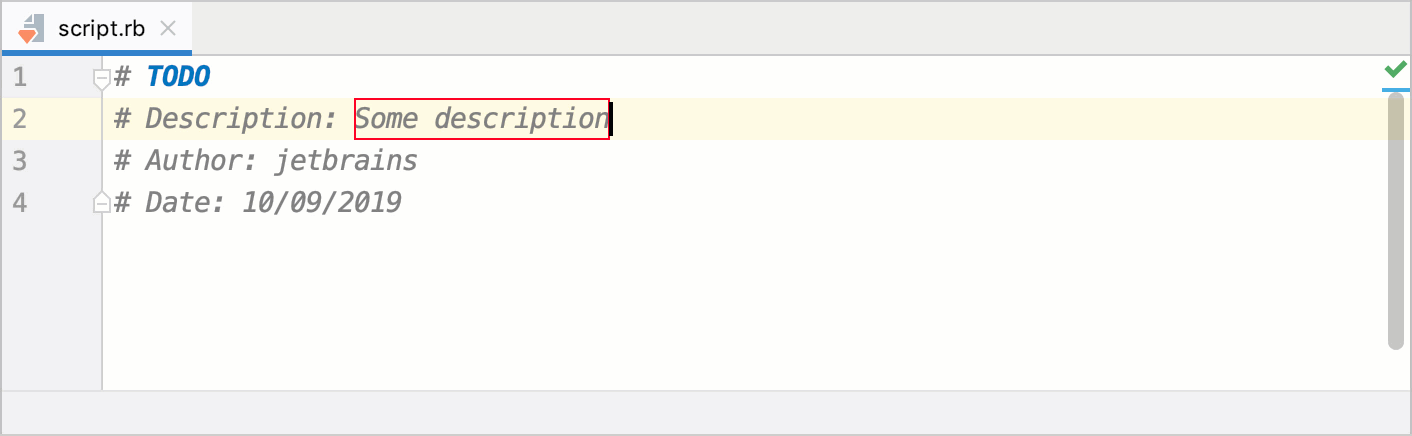
As you can see, RubyMine fills out Author and Date automatically with values obtained using the
useranddatefunctions, respectively. So, you only need to provide a description.
Predefined template variables
RubyMine supports the following predefined live template variables that cannot be modified:
$END$indicates the caret position when the code snippet is complete and you can no longer press Tab to jump to the next variable.$SELECTION$is used in surround templates and denotes the code fragment to be wrapped. Learn more at Surround templates.
Surround templates
Surround templates wrap a code block with the predefined code. The $SELECTION$ predefined variable is used to denote the code fragment to be wrapped. Let's see on how to create the custom surround template similar to the predefined ife template.
Create a surround template
Open Settings/Preferences and go to the page.
Select the Ruby group and click the
 button.
Specify settings, as shown below.

Abbreviation: Specifies the template abbreviation (
ife_surin our case).Description: Contains template description that will be displayed in the Select Template popup.
Template text: Specify the template body in the following way:
if $SELECTION$ $STATEMENT_ONE$ else $STATEMENT_TWO$ end $END$Note that this code snippet contains the
$SELECTION$variable that will be replaced with the selected code when expanding a template.Define: Click OK in this dialog and then click OK in Settings/Preferences.
To expand the created surround template, select the required code fragment in the editor and press Ctrl+Alt+J. Select the desired surround template and press Enter.
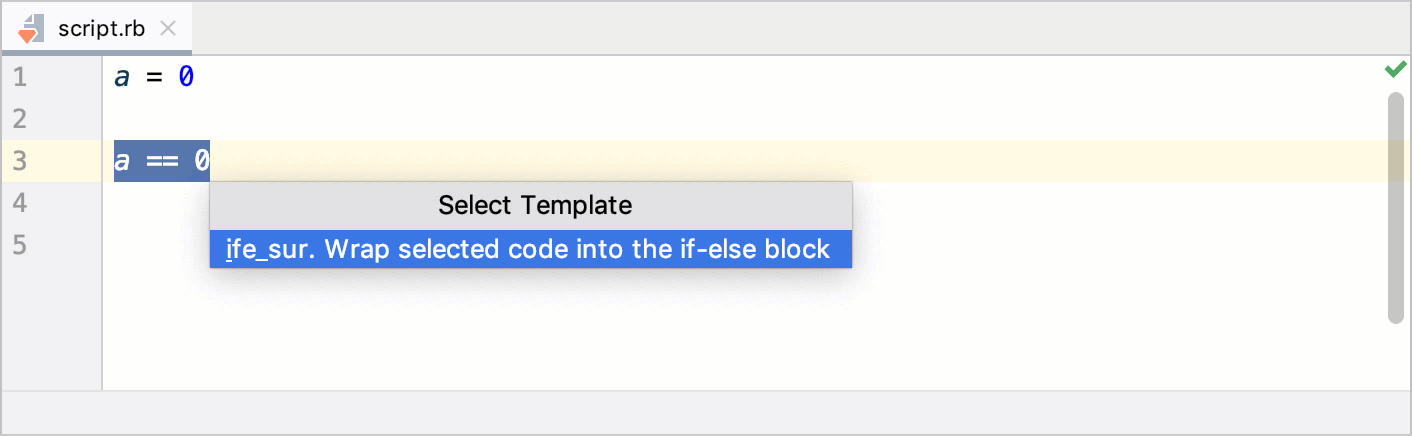
The selected code will be inserted as a condition. Use Tab to jump between variables. When you finish, the caret will be placed on the line next to the generated snippet as the
$END$variable is placed in Template text.
Share live templates
RubyMine stores definitions of custom live template groups and templates added to predefined template groups in automatically generated XML configuration files.
For a custom group, the file contains definitions of all the templates the group includes.
For a modified predefined group, the file contains definitions of the added (or modified) live templates only.
Live template group configuration files are stored in the templates directory of the IDE configuration directory. By copying the relevant files in the templates directory, you can share live templates among team members and multiple RubyMine installations. Moreover, you can share live templates across all IDEs based on the IntelliJ platform.
Export live template configuration
Choose from the menu.
In the Export Settings dialog, make sure that the Live templates checkbox is selected and specify the path and name of the archive, where the exported settings will be saved.
Click OK to generate the file based on live template configuration files. You can share this file with your team members, or import it on another RubyMine installation.
Import live template configuration
Choose from the menu.
Specify the path to the archive with the exported live template configuration.
In the Import Settings dialog, select the Live templates checkbox and click OK.
After restarting RubyMine, you will see the imported live templates on the Editor | Live Templates page of the IDE settings Ctrl+Alt+S.
Live template settings
To configure live templates, open Settings/Preferences(Ctrl+Alt+S), go to the page. On this page, you can see all the available live templates grouped by language or framework. To configure a template, expand the desired group (for example, Ruby) and select a template.
Main settings
| Item | Description | |
|---|---|---|
| By default expand with | Specifies the default invocation key for all templates. Individual expansion keys for the particular templates are defined in the editing area. If the standard expansion keys (Tab, Enter, or Space) are not desirable, select the Custom option from this list. When Custom is selected, the Change link appears next to the drop-down, leading you to the Keymap page. | |
| Live Templates | Displays all currently available template abbreviations with their descriptions. The abbreviations are grouped below nodes and sorted alphabetically within each group. To activate a template or an entire group, select the checkbox near the template or the group. | |
| Add Alt+Insert | Adds a new template item to the current group of template. You can define the template abbreviation, description, text, variables, expansion key, and context in the editing area below. | |
| Remove Delete | Removes the selected live template from the list. | |
| Duplicate | Click this button to create a new template based on the selected template. A new template item is added to the current node and the fields in the Template Text area show the definition of the selected template. | |
| Restore deleted defaults | Click this button to restore the deleted live templates. This button is only enabled when the changes are applied. | |
Context menu of a live template
| Item | Description |
|---|---|
| Move | Moves the selected template to a specified group. |
| Change context | Changes context or contexts where the current template is enabled. When you select this command, a list of supported language contexts is displayed. To make RubyMine consider a context sensitive to the template, select a checkbox next to the context name. The available context types depend on the enabled plugins. |
| Copy | Creates a serialized template XML in the system clipboard. |
| Paste | Pastes an XML representation of the copied templates to the selected group of templates. |
| Restore defaults | This command only appears on the context menus of the modified templates, marked blue. Choose this command to restore the default template settings. |
Template editing area
The focus is moved to this area in the following cases:
When you click the Add
or Copy  button.
When you select a live template in the list.
When you select a fragment of code in the editor and choose .
Use controls of this area to create new live templates and edit the settings for the existing ones.
You can navigate through the Template Text Area using the hot keys that are marked in the field labels.
| Item | Description |
|---|---|
| Abbreviation | In this field, specify the template abbreviation, i.e a sequence of characters that identify the template in the editor. |
| Description | In this field, provide optional description of a template or an example of its usage. |
| Template Text | In this field, type the template body that may contain plain text and variables in the format $<variable name>$. If necessary, click Edit Variables and configure the variables as required. To escape a dollar sign $ in the template text, just duplicate it $$. |
| Applicable in: | This read-only field shows the languages and/or pieces of code where the editor should be sensitive to the template. Upon pressing Ctrl+J in such context, RubyMine displays a list of templates that are valid for this context. |
| Change | Click this link to modify the set of contexts where the current template is enabled. Upon clicking the link, a list of supported language contexts is displayed. To make RubyMine consider a context sensitive to the template, select a checkbox next to the context name. The available context types depend on the enabled plugins. |
| Edit Variables | Open the Edit Template Variables dialog, where you can define how RubyMine should process template variables upon template expansion. |
| Options | In this area, define the behavior of the editor when a template is expanded.
|
Predefined functions used in variables
List of functions
| Function | Description |
|---|---|
blockCommentEnd() | Returns the characters that indicate the end of a block comment in the current language context. |
blockCommentStart() | Returns the characters that indicate the start of a block comment in the current language context. |
camelCase(<String>) | Converts a string into camelCase. For example, |
capitalize(<String>) | Capitalizes the first letter of a string. For example, |
capitalizeAndUnderscore(<String>) | Capitalizes all the letters of a string, and inserts an underscore between the parts. For example, |
clipboard() | Returns the contents of the system clipboard. |
commentEnd() | Returns the characters that indicate the end of a comment in the current language context. For languages with line comments, the return value is empty. |
commentStart() | Returns the characters that indicate the start of a comment in the current language context. For languages with line comments, the return value is the start of a line comment, same as lineCommentStart(). |
complete() | Invokes code completion at the position of the variable. |
concat(<String>, ...) | Returns a concatenation of all the strings passed to the function as parameters. For example, |
date([format]) | Returns the current system date. By default, without a parameter, it returns the date in the current system format. To use a different format, provide a parameter according to the SimpleDateFormat specification. For example, the |
dbColumns() | Returns a list of columns for a table or a view. The |
dbObjectName() | Returns a name of a table or a view. The |
decapitalize(<String>) | Replaces the first letter of a string with the corresponding lowercase letter. For example, |
defaultReturnValues | Returns the default value if the expression is used in the return statement. Uses the errorVariableName parameter if the expression is of the error type. |
enum(<String>, ...) | Returns a list of strings suggested for completion when the template expands. For example, |
escapeString(<String>) | Escapes special characters so that the result can be used in a Java string. For example, it replaces the tab character with |
expectedType() | Returns the expected type of the expression where the template expands (in the right part of an assignment, after return, as a method parameter, and so on). |
fileName() | Returns the name of the current file with its extension. |
fileNameWithoutExtension() | Returns the name of the current file without its extension. |
filePath() | Returns the absolute path to the current file. |
fileRelativePath() | Returns the current file path relative to the current project. To check what the relative path is for a given file, right-click it and select Copy Reference, or press Ctrl+Alt+Shift+C. |
firstWord(<String>) | Returns the first word of the string passed as the parameter. For example, |
groovyScript(<String>, [arg, ...]) | Executes the Groovy script passed as a string. The first argument is a string with either the text of the script or the path to the file that contains the script. The function passes other optional arguments to the script as values for The following example shows a
groovyScript("def result = ''; _1.split().eachWithIndex { item, index -> result = result + index.next() + '. ' + item + System.lineSeparator() }; return result;", SELECTION);
|
lineCommentStart() | Returns the characters that indicate the start of a line comment in the current language context. |
lineNumber() | Returns the current line number. |
lowercaseAndDash(<String>) | Converts a string into lower case and inserts n-dashes as separators. For example, lowercaseAndDash("MyExampleName") and lowercaseAndDash("my example name") both return my-example-name. |
regularExpression(<String>, <Pattern>, <Replacement>) | Finds all occurrences of Pattern in a String and replaces them with Replacement. You can specify the pattern as a regular expression to find everything that matches it in the string. |
showParameterInfo() | Returns the parameter details when adding a parameter to a function or method. |
snakeCase(<String>) | Converts a string into snake_case. For example, snakeCase("fooBar") and snakeCase("foo bar") both return foo_bar. |
spaceSeparated(<String>) | Returns the specified string with spaces as separators. For example, spaceSeparated("fooBar") returns foo Bar and spaceSeparated("Foo_BAR") returns Foo BAR. |
spacesToUnderscores(<String>) | Replaces spaces with underscores in the string passed as the parameter. For example, spacesToUnderscores("foo bar BAZ") returns foo_bar_BAZ. |
substringBefore(<String>, <Delimeter>) | Returns the substring up to the specified delimiter. This is helpful for removing the extensions in test file names. For example, substringBefore(fileName(),".") returns component-test if used in a file named component-test.js. |
time([format]) | Returns the current system time. By default, without a parameter, it returns the time in the current system format. To use a different format, provide a parameter according to the SimpleDateFormat specification. For example, the |
underscoresToCamelCase(<String>) | Transforms a string with underscores (like snake_case) into camelCase. For example, underscoresToCamelCase(foo_bar_baz) and underscoresToCamelCase(FOO_BaR_baZ) both return fooBarBaz. |
underscoresToSpaces(<String>) | Transforms underscores in a string to spaces. For example, underscoresToSpaces(foo_bar_baz) returns foo bar baz and underscoresToSpaces(FOO_BaR_baZ) returns FOO BaR baZ. |
user() | Returns the name of the current user. |