Cucumber
Cucumber is a test framework for behavior-driven Ruby development. Cucumber scenarios are written using the Gherkin syntax and stored in .feature files. Each scenario has multiple steps that link to step definitions representing Ruby blocks.
RubyMine integrates with Cucumber and allows you to run tests, create step definitions, navigate between features and step definitions, and so on. In this topic, we'll walk through the main IDE capabilities that help you work with Cucumber for Ruby development. To learn how RubyMine helps you work with Cucumber for JavaScript development, see Cucumber.js.
Prerequisites
Before working with Cucumber in RubyMine, make sure that:
The Gherkin repository plugin is installed and enabled. For more information, see Managing plugins.
Depending on the project type (Ruby or Rails), the 'cucumber' or 'cucumber-rails' gems are added to the Gemfile and installed to the project's SDK. Learn how to install gems using RubyMine from the Bundler topic.
Enable Cucumber support in Rails applications
Add the 'cucumber-rails' gem to the
testgroup of the project's Gemfile and install it.From the main menu, select Ctrl+Alt+G and start typing cucumber:install. Select the corresponding command from the list and press Enter.

In the Setup Cucumber Support dialog, choose the test framework for Cucumber, specify the required options, and click OK.

RubyMine will run the
cucumber:installgenerator that sets up Cucumber in your Rails project and generates necessary files in the features directory. After running this generator, you will also get a new Rake task calledcucumberthat can be used to run Cucumber tests in RubyMine.
Create a feature file
In the Project tool window, right-click a directory, where feature files should be created.
From the context menu of this directory, choose Alt+Insert, and create a file with the .feature extension.

In the created feature file, type your scenario. For example, we'll use a code snippet from the Cucumber Getting Started:
Feature: Is it Friday yet? Everybody wants to know when it's Friday Scenario: Sunday isn't Friday Given today is Sunday When I ask whether it's Friday yet Then I should be told "Nope"Since there are no step definitions, the steps will be highlighted as unresolved. See the next chapter to learn how to create step definitions.
Create step definitions
When you're editing a feature file, RubyMine detects and highlights the steps where definitions are missing. You can generate missing step definitions in the following way:
Place the caret at the step without a definition, press Alt+Enter, and select Create step definition or Create all step definitions.

Choose whether to use the existing step definition file or create a new one.

Press Enter.
(Optional) If you selected Create new file, specify the name for the new file and the language for writing definitions.

Click OK.
In the opened Ruby file, write step definition code.

Run tests
RubyMine allows you to run either individual Cucumber scenarios or all scenarios from the specified folder or file. You can also run scenarios using Rake tasks.
Run multiple tests from a folder
In the Project view, right-click the desired folder and select Run 'All features in ...'.

To run a specific subset of tests, for example, only scenarios which match a certain name or marked with a specific tag, customize the Cucumber run/debug configuration.
Run tests from the editor
To run tests from the editor, do one of the following:
Open the .feature file and click the Run button on the left gutter next to the required feature or scenario. Then, select the required run command from the context menu.

Place the caret at the required feature or scenario, press Alt+Enter, select the required run action and press Enter.

Run tests using a Rake task
Press Ctrl twice to invoke the Run Anything popup. Start typing the required task name, select it from the list and press Enter.

After executing tests, you can analyze results in the Run tool window.
Cucumber run/debug configuration
When you run Cucumber tests using a context menu or from the editor, RubyMine automatically creates a corresponding Cucumber temporary configuration, which can be saved. If necessary, you can create the Cucumber run/debug configuration manually from the predefined template.
To customize and run the created configuration, do the following:
Press Ctrl+Shift+A and start typing edit configurations. Select Edit Configurations and press Enter.

In the opened Run/Debug Configurations dialog, select the required configuration, and specify its settings.

For example, you can specify the following settings:
Option
Description
Mode
Choose whether to run all features in a directory or file.
Features folder / Feature file
Specify the full path to the folder/file that contains the desired features.
Element name filter
Allows you to run only scenarios that match a certain name. This can be a substring of the names of Features, Scenarios, Scenario Outlines, or Example blocks. Learn more at Cucumber help.
Tags filter
Specify tags to run subsets of features. Learn more at Tag logic.
Runner options
Specify the required options for running Cucumber tests. For example, the
-r featuresparameter loads files from the features folder before running tests.'Cucumber' gem
Select the Cucumber gem used to run tests.
Use custom Cucumber runner script
Enable this option if you want to use an alternative Cucumber runner script. You can type the full path to the Cucumber runner script in the text field, or click
 , and select the desired runner script in the dialog that opens.
Click OK to save the run/debug configuration.
To run the saved configuration, press Ctrl twice, start typing the configuration name, select it from the list, and press Enter.

Scenario outlines and examples
The Scenario Outline can be used to run the same Scenario multiple times, with different combinations of values. These values are stored in the Examples table. You can learn more from Cucumber help.
RubyMine allows you to convert scenarios to outlines and generate missing Examples tables.
Convert Scenario to Outline
Place the caret at the desired scenario and press Alt+Enter.
Select Convert scenario to outline and press Enter.

RubyMine will change
ScenariotoScenario Outlineand add theExamplestable.
Create Examples in Scenario Outline
RubyMine provides an inspection to detect examples missing in scenario outlines. To create missing examples, do the following:
Place the caret at the highlighted scenario outline and press Alt+Enter.
Select Create Examples Section and press Enter.

RubyMine will create the
Examplestable with a header row.
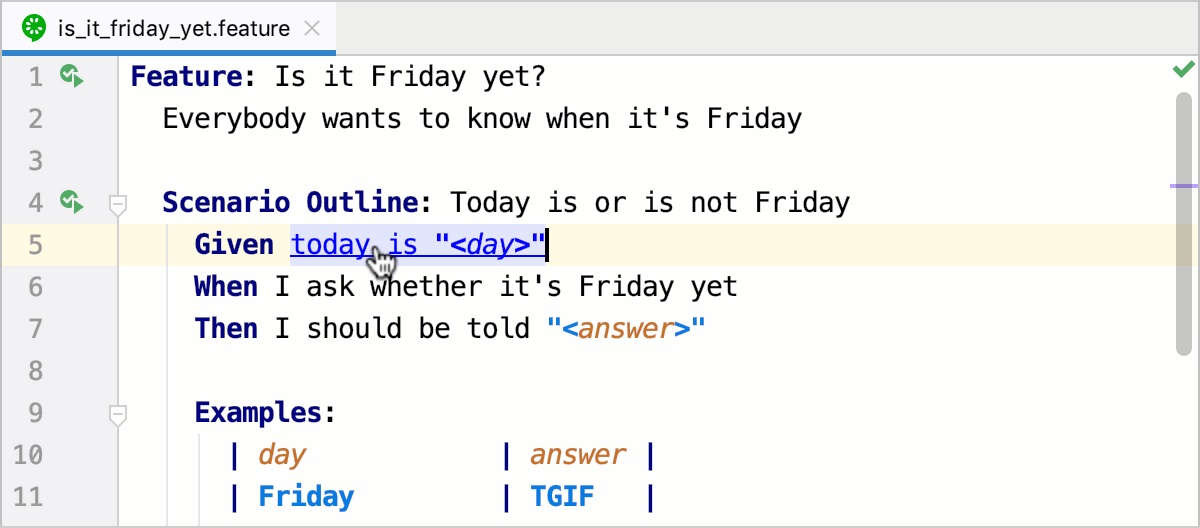
Navigation
To jump from a step in a .feature file to the step definition, press and hold Ctrl, hover over the step, and click the step when it turns into a link.
Configuring syntax highlighting
You can configure Cucumber-aware syntax highlighting in the following way:
In the Settings/Preferences dialog Ctrl+Alt+S, go to .
Select the color scheme, accept the highlighting settings inherited from defaults or customize them as described in Configuring Colors and Fonts.