Kubernetes Installation
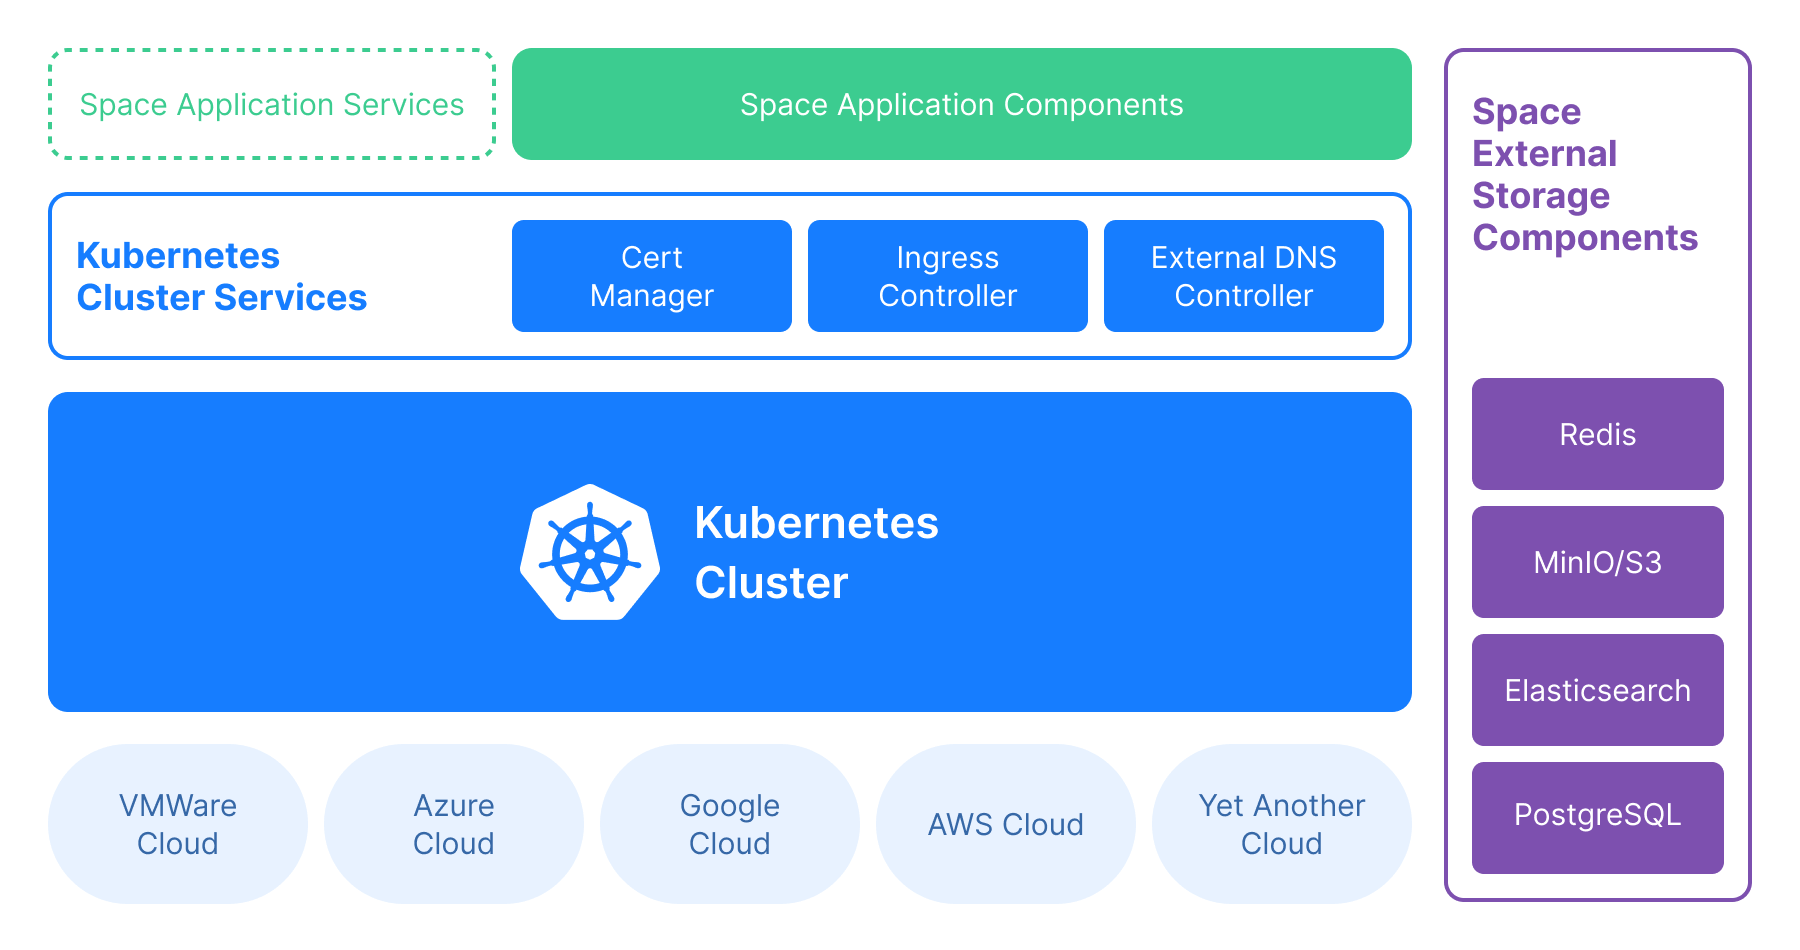
The Kubernetes installation of Space On-Premises provides a scalable solution, suited for handling larger workloads. The cluster itself can run in your own environment, in Amazon Elastic Kubernetes Service, Google Kubernetes Engine, or any other cloud service that supports Kubernetes. The minimum supported Kubernetes version is 1.21.
Overview
A user can access Space instance from various clients: mobile app, web browser, desktop app. All Space DNS names must resolve to the IP address of the same load balancer. The load balancer uses Server Name Indication to route the user to one of the pods that runs the required service.
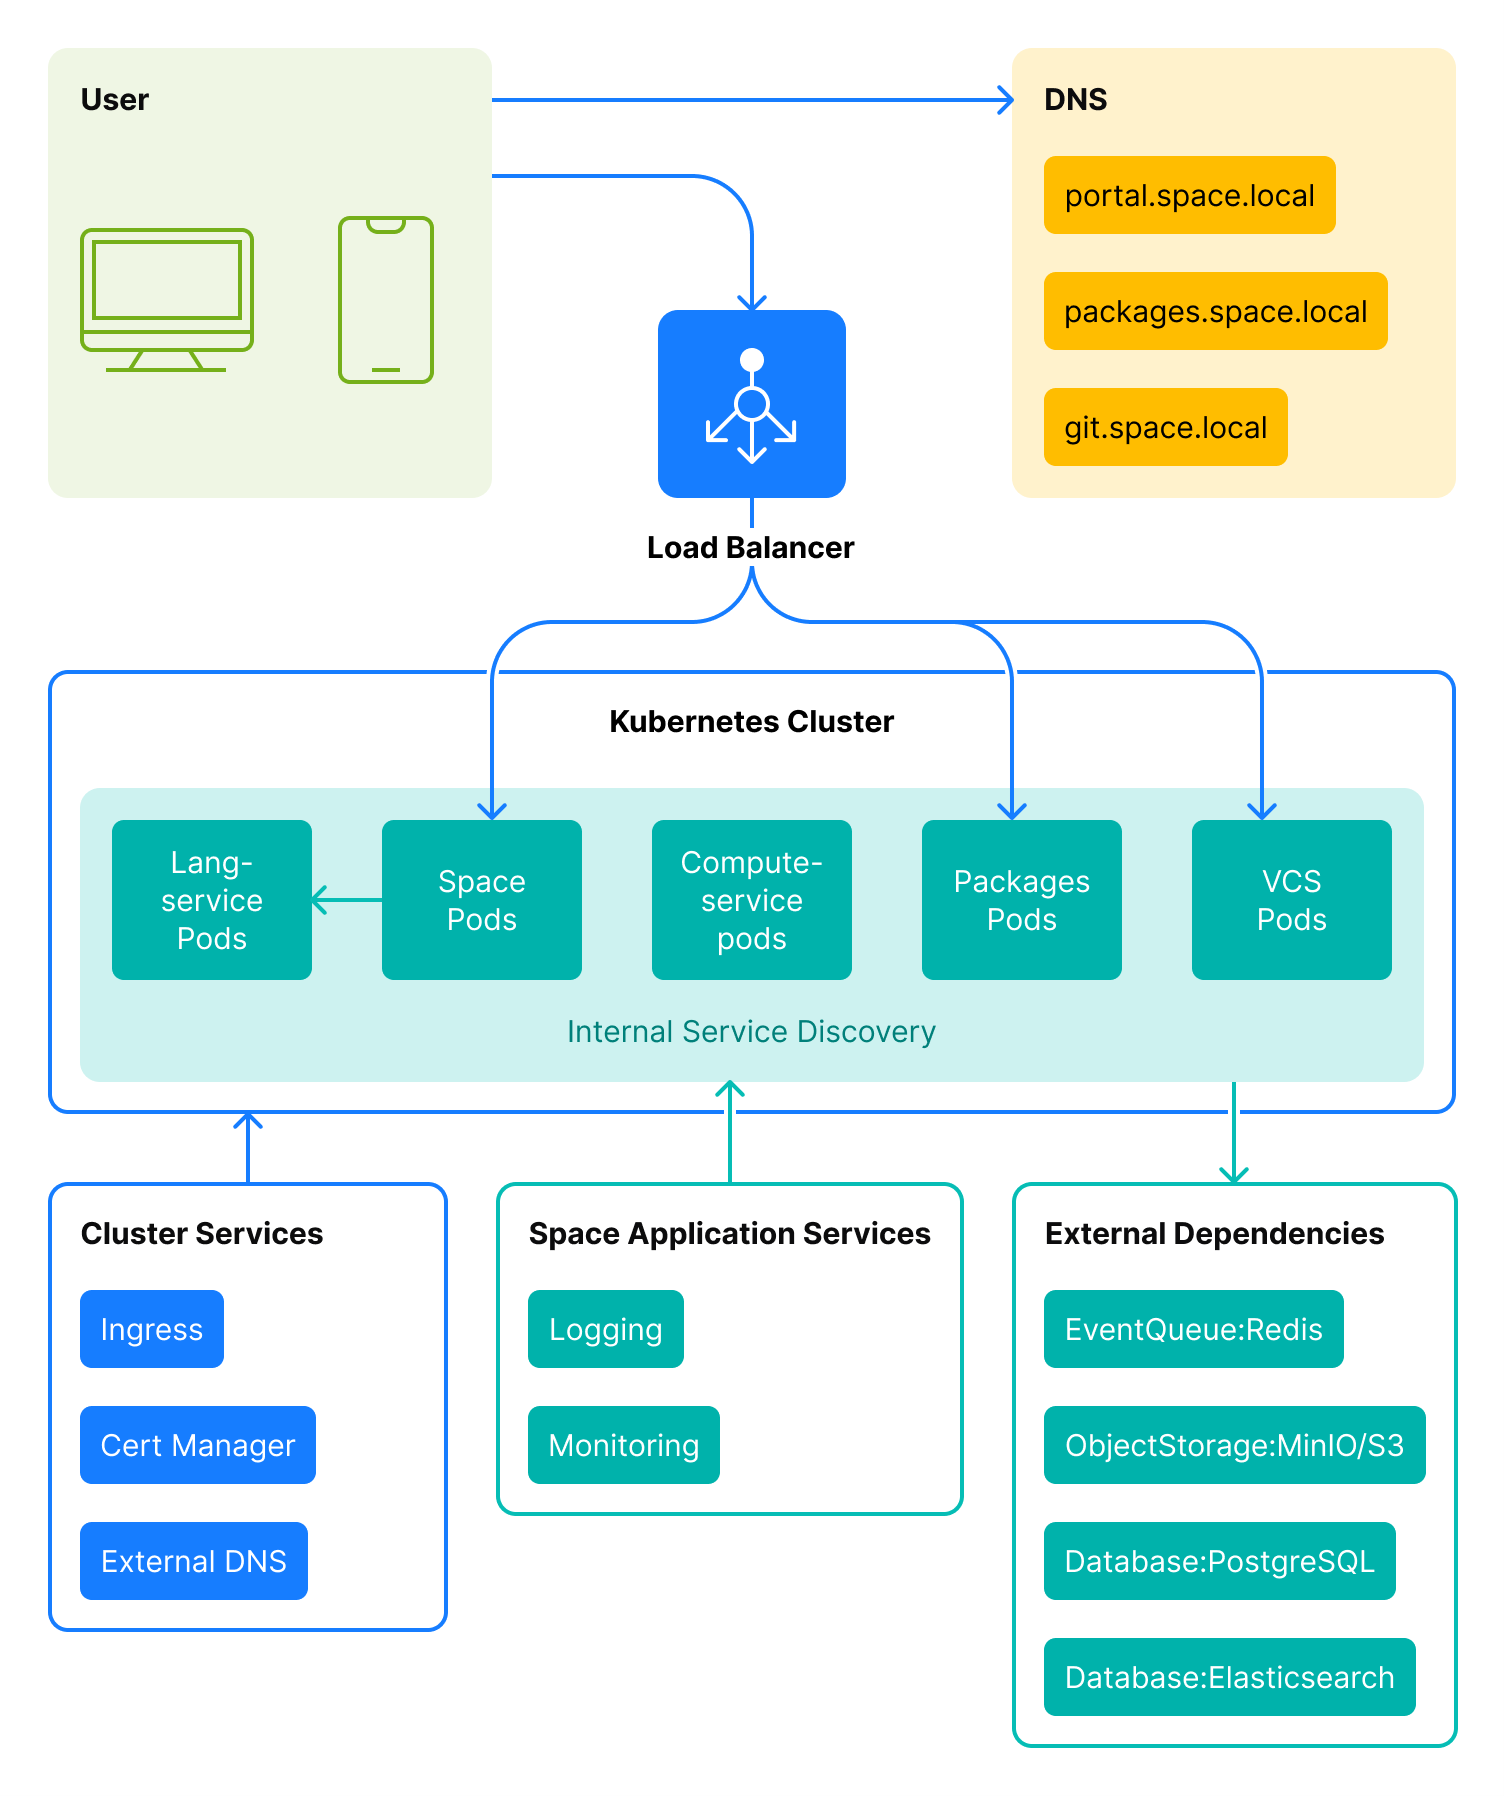
A Space On-Premises instance consists of the following components:
Cluster services:
Ingress controller – creates Space subdomains on demand.
External DNS – links the created subdomains with an external DNS.
Cert manager – issues domain certificates on demand.
Space application components:
Space application – provides all Space functionality including the user interface. Available to users via a public URL.
VCS – a Git server. Available to users via a public URL.
Compute-service – a service that allows running Space Automation workers in the Kubernetes cluster.
Packages – a Space package repository manager that lets users create various repositories, for example, container registries, NuGet feeds, Maven repositories, etc. Available to users via a public URL.
Lang-service – an internal component that provides code formatting services for the Space user interface. Not available to users.
Space application services is an optional component that typically includes logging and monitoring services. These services are not included in the Space On-Premises installation as most of the companies already have conventions about what services should be used to monitor applications on a cluster level.
Space external storage components is a data pool shared between all application components. The components can be configured in the way that provides data segregation and isolation: Each component doesn't share data with any other component. The storage components are added to a cluster with external links – they can be a part of the cluster or can be hosted externally to Space.
Redis – used as an event queue.
PostgreSQL – an SQL database that stores apllication data.
MinIO or another S3-compatible storage – an object storage.
Elasticsearch – a search database.
DNS
As mentioned above, a user client can access only three Space application components via public URLs: Space user interface, Space Packages, and VCS. This means a Space On-Premises instance requires a top-level domain name and three subdomains for the corresponding services. The URLs must be available to the clients. For example, if we suggest that your top-level domain is space.local:
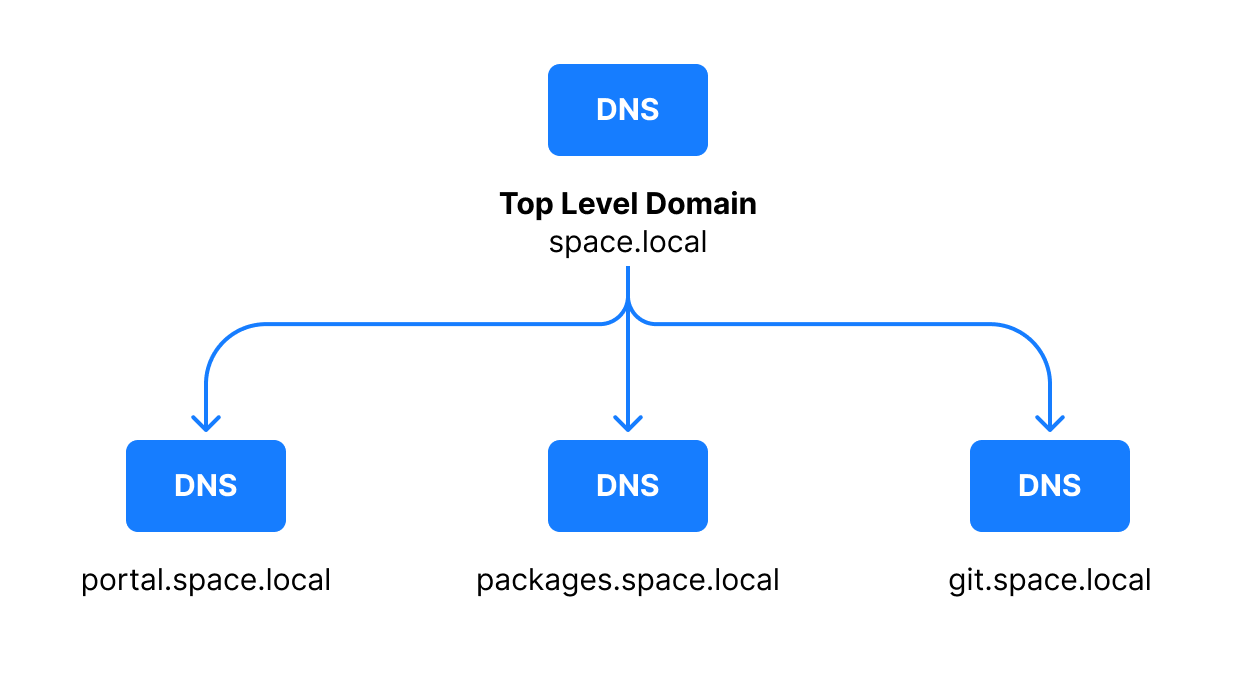
From the security perspective, you can either create a number of TLS certificates (one for each service) or create a shared (wildcard) certificate for all services.
Pod scheduling
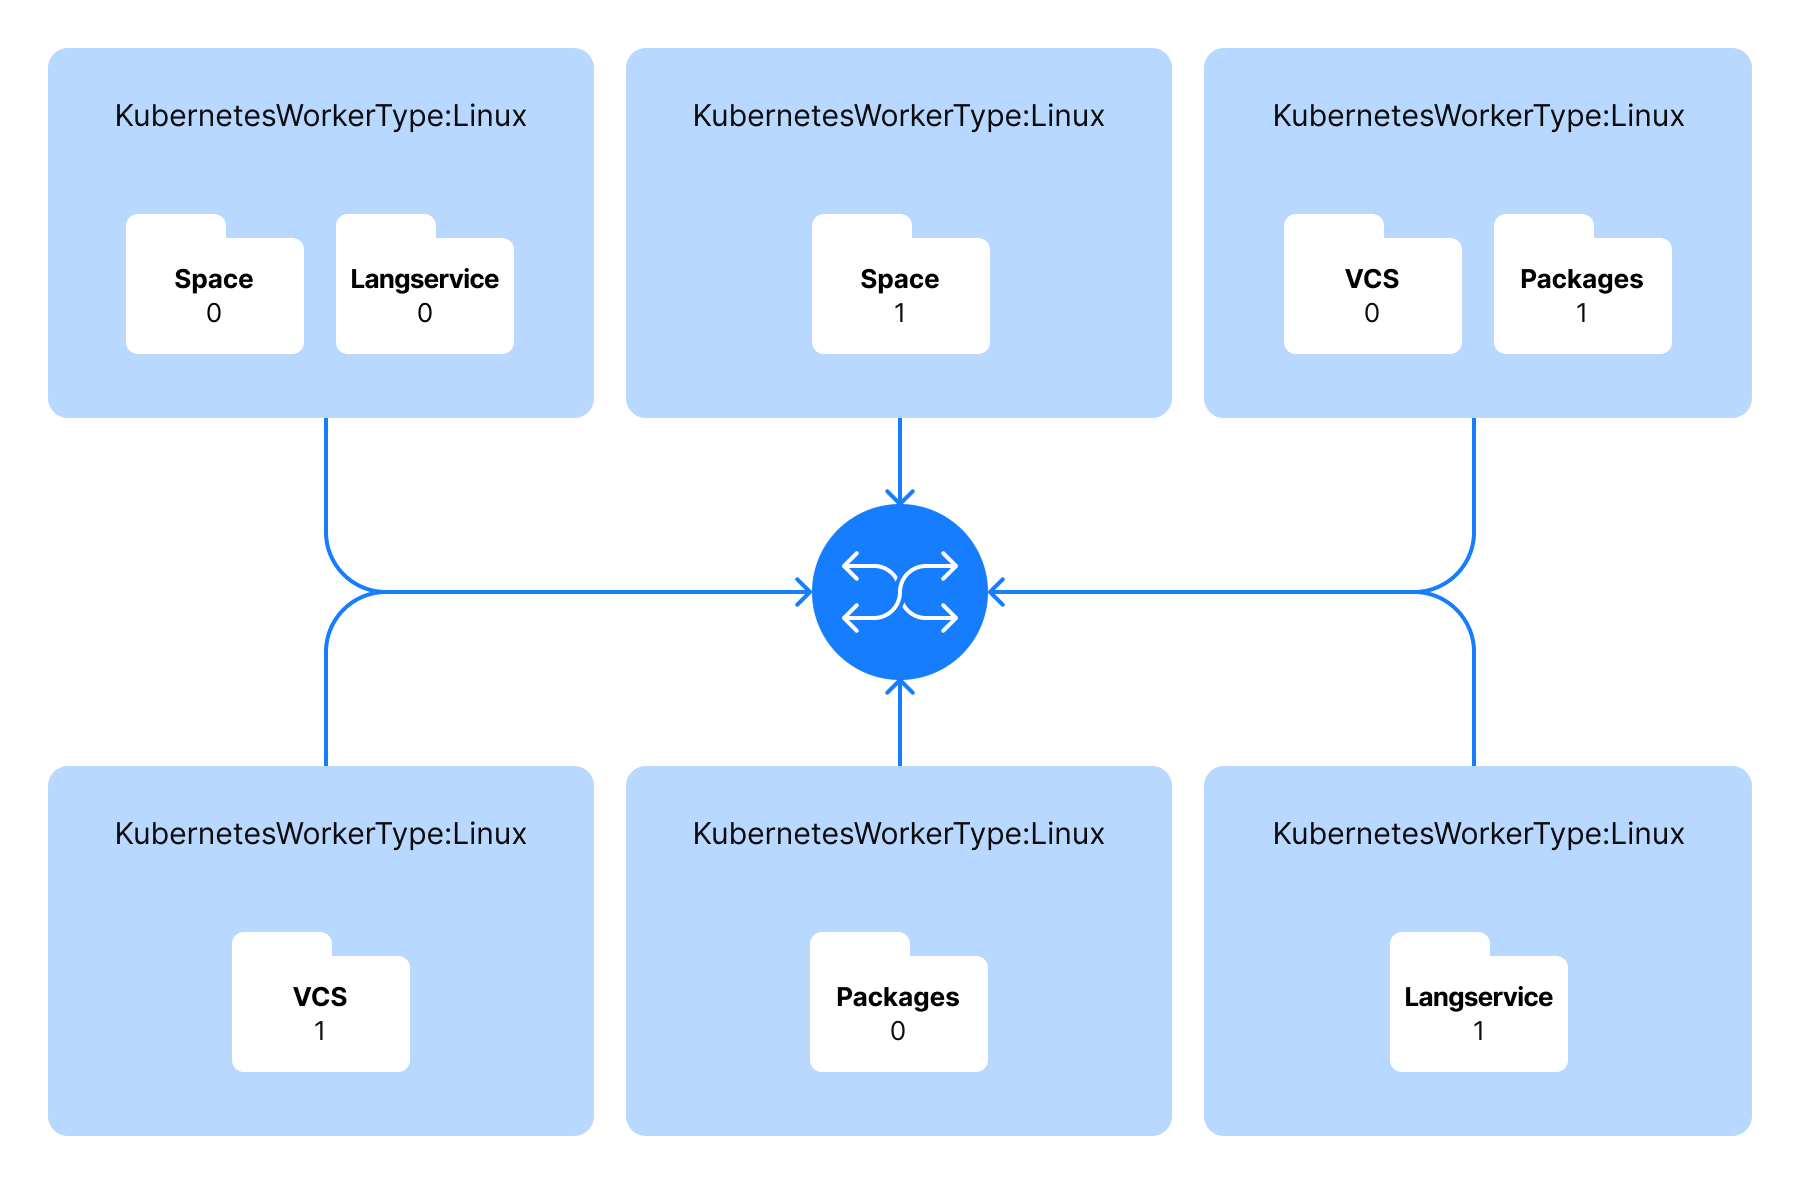
The scheduling policy implies that a worker can run only one pod with a particular Space application component. For example, if a worker runs a pod with Space Packages, Kubernetes Scheduler will not deploy one more Space Packages pod to this worker. But it can deploy a pod with another component to it, e.g. with a Git server.
For example, a runtime pod configuration may look like follows:
Application components. Space
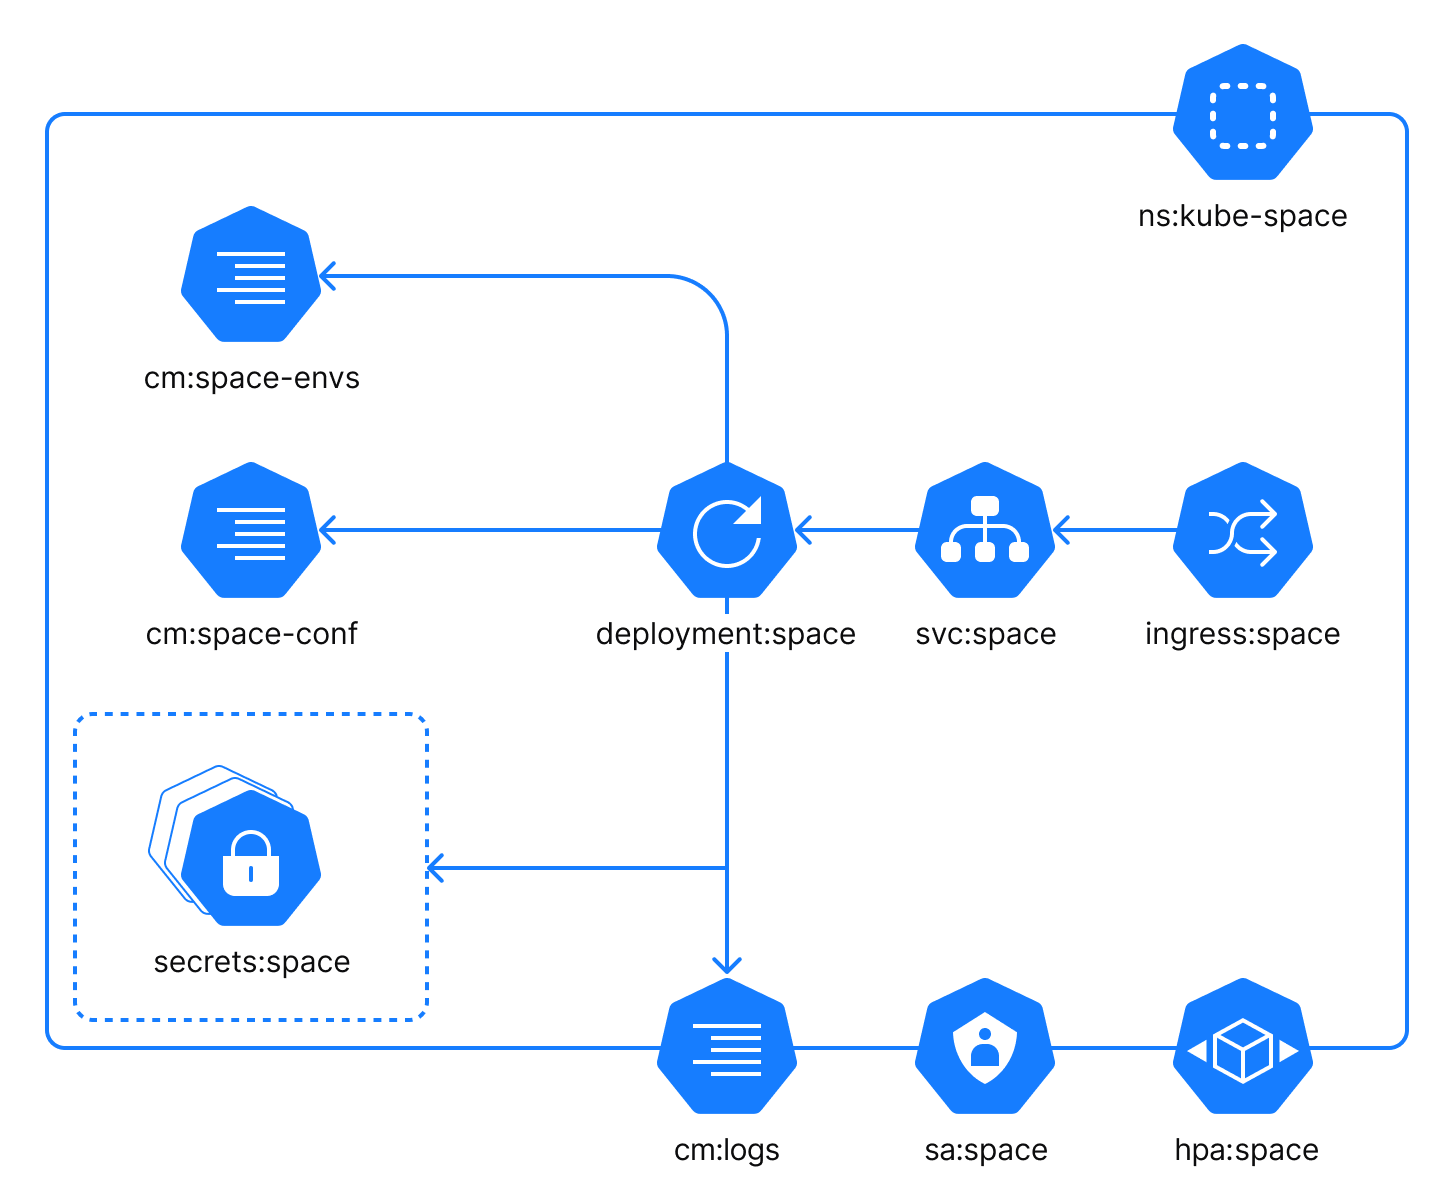
The Space application component provides the user interface and the main Space functionality. Within the cluster, the Space application is reachable as the internal service on the default port 9084 (adjustable).
The Space application component uses the following configuration files:
cm:space-envs: a ConfigMap with custom environment variables which can be injected into the process by a user.cm:space-conf: a ConfigMap with specific configuration settings for the process. It is local to this application.cm:logs: a ConfigMap with logging configuration. This ConfigMap is common for all application components.
In addition to the configuration files, you should use a number of secrets to configure the Space application component. The secrets:space is a group of configuration files that contain required application configuration specified as environment variables. Each secret represents a corresponding group in the values.yaml file:
space-automation-dsl
space-automation-logs
space-automation-worker
space-database
space-es-audit
space-es-metrics
space-es-search
space-eventbus
space-mail
space-main
space-oauth
space-organization
space-packages
space-recaptcha
space-s3
space-vcs
Optionally:
It is possible to configure the Horizontal Pod Autoscaler policy. To enable the policy, the Kubernetes Cluster Admin must configure an HPA Controller.
It is possible to configure a service account.
Application components. VCS
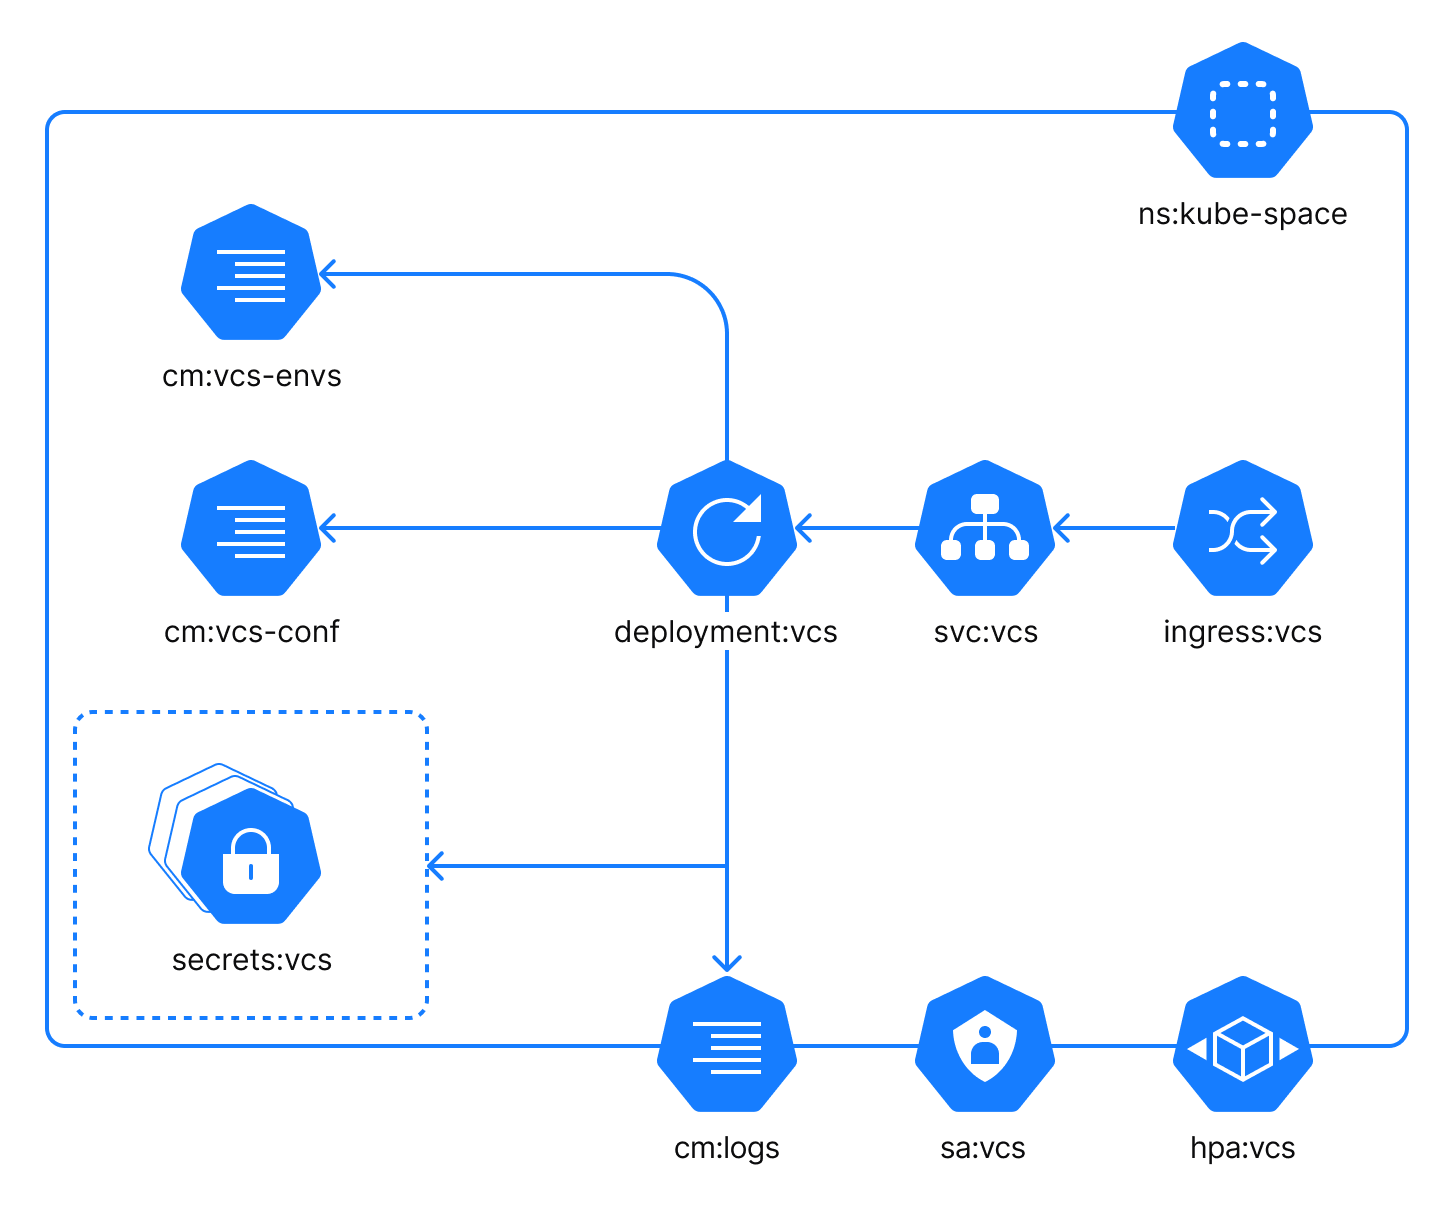
The VCS component lets users create Git repositories for their projects in Space. Within the cluster, the component is reachable as the internal service on the default port 19084 (adjustable).
The VCS component uses the following configuration files:
cm:vcs-envs: a ConfigMap with custom environment variables which can be injected into the process by a user.cm:vcs-conf: a ConfigMap with specific configuration settings for the process. It is local to this application.cm:logs: a ConfigMap with logging configuration. This ConfigMap is common for all application components.
In addition to the configuration files, you should use a number of secrets to configure the VCS component. The secrets:vcs is a group of configuration files that contain required application configuration specified as environment variables. Each secret represents a corresponding group in the values.yaml file:
vcs-database
vcs-eventbus
vcs-main
vcs-s3
Optionally:
It is possible to configure the Horizontal Pod Autoscaler policy. To enable the policy, the Kubernetes Cluster Admin must configure an HPA Controller.
It is possible to configure a service account.
Application components. Compute-service
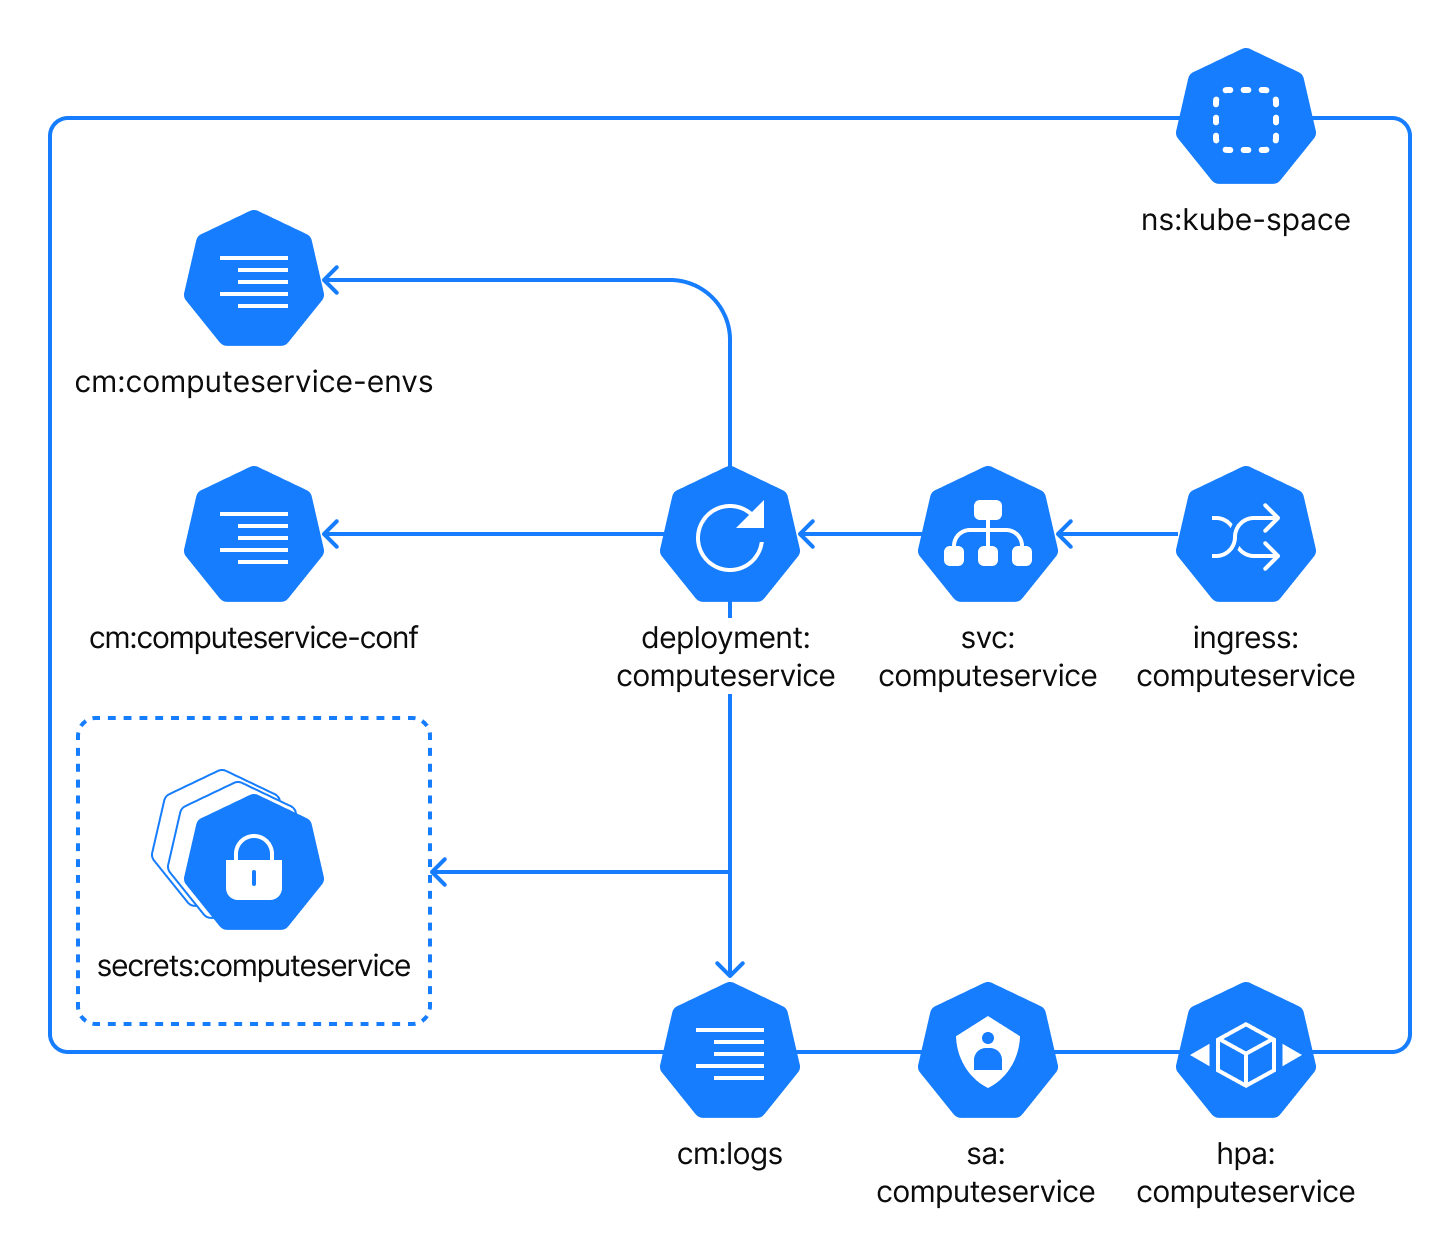
Compute-service manages Space Automation workers – machines that run Automation jobs. For example, the service creates a worker in the cluster on demand (to run a CI/CD job) and removes the worker once it's no longer needed. By default, Compute-service is disabled – the default Space On-Premises installation implies using self-hosted workers (machines hosted by Space users).
Within the cluster, the component is reachable as the internal service on the default port 8084 (adjustable).
The Compute-service component uses the following configuration files:
cm:computeservice-envs: a ConfigMap with custom environment variables which can be injected into the process by a user.cm:computeservice-conf: a ConfigMap with specific configuration settings for the process. It is local to this application.cm:logs: a ConfigMap with logging configuration. This ConfigMap is common for all application components.
In addition to the configuration files, you should use a number of secrets to configure the Compute-service component. The secrets:computeservice is a group of configuration files that contain required application configuration specified as environment variables.
Optionally:
It is possible to configure the Horizontal Pod Autoscaler policy. To enable the policy, the Kubernetes Cluster Admin must configure an HPA Controller.
It is possible to configure a service account.
Application components. Automation-jobs
Automation-jobs are Kubernetes jobs launched by the Compute-service.
Optionally:
It is possible to configure the Horizontal Node Autoscaler policy.
Application components. Packages
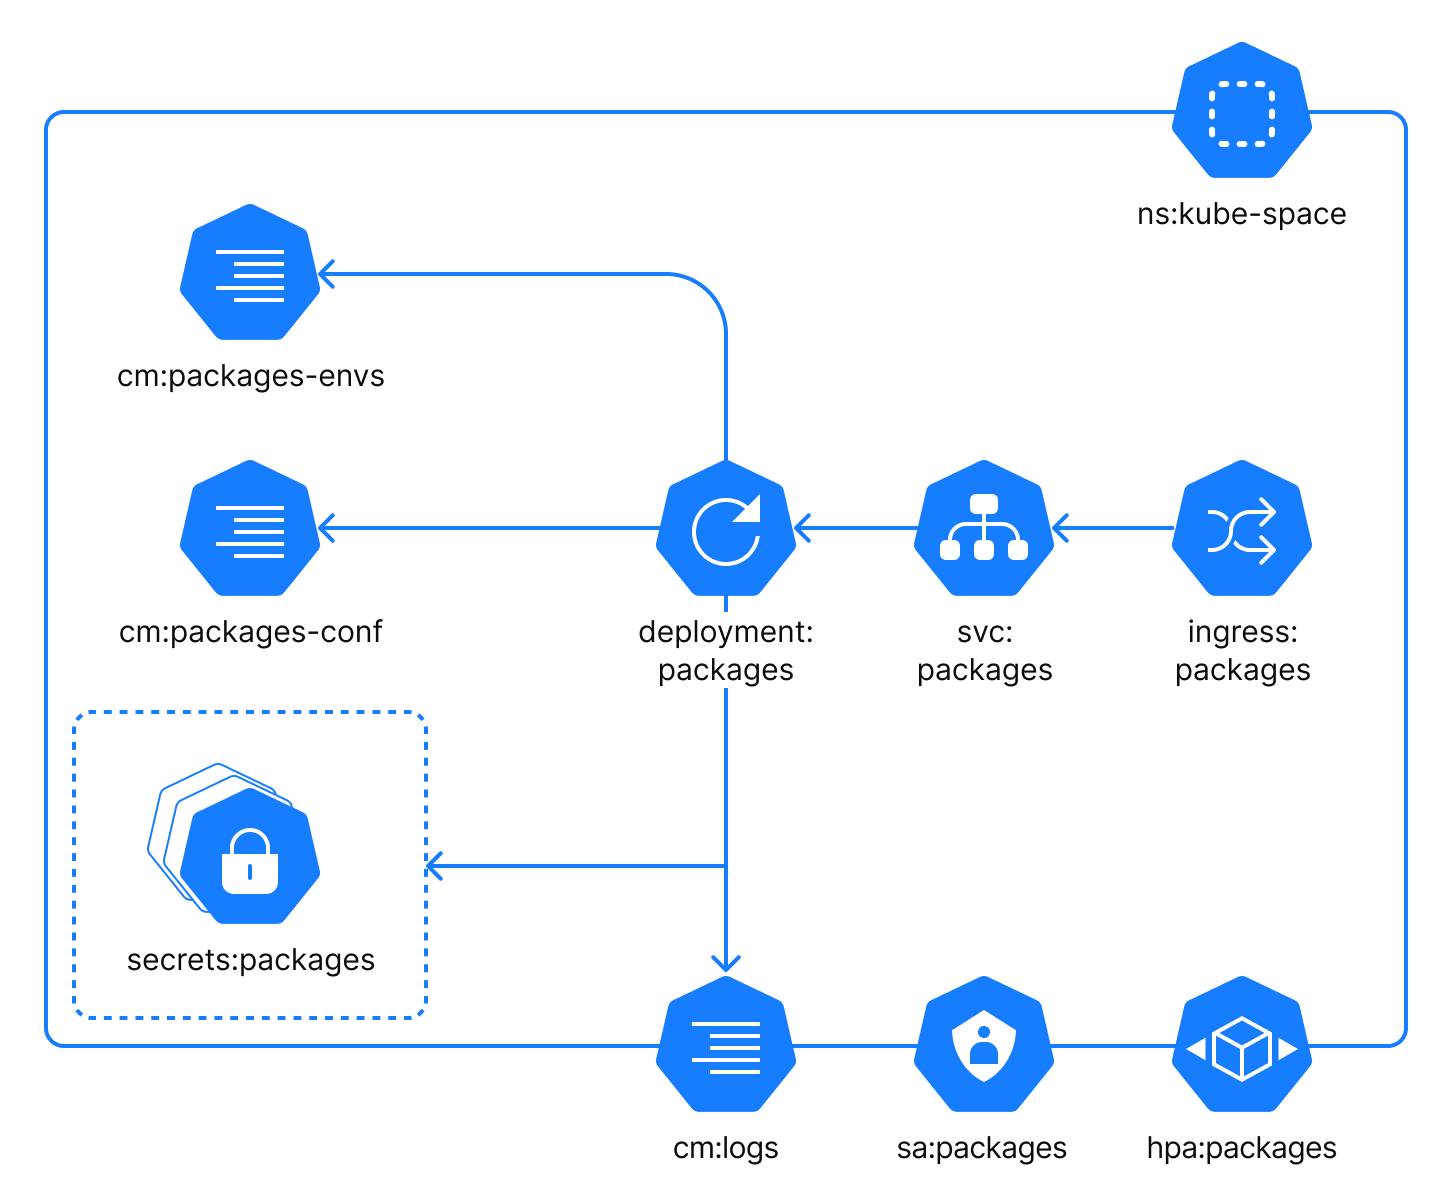
Space Packages is a package repository manager. Within the cluster, the component is reachable as the internal service on the default port 9390 (adjustable).
The Packages component uses the following configuration files:
cm:packages-envs: a ConfigMap with custom environment variables which can be injected into the process by a user.cm:packages-conf: a ConfigMap with specific configuration settings for the process. It is local to this application.cm:logs: a ConfigMap with logging configuration. This ConfigMap is common for all application components.
In addition to the configuration files, you should use a number of secrets to configure the Packages component. The secrets:packages is a group of configuration files that contain required application configuration specified as environment variables. Each secret represents a corresponding group in the values.yaml file:
packages-database
packages-es-search
packages-eventbus
packages-main
packages-oauth
packages-organization
packages-s3
packages-space
packages-oauth
Optionally:
It is possible to configure the Horizontal Pod Autoscaler policy. To enable the policy, the Kubernetes Cluster Admin must configure an HPA Controller.
It is possible to configure a service account.
Application components. Lang-service
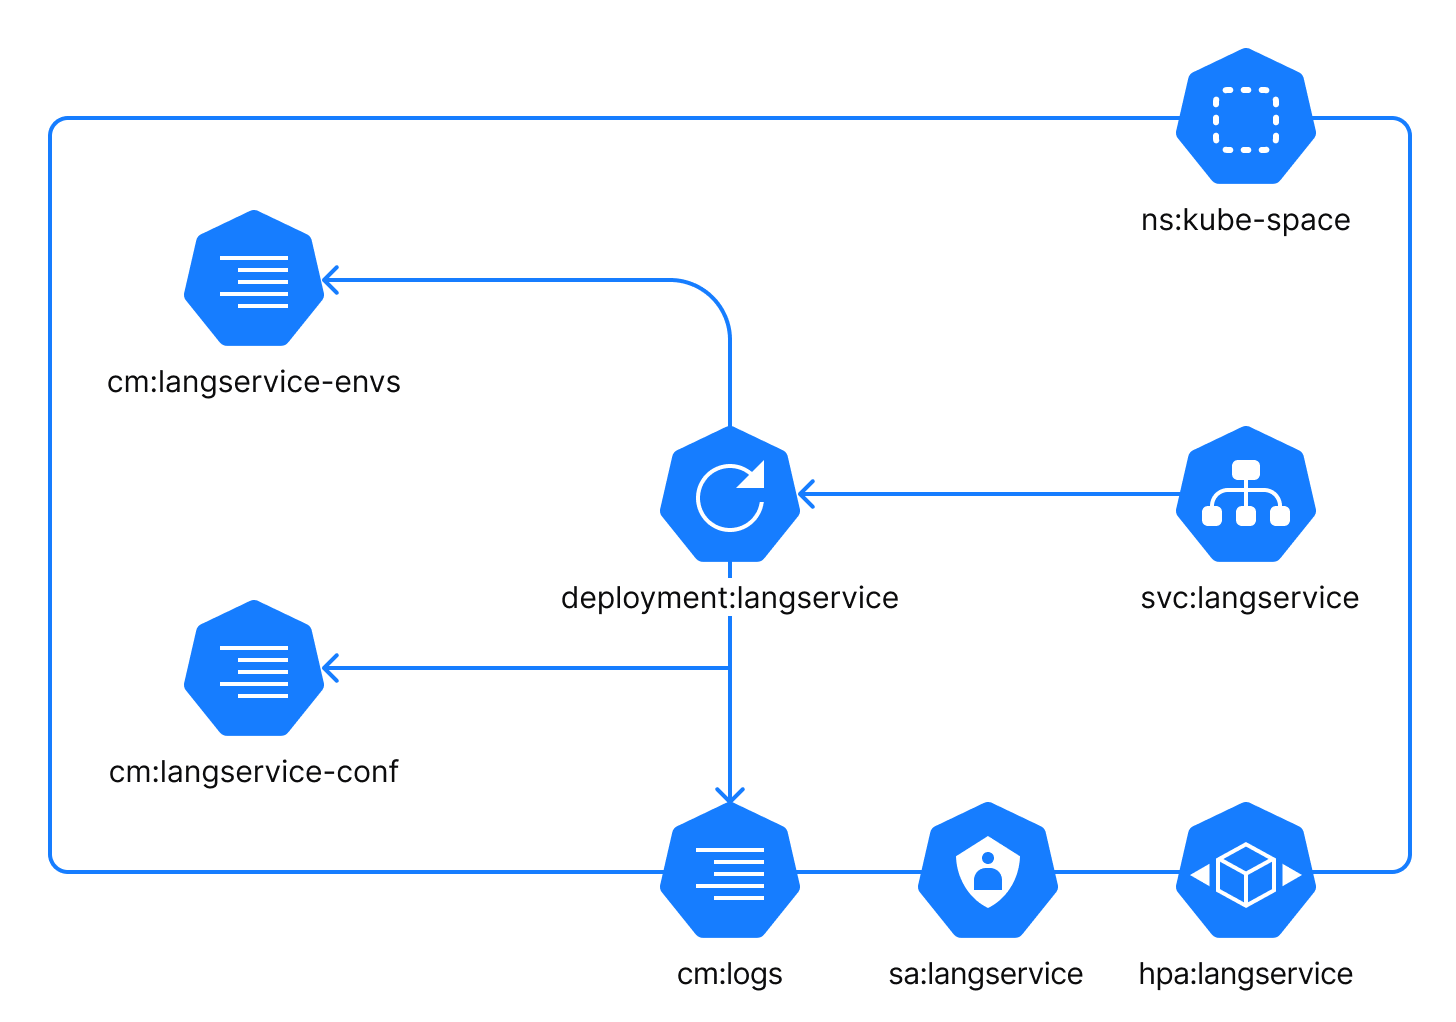
The Lang-service is an internal component that provides code formatting for the Space user interface. Within the cluster, the component is reachable as the internal service svc:langservice on the default port 8095 (adjustable).
The Lang-service component uses the following configuration files:
cm:langservice-envs: a ConfigMap with custom environment variables which can be injected into the process by a user.cm:langservice-conf: a ConfigMap with specific configuration settings for the process. It is local to this application.cm:logs: a ConfigMap with logging configuration. This ConfigMap is common for all application components.
Optionally:
It is possible to configure the Horizontal Pod Autoscaler policy. To enable the policy, the Kubernetes Cluster Admin must configure an HPA Controller.
It is possible to configure a service account.