Angular
Angular is a popular framework for building cross-platform applications. WebStorm provides support for Angular and helps you on every step of the development process – from creating a new Angular app and working on the components to debugging and testing it.
Creating a new Angular application
The recommended way to start building a new Angular application is Angular CLI, which WebStorm downloads and runs for you using npx. As a result, your application is bootstrapped with a ready to use TypeScript and Webpack configuration.
Of course, you can download Angular CLI yourself or create an empty WebStorm project and install Angular in it.
Select from the main menu or click Create New Project on the Welcome screen. The Create New Project Dialog opens.
In the left-hand pane, choose Angular CLI.
-
In the right-hand pane:
-
Specify the path to the folder where the project-related files will be stored.
-
In the Node Interpreter field, specify the Node.js interpreter to use. Select a configured interpreter from the list or choose Add to configure a new one.
-
From the Angular CLI list, select npx --package @angular/cli ng.
Alternatively, for npm version 5.1 and earlier, install the
@angular/clipackage yourself by runningnpm install -g @angular/cliin the Terminal Alt+F12. When creating an application, select the folder where the@angular/clipackage is stored. -
Optionally, in the Additional parameters field, specify the extra ng new options to pass to Angular CLI. Code completion is available in this field: as you start typing the name of an option or press Ctrl+Space, WebStorm shows you the available options and their description.
-
When you click Create, WebStorm generates an Angular-specific project with all the required configuration files and downloads all the newcessary dependencies.
To create an empty WebStorm project
Select from the main menu or click Create New Project on the Welcome screen. The Create New Project Dialog opens.
In the left-hand pane, choose Empty Project.
Specify the path to the folder where the project-related files will be stored.
When you click Create, WebStorm creates and opens an empty project.
To install Angular in an empty project
Open the empty project where you will use Angular.
-
In the embedded Terminal (Alt+F12), type:
npm install @angular/coreThat will install the core Angular package with the critical runtime parts of the framework.
You may also need to install other packages that are parts of Angular, see the list of packages.
Starting with an existing Angular application
To continue developing an existing Angular application, open it in WebStorm and download the required dependencies.
To open the application sources that are already on your machine
To check out the application sources from your version control
-
Click Check out from Version Control on the Welcome screen or select from the main menu.
-
Select your version control system from the list.
-
In the VCS-specific dialog that opens, type your credentials and the repository to check out the application sources from.
To download the dependencies
Click Run 'npm install' in the popup: 
Running and debugging an Angular application
Also, for applications created with Angular CLI WebStorm generates two run/debug configurations with default settings:
An npm configuration with the default name Angular CLI Server. This configuration runs the
ng servecommand that launches the development server and starts your application in the development mode.A JavaScript Debug configuration with the default name Angular Application. This configuration launches a debugging session.
To run an Angular application
-
For Angular CLI applications, select the Angular CLI Server run configuration from the list on the toolbar and click
 next to the list.
 Alternatively, run
npm startin the Terminal Alt+F12 or double-click thestarttask in the npm tool window (). Wait till the application is compiled and the Webpack development server is ready. Open your browser at http://localhost:4200/ to view the application.

When the development server is running, your application is automatically reloaded as soon as you change any of the source files and save the updates.
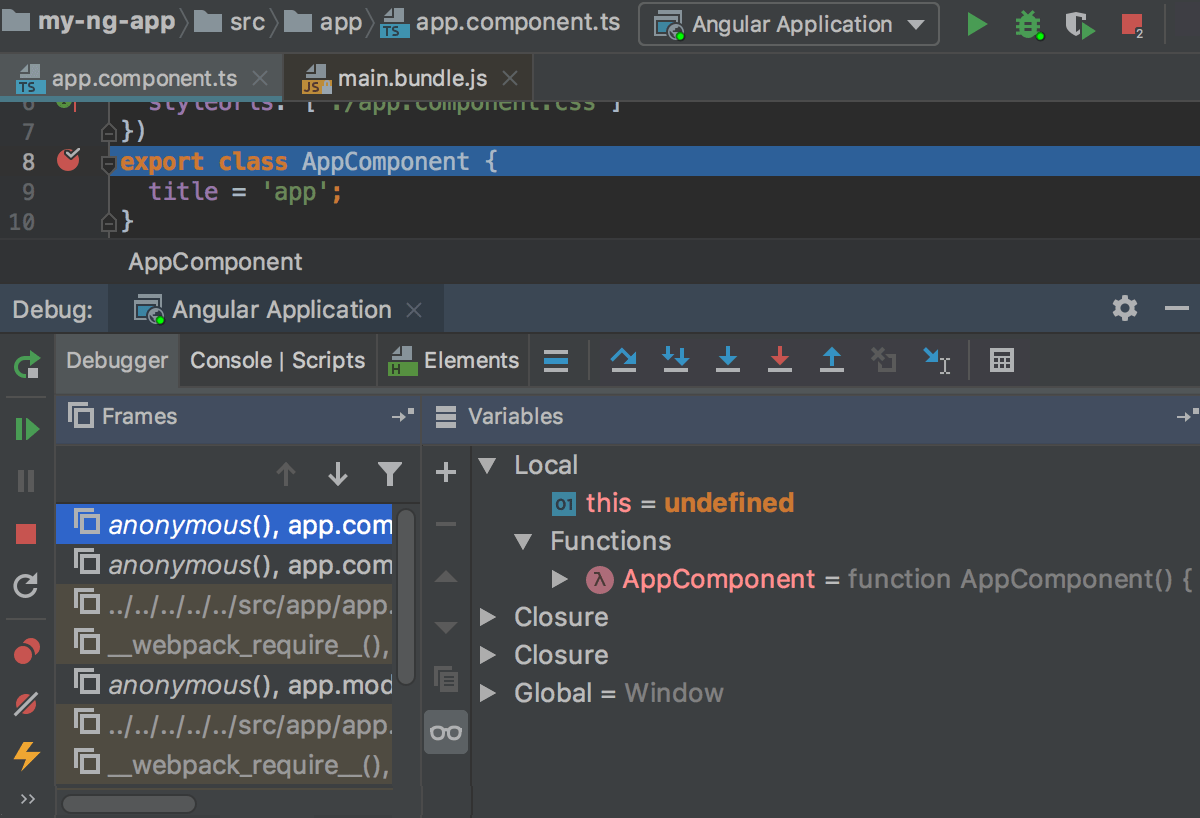
To debug an Angular application
Set the breakpoints in your code.
Start the application in the development mode as described above and wait till the application is compiled and the Webpack development server is ready.
-
To view the application, open your browser at the URL that is shown in the Run tool window, by default it is http://localhost:4200/.

If you are using another port or your application was not created with Angular CLI, copy the URL address at which your application is actually running, you will later specify this URL in a debug configuration.
-
If you created your application with Angular CLI and it is running on the default port
4200, WebStorm generates a default Angular Application configuration.Otherwise, create a new JavaScript debug configuration: go to , click
 , and select JavaScript Debug from the list. In the Run/Debug Configuration: JavaScript Debug dialog, paste the saved URL in the URL field and save the configuration.
 From the list of configurations, select the autogenerated Angular Application configuration or your newly created custom one and start a debugging session by clicking
 next to the list.
 When the first breakpoint is hit, switch to the Debug Tool Window and proceed as usual: step through the program, stop and resume program execution, examine it when suspended, explore the call stack and variables, set watches, evaluate variables, view actual HTML DOM, and so on.
Navigating through an Angular application
You can also download the Angular CLI QuickSwitch plugin and install it on your computer.
Yet another way is the Related Symbol popup.
-
In an Angular component file, press Ctrl+Alt+Home. WebStorm shows a Related Symbol popup with a list of related files. In a TypeScript component file, the popup also lists all the symbols that were imported into this file.

-
To open a file, select it and press Enter. Alternatively, use the numbers associated with each file type:
The TypeScript file with the component class
Template
Tests
Styles
Adding new features to an Angular application using ng add
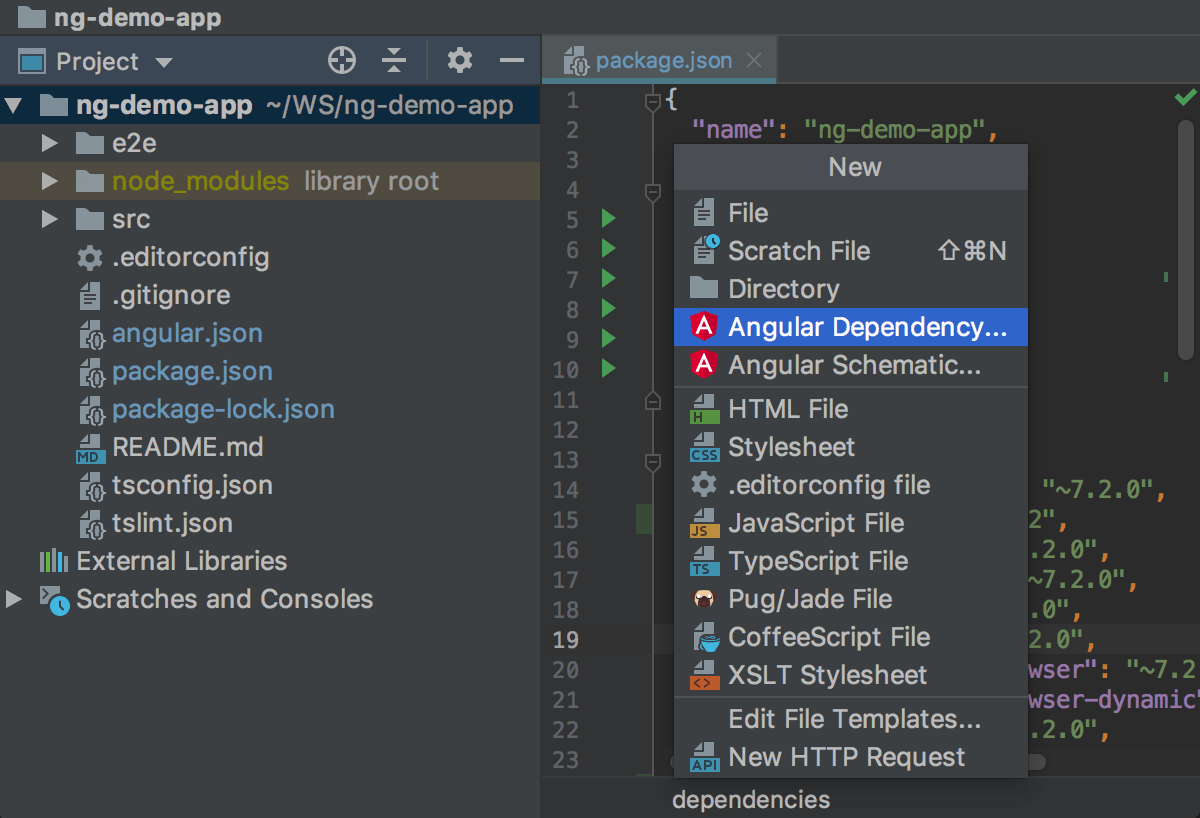
In projects that use Angular CLI 6 or later, you can use the Angular Dependency action to add new libraries. This action runs the ng add command which installs the dependency and updates the app with a special installation script. Note that not all libraries support installation with ng add.
Select from the main menu or press Alt+Insert in the Project tool window, and then select Angular Dependency.
-
From the list, select the library to add. The list shows the libraries that can be definitely installed with
ng add. To install a package that is not on the list, scroll to its end and double-click the Install package not listed above link, then specify the package name in the dialog that opens.The example below illustrates adding Angular Material to a project.
If you manage dependencies manually through your package.json, WebStorm still recognizes packages that support ng add. When you add such package to package.json, WebStorm suggests installing it with ng add.

If such dependency is already installed, you may still want to reinstall it with ng add. In the package.json file, select the name of the package, press Alt+Enter, and click Reinstall with ng add.

Generating code with Angular Schematics
In Angular CLI 6 projects, WebStorm can generate code using both schematics defined in libraries like @angular/material and those defined in Angular CLI itself. For earlier versions, WebStorm generates only components, services, and other blueprints defined in Angular CLI.
Select from the main menu or press Alt+Insert in the Project tool window, and then select Angular Schematic.
From the list, select the relevant schematic.

In the dialog that opens, specify the name of the schematic to be generated and additional options, if necessary. WebStorm shows the description of the schematic and provides code completion and description for available options.

Inspecting Angular application code
WebStorm brings a number of Angular-specific inspections that help you find errors as you edit your code and suggest quick-fixes for them.
In the example below, both a template and a templateUrl properties are used. WebStorm detects the error, warns you about it, and suggests a quick-fix.

Another example shows how WebStorm warns you about incorrect use of the *ngIf and *ngFor structural directives.

To see the list of Angular-specific inspections and configure them
-
Expand the Angular node.
Configure inspection profiles and severity, disable and suppress predefined inspections, and create custom ones as described in Code inspections.
Using Angular Material Design components
WebStorm recognizes Angular Material components and attributes and provides coding assistance for them:
Completion for components

Completion for attributes

Navigation between a component or an attribute and its declaration (press Ctrl+B or select from the context menu).
To install Angular Material
-
In the embedded Terminal (Alt+F12), type:
npm install --save @angular/materialFor details, see Getting Started on the Angular Material official website.
-
In Angular CLI 6 projects, install Angular Material using Angular Schematic as described above.
Configuring syntax highlighting
You can configure Angular-aware syntax highlighting according to your preferences and habits.
Select the color scheme, accept the highlighting settings inherited from defaults or customize them as described in Configuring Colors and Fonts.