Terminal
WebStorm includes an embedded terminal emulator for working with your command-line shell from inside the IDE. Use it to run Git commands, set file permissions, and perform other command-line tasks without switching to a dedicated terminal application.
Initially, the terminal emulator runs with your default system shell, but it supports many other shells such as Windows PowerShell, Command Prompt cmd.exe, sh, bash, zsh, csh, and so on. For information about changing the shell, see Configure the terminal emulator.
Open the Terminal tool window
Select from the main menu or press Alt+F12.
By default, the terminal emulator runs with the current directory set to the root directory of the current project. You can change the default start directory in .
Alternatively, you can right-click any file (for example, in the Project tool window or any open tab) and select Open in Terminal from the context menu to open the Terminal tool window with a new session in the directory of that file.
Start a new session
Click
 on the toolbar to start a new session in a separate tab.
To run multiple sessions inside a tab, right-click the tab and select Split Vertically or Split Horizontally in the context menu.
The Terminal saves tabs and sessions when you close the project or WebStorm. It preserves tab names, the current working directory, and even the shell history.
To close a tab, click ![]() on the Terminal toolbar or right-click the tab and select Close Tab from the context menu.
on the Terminal toolbar or right-click the tab and select Close Tab from the context menu.
Press Alt+Right and Alt+Left to switch between active tabs. Alternatively, you can press Alt+Down to see the list of all terminal tabs.
To rename a tab, right-click the tab and select Rename Session from the context menu.
To search for a certain string in a Terminal session, press Ctrl+F. This searches all text in the session: the prompt, commands, and output.
Configure the terminal emulator
Press Ctrl+Alt+S to open IDE settings and select Tools | Terminal.
Specify the desired shell to use with the embedded terminal emulator, change the start directory, and define environment variables among other settings.
WebStorm should automatically detect the default shell based on your environment. Here are some of the possible shells you might consider:
Bash:
/bin/bashZ shell:
/bin/zshBash for Windows:
bash.exeWSL:
wsl.exePowerShell:
powershellCommand Prompt:
cmd.exeCygwin:
"C:\cygwin\bin\bash.exe" --login -i
The embedded terminal emulator also inherits the following IDE settings:
On the Keymap page, you can configure the copy Ctrl+C and paste Ctrl+V shortcuts.
On the Editor | General | Appearance page, you can configure blinking frequency for the caret. The Terminal does not inherit the Use block caret option because it always renders the caret as a block.
On the Editor | Color Scheme | Console Font page, you can configure line spacing and fonts.
On the Editor | Color Scheme | Console Colors page, you can configure font colors.
On the Editor | Color Scheme | General page, you can configure the selection foreground and background colors.
Configure Terminal in WSL
To run Terminal in WSL configuration, open project Settings/Preference (Ctrl+Alt+S) and go to .
Type
wsl.exein the Shell path field and click Ok.
Switch to the Terminal tool window and type any command to inspect the output.

Run IDE features from the terminal
Instead of running a specific command in the integrated terminal and reading console output, you can use the relevant IDE feature, like a tool window or a dialog that implements this functionality. For example, you can launch an npm, yarn, gulp, or grunt command from the Terminal tool window and view its output in the Run or Debug tool window.
Another example is the Difference Viewer, which actually runs the diff command in the system shell to produce results, or the Log tab in the Git tool window, which is based on the output of the git log command.
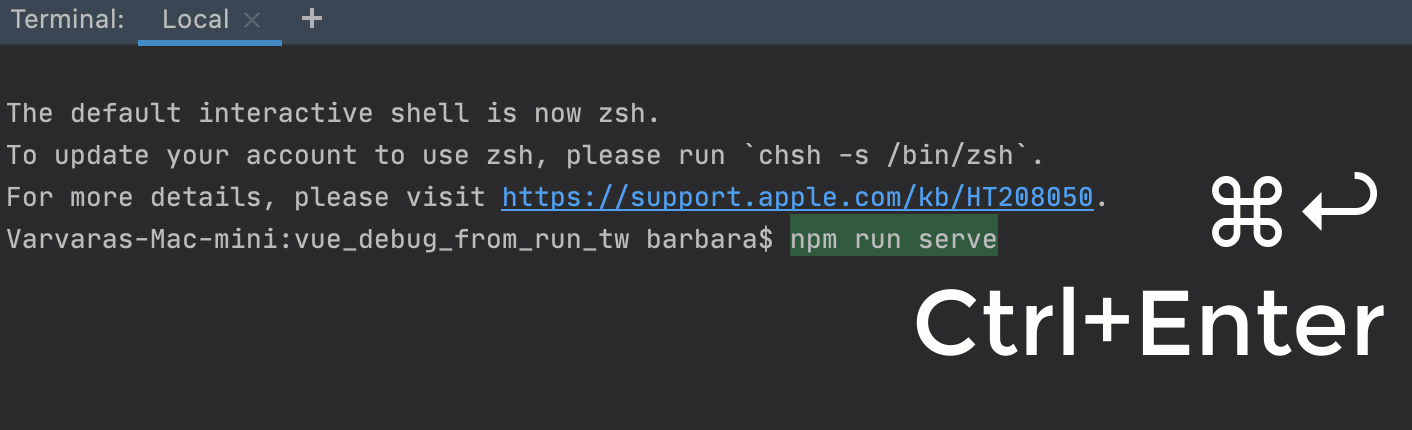
Run a command in the Run or Debug tool window from the terminal
Type a supported command (
npm run serve) in the terminal and notice how it gets highlighted.
Instead of pressing Enter, which runs the command in the terminal, press Ctrl+Enter to open the corresponding GUI element. In this example, it will open the Run tool window with the output of the
npm servecommand.
To run the command in the Debug tool window, press Ctrl+Shift+Enter.
You can run most of the commands recognized by Run Anything in the Run or Debug tool window.
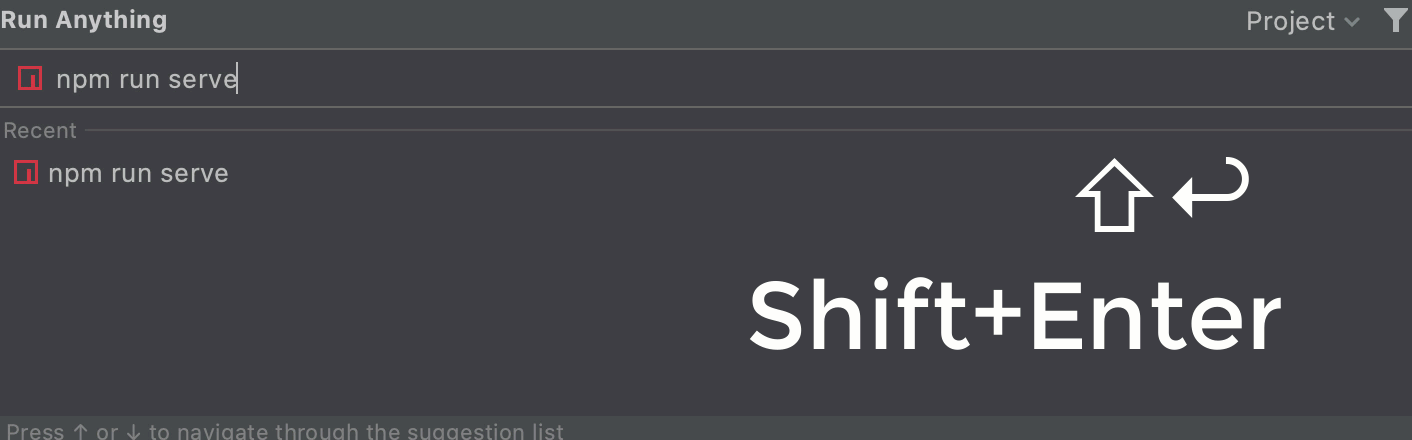
Run a WebStorm command from the Run Anything popup
Open the Run Anything popup by pressing Ctrl twice.
Start typing a command, for example,
npm run serve.Select the command from the list and press Ctrl+Enter to show its output in the Run tool window or Shift+Enter to show the output in the Debug tool window.
Disable running WebStorm commands from the Terminal
Click
 on the title bar of the Terminal tool window and clear the Run Commands using IDE option.
Alternatively, open the Settings/Preferences dialog Ctrl+Alt+S, go to , and clear the Run Commands using IDE checkbox.