# Reuse pieces of content
> For the complete documentation index, see [llms.txt](https://www.jetbrains.com/help/writerside/llms.txt).
To avoid writing the same content in different places, you can reuse any element by including it anywhere you need. Good candidates for content reuse are repeating notes and warnings, common instructions and references.
By reusing these elements, you ensure consistent wording and a single source for updating it everywhere.
Procedure: Reuse single elements
1. Add the `id` attribute to any element, for example, a warning:
Semantic markup:
```XML
This version support ended on January 14, 2022.
Download the latest version.
```
Markdown:
```PLAINTEXT
> This version support ended on January 14, 2022.
> Download the latest version.
>
{style="warning" id="generic-warning"}
```
2. Insert it anywhere using the [<include>](semantic-markup-reference.html#include) element:
```XML
```
Procedure: Reuse fragments with multiple elements
1. Surround the elements with [<snippet>](semantic-markup-reference.html#snippet) and assign a unique value for the `id` attribute:
Semantic markup:
```XML
Make sure you are logged in the account.
 ```
Markdown:
```PLAINTEXT
Make sure you are logged in the account.
 {border-effect="line" width="436"}
```
> **Warning:**
> Markdown relies on blank lines to separate paragraphs from other elements. Put a blank line after the opening tag and before the closing tag.
2. Insert it anywhere using the [<include>](semantic-markup-reference.html#include) element:
```XML
```
## Snippet libraries
Although you can reuse any element with an ID from one topic in another topic, it is better to store all reusable snippets in a dedicated library topic.
A library topic is a topic with the `is-library="true"` attribute and designated by a dedicated icon in the form of two angle brackets `<>`. Do not include it in any [instance](instances.html) and do not build it.
Semantic markup:
```XML
This version support ended on January 14, 2022.
Download the latest version.
```
Markdown:
```PLAINTEXT
Make sure you are logged in the account.
 {border-effect="line" width="436"}
```
> **Warning:**
> Markdown relies on blank lines to separate paragraphs from other elements. Put a blank line after the opening tag and before the closing tag.
2. Insert it anywhere using the [<include>](semantic-markup-reference.html#include) element:
```XML
```
## Snippet libraries
Although you can reuse any element with an ID from one topic in another topic, it is better to store all reusable snippets in a dedicated library topic.
A library topic is a topic with the `is-library="true"` attribute and designated by a dedicated icon in the form of two angle brackets `<>`. Do not include it in any [instance](instances.html) and do not build it.
Semantic markup:
```XML
This version support ended on January 14, 2022.
Download the latest version.
Make sure you are logged in the account.
```
Markdown:
```PLAINTEXT
---
is-library: true
title: Library
---
> This version support ended on January 14, 2022.
> Download the latest version.
>
{style="warning"}
Make sure you are logged in the account.
 {border-effect="line" width="436"}
```
> **Warning:**
> Markdown relies on blank lines to separate paragraphs from other elements. Put a blank line after the opening tag and before the closing tag.
### Manage libraries
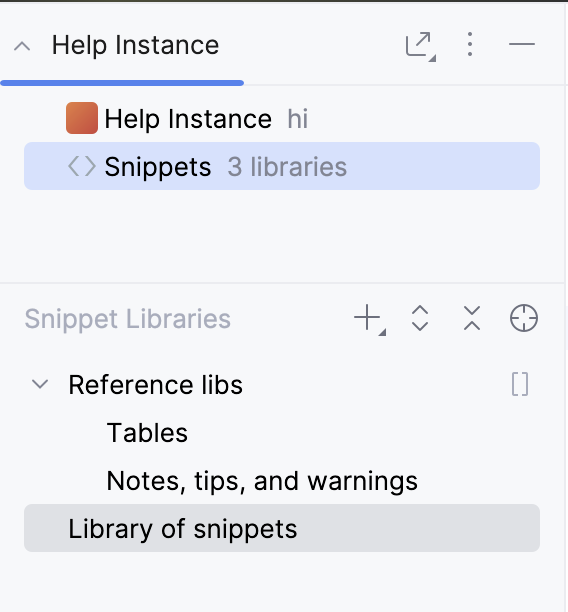
In the Writerside tool window, besides [instances](instances.html), there is a Snippets node for managing snippet libraries. Select this node to view the Snippet Libraries pane. You can create new libraries and add existing library topics to this pane.
Select multiple libraries, right-click and then click Group to group libraries that are often used together or cover the same subsystem of your documentation.
> **Note:**
> If you have more than one [module](help-modules.html), each module will have a separate Snippets node.
Procedure: Rename library
Like regular topics, snippet libraries have a title and filename. For example, the `Tables` library on the screenshot above can have a filename `tables-lib.topic`. If present, the Snippet Libraries pane will show the title. Otherwise, it will show the filename.
1. Right-click a library and select Rename.
2. In the Rename dialog, specify the title and filename, then click OK.
Procedure: Delete library
1. Right-click a library and select Delete.
2. In the Delete dialog, select whether you want to automatically delete usages. This will remove [<include>](semantic-markup-reference.html#include) elements that reference any snippets from the library you are deleting.
3. If necessary, you can click Review Usages to see all affected includes before deleting the usages.
4. Click Delete to delete the library file.
Procedure: Move snippet
You can move a snippet from an ordinary topic to a library using the Move Snippet action.
1. Place the caret on the [<snippet>](semantic-markup-reference.html#snippet) element you want to move.
2. From the main menu, select `Refactor | Move Snippet`.
3. In the Move Snippet dialog, select the target library topic file and click OK.
Procedure: Navigate to declaration
* If you want to edit the source of the [<include>](semantic-markup-reference.html#include) , `Ctrl+Click` (Windows), `⌘ Click` (macOS), `Ctrl+Click` (IntelliJ IDEA Classic (macOS)), `Ctrl+Click` (macOS System Shortcuts), `Ctrl+Click` (XWin), `Ctrl+Click` (GNOME), `Ctrl+Click` (KDE), `Ctrl+Click` (Emacs), `Ctrl+Click` (Sublime Text), `Ctrl+Click` (Sublime Text (macOS)), `Ctrl+Click` (NetBeans), `Ctrl+Click` (Visual Studio), `Ctrl+Click` (Visual Studio (macOS)), `Ctrl+Click` (Eclipse), `Ctrl+Click` (Eclipse (macOS)) the [element-id](semantic-markup-reference.html#include_element-id) attribute value to navigate to this element.
Alternatively, press `Ctrl+B` (Windows), `⌘ B` (macOS), `⌘ B` (IntelliJ IDEA Classic (macOS)), `⌘ B` (macOS System Shortcuts), `Ctrl+B` (XWin), `Ctrl+B` (GNOME), `Ctrl+B` (KDE), `Ctrl+Alt+G` (Emacs), `F12` (Sublime Text), `F12` (Sublime Text (macOS)), `Ctrl+B` (NetBeans), `F12` (Visual Studio), `F12` (Visual Studio (macOS)), `F3` (Eclipse), `F3` (Eclipse (macOS)) with the caret on the [element-id](semantic-markup-reference.html#include_element-id) attribute value.
Procedure: Find usages
* If you want to see where a [<snippet>](semantic-markup-reference.html#snippet) or any other element is included, `Ctrl+Click` (Windows), `⌘ Click` (macOS), `Ctrl+Click` (IntelliJ IDEA Classic (macOS)), `Ctrl+Click` (macOS System Shortcuts), `Ctrl+Click` (XWin), `Ctrl+Click` (GNOME), `Ctrl+Click` (KDE), `Ctrl+Click` (Emacs), `Ctrl+Click` (Sublime Text), `Ctrl+Click` (Sublime Text (macOS)), `Ctrl+Click` (NetBeans), `Ctrl+Click` (Visual Studio), `Ctrl+Click` (Visual Studio (macOS)), `Ctrl+Click` (Eclipse), `Ctrl+Click` (Eclipse (macOS)) the `id` attribute value of the element.
Alternatively, press `Ctrl+B` (Windows), `⌘ B` (macOS), `⌘ B` (IntelliJ IDEA Classic (macOS)), `⌘ B` (macOS System Shortcuts), `Ctrl+B` (XWin), `Ctrl+B` (GNOME), `Ctrl+B` (KDE), `Ctrl+Alt+G` (Emacs), `F12` (Sublime Text), `F12` (Sublime Text (macOS)), `Ctrl+B` (NetBeans), `F12` (Visual Studio), `F12` (Visual Studio (macOS)), `F3` (Eclipse), `F3` (Eclipse (macOS)) with the caret on the `id` attribute value.
## Filters and variables
Use filters to include only certain parts of the snippet. For more information, see [Conditional content](conditional-content.html).
If there are variables defined in the snippet, set their values as child elements of the [<include>](semantic-markup-reference.html#include) element. For more information, see [Variables in snippets](variables.html#vars-in-snippets).