Helpdesk Tutorial
A helpdesk project in YouTrack lets you support external customers, maintain a service desk for internal users, or assist people inside and outside your organization.
This tutorial provides step-by-step instructions for configuring all the features that are available for use in helpdesk projects. Some of these features are optional, so you can decide how much time and effort you want to invest in setting up your helpdesk. You can also use this guide to help determine which features you want to configure when launching your helpdesk and add more features as you go.
Several features require configuration at the application level. These require the attention of a system administrator. If you're looking to set up a helpdesk project in YouTrack and don't have access to configure features system-wide, reach out to a system administrator for help with the following tasks:
Other features can be set up at the project level and can be configured by the project owner or any other user who is assigned a project administrator role in the helpdesk project. Once a system administrator is finished with the global configuration, a project administrator can manage the setup of these features:
Customize the set of fields used for tickets in the project.
Configure the service level agreement (SLA) for handling tickets created in the project.
Set up channels for customers to use when they need to reach out for support.
Customize the sender name and content used in email notifications.
Your support agents can set up and manage several additional features. Some of these features are exclusive to users with agent licenses, while others can be configured by any member of the helpdesk project team. These are the final touches you can add to your project to make sure your agents can process tickets as efficiently and effectively as possible:
Once you've set everything up, use the instructions provided here to make sure all the pieces are in place:
Setup Instructions for System Administrators
System administrators have access to key configurations used by helpdesk projects, including permissions, integrations with an email service, license management, and more. If you're reading this guide as a person responsible for setting up a helpdesk project but don't have permission to access settings at the global level, reach out to a system administrator for assistance with the following tasks.
Customize the Application Logo
When setting up a helpdesk, it's important to make sure that your customers seamlessly recognize your company branding across various customer touchpoints. This helps to promote trust, communicate high-quality service, and inspire confidence in the customer experience.
If your helpdesk is only available to people who belong to your organization, you might be fine with using the YouTrack logo. Once you start setting up projects that are accessible to external reporters, consider uploading a custom logo for your YouTrack site. This replaces the YouTrack logo in the application header with your own brand assets.
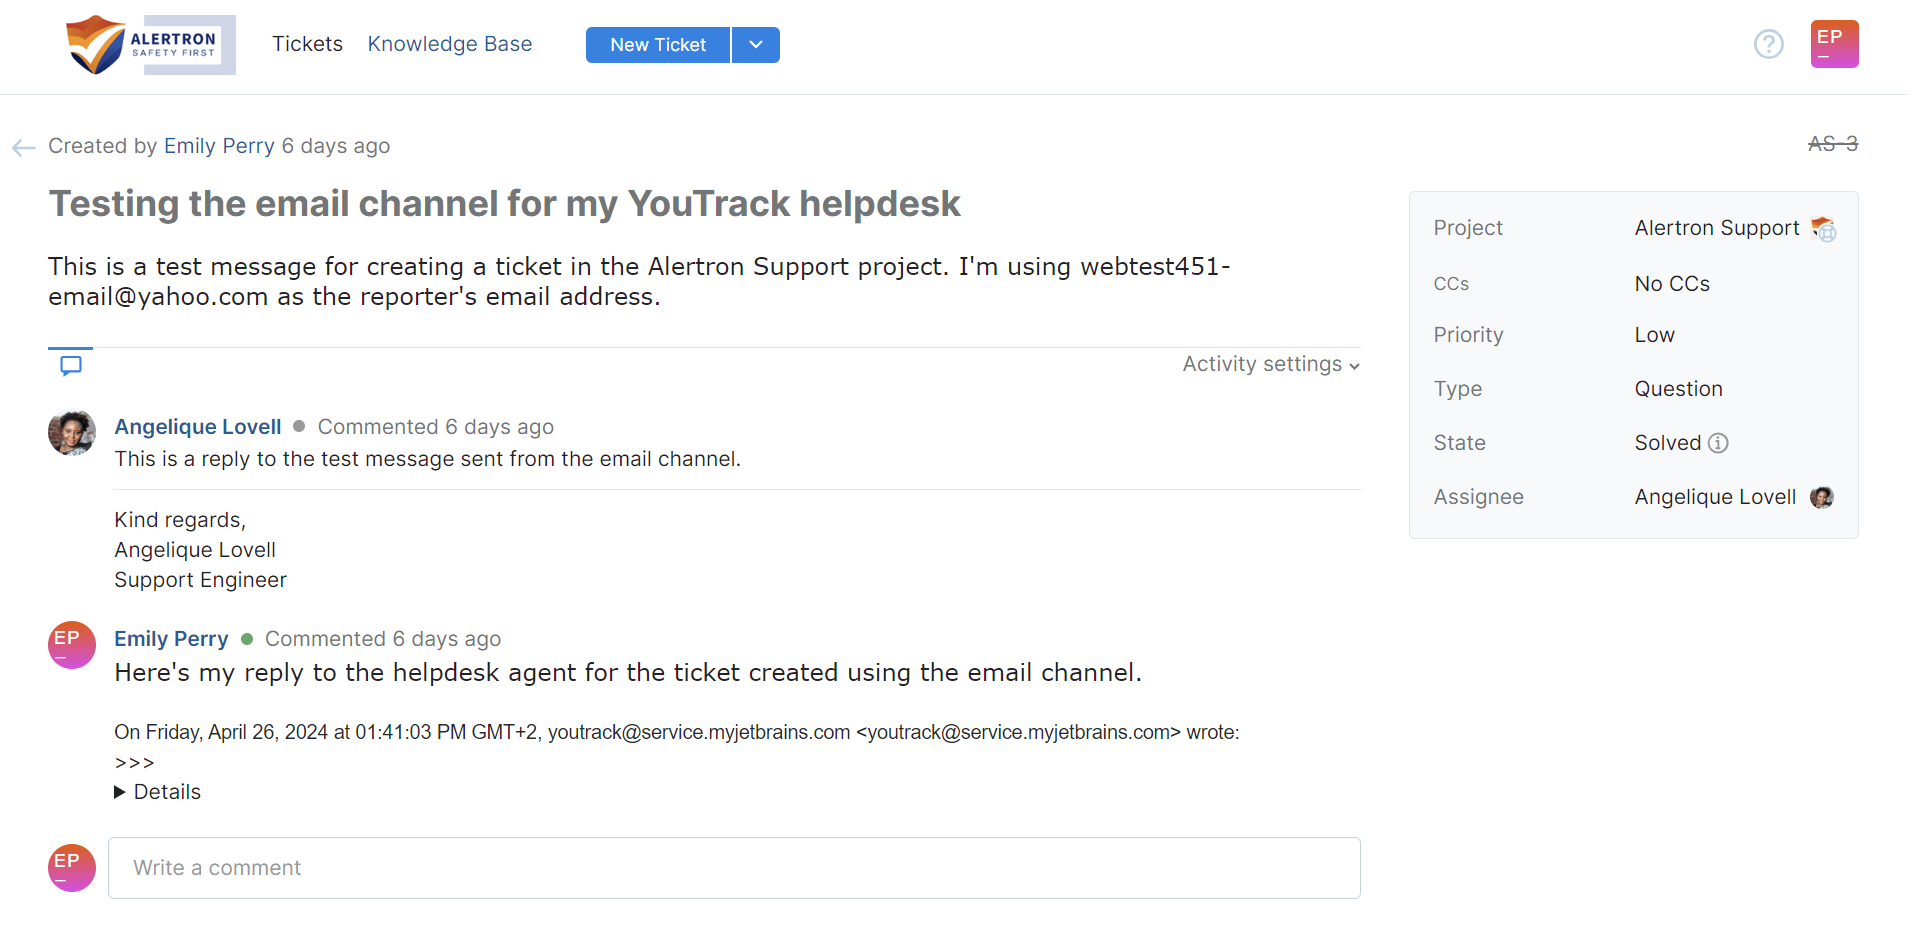
When customers click through their email notifications to access their tickets in your YouTrack site, this reassures them that their tickets are handled by members of your organization who are expected to maintain a specific level of service.
To upload a custom application logo:
From the Administration menu, select .
In the System section of the page, click the Edit icon next to the Application logo setting.
The Change Logo dialog opens.
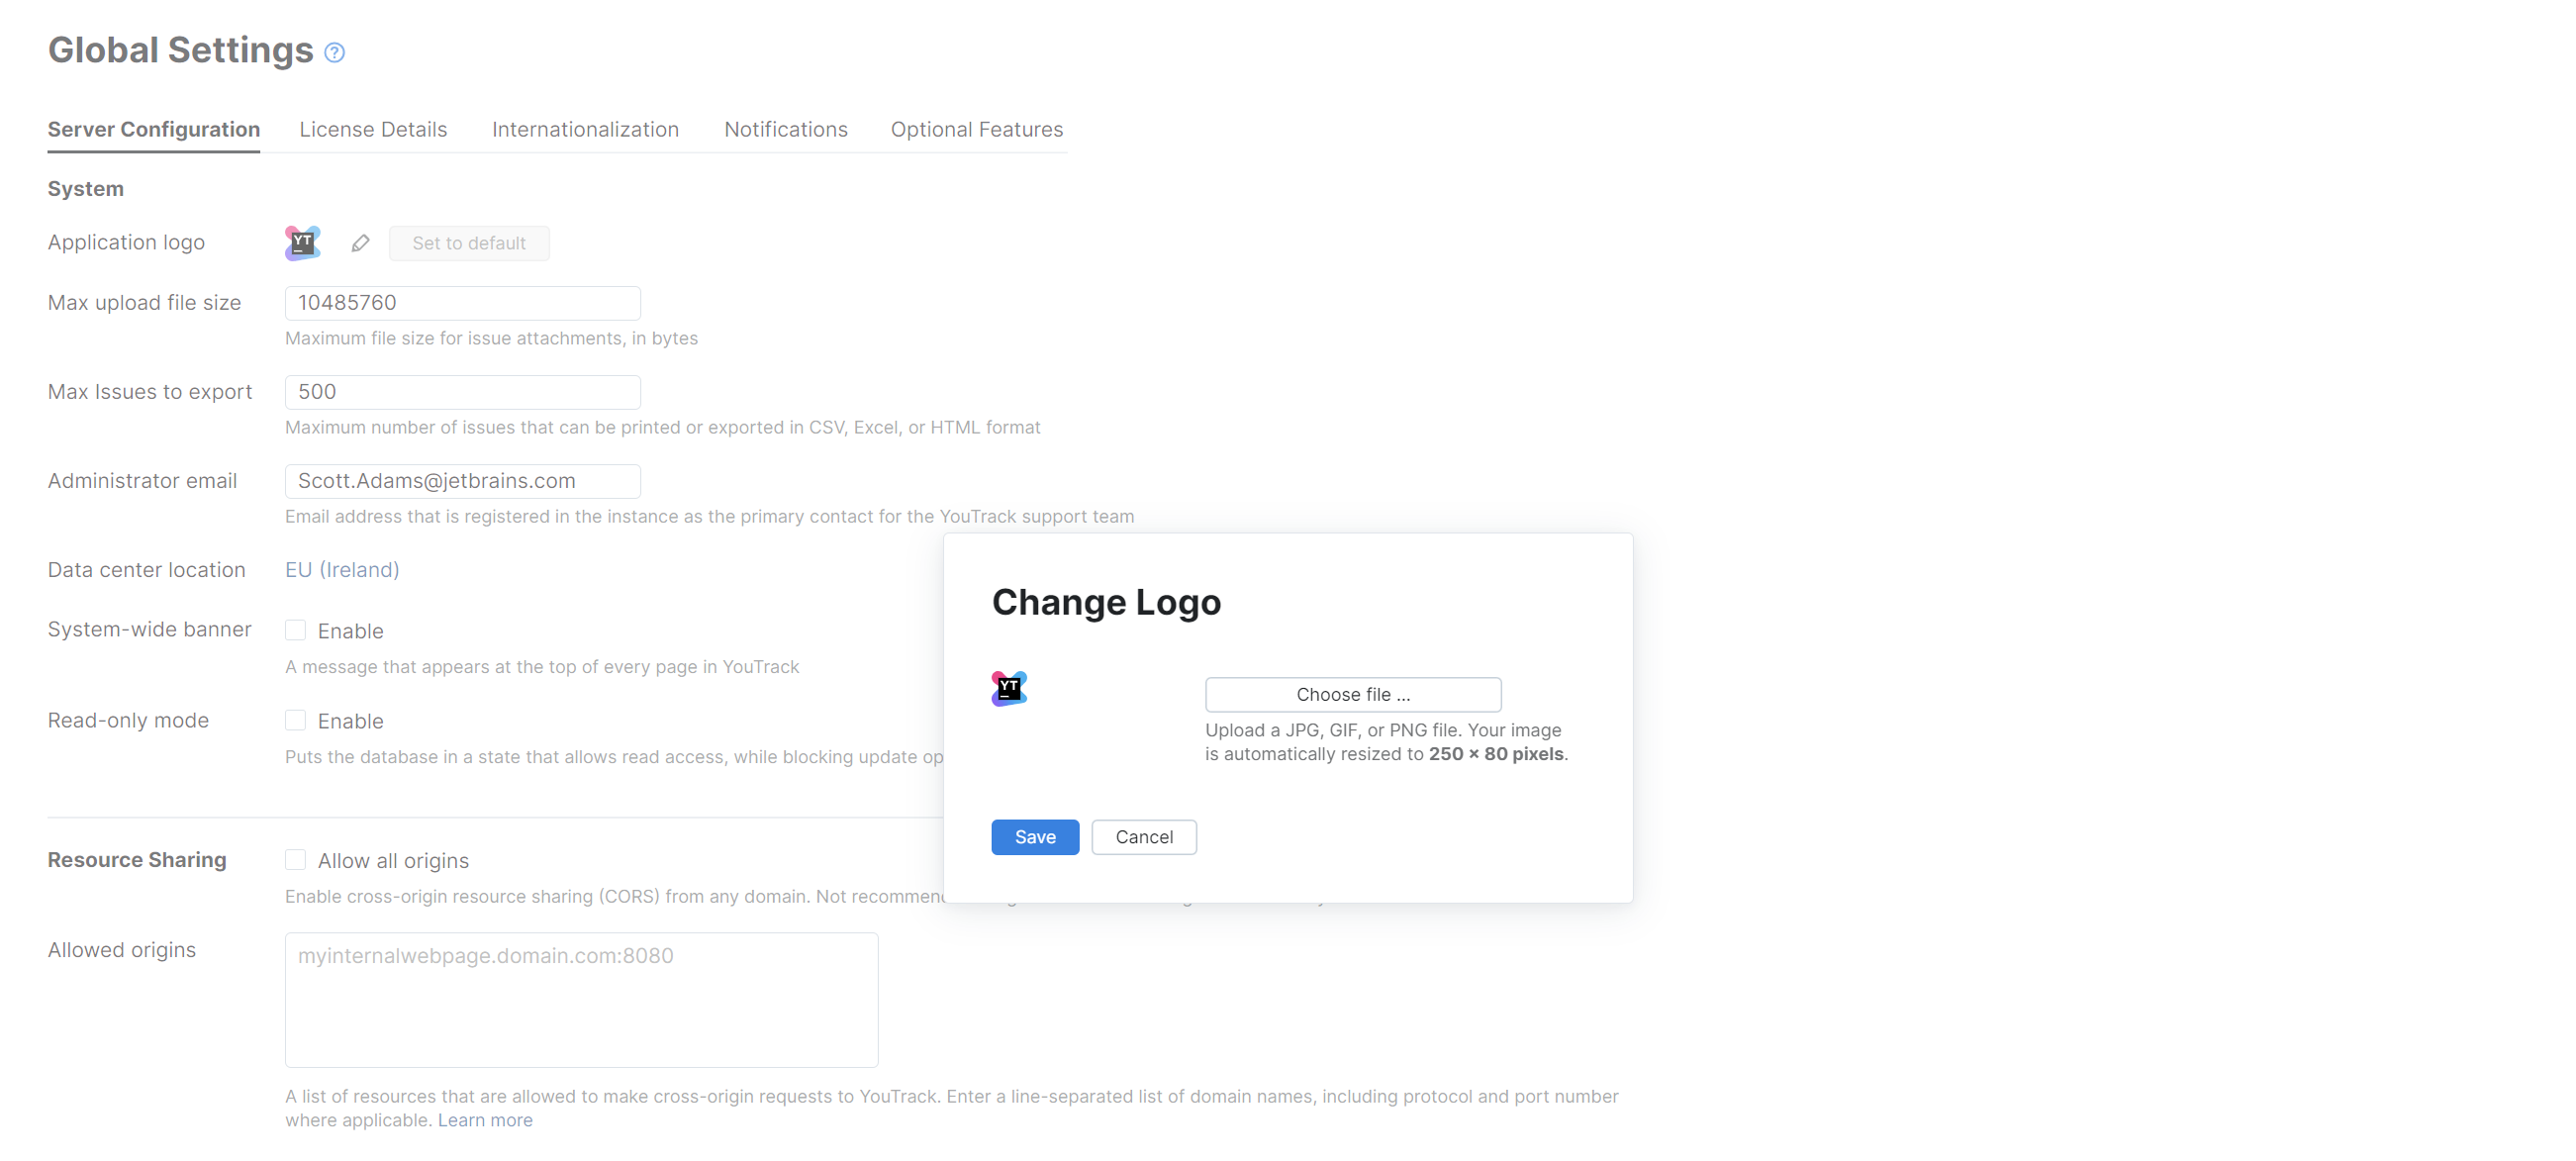
Click the Choose file button, then select an image file from your local directory.
Click the Save button.
The selected file is uploaded to YouTrack and is automatically resized to 250 x 80 pixels.
Your custom logo is displayed in the header on every page of your YouTrack site.
Purchase Agent Licenses
Only users with agent licenses can manage tickets in a helpdesk project. An agent also has access to exclusive features that are inaccessible to standard user accounts.
To ensure that everyone who will be asked to handle incoming tickets in your helpdesk project has sufficient access, you need to make sure you have purchased an adequate number of agent licenses.
YouTrack provides 3 agent licenses for free. Additional licenses must be added to your paid subscription plan.
To view your current allocation of agent licenses:
From the Administration menu, select .
Select the License Details tab.
Click the Agents button at the top of the usage graph.
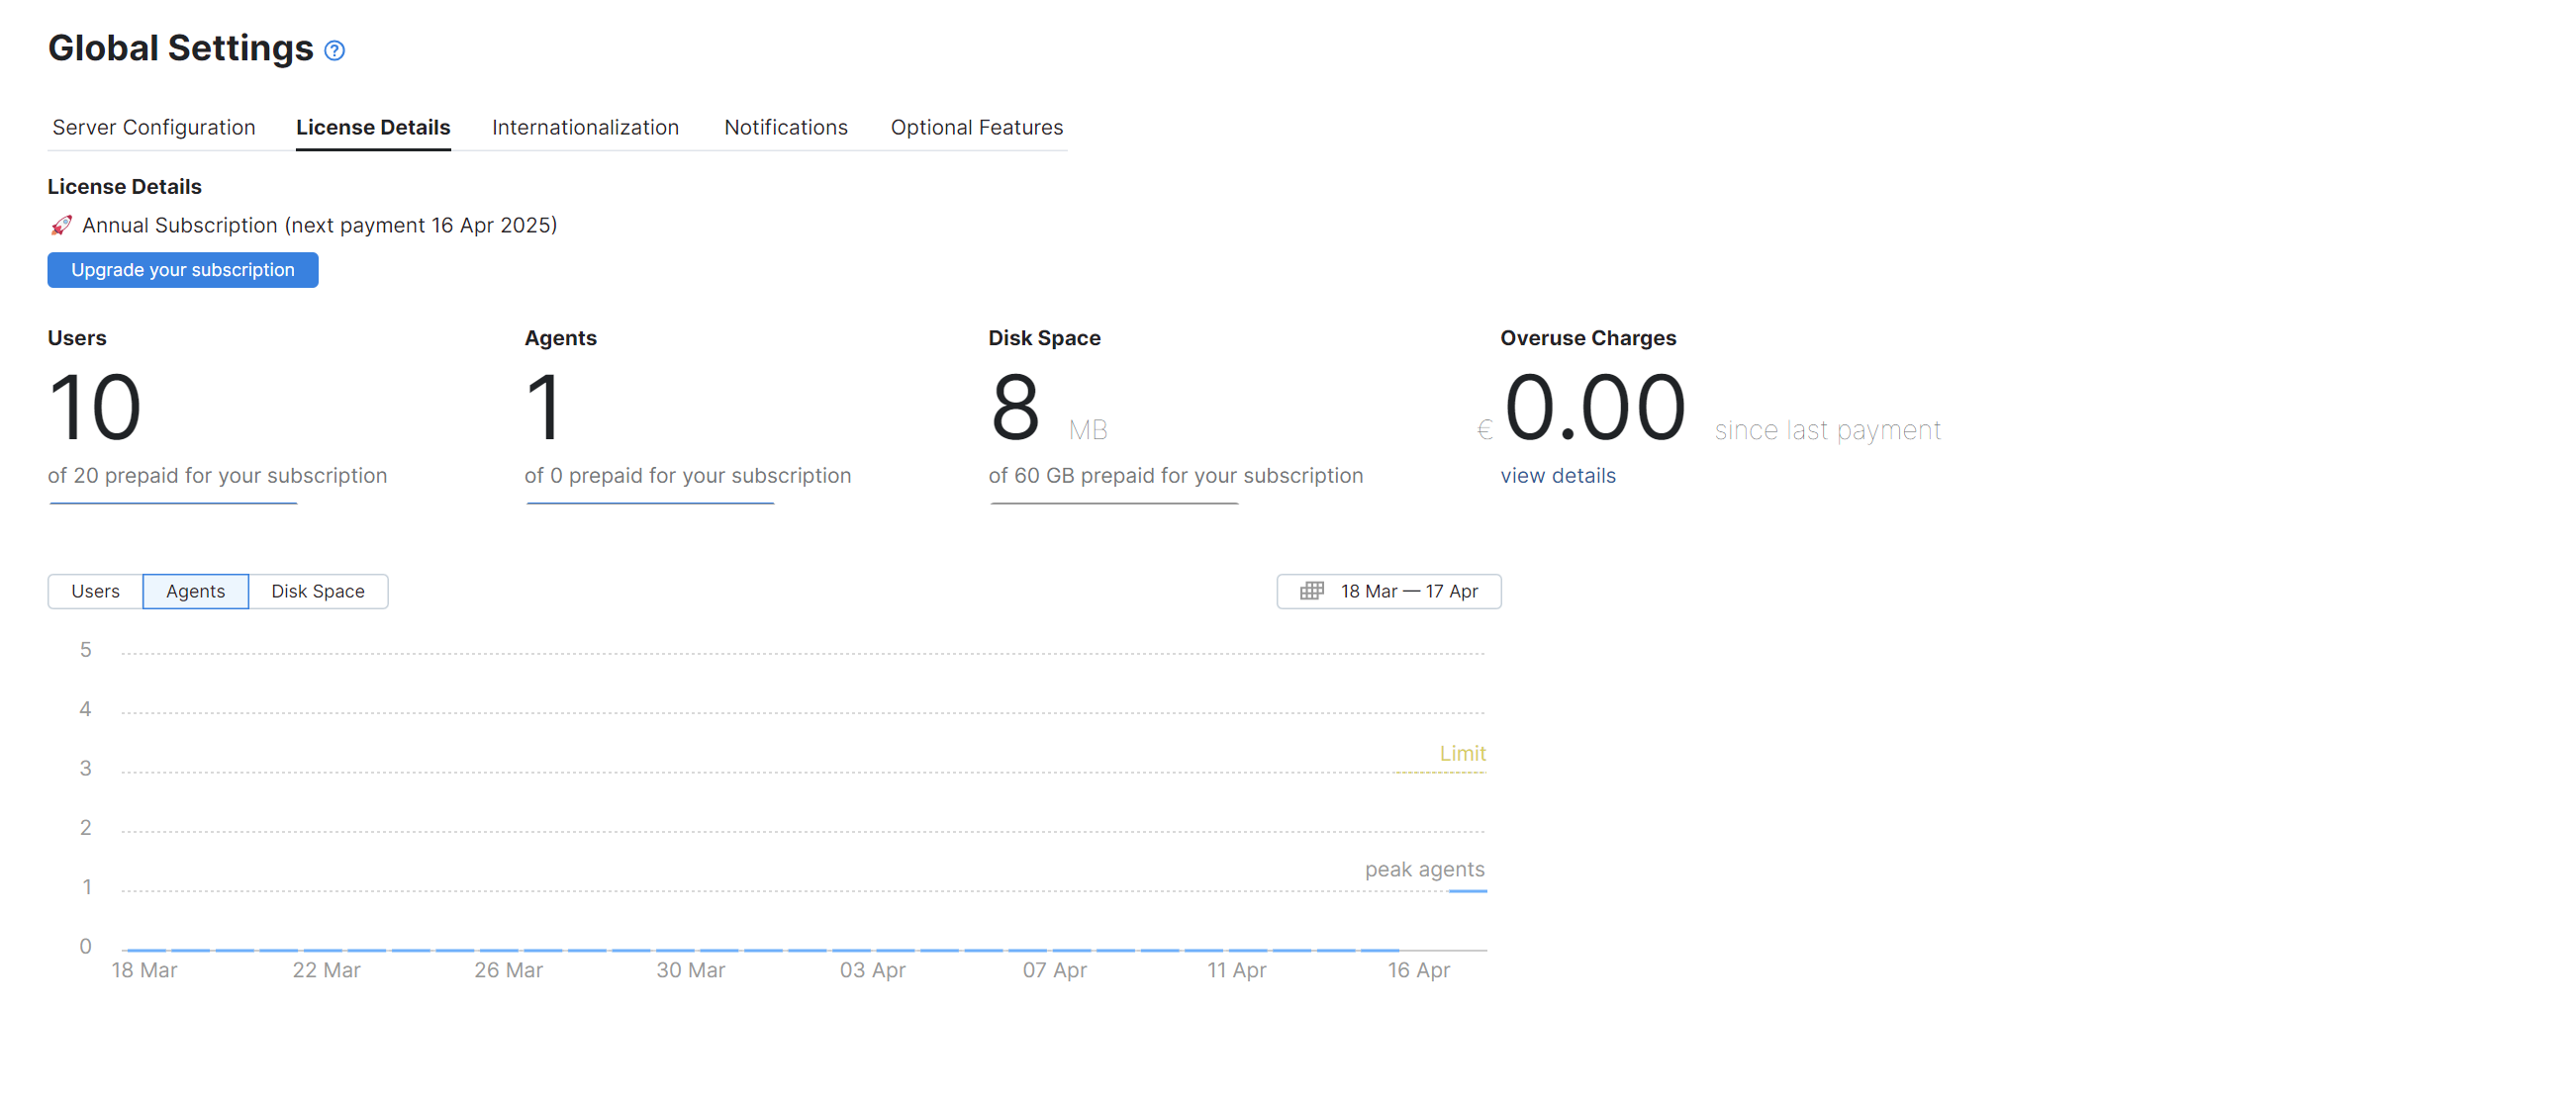
The peak agents bar indicates the current number of active user accounts that have been assigned an agent license.
The Limit bar indicates the total number of agent licenses that are currently available for use.
If the current number of licenses is insufficient, use the options available on this page to access the JetBrains eShop, where you can purchase licenses for additional agents.
For more information about agents in YouTrack, see Helpdesk Agents.
Configure Global Email Notifications
In a helpdesk project, agents manage their interactions with external users and internal clients directly in YouTrack. For reporters, most of their interaction takes place in their email client app. The helpdesk uses email to deliver updates to reporters, including confirmation emails sent when the reporter creates a ticket and update notifications when agents post public comments in the ticket. Email is also used to notify additional users who are added to existing tickets as CC recipients.
In order for all of this to work correctly, your YouTrack site needs to be connected to a service that delivers email notifications.
If you are using YouTrack Cloud and are working with the default email server configuration, you can skip this step. Email notifications are enabled and configured by default for YouTrack Cloud.

If you have changed the default email notification settings in your YouTrack Cloud instance, or are using YouTrack Server, make sure you are connected to an email server and that email notifications are enabled for your site.
To check your current notification settings:
If the connection with an email server is missing or misconfigured, you'll need to set this up before you continue any further. The instructions vary based on the type of server you use to manage email traffic in your organization. For detailed instructions, see Connect to an External Mail Service.
Configure Guest Access
If you want your reporters to have access to information in your YouTrack knowledge base, you need to make this information publicly available. This is done by granting specific permissions to a dedicated account that grants access to unregistered guests.
To prevent unexpected disclosure of private data to the public, we recommend that you create a dedicated role for the guest account and grant this level of access in helpdesk projects where you store public information. For this to work properly, you need to create your helpdesk projects first, then grant access to the guest account.
If you're reading this guide as a system administrator, you can wait for the project administrator to create the helpdesk project before performing the actions described here. You can also create the helpdesk project yourself then return to this step.
To create a dedicated role that grants public access in helpdesk projects:
From the Administration menu, select .
Click the New role button.
The New Role dialog opens.
Give the new role a name, then click the Create button.
Switch to the Permissions tab and enable the following permissions:
Read Article
Read Article Comment
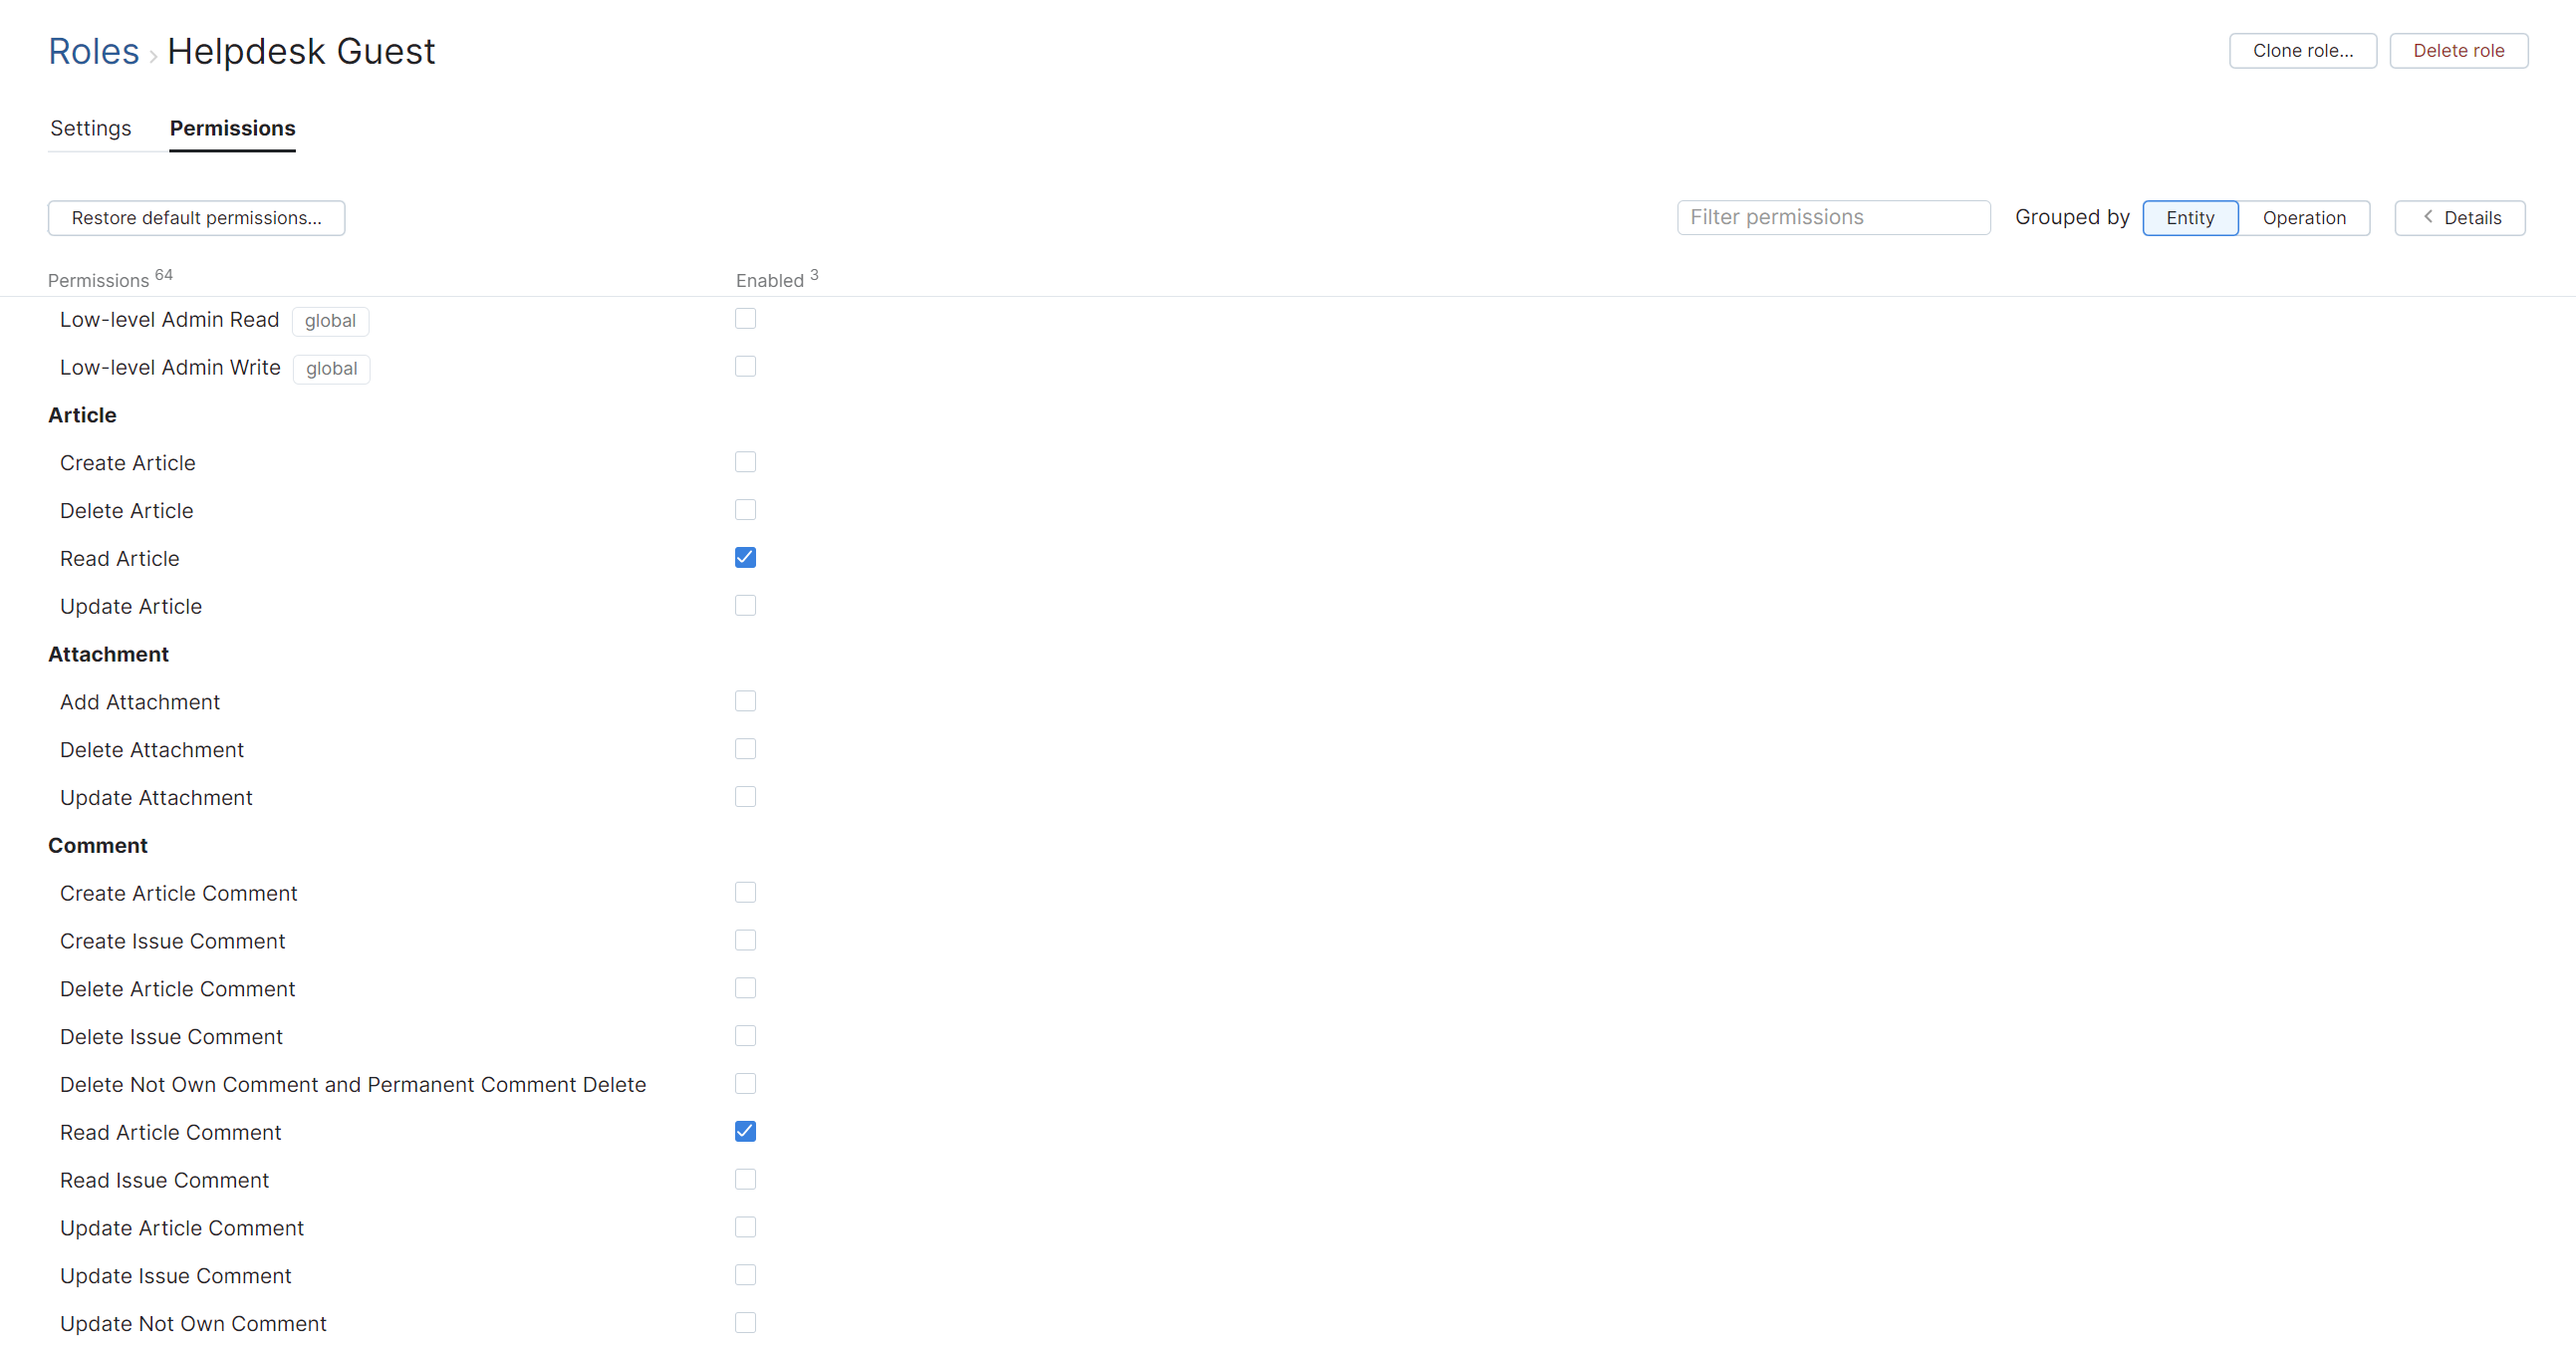
If you don't mind that users post comments to your articles anonymously, you can also enable the Create Article Comment permission. However, this can expose your YouTrack site to unwanted comment spam.
To learn more about roles in YouTrack, see Roles.
Once you have created a dedicated access profile for your guest account, you can grant this role to the guest account.
To grant custom access to the guest account:
From the Administration menu, select .
Select the guest account in the Users list.
If the guest account is currently banned, click the Unban button.
Click the name of the guest account to open its profile page.
Select the Roles tab.
Click the Grant role button.
The Grant Role dialog opens.

Click to open the Role list and select the role you created in the previous procedure.
Click to open the Scope list and select the projects where you want guests to have access to public articles in your knowledge base.
Click the Grant button.
To learn more about granting access to guests in YouTrack, see Manage the Guest User Account.
Setup Instructions for Project Administrators
At this point in the tutorial, we switch away from the tasks that can only be performed by system administrators and focus on the setup steps that are accessible to project administrators. The setup instructions described in this section are project-scoped, which means they can be configured independently for multiple helpdesk projects. These tasks can be performed separately by the administrators for each project or handled by a single system administrator.
Create a Helpdesk Project
A project in YouTrack serves as a central hub for working toward a specific goal. There are several configuration options available at the project level that help to focus your team's effort and adapt it to meet your requirements. You can use a helpdesk project to cover a range of use cases, including:
Customer Support: This is the primary use case for many helpdesk projects, providing a central point for customers to raise issues, ask questions, and get assistance.
IT Support: Helpdesks are often used in IT to manage and resolve technical issues, whether hardware or software-related. This can include things like troubleshooting, system updates, password resets, and dealing with bugs or system errors.
Feedback: Helpdesks can be used to collect feedback about products, services, or customer experiences. This information can then be used to drive improvements.
Incident Reporting: In industries like construction or healthcare, helpdesks might be used for reporting and managing incidents or problems to ensure they're adequately addressed and resolved and to help organize corrective actions.
Procurement: Employees in an organization can use the helpdesk to make purchase requests. These requests can then be tracked and managed effectively.
YouTrack lets you create an unlimited number of helpdesk projects. If you have multiple target audiences or want to handle different types of requests, consider setting up a separate project for each use case or scenario. This gives you the ability to customize each project so it's ideally suited for handling each type of request.
When creating a project for use as a helpdesk, it's important that you use the predefined helpdesk template or another custom project template that is based on another helpdesk project. Projects created using a template designed for standard issue tracking don't have access to key features required by helpdesk agents. Once a project has been created, you can't switch it from one type to another.
To learn how to create a helpdesk project in YouTrack, see Create a Helpdesk Project.
Add Agents and Users to the Team
Once you have created your helpdesk project, you need to make sure that the people who will be responsible for handling incoming requests have the appropriate level of access to tickets in your project. The easiest way to do this is to add them to the project team.
When you add members to your project team, you have the option to designate these users as agents in your helpdesk projects. This action changes their user type and grants them access to features that are exclusive to helpdesk agents.
Users who aren't marked as agents are assigned a Contributor role in the project. This gives them access to view and add private comments to tickets. Use this option for people who can provide support to your customer service representatives or answer questions without responding directly to your customers.
To add users to your helpdesk project team:
From the Edit project page, select the Team tab.
Click the Add members button.
In the Add Members dialog, select the users who you want to add to the team.
Click the Make an agent link to grant the user agent access in the project.
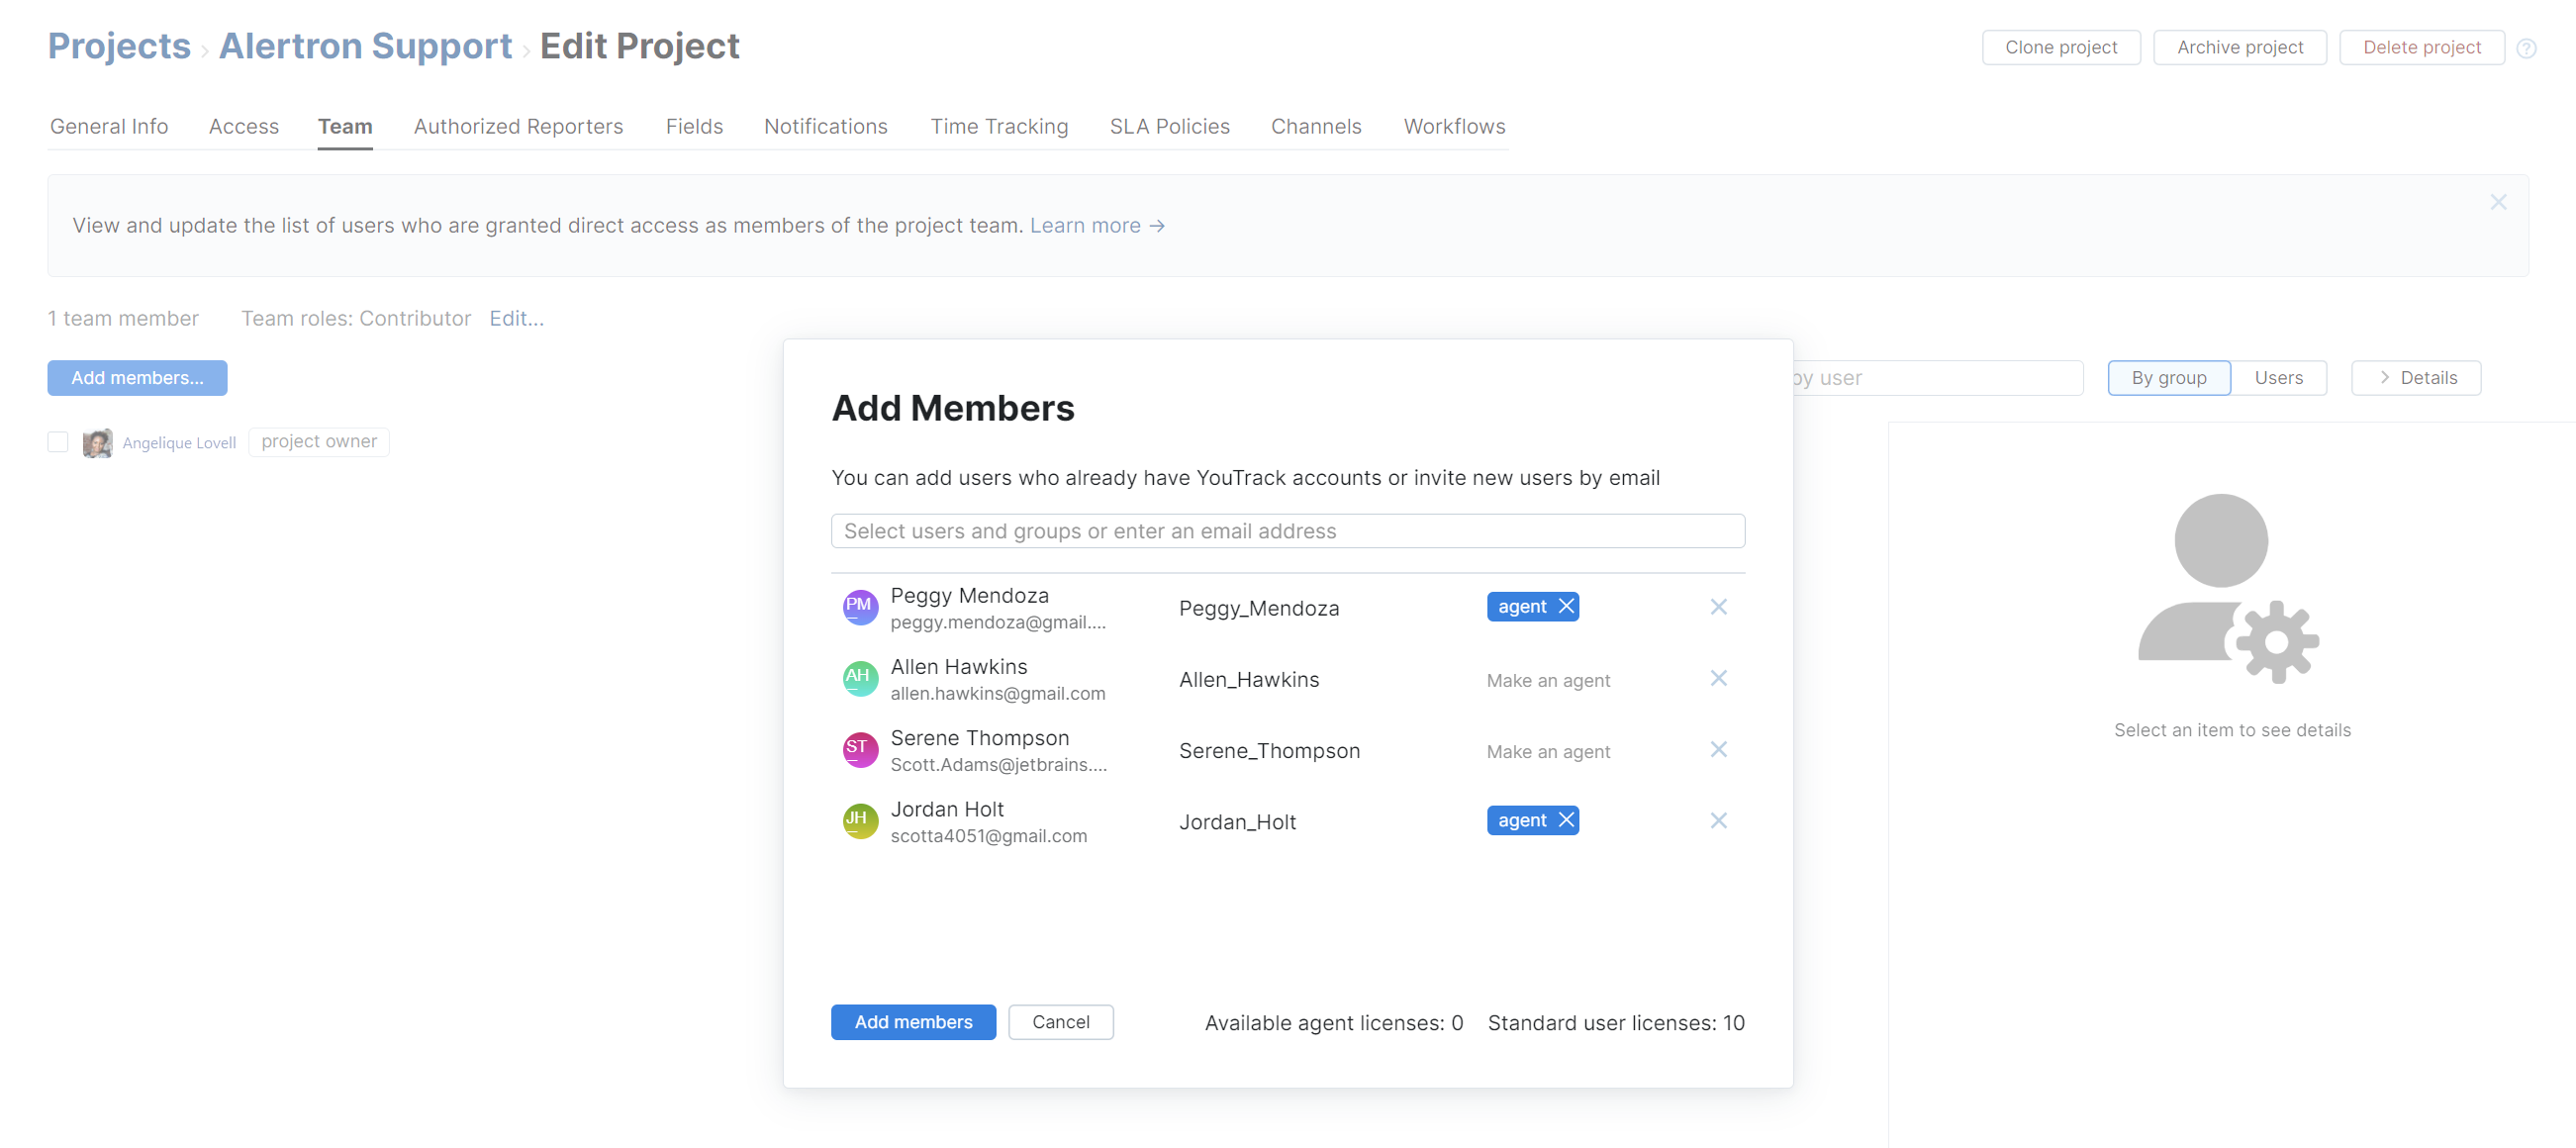
Click the Add members button.
The selected users are added to the project team.
These users inherit any role that is assigned to the project team in the current project.
If the user had the standard user type and if your current YouTrack license has unused agent licenses, the type of the user is updated to agent YouTrack immediately expands or restricts the access of the target user to YouTrack features according to the new user type.
If you have reached your current limit for users of a particular user type, you will see a warning popup informing you about the license limitations.
The user is added to the agents in this particular project. They can now communicate with reporters directly.
Next, you may want to choose which members of the project team should be designated as assignees for tickets. By default, any member of the project team can be assigned to work on a ticket. If you wish to exclude anyone from the list of assignees in your project, you can customize this as well.
To customize the list of assignees:
From the Edit project page, select the Fields tab.
Select the Assignee field from the list. If the sidebar is collapsed, click the Show details button.
In the Value section of the sidebar, click the X icon to remove the project team from the list of assignees.
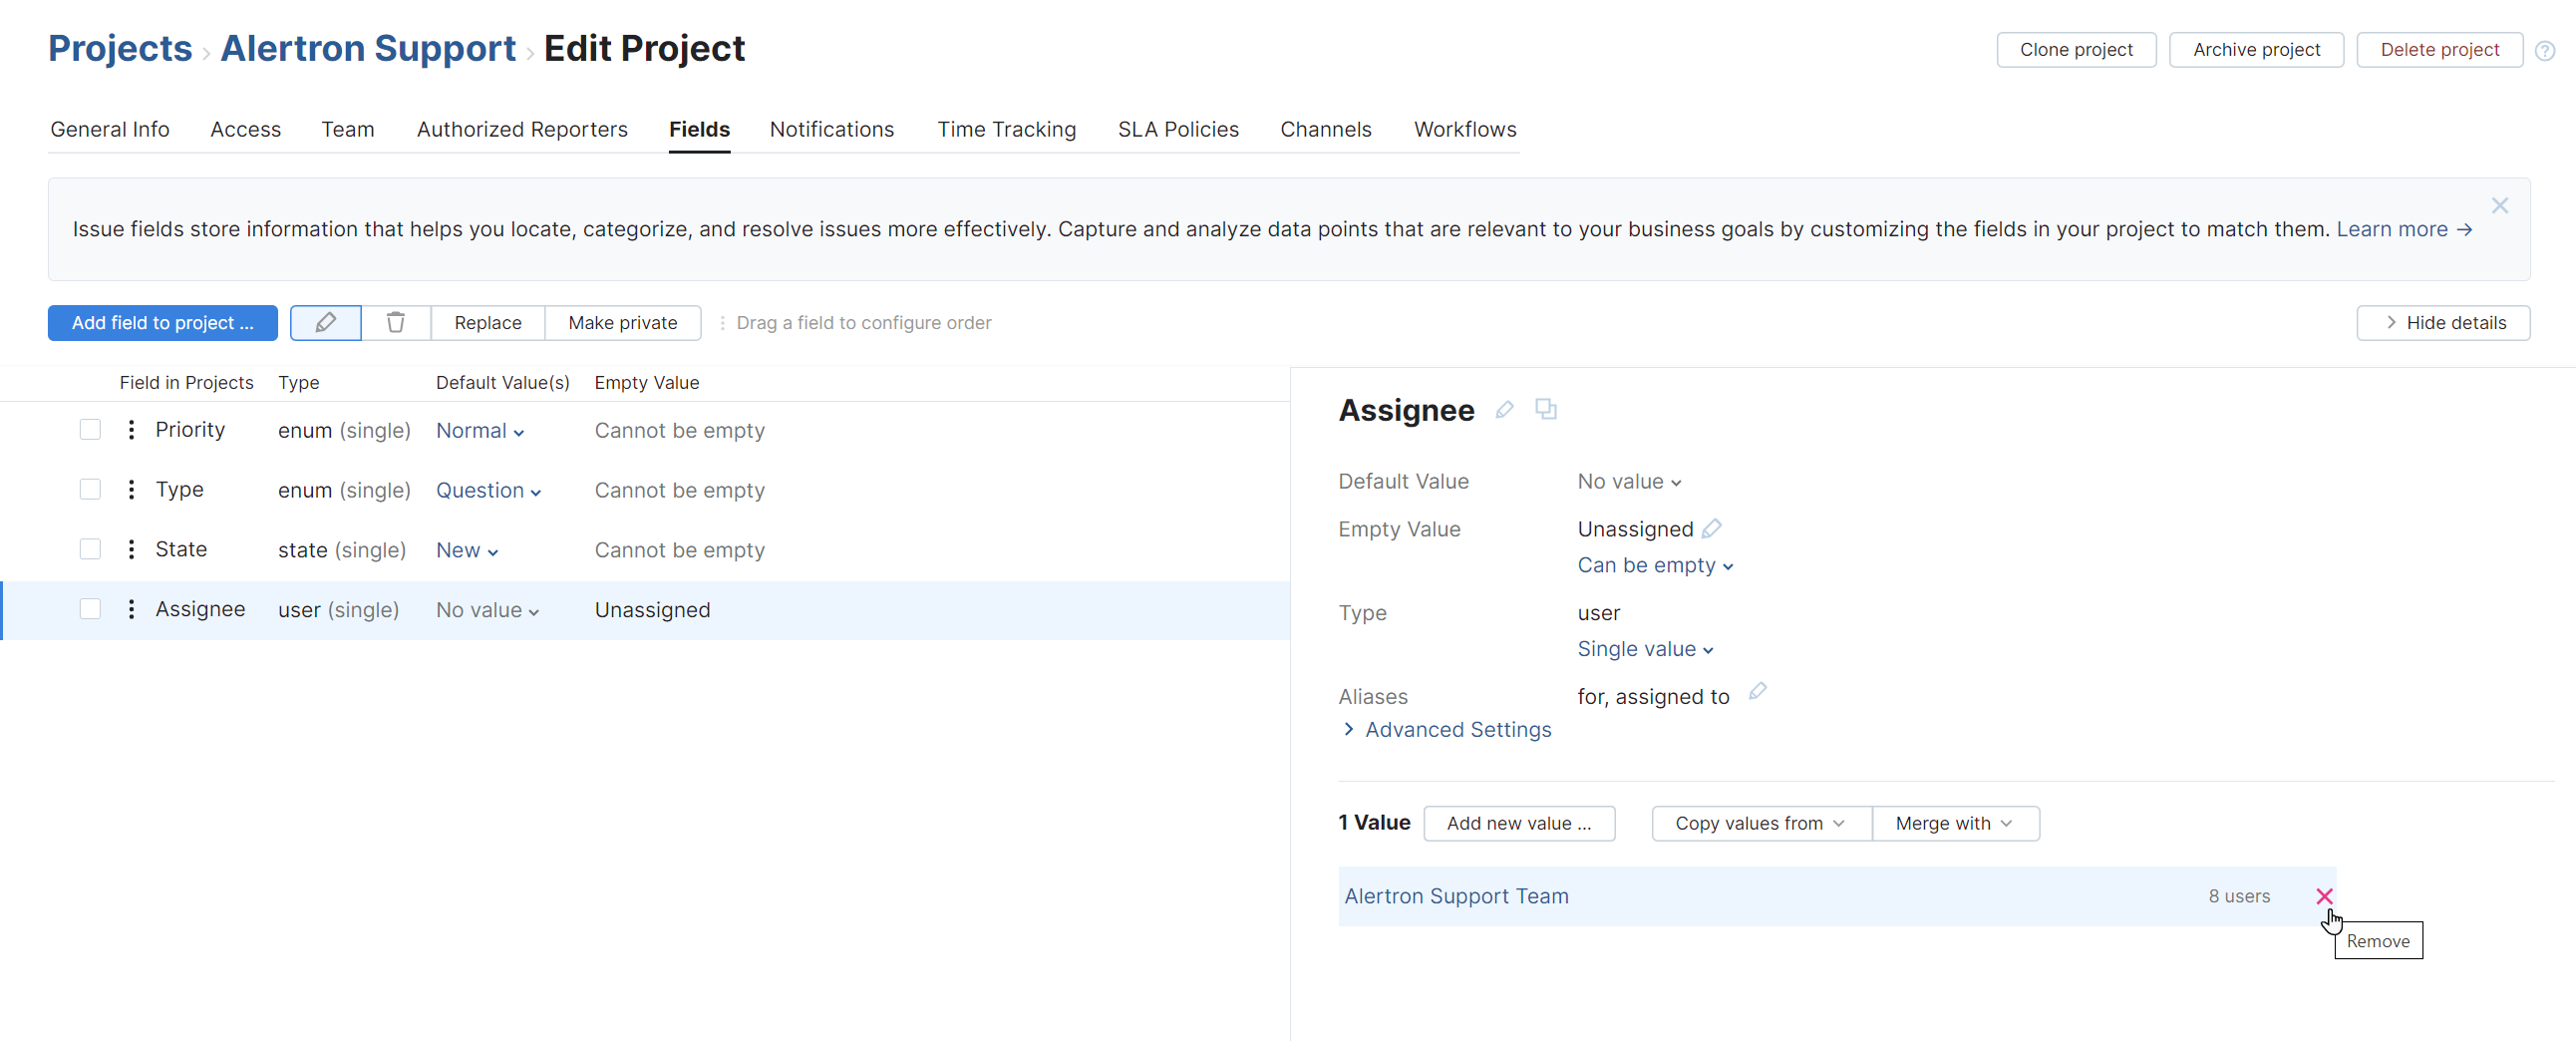
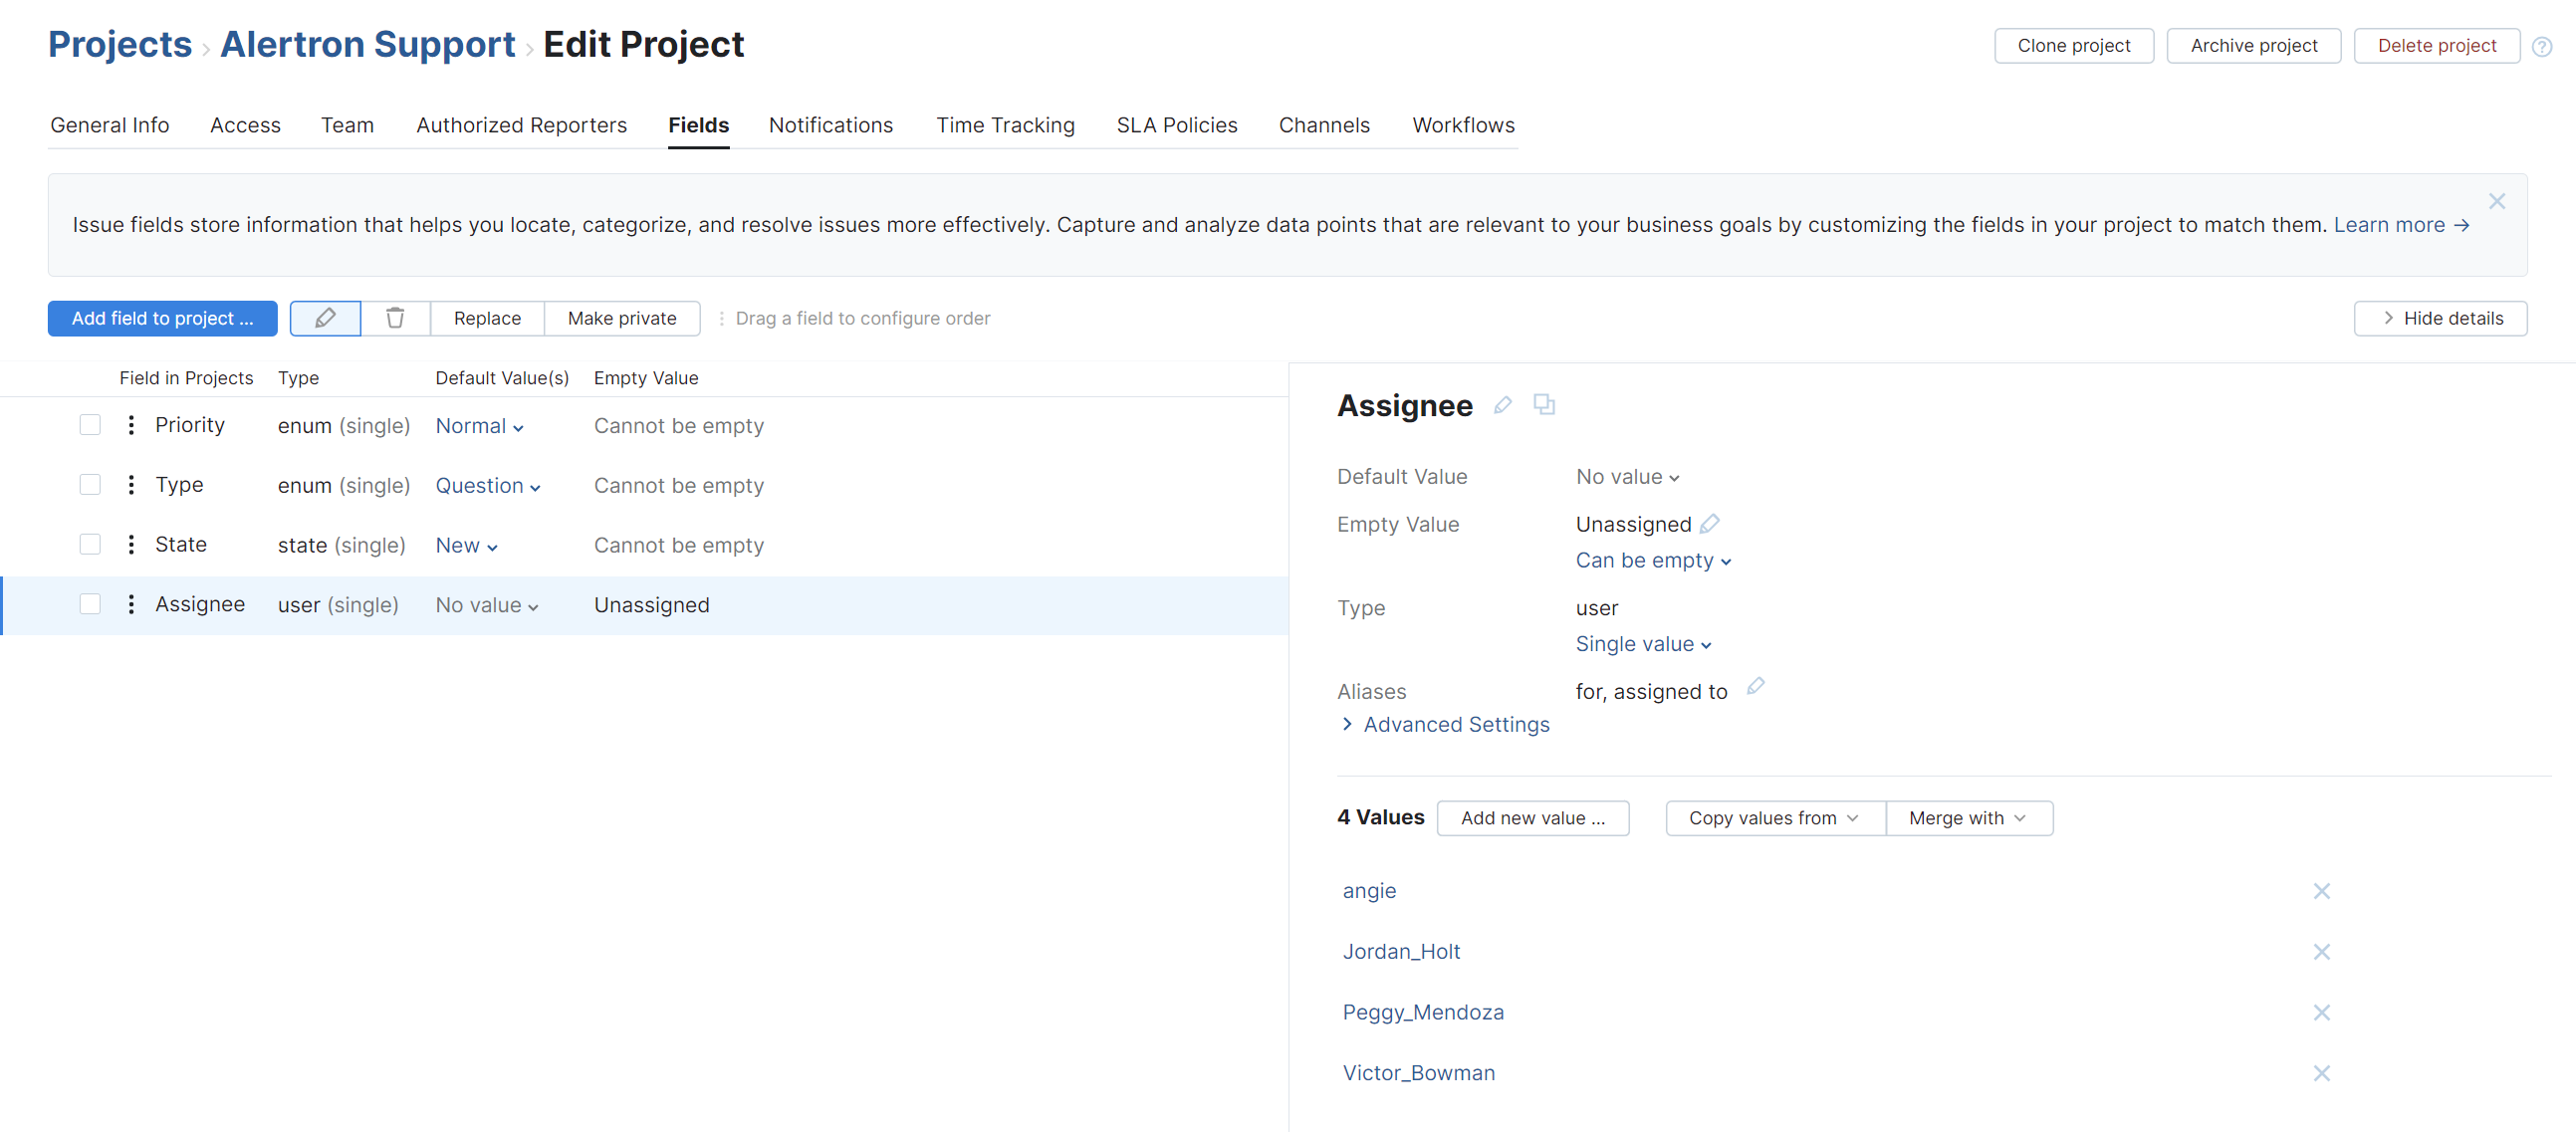
Click the Add new value button, then select the user you want to add to the list of assignees for tickets in your project, then click Save.
Repeat step 4 until you have added everyone you want to be able to assign tickets to.
Restrict Access to Specific Reporters
This is an optional feature that you can use to make your helpdesk available to a hand-selected group of reporters. If you want your helpdesk to be accessible to the public, you can ignore this feature.
There are several scenarios where you might want to enable this feature in your helpdesk project.
When you host multiple helpdesk projects in a single YouTrack site, reporters will have access to all the online forms you use to create tickets in each project. If these helpdesk projects are tailored to specific audiences, members of one target audience may notice that your forms are designed to collect different pieces of information for reporters in another target audience. In this case, it might make sense to restrict each helpdesk project so only reporters who belong to its target audience are able to report tickets there.
You only offer support to a specific group of customers, like registered customers who have purchased your product or high-value customers who need to meet specific thresholds for loyalty and engagement. Here, it would make sense to restrict the project to specific reporters who have been invited to join a higher tier of VIP service.
The settings for configuring a restricted helpdesk project are located on the Authorized Reporters tab in the project settings. For detailed setup instructions, see Restricted Helpdesk Projects.
Customize Ticket Fields
The next thing you'll want to do is customize the set of fields used in your helpdesk project to make sure you collect information relevant to your goals. Custom fields can also help your agents categorize tickets more efficiently, which leads to faster response and resolution times.
The default template for helpdesk projects includes fields for storing Priority, Type, State, and Assignee. These should usually be enough to get you started with a typical customer support process. For more specialized helpdesk scenarios, it makes sense to add fields that store specific pieces of information. You'll also want to customize the sets of values used for each field to reflect what your customers encounter in situations where they require assistance.
For an IT service desk, you might want to customize the set of values for the Type field to track whether the request is based on a hardware issue, software defect, network connectivity issue, and so on.
For software defects, you can use additional fields to store the name of the application, version number, and operating system. For hardware issues, the device type.

In a procurement project, you can add fields to indicate whether the cost is a one-time or recurring payment. You could also add fields to store the vendor name, item description, price, purchase order number, department, and more.

To access the list of available fields in your helpdesk project, open the Edit Project page and select the Fields tab.
YouTrack lets you add as many fields to a project as you want. For each field, you have the option to show it only when certain conditions are met, make it visible to specific groups of users, or hide it from users who don't have permission to view private fields.
The options available for custom fields in a helpdesk project are no different from the options for fields in standard issue-tracking projects. To learn how to manage the list of fields for tickets in your helpdesk project, see Manage Custom Fields.
Configure a Service Level Agreement
Helpdesk tickets can include additional fields that help agents see whether they have handled a request within a predefined time frame. This feature is only supported when you have defined a service level agreement (SLA) for your helpdesk project.
To access the settings for configuring an SLA in your helpdesk project, open the Edit Project page and select the SLA Policies tab.
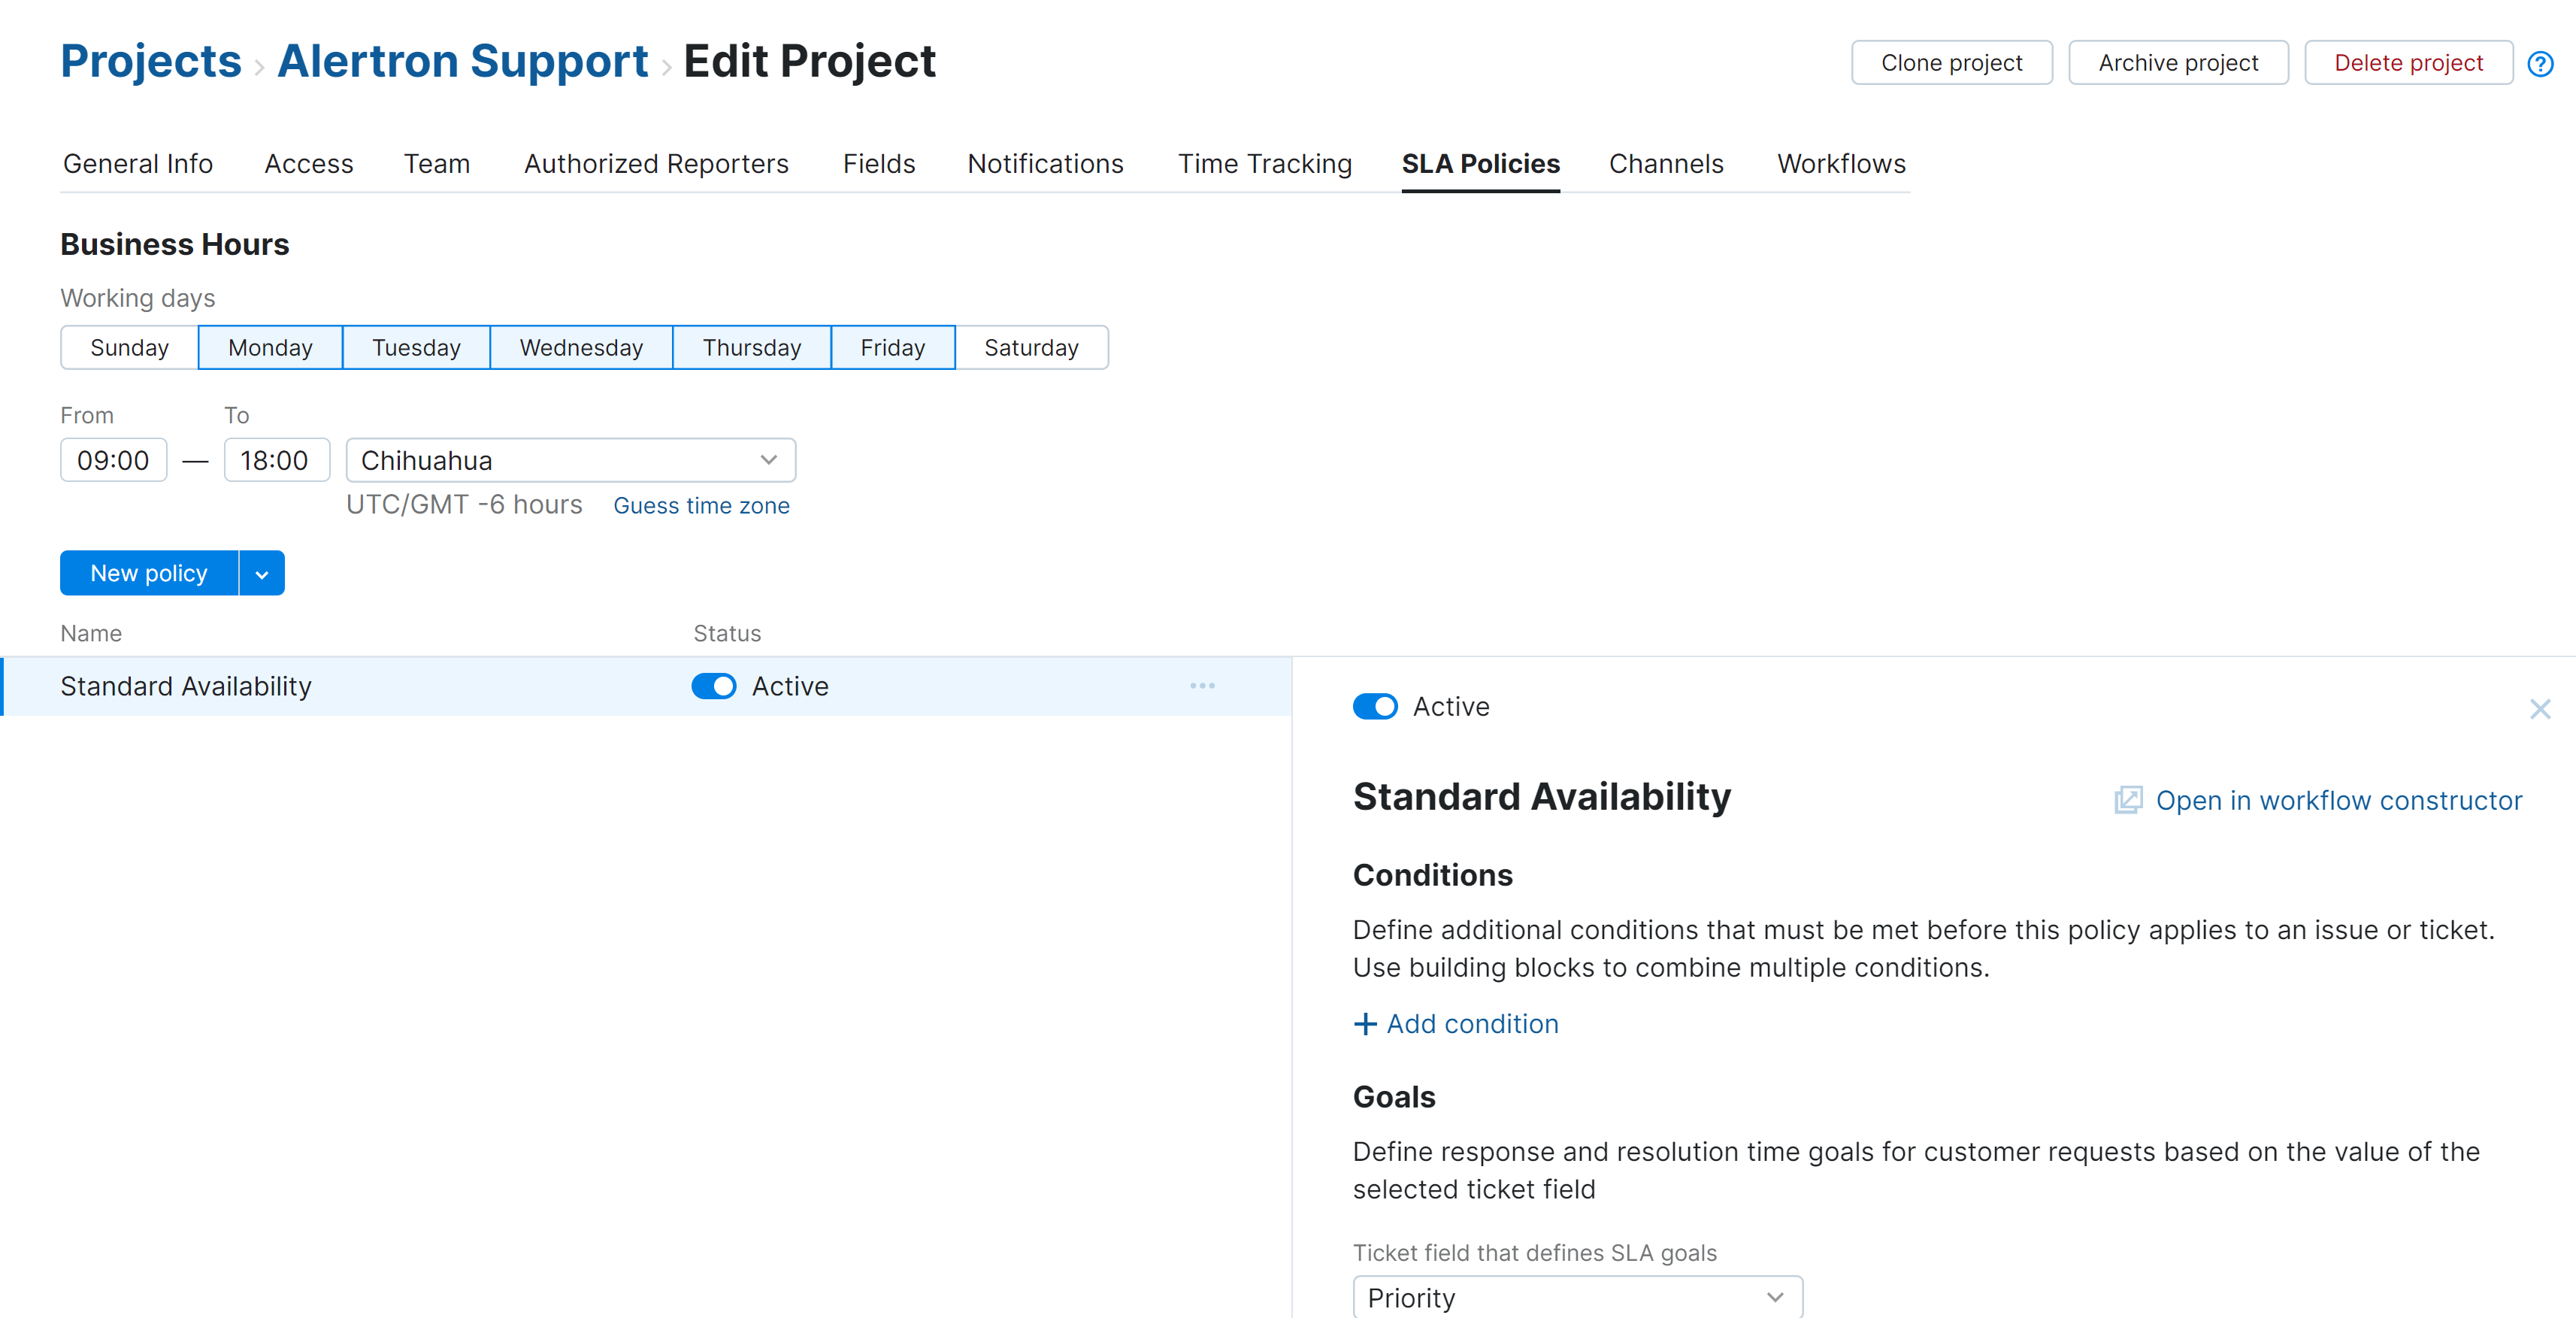
The SLA policy consists of two parts:
The Business Hours section of the page lets you define when your agents are expected to be available to respond to incoming requests.
The controls in the lower half of the page let you define policies for handling different types of tickets. You can add multiple policies for handling tickets that meet various conditions. For example, here's a policy that is only applied to tickets from a group of internal users who have been identified as stakeholders based on their membership in a specific group.
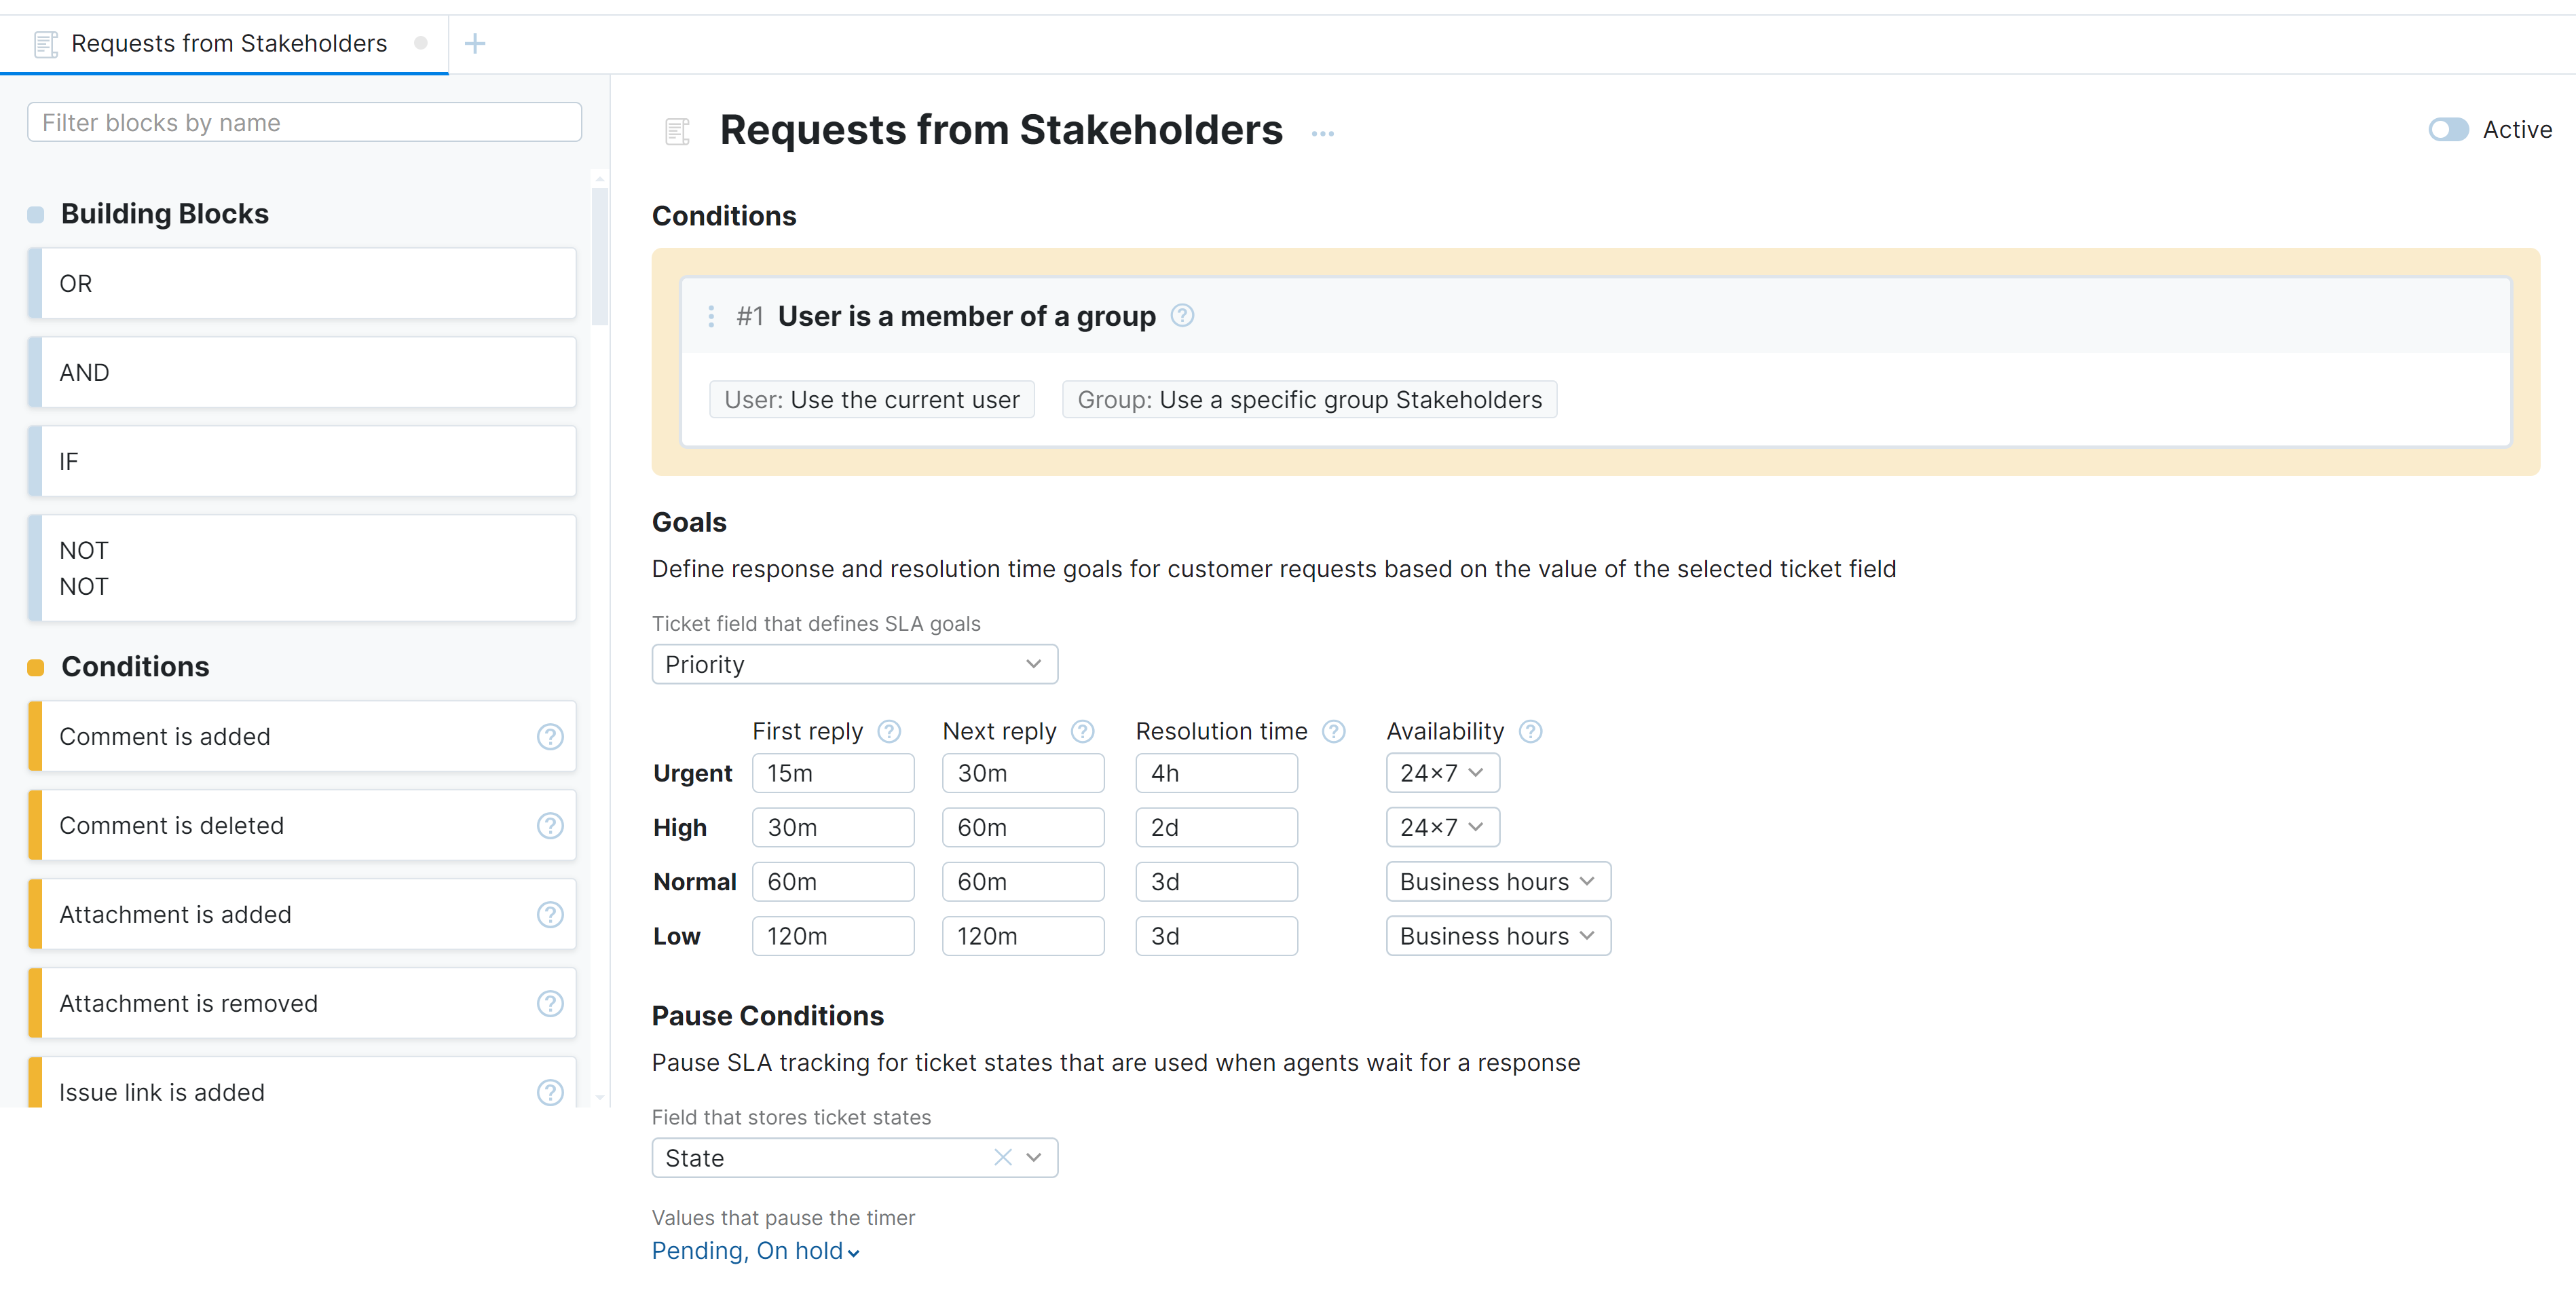
These policies can be configured using the no-code workflow constructor or written using JavaScript.
Thoughtful configuration or your SLA policies ensures that your agents prioritize requests from your most important customers. For step-by-step instructions, see SLA Policies.
Configure Customer Contact Channels
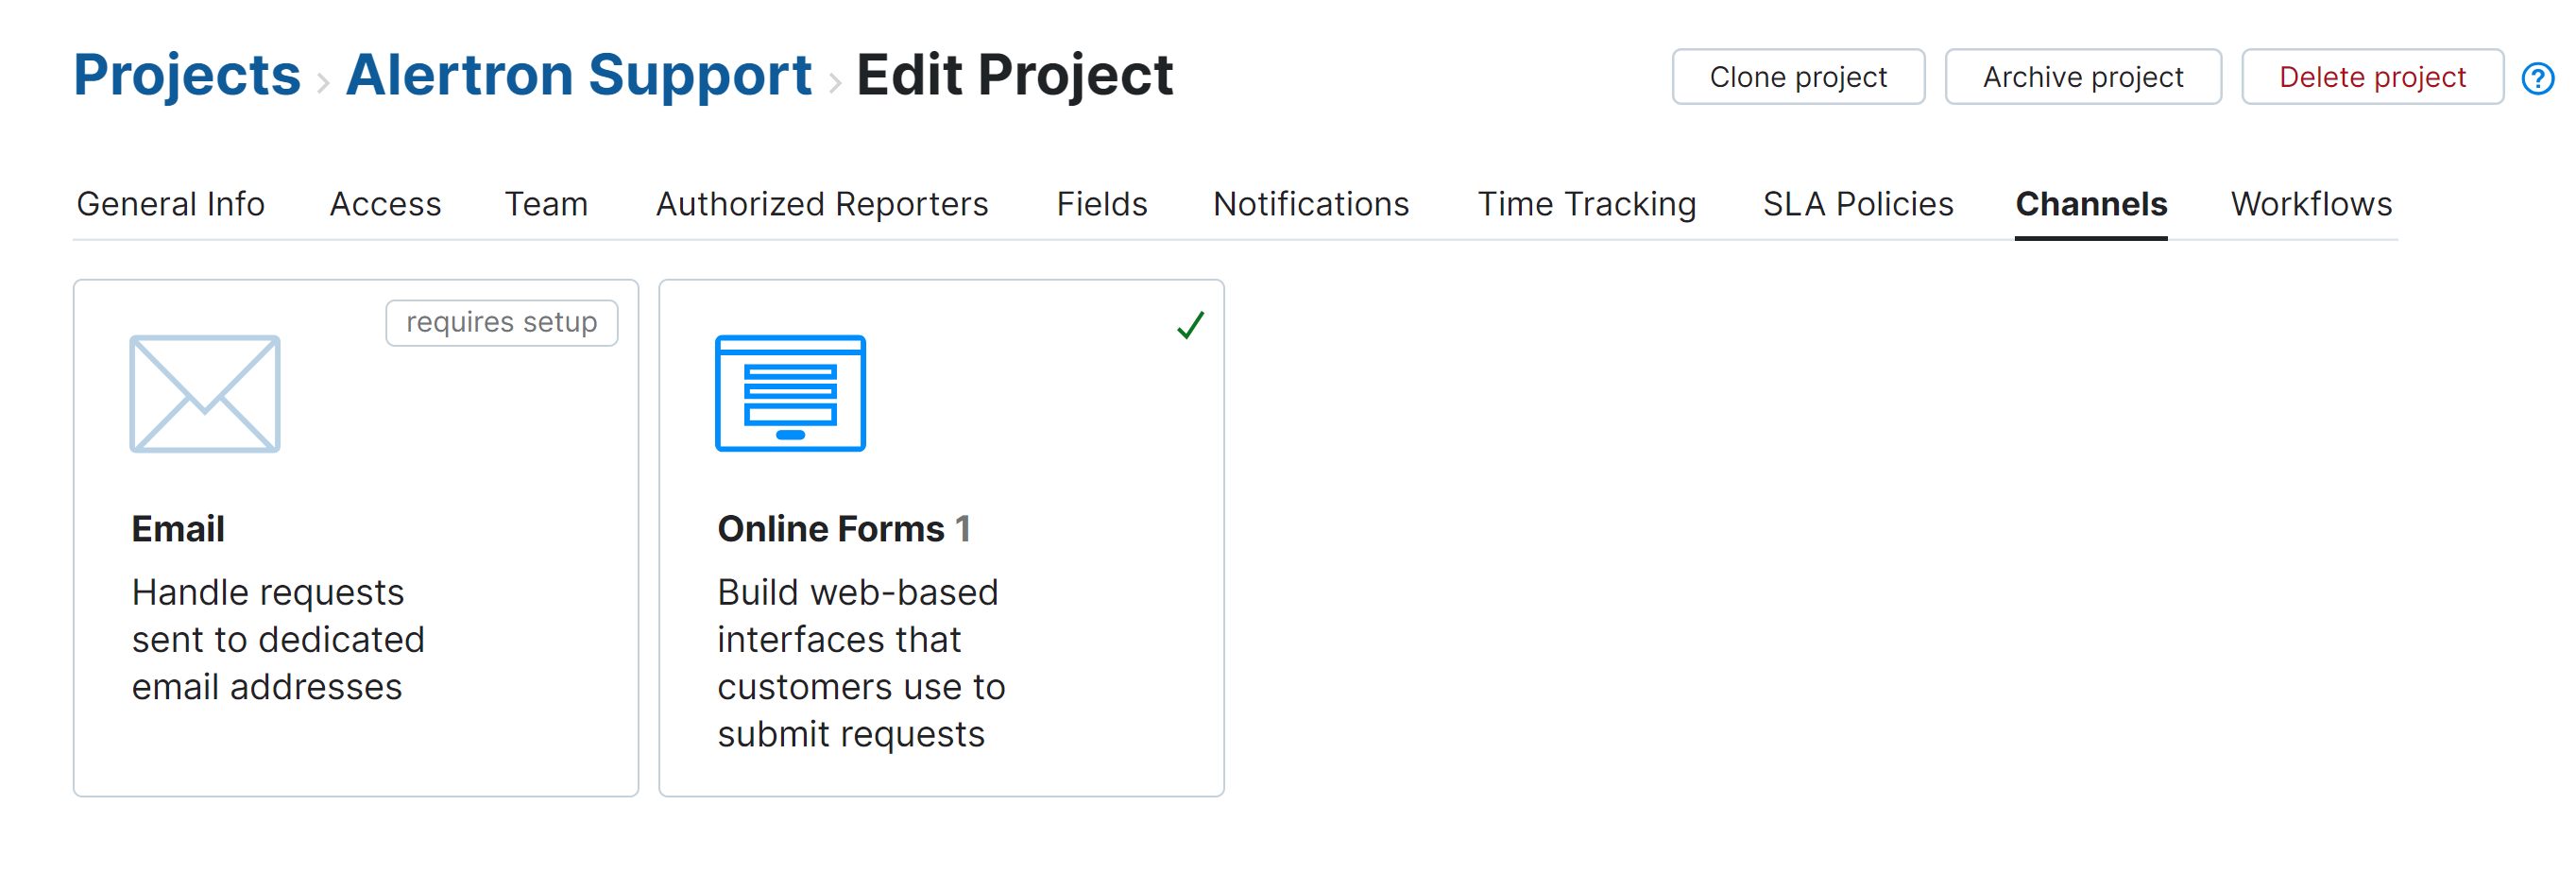
The next step in the setup process is to configure the channels that your target audience will use to reach out to your helpdesk for support. YouTrack lets your customer create tickets by submitting support requests by email or by using an online form. You can choose to set up either of these two channels or use both.
This is one of the final steps for setting up your helpdesk project. Once your support channels are live, you can expect to start receiving incoming requests from your customers. If you're following this setup and want to make sure you've configured everything you need before switching it on, consider using one of these approaches:
Test your online forms before embedding them into your web pages or updating your links to contact customer support. You can then check the email notifications generated when posting public comments or resolving tickets to see if there is any text you want to change.
Set up your email channels using email addresses that are not known to your customers. Once you have finished testing the setup, you can update the channel settings to use known addresses.
Involve your agents in the testing process so they become familiar with the flow and start to configure their components, like custom views and comment templates.
To access the settings for configuring channels in your helpdesk project, open the Edit Project page and select the Channels tab.
Online Forms
One of the key advantages of using an online form is that you can capture specific information required for processing support requests. This helps ensure that all necessary details are provided upfront, reducing the need for back-and-forth communication to gather missing information.
When you create a helpdesk project, an online form is automatically generated for you. You can get started using this form as is or customize it to suit your specific needs. The default form can be customized in the following ways:
Change the selection of fields so that the form only includes those that are needed to process tickets effectively. For example, the default form includes the Priority field, and you might prefer that agents set the value for this field, not clients. It also includes the Type field, which may not be important for your customers. Also, if you have customized the set of fields for your helpdesk project, you might want to add some of these to your form.
Add text blocks to personalize the form or provide additional instruction.
If you expect customers to share logs or other files, add a block for uploading attachments.
Add a block that displays a list of similar tickets and articles. This can help reduce duplicate support requests and empower users to find solutions to their problems on their own.
Deter automated bots and scripts from submitting spam or malicious content by adding a CAPTCHA challenge to the form.
To learn how to customize online forms in your helpdesk project, see Online Forms.
Once you are happy with your feedback form, share its code with the people responsible for building your website. This will give them time to figure out where to embed the form and ensure it works properly.
To get a copy of the code used for your online form, click the Embed button in the sidebar.
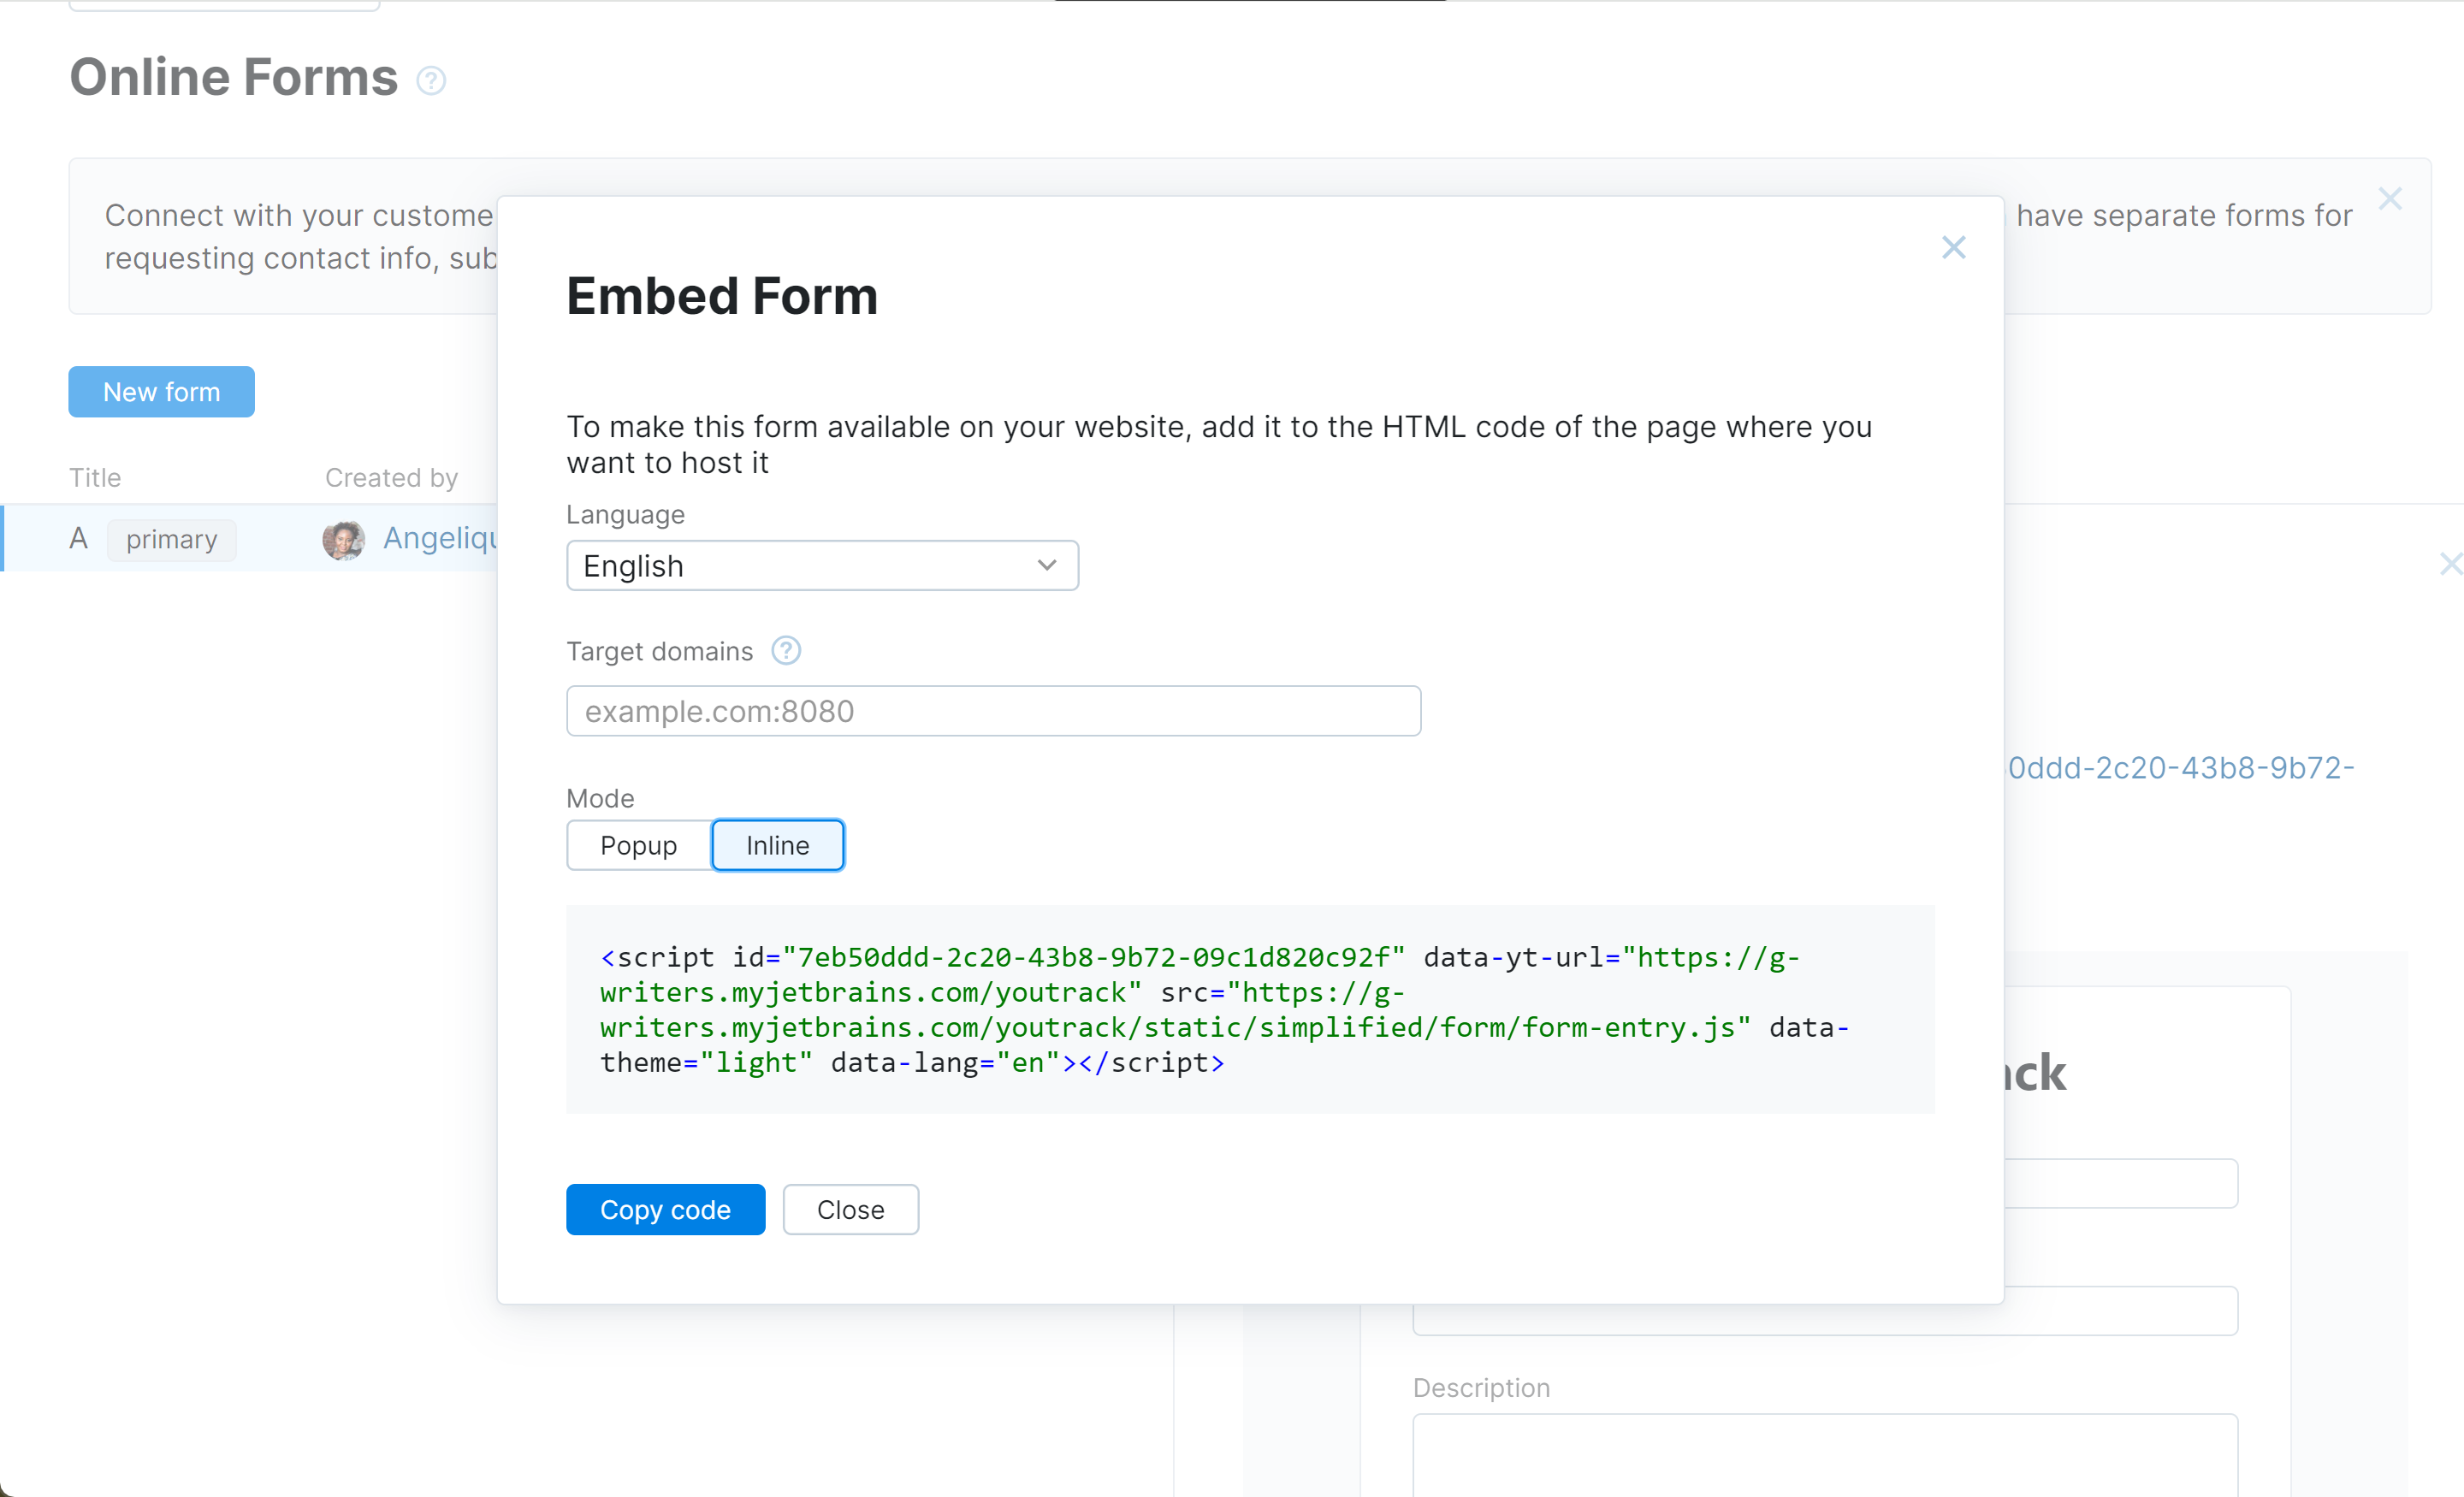
The following options are available from this view:
Choose which language you want to use for the form. This ensures that input validation errors are shown in the same language as the rest of your website.
Choose whether to display the form as a popup window or open it in line with the surrounding content.
When you have configured the form to your liking, click the Copy code button. You can then provide this code to the developers who build your website for preliminary implementation and testing.
If you're working with an embedded form, you might want to pull some variables from the page where you host the form. For example, if you embed the form into a page that pertains to a specific product, you can prefill the field that stores the product name. This makes it easier for the reporter, who is no longer asked to provide this information. It also demonstrates an understanding of user needs and preferences, which contributes to a positive overall experience.
This feature is supported by adding a block of JavaScript to the form embed code. To learn more about this feature and see a sample script, refer to the information in the Developer Portal.
Email is a widely used communication tool that most people are familiar with and comfortable using. It's also the channel used to send updates for tickets submitted using online forms, so it makes sense to set up email as a channel for direct communication as well. However, you don't have the ability to require input for specific fields when using the email channel, which makes it less efficient than an online form.
If you decide that you still want to support email as a channel of direct communication between your customers and the helpdesk, you have two options for setting it up.
When you have an email address that you're already using for customer support, you can forward messages sent there to your YouTrack helpdesk. For specific instructions, see Email Forwarding.
If you have a business email address that is hosted under your own domain, you can establish a connection that retrieves messages directly from the mail server. For instructions, see Mail Server Connections.
For YouTrack Cloud, you can set up a connection with a default mailbox. This configuration processes messages sent to a dedicated email address associated with your YouTrack instance. With the default mailbox configuration, you don't need an external mail server, and the settings are predefined, so you don't need to configure anything. For more information, see Set Up a Mail Server Connection | YouTrack Cloud.
Testing Your Channel Setup
Once you have set up all the channels you want to use for your helpdesk, test them each using different email accounts. To make sure the test messages correspond with the messages that will be sent to your customers, be sure to use email addresses that are not associated with registered accounts in your YouTrack site. Many email service providers let you set up email aliases, which are perfectly suited for this purpose. You can create an alias account for each channel you want to test, then review the responses from the YouTrack helpdesk in the same inbox.
For your online forms, copy the direct link from the channel settings in YouTrack, then open the link in your browser using private/incognito mode. This ensures that you experience using the channel as an unauthenticated reporter.

For your email channels, send a test message from one of your email alias accounts directly to the email address you set up for this channel.
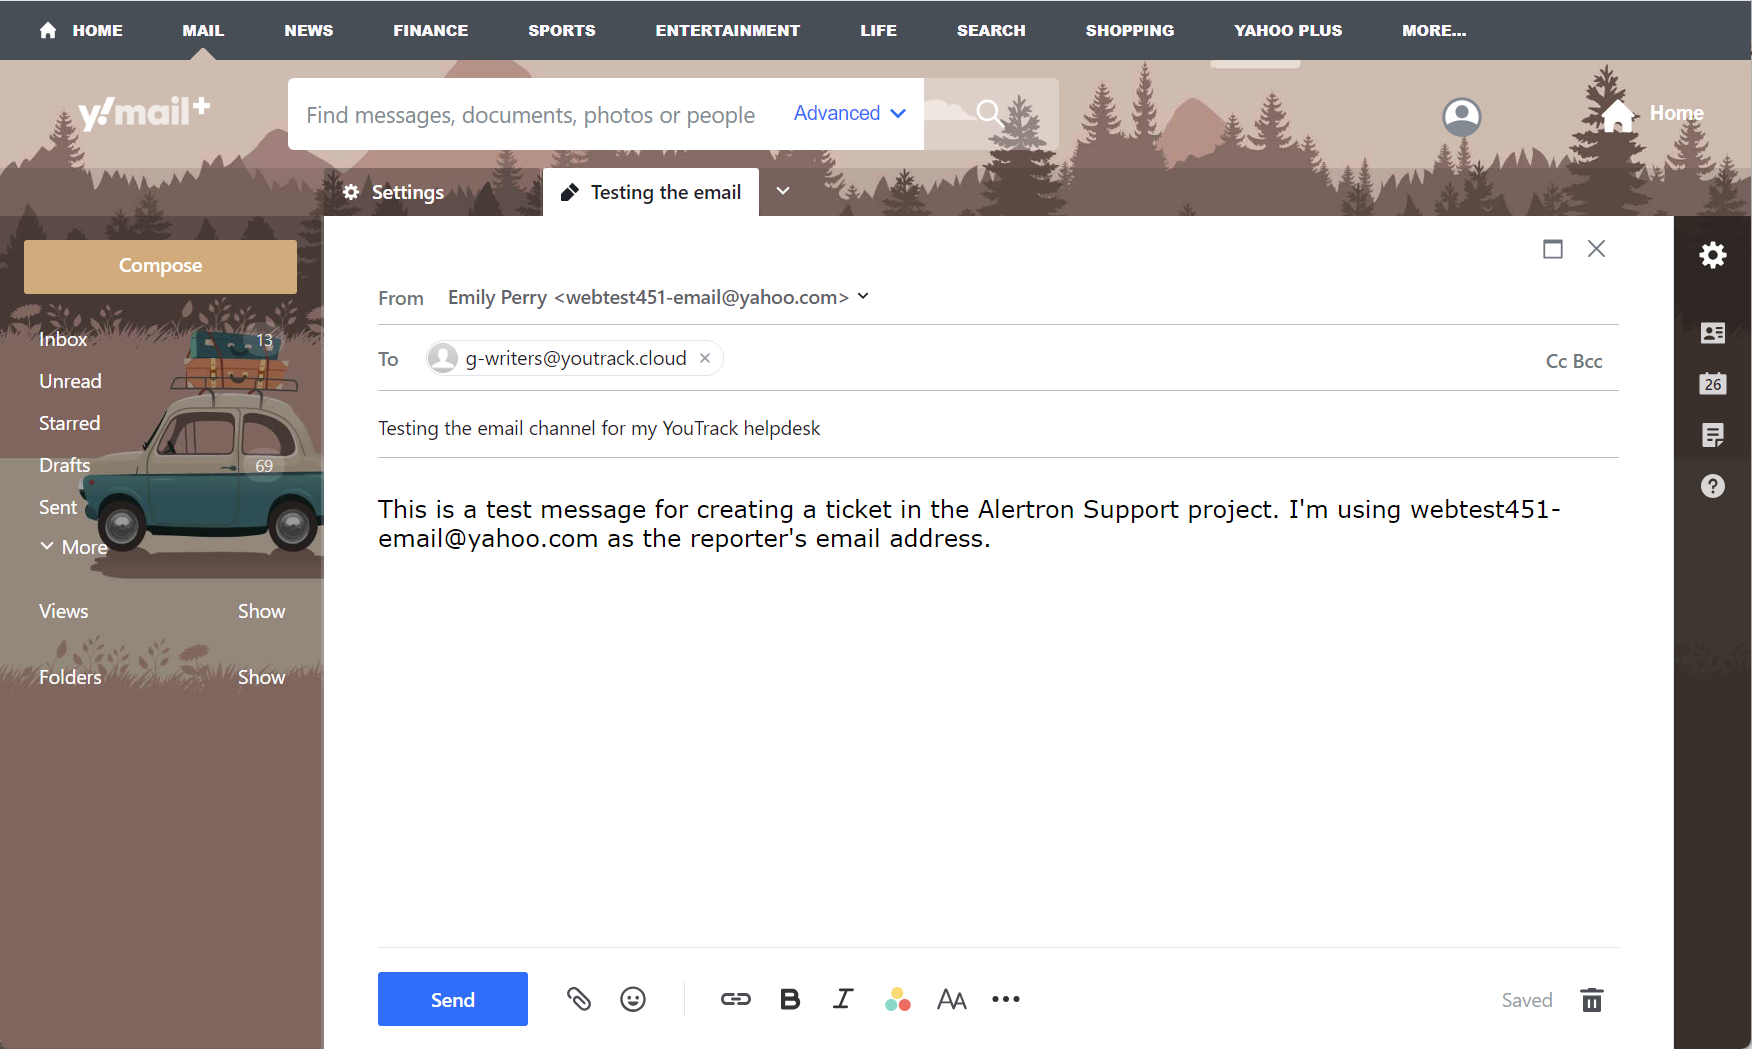
For each test message you send, YouTrack sends a confirmation email to your test account's inbox. Once you have tested all your channels, open your inbox and review each message.
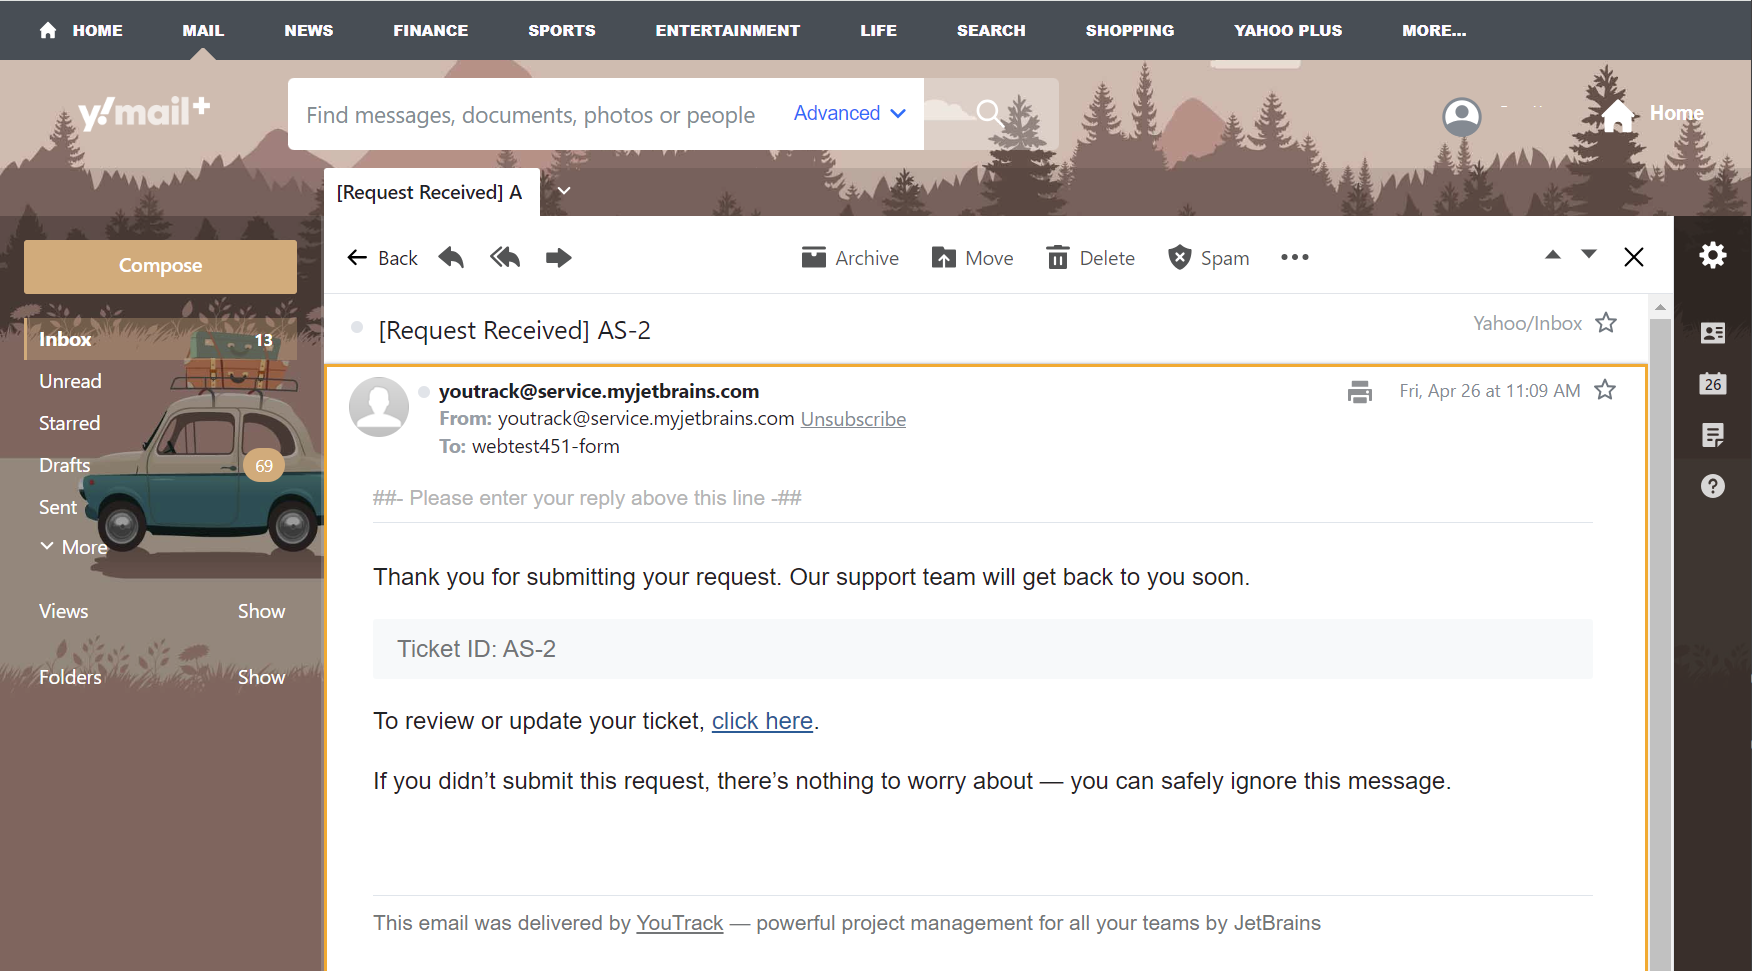
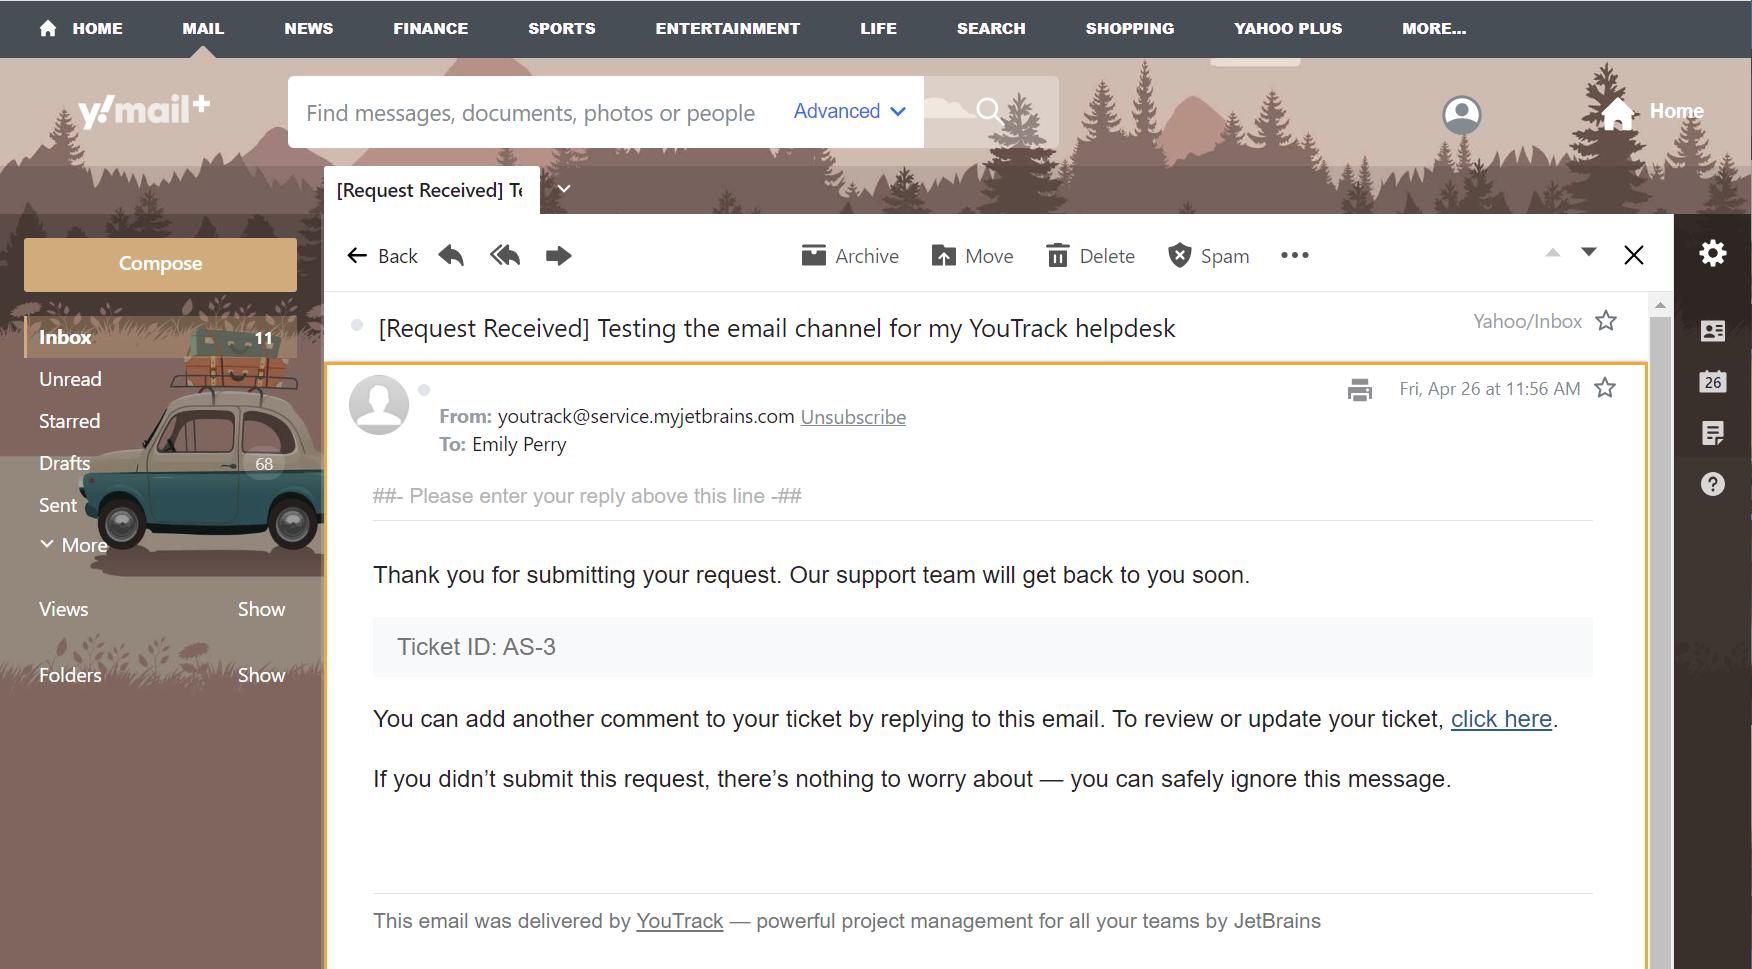
Next, open the Helpdesk page in YouTrack. Here, you'll find the tickets that were created from the messages sent to your helpdesk channels.

Open each ticket and post a reply as a public comment.
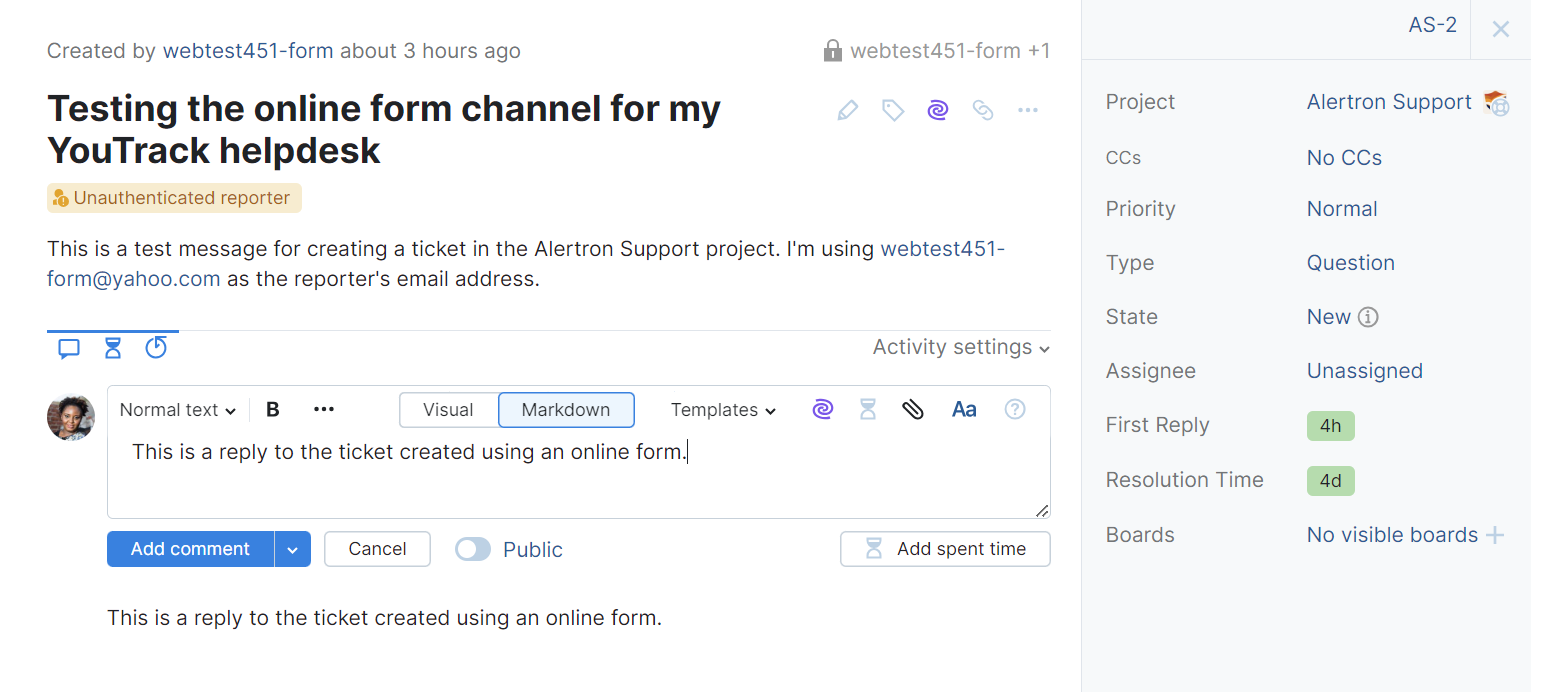
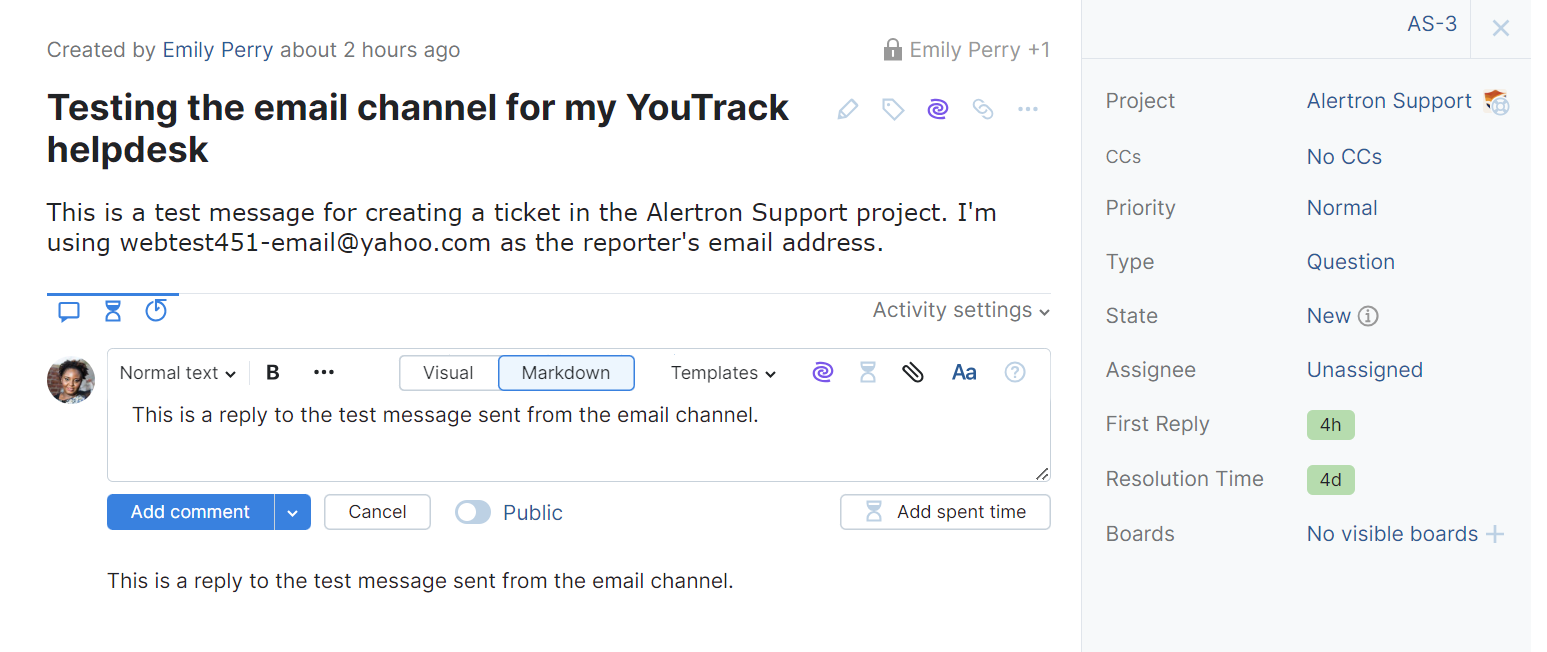
After a minute or two, check your email inbox and review the messages generated by each comment.
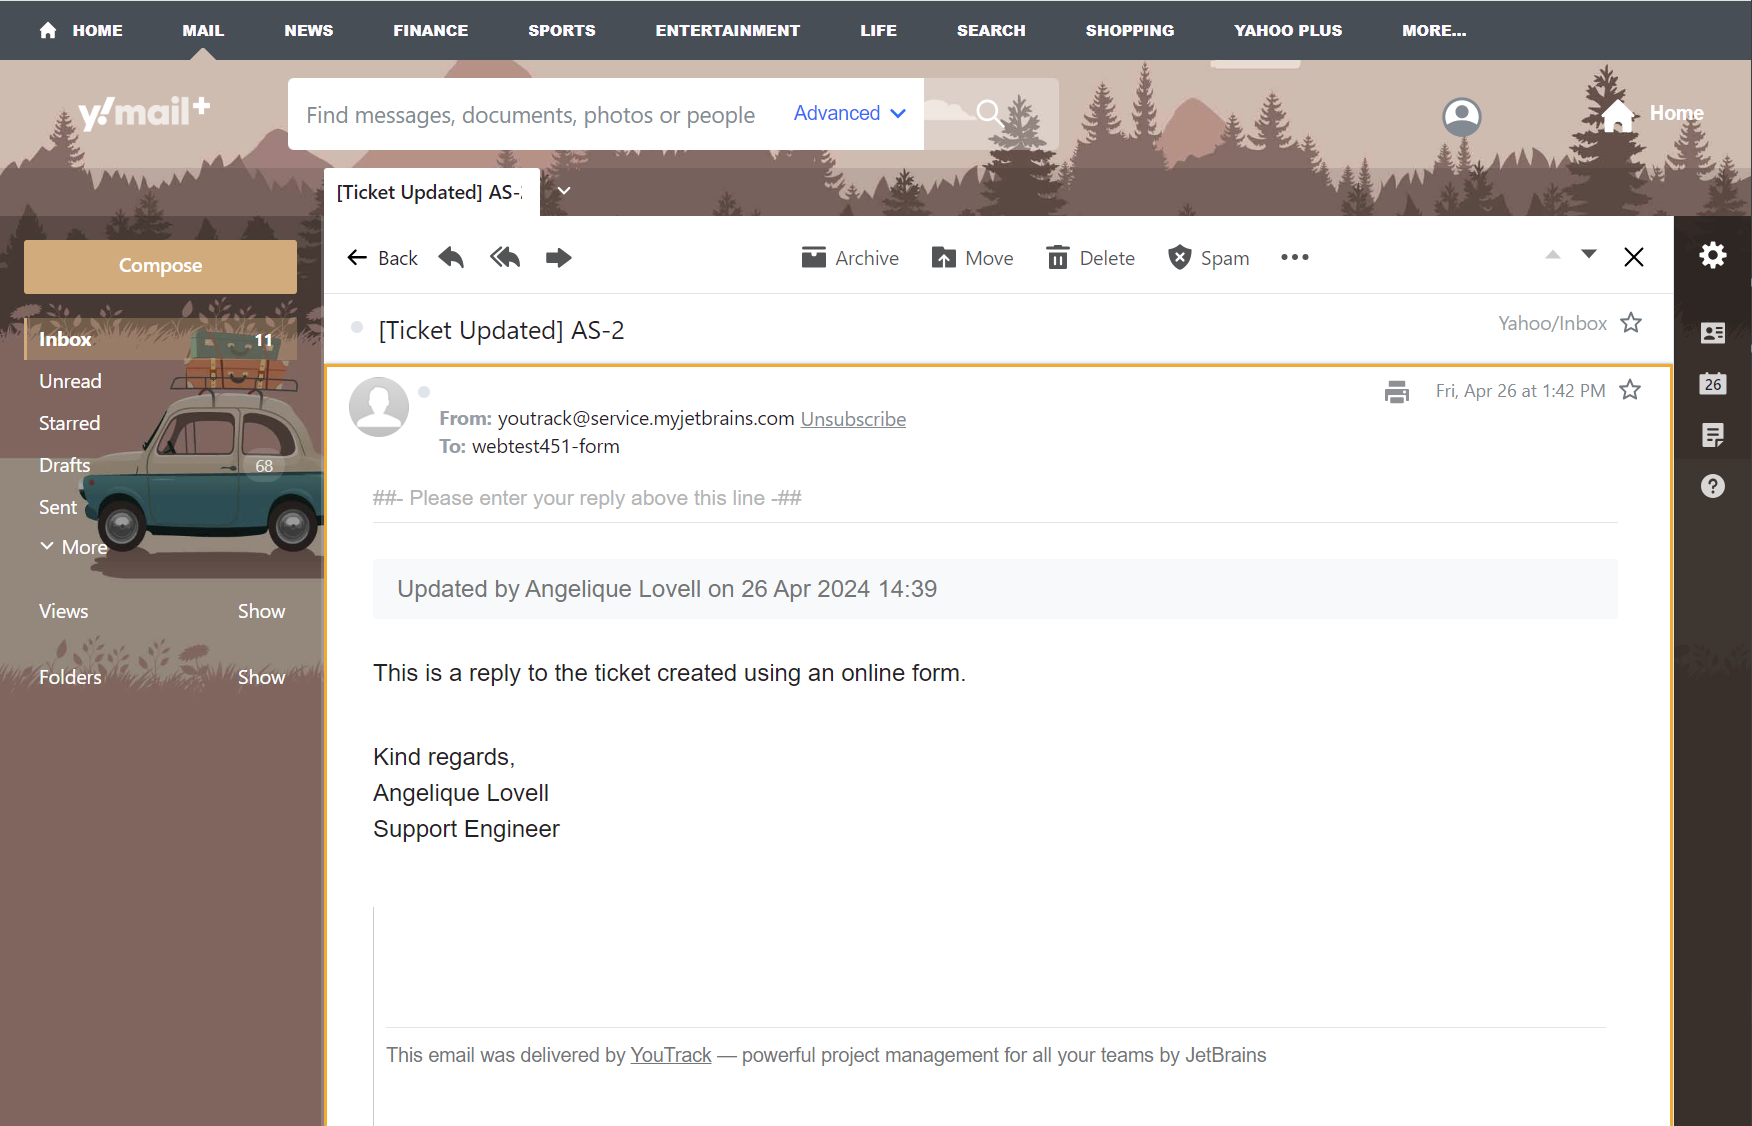
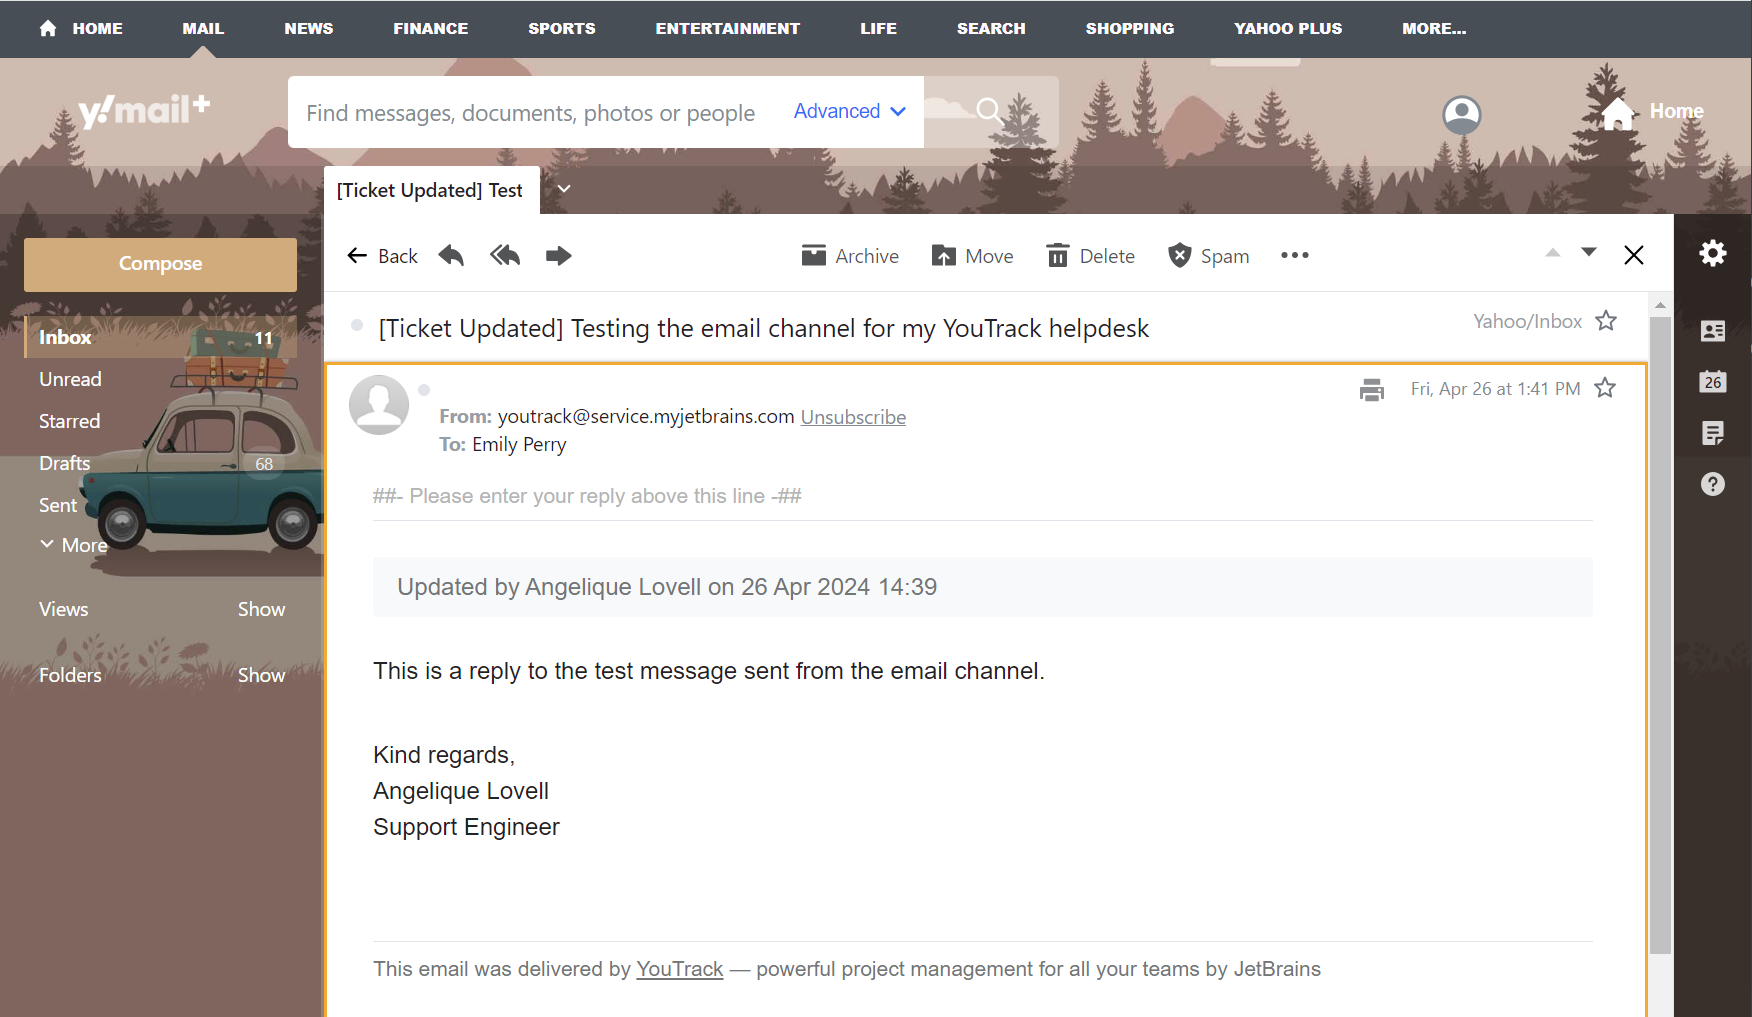
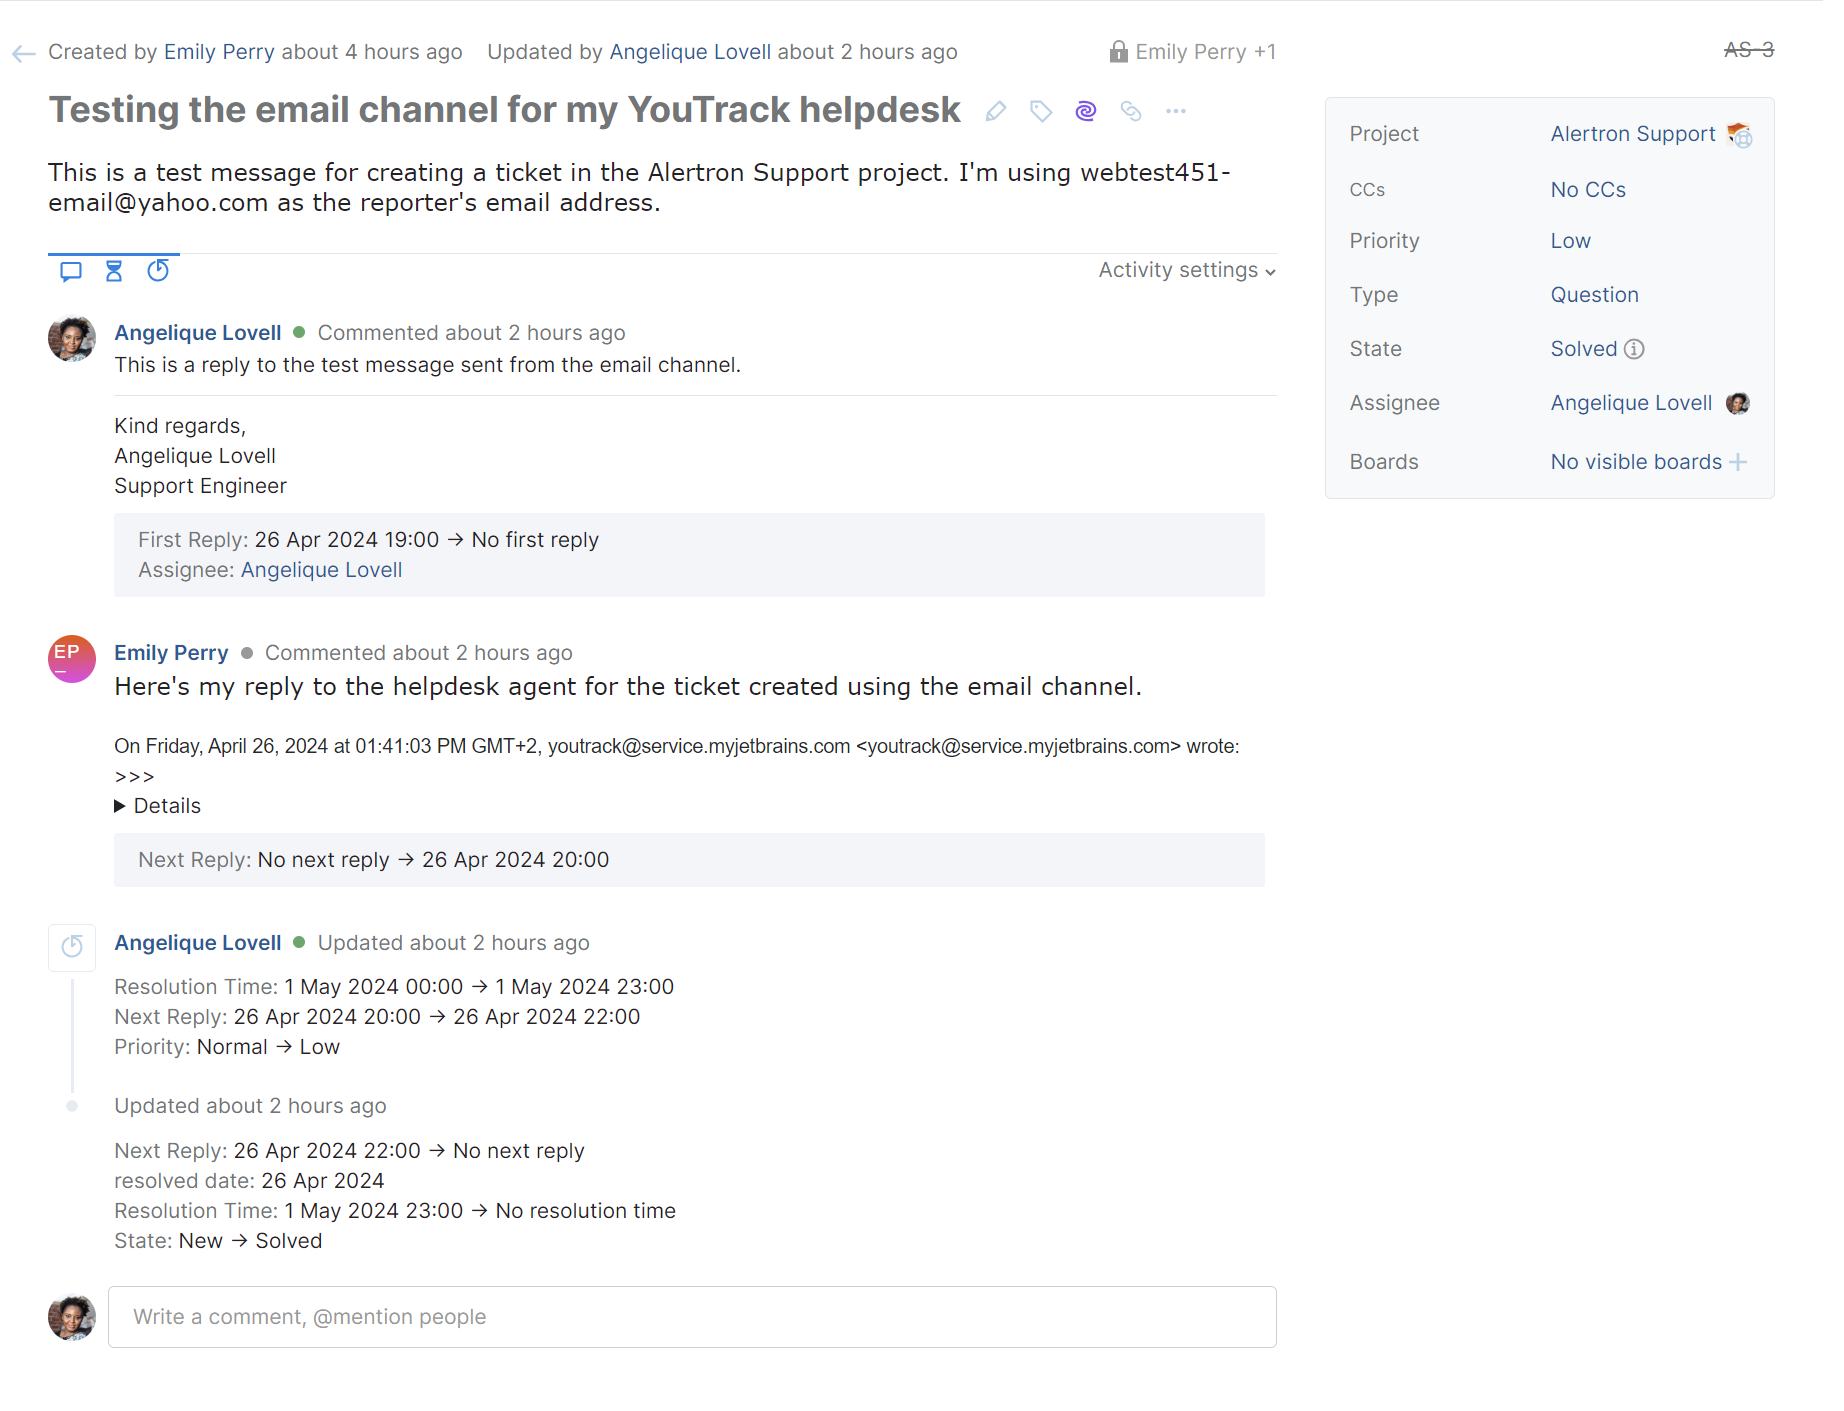
From here, you can continue testing by replying to each message from your test inbox. This lets you see how replies are added as comments to helpdesk tickets.
Customize Sender Name and Email Content
Once you have set up your helpdesk channels and have generated some sample messages, check these messages and make sure they're consistent with your brand, tone, and language.
Sender Name
First, check the sender name used for email notifications that are sent to reporters.
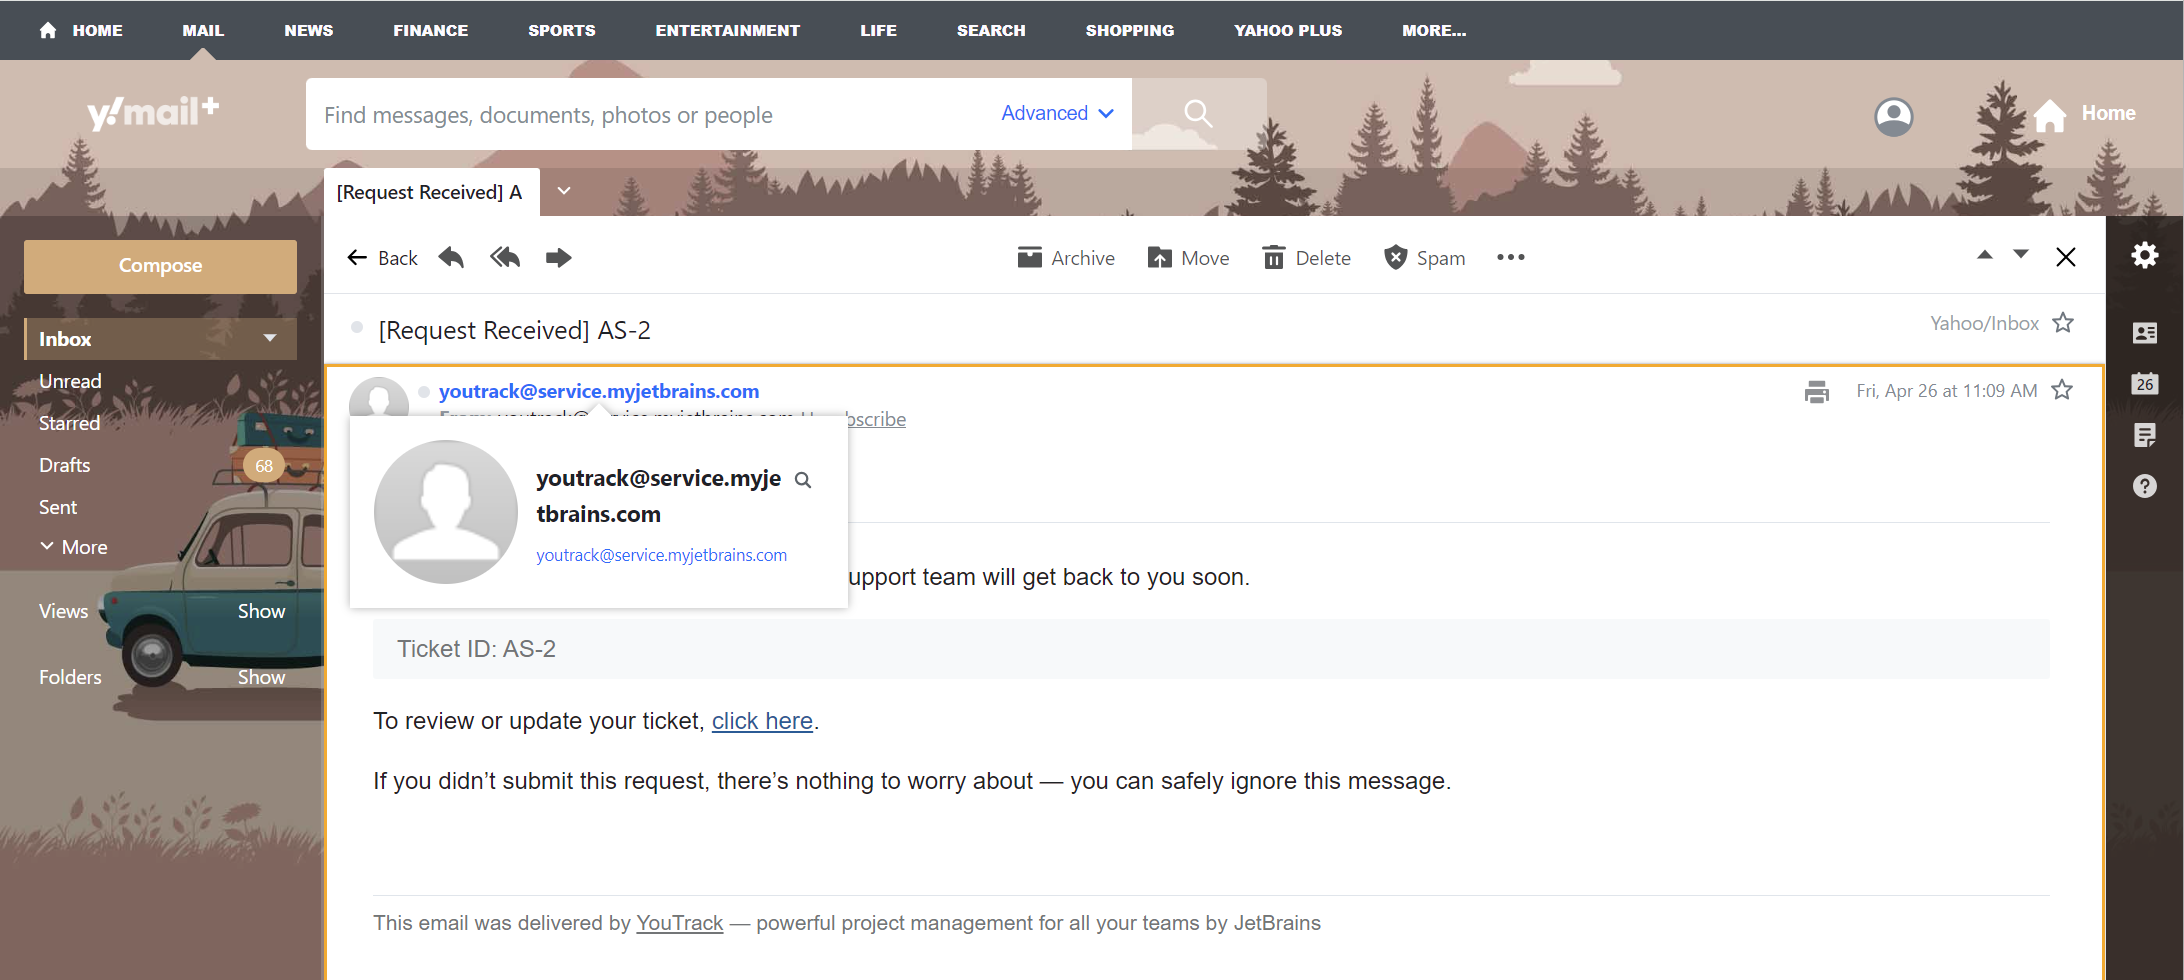
The sender name for your YouTrack site is defined at the global level by a system administrator. If this setting is empty, the email address of your mail server is used instead.
For YouTrack Cloud instances that use the default mail server, this will either be youtrack@service.myjetbrains.com or service@youtrack.cloud.
If you see another value used as the sender name for the notifications in your helpdesk project, this means an administrator has set a custom name at the global level.
YouTrack Server installations and Cloud instances that are connected to a custom mail server use the From address defined in the global notification settings.
To make sure reporters recognize notifications about the tickets they submit to your helpdesk, it's important that you customize the sender name in your helpdesk project. YouTrack lets you override the default sender name or From address on a per-project basis.
To access the setting for configuring the sender name in your helpdesk project, open the Edit Project page and select the Notifications tab.

To learn how to customize the sender name in your helpdesk project, see Notification-related Project Settings.
Delimiter for Replies
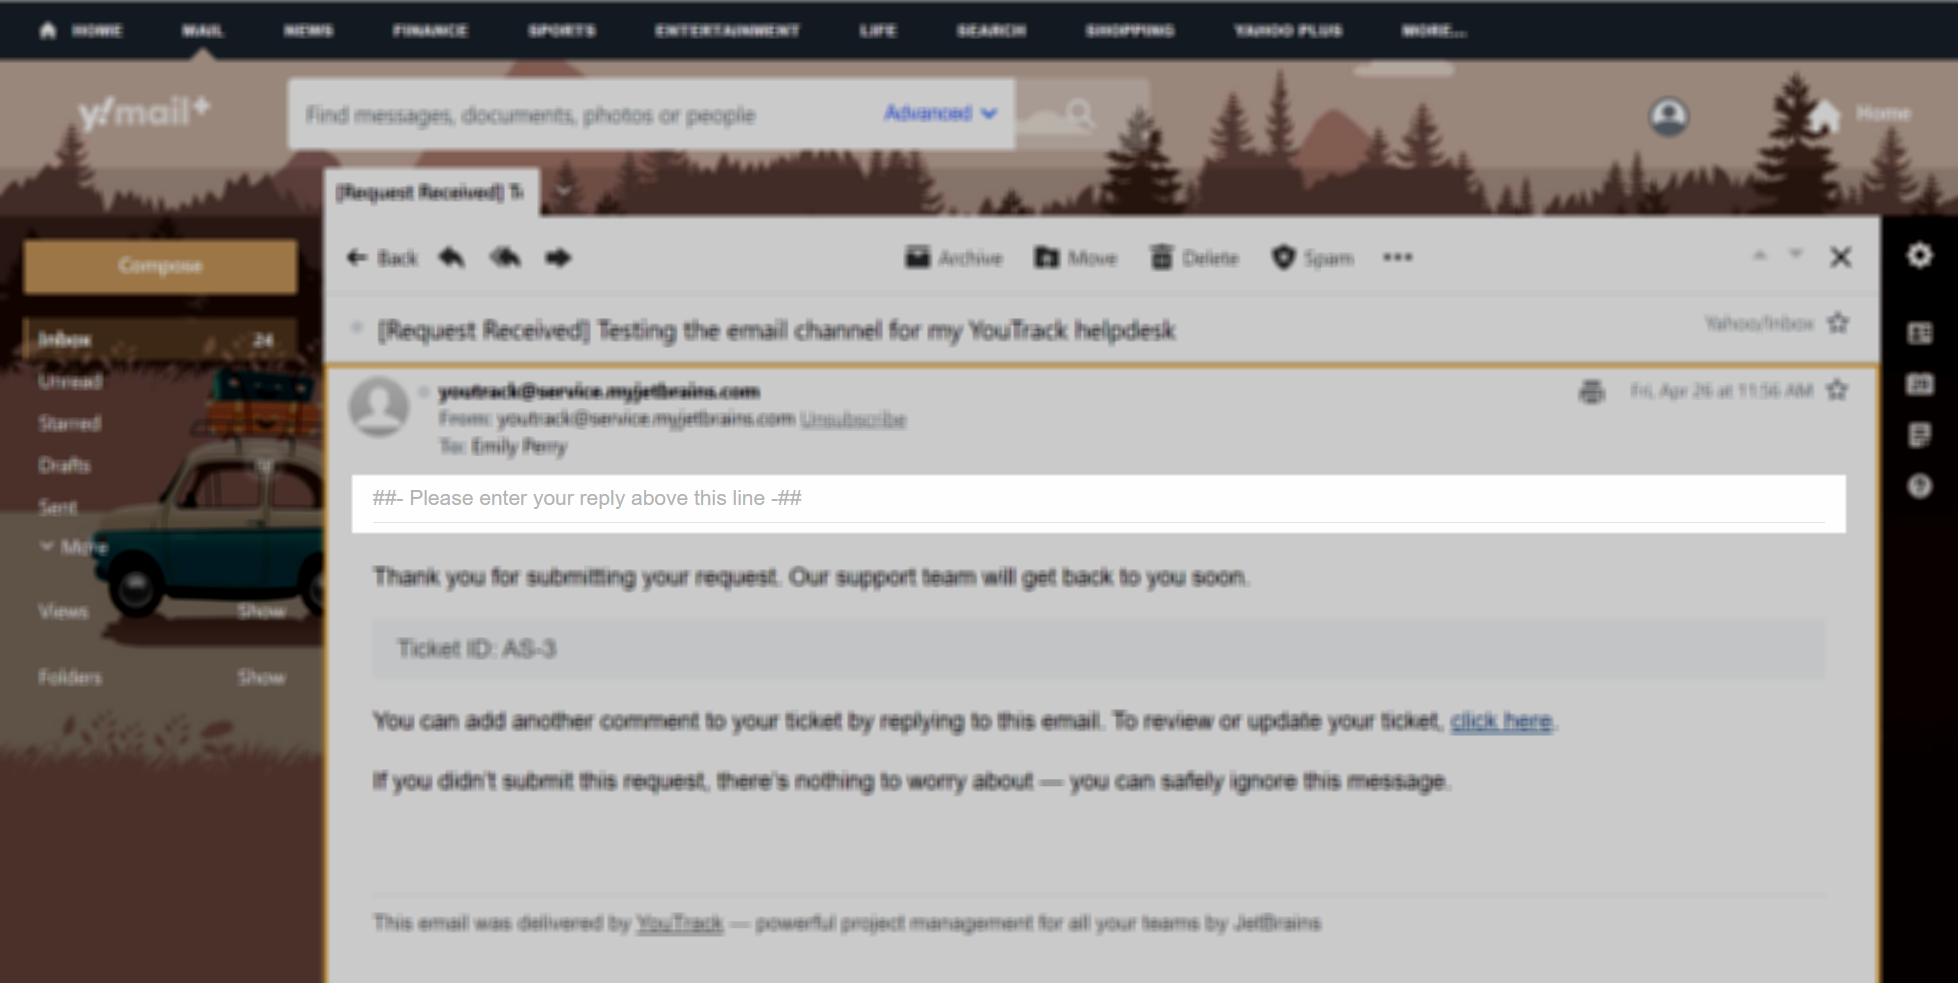
When you have configured an email channel for your helpdesk project, YouTrack automatically enables a default delimiter for replies. This helps the mailbox integration transform replies into comments with greater precision.
If a user writes an email reply and puts their text above the delimiter line, YouTrack will then show only the latest reply and collapse the rest of the thread in a comment. Replying above the delimiter lets you keep only the relevant information in the YouTrack comments.
The delimiter text is appended to the beginning of each reply that your agents post as public comments. The default delimiter text reads Please enter your reply above this line.
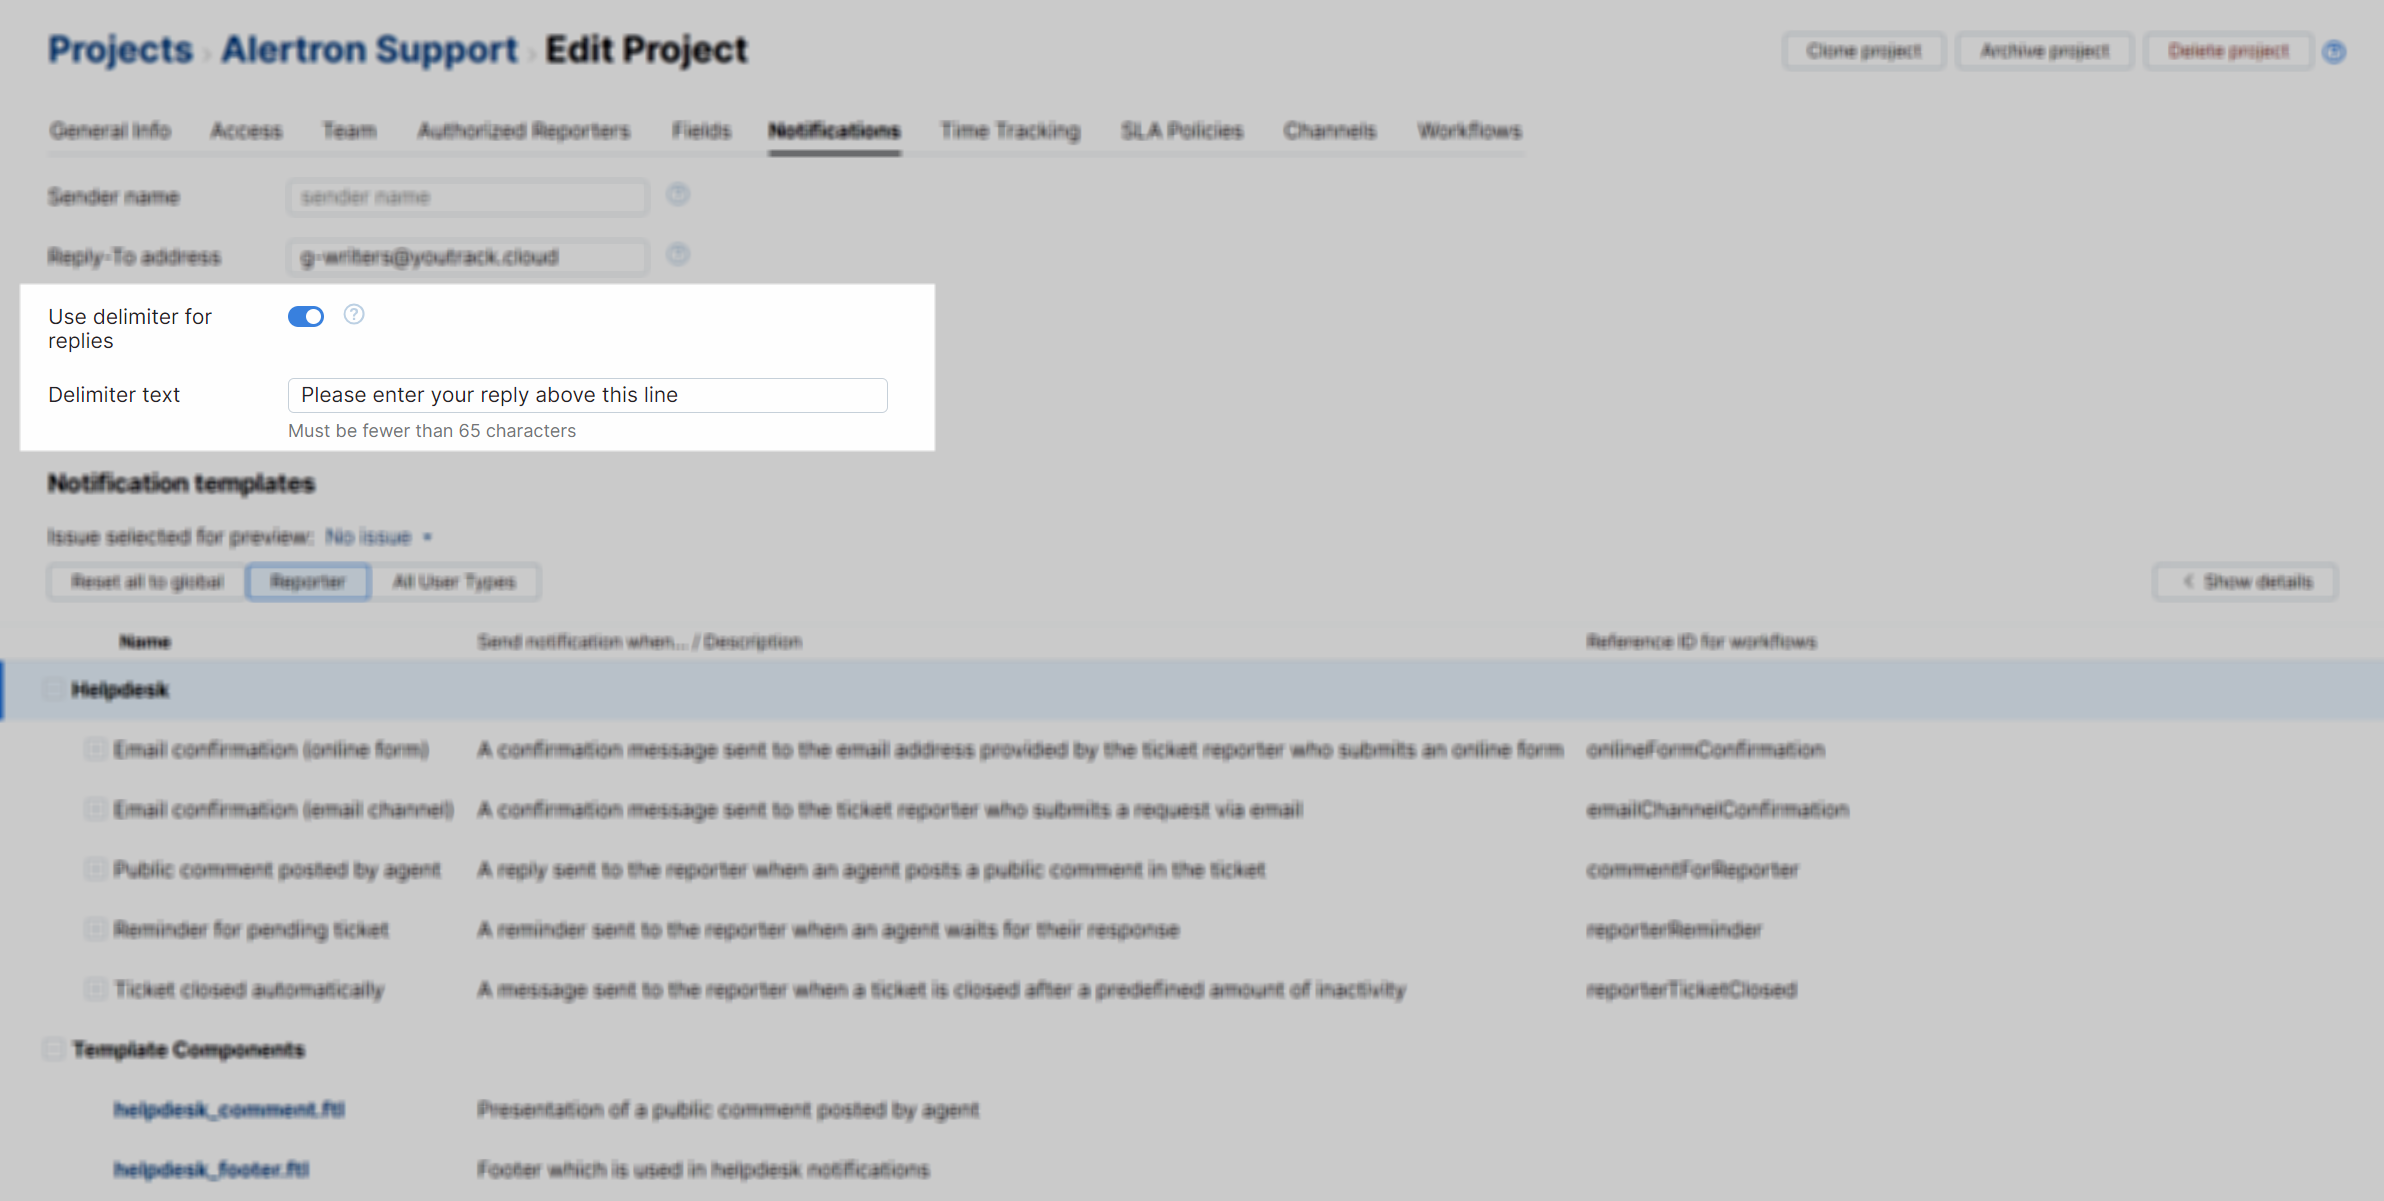
To remove the delimiter, open the Notifications tab on the Edit Project page and switch the Use delimiter for replies option off.
To change the text of the delimiter, enter the new text in the Delimiter text field.
Email Content
The last thing you'll want to check is the content in your email notifications. Each email notification sent by YouTrack can be customized independently for each project. If you want to apply the same customization to email messages in all your helpdesk projects, a system administrator can apply these customizations at the global level.
Each notification is supported by a Freemarker-based template. These templates are broken into sections that correspond with the different parts of each message, including the subject line, message body, and footer.
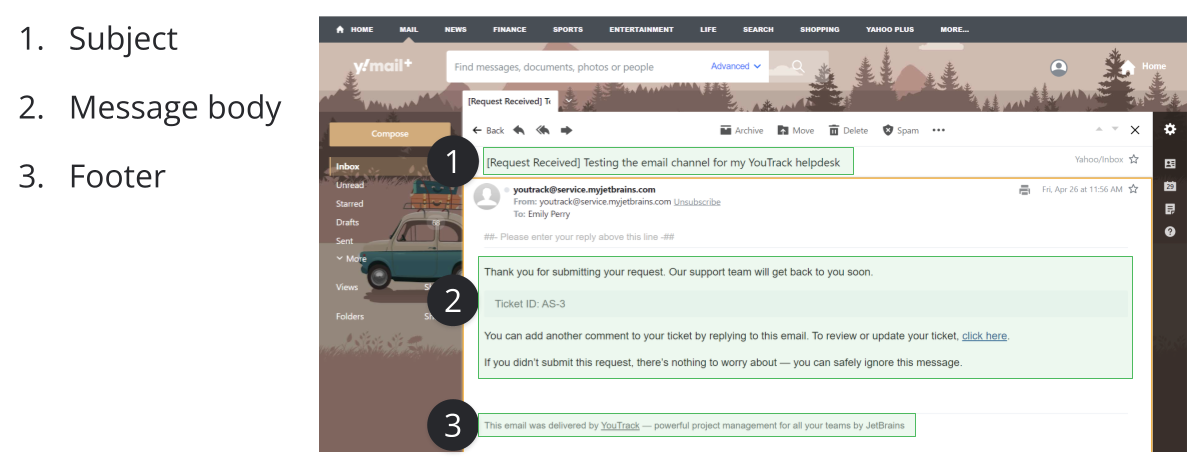
To customize the email notifications for your helpdesk project, open the Notifications tab on the Edit Project page, then locate the element you want to update in the Notification templates list.
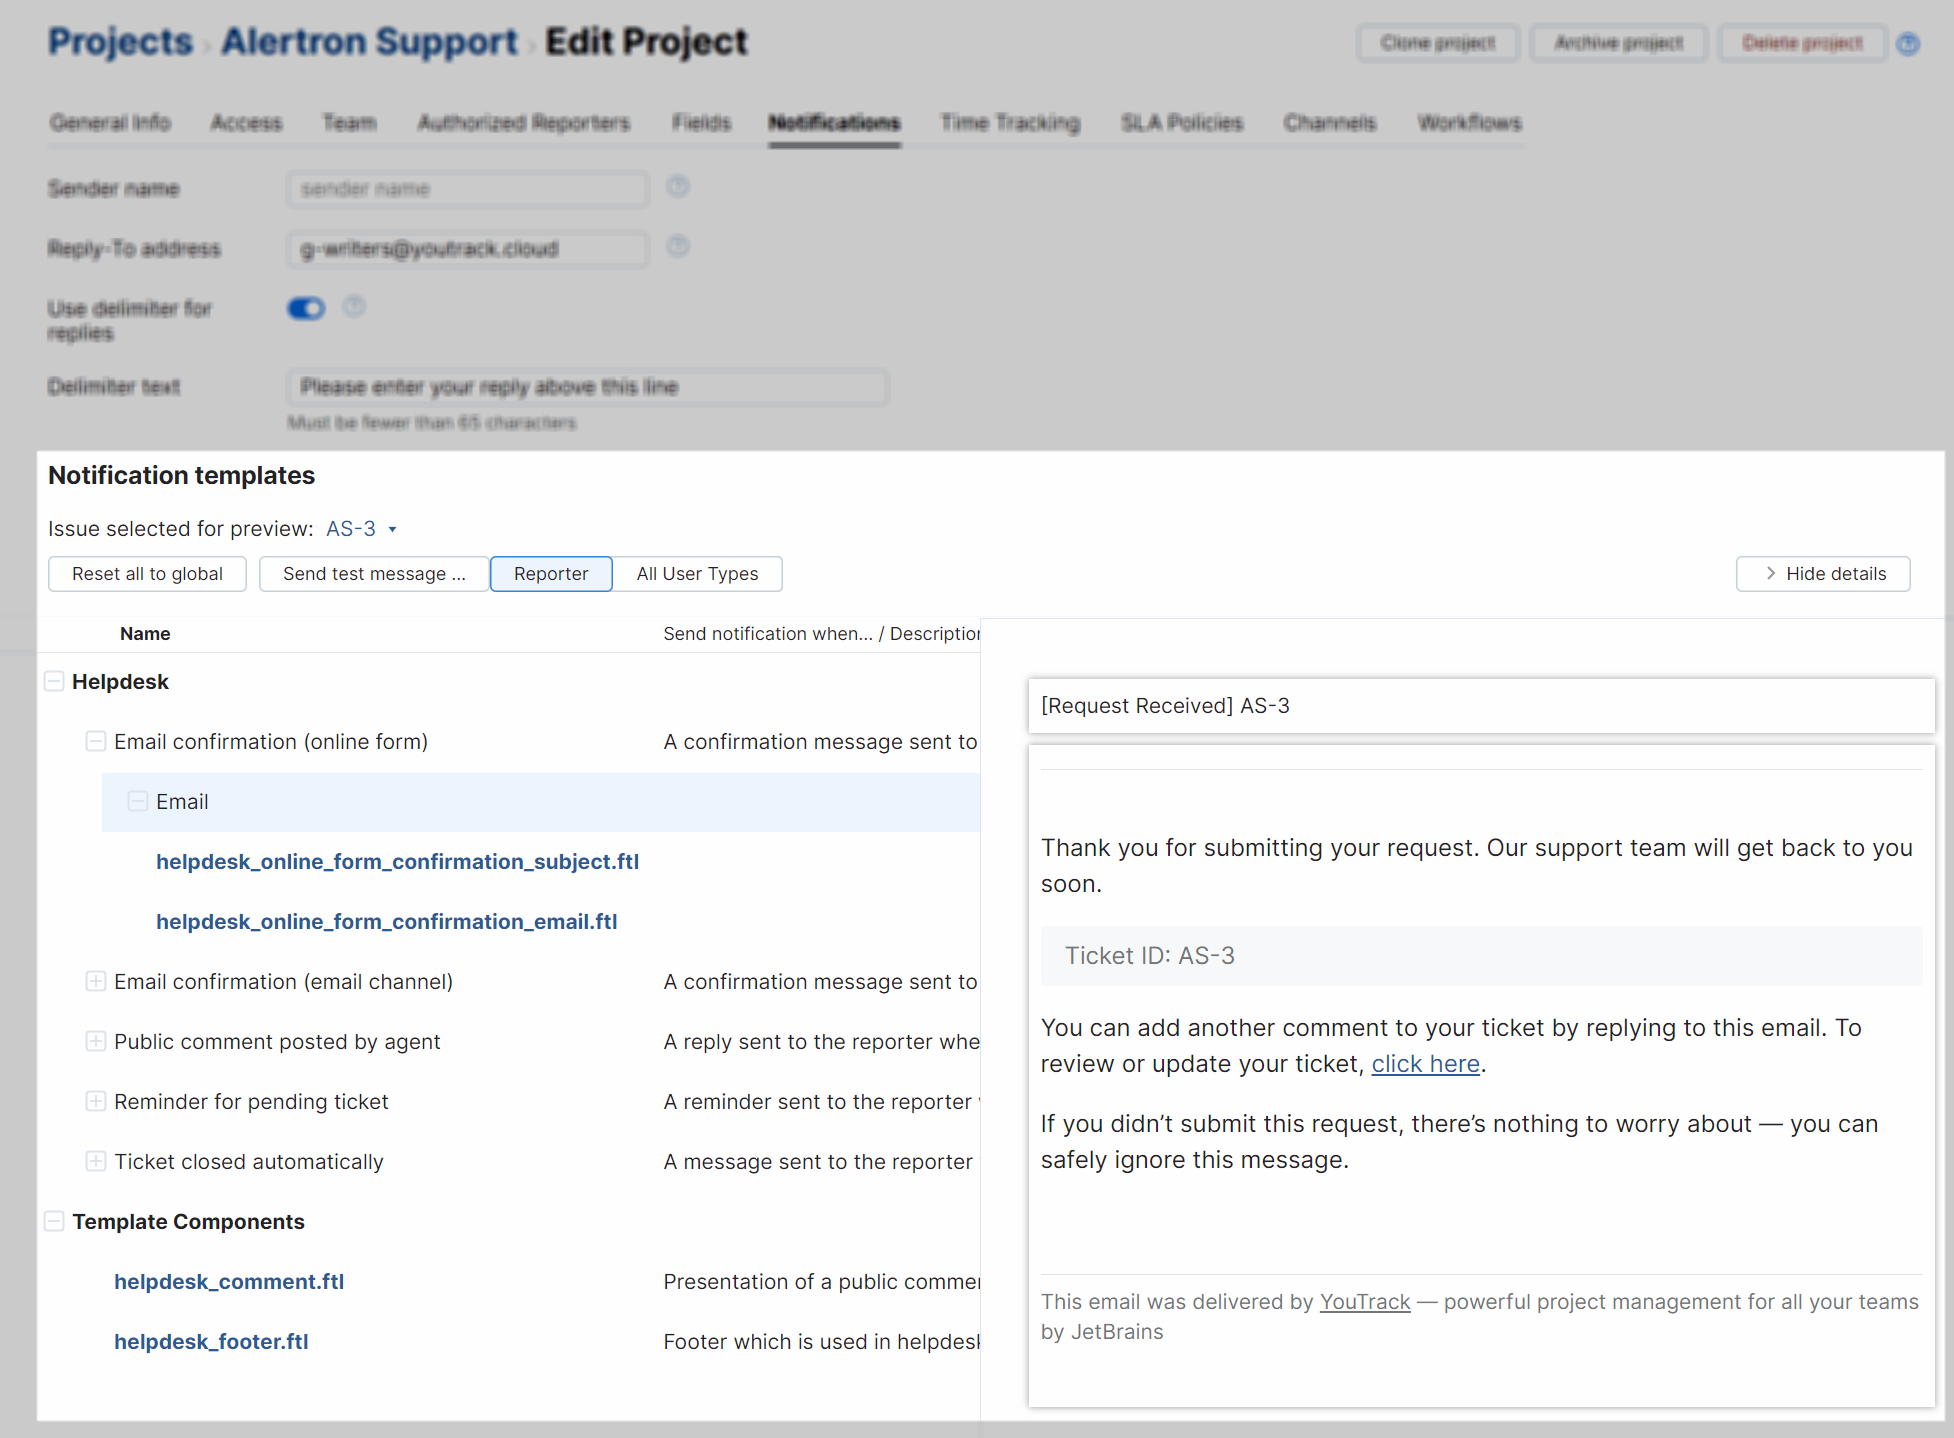
For example, if you want to update the text used in the footer for all your helpdesk notifications, open the helpdesk_footer.ftl file in the Template Components section of the list, then update the content in the file.
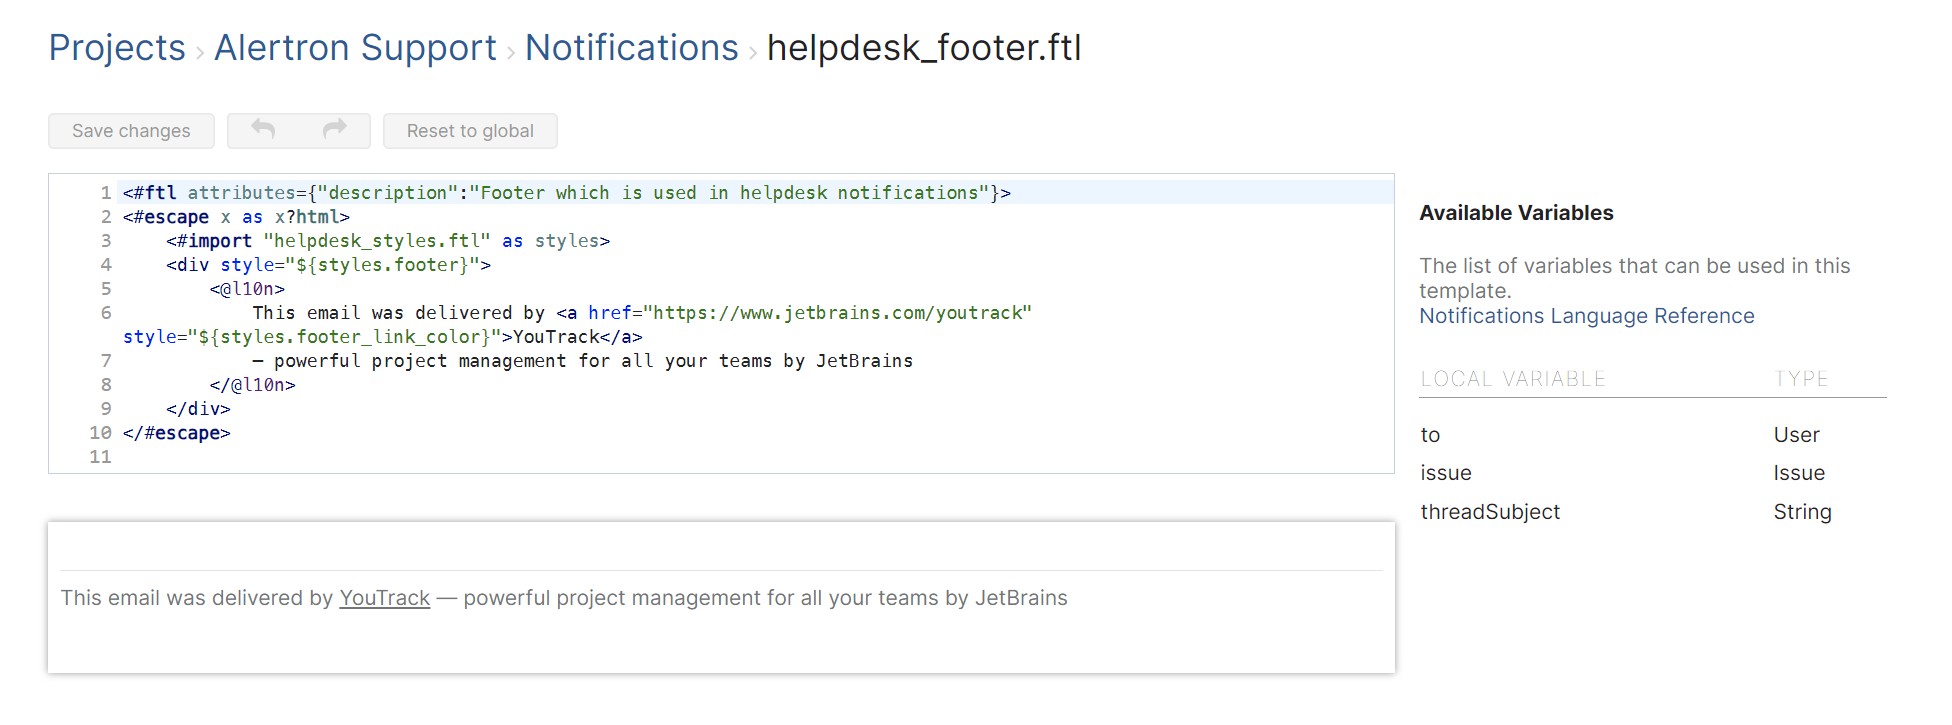
To learn more about editing notification templates in a helpdesk project, see Helpdesk Notification Templates.
Automate with Workflows
One of the final elements you want to check before launching your helpdesk is the collection of workflows attached to the project. Workflows in YouTrack are a set of rules and automated actions that help you process and manage helpdesk tickets. For example, the workflows that are automatically attached to new helpdesk projects contain rules that automate the following actions:
Merge tickets when a ticket that duplicates an existing ticket is reported.
Send reminders to reporters when a ticket has been marked as Pending. If a ticket is still pending after 21 days of inactivity, a comment is posted to the ticket, and its state is changed from Pending to Solved.
Reopen tickets when a reporter adds a new comment to a resolved ticket.
Close tickets that have been marked as spam.
Assign tickets to the agent who adds the first public comment.
Additional rules let agents perform the following actions:
Merge duplicate tickets manually.
Create a copy of a ticket in an issue-tracking project.
Create a new ticket from a comment.
Mark tickets as spam.
If you think that any of these actions would be confusing or counterproductive, you can deactivate them without affecting the behavior of other projects in the system. You can also take inspiration from the set of default actions and enforce your own business logic by writing your own rules.
Setup Instructions for Agents
The remaining features described in this tutorial are relevant to agents who handle tickets in the helpdesk project.
If you're reading this guide as a project administrator or someone who is responsible for managing a team of customer service representatives, use these setup guides to make sure your agents take full advantage of the features available to them in YouTrack. You can also participate in some of the setup as you provide onboarding instructions for your team.
If you're working with a helpdesk project as an agent, follow the instructions provided here to make sure you're prepared to handle incoming requests with maximum efficiency.
To learn more about handling tickets as a helpdesk agent, see Tools for Agents.
Add an Agent Signature
Helpdesk agents have a dedicated setting in their YouTrack profile that lets them store a default signature. This text is automatically appended to public comments posted in helpdesk projects.
To locate your agent signature, open your YouTrack profile.
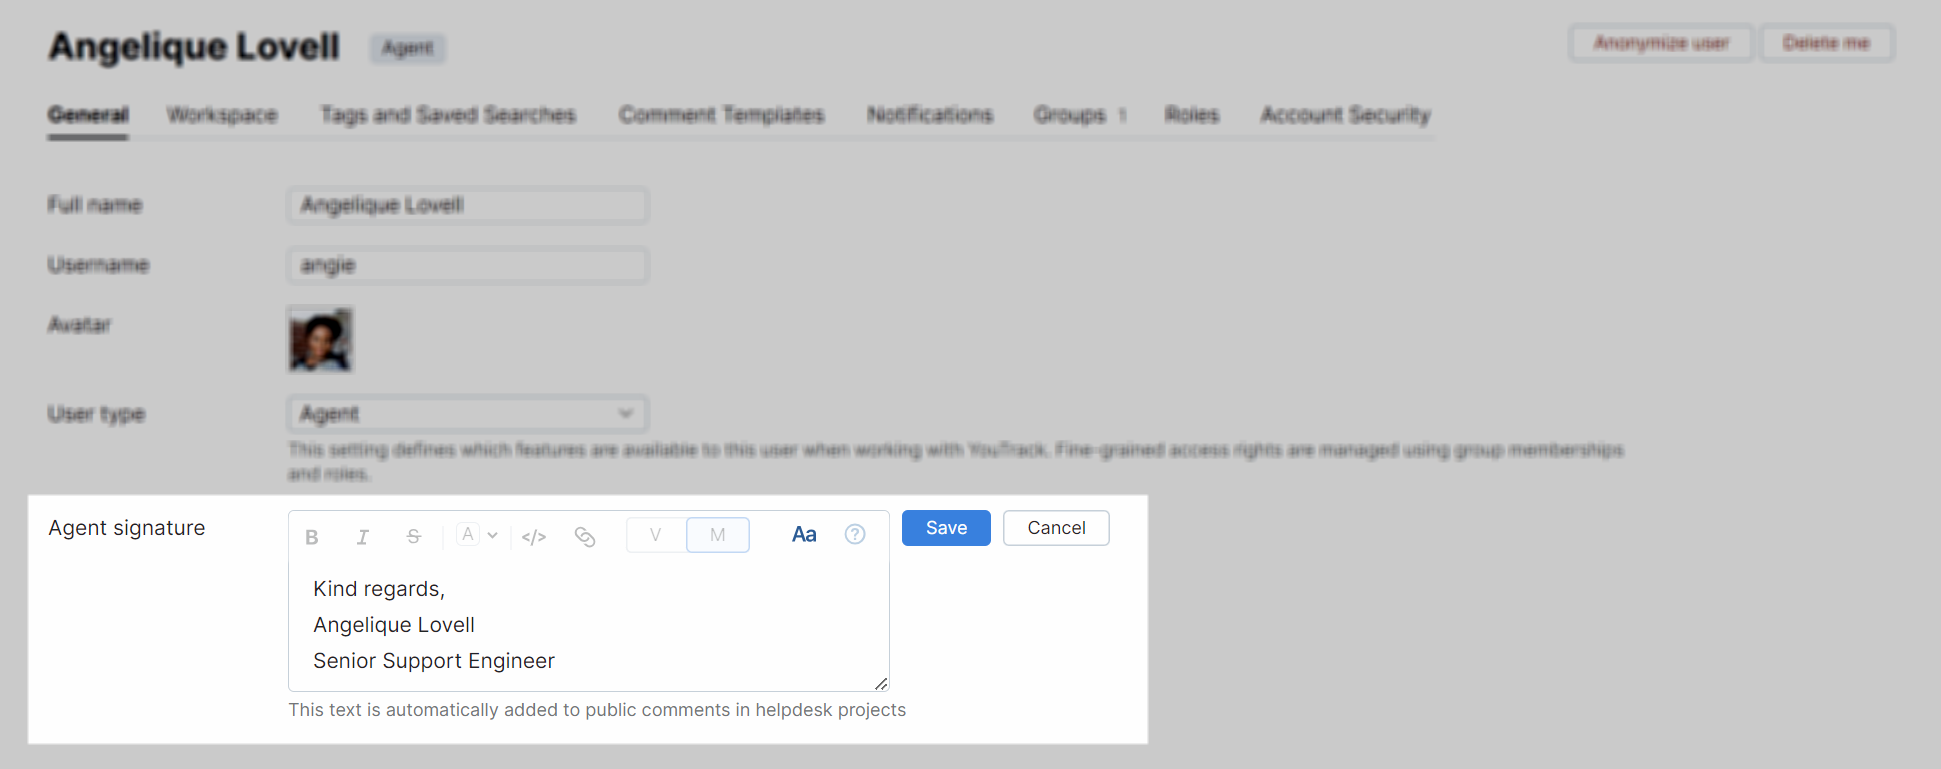
For more information, see Agent Signatures.
Create Custom Views
Whenever a new helpdesk project is created, YouTrack generates a set of default saved searches. Saved searches are predefined search queries that let you load and view a list of tickets that match specific search criteria. The predefined views for agents are configured to show:
All tickets assigned to me
New tickets
Unresolved tickets
Unresolved tickets assigned to me
These saved searches are automatically added to the sidebar for every member of the helpdesk project team.

These queries are the most commonly used by agents in helpdesk projects. Even so, you may find that other queries are more informative for your work or that your role requires an additional level of oversight. You may even find that your team needs to pay attention to a particular type of ticket that warrants its own saved search.
YouTrack lets you save an unlimited number of search queries for your account and lets you choose whether to use them for your own benefit or share them with other members of your team.
Whenever you change the filters or search attributes for a query that displays a list of tickets, you are given the option to Update the query or Save as new.

Use the Update the query option to refine an existing search query, so it returns results that are more interesting or relevant to you.
Use the Save as new option to add this query to your list of saved searches without overwriting an existing query.
To learn more about this feature, see Predefined Search Queries for Tickets.
Customize the Ticket List
Tickets in helpdesk projects are presented in a list. The list is filtered based on the query used for the saved search that is selected in the sidebar.
This list is presented in a table format, which means you can sort the list of tickets for each of the columns shown in the table header. By default, YouTrack shows columns for the Summary, State, Project, Assignee, and SLA. To customize this view, open the List Settings menu.
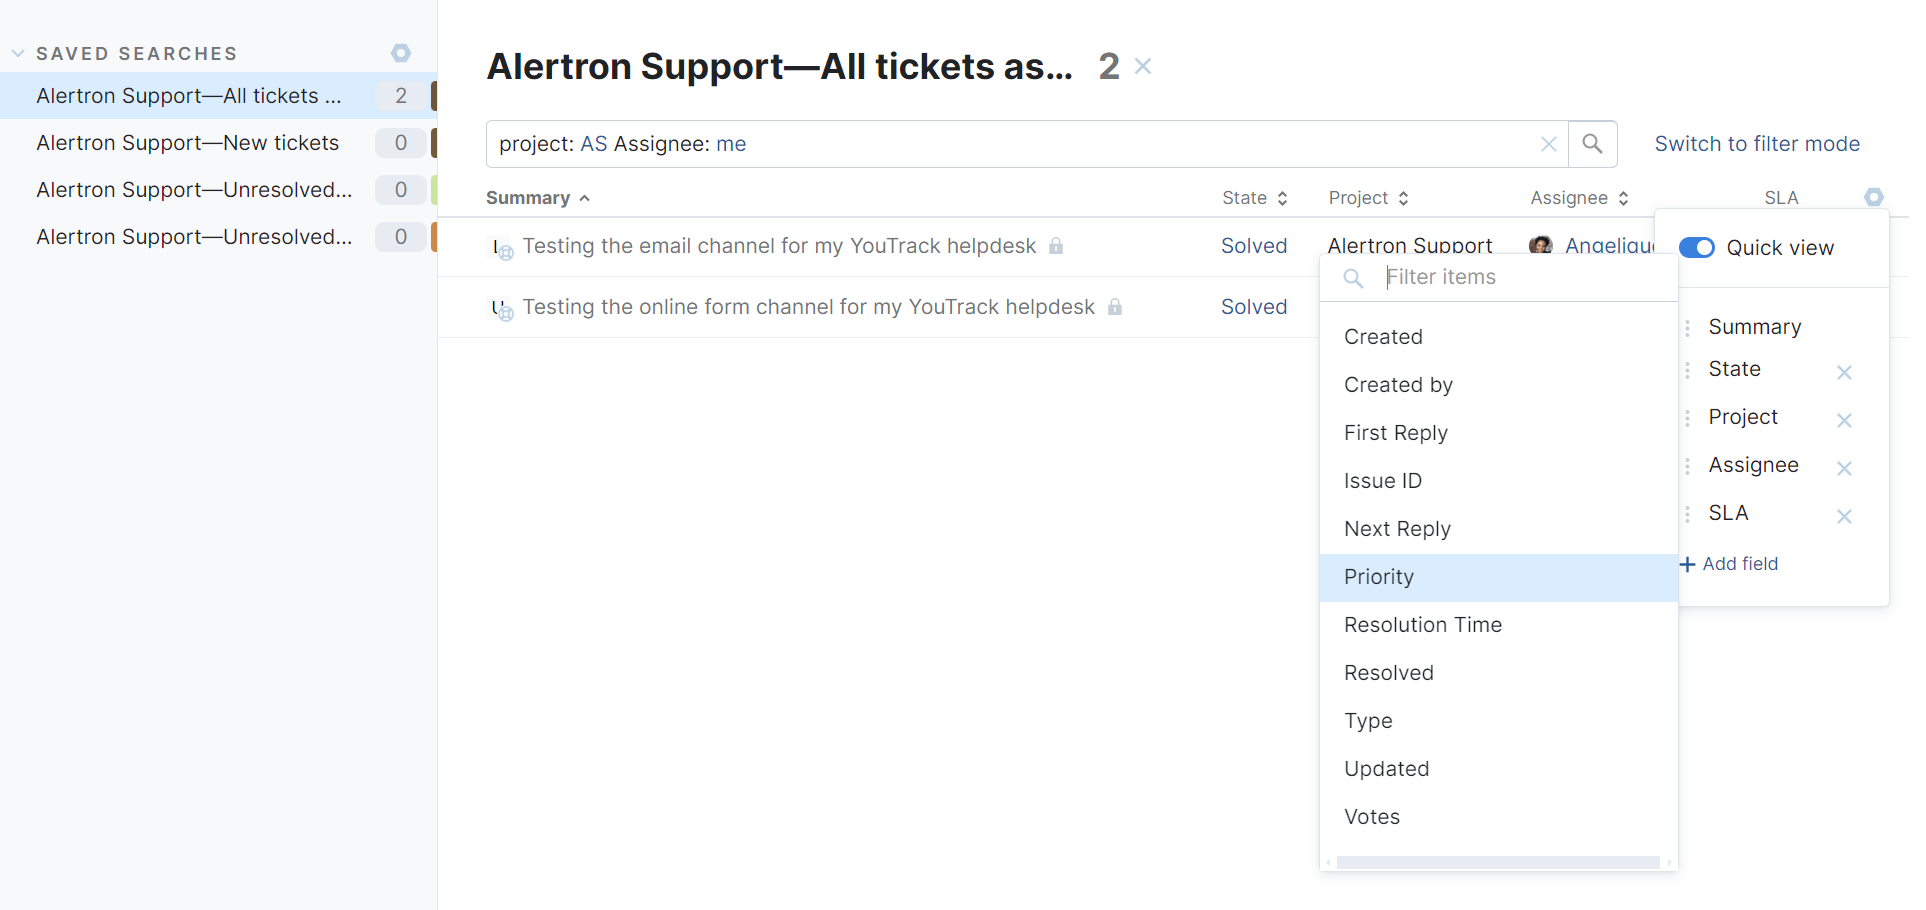
To remove a column from the table, click the x icon next to an existing field.
For example, if you're only working with one helpdesk project, the Project column is irrelevant and can be removed without consequences.
To add a column to the table, click the Add field button and select the field you want to show.
Drag the fields in the list to reorder the columns in the table.
Click the field name in the table header to sort the list in ascending or descending order based on the value stored in the corresponding field.
The configured columns and sort order are applied to all ticket views.
Create Comment Templates
One of the key features available to agents in helpdesk projects is the ability to save an unlimited number of predefined responses as comment templates. Like saved searches, you can create comment templates for personal use or create and share responses for use by other agents on your team.
Comment templates are something you can create in preparation for the launch of your helpdesk project or compile and refine as time goes by.
You'll also find this feature handy whenever there's a major change or a big announcement that stirs up controversy with your customer base. In these situations, it's always good to have a set of go-to responses that reinforce the narrative your company wants to put forth.
When you're working together with a group of customer service representatives, it's always a great idea to share your comment templates with each other and find ways to adapt them to specific situations. This helps ensure that your target audience experiences a consistent level of customer service and that your policies are explained in a consistent manner.
To learn more about this feature, see Comment Templates.
Add Articles to the Knowledge Base
When planning your helpdesk project, it helps to decide whether you want to keep your knowledge base for internal use or to make some or all of its content publicly available to external users.
A public knowledge base empowers users to find solutions to common issues on their own without having to contact support. By adding articles, you contribute to building a valuable resource that reduces your workload and improves customer satisfaction by enabling self-service support.
You can also use public articles to describe your policies for handling specific types of requests and outline your service-level agreements.
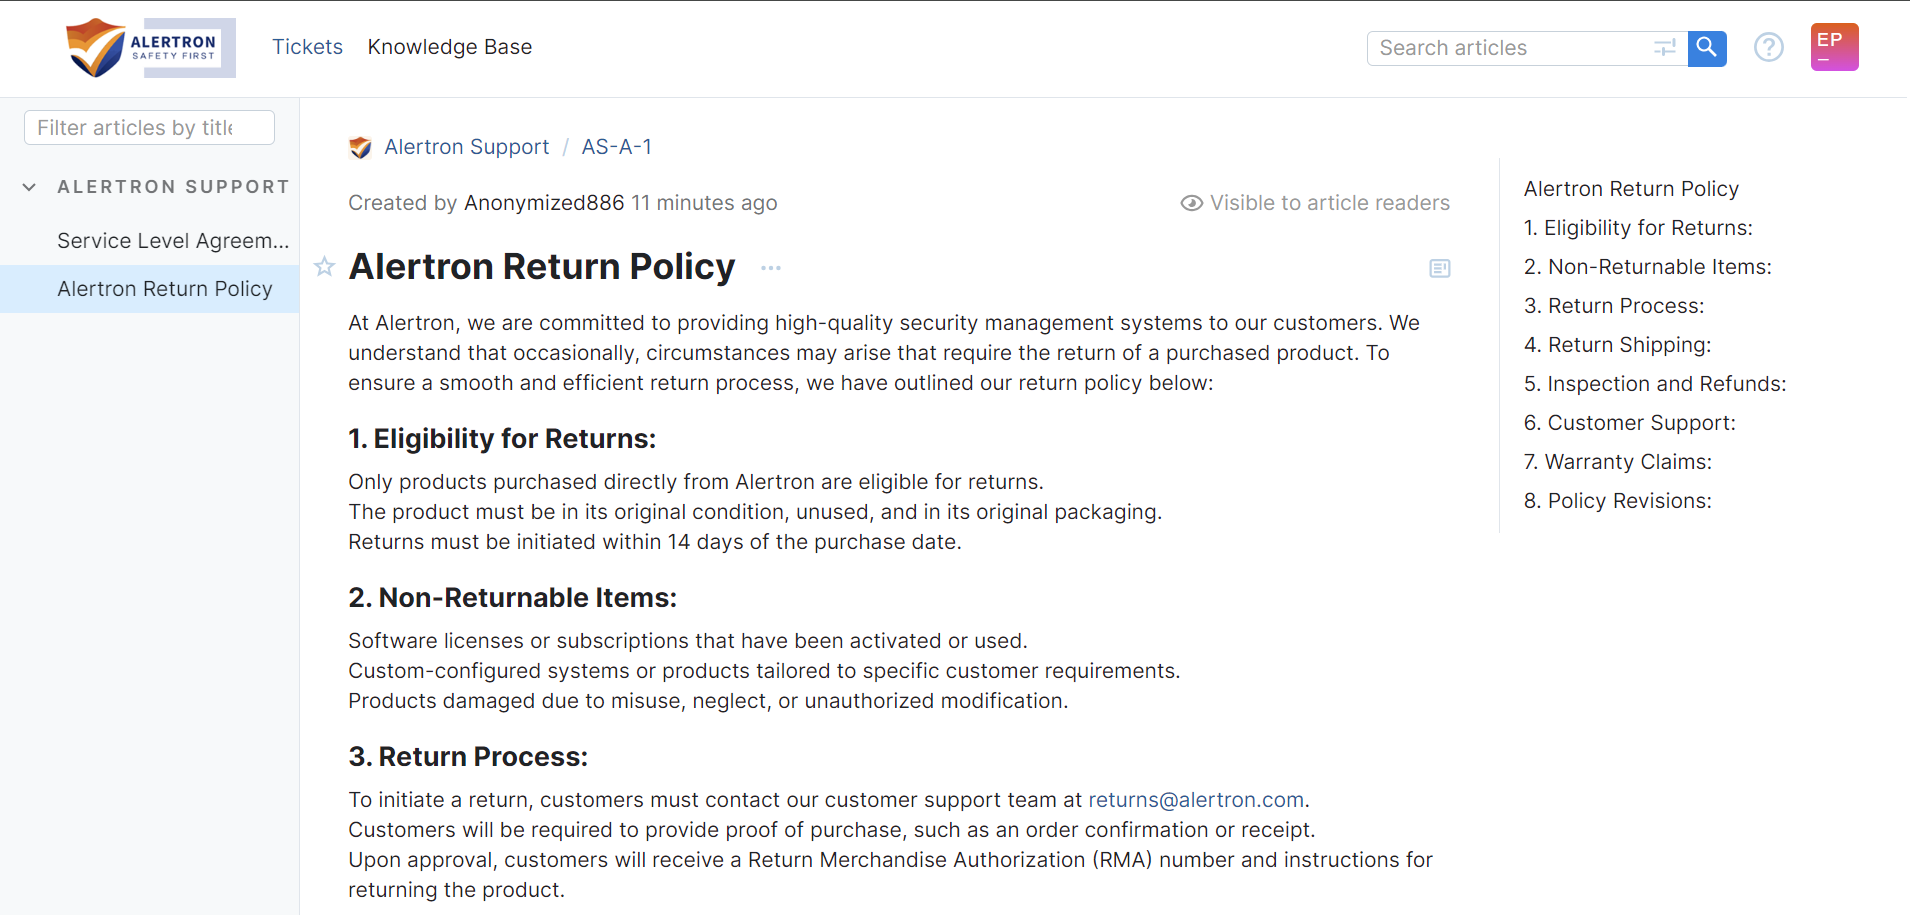
An internal knowledge base can give your team quick access to relevant information and solutions when responding to support tickets. By adding articles covering frequently encountered issues or standard procedures, agents can streamline their workflow and resolve tickets more efficiently. It can also help your team maintain consistency across all support interactions, which helps build trust with your customers.
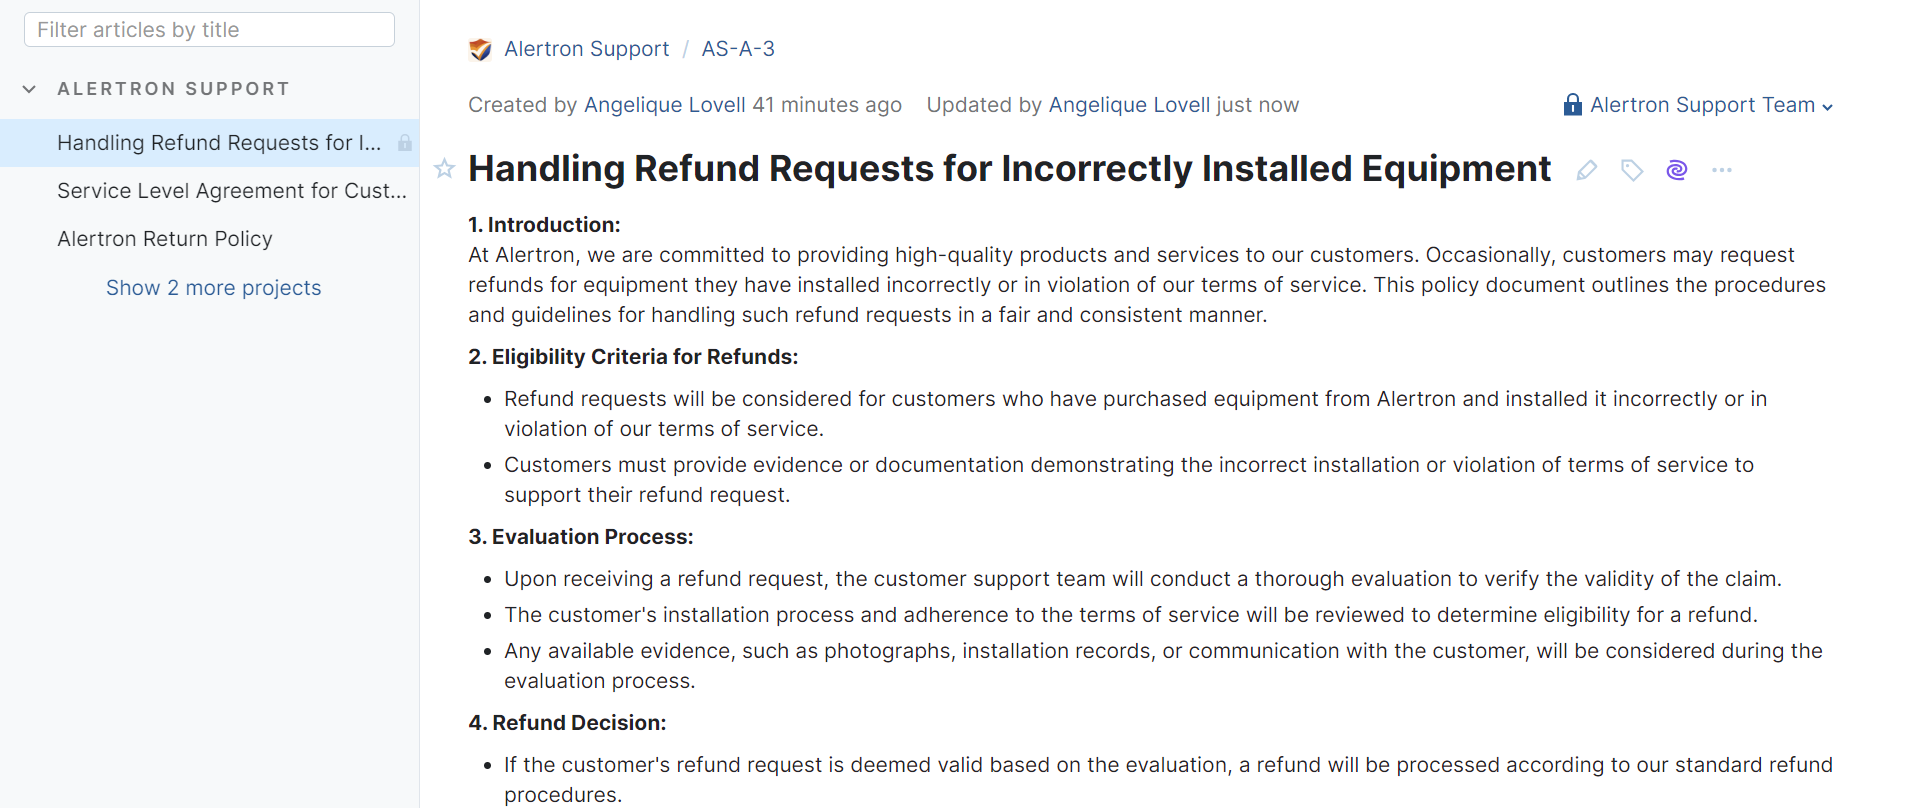
Some support cases may require creative or unconventional solutions that are not documented elsewhere. By adding articles detailing these unique solutions to the knowledge base, you ensure that valuable knowledge is preserved and can be shared with the wider support team for future reference.
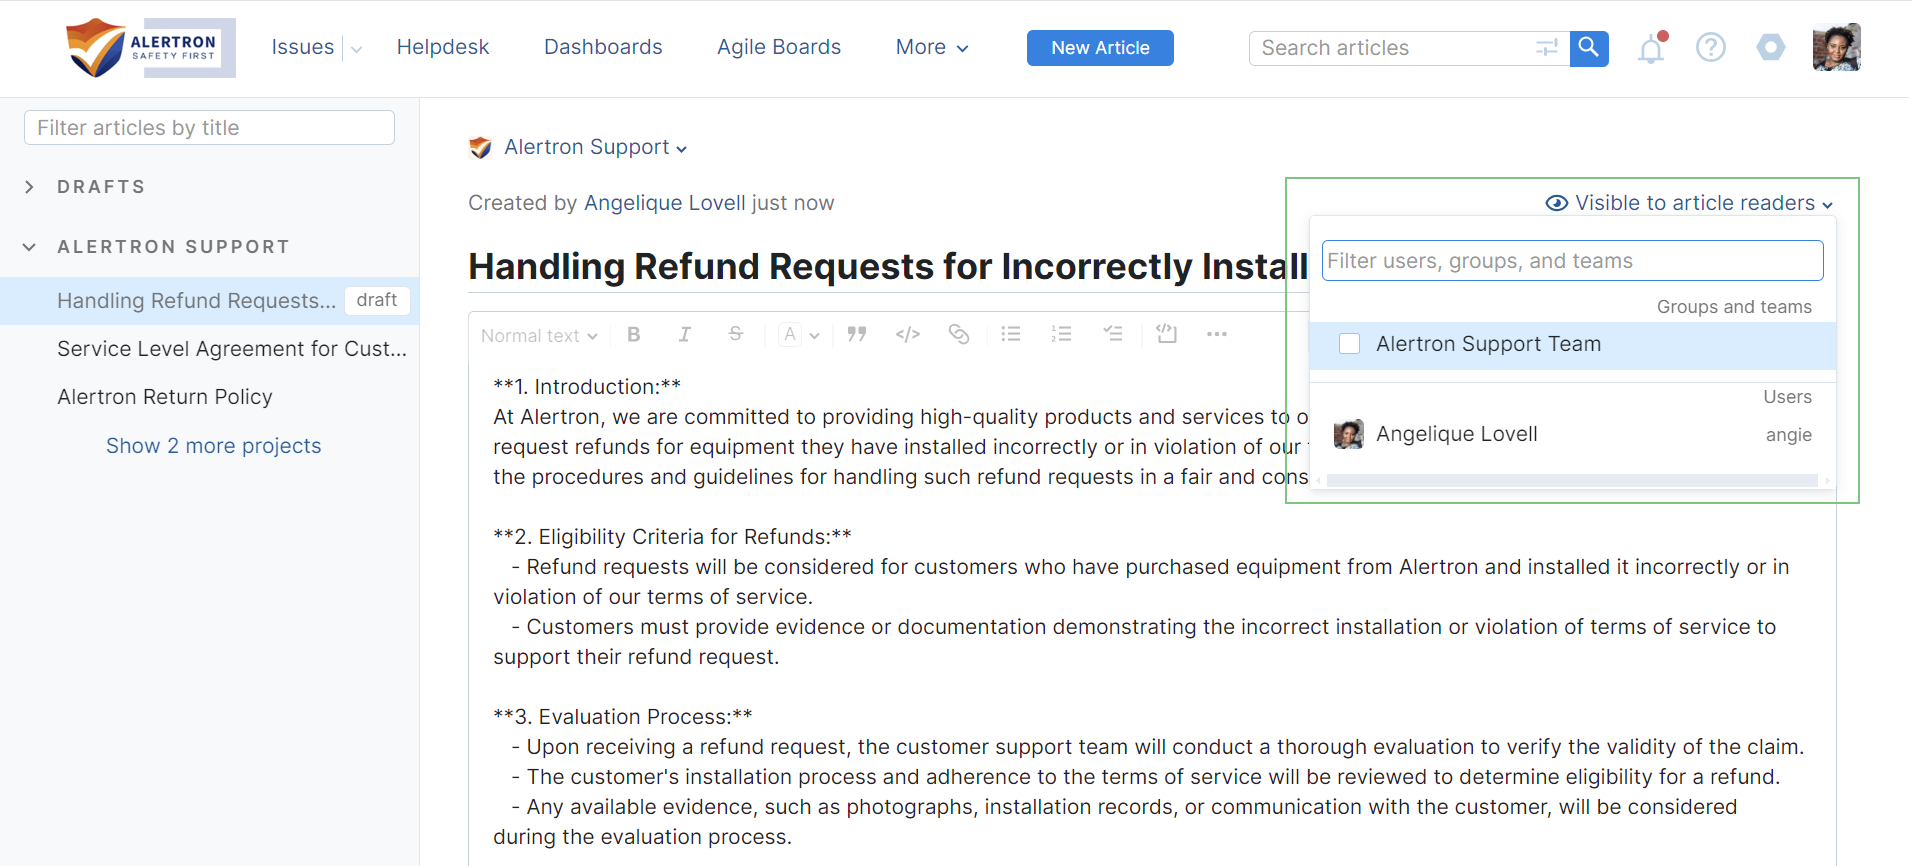
Your knowledge base can also support a mix of internal and public articles. This is done by using the visibility settings for articles, comments, and attachments.
To make articles available to external users, a system administrator has to grant read access to the guest account. For specific instructions, see Configure Guest Access. Once the guest account has been granted access, any article, comment, or attachment that is visible to article readers is available publicly. If you want to make an article, comment, or attachment visible to internal users only, open the visibility setting and select the groups, teams, and users who should have access to this content.
Testing Your Helpdesk Setup
Once you and your team have performed all the tasks described in this guide, take some time to test and validate the setup of your helpdesk project.
Revisit the steps for testing your helpdesk channels as described in the Testing Your Channel Setup section of this guide. Check each message to ensure that any changes made to your notification templates have been applied correctly.
Invite your agents to participate in testing as well so they can make sure their ticket views are set up to their liking, and they know how to prioritize their work. You'll also want to make sure they understand the benchmarks for handling tickets according to the SLA policies that are active in the project and can identify potential SLA breaches.
Launching Your Helpdesk Project
When everything has been tested to your satisfaction, you're ready to go live with your helpdesk. To ensure that your helpdesk is rolled out effectively:
Provide comprehensive training and onboarding sessions to helpdesk agents, administrators, and end-users on how to use the new helpdesk system effectively.
Create a communication plan to announce the upcoming launch of the helpdesk project to all stakeholders, including employees, customers, partners, and vendors.
Update your customer-facing email addresses and support links so they point to your new email channels and online forms.
Continuously monitor the performance and usage metrics of the helpdesk system, such as ticket volume, response times, resolution rates, and customer satisfaction scores. Use these metrics to evaluate the success of the launch and make data-driven decisions for future enhancements.
