Manage Sets of Values
A set of values is simply a list of possible values that can be stored in a custom field.
Sets of values are used in custom fields with enumerated types, like enum[1|*] or version[1|*]. The default custom fields State, Priority, and Build are also enumerated types. This page describes how to create, edit, and customize these sets of values.
These procedures describe how to configure a generic enum[1|*] type. For other sets of values like states, builds, subsystems, and versions, the procedure is similar and is not explicitly described.
Fields that store a user type are also enumerated types that use a set of values. These fields have additional properties that you should configure in a specific way. To learn more about fields that store a user type, see Manage Assignees.
Create a New Set of Values
You define the set of values after you create a field with an enumerated type.
To create a new set of values:
From the Administration menu, select Custom Fields.
Select the Fields List tab.
Click the New custom field button.
The New Custom Field dialog opens in the sidebar.
In the New Custom Field dialog, enter a Field name.
In the Type drop-down list, select
enum.Click the Add field button.
The custom field is added to YouTrack.
The custom field settings are displayed in the sidebar.
Click the Create new set button
Click the Add value button.
In the Add Value dialog, enter a Name and optional Description, select an optional color scheme (a combination of background and text colors), then click the Save button.
Repeat from step 7 until you have added all the values that you want to use for the custom field.
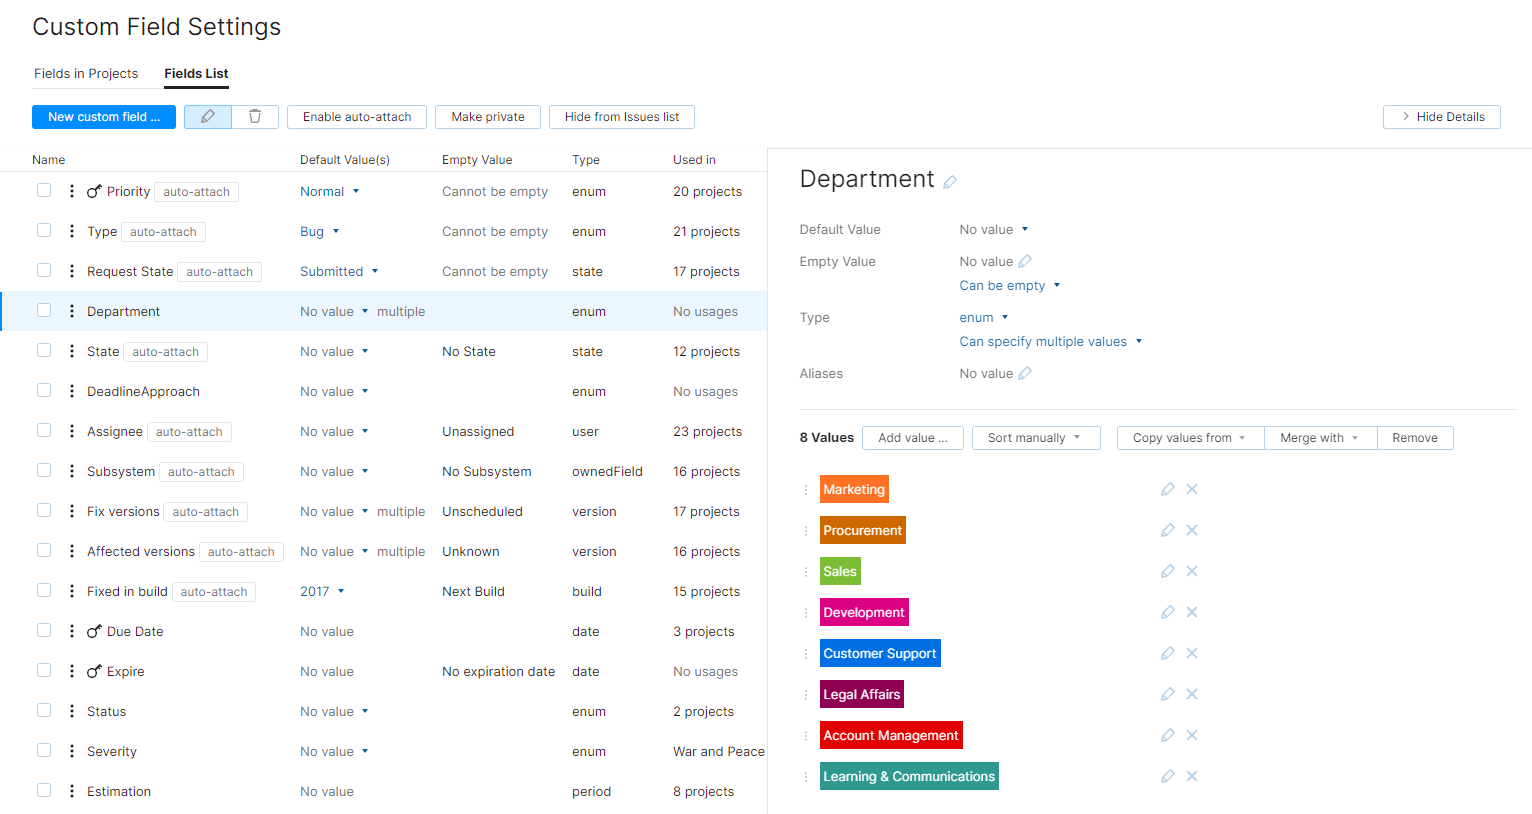
Add Values to a Set
To add values to an existing set, you can either add a new value manually or copy/merge/replace existing values from another set of values.
Wherever you can change the value for a field, there is an option to add a new value to the set. Project administrators can add values to fields that are unique to thier projects or use an independent set of values. System administrators and users with project administrator access in the global project can add values to the set in all projects. When created, the new value is added to the issue. This option is visible in the following locations:
The Issues list
Single issue view
Agile boards
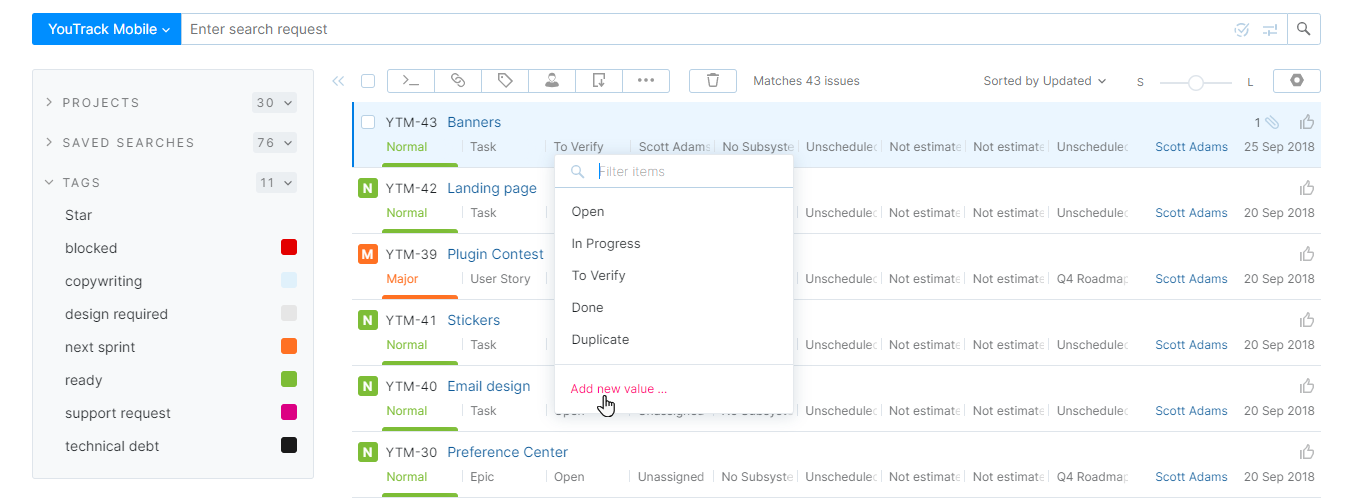
If the field uses an independent set of values, the value is added to the custom field in the project that is assigned to the issue.
You can add values to a custom field on the Custom Fields Settings page.
To add a value to a set:
From the Administration menu, select Custom Fields.
Select the Fields List tab.
Select a custom field with an enumerated type.
If the custom field is attached to one or more projects, you have the following options:
Edit set for all affected projects — values added to the list are available in all projects that use this field.
Make independent copy — values added to the list are only available in the current project.
Select the option that suits your purpose.
Click the Add value button.
The Add Value dialog opens.
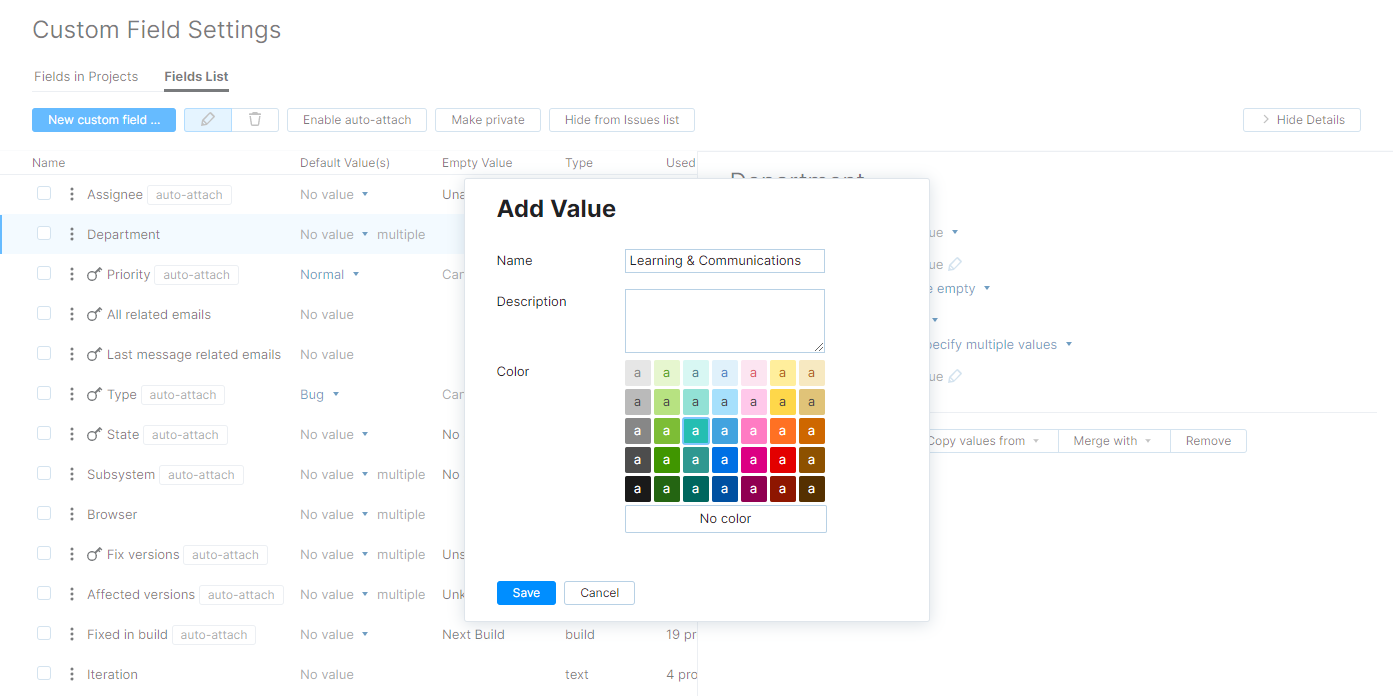
Enter values in the following fields:
Name (mandatory)
Description
Optionally, select a color scheme (a combination of background and text colors). For example, for a set of values in the Priorities field, you can opt to highlight Critical and Show-stopper values in red.
Click the Save button.
Sort Values in a Set
By default, the values in a set are ordered manually in the order that they were added to the field. When ordered manually, each value is assigned an ordinal value that represents its position in the list.
The sort order affects the following behavior in YouTrack:
The values that are displayed in drop-down lists for custom fields are displayed in the specified sort order. For example, the values for the default Priority field are sorted manually from highest to lowest. The value that represents the highest priority (Show-stopper) appears at the top of the list.
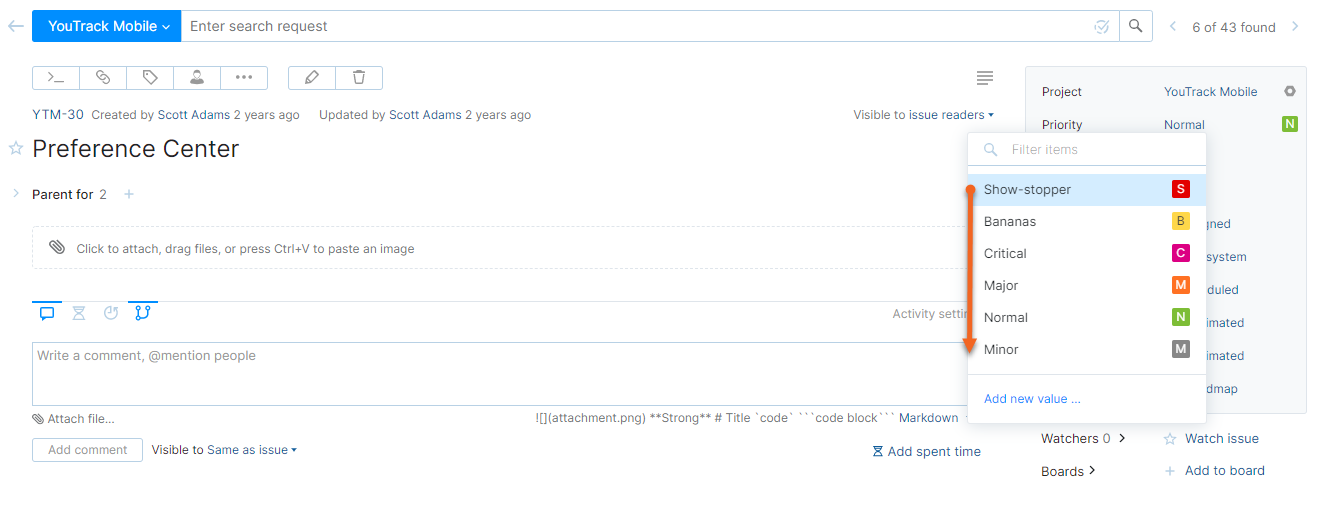
In search queries that specify a range of values, the sort order determines which values match the search request. For example, a search request that includes
Priority: Show-stopper .. Majorreturns issues that are Show-stopper, Critical, and Major.
As an administrator, you have the ability to determine the sort order for values in fields that are used in multiple projects. Project administrators can set the sort order independently per project by managing an independent copy of the set of values. For more information, see Sort Values in a Set.
You can sort values in a custom field on the Fields List tab of the Custom Fields Settings page. Sort options are available for all fields that store enumerated types except for fields that store a user or group type.
For fields that store a
usertype, the values are automatically sorted alphabetically by full name, with the current user at the top of the list.For fields that store a
grouptype, values are sorted alphabetically by name.
Sort Values Manually
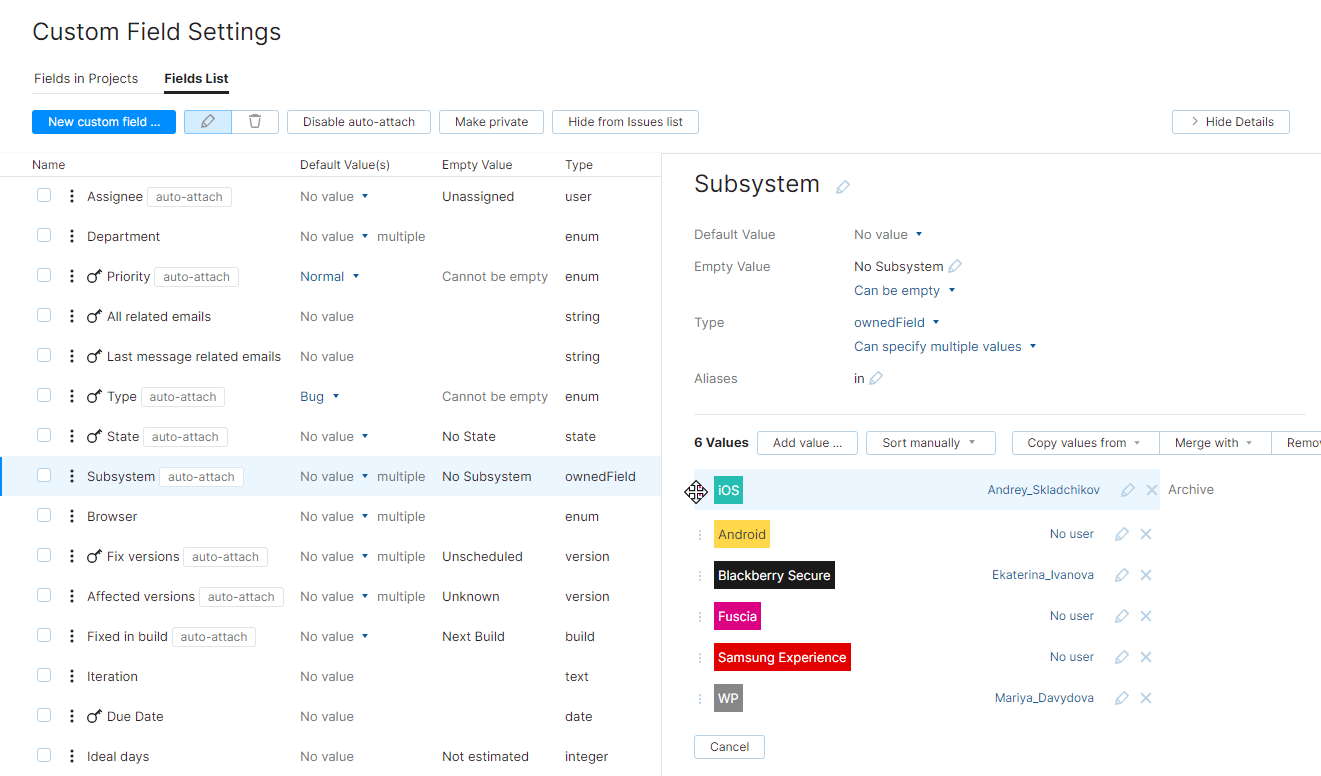
If you want to override the default order in which values appear in a custom field, you can manually resort the values in the list.
To resort values that are sorted manually:
From the Administration menu, select Custom Fields.
Select the Fields List tab.
Select a custom field with a set of values that can be sorted.
If the custom field is attached to one or more projects, you have the following options:
Edit set for all affected projects — the custom sort order is applied in all projects that use this set of values.
Make independent copy — the custom sort order is stored in the default set of values for the field.
Select the option that suits your purpose.
Drag the values into the desired order.
The custom order is saved automatically.
Sort Values by Name
For any field that supports manual sorting, you have the option to automatically sort values by name. Values can be sorted by name in ascending or descending order. When sorted by name, new values that are added to the set are shown in alphabetical order. There are two options for sorting by name:
The case-sensitive option sorts values alphabetically from A — Z, then a — z.
The case-insensitive option sorts values alphabetically regardless of which case is used for the first letter.
When you switch from manual sorting to any other sort option, the manual option is discarded. If you revert to sorting values manually, you have to reapply the custom order.
To sort values by name:
From the Administration menu, select Custom Fields.
Select the Fields List tab.
Select a custom field with a set of values that can be sorted.
If the custom field is attached to one or more projects, you have the following options:
Edit set for all affected projects — the sort order is applied in all projects that use this set of values.
Make independent copy — the sort order is stored in the default set of values for the field.
Select the option that suits your purpose.
Open the sort menu and select a Sort by name option (either case-sensitive or case-insensitive).
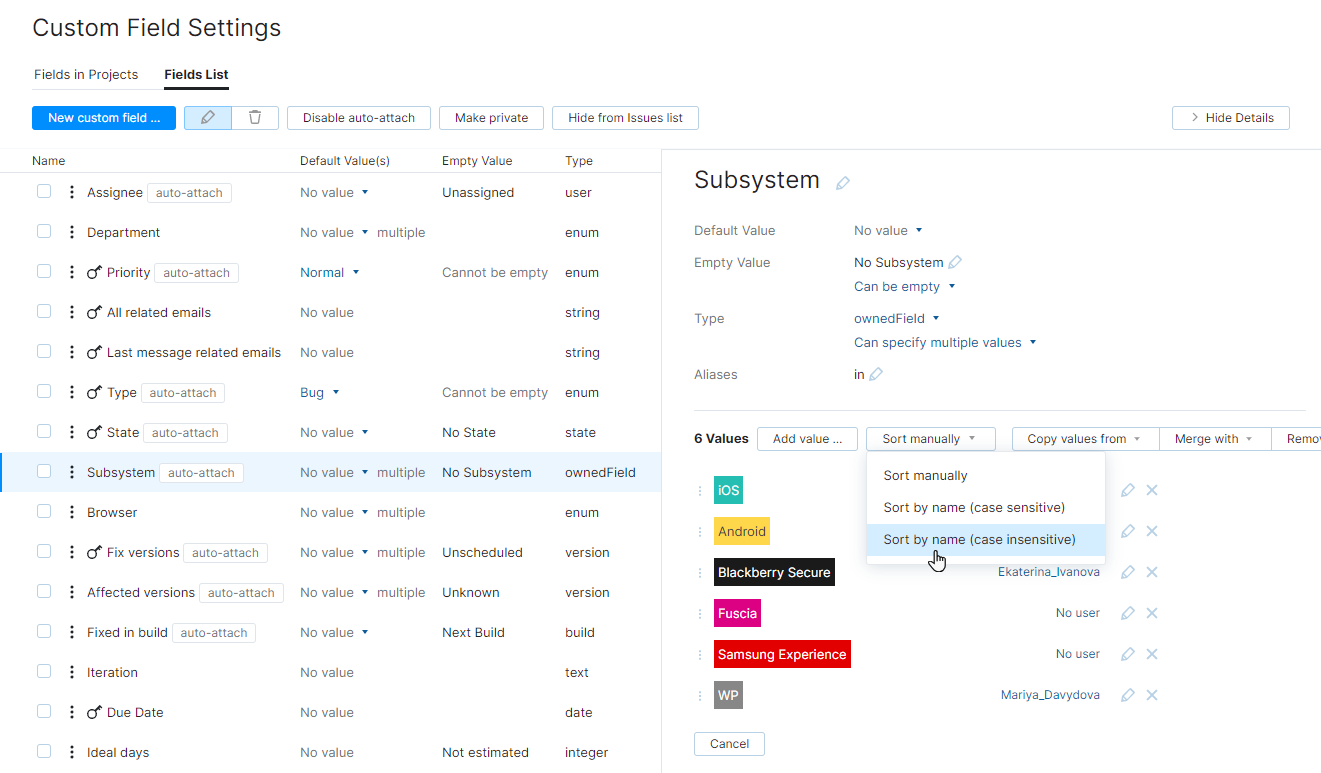
Confirm the action in the Change Sort Order dialog.
If the values were previously ordered manually, the manual order is discarded.
The values in the set are sorted by name in ascending alphabetical order.
If you want to sort the values in descending order, select the desc option from the drop-down list.
Sort Values by Version
For fields that store a version or build, you have the option to sort values by version. Values can be sorted by version in ascending or descending order. With this option, numeric values are sorted automatically according to the Semantic Versioning Specification (SemVer).
The most valuable application of this feature is in a search query. For many teams, the ability to search for issues that were fixed in a specific range of versions or builds helps to generate an accurate list for the publication of release notes.
To sort values by version:
From the Administration menu, select Custom Fields.
Select the Fields List tab.
Select a custom field that stores a
versionorbuild.If the custom field is attached to one or more projects, you have the following options:
Edit set for all affected projects — the sort order is applied in all projects that use this set of values.
Make independent copy — the sort order is stored in the default set of values for the field.
Select the option that suits your purpose.
Open the sort menu and select the Sort by version option.
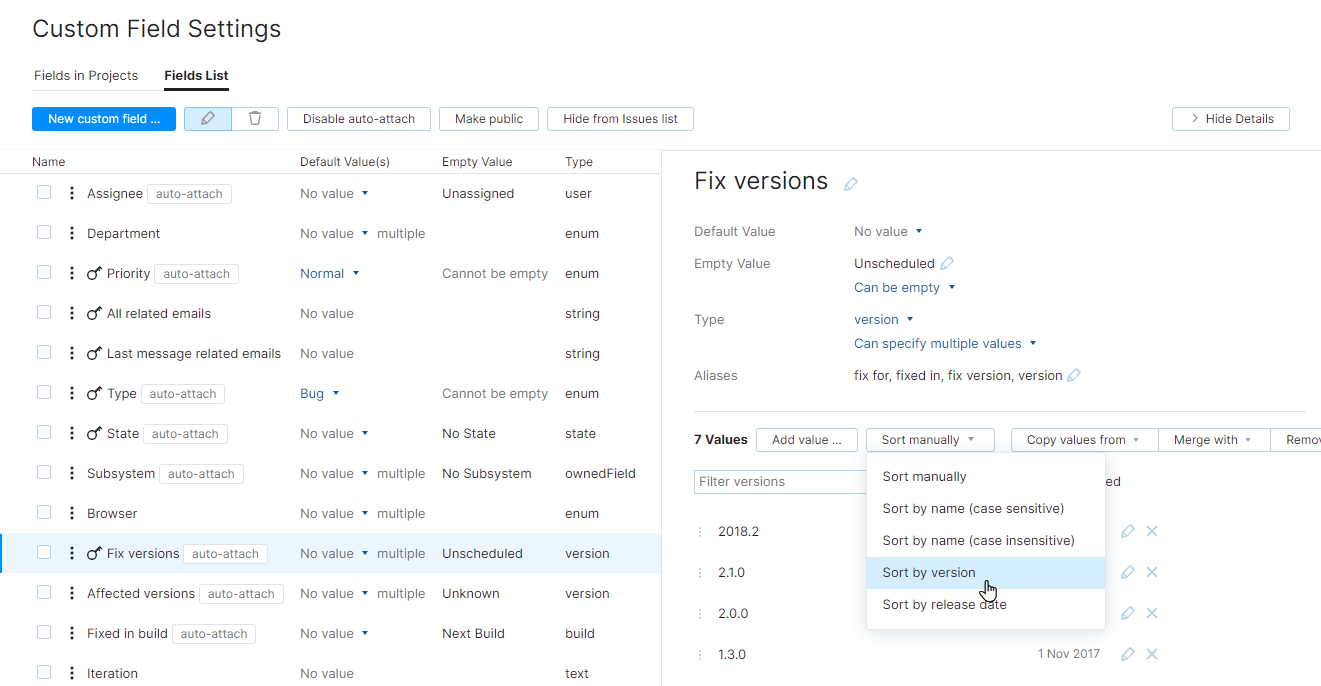
Confirm the action in the Change Sort Order dialog.
If the values were previously ordered manually, the manual order is discarded.
The values in the set are sorted by version in ascending order.
If you want to sort the values in descending order, select the desc option from the drop-down list.
Additional Sort Options
For fields that store a version or build, you have the option to sort values by the additional properties that are stored for each value. Values can be sorted by these properties in ascending or descending order.
Field Type | Sort Option | Description |
|---|---|---|
version | release date | Values are sorted chronologically by release date. |
build | assemble date | Values are sorted chronologically by assemble date. |
To sort values by either of these properties, follow the instructions for other automatic sort options as described above.
Edit a Set of Values
As an administrator, you can edit the set of values that are used in a field for all projects in the system.
To edit a set of values system-wide:
From the Administration menu, select Custom Fields.
Select the Fields List tab.
Select the field that uses the set of values.
The details dialog for the selected custom field opens in the sidebar.
Click the Edit for all affected projects button.
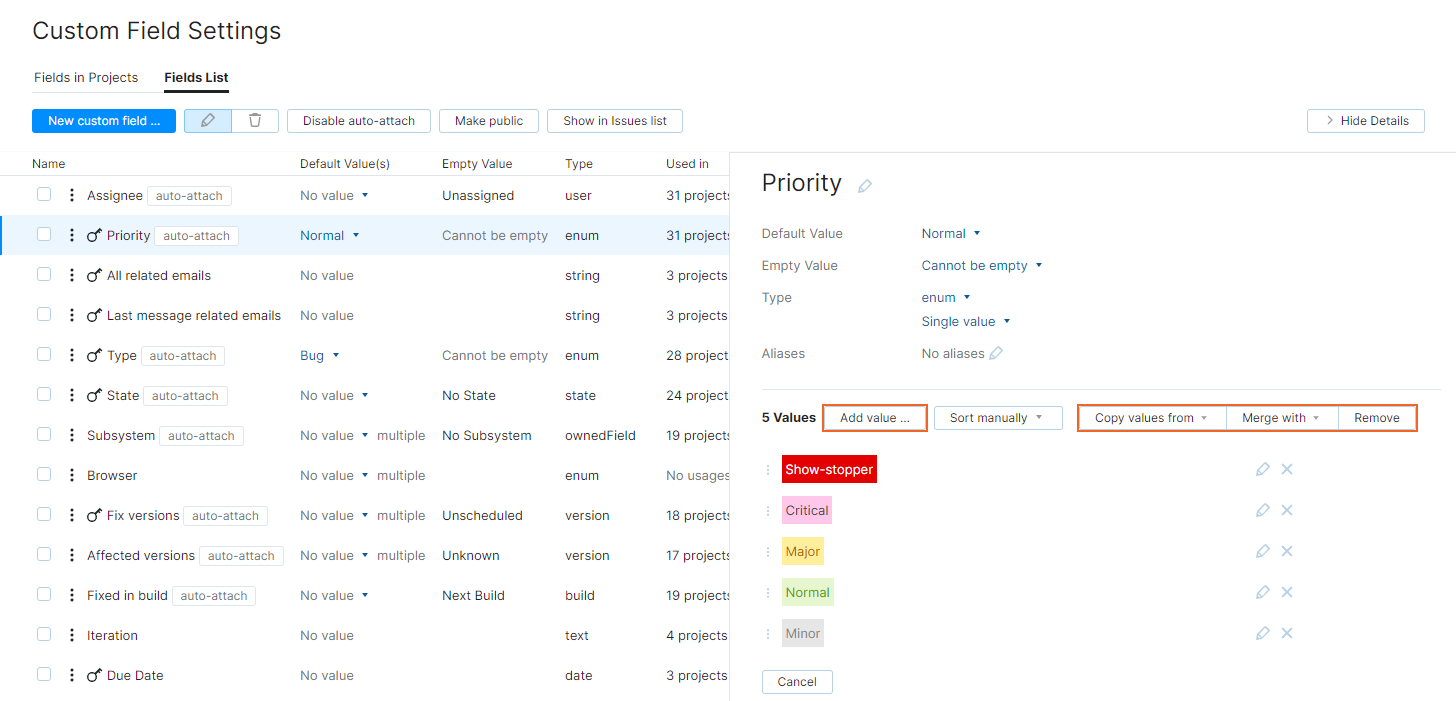
Edit the set of values. The following options are available:
Option
Description
Add value
Add a new value to the list.
Copy values from
Select a field to copy the values used in the selected field. For more information, see Copy Values from Another Set.
Merge with
Select a field to merge existing values with the values used in the selected field. For more information, see Merge Values with Another Set.
Remove
Remove the current set of values from the field.
Archive Values in a Set
In most fields that store values from an enumerated set, there is an option to archive specific values. Once archived, users can no longer set the value for the field to this value directly in the user interface.
To learn more about how to work with archived values in issues, see Working with Archived Values.
To archive a value in a custom field:
From the Administration menu, select Custom Fields.
Select the Fields List tab.
Select the field that uses the set of values.
The details panel for the selected custom field opens in the sidebar.
Click the Edit for all affected projects button.
Locate the value that you want to archive in the set and click the Archive link.
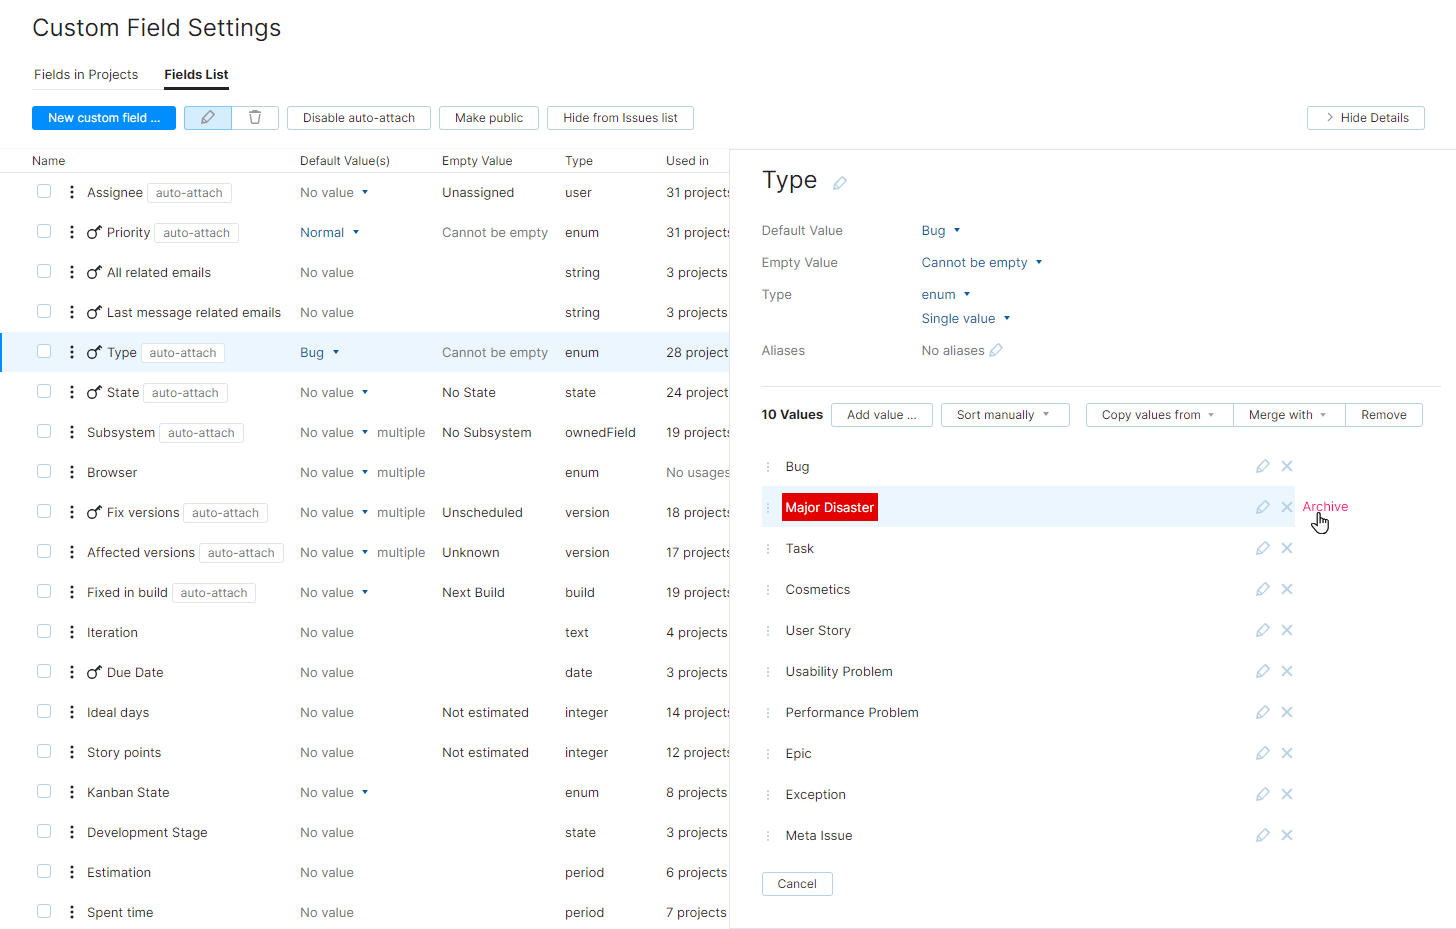
The value is marked as archived.
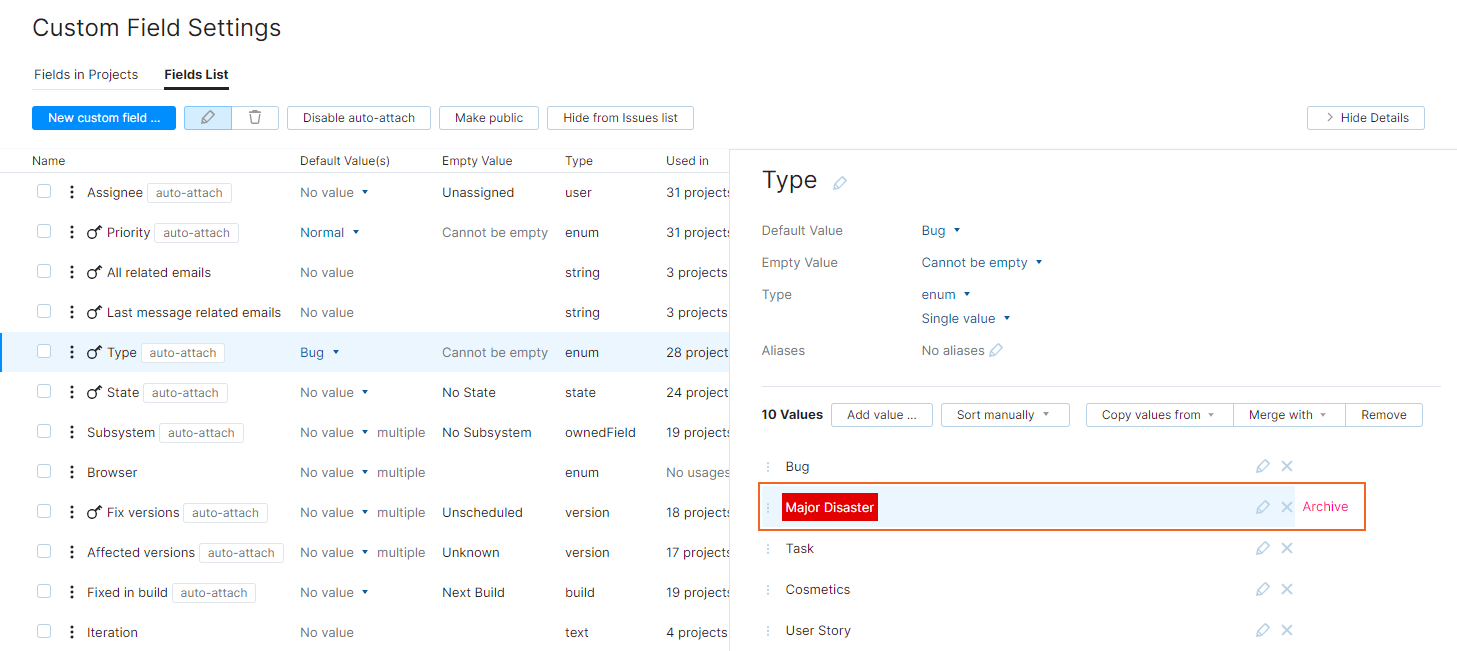
If you later decide that you want to continue working with a specific value, you can revert this operation by clicking the Unarchive control.
Copy Values from Another Set
If you have a custom field that contains a set of values that you would like to use as the basis for another custom field, you can copy the values from another set.
To copy values from another set:
From the Administration menu, select Custom Fields.
Select the Fields List tab.
Select the field where you want to edit the list of values.
Select whether you want your changes to affect all projects.
Click the Copy values from button and select a field that contains the values you want to copy.
The values from the selected field are added to the current set of values.
Merge Values with Another Set
When you merge two sets of values, you get a single set with a common collection of values that is available in all the projects where the field was used before the merge.
To merge another set of values with the current set:
From the Administration menu, select Custom Fields.
Select the Fields List tab.
Select the field where you want to edit the list of values.
Select whether you want your changes to affect all projects.
Click the Merge with button and select the field you want to merge with.
The values from the selected field are merged with the current set of values.
Check Sets for Consistent Values
On very rare occasions, the set of values that is used for a field in a specific project can become inconsistent. This situation can occur when an operation that is intended to update the list of values is interrupted by an unexpected server shutdown or other loss of connection.
In these cases, issues that belong to a single project use separate sets of values for the same custom field. This can result in one or more of the following problems:
Search results that should return issues that store matching values in a specified field only return partial results.
Commands that should update a batch of issues are not applied to the entire selection.
If your users encounter strange behavior like this, you can run a quick consistency check and repair the problem.
To resolve inconsistencies in a set of values for a custom field:
From the Administration menu, select Custom Fields.
Select the Fields in Projects tab.
Locate the project in which users are experiencing inconsistent behavior and expand its list of fields.
Select the field for which the inconsistencies have been reported.
The settings for the project field are displayed in the sidebar.
In the section of the panel that displays the set of values for the custom field, click the Check values button.
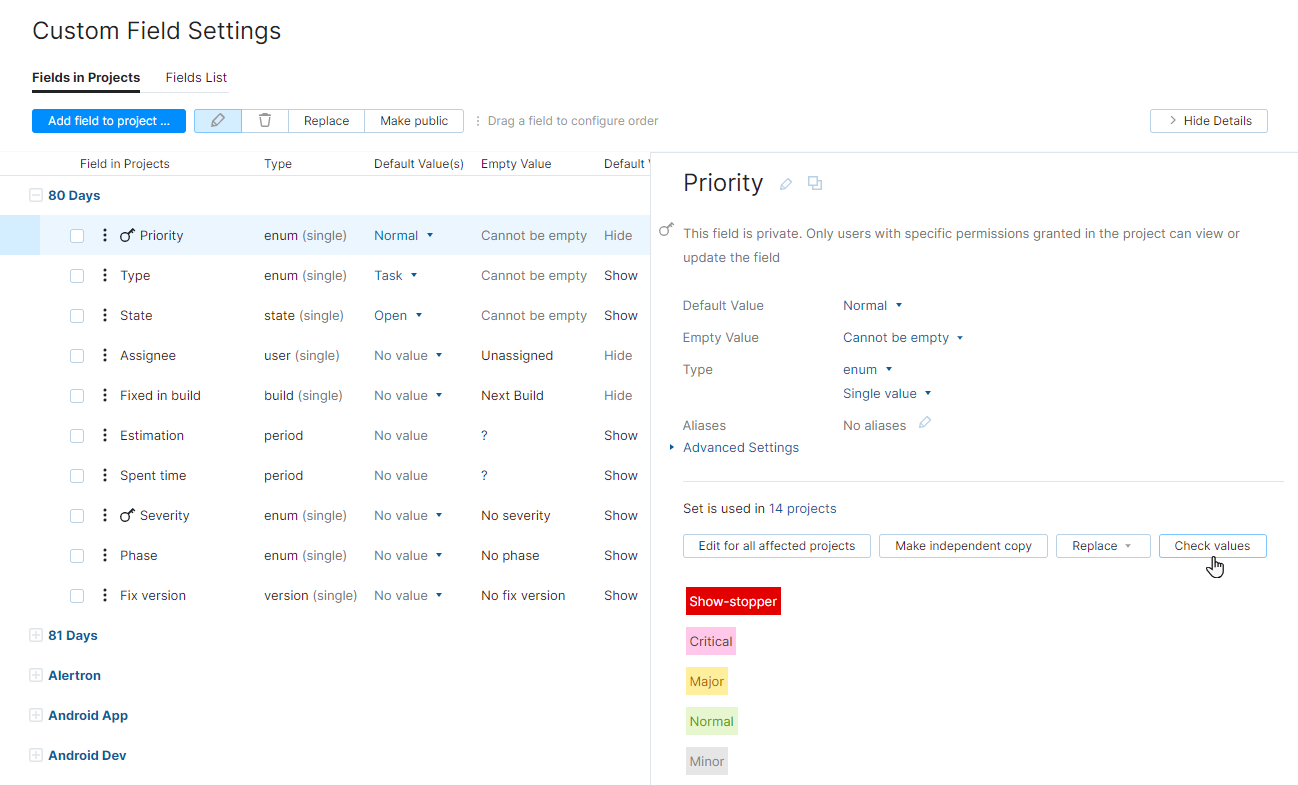
YouTrack cycles through the issues that belong to the project and checks the values that are stored in the selected custom field.
Any values that are not included in the set of values that is currently defined for the selected field are added to the set.