Scrum Boards
This tutorial shows you how to create, configure, and use an agile board in YouTrack when you follow the Scrum development framework.
An Introduction to Scrum
Scrum is about developing features in a project in an iterative process. You work toward the final release of the product with smaller pre-releases that implement specific features. The features are also known as user stories.
A product owner in Scrum negotiates a schedule for the release of the final product. Each release has to meet a deadline. The period between the development start and the deadline is divided into smaller periods, usually two weeks to one month each. These time-boxed efforts are called sprints. Each sprint results in a viable pre-release version of the product.
Scrum Development with YouTrack
Every project in YouTrack tracks different types of issues like bug reports, feature requests, and tasks.
You can view the issues in a project by looking at the issues in a list or displaying the issues on an agile board. The cards on the agile board represent the same issues that are displayed in the list. The agile board, however, gives you a better visualization of the current project state and its progress. The board also includes a number of features that have been designed specifically to support Scrum development.
Configure Your Projects
Before you start to configure your Scrum board, take a minute to pick which projects you want to manage on the board and check that they are configured properly.
If you want to use a Scrum board with a new project, you can create the project and two agile boards simultaneously with the Scrum project template. For more information, see Scrum Project Template.
The primary agile board for Scrum development displays features (or user stories) as swimlanes on the board. Each card on the board represents a task that contributes to the development of the corresponding feature.
You can also create a second board to track the progress toward the development of the final product. This board shows epics as swimlanes, with cards that represent major features or user stories.
To support this configuration, all the projects that you want to manage on a Scrum board should store these values in a custom field. Here, we have customized the set of values that are stored in the Type field.
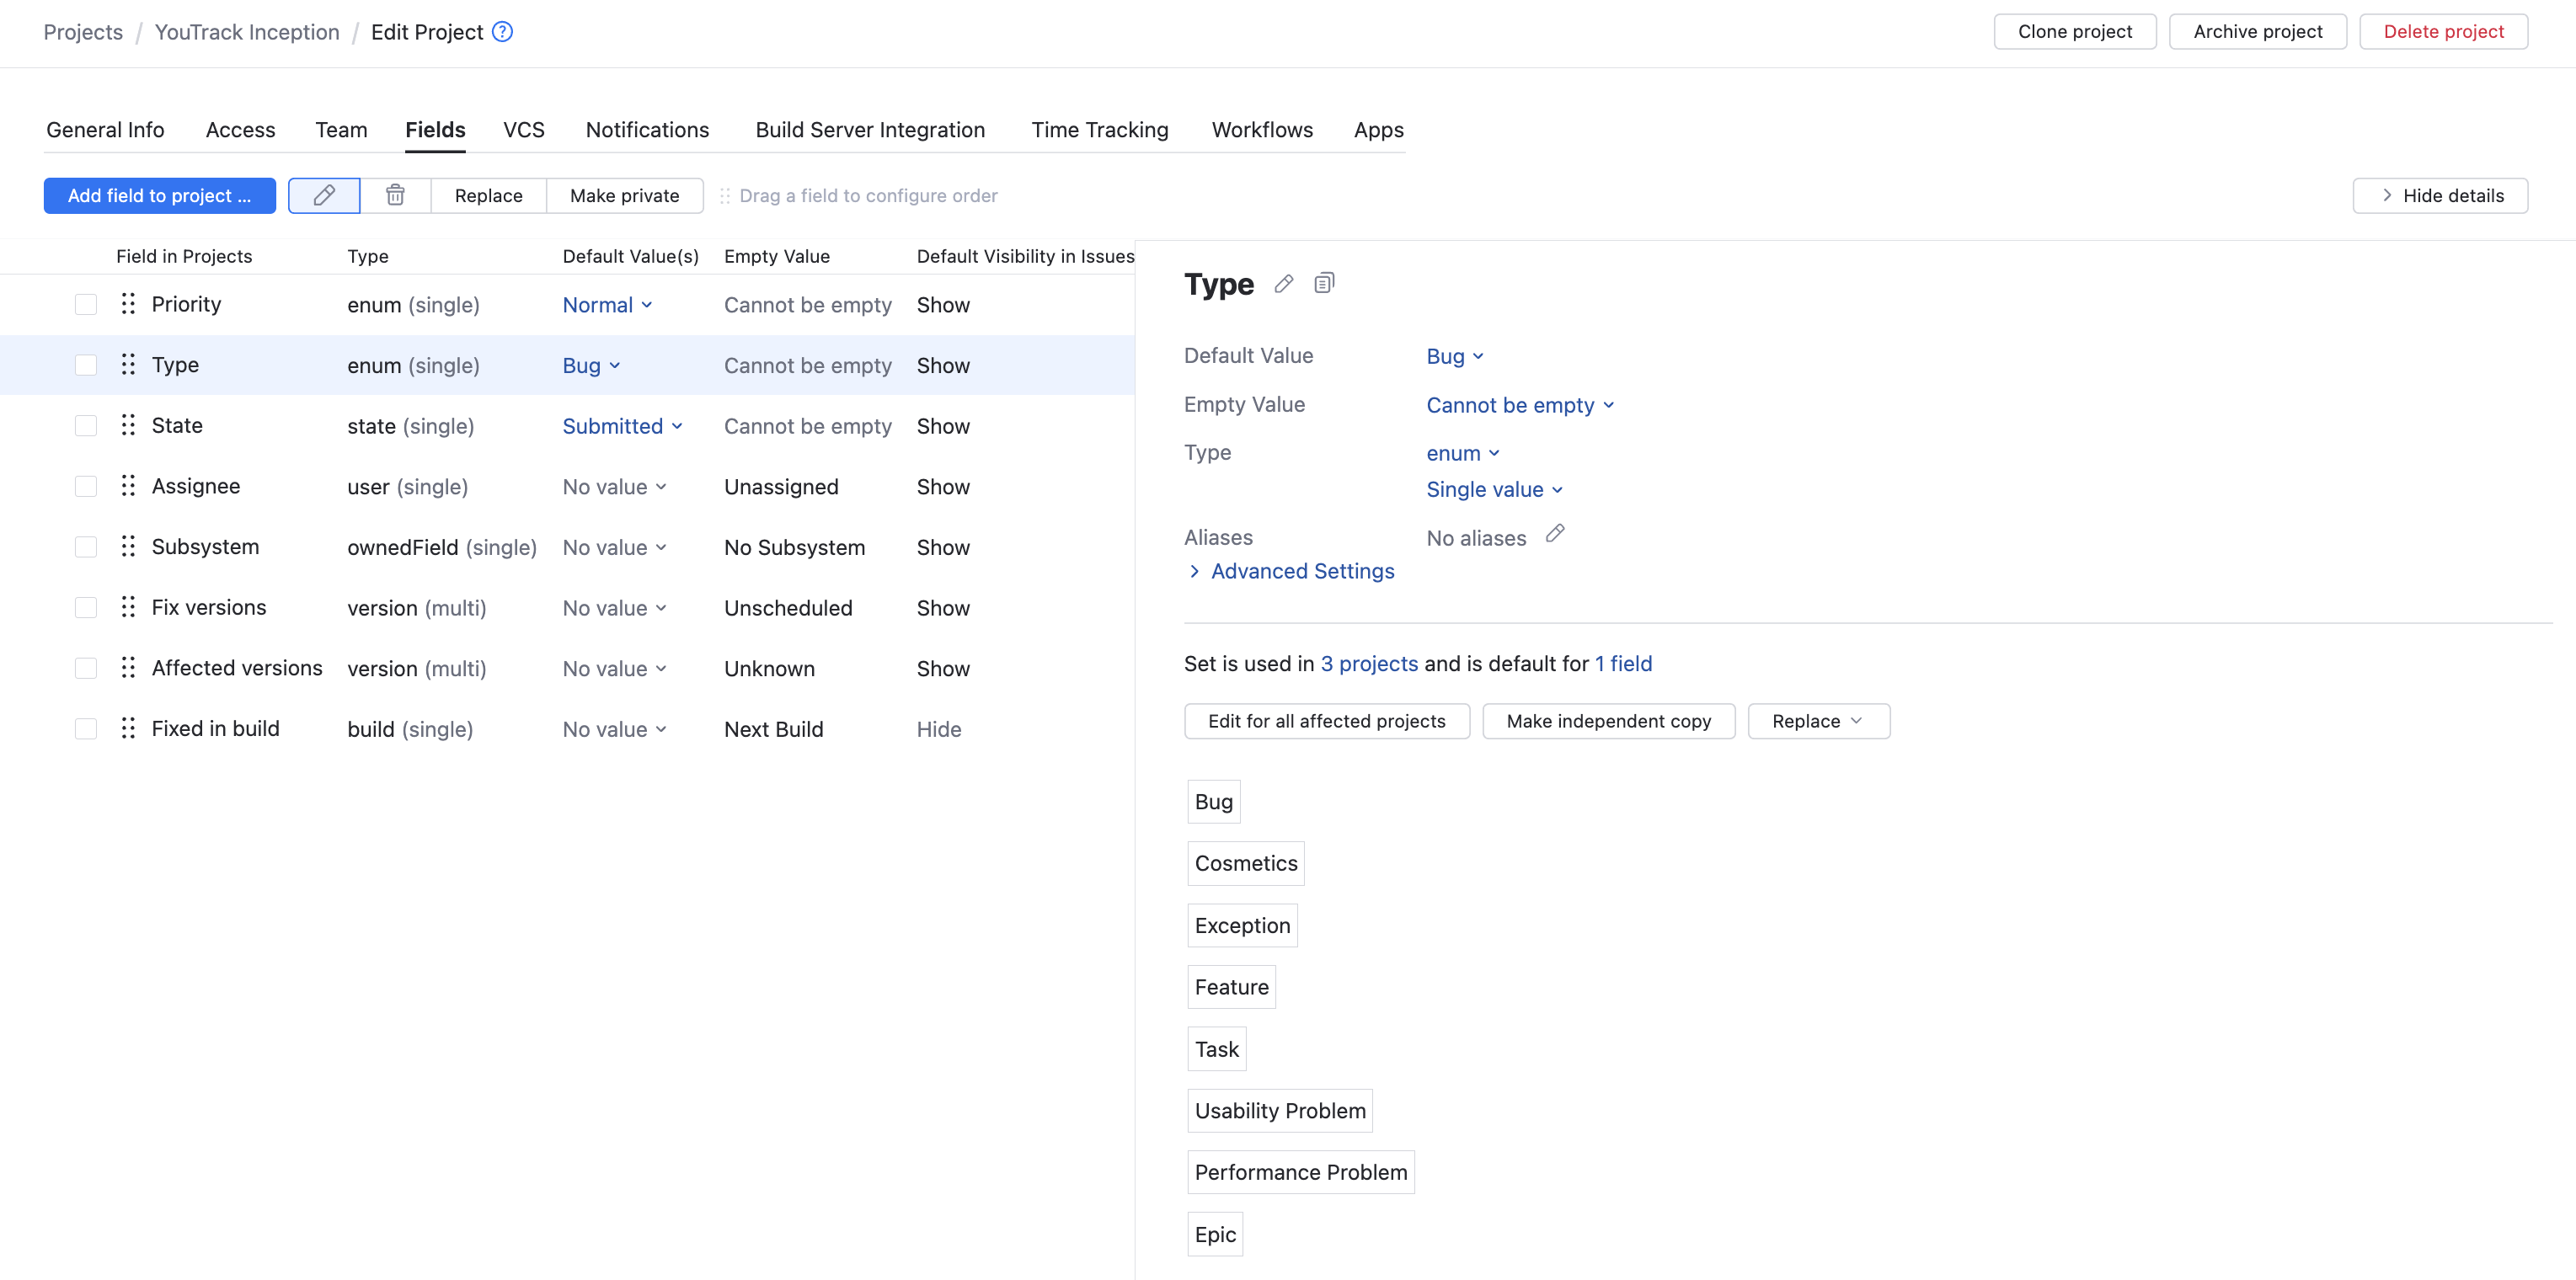
The columns on the board represent different states of delivery. The state is also stored in an issue field. The Scrum board uses a field that stores this value as a state type. When you move the card around the board, the field takes the value of the column that it has been moved to.
This example shows a state-type field that represents the states of delivery in the project. The field cannot be empty, which means that all new issues that are created in this project are displayed in the column that represents this value on the board when it is set.
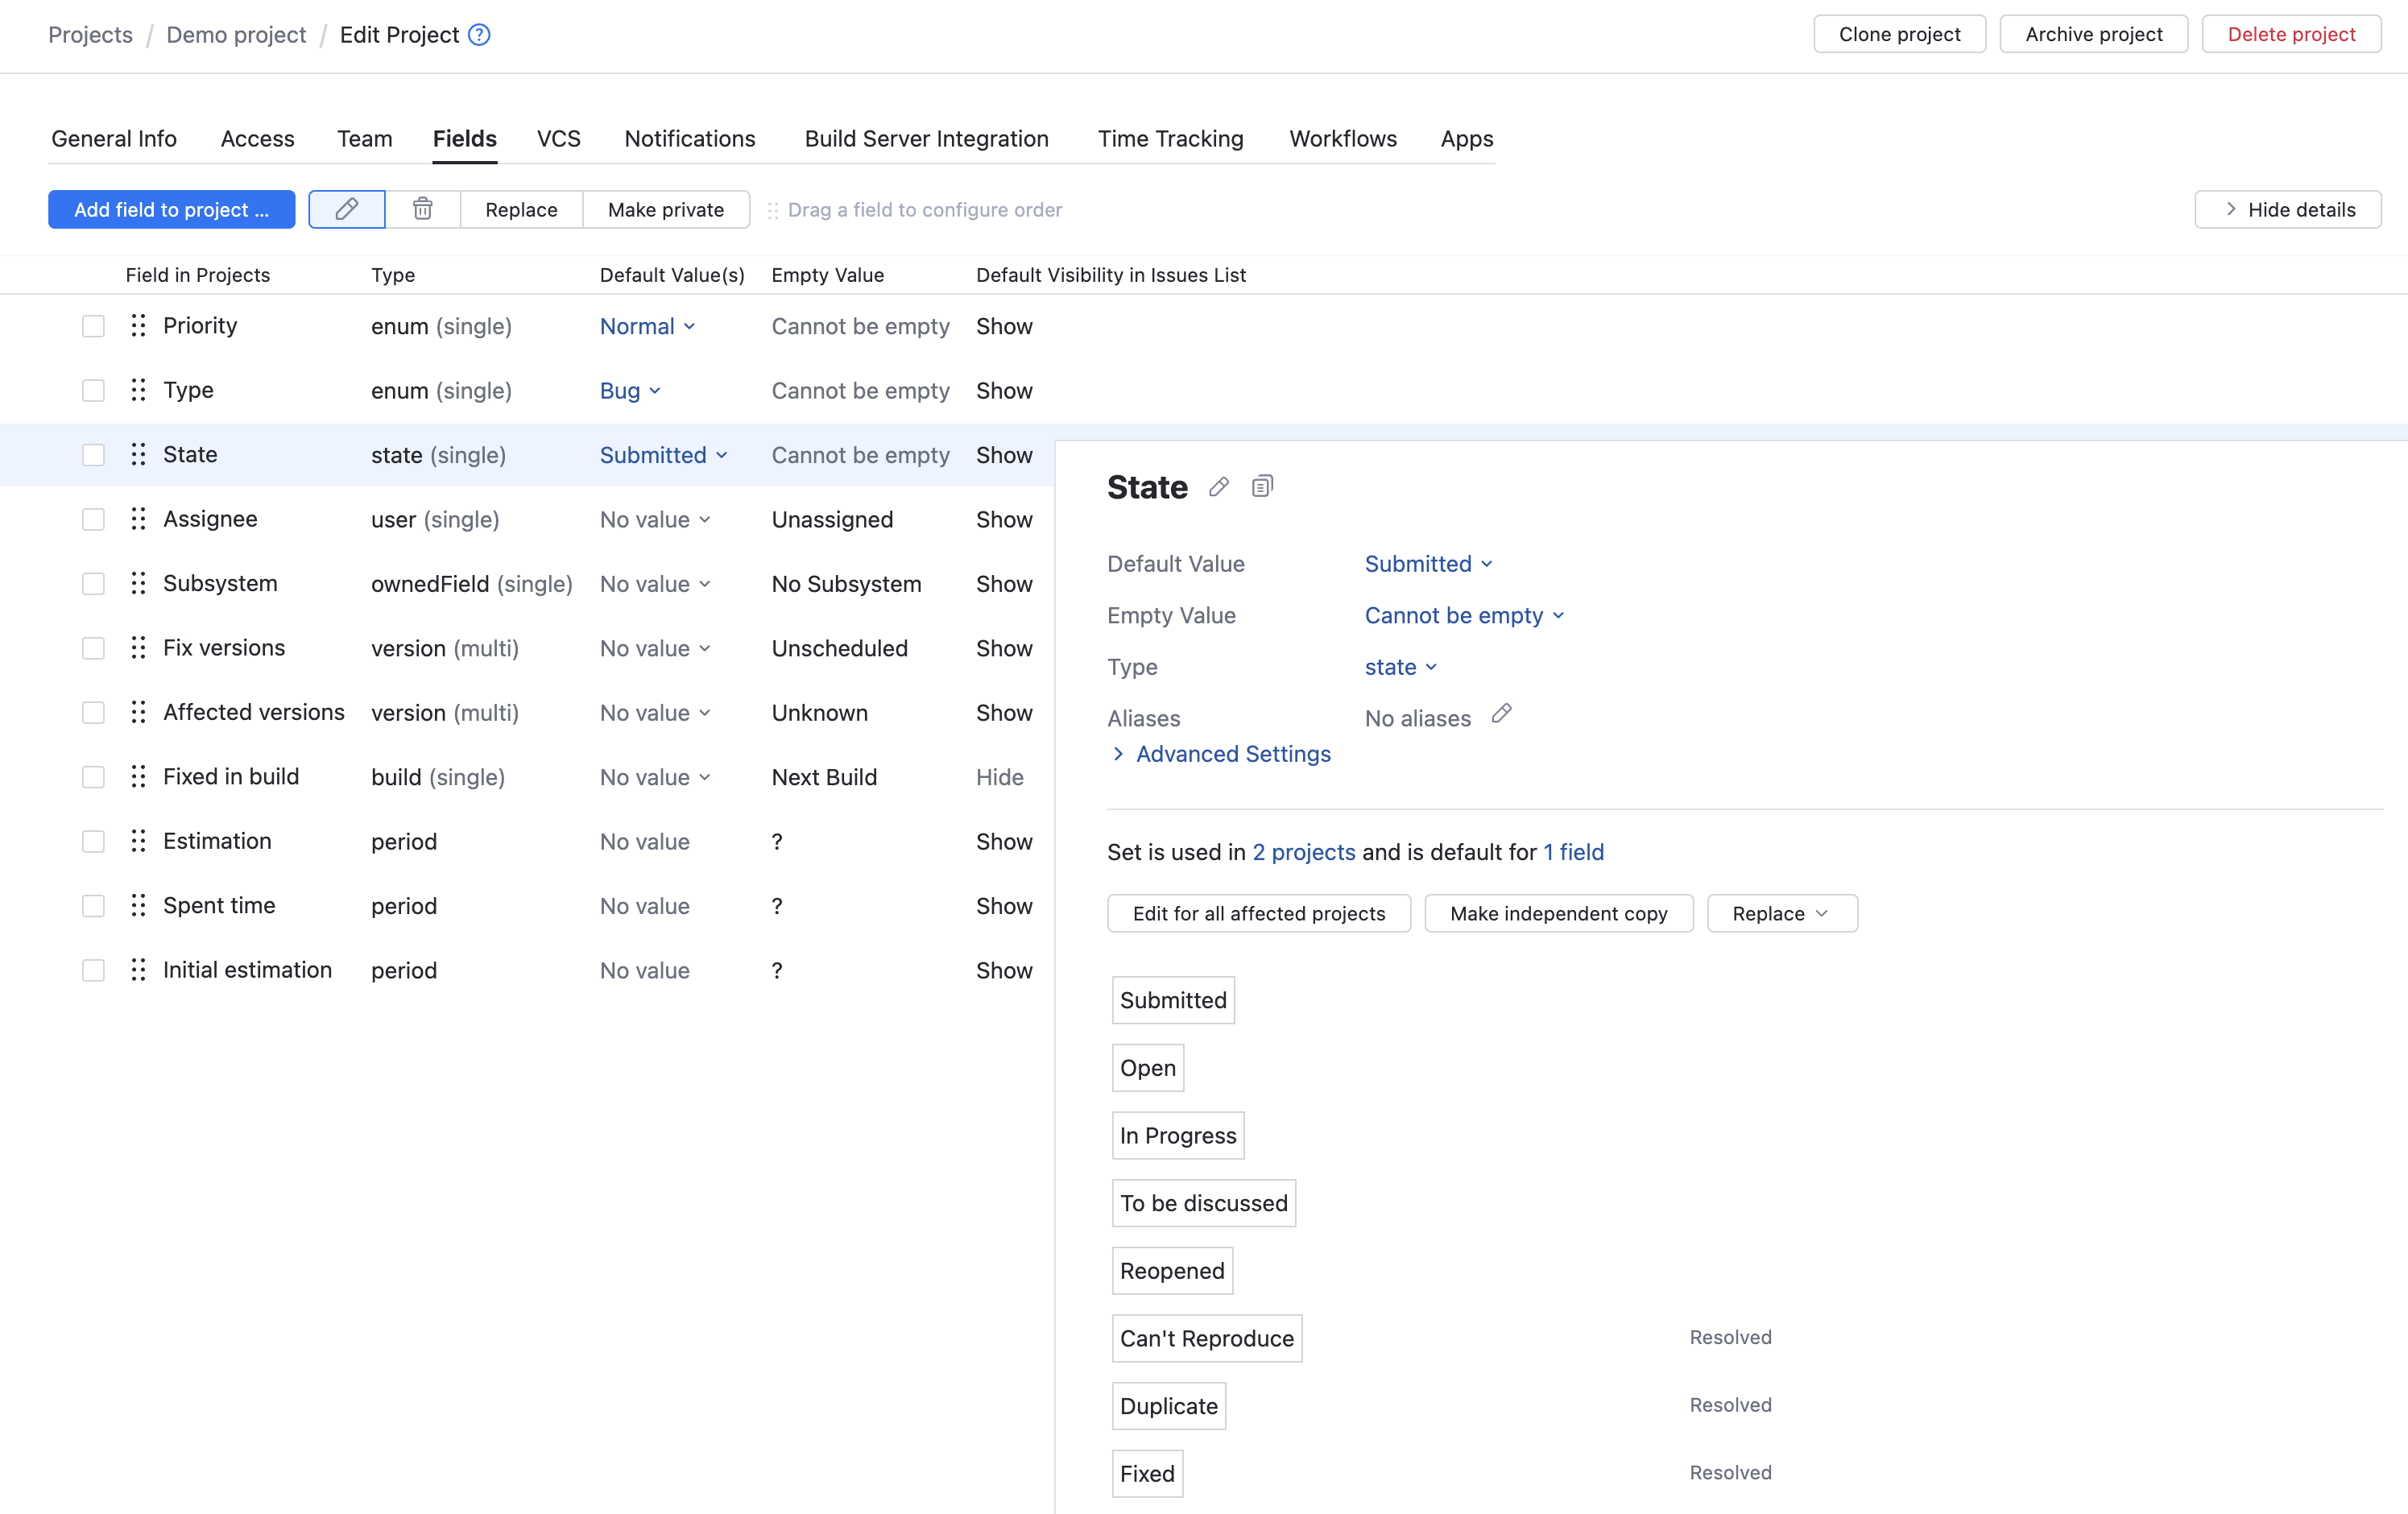
For best results, edit the set of values for an existing field that uses a state type. If you add a new state-type field to your projects, be sure to remove any additional state-type fields. Projects that use multiple state-type fields can be difficult to work with and require additional setup. For more information, see Possible Conflicts with Multiple State-type Fields.
Create the Board
Click Agile Boards in the main navigation menu, select Board from the New... menu, then click the Scrum board button.
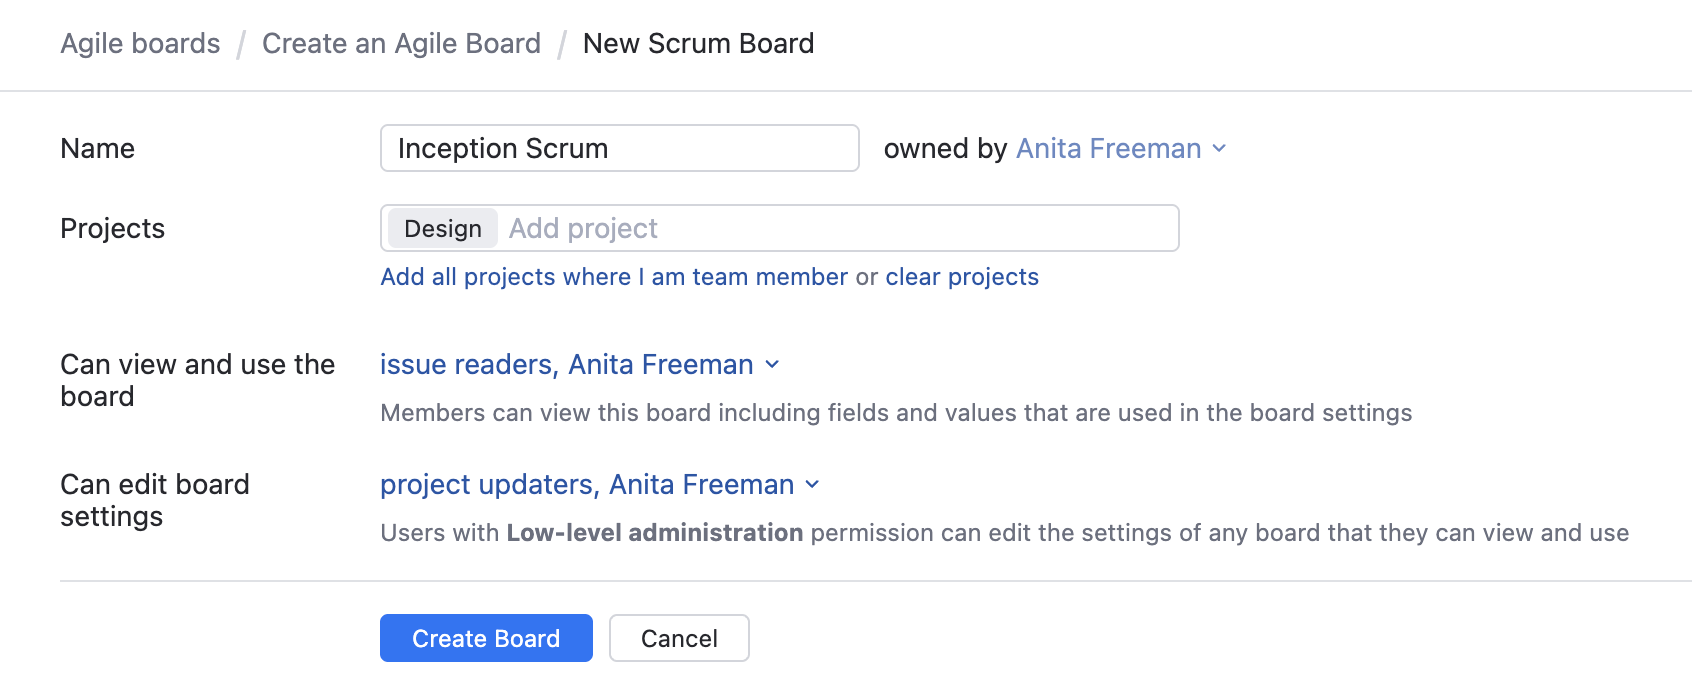
Use the following guidelines to set up your new board:
Setting | Guideline |
|---|---|
Name | Give the board a name. |
Projects | Choose the projects that you want to manage on the board. |
Can view and use the board | Select the name of your project team from the list. To view cards and swimlanes and use the board, each member of the project team should also have permission to view and update issues in the selected projects. This setting supports an additional option for issue readers. When you select this option, any user who has Read Issue access in all the projects that are managed on the board can view and use it. |
Can edit board settings | If you want other members of your project team to have access to the board settings, select the name of your project team from the list. Additional options let you configure access to the board settings in other ways:
|
When done, click the Create Board button.
Choose a Board Behavior Option
When you open the Board Settings panel, the General tab displays the settings that you just defined to create the board. For boards that are created with the Scrum board template, the Sprints option is Enabled by default. With sprints enabled, you have three different options for the Board behavior setting.
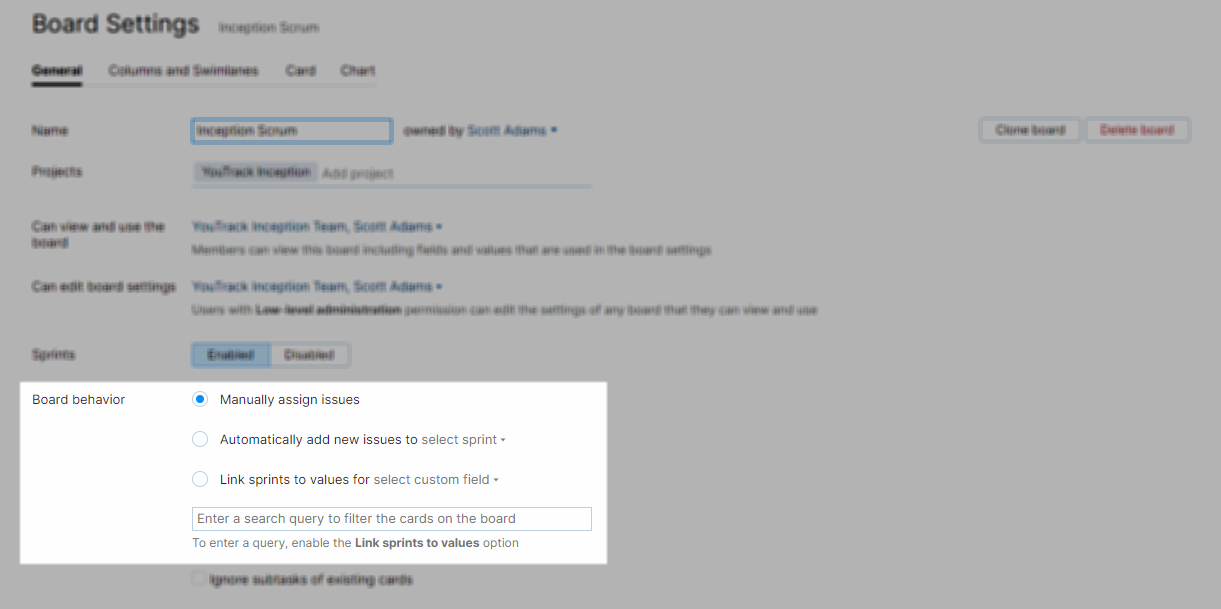
These options determine how issues are assigned to sprints on your board.
Option | Description |
|---|---|
Manually assign issues | Leave this default option enabled if you want to manage which issues are added to the board explicitly. New issues that are created in your projects are not seen on the board unless you add them manually. When you use this option, you prioritize all of your work by grooming and refining issues in the backlog. |
Automatically add new issues to sprint | For Scrum development, you generally want to plan all the work that you want to finish at the beginning of the sprint. This option adds any new issue that is created in your projects to the board automatically. This behavior defeats the purpose of spring planning and is not recommended for Scrum development. |
Link sprints to values for custom field | This option synchronizes sprints with the values that are stored in a custom field. When enabled, issues are assigned to sprints automatically when you update the value that is set for the linked custom field. Use this option when you want issues in each sprint to match the product iteration for which they were developed. |
Define Columns and Swimlanes
The next step is to configure the settings that identify columns and swimlanes on the board. When the board is created, the custom field that you configured in the first section of this tutorial is used to identify columns by default.
On the Columns and Swimlanes tab, you can use the Add column option to add values from this field as columns to the board.
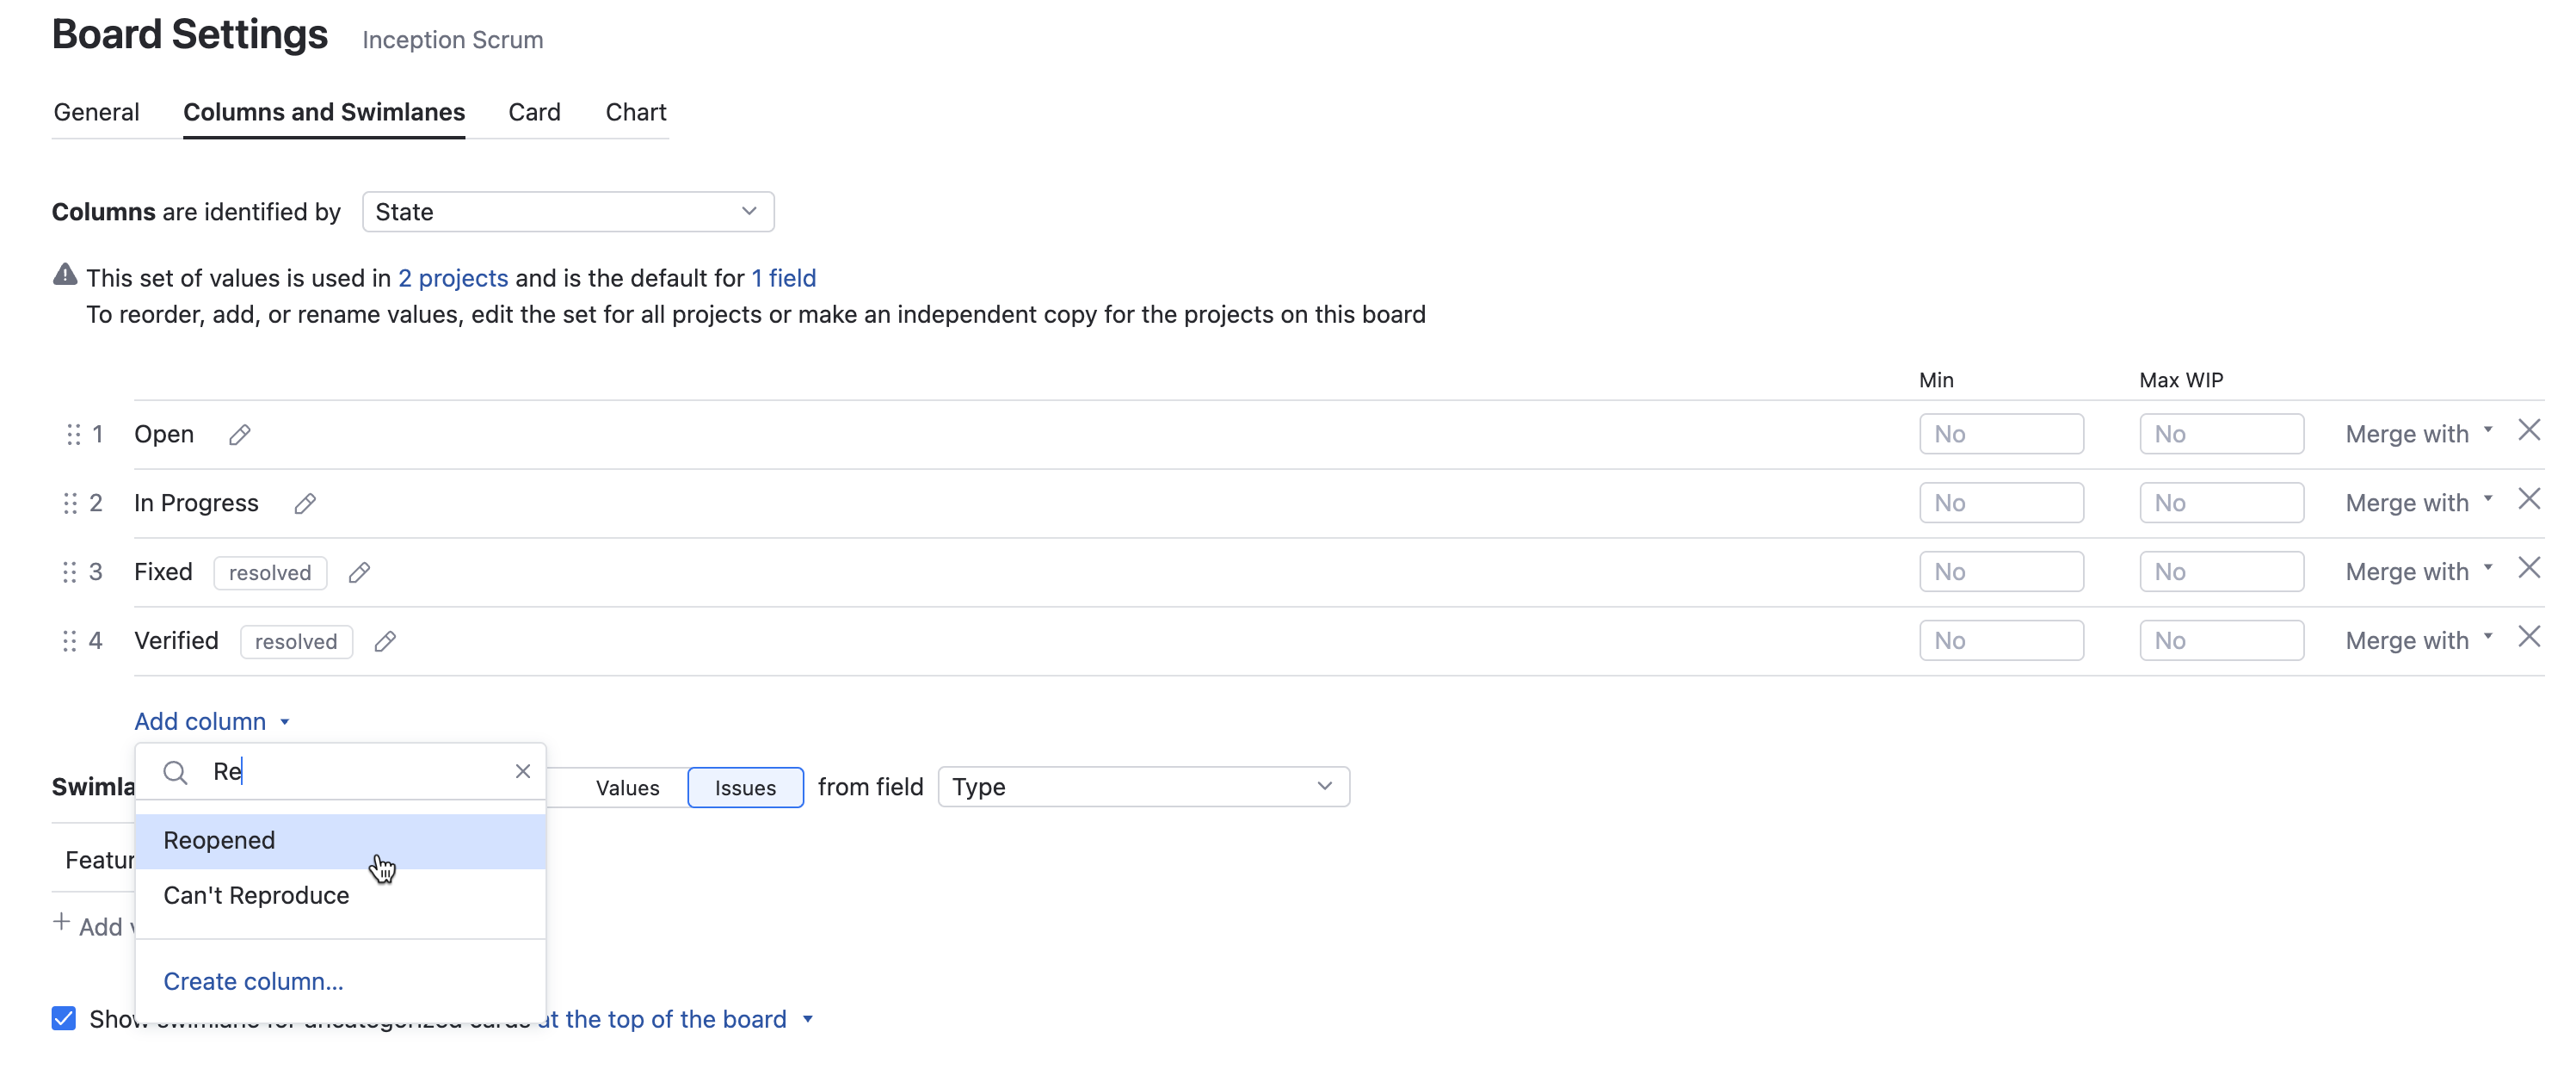
By default, the template for the Scrum board uses the Type field to identify swimlanes.

For the development board, you show swimlanes for features or user stories. Each card on the board represents a task that contributes to the completion of the user story. When you create an additional board to track the development of the final product, you show swimlanes for epics. The cards on this board represent the user stories that you work on during each sprint.
Customize Card Presentation
The Card tab gives you a few options that you can use to configure your Scrum board.
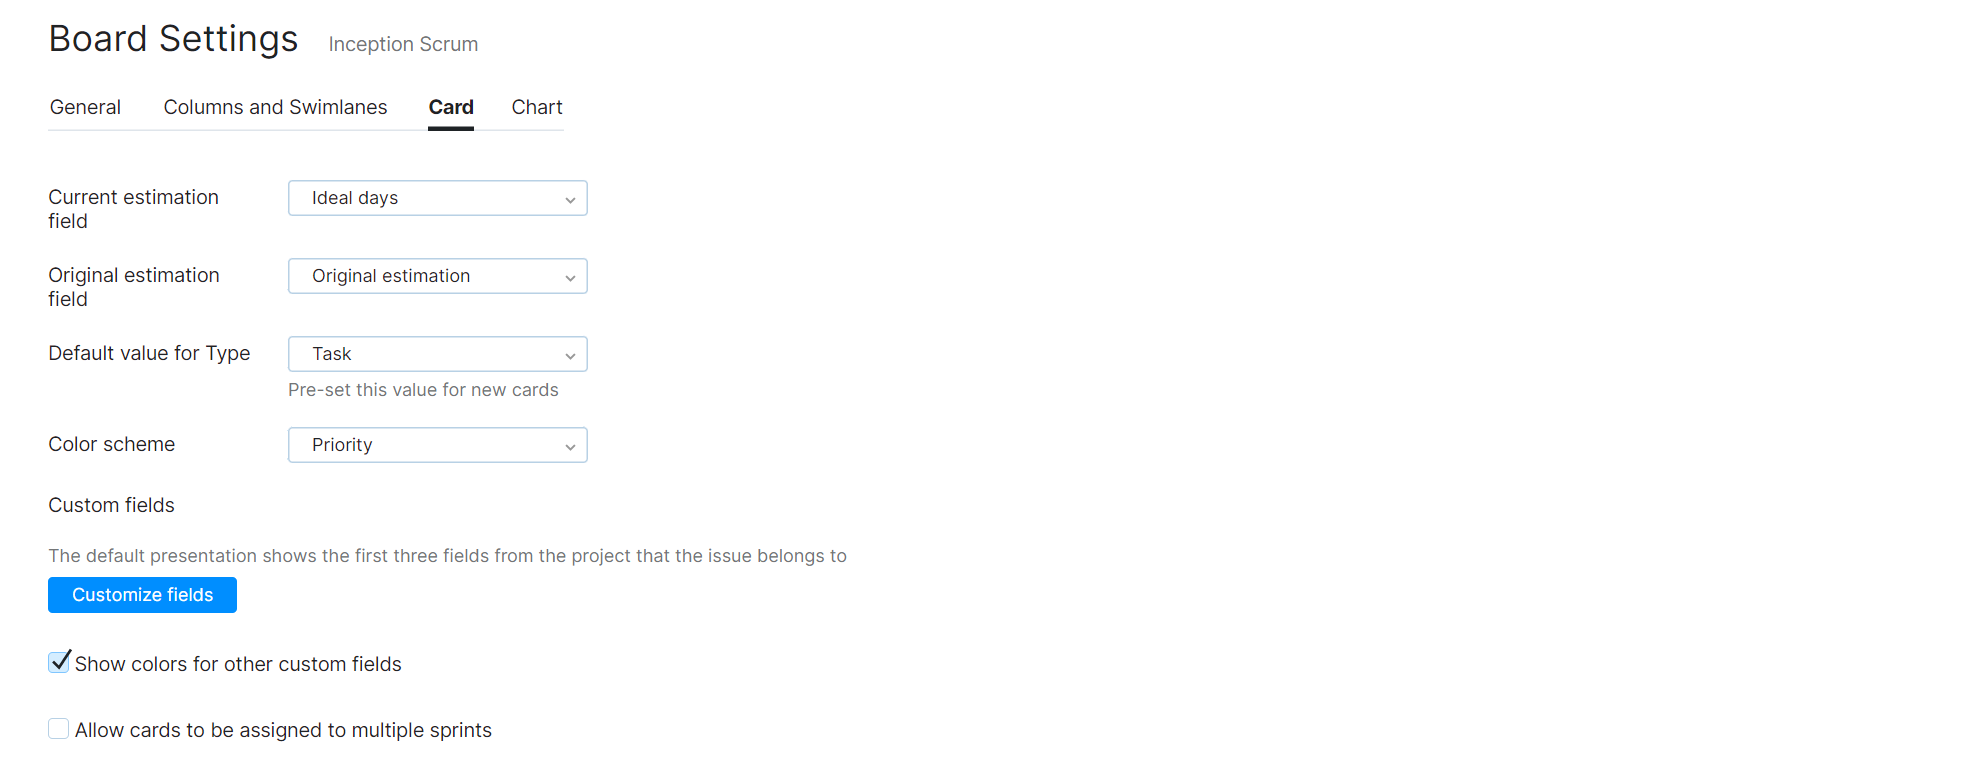
If you estimate the amount of time that is required to finish each task, you can display estimations on the board. Use the Current estimation field and Original estimation field settings to select which fields are used to store estimation values in your projects. This lets you show and update estimations directly on each card.
You can also set the color scheme that is used to highlight cards on the board. There are two ways to color cards. The simple scenario is to color cards based on the value of an issue field, for example, Project or Priority. The Priority field has a default color scheme. Critical issues are highlighted in pink, normal issues in green. You can update the color scheme for custom fields on the Edit Project page.
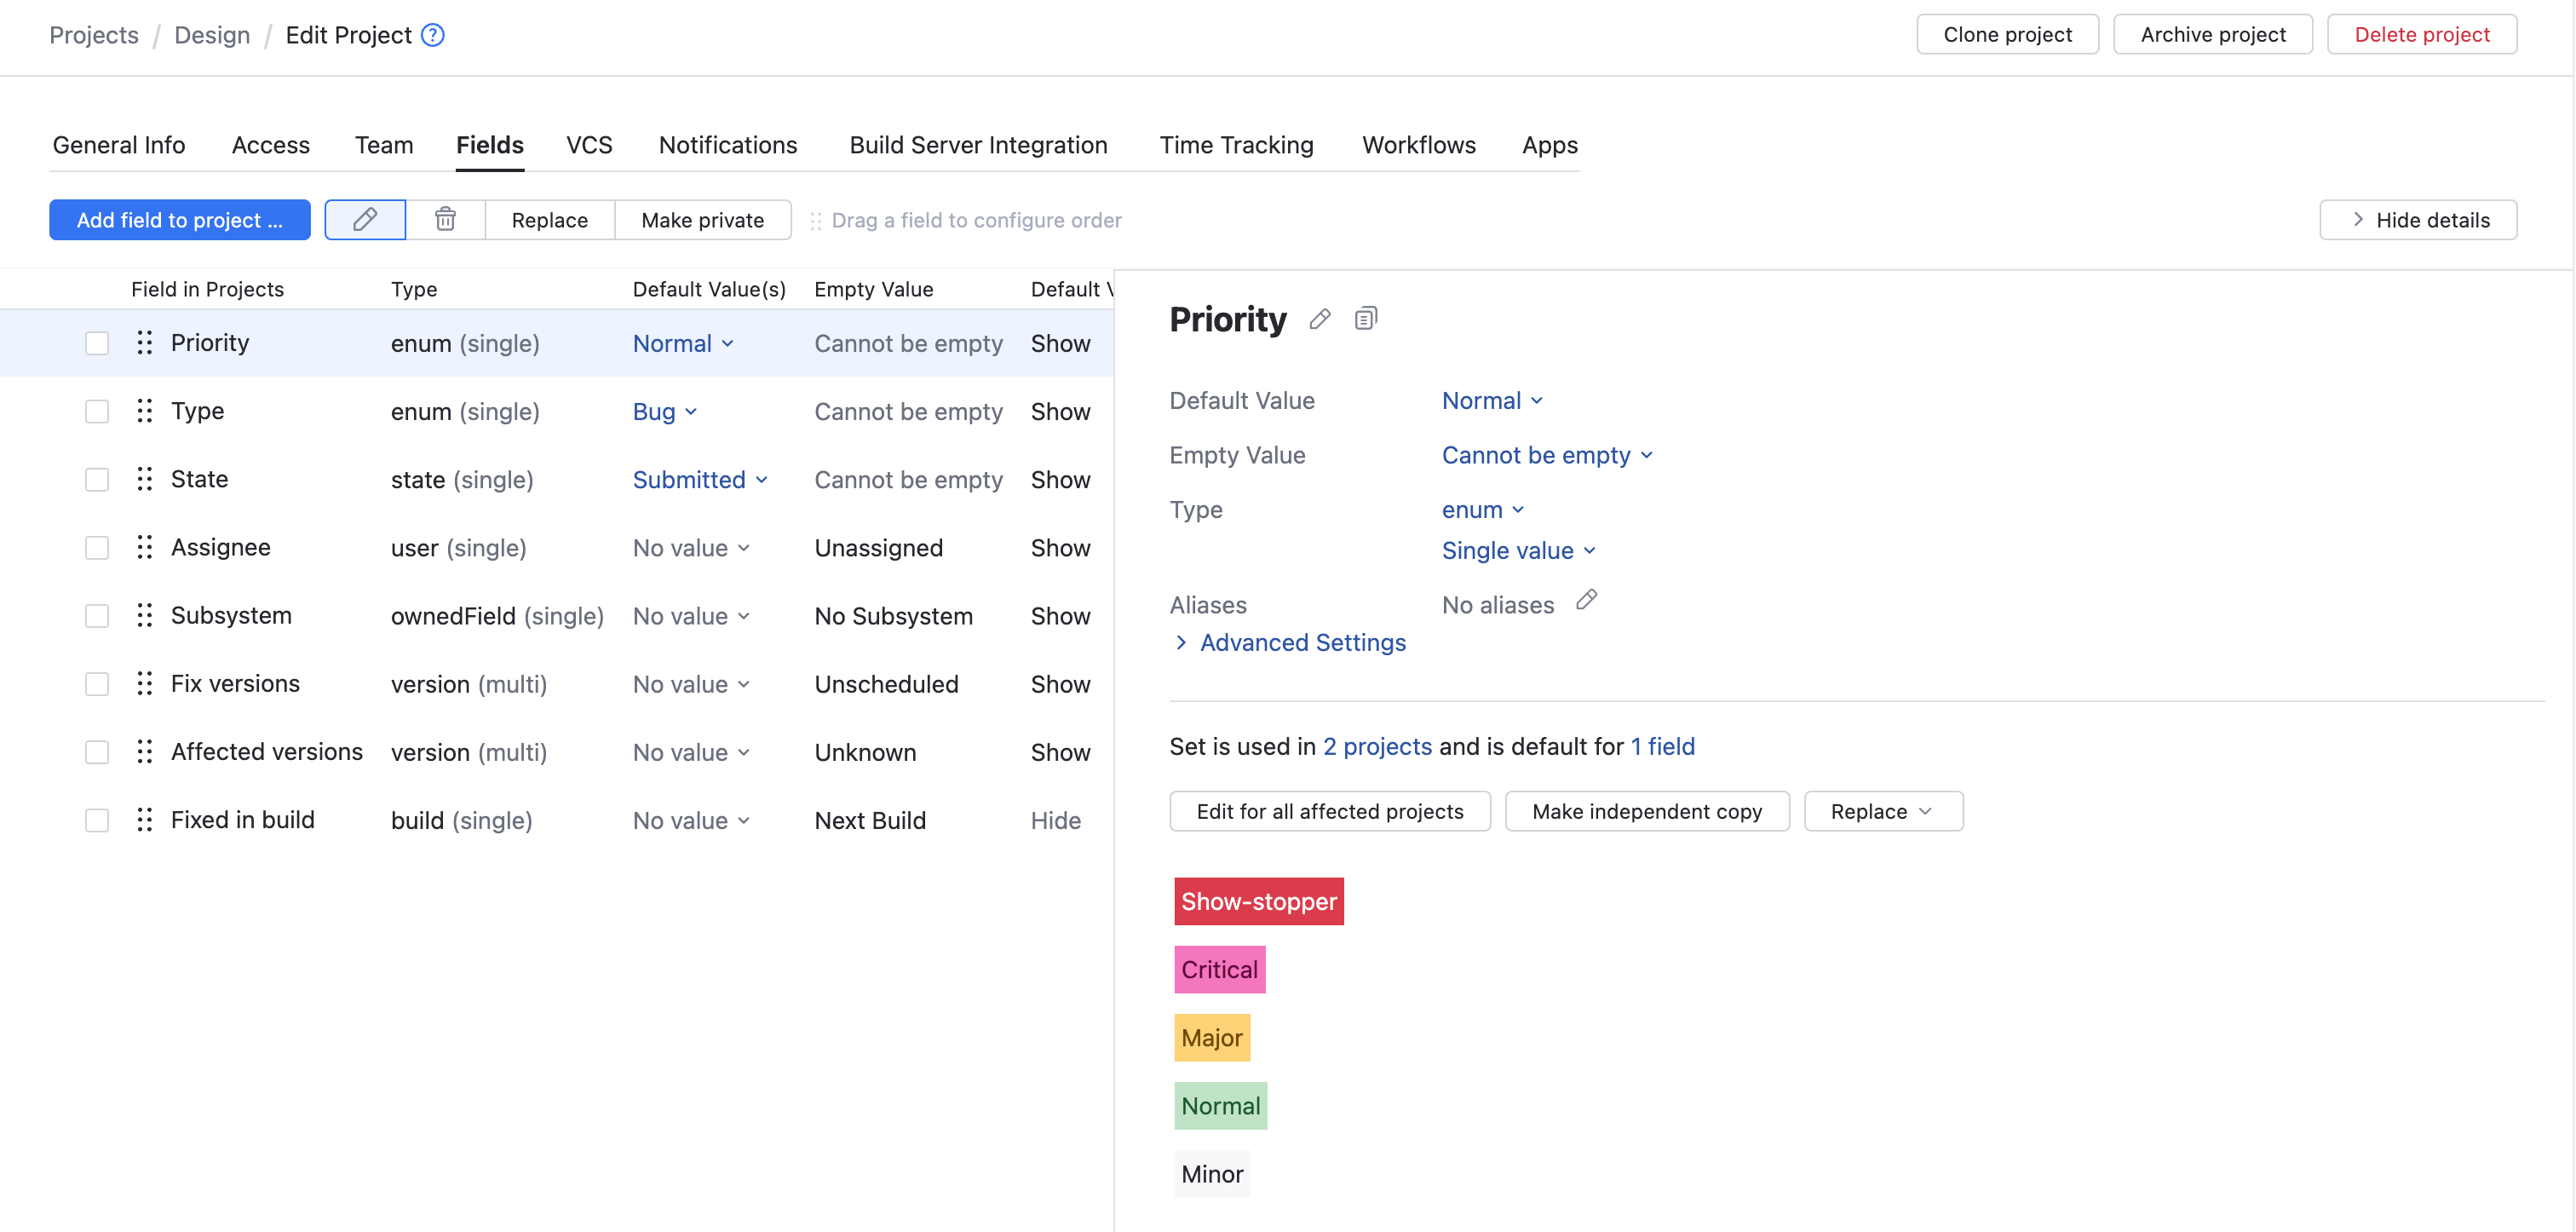
You can use this approach for any enumerated field.
If you color cards by project, you assign each project a color on the Card tab of the Board Settings page.
Configure the Chart
The Chart tab lets you choose which report you want to display on your Scrum board.

The Scrum development methodology uses a burndown chart. This report shows the ideal progress vs. actual progress for all the issues that are assigned to the current sprint. The burndown chart helps you monitor your progress, analyze your development process, and measure the velocity of your team.
Use the Issue Filter setting to limit which cards are included in the calculation of the report.
You can calculate the burndown based on the number of issues that are resolved each day, the value that is stored in the estimation for the task, or the amount of work that is logged as a work item.
Configure the Backlog
A backlog is usually a collection of unfinished work that your development team can build to improve the product. Scrum teams normally prioritize issues in the backlog to determine which issues are addressed in each release cycle.
When you configure a backlog for your Scrum board, you can use this list of issues to add cards to the board whenever the team has capacity to take on new work.
To add a backlog to your Scrum board, click the Backlog button in the toolbar. This expands the panel to the left side of the board, revealing the backlog.
You have the option to choose whether you want to create a saved search to use as the backlog or use an existing search.
If you've already defined a saved search that filters for issues that you want to use as the backlog for the board, click either link and select the saved search from the list.
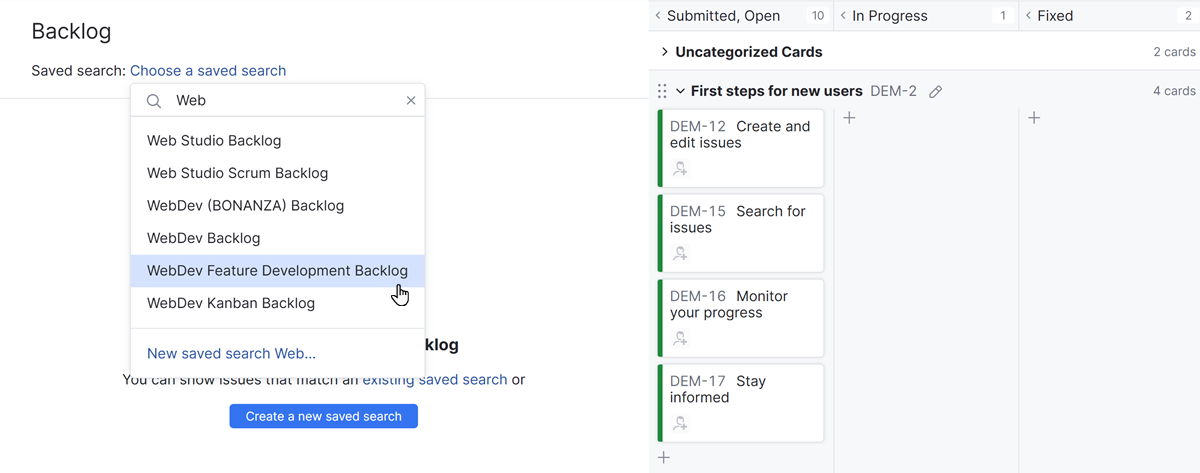
Use the search box to filter the list by name
To generate a new saved search, click the Create a new saved search button.
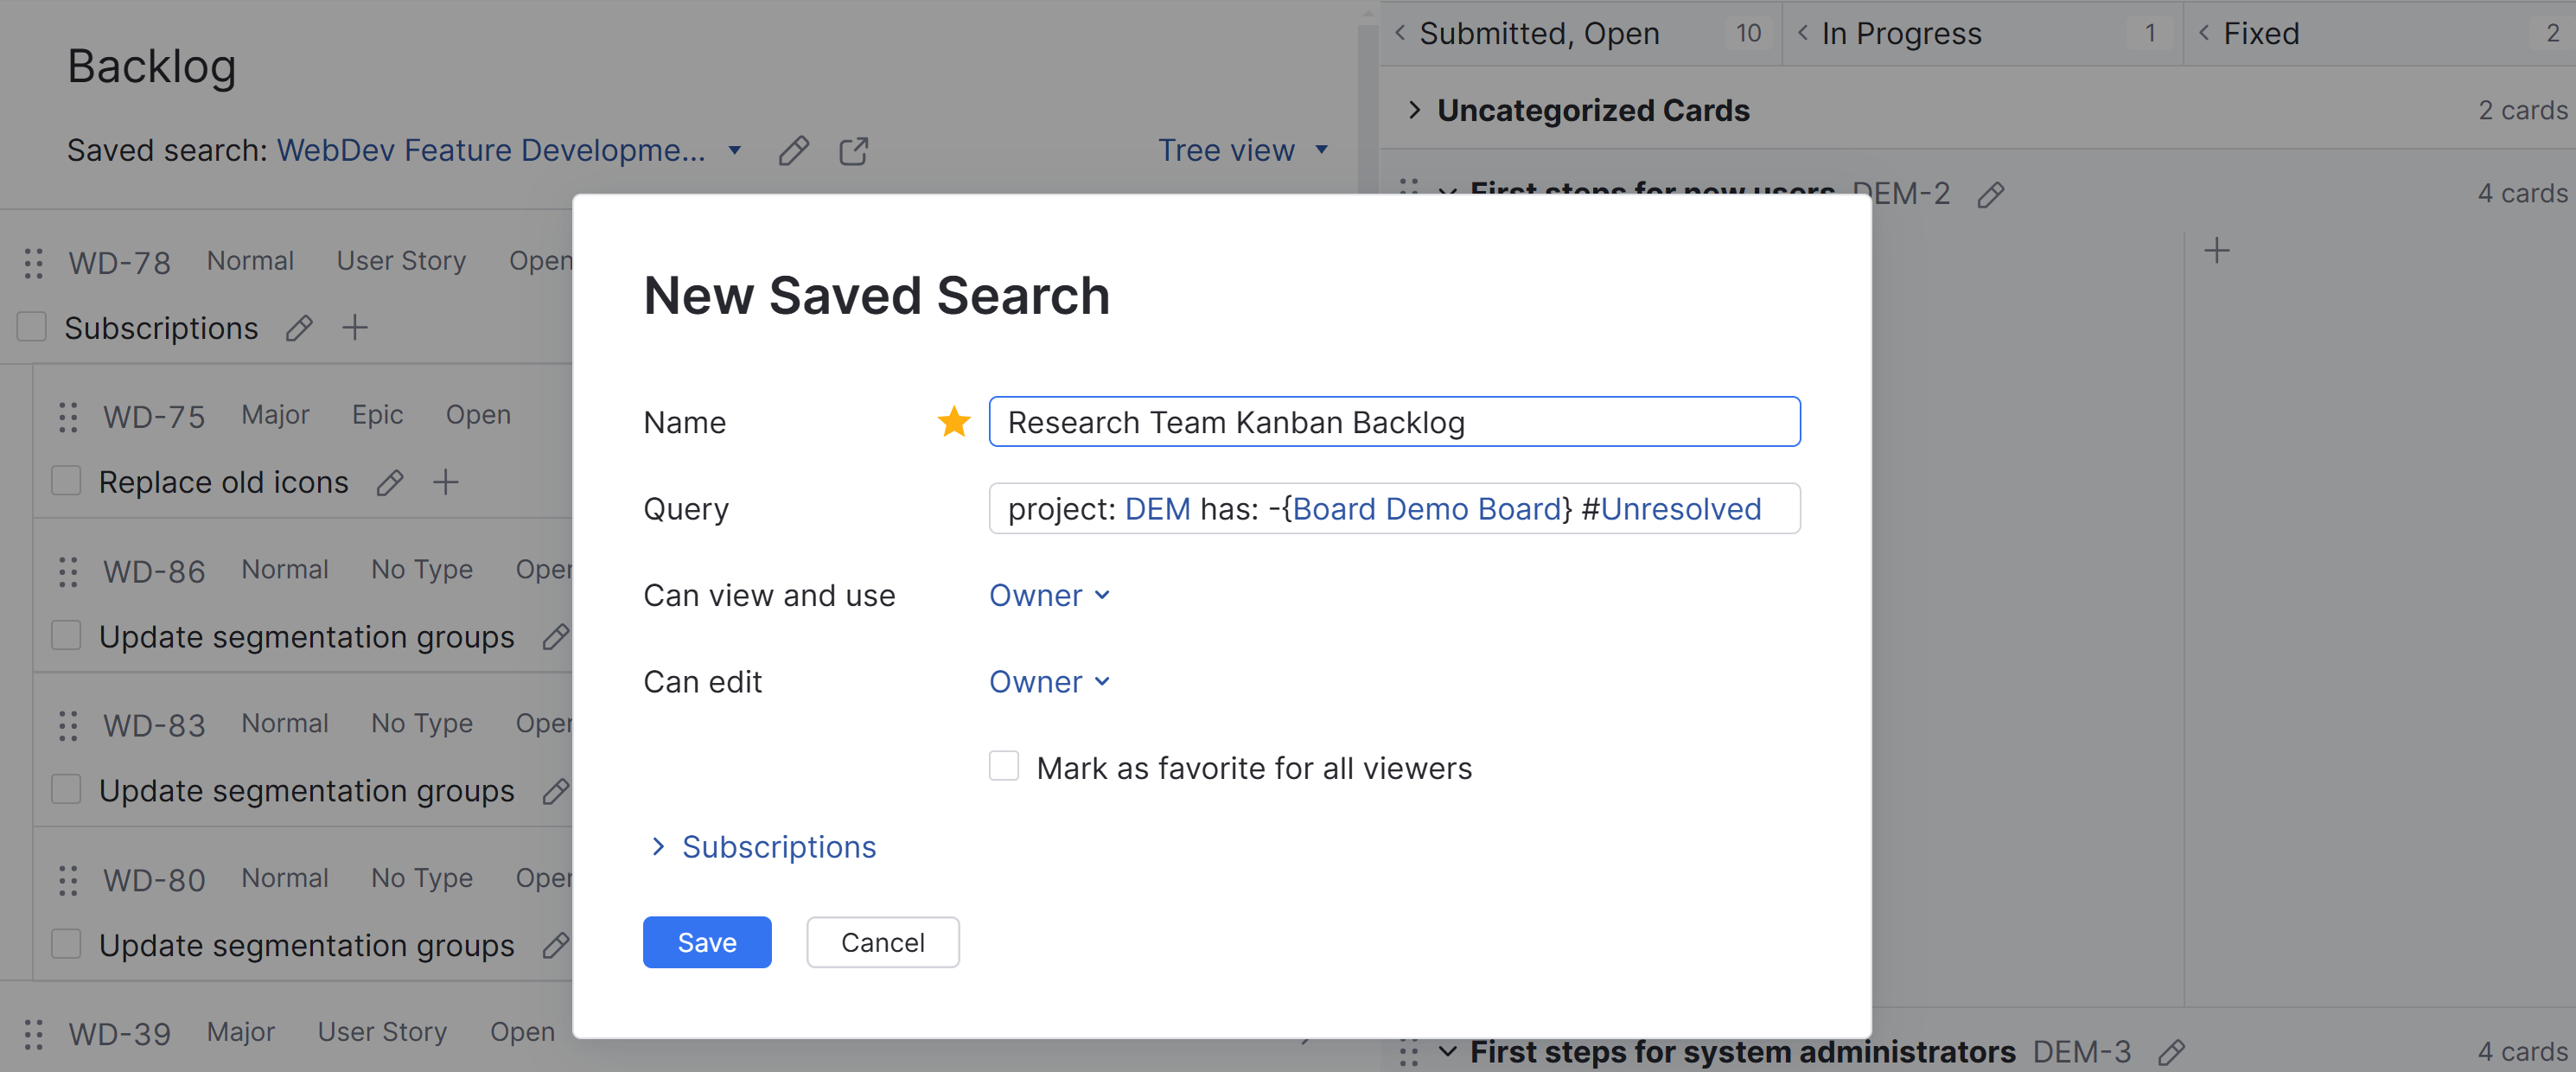
A query for the new saved search is generated with the following format:
project: <project(s)> has: -{Board <Board Name>} #UnresolvedThis saved search returns all unresolved issues in the projects that are managed on the board that are not already assigned to the board.
The saved search is automatically assigned the name <Board Name> Backlog. If you want to assign the saved search another name, edit the value in the Name field.
Once you've selected or created a saved search, a list of issues that match the search criteria is shown in the backlog.
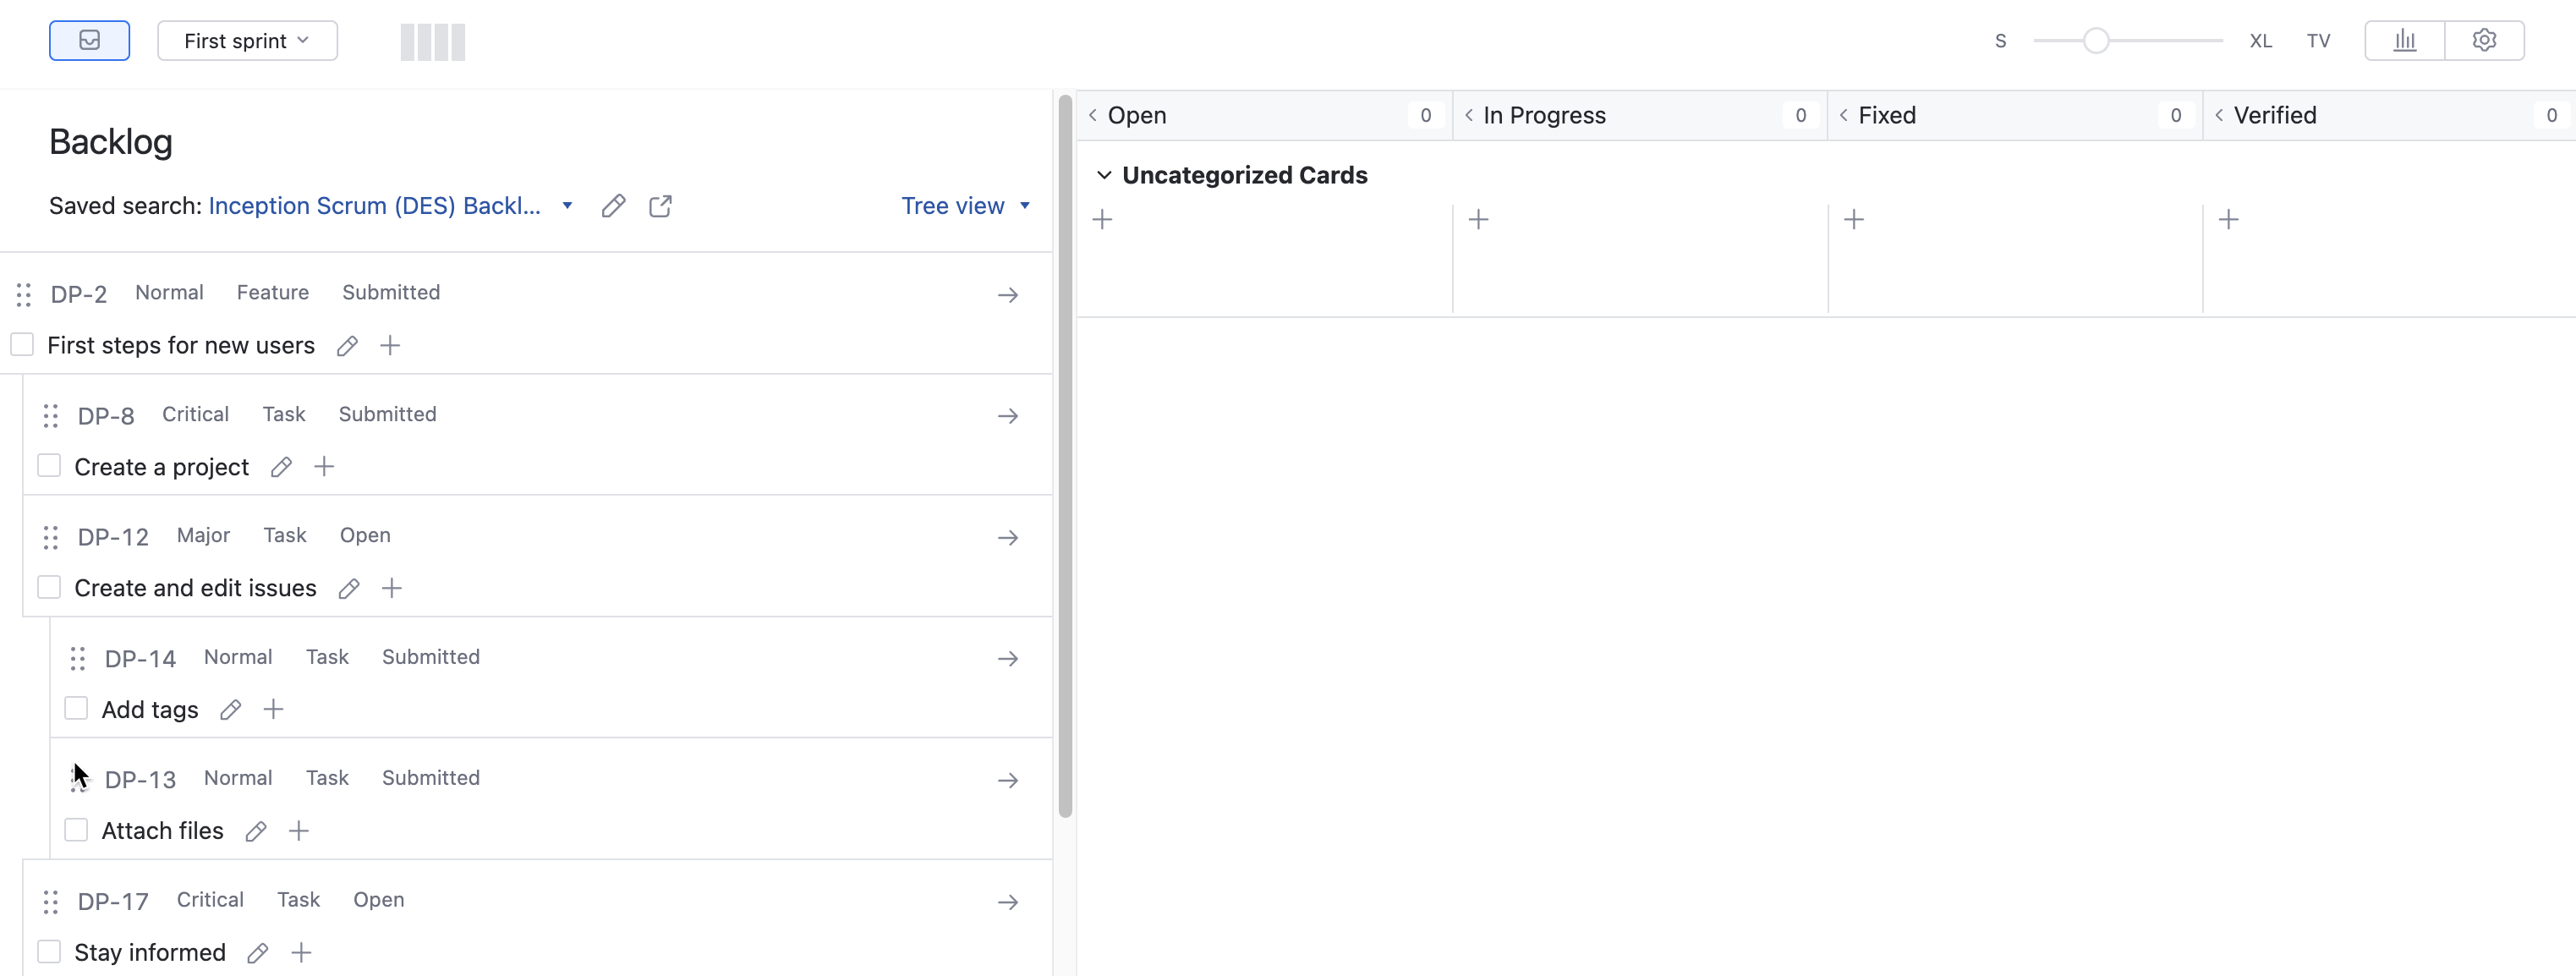
To collapse the backlog and continue working with the board, click the Backlog button in the toolbar.
To learn more about working with issues in the backlog, see Work with a Backlog.
Working with the Scrum Board
When you have finished configuring the board, you and your team can use the board to manage your work. Here are some of the key components of the board with a few guidelines for using the board with the Scrum development framework.
Product Backlog
One of the key concepts in Scrum is to maintain a product backlog. The backlog contains an ordered list of requirements for delivering the final product. In general, the backlog determines which features will be delivered in the product and the order in which they will be built.
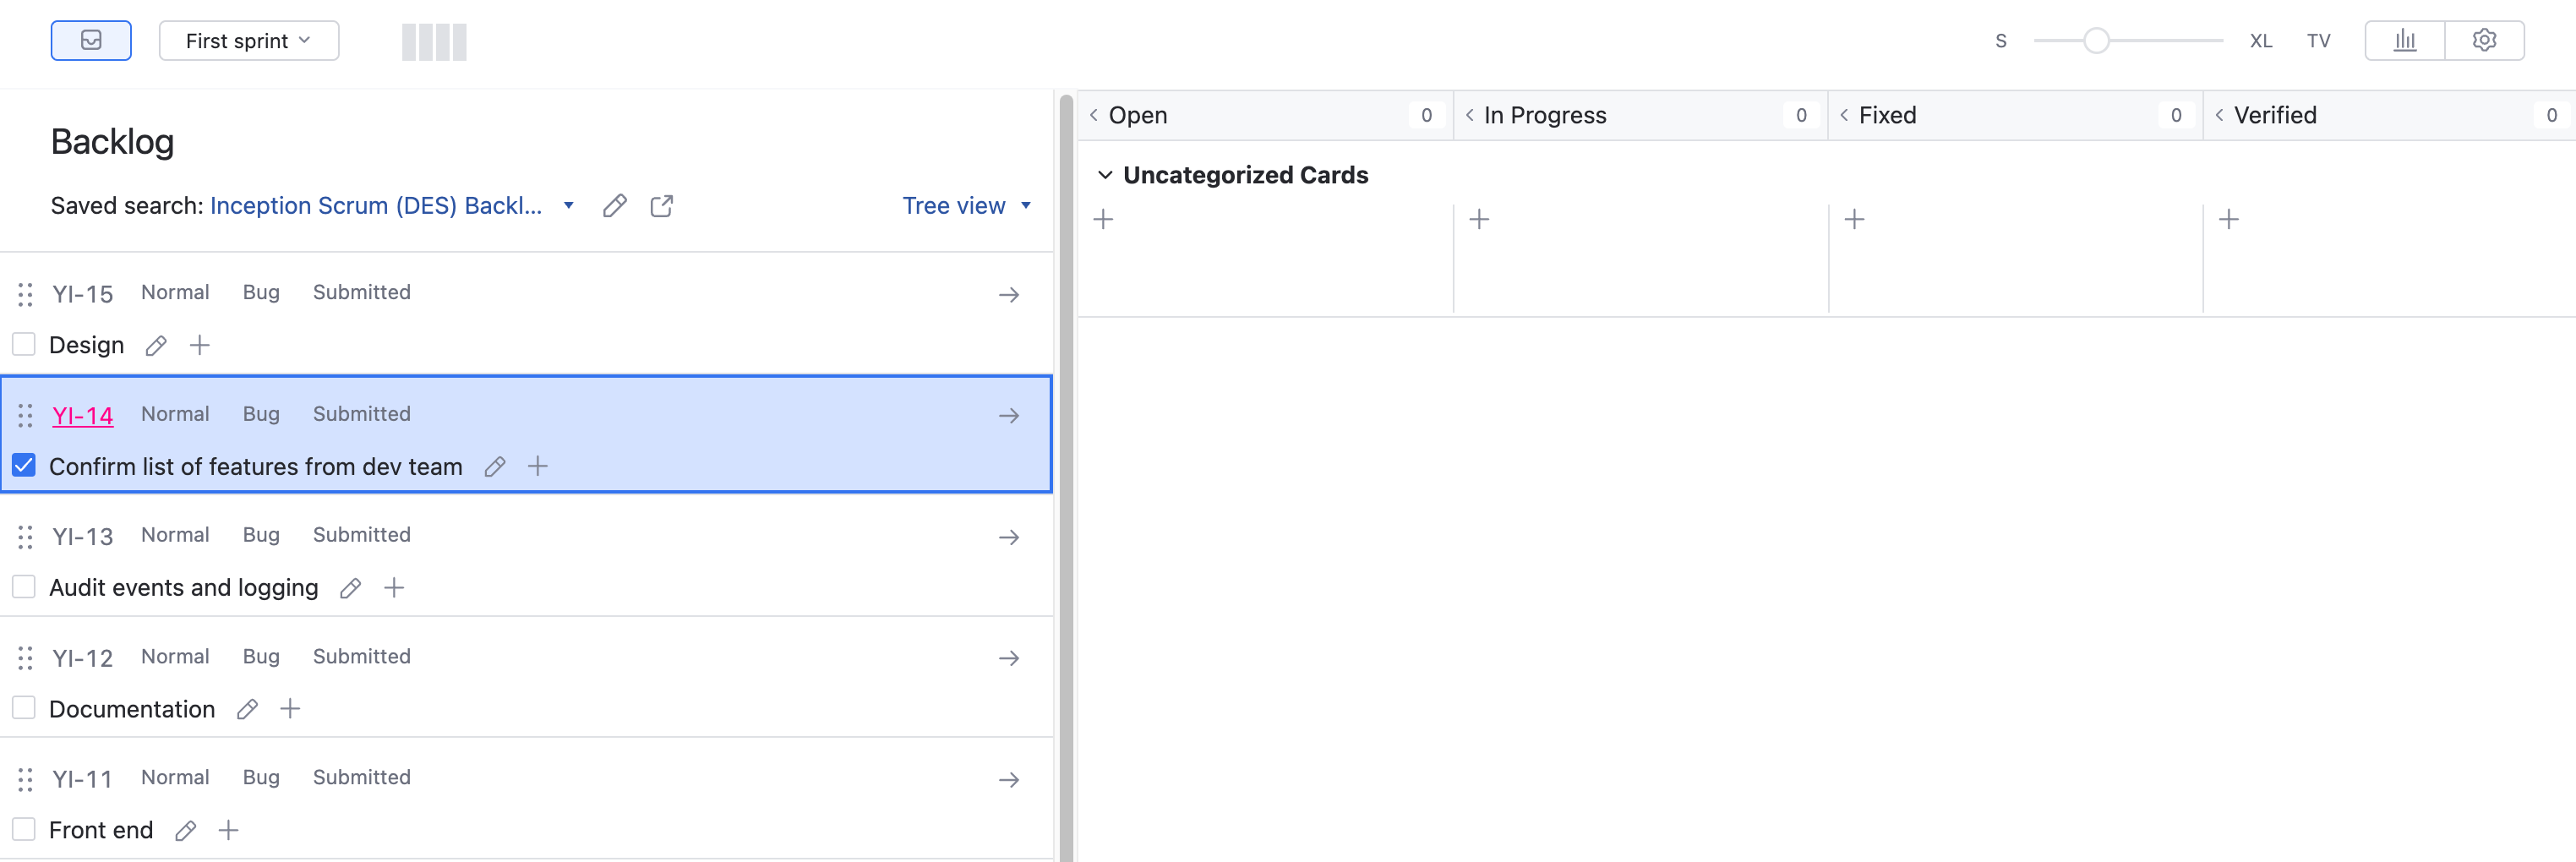
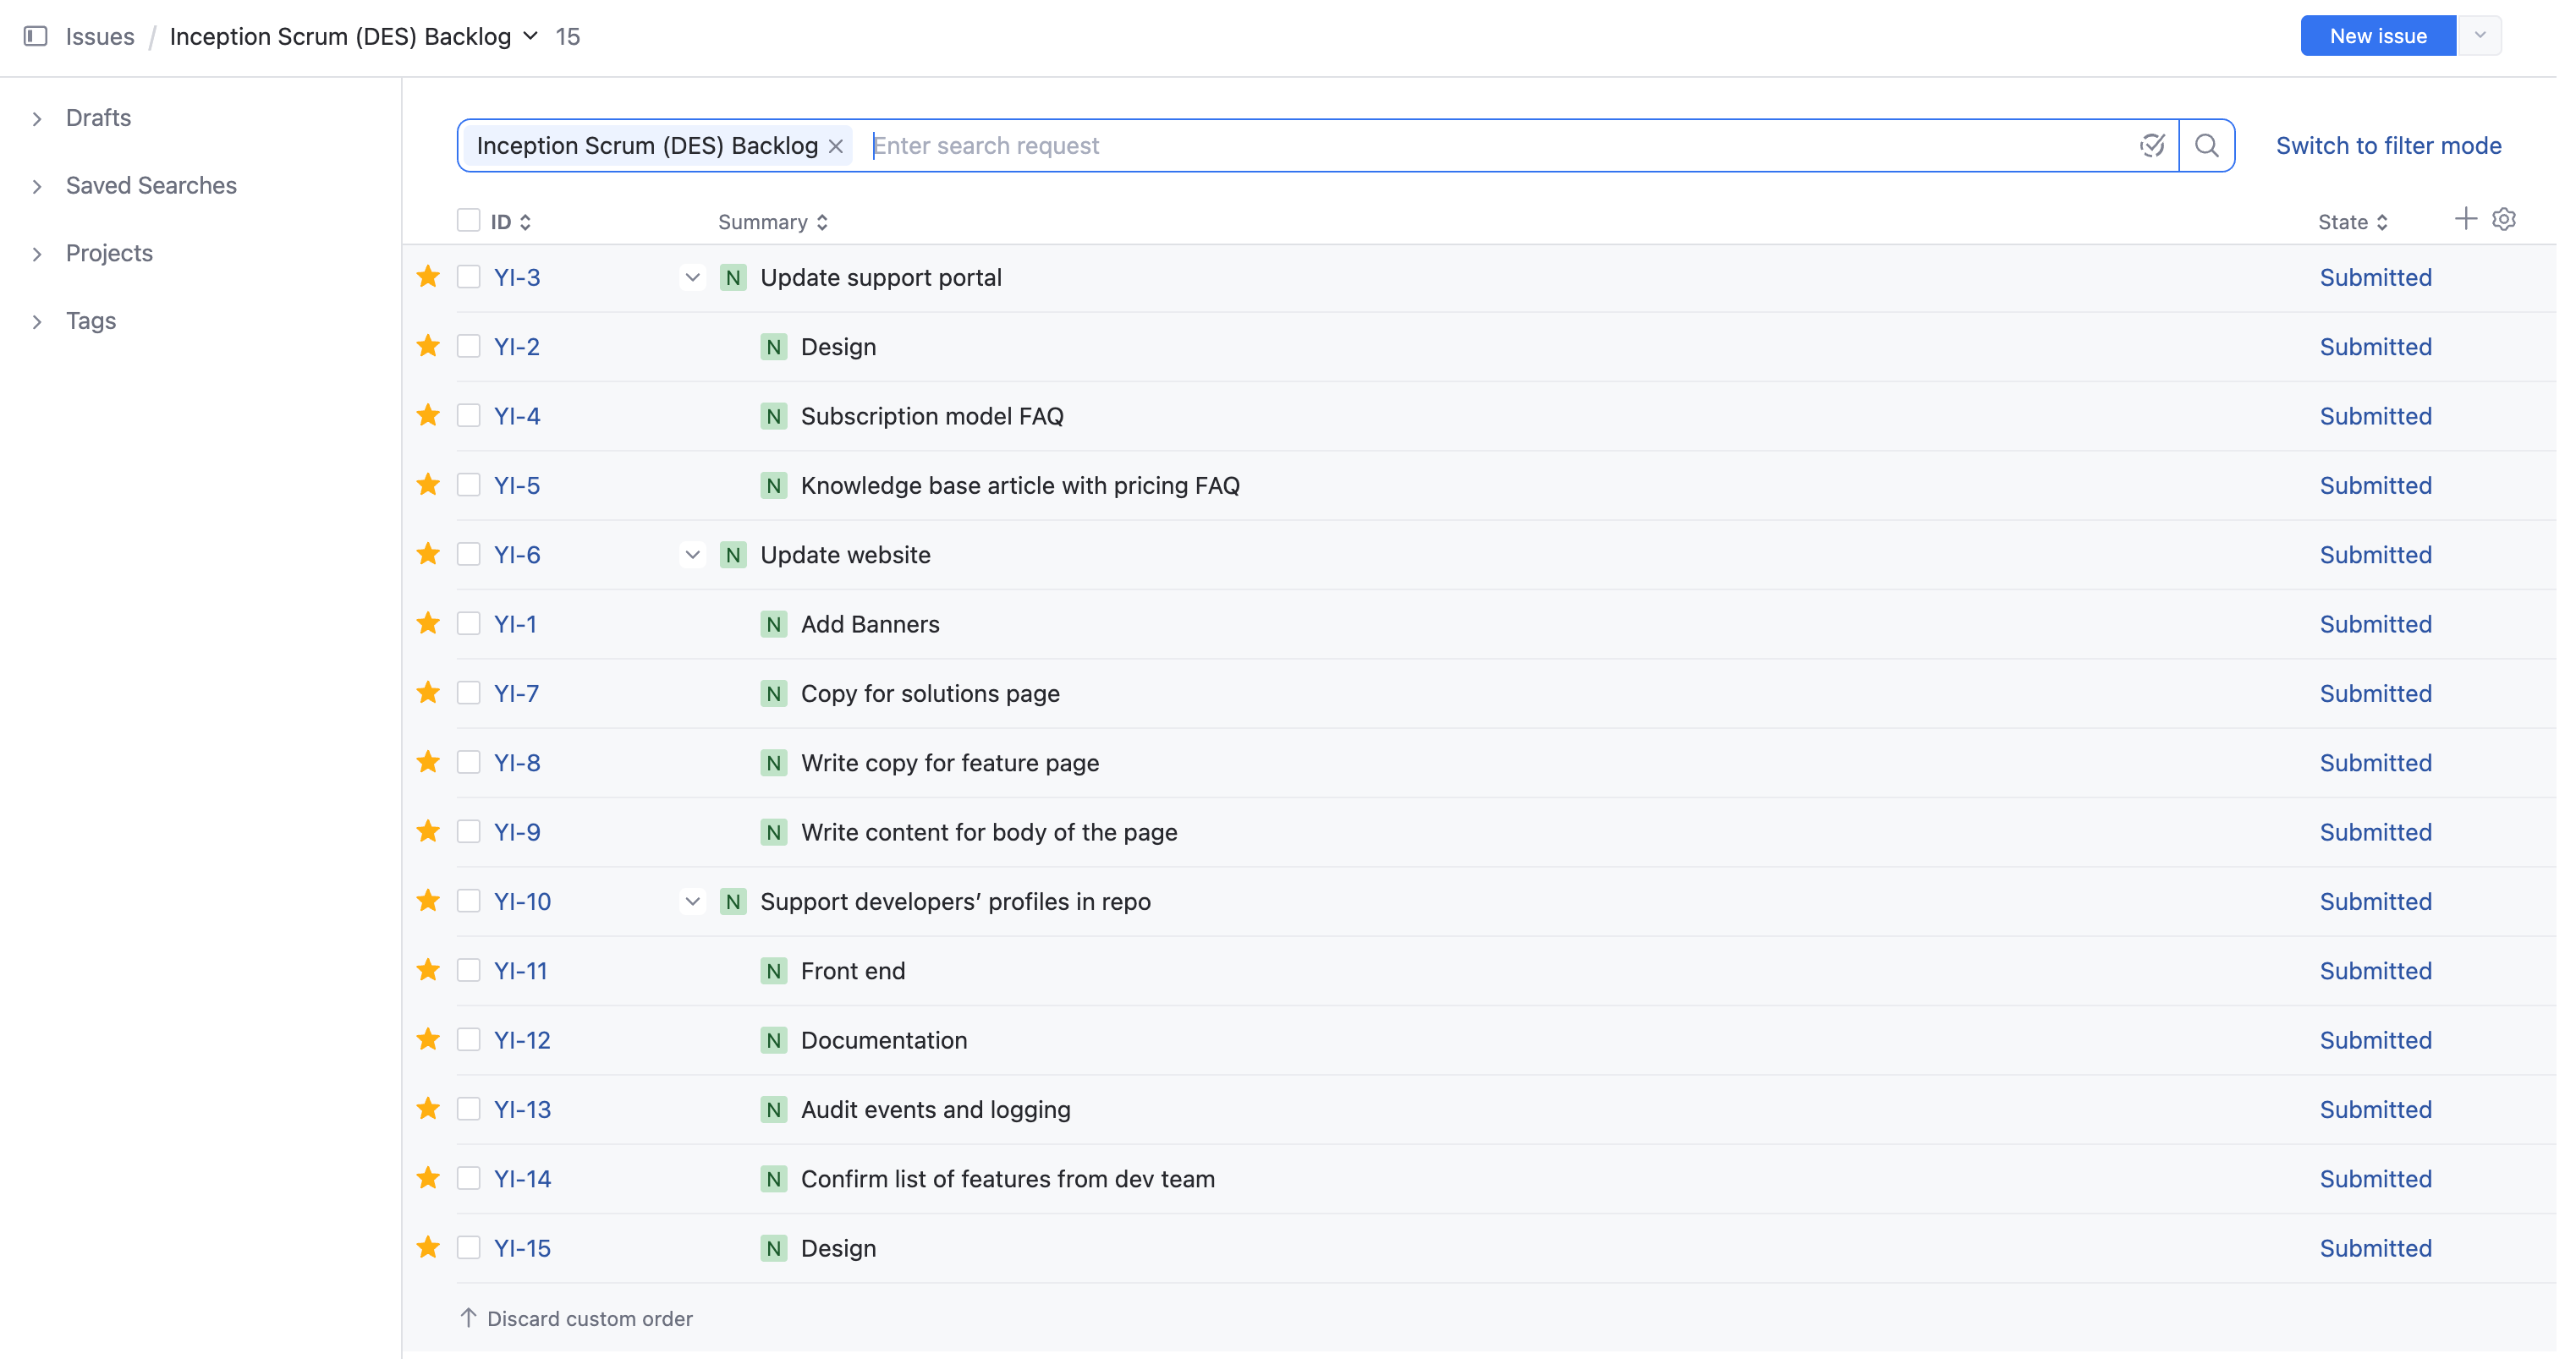
You can open the backlog directly on the board. Here, the Product Owner can drag issues into the order that they will be assigned to sprints for development. Because the backlog is based on a saved search, you can also open the backlog in the Issues list. Changes to the order in the Issues list are applied to the backlog on the agile board in real time.
Plan Your First Sprint
When you have collected all the features or user stores that you want to develop and have prioritized these issues in the backlog, you are ready to plan and execute your first sprint.
Sprints usually start when the scrum team holds a planning event. During this event, the team identifies which user stories can be finished in the sprint. They then identify which tasks are required to deliver each user story, creating the sprint backlog.
You can use the agile board to facilitate this process. To create the sprint backlog, add issues as subtasks to the user stores in the backlog.
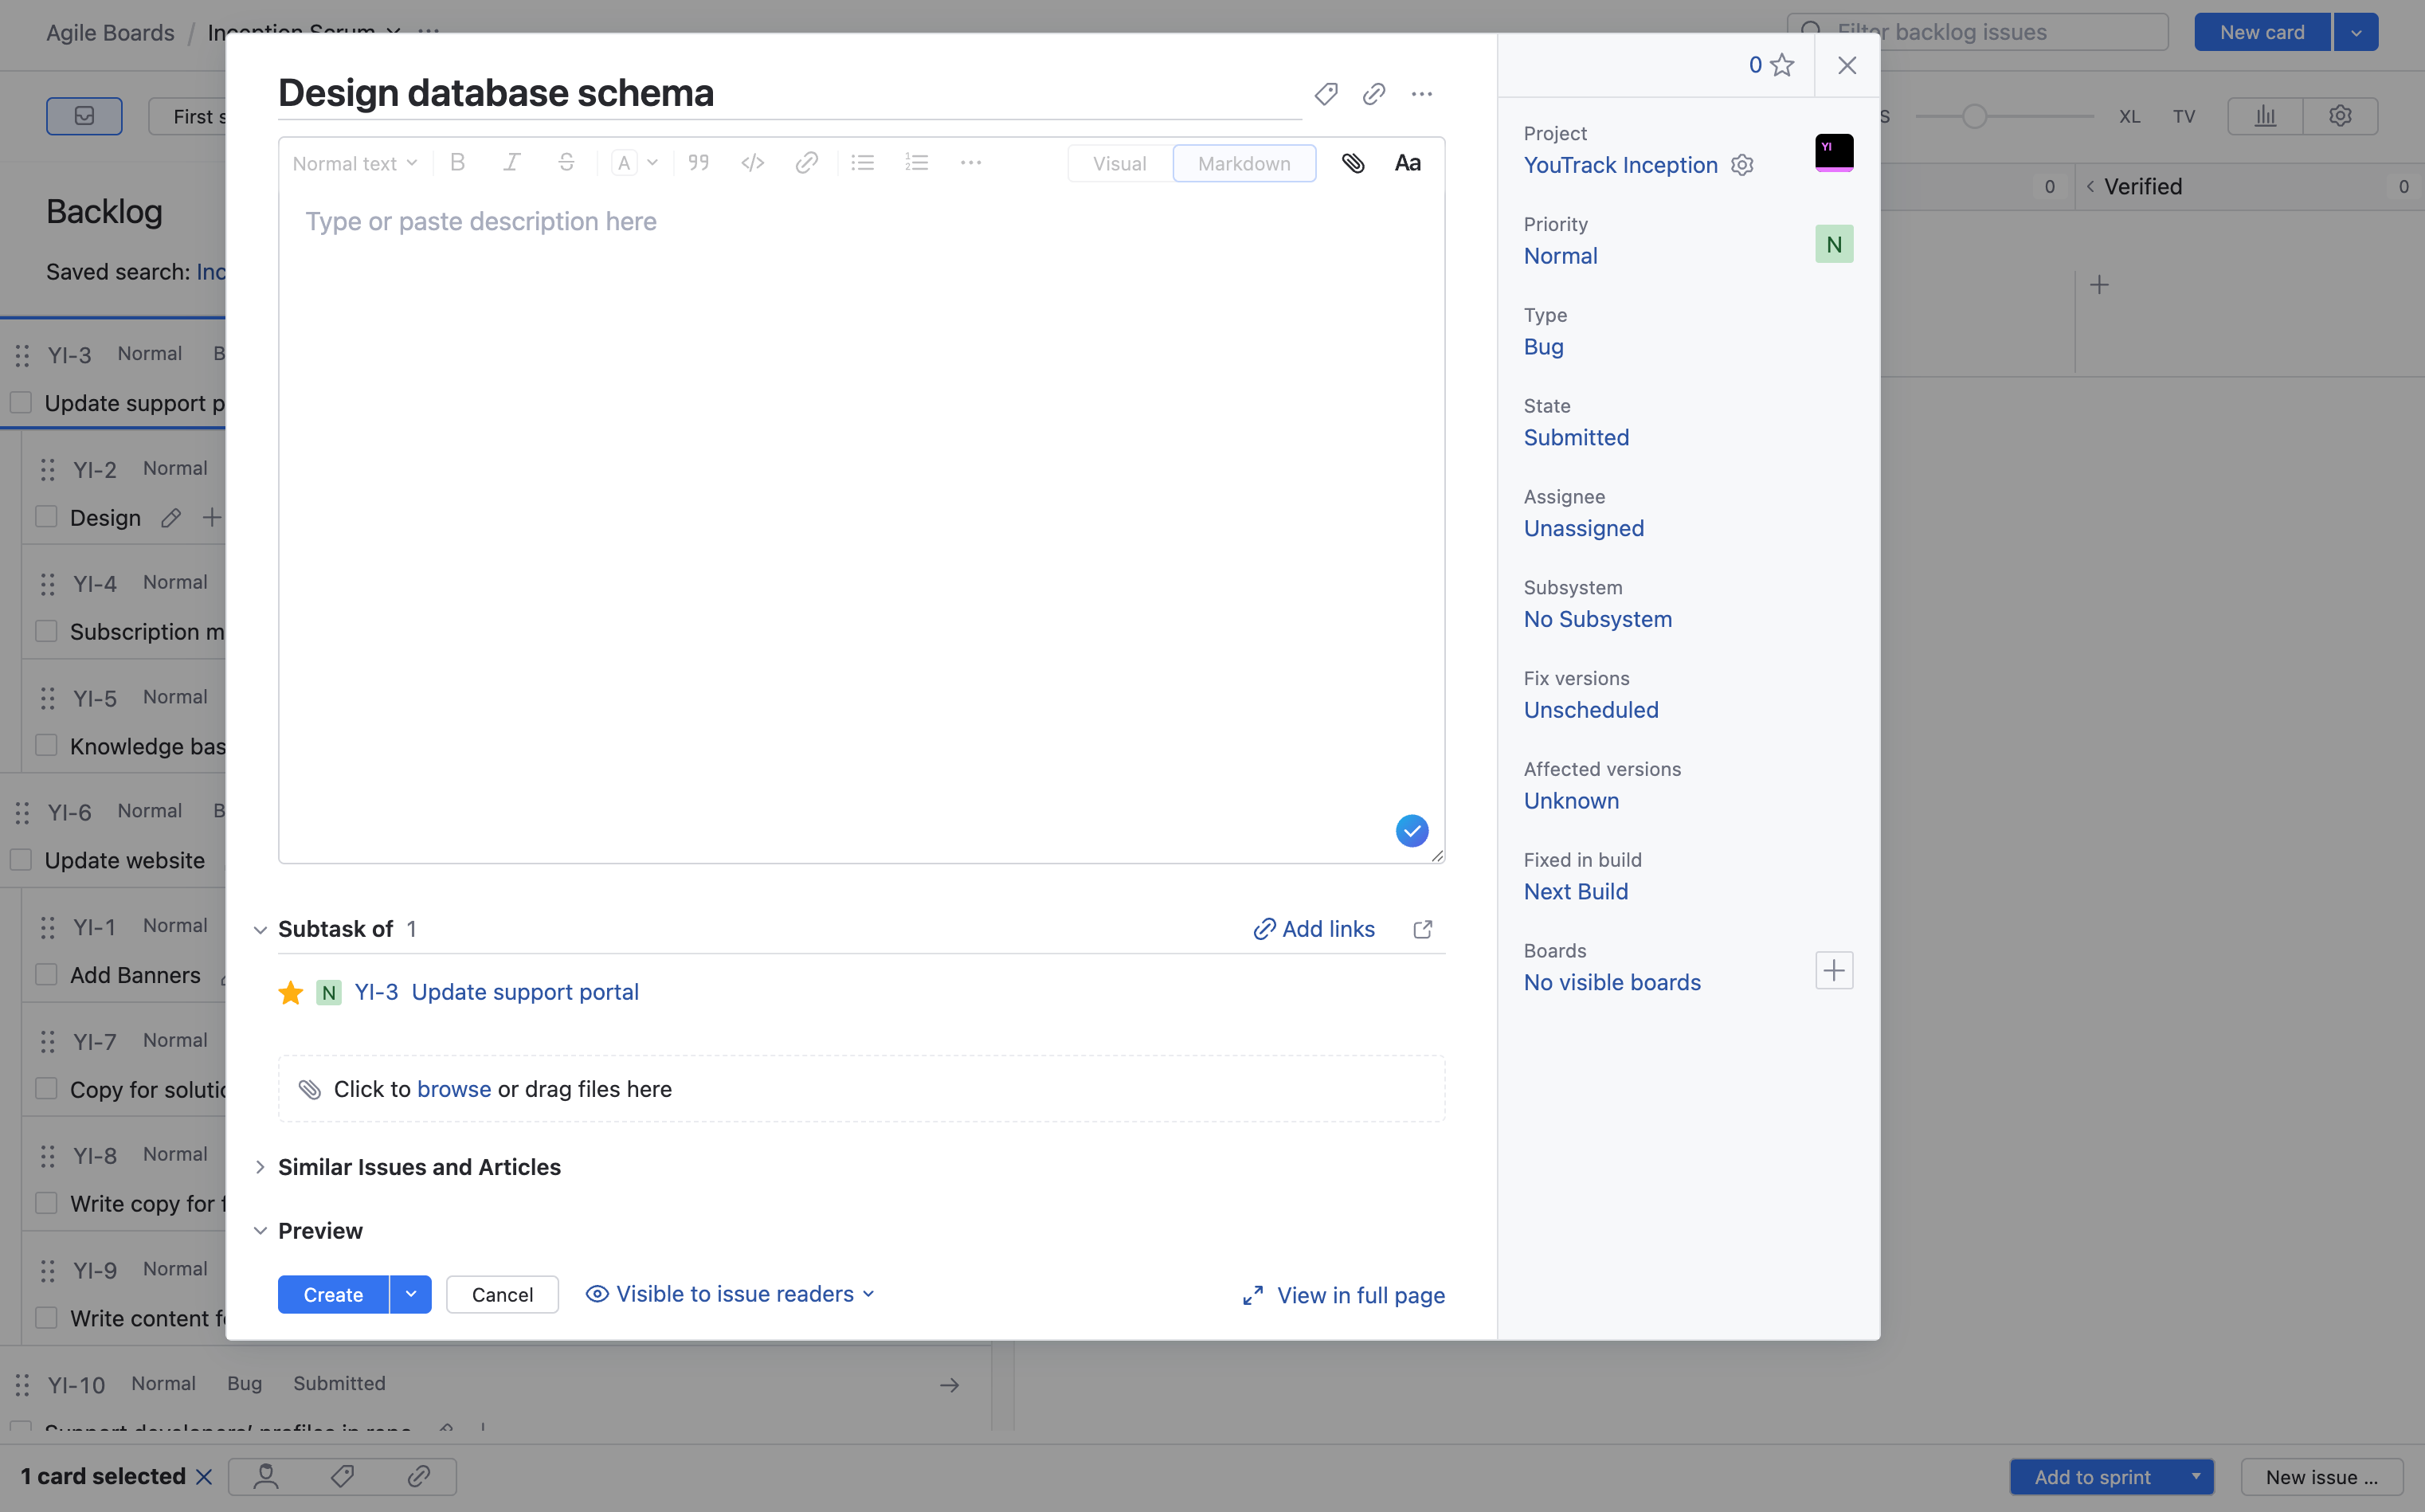
When you create your Scrum board, an unscheduled sprint is created by default. To schedule your first sprint, open the Sprints drop-down list and edit the sprint.

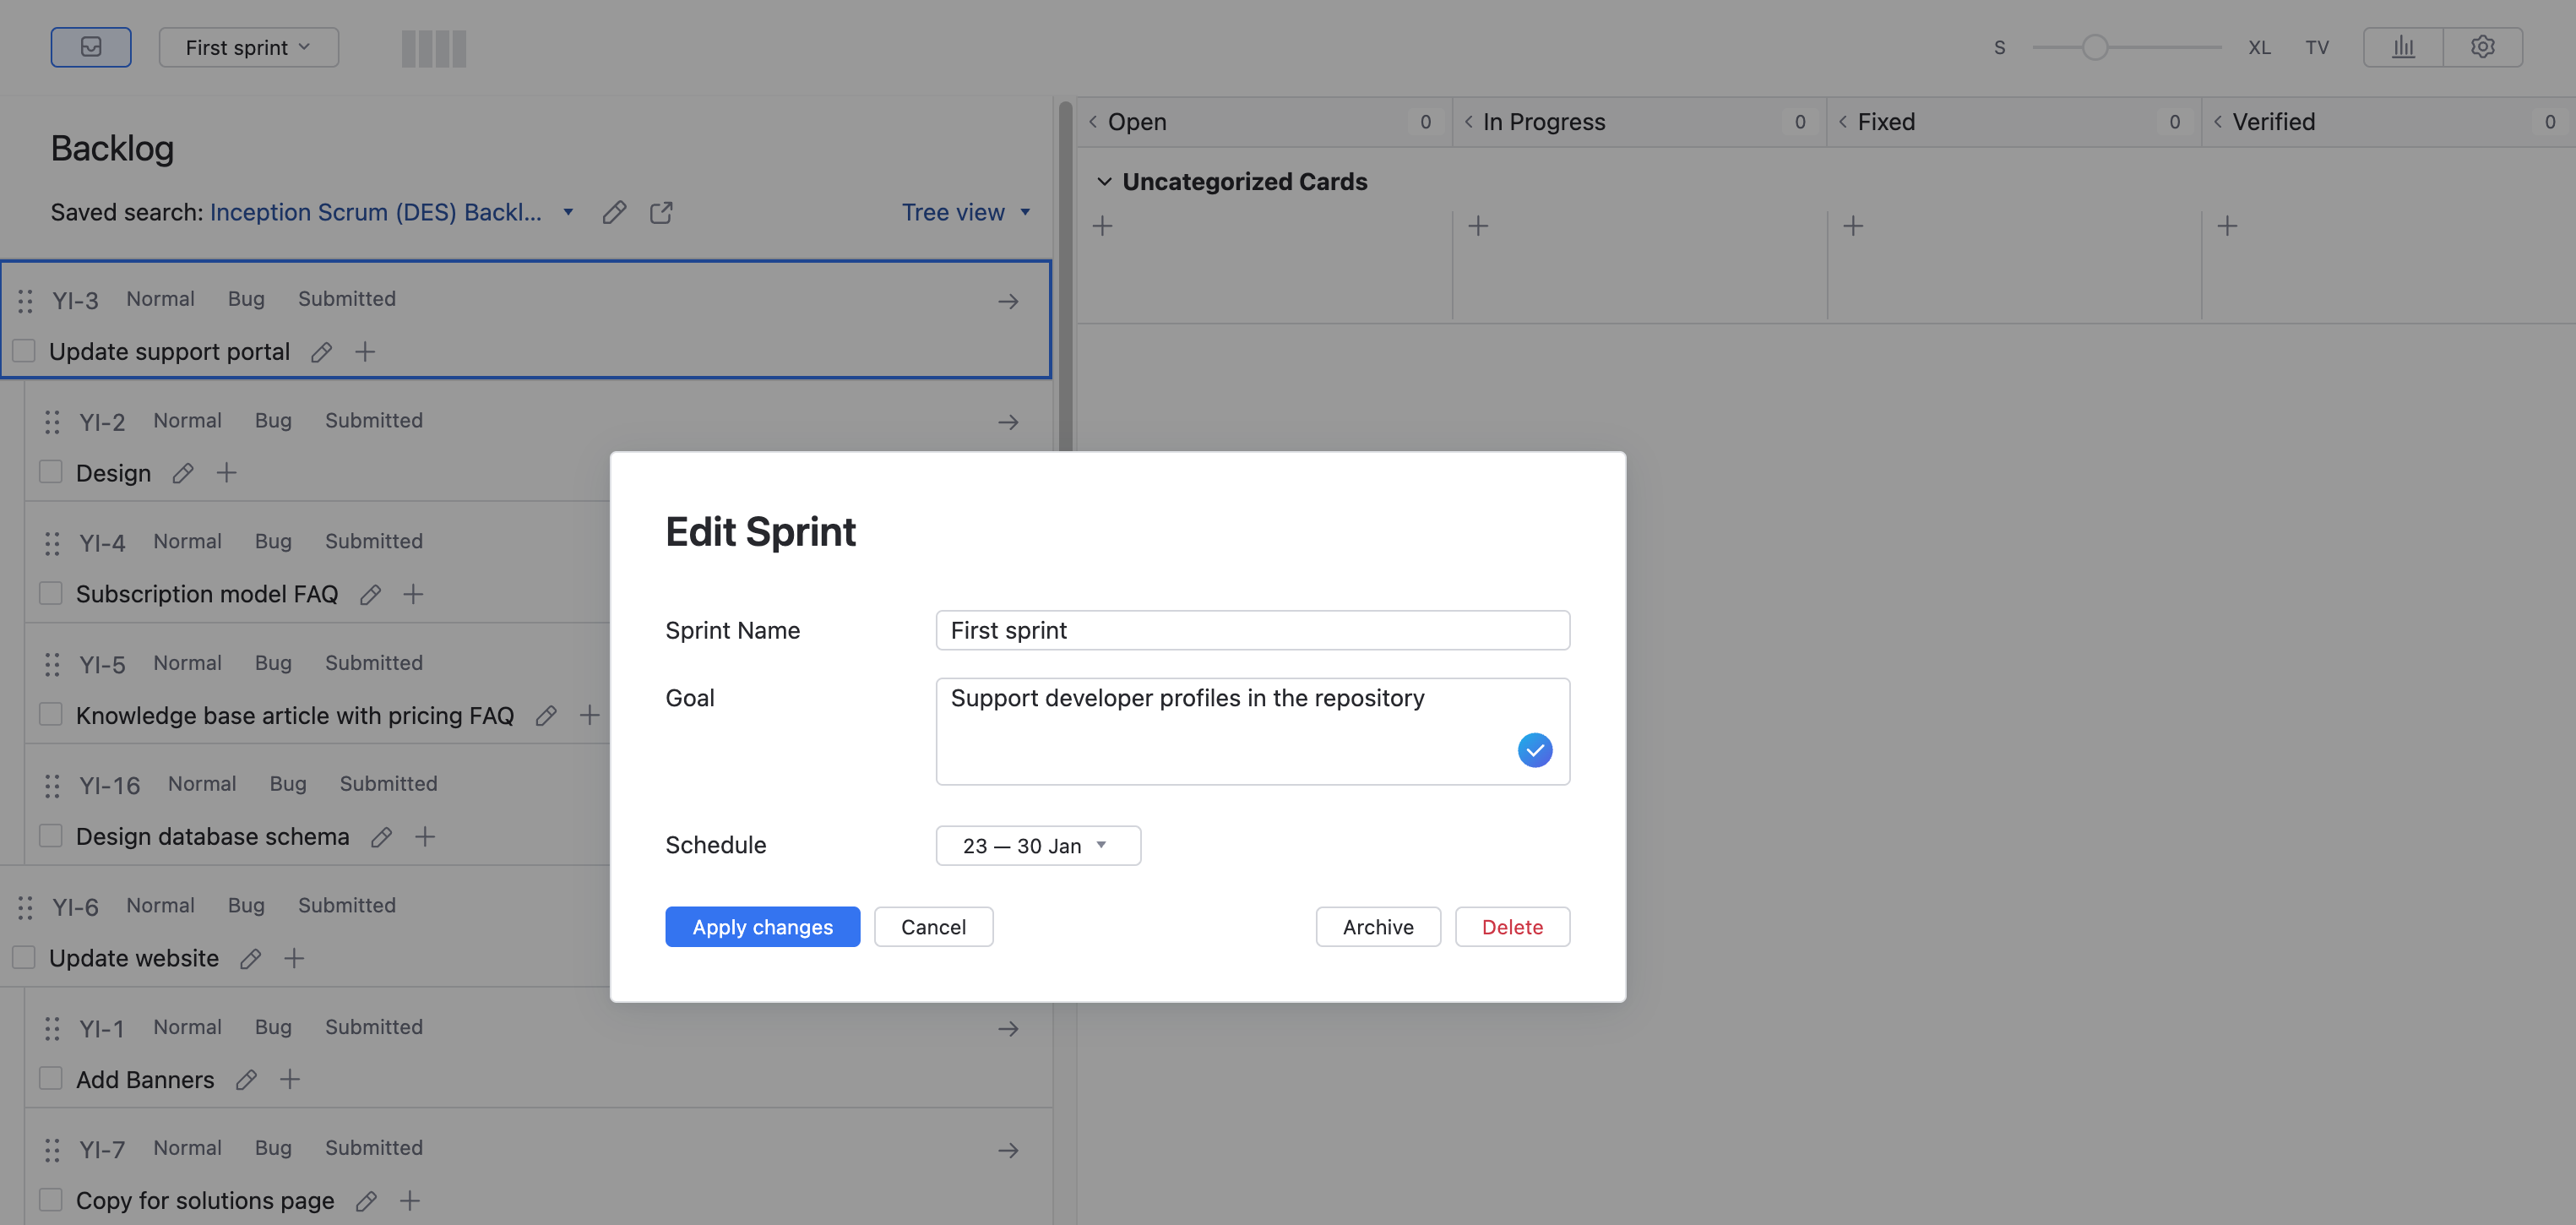
In the Edit Sprint dialog, describe the features that you want to deliver in this sprint as the sprint Goal. The sprint goal is displayed at the bottom of the board and is visible to the team for the duration of the sprint.
Next, open the calendar and set the schedule for the sprint.
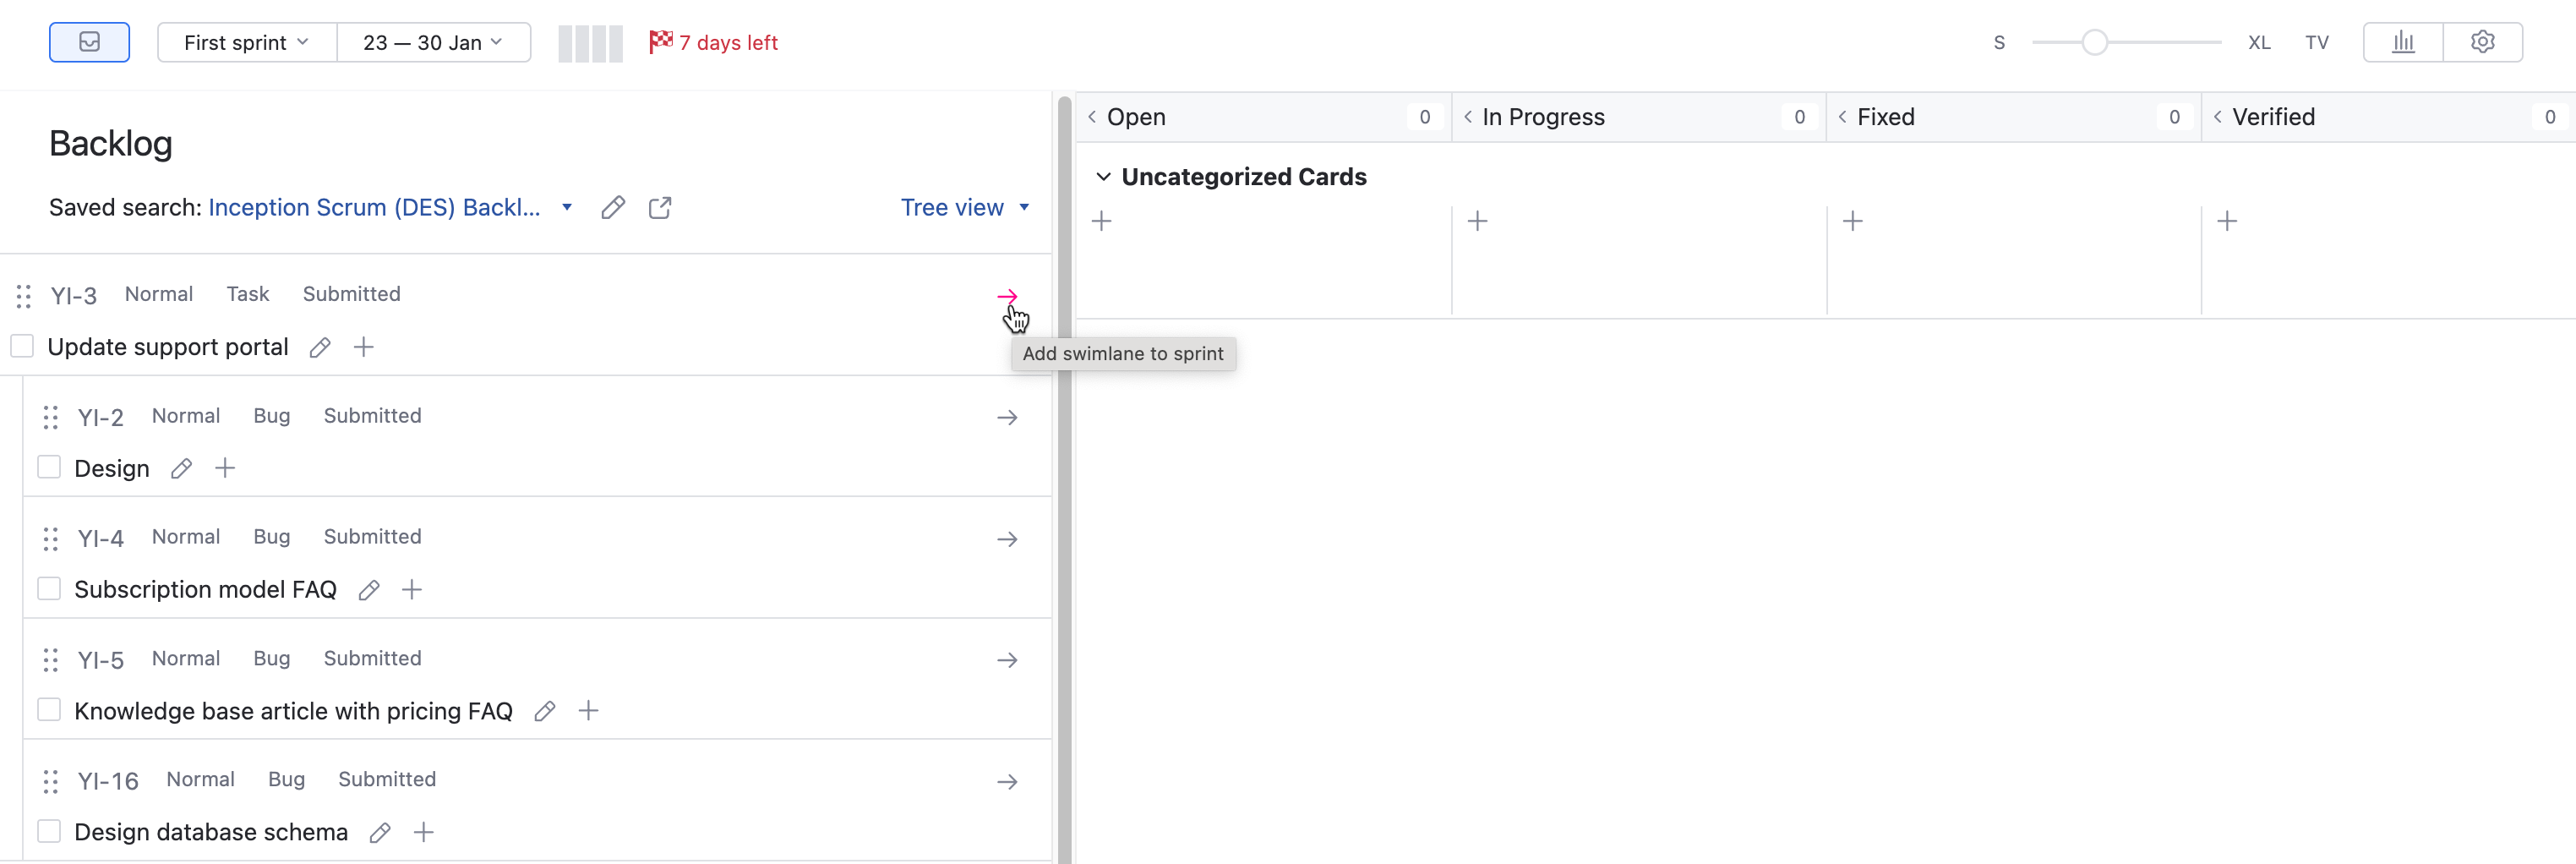
Now you're ready to add issues to the sprint as swimlanes. You can drag issues from the backlog to the board or use the Add swimlane to sprint option. This option lets you choose whether you want to add the subtasks from the sprint backlog to the board as well.
Daily Scrum
After you have defined the first sprint, the team can then use the board to track their efforts for the current sprint. A common practice in scrum teams is to participate in a daily scrum or stand-up. Any obstacle that impedes progress in the sprint can be identified and captured on the board as a new issue or bug.
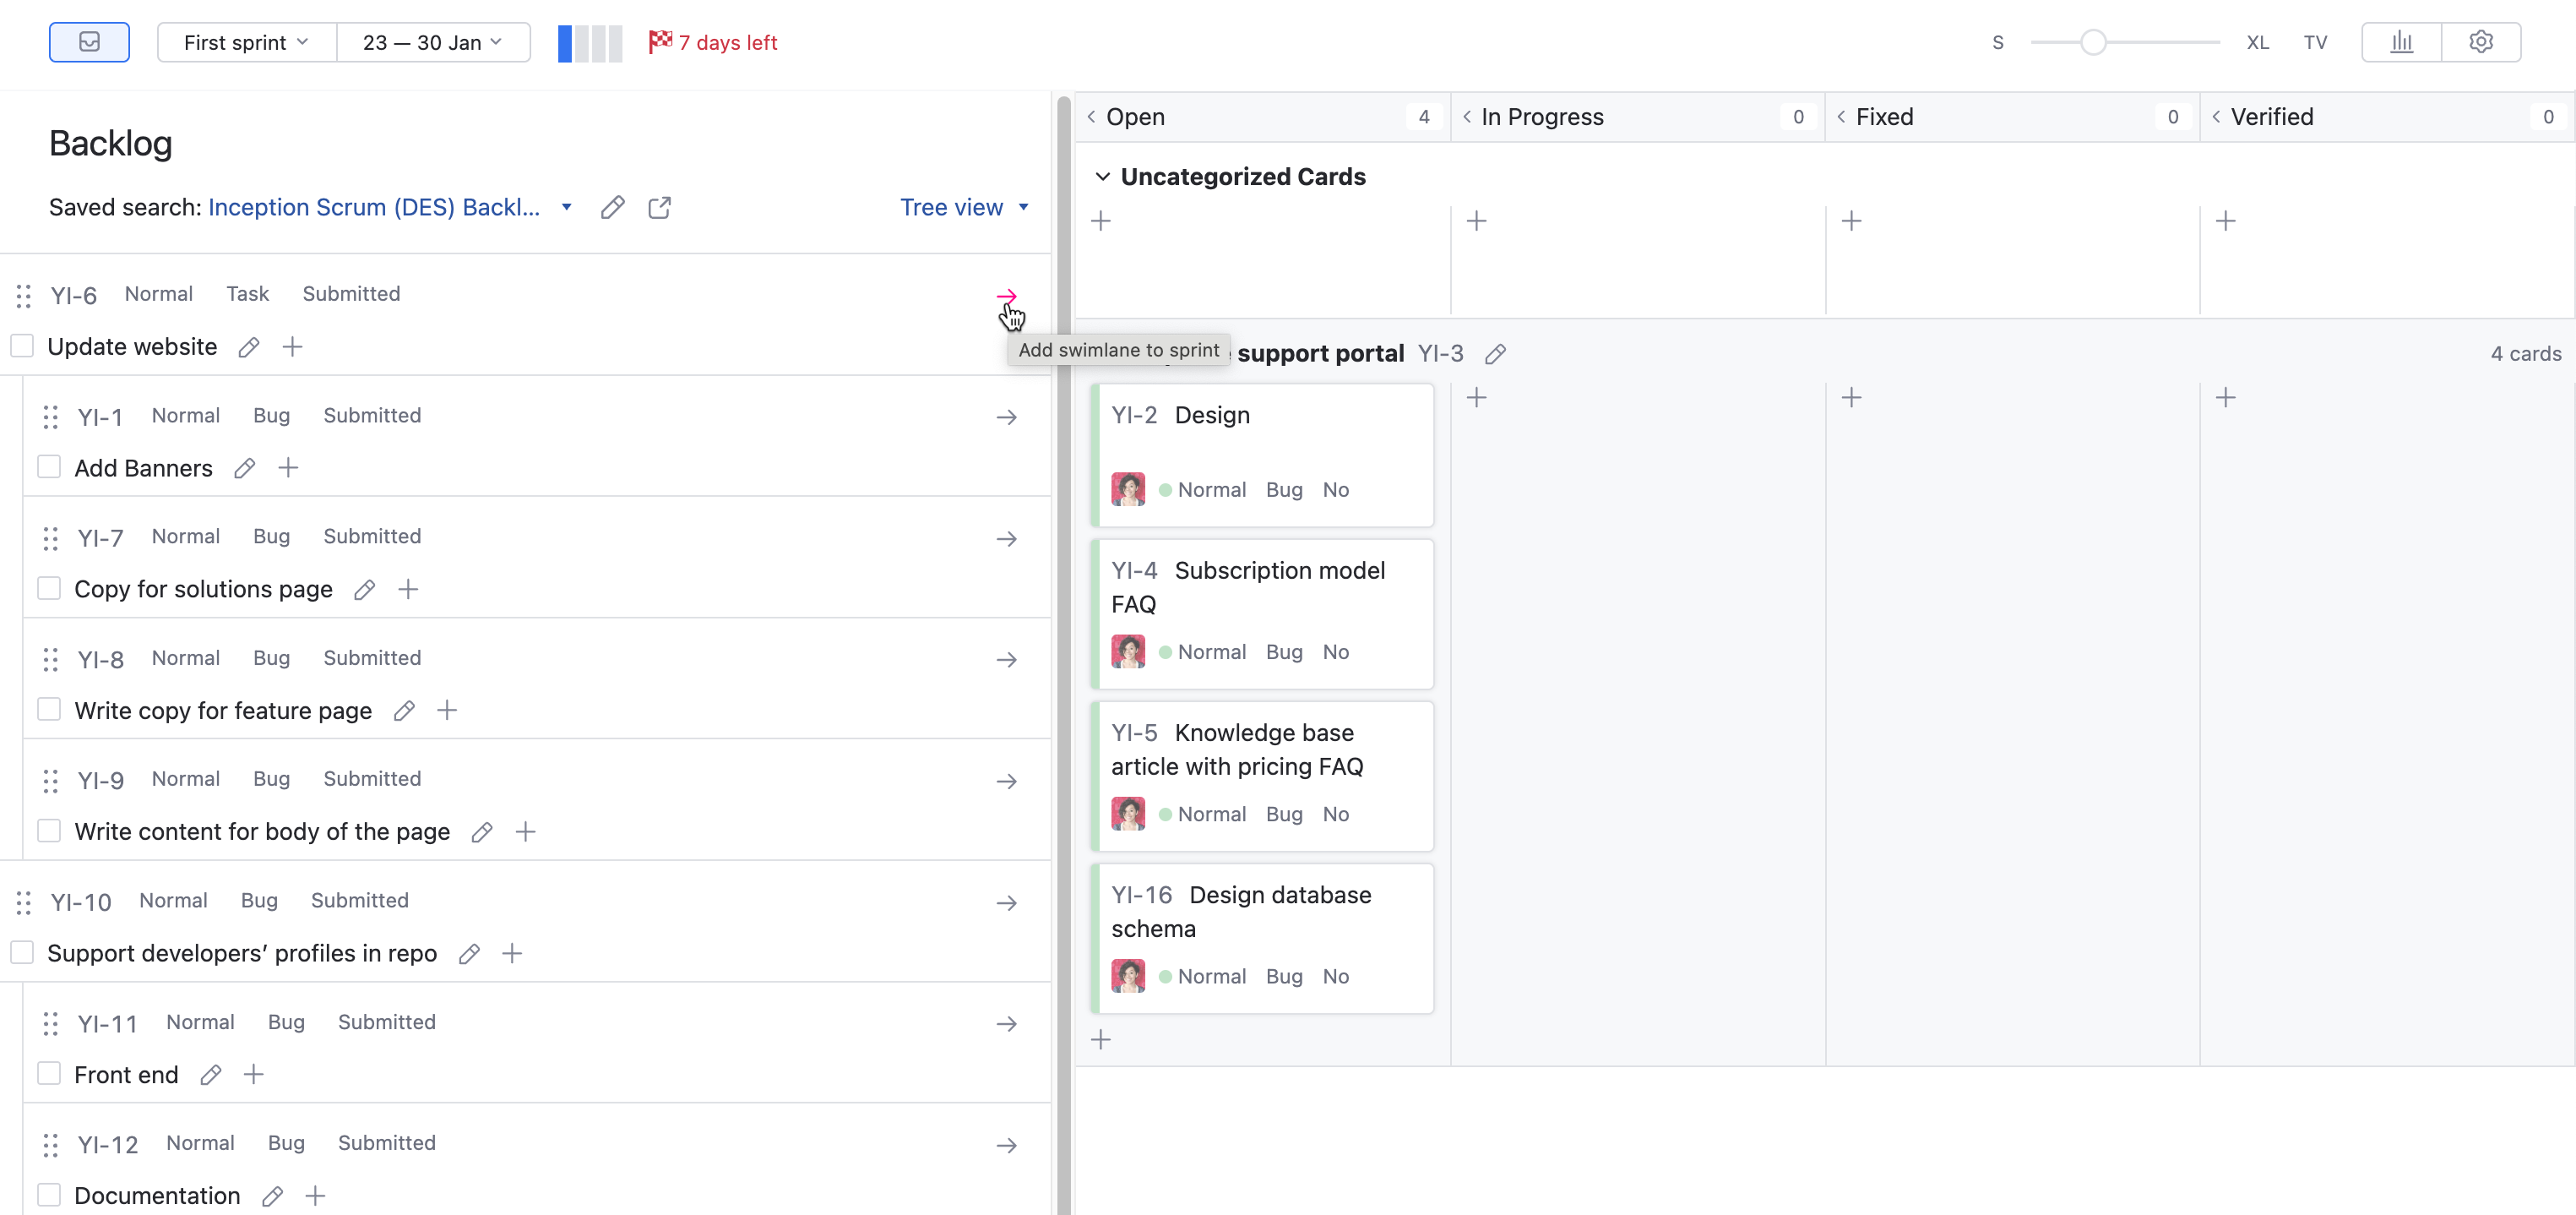
As your team completes each task, the cards move from the left side of the board to the right-most column that represents the end state.
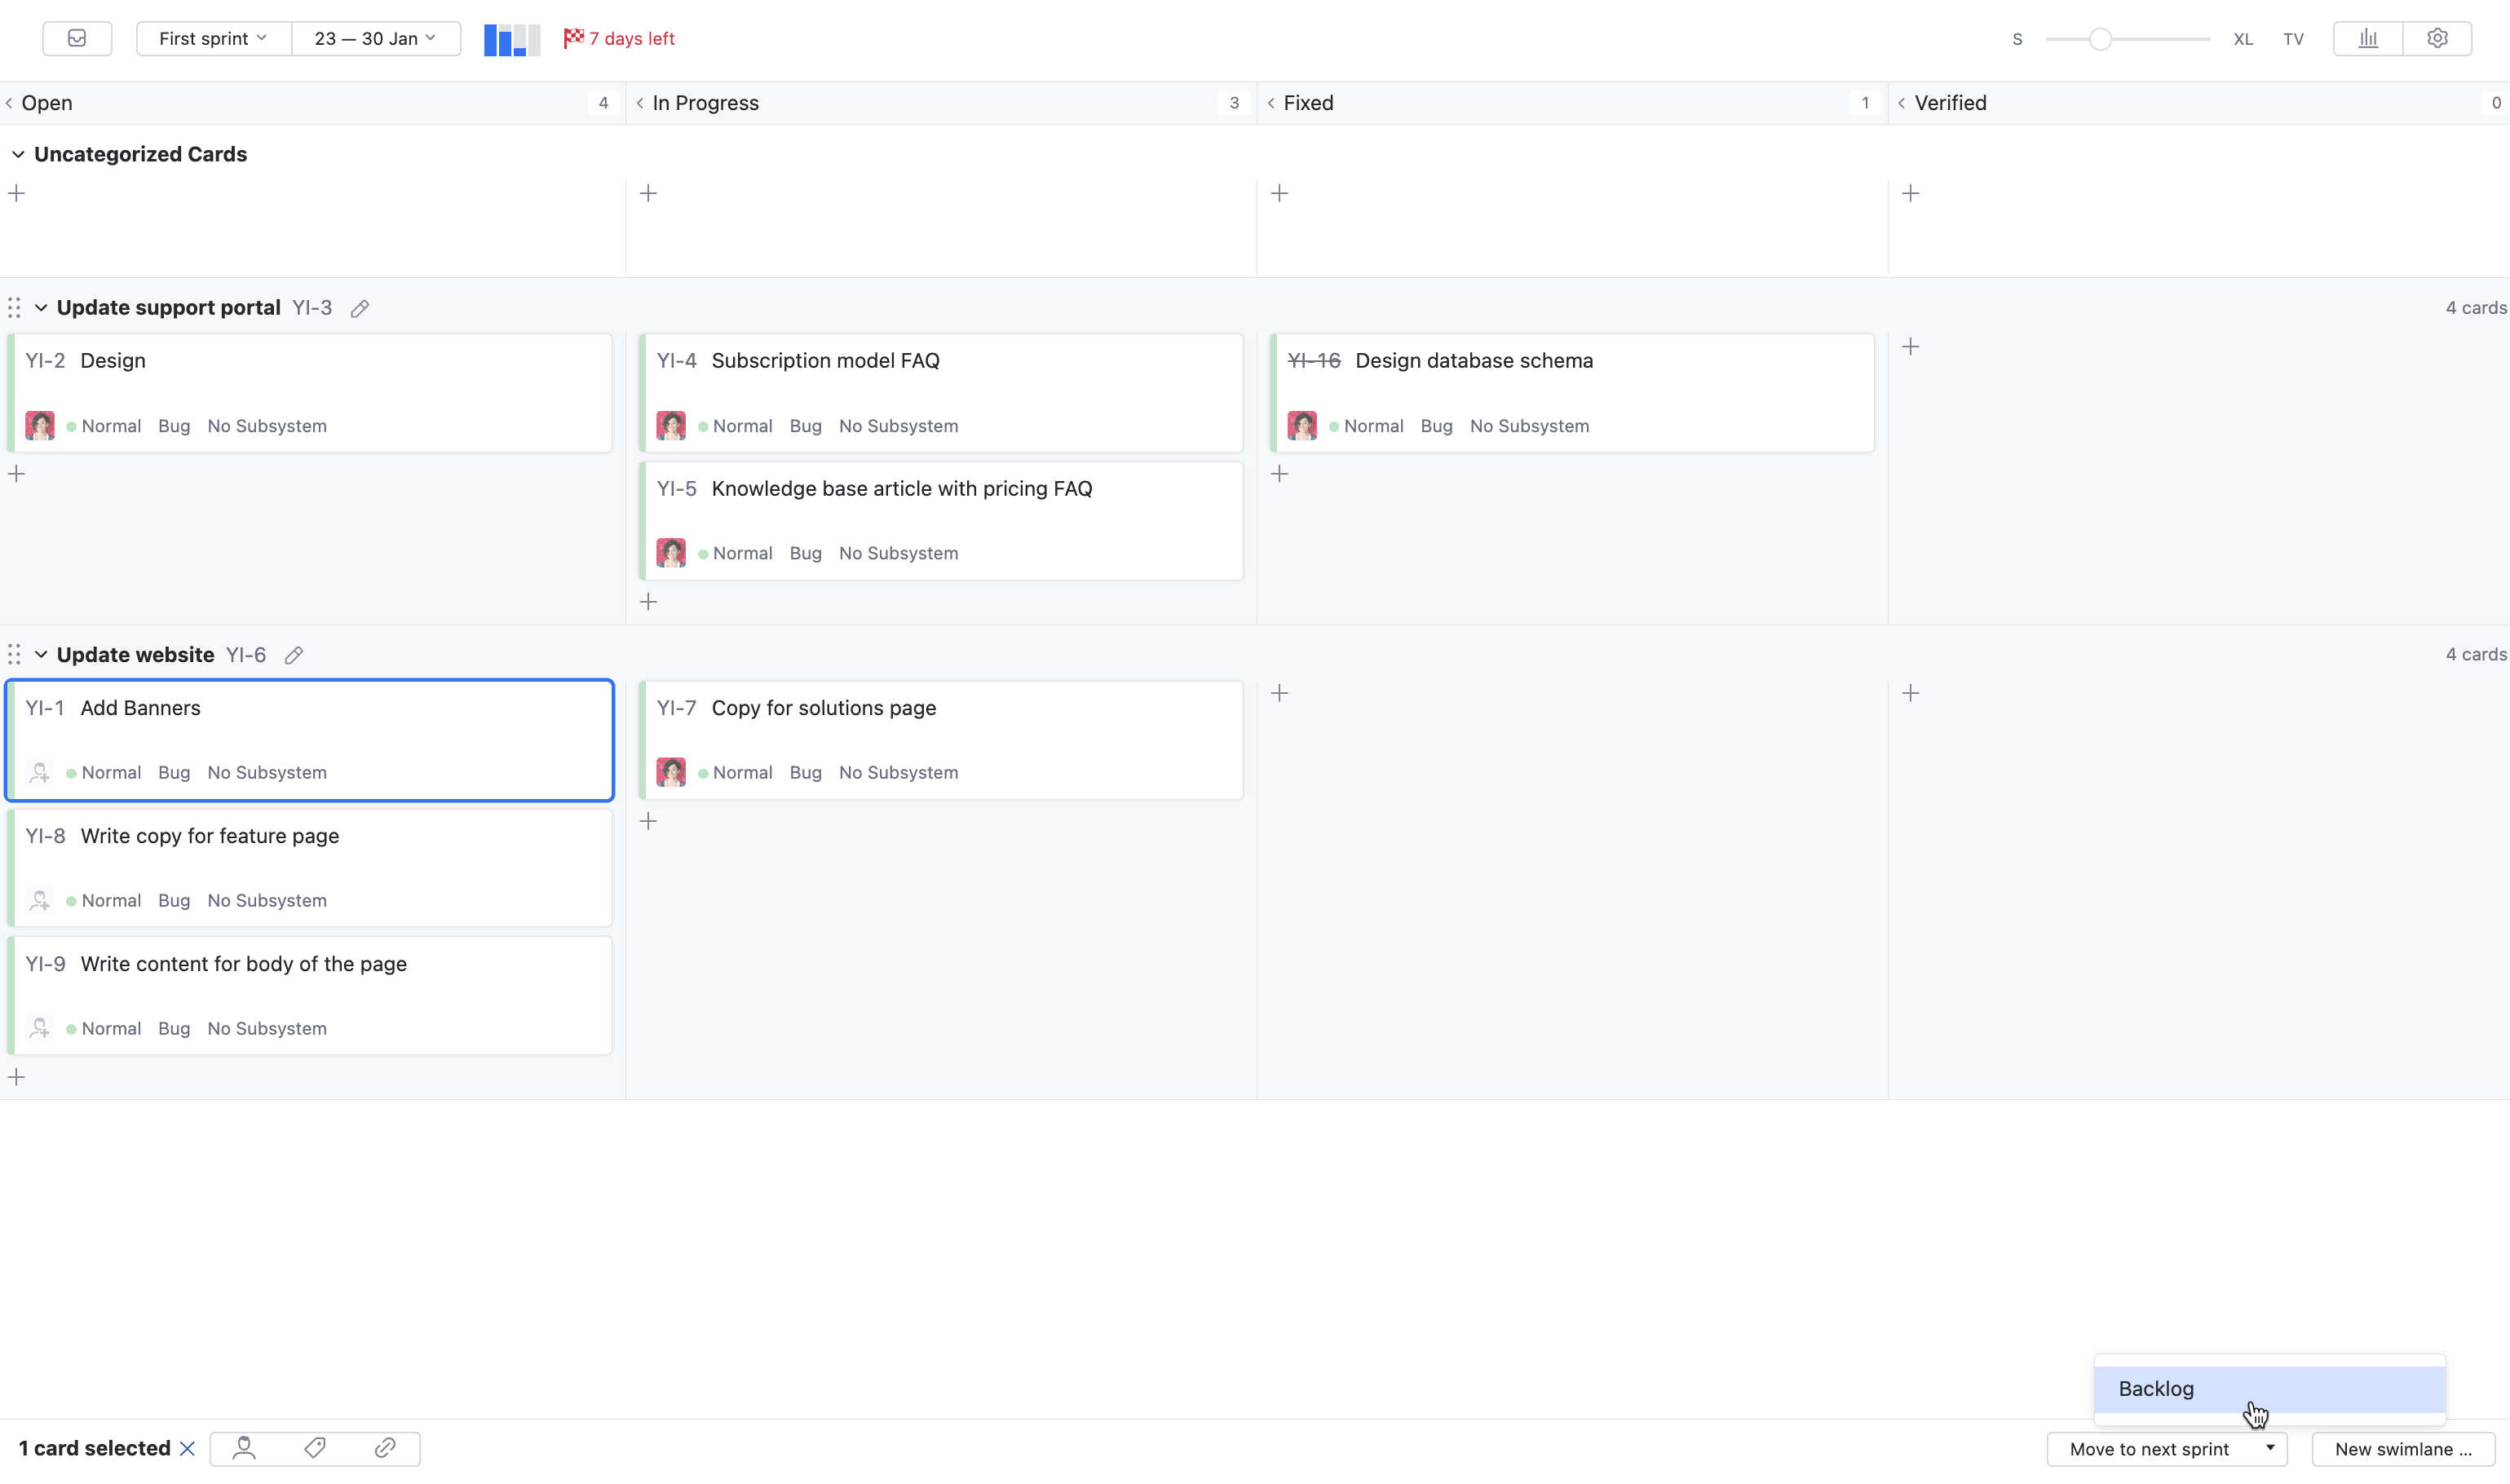
If the team decides to abandon a task for whatever reason, you can remove it from the sprint. You can open the backlog and drag the card from the board to the backlog. Alternatively, select multiple cards and use an option in the footer to send the selected cards to the backlog.
Card Size and TV Mode
The slider at the top of the board sets the level of detail for cards on the board. This setting is user-specific and can be set independently for different boards.

Some teams use large monitors or projectors to display the board during the daily scrum. TV mode displays the board in full screen and uses a color scheme with a dark background. This visual presentation has been proven to improve visibility from a distance on large monitors.
Progress Indicators
The progress indicator shows the distribution of cards by state. Each bar corresponds to a column on the board.
To view the total number of cards in each column, move the pointer over the corresponding column in the progress indicator. The number of cards in each swimlane is displayed on the right side of the swimlane.

If you have enabled the Estimation Field setting, the board displays the total estimation for all the cards at the top of the board. The presentation varies based on the data type of the custom field that is used to estimate the time that is required to complete a task.
This example shows estimations as a duration. The total estimation for all the cards in each swimlane is displayed on the right side of the swimlane.
Tracking Your Progress
You can open the burndown chart directly on the board. The chart shows the ideal burndown that was calculated based on the number of tasks or total estimation at the beginning of the sprint. The remaining effort line represents the number of issues or total estimation for unresolved issues that are assigned to the sprint. Move the pointer over a date on the chart to compare the difference between these values and see whether you are ahead of or behind schedule.
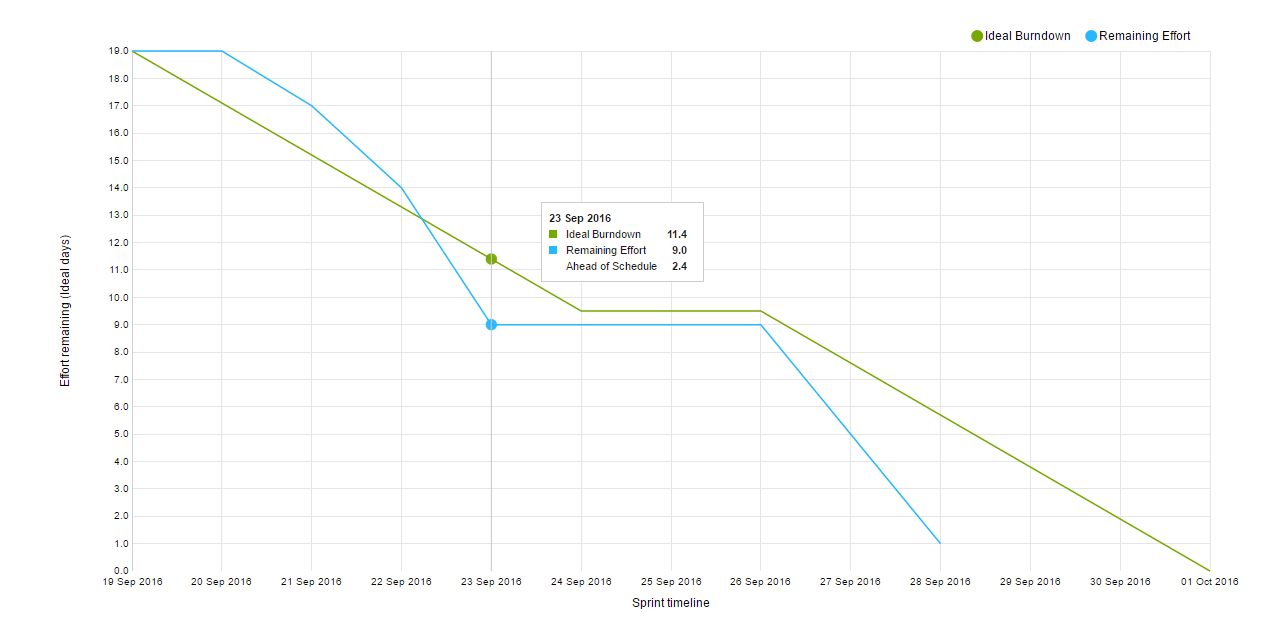
The vertical axis represents the amount of effort remaining. The horizontal axis represents time by date. This chart shows estimations in ideal days. At the selected point in time, the project team is completing the tasks that were assigned to this sprint ahead of schedule.
Subsequent Sprints
When you finish your first sprint, the cycle continues. Teams usually hold a review and retrospective at the end of the sprint to revisit what was accomplished during the sprint and identify improvements for the next iteration.
The following sprint starts with another sprint planning event. When you have identified the user stories that you want to finish in the next sprint, open the Sprints drop-down list and select the New sprint option.
If you have any unresolved issues that were assigned to the previous sprint, you can move them to the new sprint automatically.

And so it goes. As you continue developing new features, the product backlog dwindles. If you're staying on track and delivering on schedule, you end up with a final product version that you can release to your customers...
... and start working on the next version!