TeamCity Integration
Follow the instructions on this page to establish a connection between one or more YouTrack projects and a build configuration in TeamCity. The integration between YouTrack and TeamCity enables useful features in both applications:
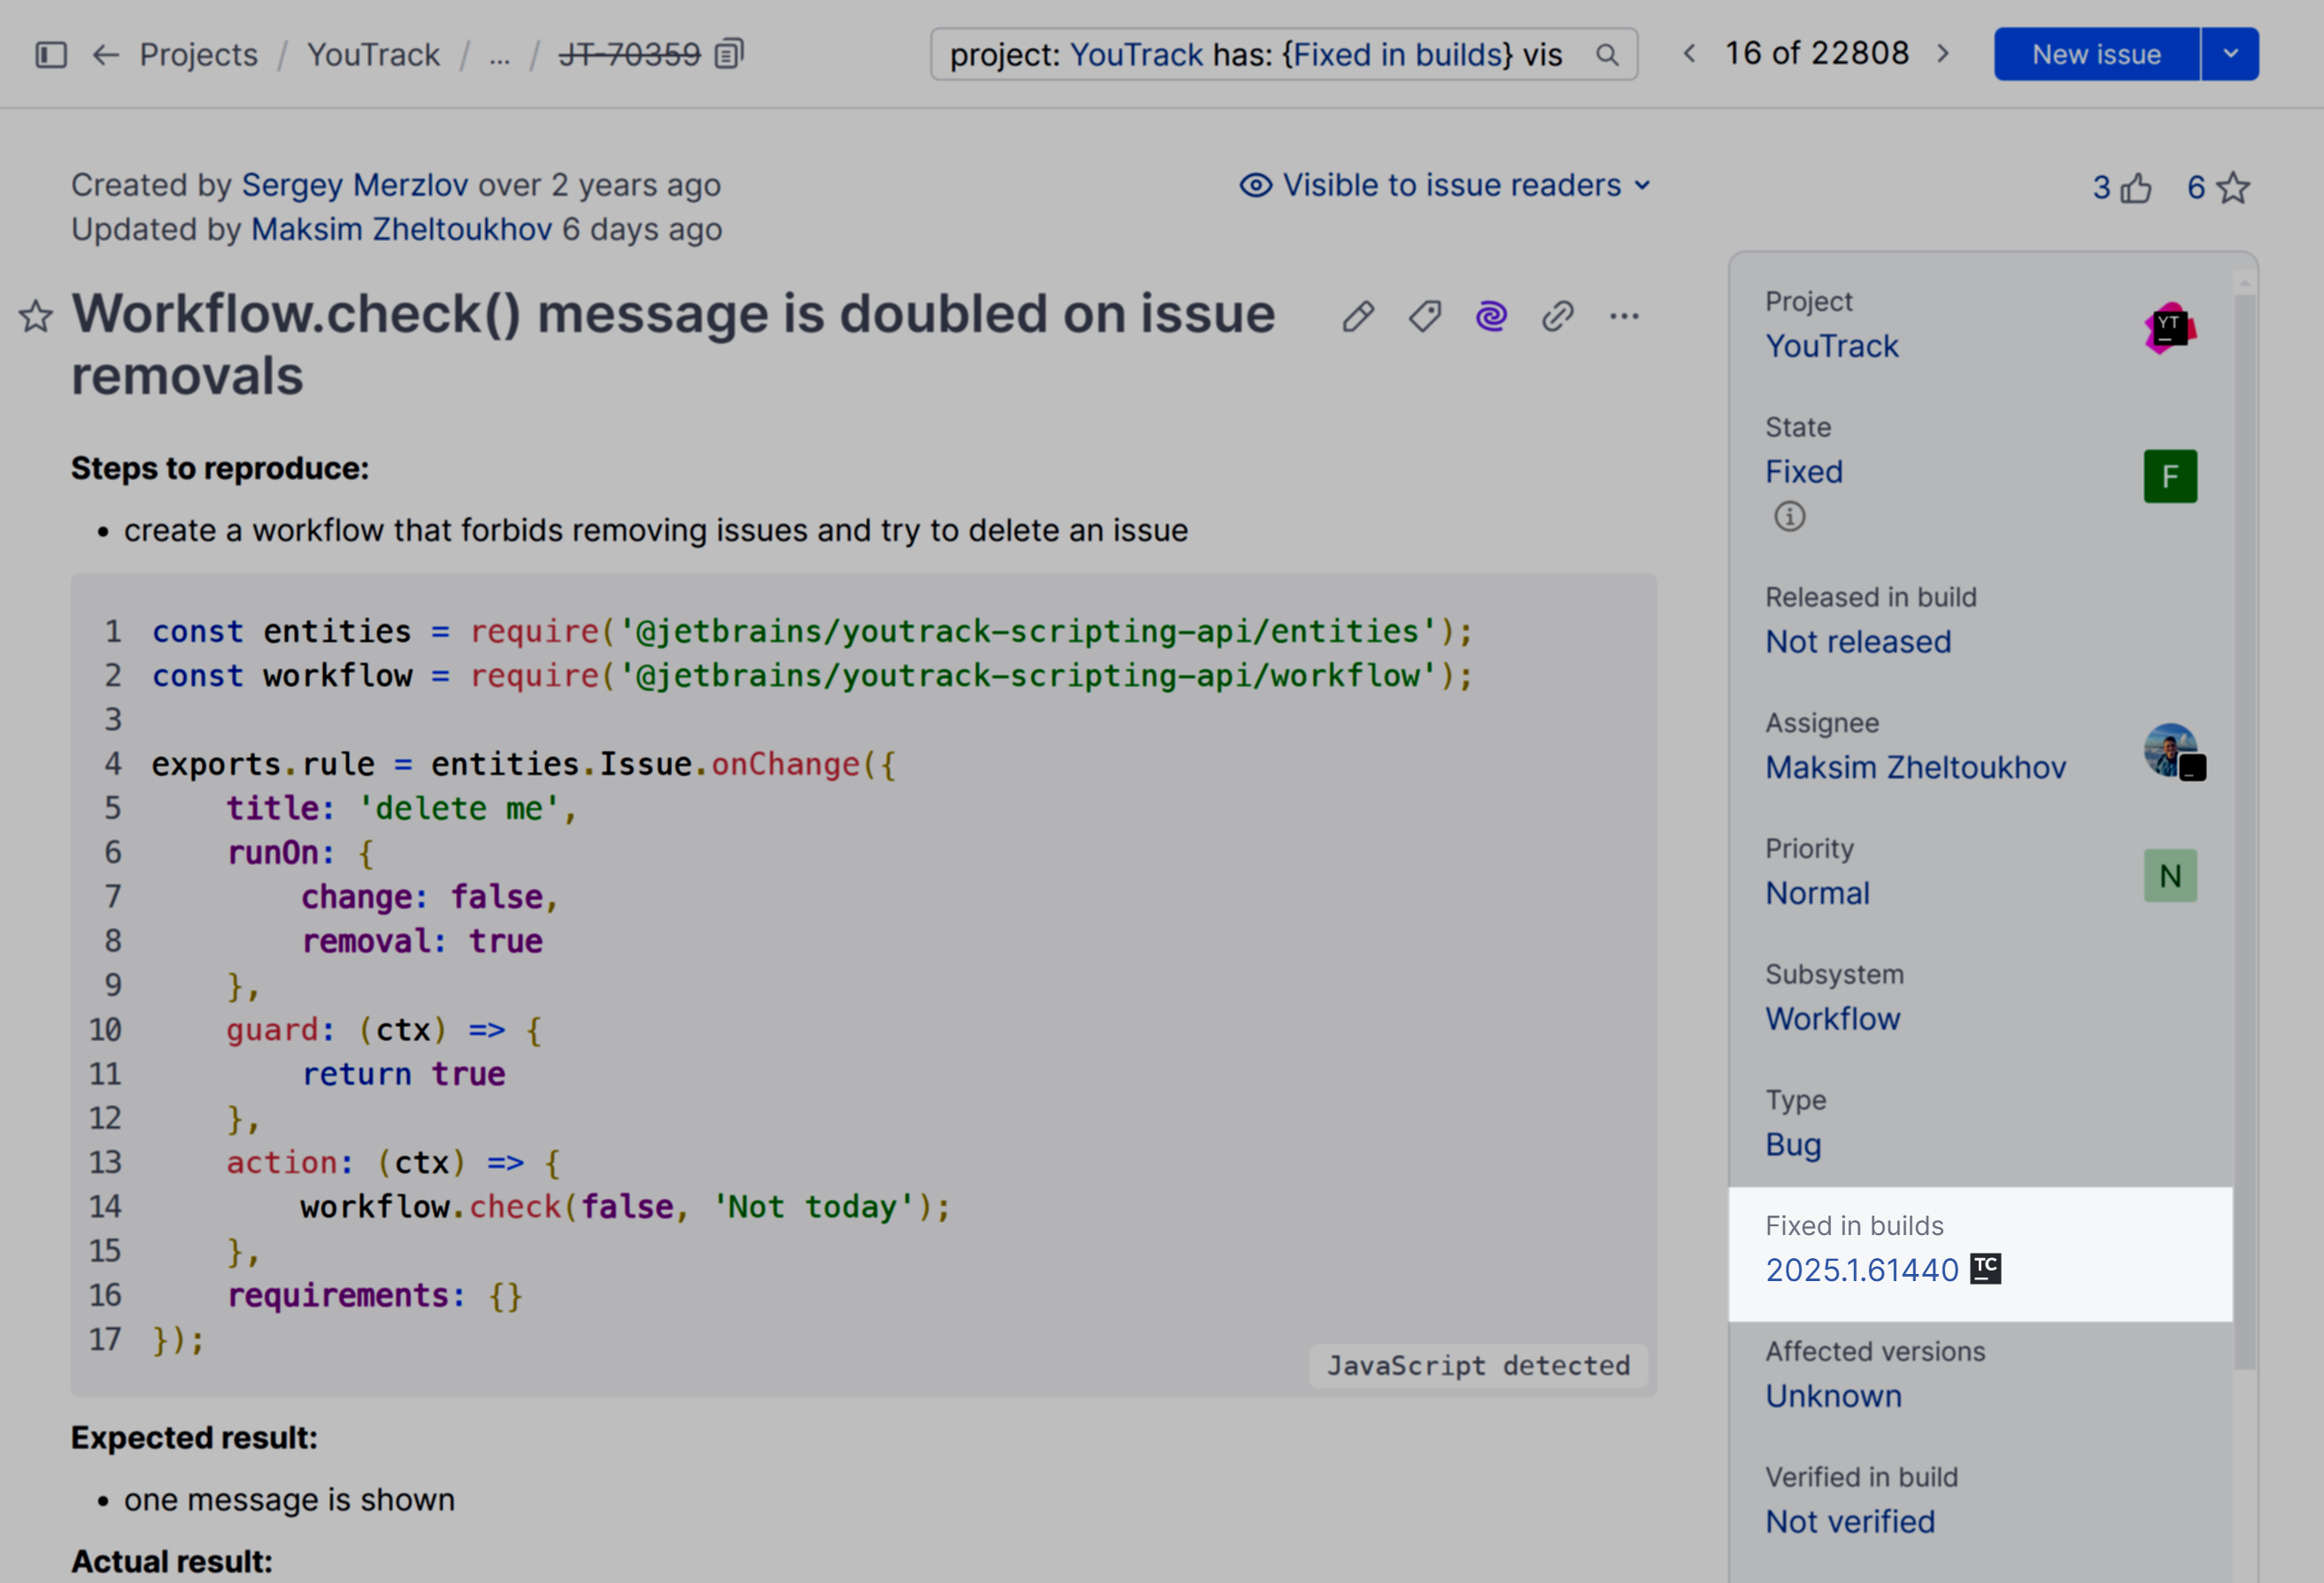
Pull build numbers from connected projects and automatically update the values in custom fields that store build numbers for resolved issues. Build numbers in YouTrack are appended with an icon that provides direct access to the build in TeamCity.
Add VCS change records to issues that are referenced in commit messages or branch names. To learn more about VCS changes in YouTrack issues, see View and Edit VCS Changes.
Apply commands to issues in commit messages when TeamCity assembles a build that contains the commit. To learn how to format commands in commit messages, see Apply Commands in VCS Commits.
Prerequisites
Before you start, verify the following requirements:
You have an active TeamCity installation that runs version 8.0 or later.
Your user account in TeamCity is assigned the permissions that are required for this integration. You need permission to View project and all parent projects, View user profile, and View all registered users. Access to these permissions is based on the authorization mode that is used by your TeamCity server.
Authorization Mode
Access Requirements
Simple
These permissions are only available to users with Administrator level permissions.
Per-project
These permissions are available to users who are assigned the default Project administrator role.
TeamCity also supports a dedicated Tools integration role that is designed for this type of integration. In older versions of TeamCity, this role does not contain the View all registered users, so you may need to add it manually.
Either one of these roles can be assigned to your account directly or set up at the group level.
For more information about roles and permissions, refer to the TeamCity documentation.
The YouTrack projects that you want to integrate with TeamCity use a custom field that stores values as a build or version. You can use the default custom field Fixed in build or any other custom field that stores a build or version.
If you don't want to add build numbers to issues, you can enable the integration without mapping build numbers to a custom field in YouTrack. In this case, your developers can still mention issues and apply commands in VCS commit messages based on the rules for processing VCS changes for the integration.
Connect to a TeamCity Server
To enable the integration, you need to connect to one or more TeamCity servers. This operation can also be performed by a project administrator on a per-project basis. For more information, see Integrate with TeamCity.
As an administrator, you can enable the TeamCity integration for any project in YouTrack.
To connect to a TeamCity server:
From the main navigation menu, select
.
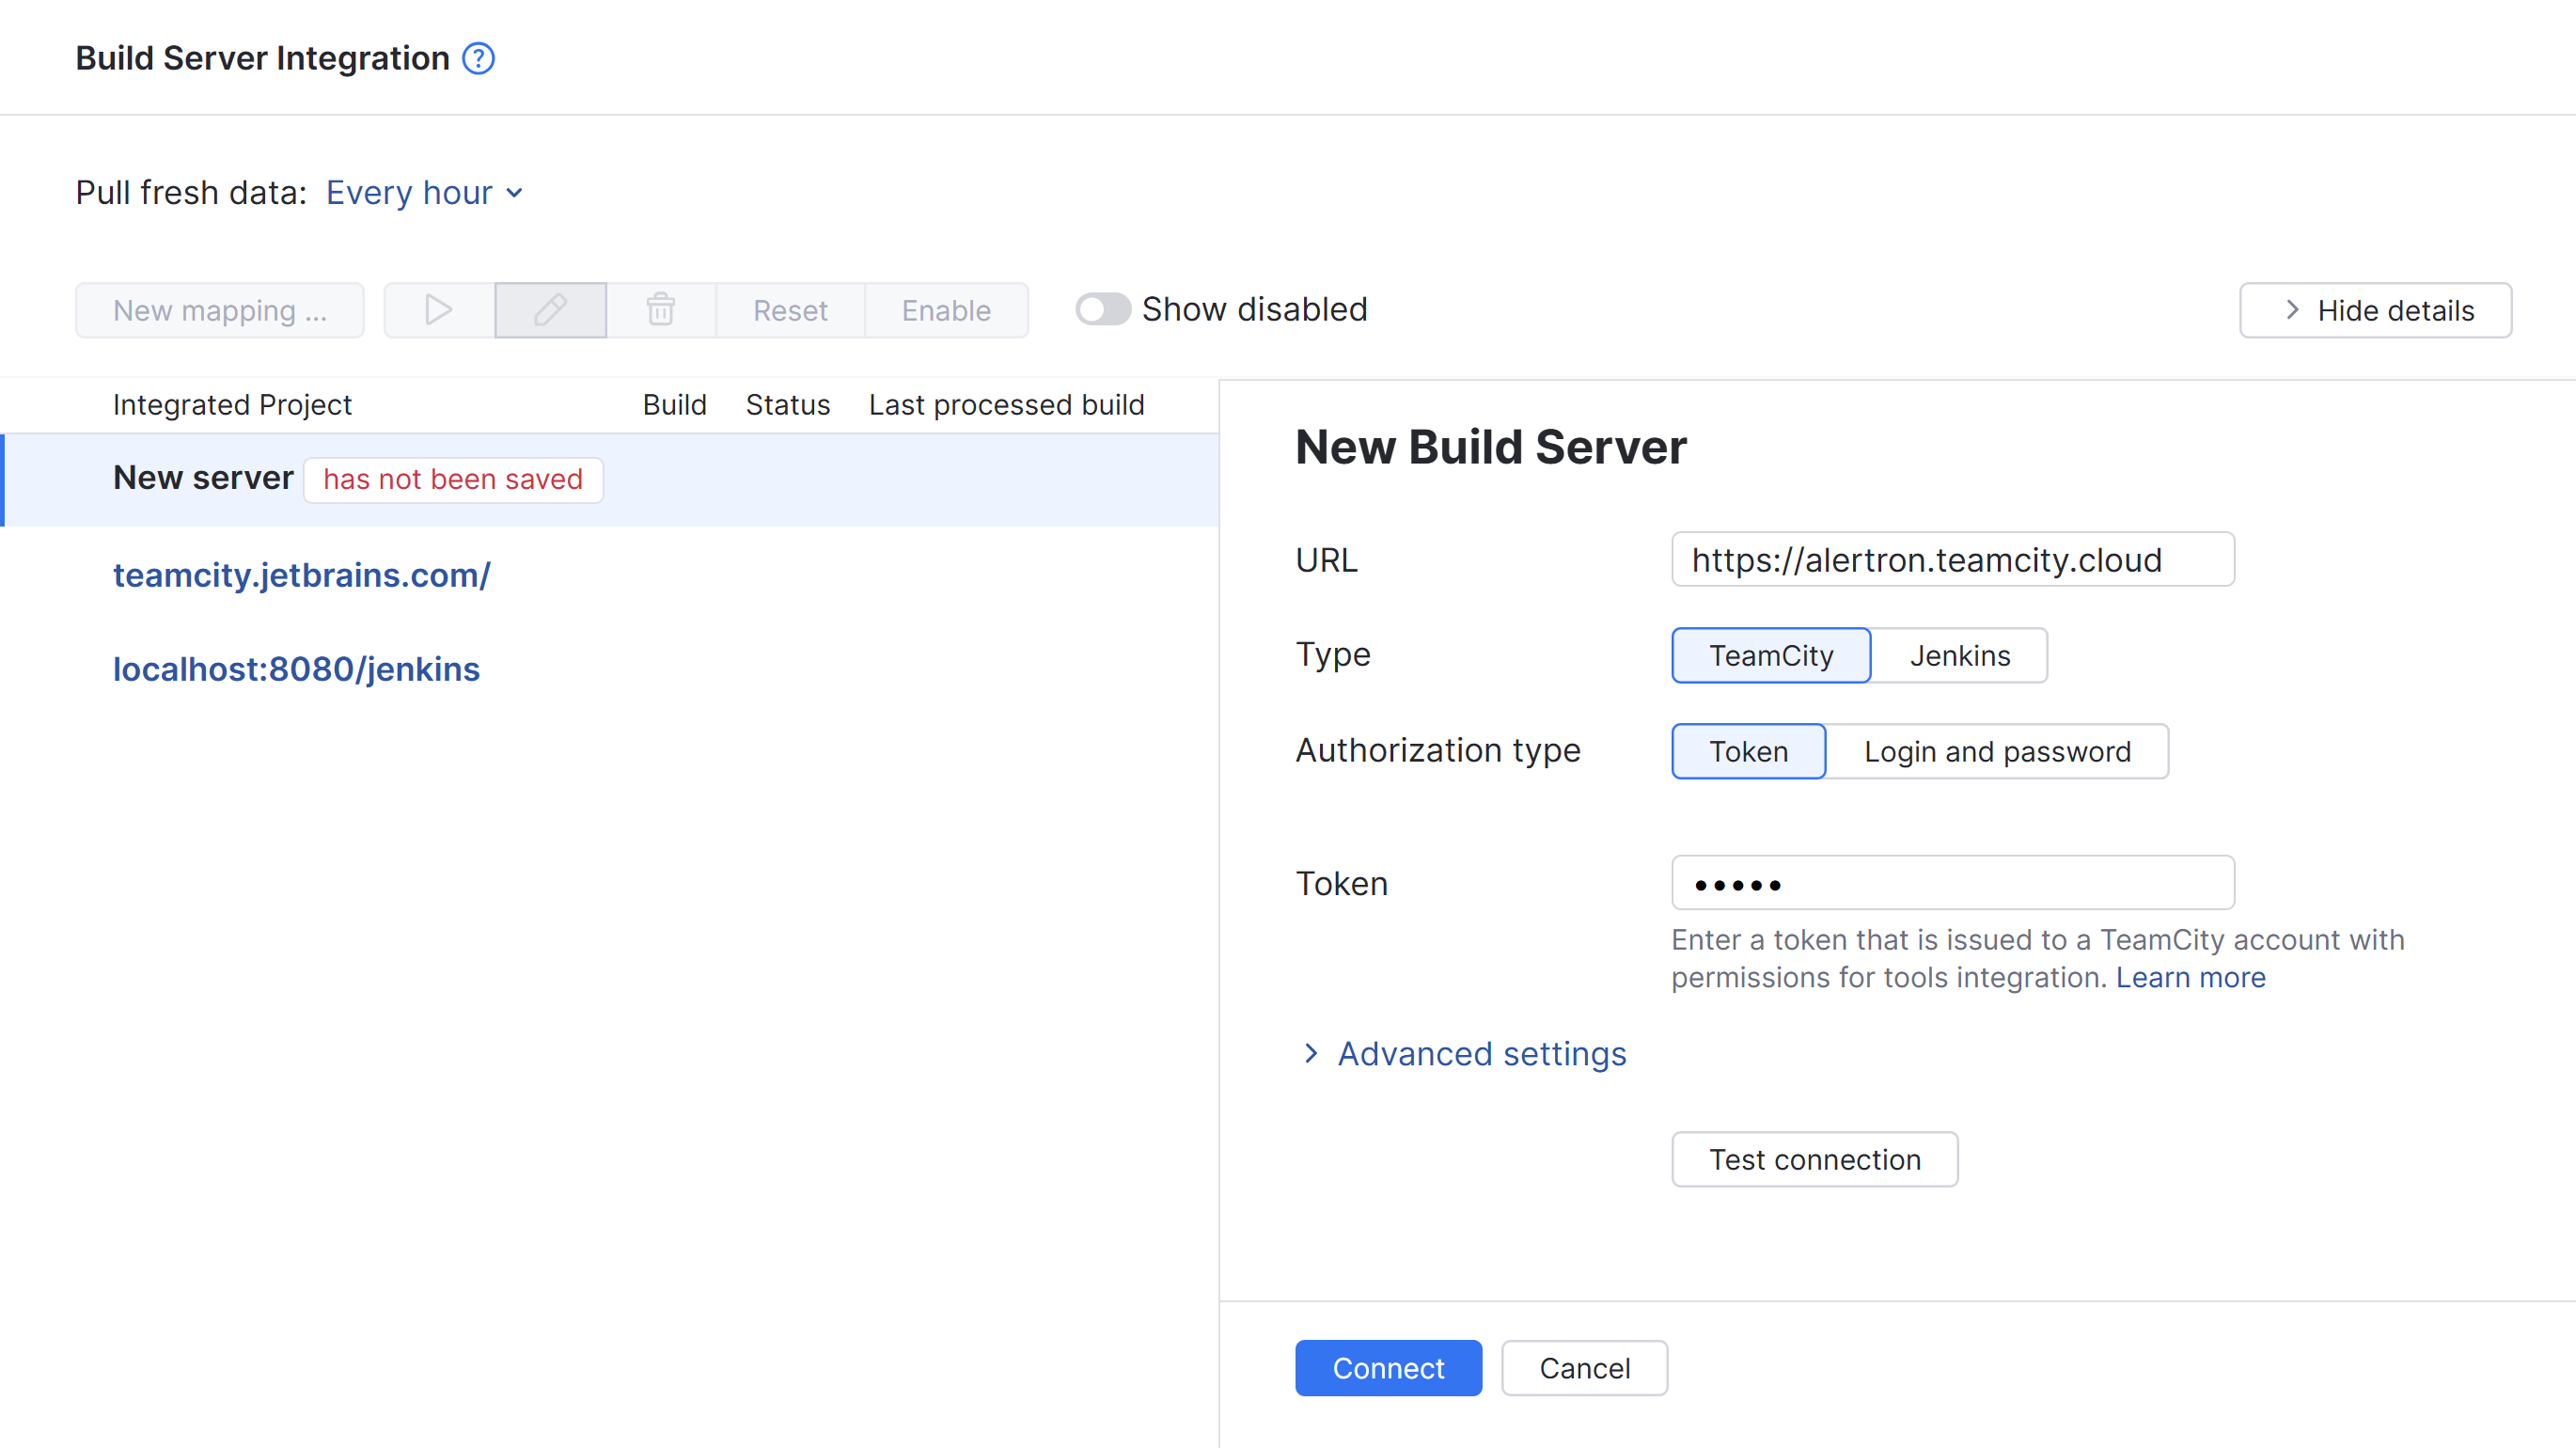
On the Build Server Integration Settings page, click the New build server integration link in the toolbar.
Enter values for the following settings:
Setting
Description
URL
Enter the URL of the TeamCity server.
Type
Select TeamCity.
Authorization type
Choose which type of authorization you want to use to set up the integration. You can either use a token or sign in with a username and password.
Token
Enter the application token for your TeamCity user account.
This option is only shown when the Authorization type is set to Token.
Username
Enter the username of the TeamCity user account.
This option is only shown when the Authorization type is set to Username and password.
Password
Enter the password for the TeamCity user account.
This option is only shown when the Authorization type is set to Username and password.
Expand the Advanced settings section and configure the following optional settings:
Setting
Description
SSL key
If the TeamCity server requires client SSL authentication and you have uploaded an SSL client key to authenticate your YouTrack service, select the client key from the drop-down list. For more information, see SSL Keys.
Socket timeout
Set the maximum amount of time to wait for a response from the TeamCity server before disconnecting the socket. The default is 30 seconds.
Read timeout
Set the maximum amount of time to wait for complete data transfer from the TeamCity server before closing the connection. The default is 30 seconds.
Click the Test connection button.
YouTrack verifies the connection to the TeamCity server.
Click the Connect button.
The TeamCity server connection settings are saved.
The integration between your YouTrack installation and the specified TeamCity server is enabled.
Repeat these steps to add connections to additional TeamCity servers.
Define the Mapping between Projects
Once you are connected to a TeamCity server, you can map one or more YouTrack projects to a build configuration in TeamCity. As an administrator, you can either map the projects yourself, or let the project administrators map their own projects and build configurations. For detailed instructions that are appropriate for project administrators, see Integrate with TeamCity.
The first group of settings connect YouTrack to a build configuration for a project on a TeamCity server. Additional options for the default and feature branches let you define which issues are assigned build numbers for these branches. You can also specify commands that are applied to the issues that are processed by the integration.
To define a mapping between YouTrack and TeamCity:
From the main navigation menu, select
.
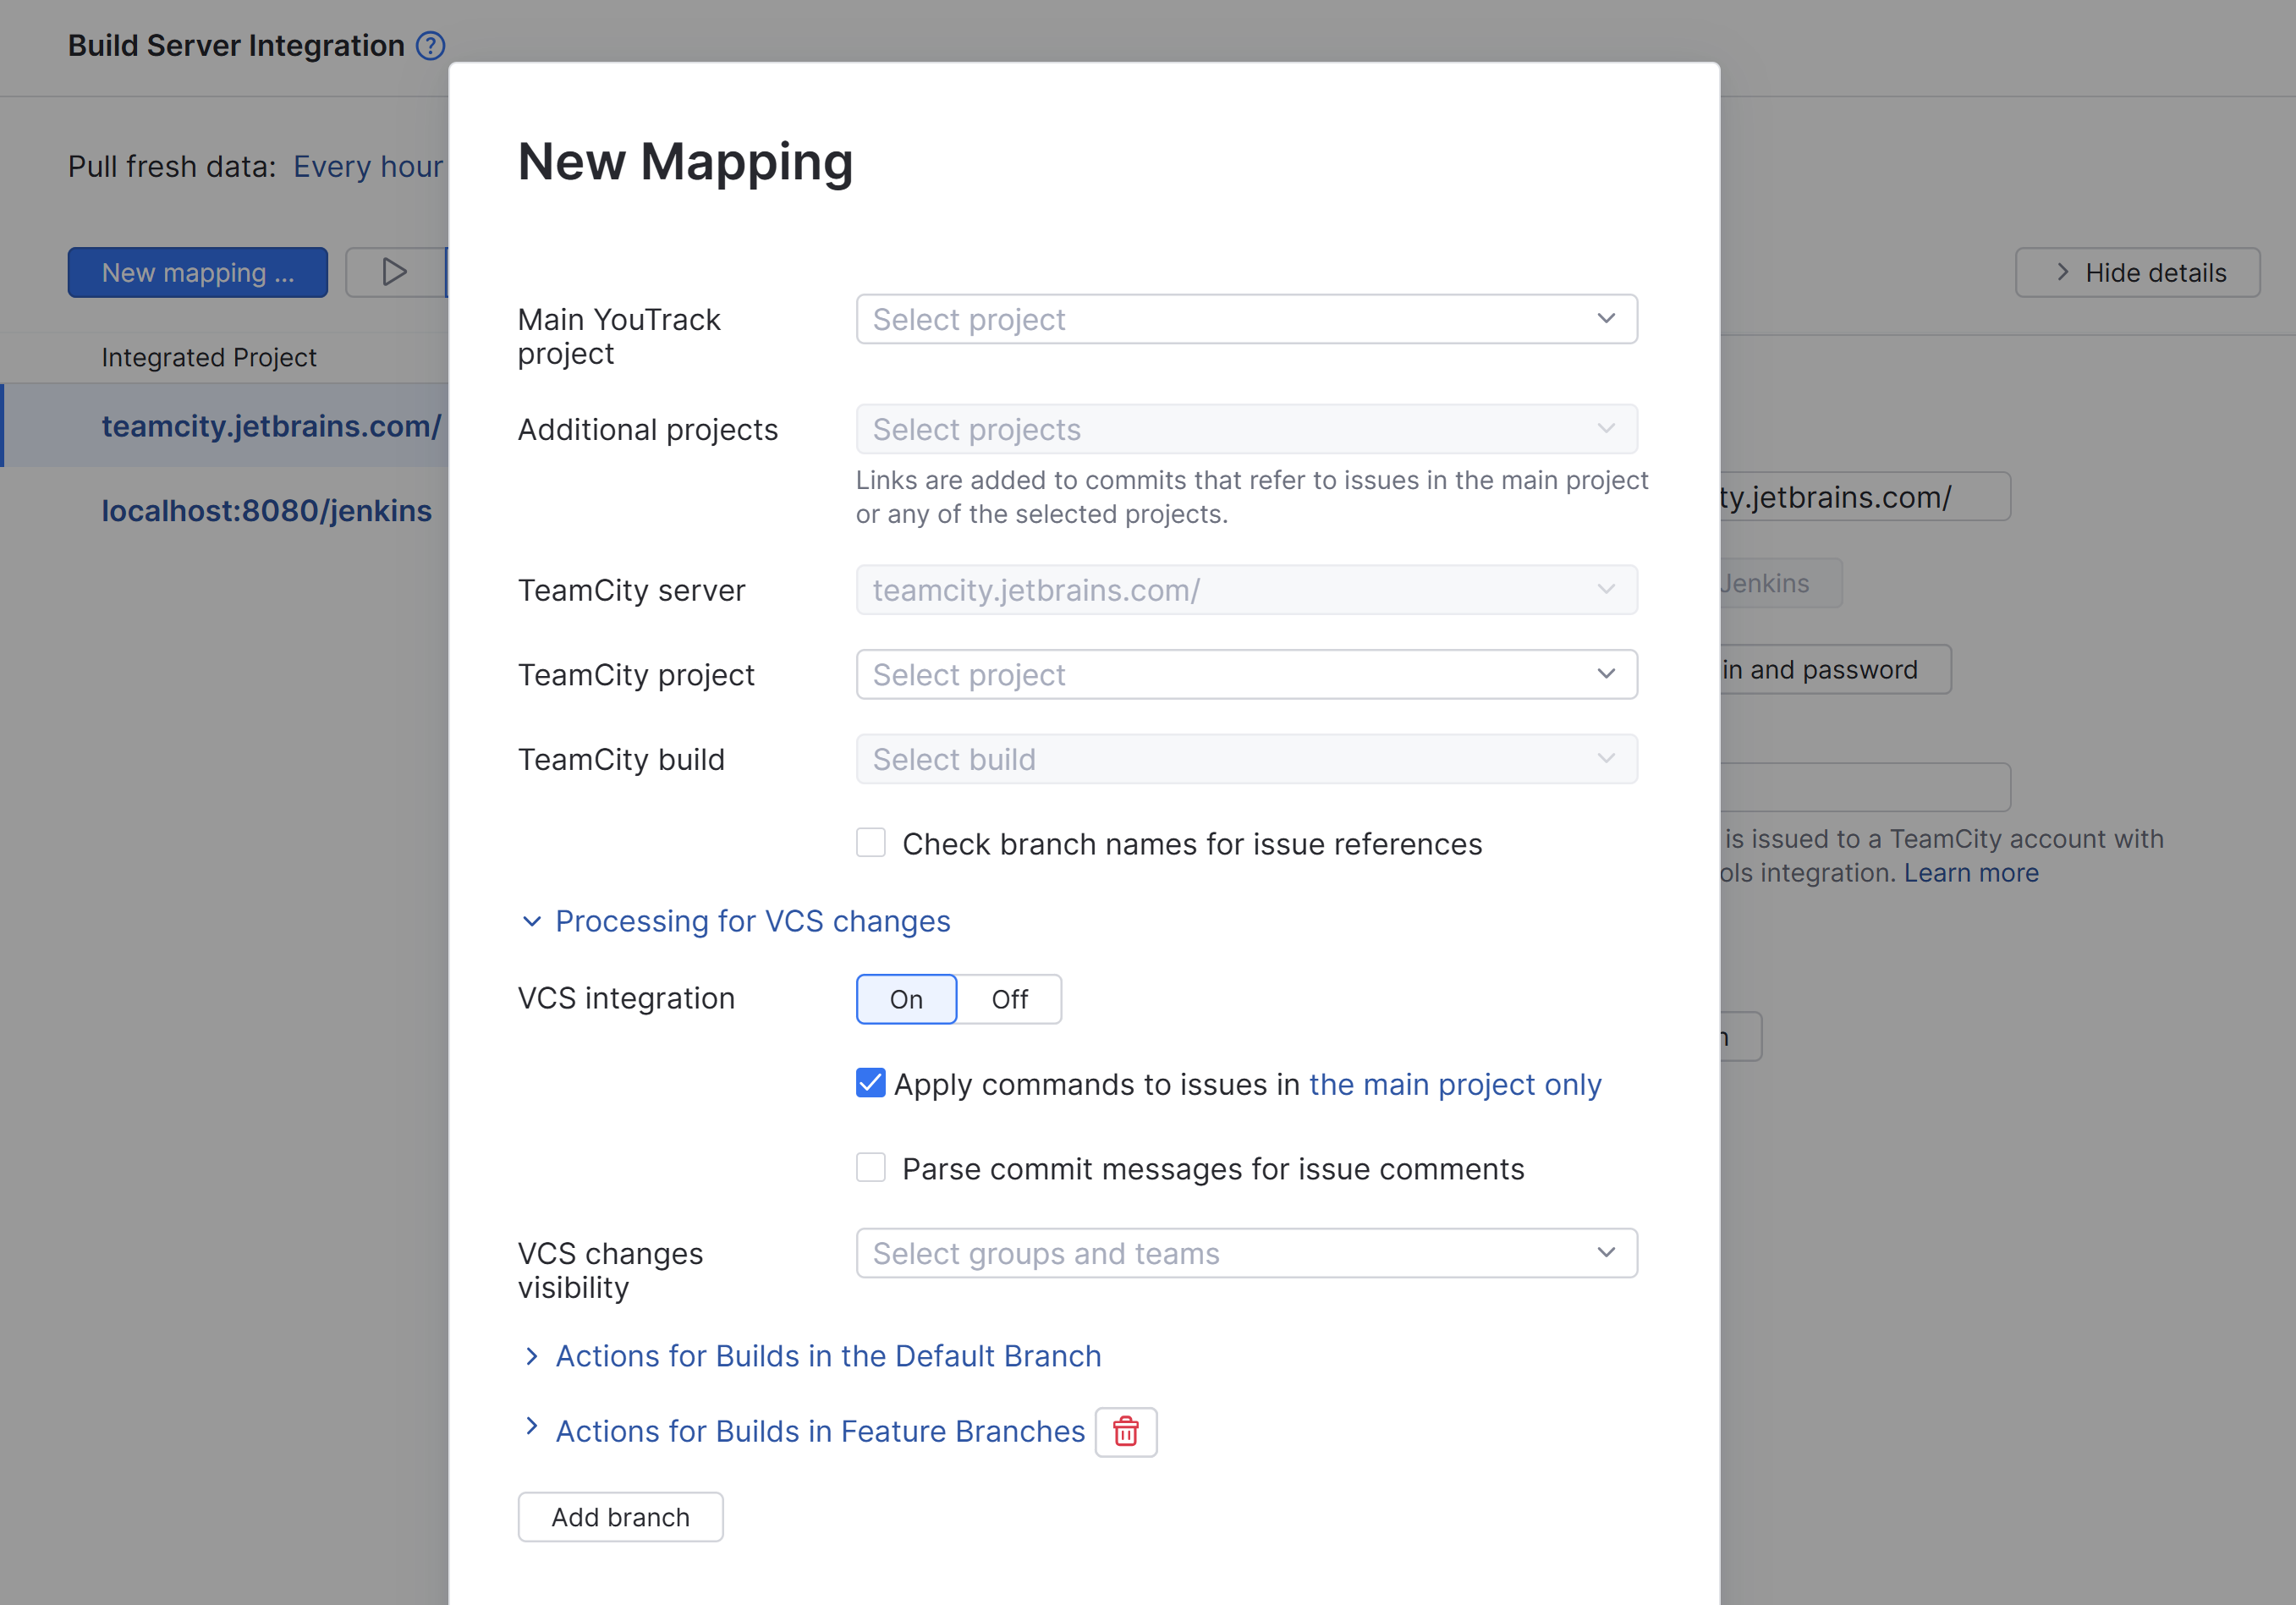
Click the New mapping button.
Select a TeamCity server in the list of build server integrations.
Set the values for the mapping settings. For a complete description of each setting, see Mapping Settings.
If you want YouTrack to listen for and react to VCS changes in builds that are processed by TeamCity, expand the Processing for VCS changes settings. Otherwise, skip to the next step.
For a complete description of the settings in this section of the form, see Processing for VCS Changes.
Click to expand the Actions for Builds in the Default Branch settings. These settings determine which builds in the default branch are processed by the integration and which issues are assigned build numbers.
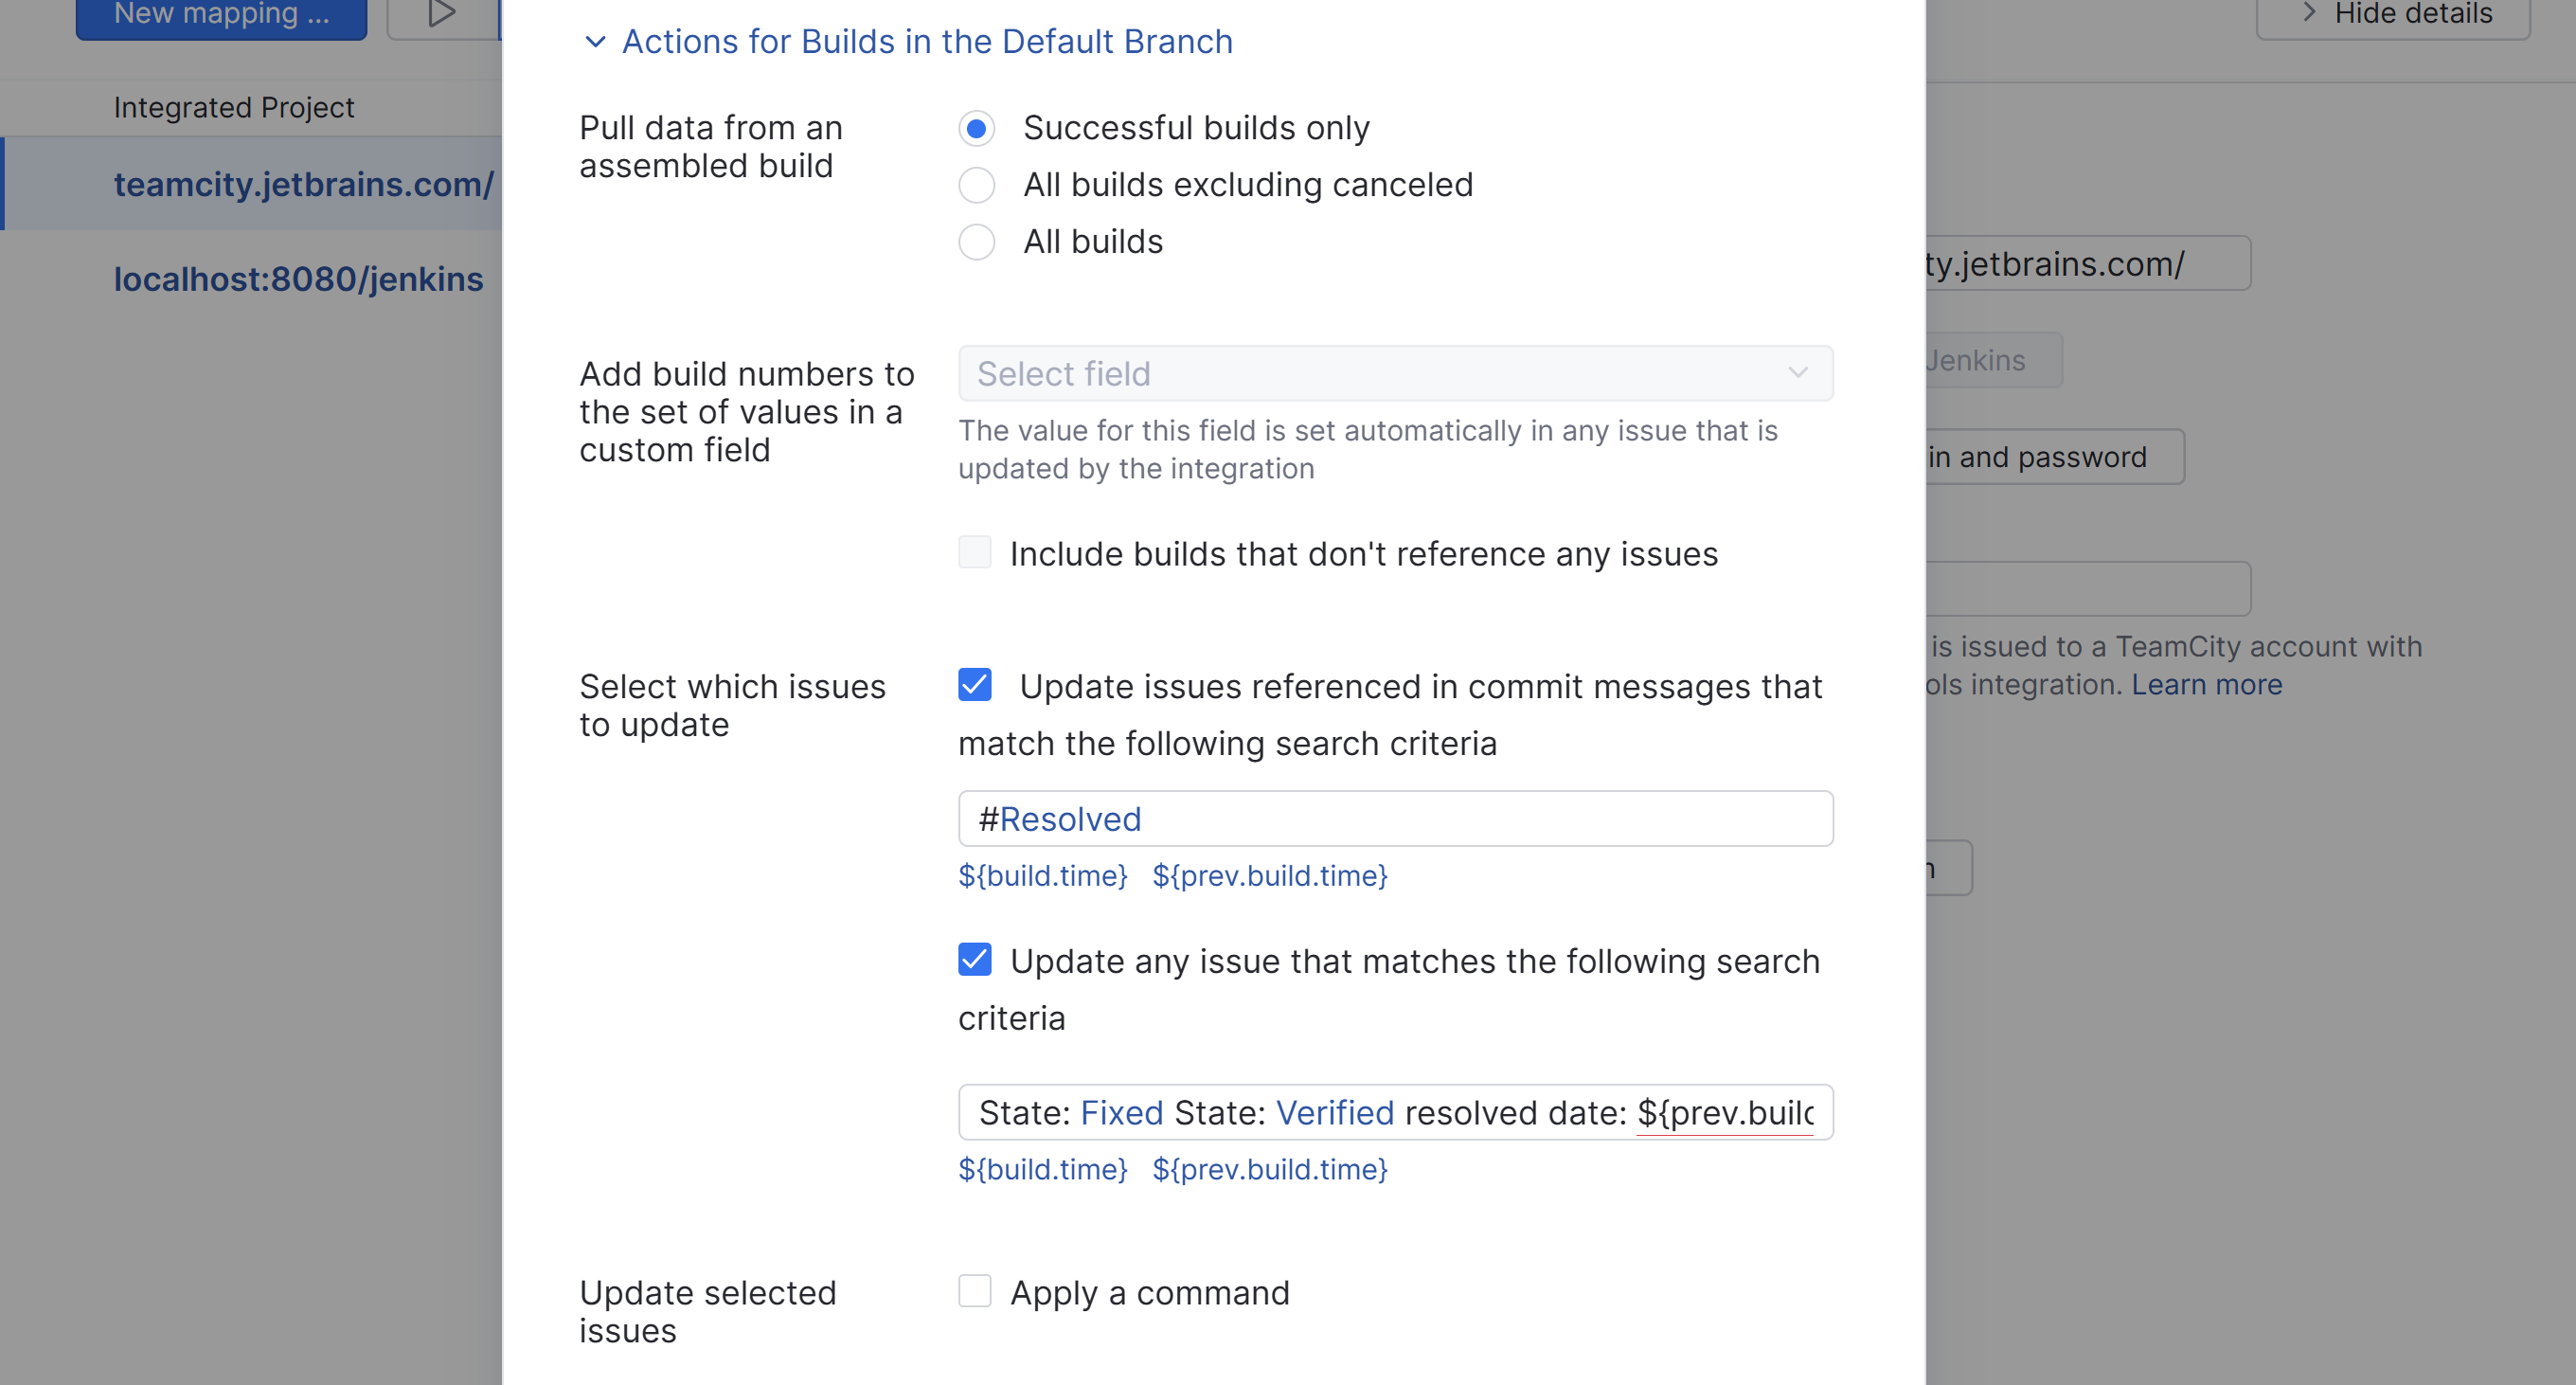
Use these settings to configure the integration. For a complete description of each setting, see Actions for Builds.
Expand and set the options for the Actions for Builds in Feature Branches. These settings determine which actions are applied to builds in one or more feature branches. For a complete description of each setting, see Actions for Builds.
When finished with the configuration, click the Save button.
The YouTrack project is mapped to the selected project in TeamCity.
The TeamCity integration is enabled and available for use in the selected YouTrack project.
Mapping Settings
The following settings are available in the New Mapping dialog for a build server integration.
Setting | Description |
|---|---|
Main YouTrack project | Select the primary YouTrack project that you want to map to a project in TeamCity. |
Additional projects | Integrates the linked build server with one or more additional projects. |
TeamCity server | Select the TeamCity server that contains the project that you want to map to. If you are only connected to one TeamCity server, it is set by default. |
TeamCity project | Select the name of the project in TeamCity. |
TeamCity build | Select a build configuration from the selected TeamCity project. |
Check branch names for issue references | When enabled, the integration checks for references to issues in branch names for commits and pull requests. This option is included for teams that use a branch-per-ticket process, so their developers don't have to mention issue IDs in their commit messages explicitly. |
Processing for VCS Changes
The following settings are available in the Processing for VCS Changes section of the New Mapping dialog for a build server integration.
Setting | Description |
|---|---|
VCS integration | Determines whether the integration adds VCS change records to and processes commands for issues that are referenced in commit messages.
|
Apply commands to issues | Determines whether commit messages are also parsed for YouTrack commands. When enabled, YouTrack applies any command that is specified in a commit message that is included in the assembled build to the corresponding issue. This option is only available when the VCS integration setting is Enabled. When enabled, you can select whether commands are applied to issues in all integrated projects or the main project only. |
Parse commits for issue comments | When enabled, specific lines of text in commit messages are copied to issues as comments. When you copy parts of the commit message to the issue as comments, you can trigger @mention notifications and expose information to users who don't have access to VCS changes. This setting does not affect how commit messages are shown in VCS changes. The entire commit message, including commands and issue comments, is always shown as part of the VCS change record in the activity stream. You should only enable this option when:
To learn more about how YouTrack processes commit messages, see Apply Commands in VCS Commits. |
VCS changes visibility | To restrict the visibility of comments and updates that are shown as VCS changes in the activity stream, select one or more groups or teams from the list. Otherwise, this activity type is visible to any user who has sufficient access to read the issue. |
Actions for Builds
The following options are available in the Actions for Builds section of the New Mapping settings for a build server integration. TeamCity integrations support separate actions for an unlimited number of branches.
Option | Description |
|---|---|
Pull data from assembled builds | Determines whether the integration listens for all builds that are assembled by the build server, excludes canceled builds, or only considers successful builds. |
Add build numbers to the set of values in a custom field | Determines which custom field is populated with build numbers in the integrated YouTrack project. The selection is restricted to custom fields that store a The value for the selected field is set automatically in any issue that is updated by the integration. The settings in the Select which issues to update section of the integration determine which issues are assigned build numbers. The following option is available:
|
Select which issues to update | The options in this section determine which issues are assigned build numbers by the integration. The following options are available:
If both options are enabled, build numbers are automatically assigned to issues that meet either of these two conditions. |
Update selected issues | Determines whether the integration applies changes to the selected issues in addition to the automatic build number assignment. When the Apply a command option is enabled, you can enter a predefined command that is applied to all issues that are assigned build numbers. Use the With this command, all issues that are processed by YouTrack are assigned to the Testing subsystem and the Test in build field is set to the build number. |
New integrations will automatically include settings for defining which actions are taken for builds in feature branches. If you want to use this feature in your project, click to expand these settings and configure it according to the guidelines described above for the default branch.
You can also follow these instructions described for the default branch to set up custom actions for any branch in your repository.
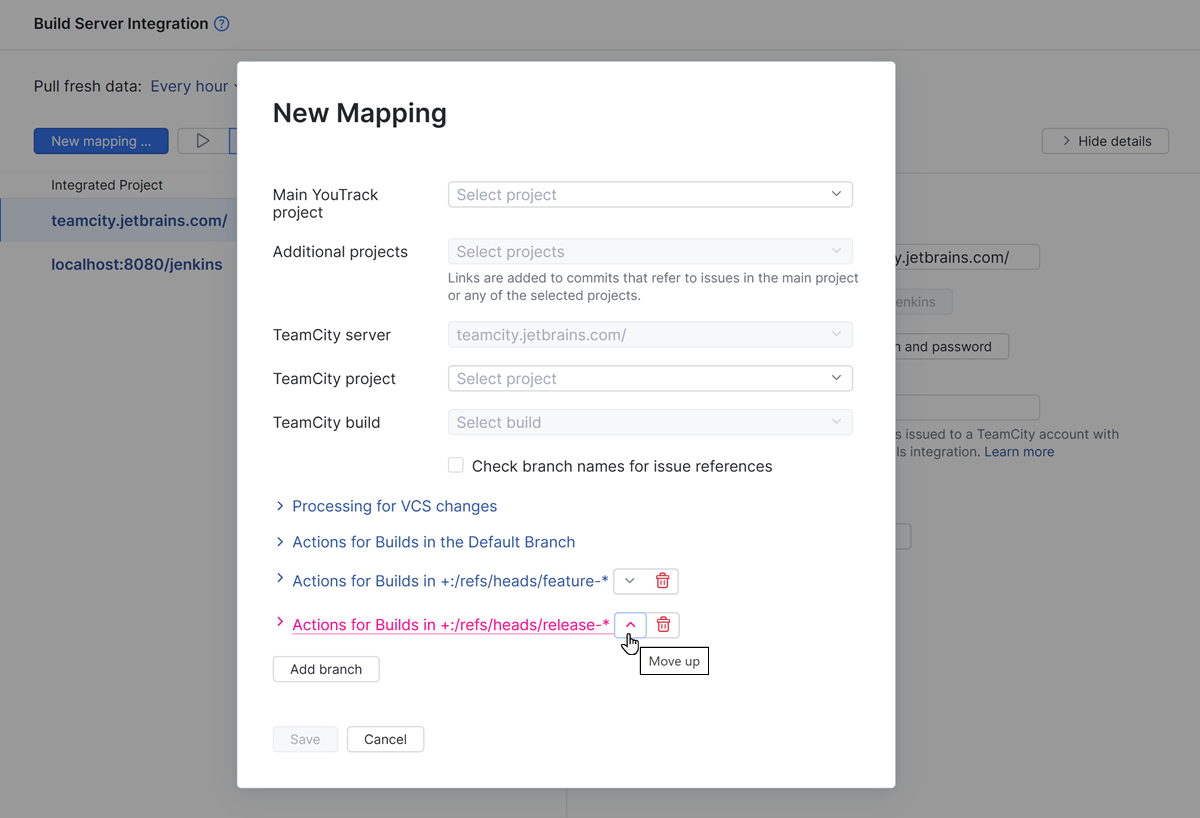
Click the Add branch button to specify custom actions for a new branch. The branches are defined in the Monitored branches setting for the new custom action.
Click the
icon to remove actions for a specific branch.
Click the up and down arrows to manage the order in which the actions are processed. If branch matches more than one specification, only the actions specified in the first matched branch are applied.
Placeholders
You can use placeholders in the Query and Command settings. These placeholders reference attributes that are stored for builds in TeamCity. The placeholder is replaced with the corresponding value in the connected version control system when the builds are processed by YouTrack. The following placeholders are available:
Placeholder | Description |
|---|---|
${build.time} | The date and time of the build that is processed by YouTrack. |
${prev.build.time} | The date and time of the build prior to the build that is processed by YouTrack. |
${build} | The number of the build that is processed by YouTrack. |
Match VCS Commit Authors and YouTrack Users
To link VCS changes and process commands in commit messages, YouTrack has to find a user account that matches the author of the commit message. If a command is specified in the commit message, it is applied based on the access permissions that are granted to the user account in YouTrack.
For integrations with TeamCity, YouTrack checks the email address that is stored in the TeamCity user profile of the user who committed changes to the VCS. To recognize the TeamCity user who committed the change, the VCS username should be associated with the user profile in TeamCity.
If the author of the commit message cannot be found in YouTrack, the command is not applied. The username is shown in red text on the VCS changes tab. The warning tooltip provides information that you can use to fix the problem.

There are basically two things that users can do to fix this problem:
Use the same email address for their accounts in YouTrack and the VCS that is connected to TeamCity.
Add their name (or nickname for Bitbucket) to the list of VCS usernames in their Hub accounts.
