YouTrack Integration Plugin
The YouTrack Integration plugin extends the functionality of the Task Management plugin that is built into JetBrains IDEs. The plugin is available for use with all JetBrains IDEs. This includes AppCode, CLion, DataGrip, GoLand, IntelliJ IDEA, PhpStorm, PyCharm, Rider, RubyMine, RustRover, and WebStorm. The plugin is also supported in Android Studio.
This plugin enables the following features in your IDE:
View a list of issues that match specific search criteria directly in your IDE.
Receive update notifications without switching to your email client or external messaging client.
Enter a search query to locate a specific issue in the list.
Open an issue as a task to set the work context in your IDE.
Open a command dialog in your IDE to apply commands to issues in YouTrack.
Track and record time spent working on YouTrack issues.
Access YouTrack issues from the VCS history and comments in Java code. These references to issue IDs are automatically formatted as links to YouTrack. This mimics the functionality of the Issue Navigation plugin, so you don't have to enable it separately.
In addition, this plugin enables the Open in IDE feature in YouTrack.
The list of issues that is pulled from your YouTrack server is cached locally in your IDE. This means that you can view issues even when offline.
Install the YouTrack Integration Plugin
Perform this setup directly in your IDE. You do not need to configure anything in YouTrack. You can configure the plugin settings independently for different projects in your IDE.
To install the YouTrack Integration Plugin:
Open a project in your IDE.
Access the Plugin settings.
For Windows and Linux, open the dialog and select Plugins.
For macOS, open the dialog and select Plugins.
Select the Marketplace tab.
Select the YouTrack Integration plugin from the list.
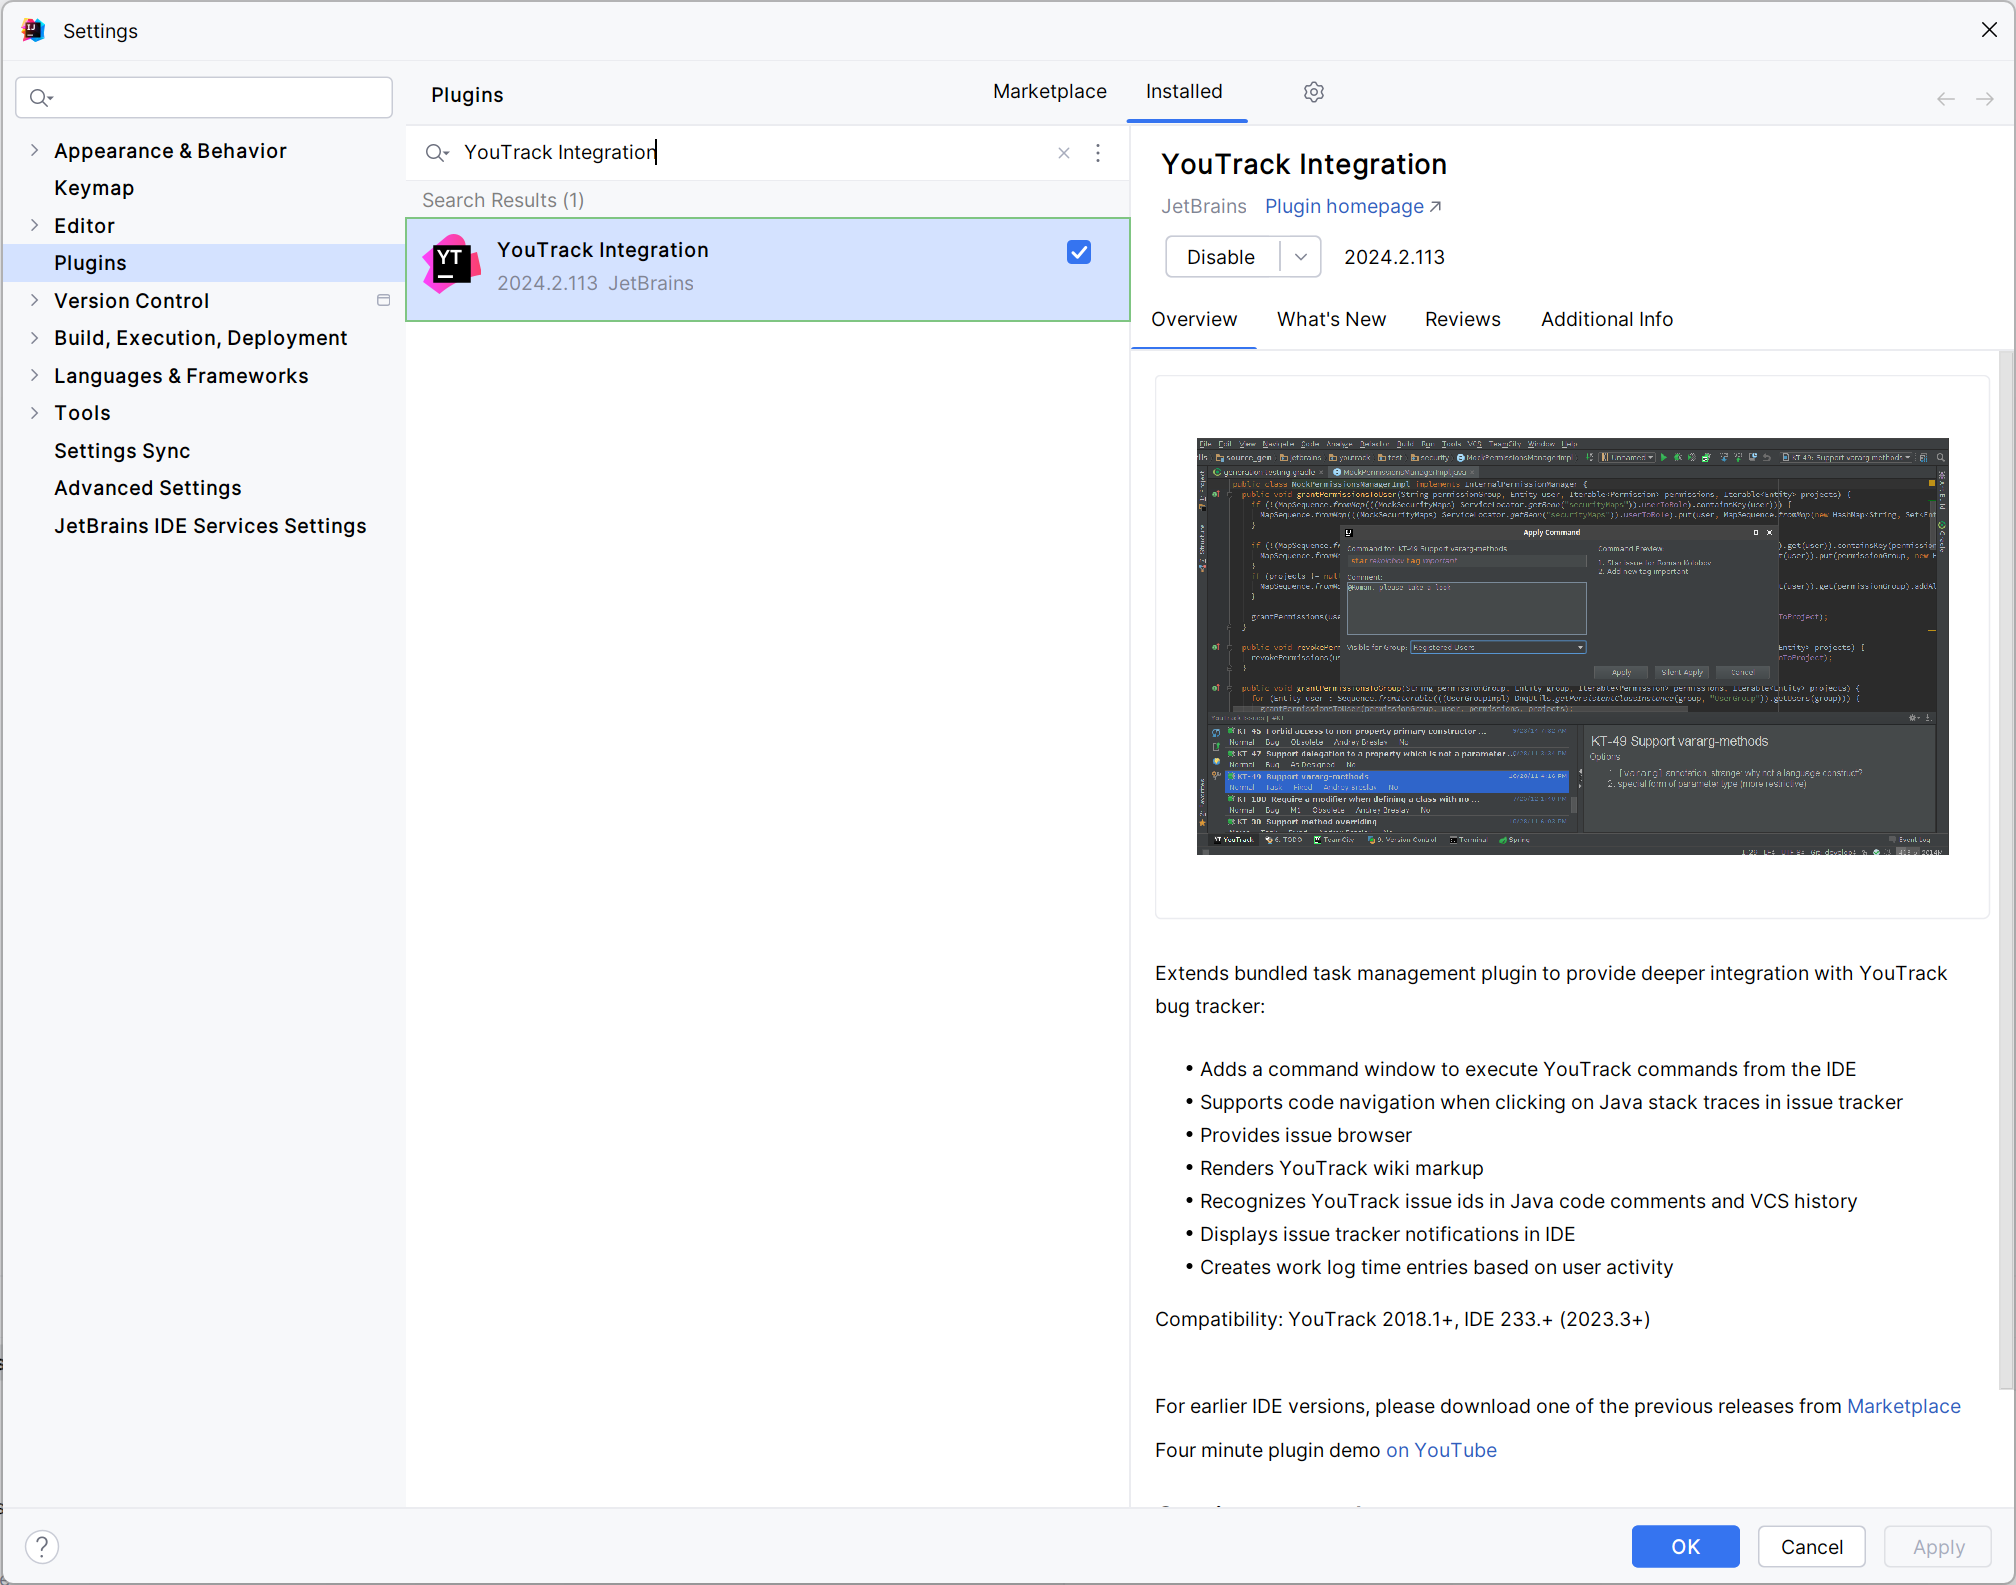
Click the Install button.
The plugin is installed in your IDE.
Older IDEs may require that you restart the application to apply changes. In newer IDEs, the plugin is immediately available for use.
Connect Your YouTrack Account
To start working with the plugin, you first need to sign in with your YouTrack account. For this, you need to supply the following information:
The web address (URL) of your YouTrack site:
A permanent token that has been generated for your YouTrack account.
To configure the YouTrack Integration Plugin:
Select the YouTrack tool window. If your Tool Buttons menu is hidden, select .
Click the Configure link.
The plugin setup dialog opens.
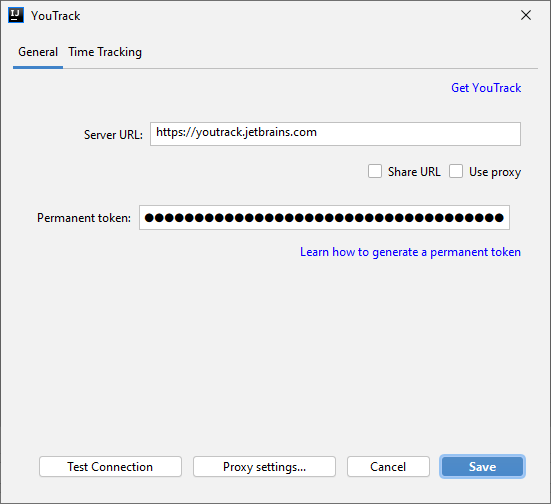
Use the settings on the General tab to connect to your YouTrack site:
Setting
Description
Server URL
Enter the URL of your YouTrack site.
For YouTrack Cloud instances hosted on
myjetbrains.com,be sure to include the trailing/youtrack. For example,https://writing.myjetbrains.com/youtrack.Permanent token
Enter a permanent token that has been generated for your user account in YouTrack.
To learn how to generate a permanent token in YouTrack, see Create a Permanent Token.
Click the Test Connection button to test the connection to the server.
Click the Save button.
Your IDE is configured to connect to your YouTrack server.
If your YouTrack installation is migrated to another location, or you want to work with issues from another YouTrack site, navigate to the section of the Settings/Preferences in your IDE and add the new server to the list.
View Issues in the YouTrack Tool Window
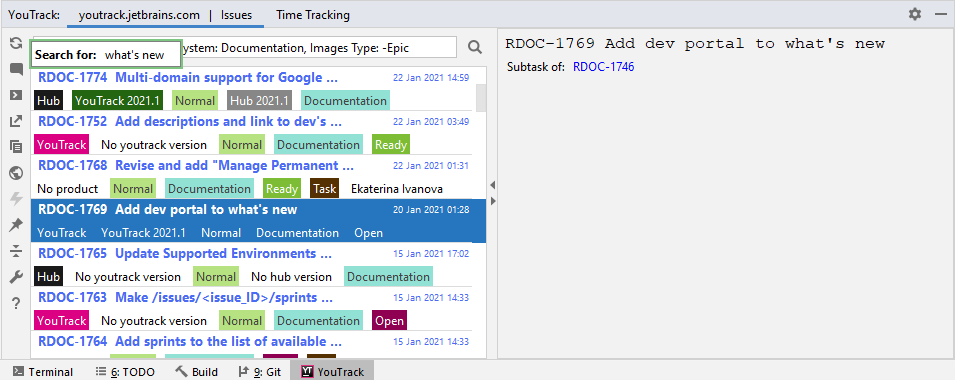
The YouTrack Integration plugin adds a YouTrack tool window to your IDE.

The tool window has separate views for Issues and Time Tracking.
The Issues view is divided into two panes:
The left pane displays a list of issues that match the current search criteria. You can edit this search query at any time in the input field at the top of the tool window. The list supports two levels of detail.
In one-line view, you see the issue priority, ID, summary, and the date and time of the last update.
In compact view, the values for custom fields are also displayed.
The right pane displays the issue detail. Here, you can find the issue ID, summary, tags, issue links, issue description, and attachments. The activity stream shows separate tabs for comments and spent time. Descriptions and comments are formatted as shown in YouTrack.
The toolbar to the left of the tool window provides access to the following actions:
Action | Description |
|---|---|
Refresh List | Pulls updates from your YouTrack server. All issues that match the search query are displayed in the tool window. |
Add Comment | Opens the Apply Command dialog with the |
Open Command Dialog | Opens the Apply Command dialog. Here, you can enter a command to update an issue. For a complete list of commands, see Command Reference. |
Open Task | Sets the selected issue as the active task. All the changes that you make in the code are associated with the issue that is selected as the current task. |
Copy Issue Link | Copies the URL of the selected issue to the clipboard. |
View in YouTrack | Opens the selected issue in YouTrack. |
Analyze Stack Trace | Opens a stack trace from the issue description in the Analyze Stack Trace dialog. |
Pin Issue | Opens the selected issue in a separate tool window tab. To remove the pinned issue, right-click the tool window tab and select Close Tab. |
Toggle Presentation | Expands and collapses the list of issues in the tool window. The two views that are supported in the tool window are similar to the One-line view and Compact view settings on the Issues list in YouTrack. |
Open Setup Dialog | Opens the plugin setup dialog. Here, you can change the URL for your YouTrack server, update your permanent token, and adjust your time tracking preferences. |
Help | Opens the page in the documentation for YouTrack Server that describes the features supported by the plugin. |
Get Issue Notifications
When you connect to YouTrack through the plugin, update notifications are delivered directly in your IDE. This means that you can stay up to date on all of your issues without switching to your email or external messaging client.

The notifications that are posted to your IDE are based on your personal notification preferences that are configured on the Notifications tab in your user profile. For more information, see Notifications.
The following actions are available for each notification:
Action | Description |
|---|---|
View | Opens the issue for which the notification was sent in YouTrack. |
Dismiss | When selected in the notification popup, the notification balloon closes. When selected in the Event Log tool window, the notification links are disabled. |
Configure Notifications | Opens the Notifications tab in your YouTrack profile. Here, you can modify your general notification scheme and update your subscriptions. |
The appearance and behavior of these notifications is dictated by the notification settings in your IDE. These settings determine whether the notifications are shown as balloon notifications and how the notifications are presented. To learn more about these settings, refer to the documentation for your IDE. For JetBrains IDEs, the notification settings are similar to the options that are described in the documentation for IntelliJ IDEA.
Search for Issues in the List
To search for a specific issue, select the tool window and start typing. The first issue that matches your search query is highlighted in the list.
Open Issues as Tasks in Your IDE
Like the Task Management plugin, the YouTrack Integration plugin lets you open an issue as a task and set your current work context.
To define the work context:
Open the YouTrack tool window.
Select an issue from the list.
Click the Open Task icon.
Set the parameters for the new task.
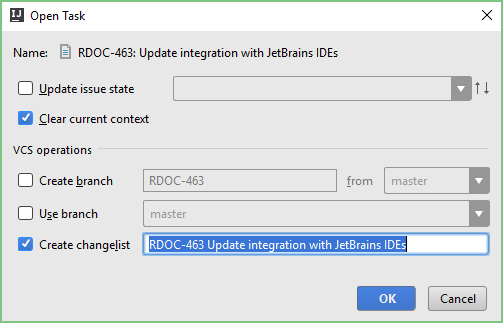
The following options are supported for task management:
Option
Description
Update issue state
When enabled, updates the value for a custom field that stores a state type to the selected value in the drop-down list.
Clear current context
When enabled, clears the current context.
If your project is connected to a version control system, a set of options for VCS operations are also available. These options vary by version control system. The following operations are available for Git-based version control systems:
Operation
Description
Create changelist
Creates a changelist with the name specified in the input field. The default name assigned to each changelist is defined as the Changelist name format in the section of the Settings/Preferences for your IDE.
If you deselect this option, the IDE switches the work context to the task without creating a changelist.
Shelve current changes
Stores pending changes that you have not yet committed to the repository. You can then unshelve the postponed changes when you switch back to the previous task.
Create branch
Creates a branch with the name specified in the input field. The default name assigned to each changelist is defined as the Feature branch name format in the section of the Settings/Preferences for your IDE.
Use branch
Lets you select an existing branch to store your changes.
For additional information about other VCS operations, refer to the documentation for your IDE.
Click the OK button.
The new task is set as your work context.
The active task is marked with a
star icon in the issue list.
Create Issues
While you're working to resolve an issue in your IDE, you may encounter other problems that you'd rather address in a separate issue or task. With the YouTrack Integration Plugin, you can highlight a block of code or a message in the console and insert it into the description field for a new issue in YouTrack.
The Create YouTrack Issue option is available from the context menu in the code editor, as well as the tool windows for running scripts, the debug console, and event log.
To create a new YouTrack issue from your IDE:
Highlight the text that you want to copy to the description field in the new issue.
Open the context menu and select the Create YouTrack Issue option.
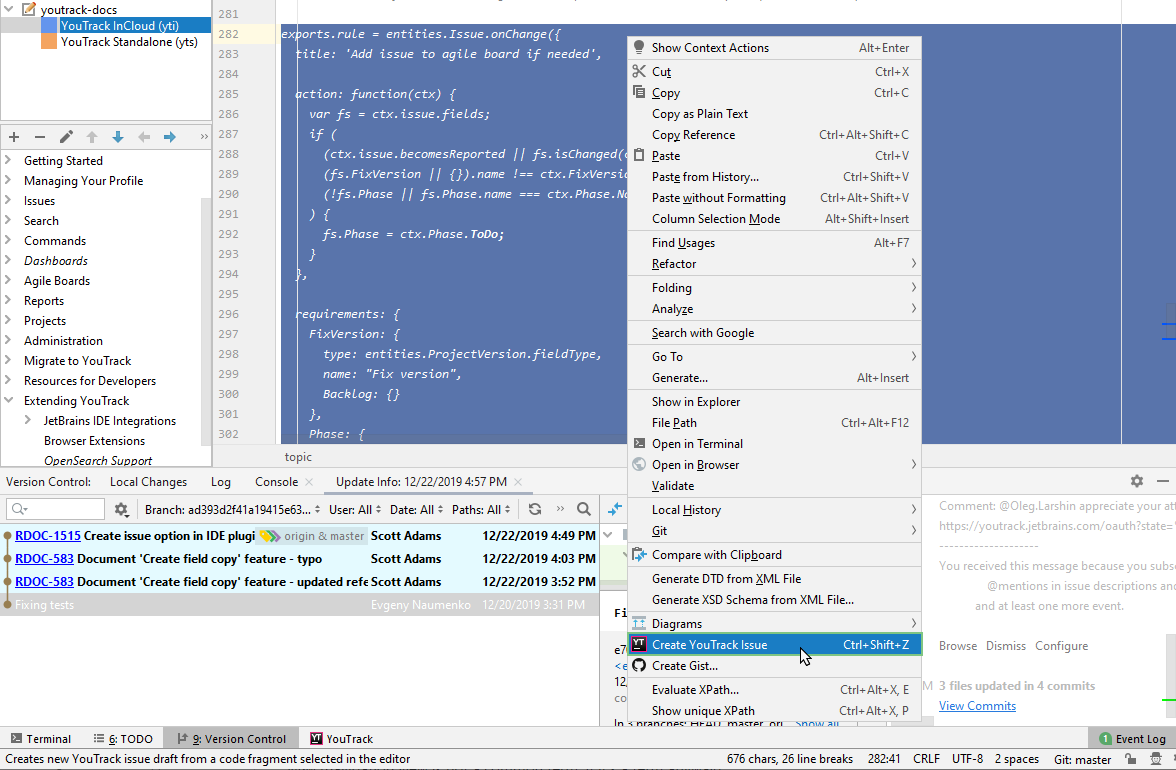
YouTrack opens to the New Issue page in a new browser tab.
The block of text that you selected in your IDE is set as a fenced code block inside the field for the issue description.
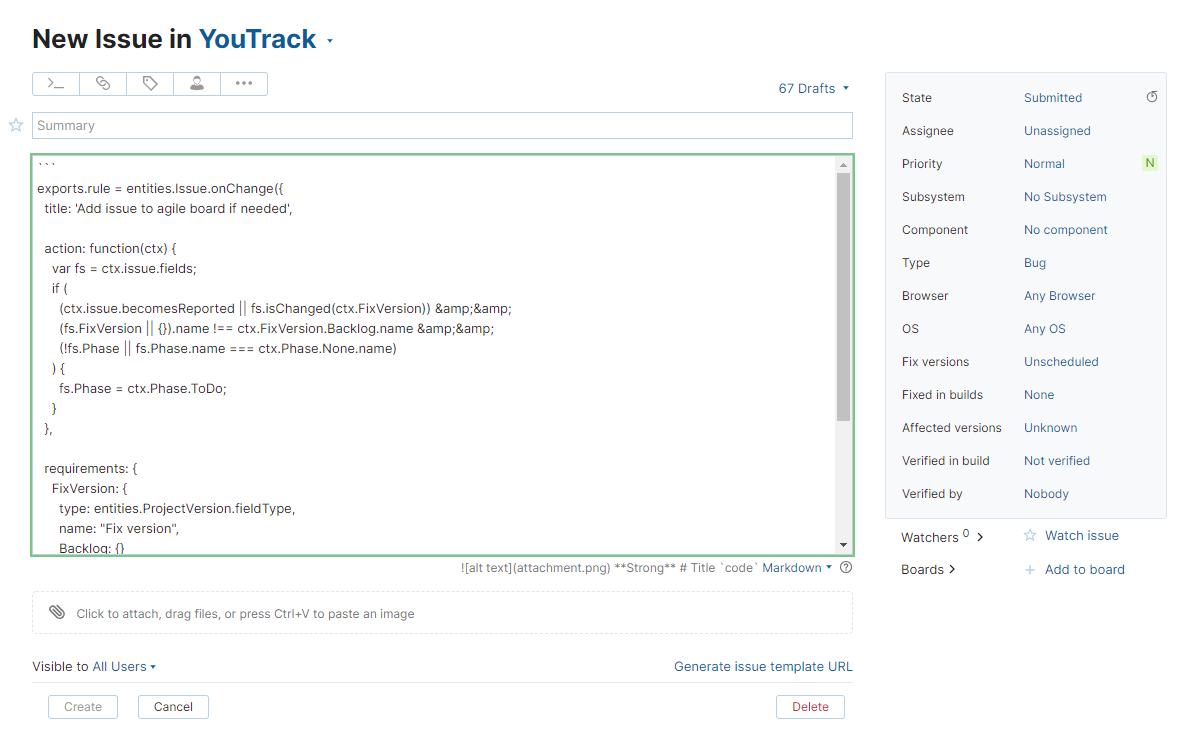
This action is also mapped to the following keyboard shortcut:
Ctrl + Shift + Z
Shift + ⌘ + Z
If needed, select the project for which you want to report the issue.
Enter an issue summary.
Set the initial values for the issue fields where appropriate.
Click the Create button.
The new issue is created in YouTrack.
Update Issues with Commands
The YouTrack Integration plugin lets you apply commands to issues directly from your IDE. To open the Apply Command dialog in your IDE:
Click the Execute YouTrack command button in the toolbar.
Press Ctrl + Shift + Y.
Press ⌘ + Shift + Y.
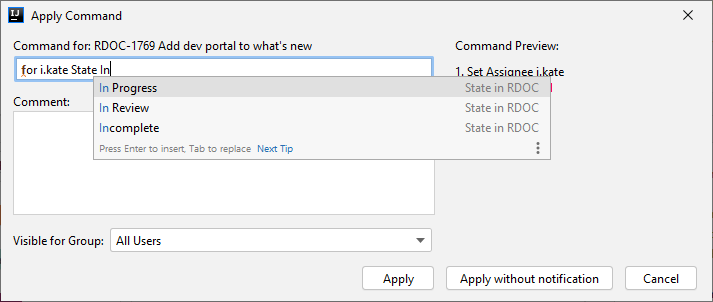
The Apply Command dialog works exactly as it does in YouTrack. For more information, see Commands.
Open Stack Traces in Your IDE
YouTrack automatically recognizes and formats Java and C# stack traces that are inserted into an issue description or comment.

When the stack trace is formatted, references to source code and other issues are set as links. Click these links to open the target reference in your IDE.
Track Spent Time
If the Time Tracking feature is enabled for your projects in YouTrack, you can track the amount of time you spend working in your IDE and post this information to your YouTrack issues as work items.
Time Tracking
The Time Tracking tab in the tool window displays a list of work items that you have posted to various issues in YouTrack.

Use the search box at the top of the tool window to filter the list using various criteria.
A control in the toolbar for the plugin lets you choose whether to sort the list by issue or date.
Additional controls in the toolbar help you manage how you post work items to issues as you use the IDE. The visibility of these controls is based on the current selection for the Tracking mode option in the plugin settings.
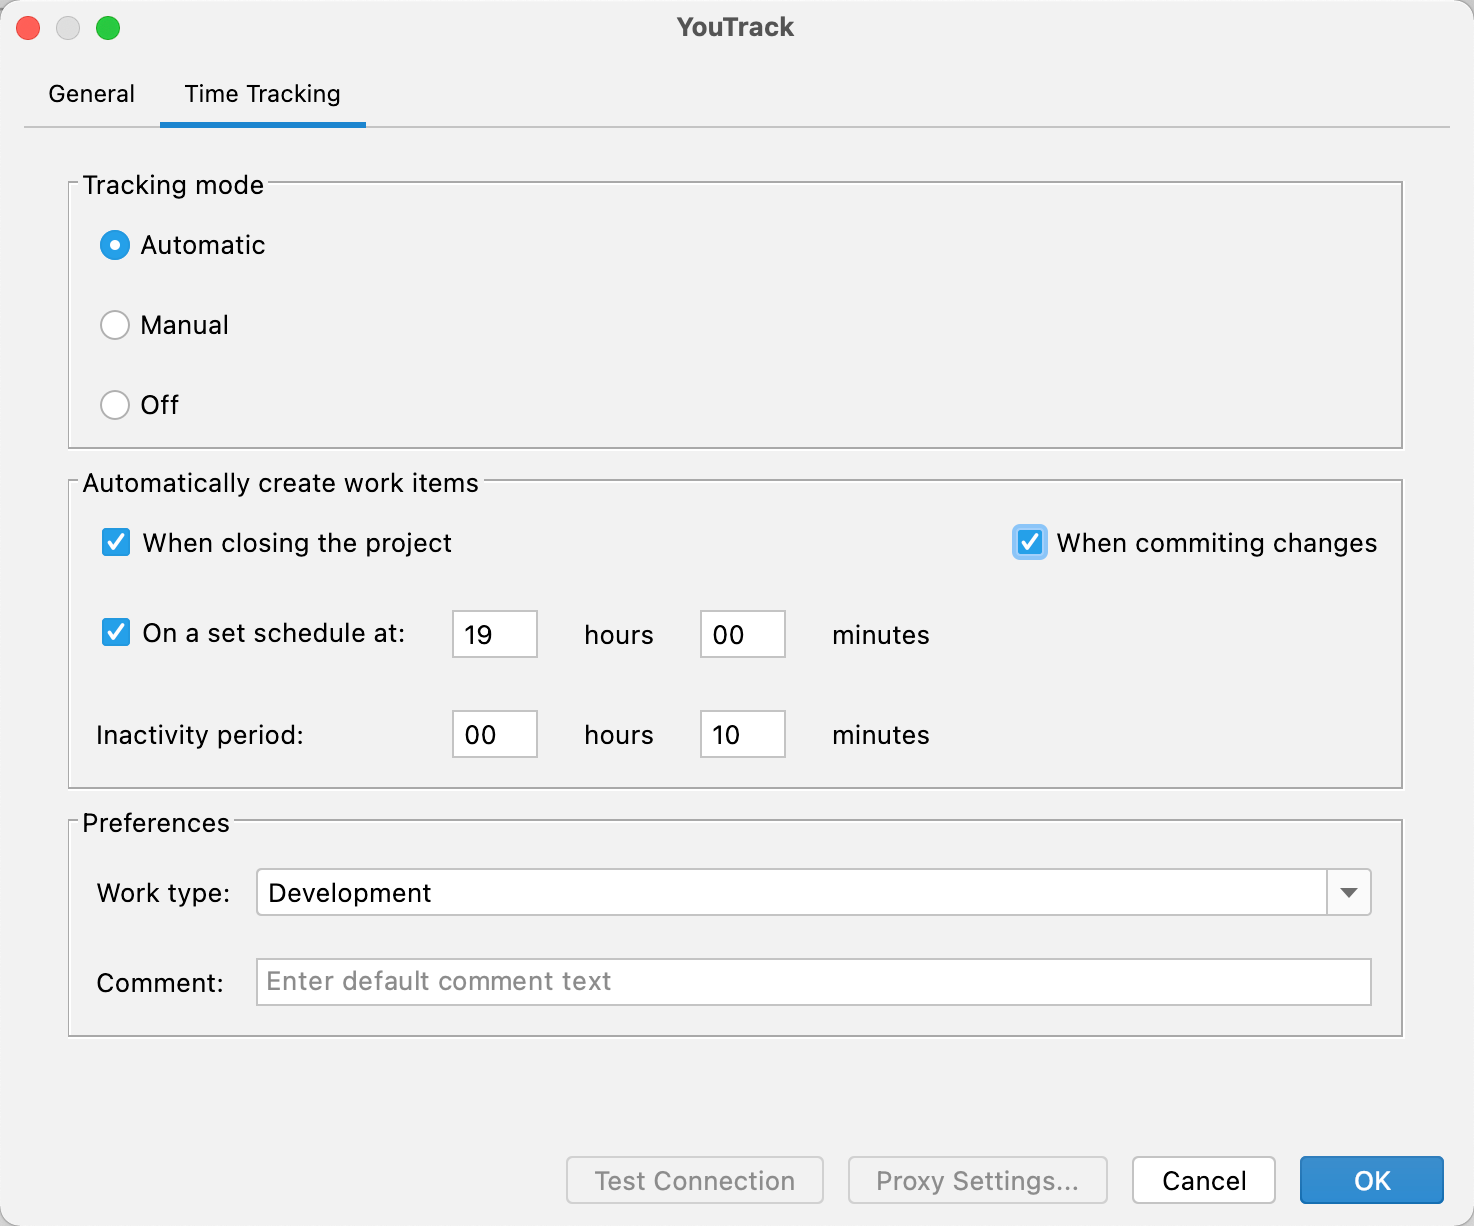
The plugin supports three different modes for tracking the time you spend working in the IDE. To choose which mode you want to work with, edit the Time Tracking settings in the plugin setup dialog.
Tracking Mode: Off
When the Tracking mode option is Off, you still have the ability to post spent time to YouTrack issues while you work in your IDE. This is managed by manually creating work items in the Add Spent Time dialog. To open this dialog, click the corresponding icon in the toolbar for the plugin.
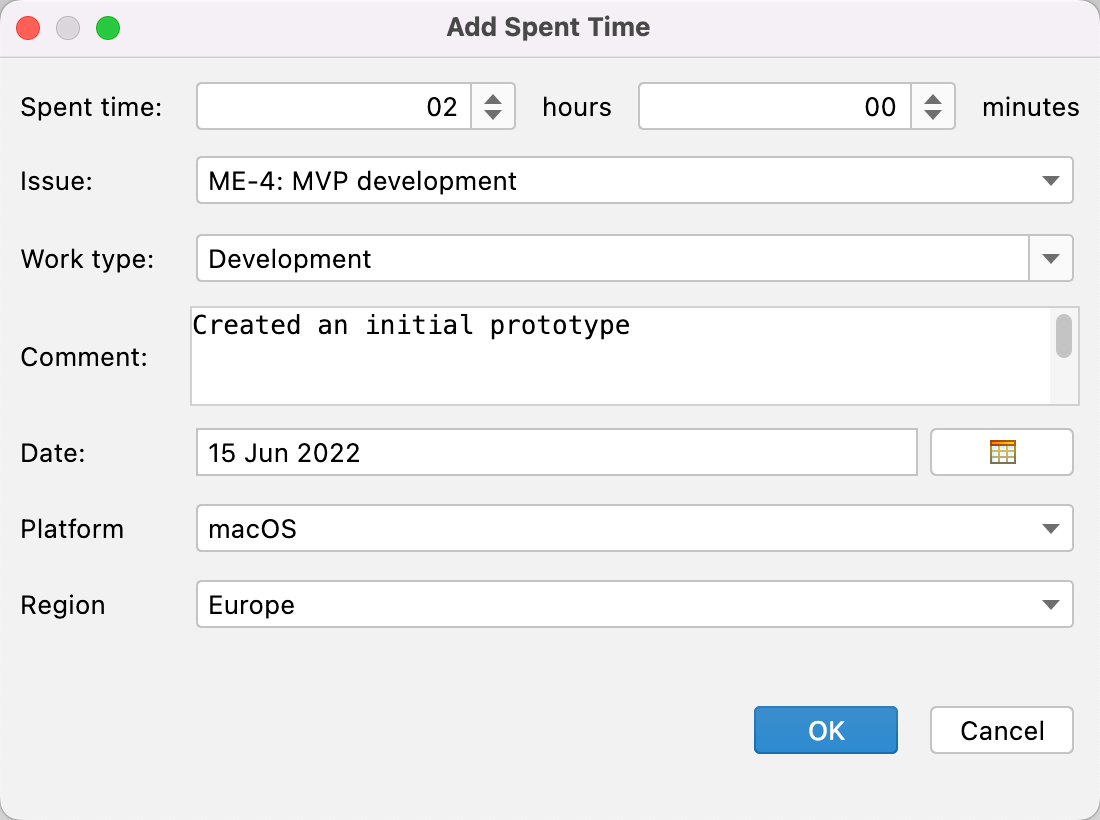
Use the following fields to manually add work items to YouTrack issues:
Field | Description |
|---|---|
Spent time | Set the amount of time to add to the work item in hours and minutes. |
Issue | Select the issue to which you want to add the work item. If you already have a YouTrack issue as your work context in the IDE, it is selected automatically. Otherwise, select an issue from the list. The list is filtered to match the search criteria that is currently applied to issues in the plugin. |
Work type | Select a work item type from the list. |
Custom work item attributes | Optionally, select values for the custom work item attributes. |
Comment | Enter an optional comment to describe the activity that is represented by this work item. |
Date | Select the date when the work took place. The current date is selected by default. |
Tracking Mode: Manual
The second option for tracking time lets you measure your spent time with a timer.

When Manual mode is active, the following actions are added to the toolbar for the plugin:
Action | Description |
|---|---|
Start Work Timer | Starts the timer to track how much time you spend working on your current task. When clicked, this control switches to the Pause Work Timer action. |
Pause Work Timer | Pauses the timer without posting spent time to the active issue. When clicked, this control switches to the Start Work Timer action. |
Reset Work Timer | Clears the amount of time that is currently tracked against the active task and restarts the timer. |
Stop Work Timer | Stops the timer and adds the amount of time that is currently tracked against the active task to the corresponding issue as a work item. Values for the work item type and comment are taken from the default preferences for the plugin. |
Show Tracked Time | Opens a dialog with the list of time entries saved locally. For more details about local tracking for spent time, see Local Tracking for Spent Time. |
The following settings are also available in manual mode:
Setting | Description |
|---|---|
Work type | Sets the default work type for all work items that are posted using the Stop Work Timer action. |
Comment | Sets the default comment text for all work items that are posted using the Stop Work Timer action. |
Tracking Mode: Automatic
The last option for tracking time lets the plugin do all the work. When Automatic mode is active, the following actions are added to the toolbar for the plugin:
Action | Description |
|---|---|
Pause Work Timer | Pauses the timer without posting spent time to the active issue. When clicked, this control switches to the Start Work Timer action. |
Start Work Timer | Resumes tracking the amount of time that is spent working on the current task. When clicked, this control switches to the Pause Work Timer action. |
Post Time to Server | Adds the amount of time that is currently tracked against the active task to the corresponding issue as a work item and restarts the timer. Values for the work item type and comment are taken from the default preferences for the plugin. |
Show Tracked Time | Opens a dialog with the list of time entries saved locally. For more details about local tracking for spent time, see Local Tracking for Spent Time. |
In automatic mode, the timer starts automatically when you open a project that is configured to use the YouTrack Integration plugin in your IDE.
Additional options in the Time Tracking settings for the plugin determine how time is tracked from that point forward. These options are shown in the Automatically create work items section of the setup dialog. The following options are available:
Option | Description |
|---|---|
When closing the project | Adds the time tracked against the active task to the corresponding issue whenever you close the current project or quit the IDE. |
When committing changes | Adds the time tracked against the active task to the corresponding issue whenever you commit the current set of changes to version control. |
On a set schedule | Automatically posts the time tracked against the active task to the corresponding issue at the specified time each day. This action is only applied when the IDE is open at the specified time. |
The Inactivity period setting tells the plugin to automatically pause the work timer if you are not actively working in the IDE for the specified period. If the timer is paused, it restarts automatically as soon as you resume your work in the IDE.
When in automatic mode, the plugin tracks the user's activity in the IDE. This includes mouse movement, keystrokes, and changes in focus between active windows or tabs. If the plugin fails to detect activity in the IDE within the designated inactivity period, the timer is automatically paused.
The following settings are also available in automatic mode:
Setting | Description |
|---|---|
Work type | Sets the default work type for all work items that are posted using the Post Time to Server action. |
Comment | Sets the default comment text for all work items that are posted using the Post Time to Server action. |
Local Tracking for Spent Time
When you frequently switch between tasks while tracking spent time, you may see many small work items reported in your tasks. To avoid cluttering your tasks and spamming the subscribers, you can accumulate the spent time for each task, keep it locally in your IDE, and report the aggregated time in one work item when you're ready.
When you have a working timer and you switch the work context, the timer pauses automatically, and the time you've tracked so far is saved locally. You can access your local time entries by clicking the Show Tracked Time action in the plugin toolbar.
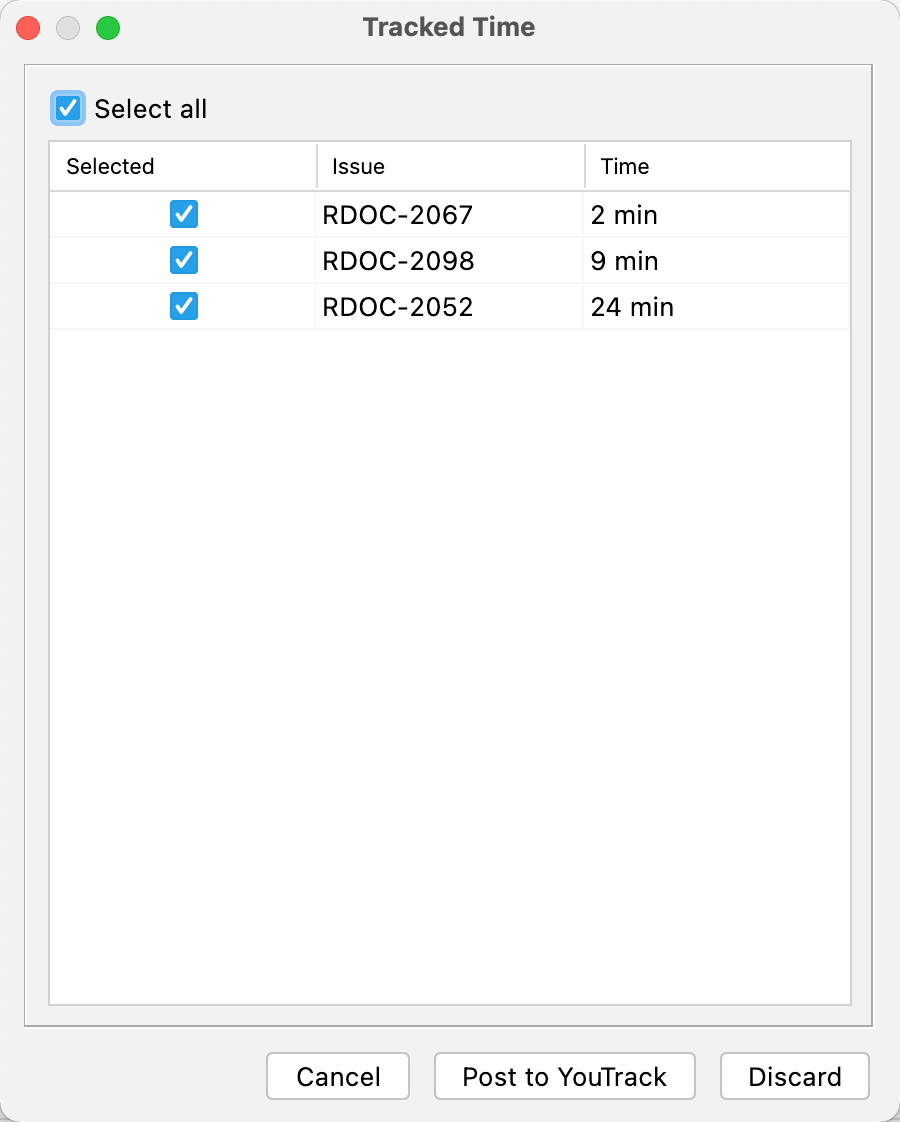
The Tracked Time dialog shows the list of the time entries you have saved locally. Each entry shows the issue and the amount of time you have tracked for it so far.
In this dialog, you can manage the tracked time entries. Here are the controls available in the dialog:
Option | Description |
|---|---|
Select all | Selects all the time entries on the list. |
Post to YouTrack | Posts the selected local time entries as work items to the corresponding issues in YouTrack. |
Discard | Deletes the selected local time entries. |
Cancel | Closes the dialog without change. |
When you switch the work context to a task where you already have tracked time, a dialog appears.

There are two options the Existing Time Record Found dialog offers:
Option | Description |
|---|---|
Post to YouTrack | Pauses the timer for the current task and changes the work context. Posts the existing time entry as a work item to the task you've just set as the new work context. Starts a new timer for the new work context. |
Save and Continue | Pauses the timer for the current task and changes the work context. Resumes the timer for the new work context. The timer continues adding time to the existing time entry. |
Local tracking for spent time comes in handy when your network connection is unstable. If your IDE loses connection when you need to post the tracked time, the plugin saves it locally. When the IDE restores the connection, you can access the time you've tracked and post it to YouTrack.
Local tracking for spent time is available in Automatic and Manual tracking modes.