Back Up the Database
To protect your installation against ransomware and recover from hardware or software failure, you should backup your YouTrack database on a regular basis. You should always have at least one recent, valid backup copy of your database that you can use to restore your installation.
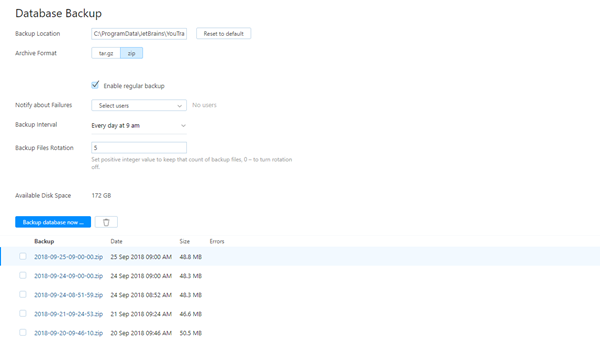
To access database controls, select Database Backup from the Administration menu.
You can back up YouTrack database right away or us a cron expression to back up the database on a set schedule (see cron expression syntax for reference).
There are several things to take note of regarding YouTrack database settings and controls:
If YouTrack uses a built-in Hub service, YouTrack automatically switches the database to read-only mode when you start the database backup. This preserves the synchronization between the YouTrack and Hub databases. Users can still access and update issues in YouTrack, but most of the settings on administrative pages are read only. For best results, schedule backups outside of working hours.
You can't cancel the database backup once it has started.
Notifications about the status of the database backup can only be configured for YouTrack application administrators.
Configure Backup Settings
You can modify the default settings of your database backup configuration.
To configure database backup settings:
In the Server Settings section of the Administration menu, select Database Backup.
In the Backup Location field, set the location of the backup folder for your server.
- Set the Archive Format to determine whether the backup files are created as a TAR.GZ or ZIP archives.
The maximum size of the ZIP backup file is 2Gb. For larger databases, use TAR.GZ archives.
- In the Notify about Failures drop-down list, select the users who receive notification messages about the database backups.
To receive notifications for database backup, the user must also have the Low-level Administration permission.
- To configure automated backups, select the Enable regular backup check box. When you enable regular backup, the following settings are displayed:
Backup Interval — Set the schedule for automatic backups. Select one of the pre-configured intervals or use a cron expression to set up a custom interval (see cron expression syntax for reference).
Backup Files Rotation — Specify a number of the database backup files to keep. This parameter lets you create a rotation of database backups. Only the specified number of the backups files are kept on your server. To disable the automatic backup rotation, set the number to '0' (zero). In this case, all backups files are kept and must be deleted manually.
To delete a backup file manually, select the file in the list and click the trash button.
Restore Your Installation
One of the primary reasons for storing backups is keep a valid copy of your data that you can use to recover from hardware or software failure. To keep your data safe, we strongly recommend that you enable regular backup of your database and test the process of restoring your installation.
For additional information and instructions, see Restore an Installation.