# チュートリアル: 初めての RESTful Web サービス
> For the complete documentation index, see [llms.txt](https://www.jetbrains.com/ja-jp/help/idea/llms.txt).
このチュートリアルでは、IntelliJ IDEA で単純な RESTful Web サービスを作成し、それを Tomcat GlassFish アプリケーションサーバーにデプロイする方法について説明します。 Web ブラウザーから特定の URL にアクセスするか、この URL に GET リクエストを送信すると、サービスは `Hello, World!` を出力します。 別のアプリケーションサーバーの手順については、このページの上部にあるスイッチャーを使用してください。
新しい Java Enterprise プロジェクトを作成し、必要な Java コードを追加し、IntelliJ IDEA に GlassFish Tomcat サーバーの場所を伝え、実行構成を使用してアーティファクトをビルドし、サーバーを起動して、アーティファクトをデプロイします。
必要なものは次のとおりです。
| 関連するプラグイン | デフォルトでは、IntelliJ IDEA Ultimate には次の必要なプラグインがバンドルされ、有効になっています。 何かが機能しない場合は、次のプラグインが有効になっていることを確認してください。 * Jakarta EE プラットフォーム * Jakarta EE: アプリケーションサーバー * Jakarta EE: Web/ サーブレット * Jakarta EE: RESTful Web サービス (JAX-RS) * Tomcat と TomEE [プラグイン](managing-plugins.html)の説明に従って、 GlassFish プラグインをインストールして有効にします。 |
| Java SE Development Kit (JDK) バージョン 1.8 以降 | [Java 開発キット (JDK)](sdk.html#jdk)に従って、IntelliJ IDEA から直接 JDK を取得するか、手動でダウンロードしてインストールできます(例: [Oracle JDK](http://www.oracle.com/technetwork/java/javase/downloads/index.html) または [OpenJDK](https://openjdk.java.net/))。 |
| Tomcat | [Tomcat(英語)](http://tomcat.apache.org/) アプリケーションサーバーバージョン 7 以降。 > **Note:** > このチュートリアルでは、JDK 21、Jakarta EE 11、Tomcat 11 を使用します。 他の Tomcat、Java、および Jakarta EE バージョン間の互換性に関する詳細については、 [https://tomcat.apache.org/whichversion.html](https://tomcat.apache.org/whichversion.html) を参照してください。 |
| GlassFish | [GlassFish(英語)](https://projects.eclipse.org/projects/ee4j.glassfish) アプリケーションサーバーバージョン 4.0 以降。 [公式リポジトリ(英語)](https://github.com/eclipse-ee4j/glassfish)から最新リリースを入手できます。 このチュートリアルの目的には、 Web プロファイル サブセットで十分です。 > **Note:** > このチュートリアルでは、Oracle OpenJDK 17、Jakarta EE 9.1、および GlassFish 6.2.5 を使用します。 他の GlassFish、Java、および Jakarta EE バージョン間の互換性に関する詳細については、 [https://github.com/eclipse-ee4j/glassfish#compatibility](https://github.com/eclipse-ee4j/glassfish#compatibility) を参照してください。 |
| Web ブラウザー | Web アプリケーションを表示するには、Web ブラウザーが必要です。 |
Procedure: JAX-RS を使用して新しい Jakarta EE プロジェクトを作成する
IntelliJ IDEA には、さまざまな Jakarta EE 実装に基づいて Jakarta EE プロジェクトを作成するための専用ウィザードが含まれています。 このチュートリアルでは、簡単な Web アプリケーションを作成します。
1. 新規プロジェクト ウィザードを開く:
* ホーム画面を表示している場合は、 ` 新規 |  プロジェクト…` を選択します。
* 別のプロジェクトを開いている場合は、 `ファイル | 新規 | プロジェクト` に移動します。
2. 左側の ジェネレーター リストから、  Jakarta EE を選択します。
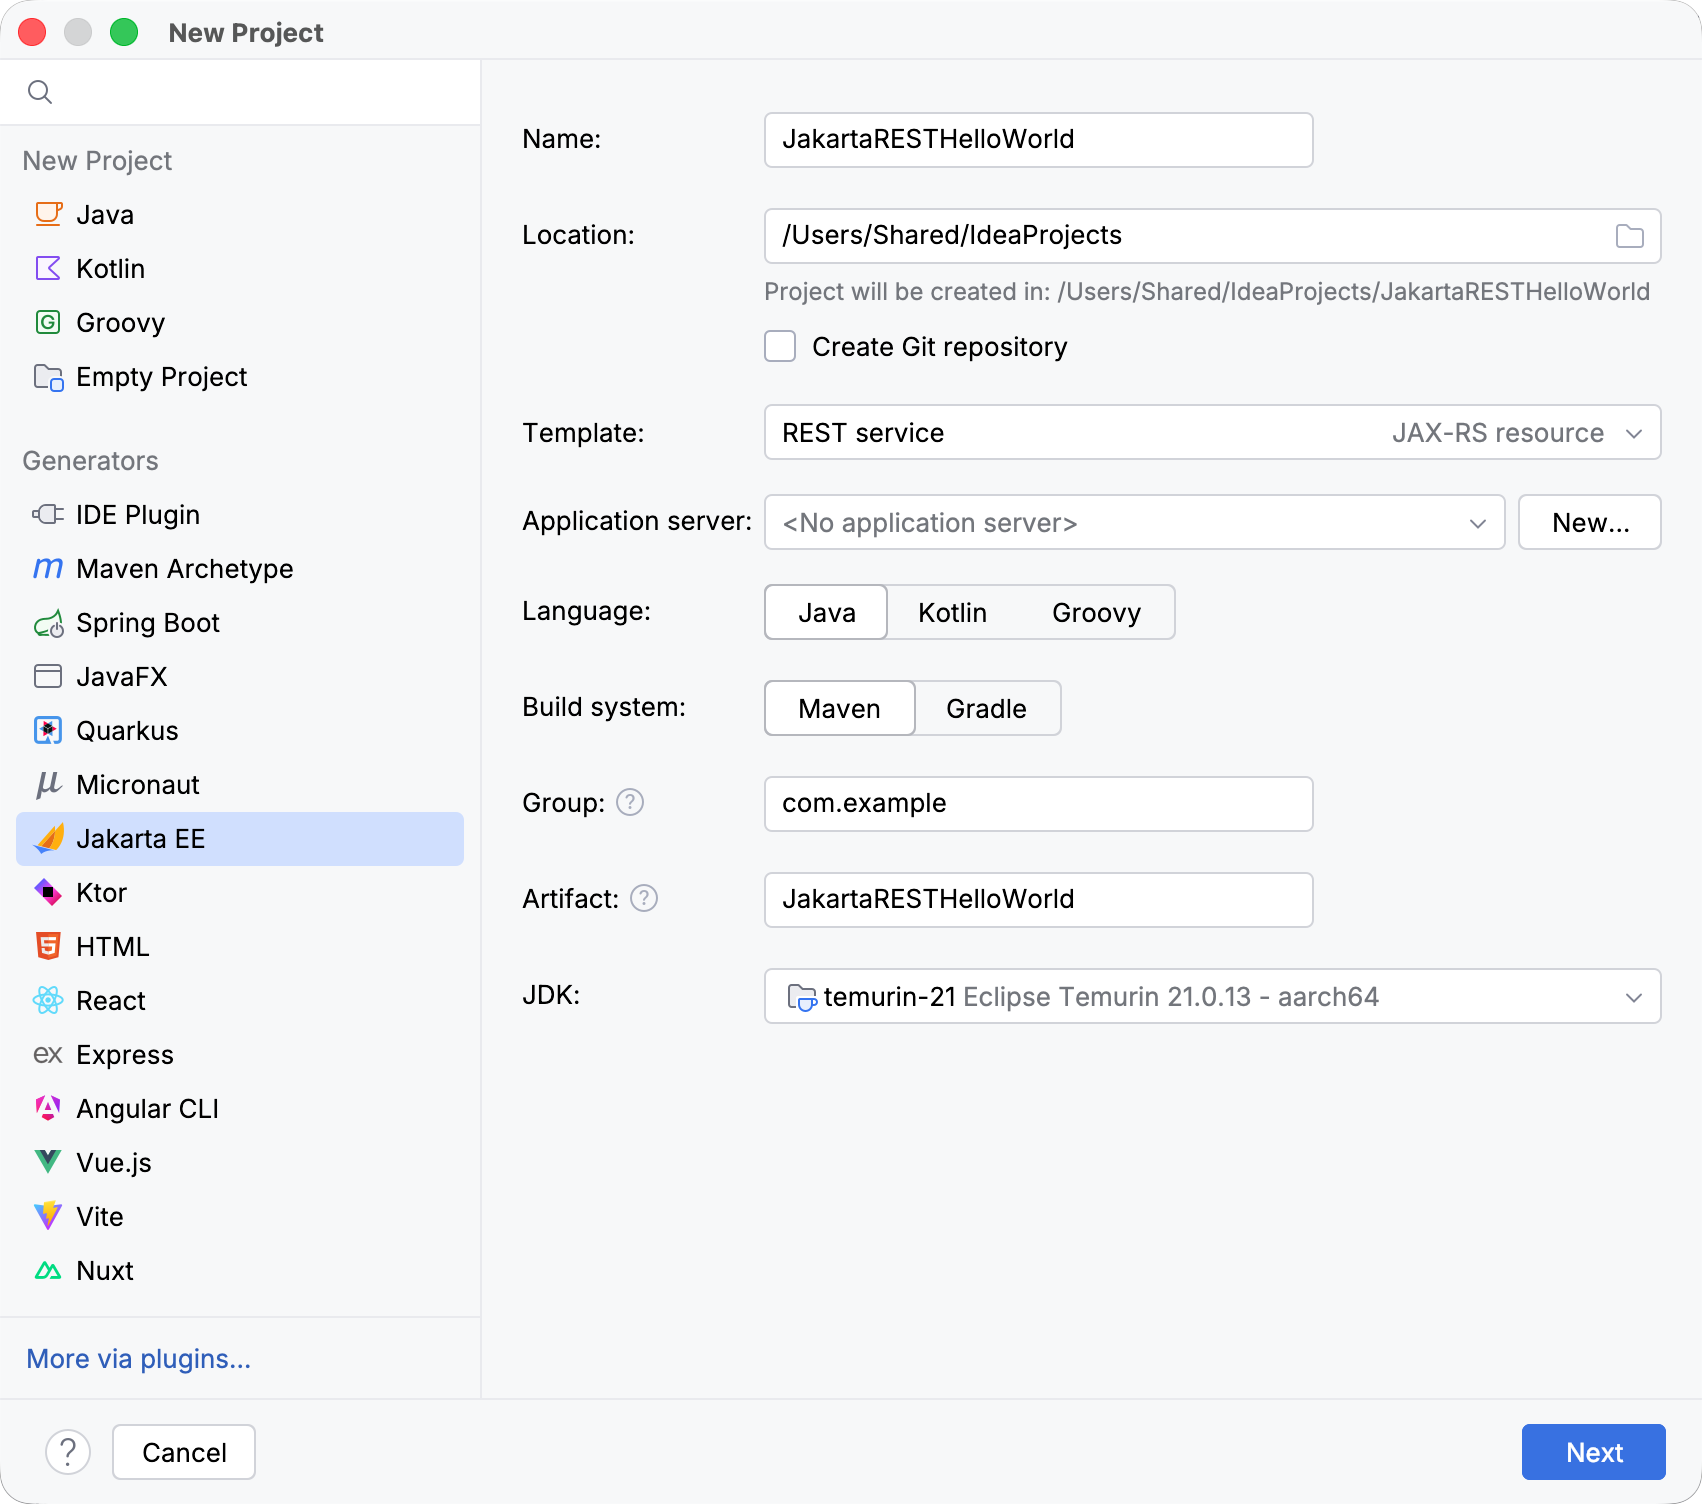
3. プロジェクト設定を次のように設定します:
* 名前 : `JakartaRESTHelloWorld`
* ロケーション : そのままにする
* Git リポジトリの作成 : そのままにする
* テンプレート : REST サービス
* アプリケーションサーバー : <アプリケーションサーバーなし>
* 言語 : Java
* ビルドシステム : Maven
* グループ : そのままにする
* アーティファクト : そのままにする
* JDK : Eclipse Temurin 21
準備ができたら、 次へ をクリックします。
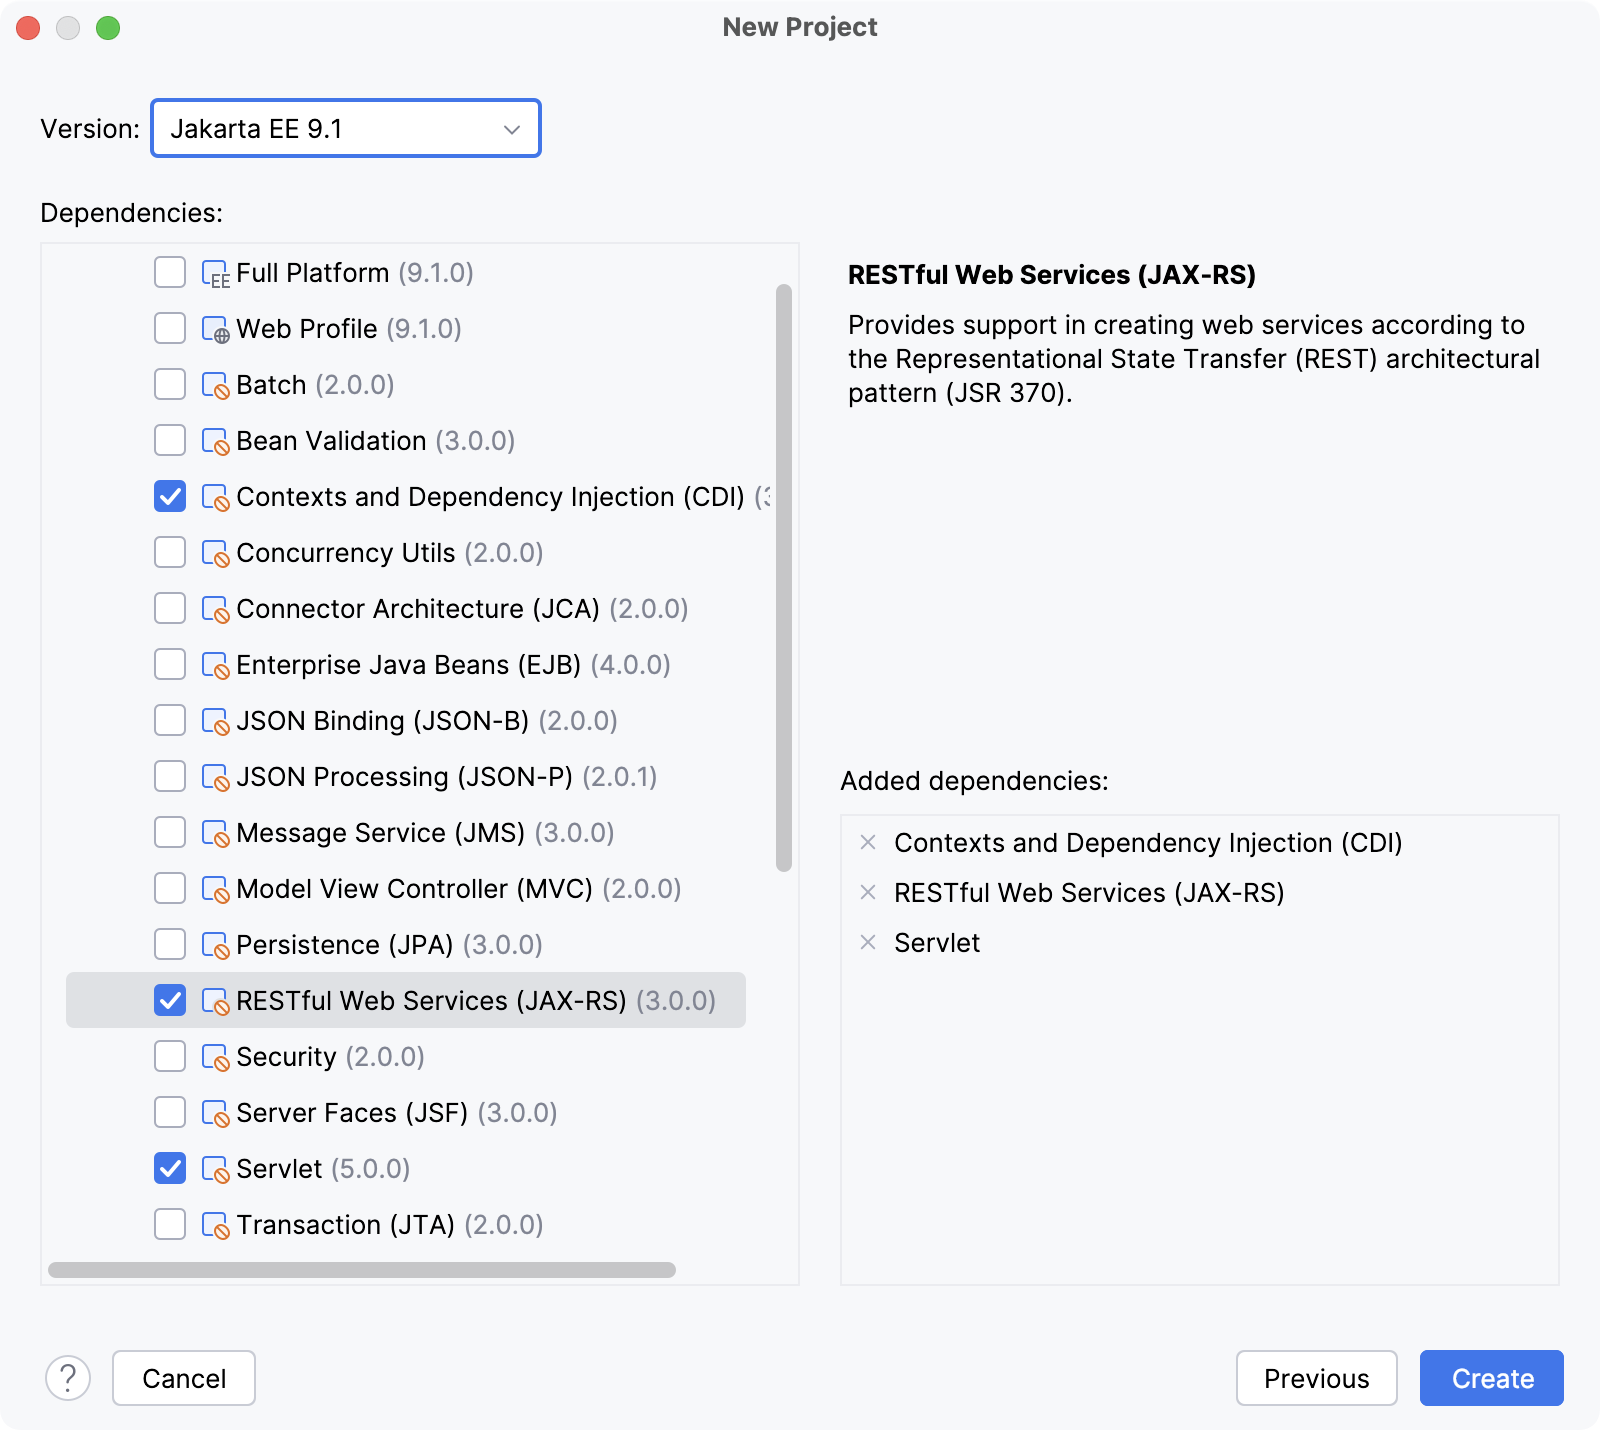
4. バージョン ドロップダウンリストから、このチュートリアルで使用する Tomcat 11 と互換性がある Jakarta EE 11 を選択します。 Jakarta EE 9.1 は、このチュートリアルで使用する GlassFish 6.2.5 と互換性があるためです。
前のステップで REST サービステンプレートを選択したため、 依存関係 リストでは一部の仕様がすでに選択されています。 このチュートリアルでは、他の依存関係を選択する必要はありません。
5. 前のステップで REST サービステンプレートを選択したため、 依存関係 リストでは一部の仕様がすでに選択されています。 ただし、それらの実装も選択する必要があります: Eclipse Jersey サーバー と Weld SE 。
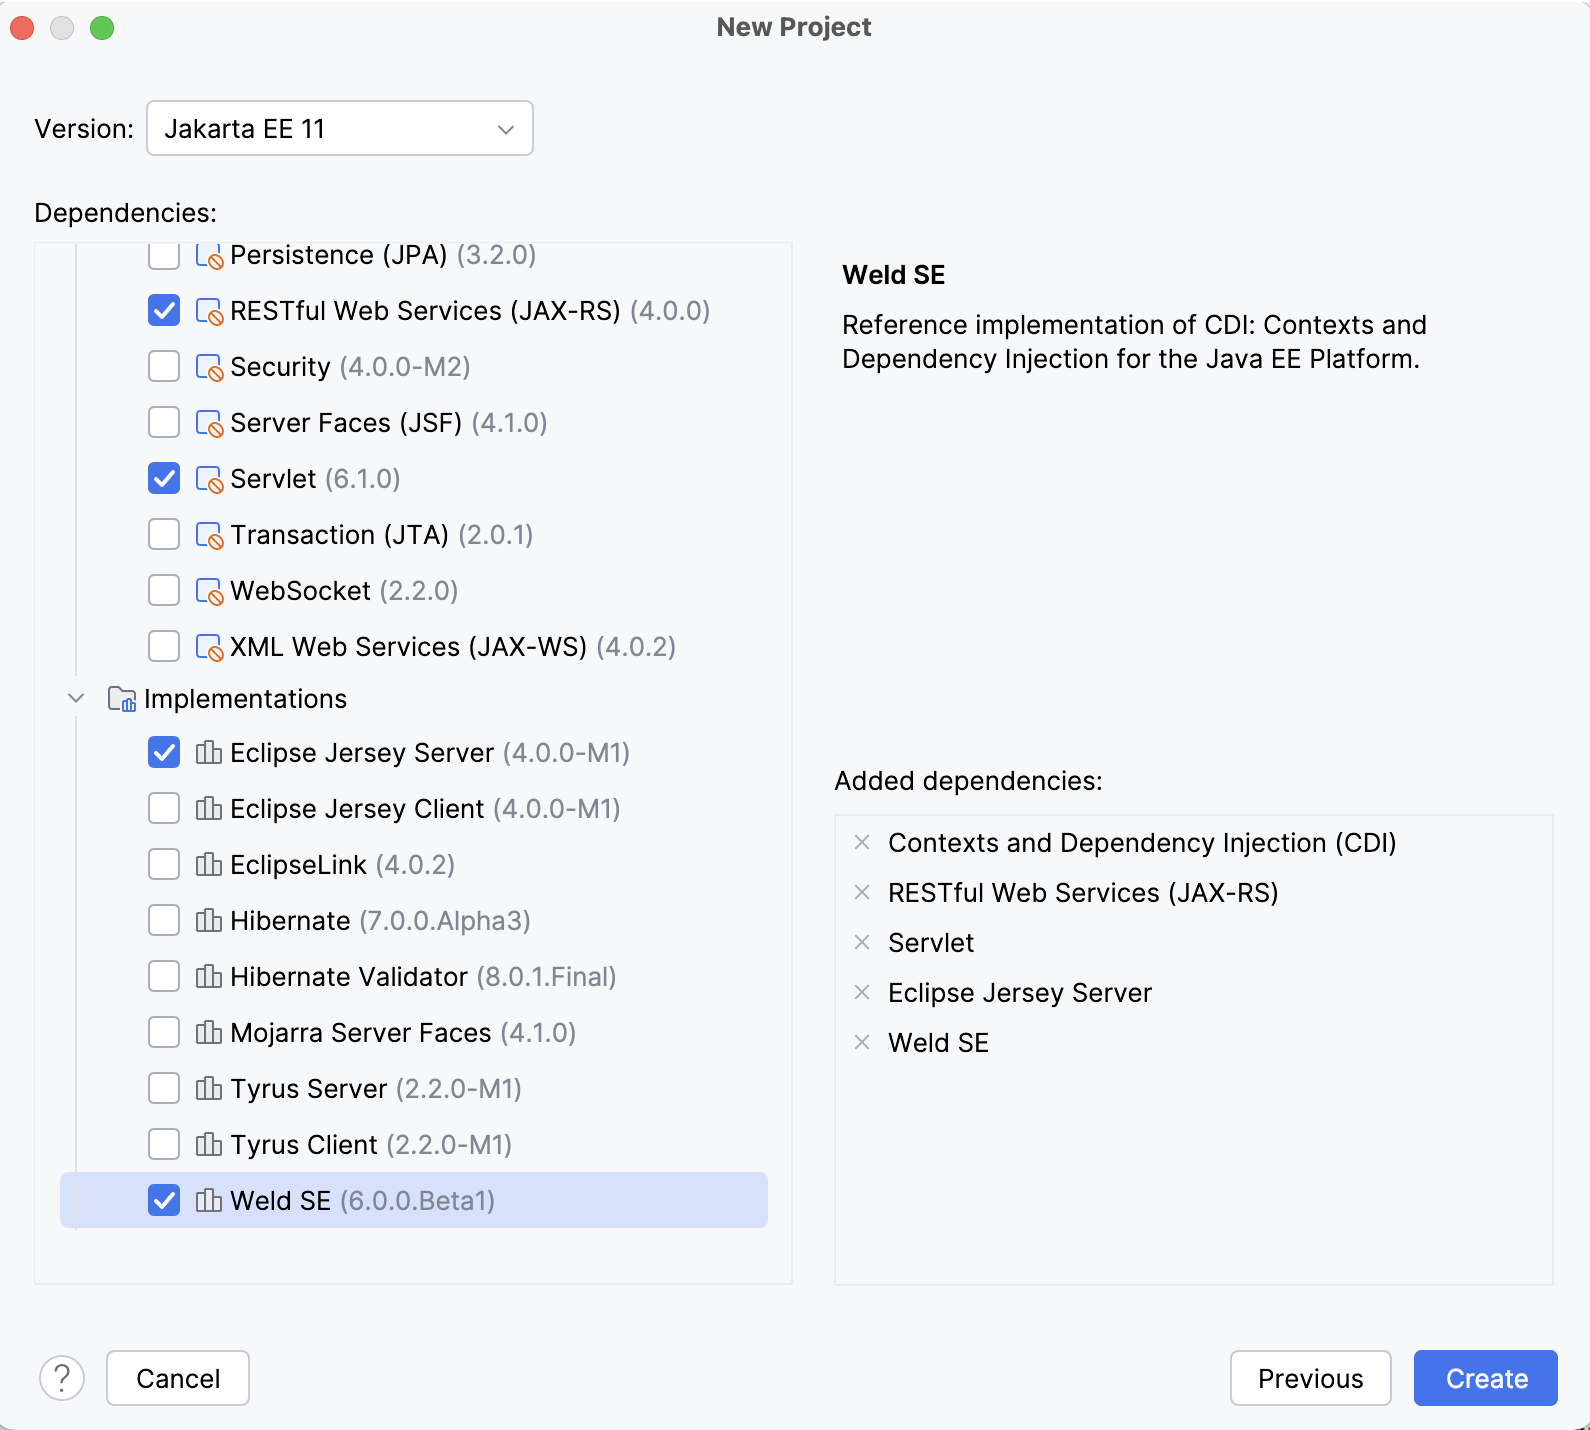
6. 作成 をクリックします。
Procedure: デフォルトのプロジェクト構造を調べる
IntelliJ IDEA は、正常にビルドおよびデプロイできる定型コードを使用してプロジェクトを作成します。
> **Tip:**
> プロジェクト ツールウィンドウを使用してプロジェクト内のファイルを参照して開くか、 `Ctrl+Shift+N` (Windows), `⌘ ⇧ O` (macOS), `⌘ ⇧ N` (IntelliJ IDEA Classic (macOS)), `⌘ ⇧ O` (macOS System Shortcuts), `Ctrl+Shift+N` (XWin), `Ctrl+Shift+N` (GNOME), `Ctrl+Shift+N` (KDE), `Ctrl+X, Ctrl+F` (Emacs), `Ctrl+P` (Sublime Text), `⌘ P` (Sublime Text (macOS)), `Ctrl+Shift+T` (Visual Studio), `⌘ ⇧ T` (Visual Studio (macOS)), `Alt+Shift+O` (NetBeans), `Ctrl+Shift+R` (Eclipse), `⌘ ⇧ R` (Eclipse (macOS)) を押してファイルの名前を入力します。
* `pom.xml` は、プロジェクトのビルドに必要な依存関係やプラグインなど、Maven 構成情報を備えた プロジェクトオブジェクトモデル です。
```XML
4.0.0
org.example
RestTomcatHelloWorld
1.0-SNAPSHOT
RestTomcatHelloWorld
war
UTF-8
21
21
5.11.0-M2
jakarta.servlet
jakarta.servlet-api
6.1.0
provided
org.glassfish.jersey.containers
jersey-container-servlet
4.0.0-M1
org.glassfish.jersey.media
jersey-media-json-jackson
4.0.0-M1
org.glassfish.jersey.inject
jersey-cdi2-se
4.0.0-M1
org.jboss.weld.se
weld-se-core
6.0.0.Beta1
org.junit.jupiter
junit-jupiter-api
${junit.version}
test
org.junit.jupiter
junit-jupiter-engine
${junit.version}
test
org.apache.maven.plugins
maven-war-plugin
3.4.0
```
```XML
4.0.0
com.example
RestTomcatHelloWorld
1.0-SNAPSHOT
RestTomcatHelloWorld
war
UTF-8
11
11
5.9.2
jakarta.servlet
jakarta.servlet-api
5.0.0
provided
org.glassfish.jersey.containers
jersey-container-servlet
3.0.4
org.glassfish.jersey.media
jersey-media-json-jackson
3.0.4
org.glassfish.jersey.inject
jersey-cdi2-se
3.0.4
org.jboss.weld.se
weld-se-core
4.0.3.Final
org.junit.jupiter
junit-jupiter-api
${junit.version}
test
org.junit.jupiter
junit-jupiter-engine
${junit.version}
test
org.apache.maven.plugins
maven-war-plugin
3.3.2
```
* `HelloResource.java` は ルートリソースクラス であり、次の JAX-RS アノテーションを使用して RESTfulWeb サービスを実装します。
* `@Path` アノテーションは、アプリケーションルートを基準にして、このリソースにアクセスするための URI を識別します。
* `@GET` アノテーションは、 `hello()` メソッドが指定された URI への HTTP GET 要求を処理することを示します。
* `@Produces` アノテーションは、メソッドが生成して返す MIME メディアタイプを指定します。
```JAVA
package com.example.restglassfishhelloworld;
import jakarta.ws.rs.GET;
import jakarta.ws.rs.Path;
import jakarta.ws.rs.Produces;
@Path("/hello-world")
public class HelloResource {
@GET
@Produces("text/plain")
public String hello() {
return "Hello, World!";
}
}
```
```JAVA
package com.example.resttomcathelloworld;
import jakarta.ws.rs.GET;
import jakarta.ws.rs.Path;
import jakarta.ws.rs.Produces;
@Path("/hello-world")
public class HelloResource {
@GET
@Produces("text/plain")
public String hello() {
return "Hello, World!";
}
}
```
* `HelloApplication.java` は `javax.ws.rs.core.Application` のサブクラスであり、アプリケーションがリソースクラスで定義された REST リソースを実行する環境を構成するために使用されます。 `@ApplicationPath` アノテーションは、アプリケーションルートの URL マッピングを識別します(デフォルトでは、 `/api` に設定されています)。
```JAVA
package com.example.restglassfishhelloworld;
import jakarta.ws.rs.ApplicationPath;
import jakarta.ws.rs.core.Application;
@ApplicationPath("/api")
public class HelloApplication extends Application {
}
```
```JAVA
package com.example.resttomcathelloworld;
import jakarta.ws.rs.ApplicationPath;
import jakarta.ws.rs.core.Application;
@ApplicationPath("/api")
public class HelloApplication extends Application {
}
```
Procedure: アプリケーションサーバーを構成する
IntelliJ IDEA に、 GlassFish Tomcat アプリケーションサーバーが配置されている場所を知らせます。
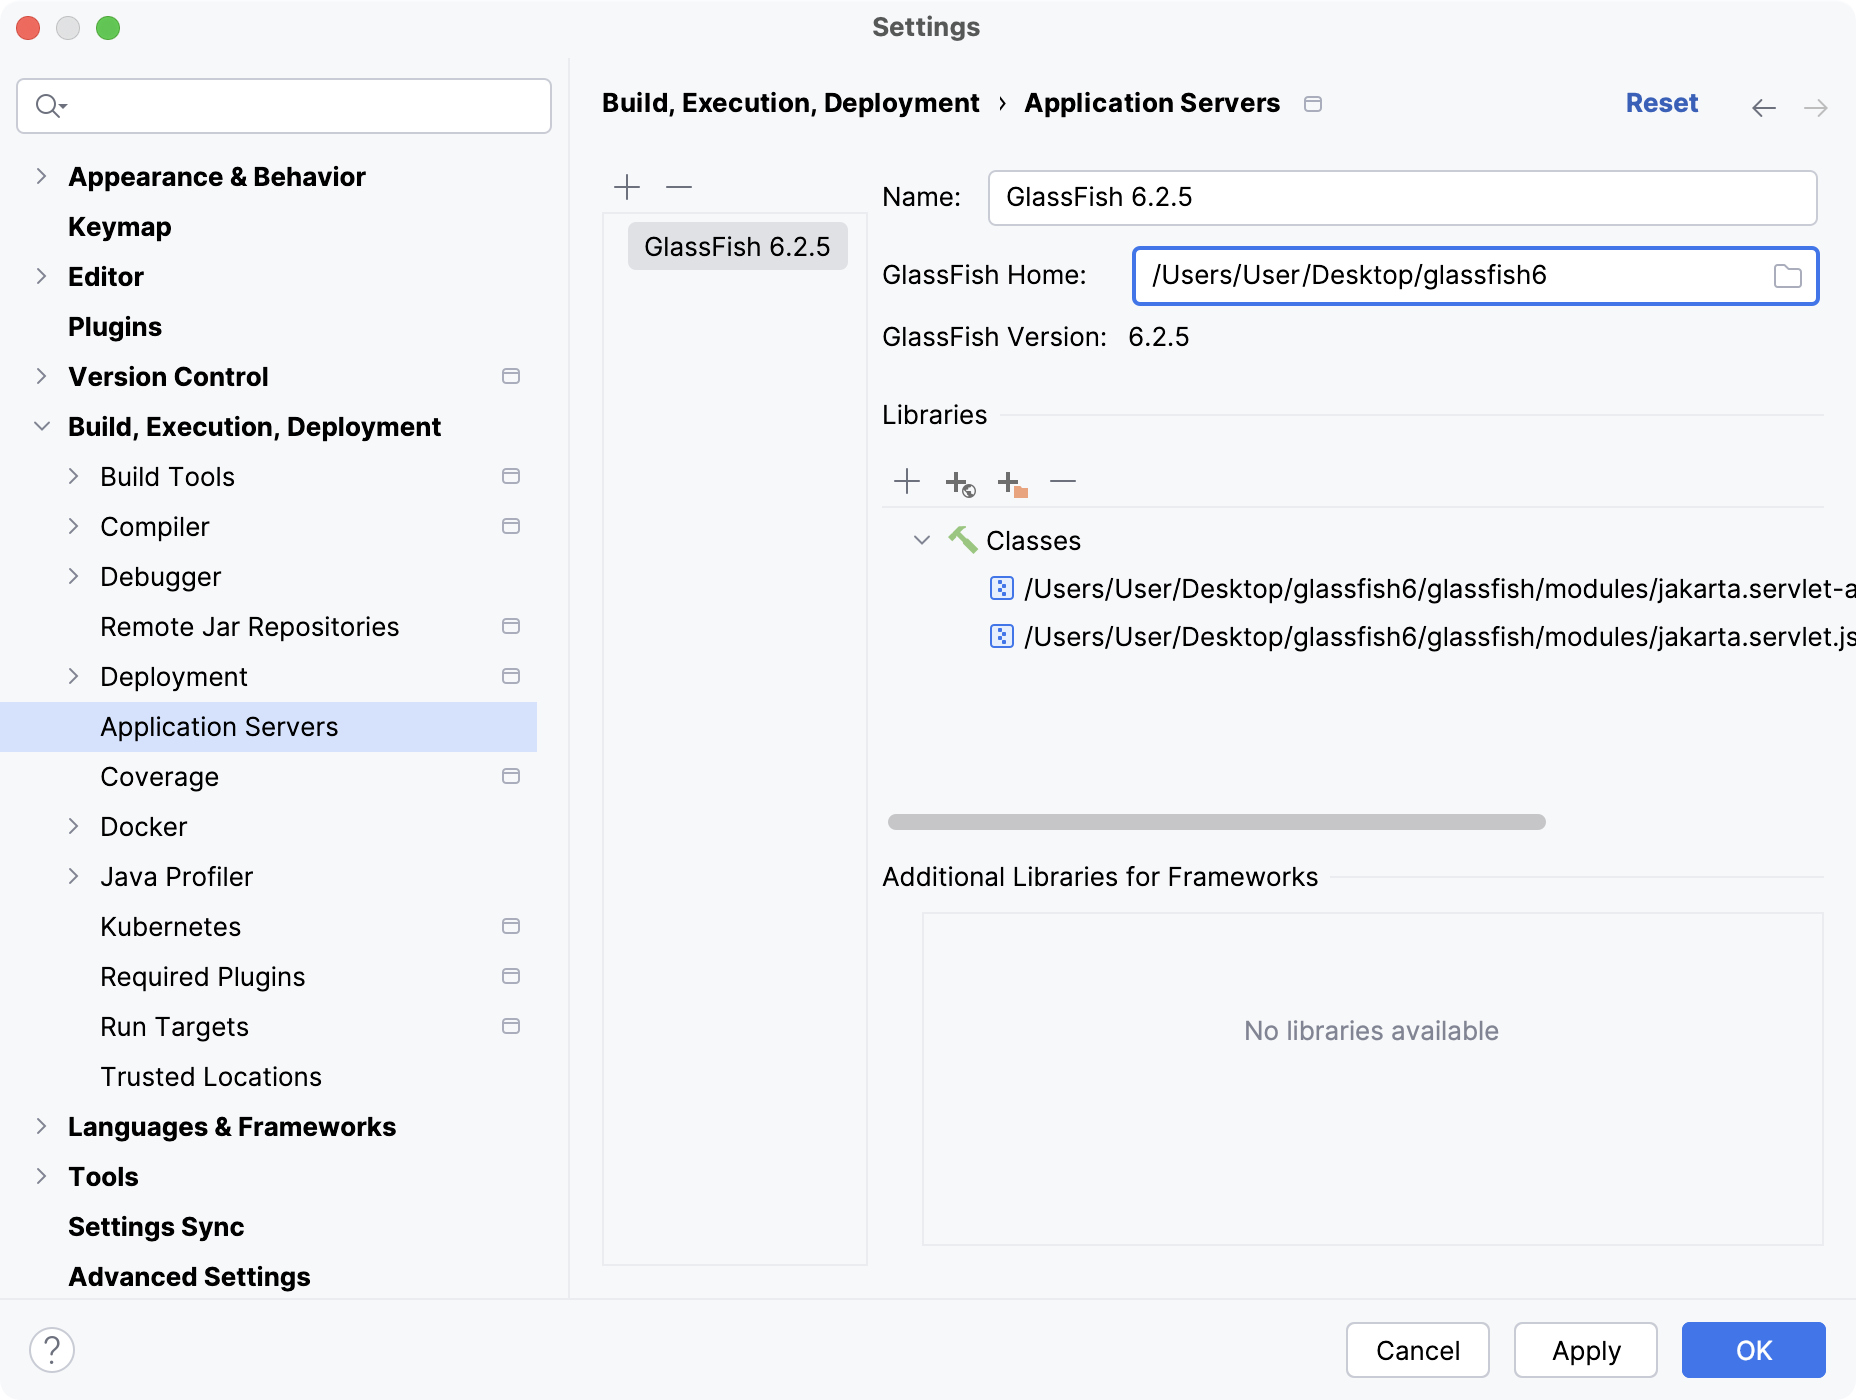
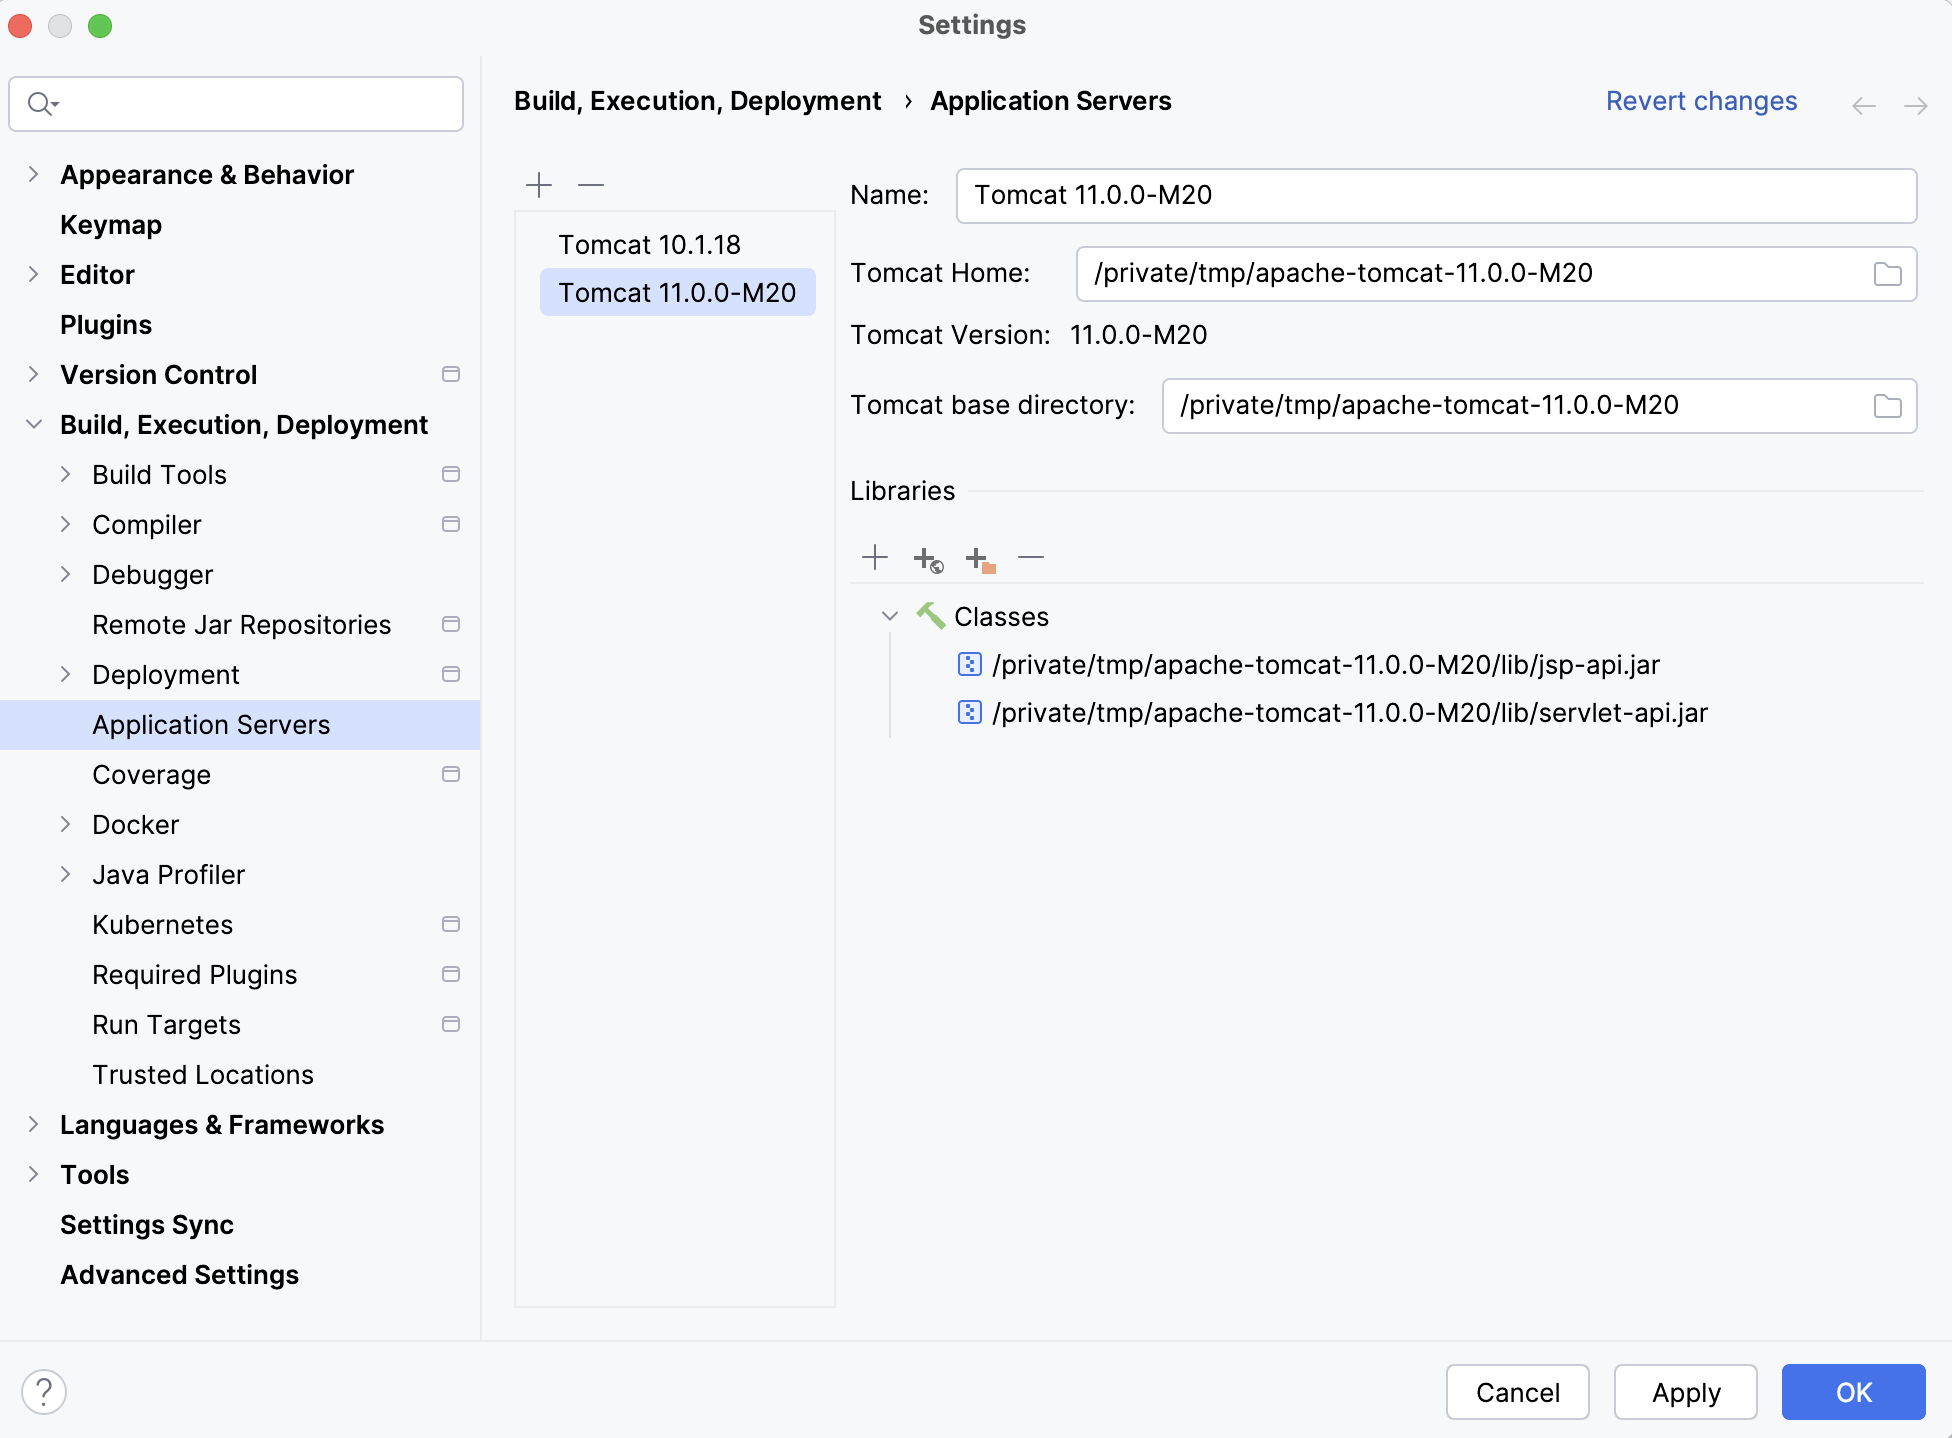
1. `Ctrl+Alt+S` (Windows), `⌘ Comma` (macOS), `⌘ Comma` (IntelliJ IDEA Classic (macOS)), `⌘ Comma` (macOS System Shortcuts), `Ctrl+Alt+S` (XWin), `Ctrl+Alt+S` (GNOME), `Ctrl+Alt+S` (KDE), `Ctrl+Alt+S` (Emacs), `Ctrl+Alt+S` (Sublime Text), `⌘ Comma` (Sublime Text (macOS)), `Ctrl+Alt+S` (Visual Studio), `⌘ Comma` (Visual Studio (macOS)), `Ctrl+Alt+S` (NetBeans), `Ctrl+Alt+S` (Eclipse), `⌘ Comma` (Eclipse (macOS)) を押して設定を開き、 `ビルド、実行、デプロイ | アプリケーションサーバー` を選択します。
2.  をクリックし、 GlassFish サーバー Tomcat を選択します。
3. GlassFish Tomcat サーバーのインストール場所へのパスを指定します。 IntelliJ IDEA は、名前とバージョンを適切に検出して設定します。
Procedure: 実行構成の作成
IntelliJ IDEA は、アーティファクトを構築してアプリケーションサーバーにデプロイするための実行構成を必要とします。
1. メインメニューで、 `実行 | 実行構成の編集` に移動します。
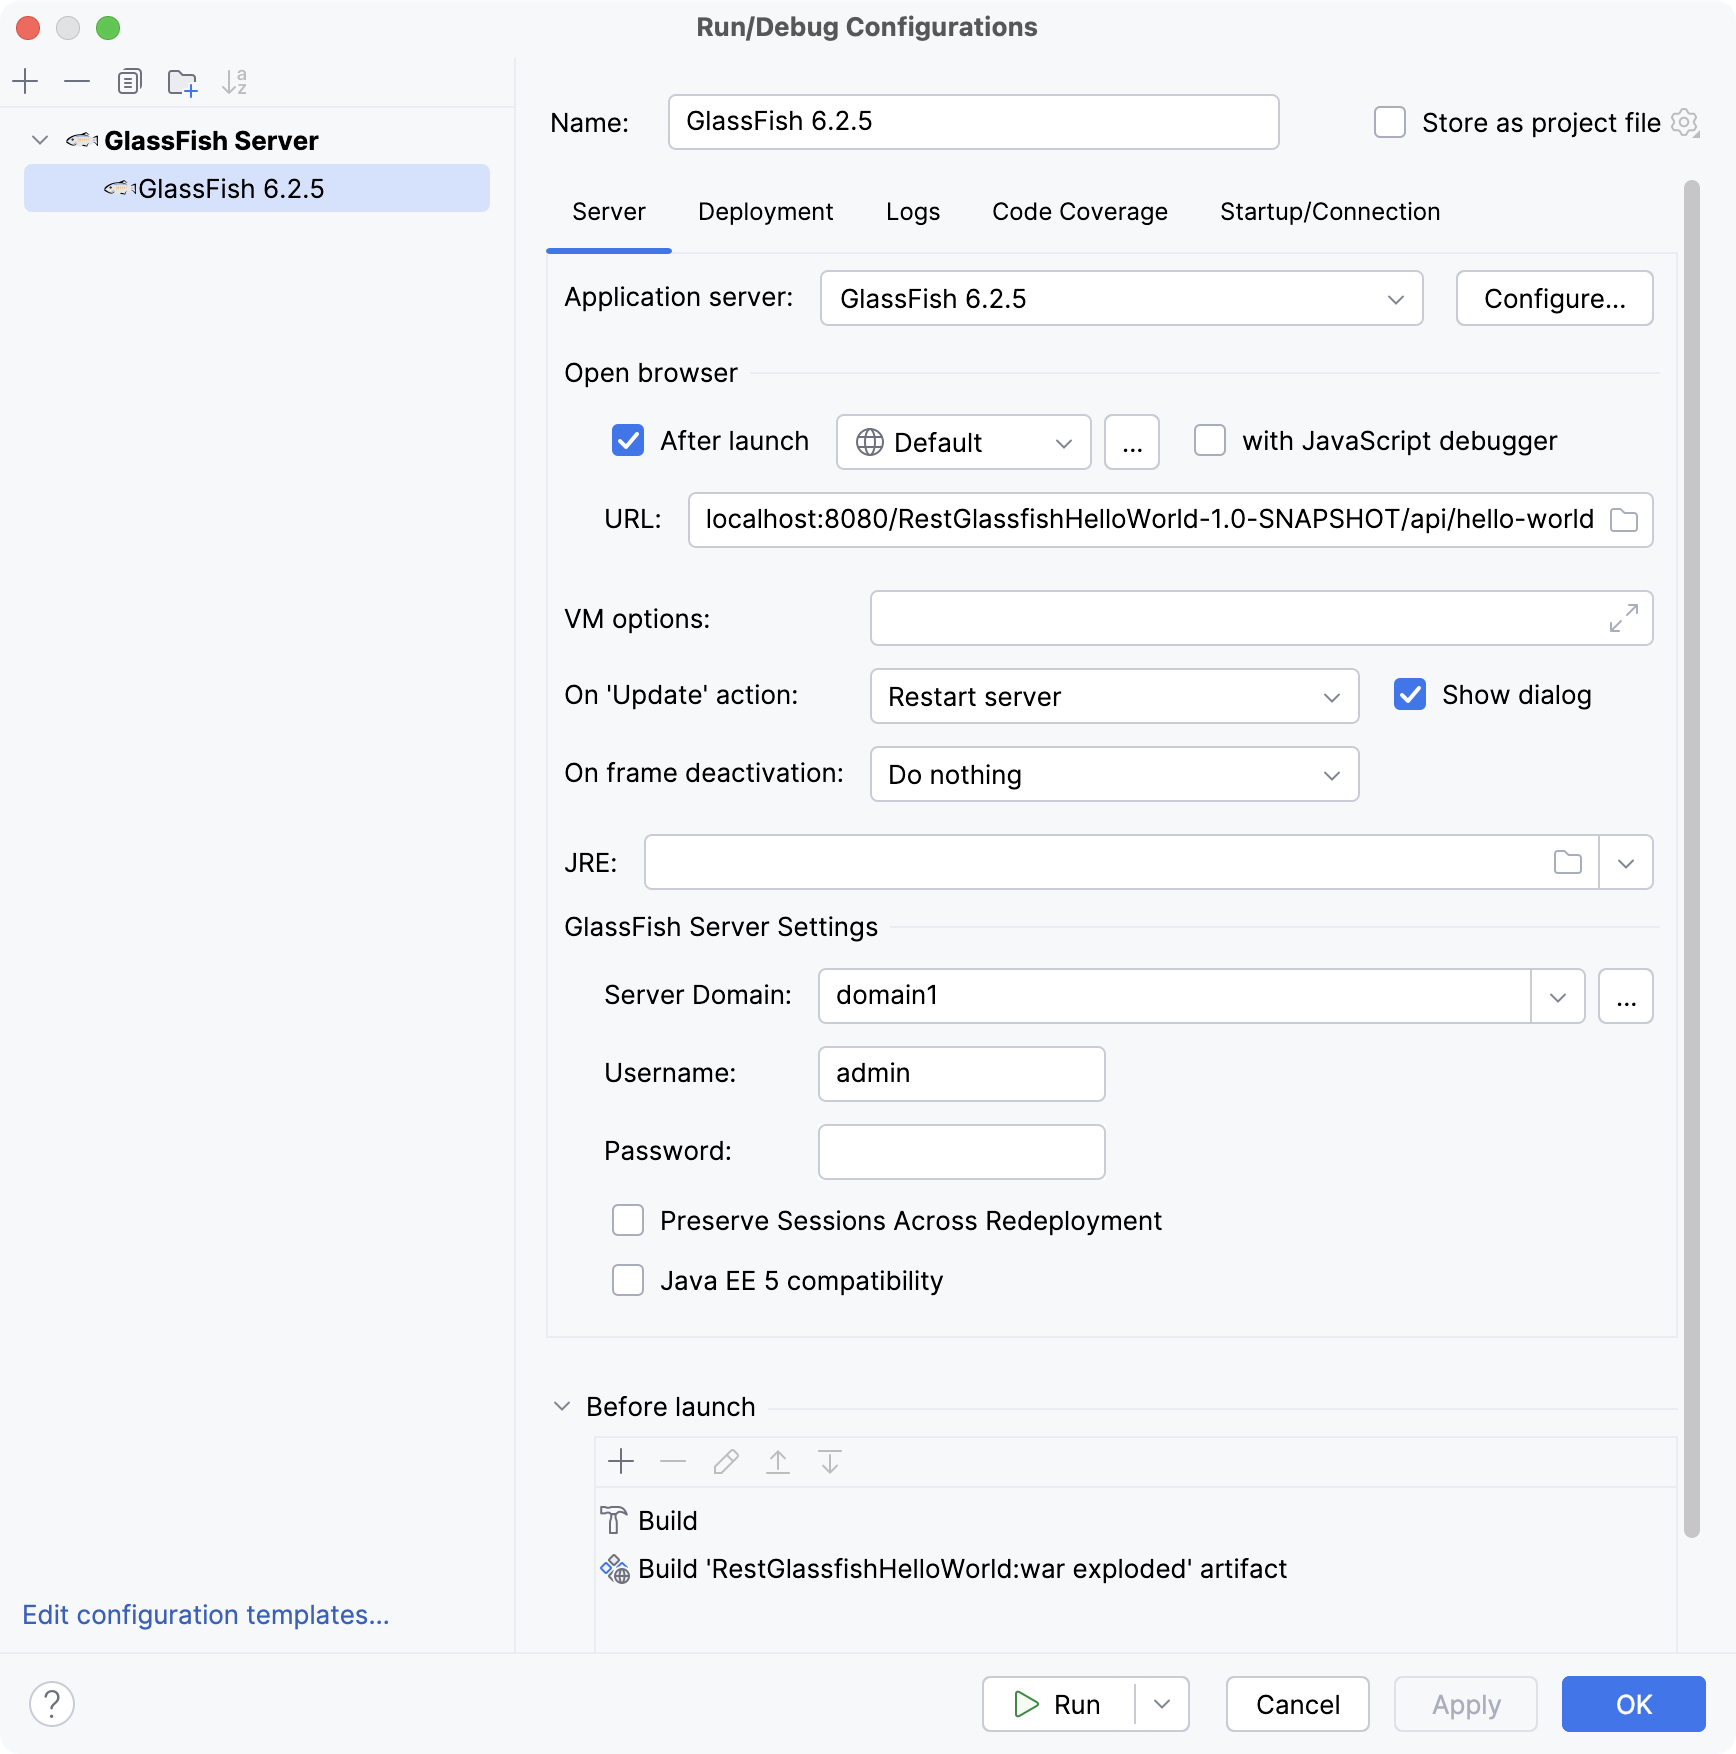
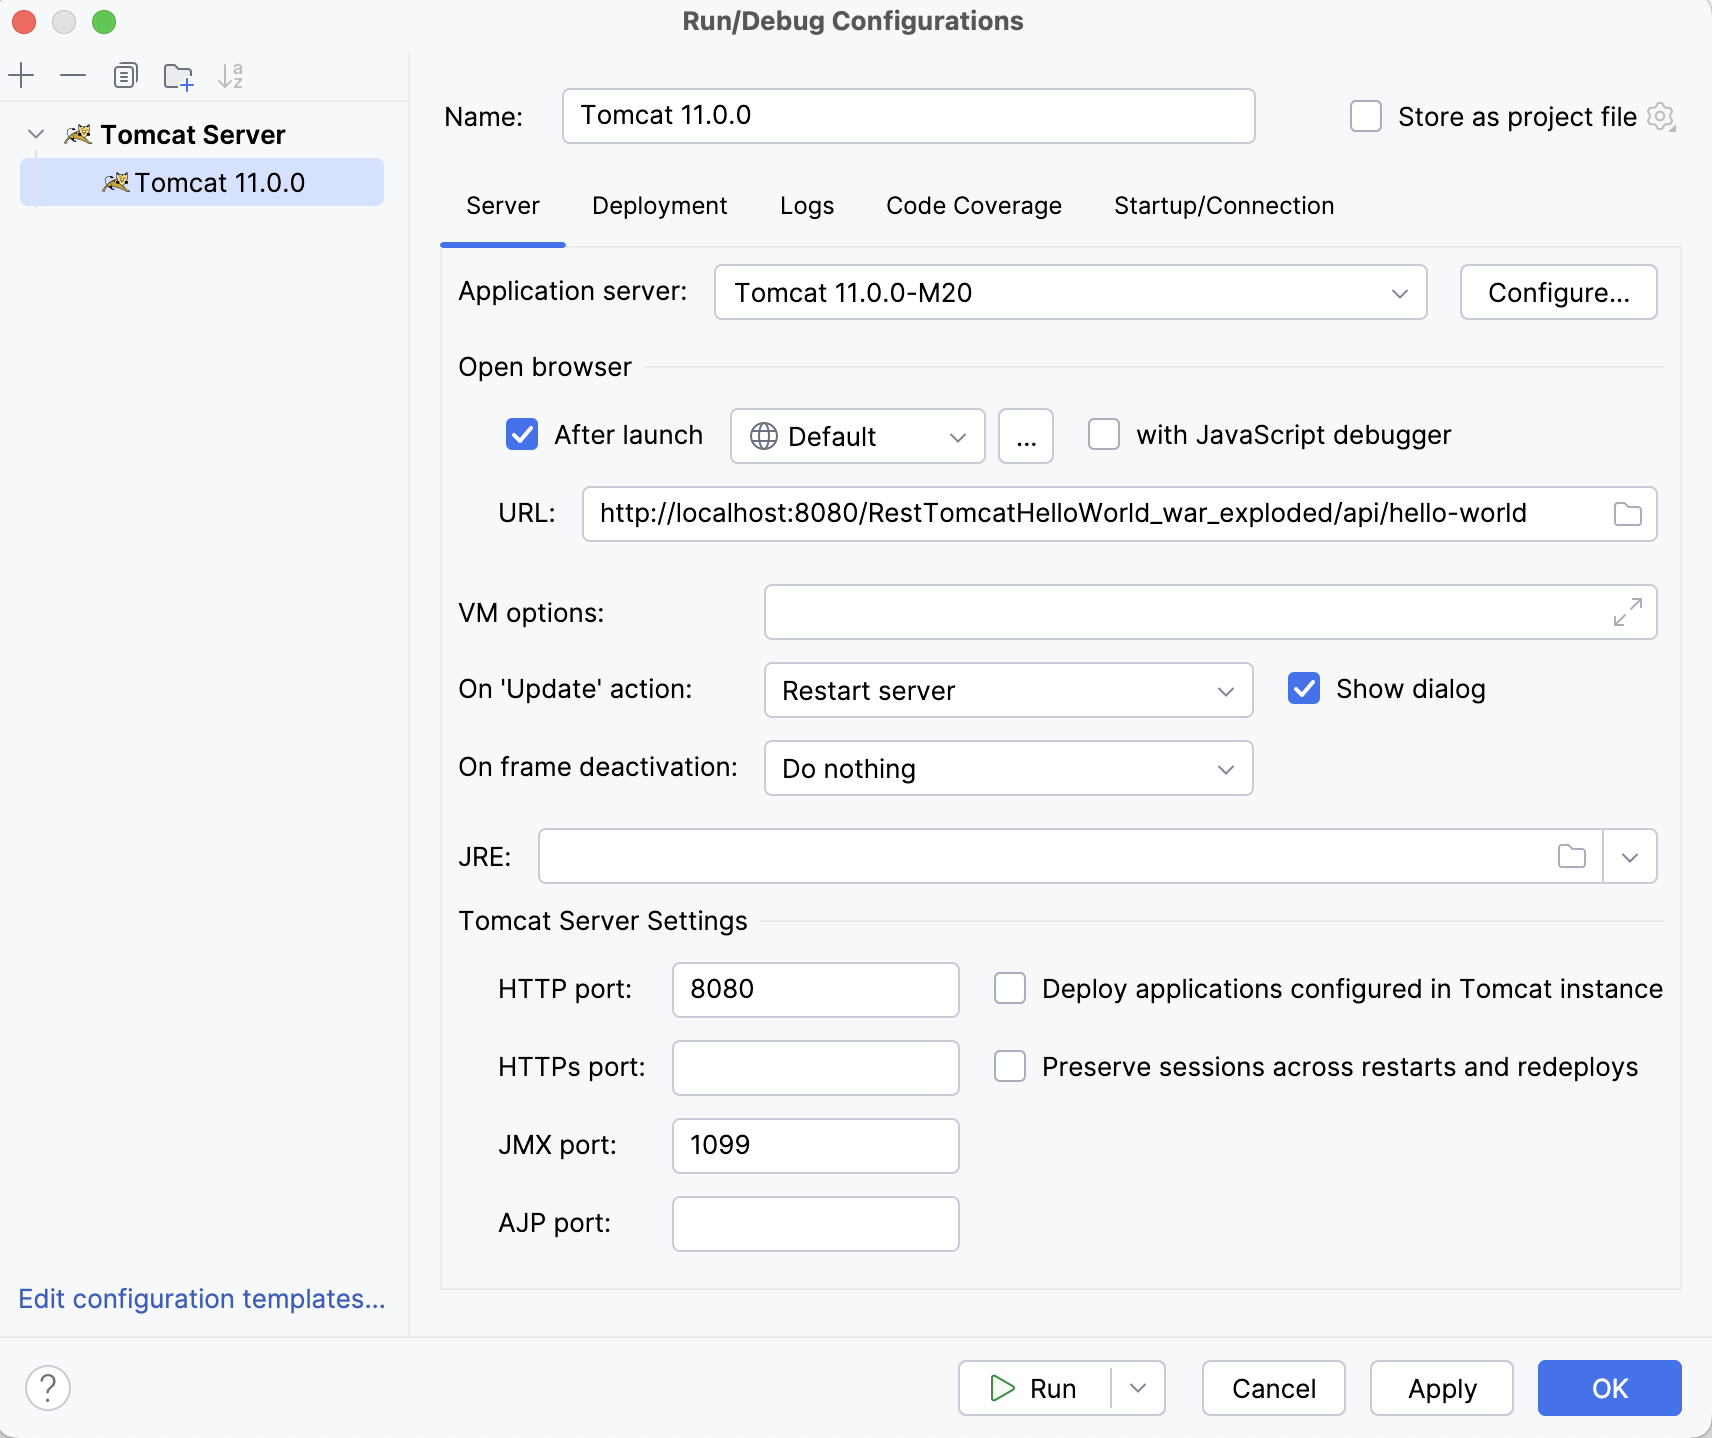
2. 実行 / デバッグ構成 ダイアログで、  をクリックし、 GlassFish サーバー Tomcat サーバー ノードを展開して、 ローカル を選択します。
3. 実行構成設定ダイアログの下部に表示される警告を修正します。

ほとんどの場合、以下を修正する必要があります。
* サーバー タブで、 サーバードメイン を `domain1` に設定します。
* デプロイ タブで、デプロイするアーティファクトを追加します: `RestGlassfishHelloWorld:war exploded` `RestTomcatHelloWorld:war exploded`
4. [サーバー
タブで、ルートリソース](#source_code)を指すように URL を設定します。
```
http://localhost:8080/RestGlassfishHelloWorld-1.0-SNAPSHOT/api/hello-world
```
```
http://localhost:8080/RestTomcatHelloWorld_war_exploded/api/hello-world
```
5. OK をクリックして、実行構成を保存します。
6. 構成を実行するには、 `Alt+Shift+F10` (Windows), `⌃ ⌥ R` (macOS), `⌥ ⇧ F10` (IntelliJ IDEA Classic (macOS)), `⌃ ⌥ R` (macOS System Shortcuts), `Alt+Shift+F10` (XWin), `Alt+Shift+F10` (GNOME), `Alt+Shift+F10` (KDE), `Alt+Shift+F10` (Emacs), `Alt+Shift+F10` (Sublime Text), `⌃ ⌥ R` (Sublime Text (macOS)), `Ctrl+Alt+Shift+R` (Visual Studio), `⌘ ⌥ ⇧ R` (Visual Studio (macOS)), `Alt+Shift+F10` (NetBeans), `Alt+Shift+F10` (Eclipse), `⌃ ⌥ R` (Eclipse (macOS)) を押して、作成したアプリケーションサーバー構成を選択します。
あるいは、上部のメインツールバーで実行構成を選択している場合は、メインツールバーの  をクリックするか、 `Shift+F10` (Windows), `⌃ R` (macOS), `⇧ F10` (IntelliJ IDEA Classic (macOS)), `⌥ ⇧ R` (macOS System Shortcuts), `Shift+F10` (XWin), `Shift+F10` (GNOME), `Shift+F10` (KDE), `Shift+F10` (Emacs), `Shift+F10` (Sublime Text), `Shift+F10` (Sublime Text (macOS)), `Ctrl+F5` (Visual Studio), `⌃ F5` (Visual Studio (macOS)), `F6` (NetBeans), `Alt+Shift+X` (Eclipse), `⌘ ⇧ F11` (Eclipse (macOS)) を押して実行できます。
この実行構成は、アーティファクトを作成してから、 GlassFish Tomcat サーバーを起動し、アーティファクトをサーバーにデプロイします。 サービス ツールウィンドウに対応する出力が表示されます。
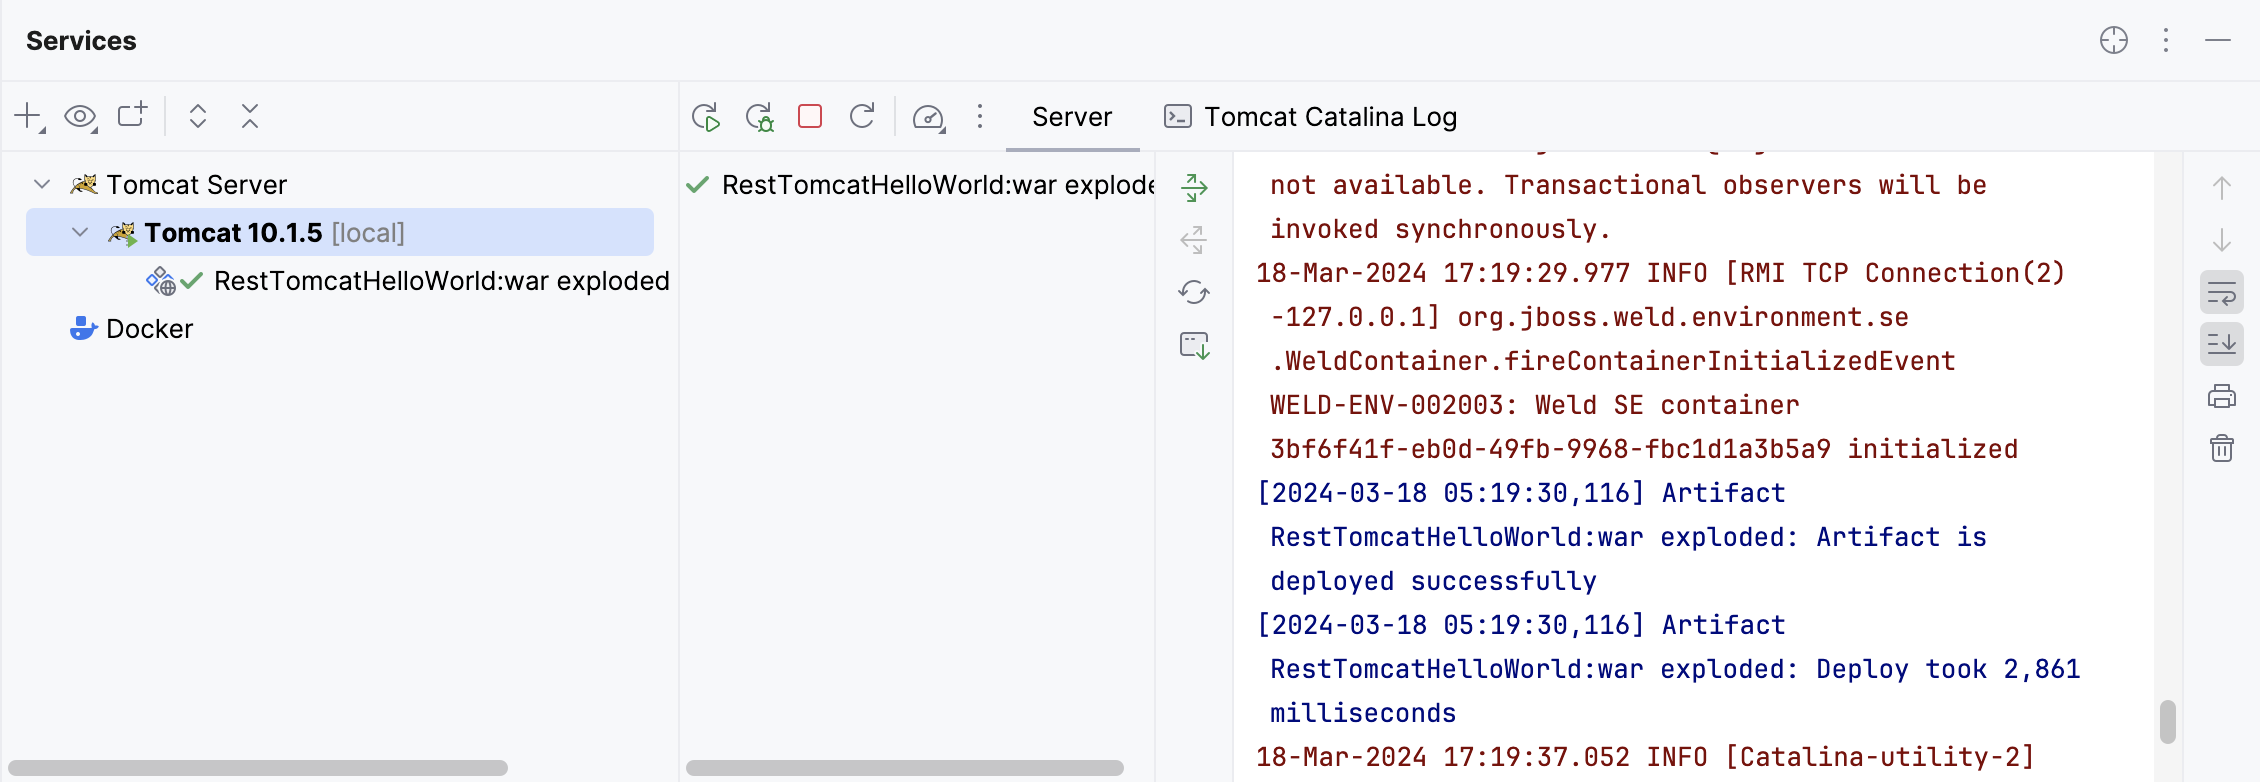
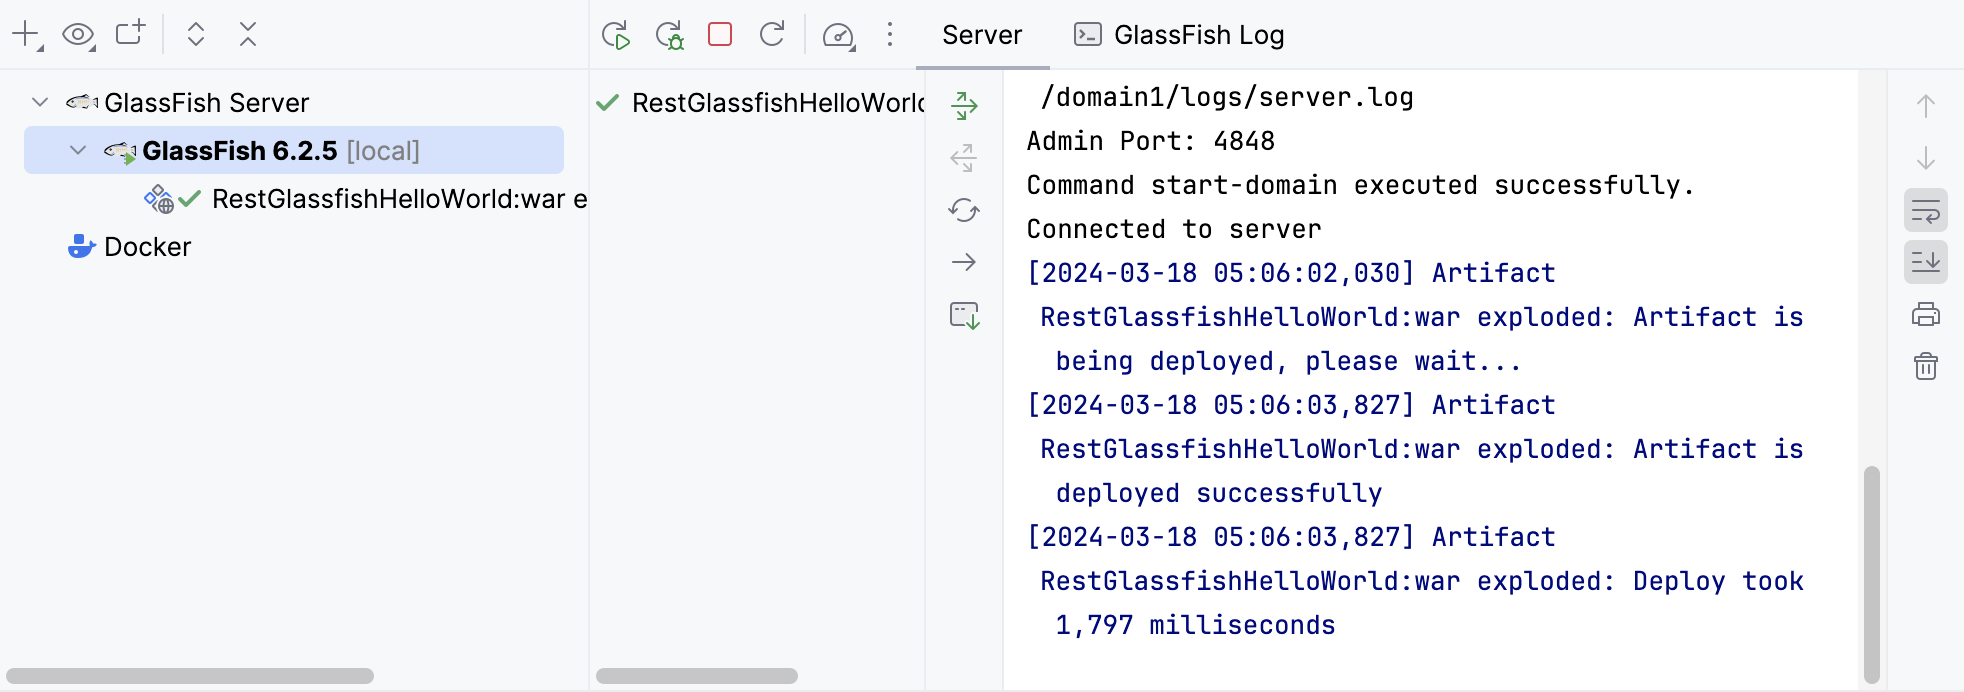
これが完了すると、IntelliJ IDEA は指定された URL を Web ブラウザーで開きます。
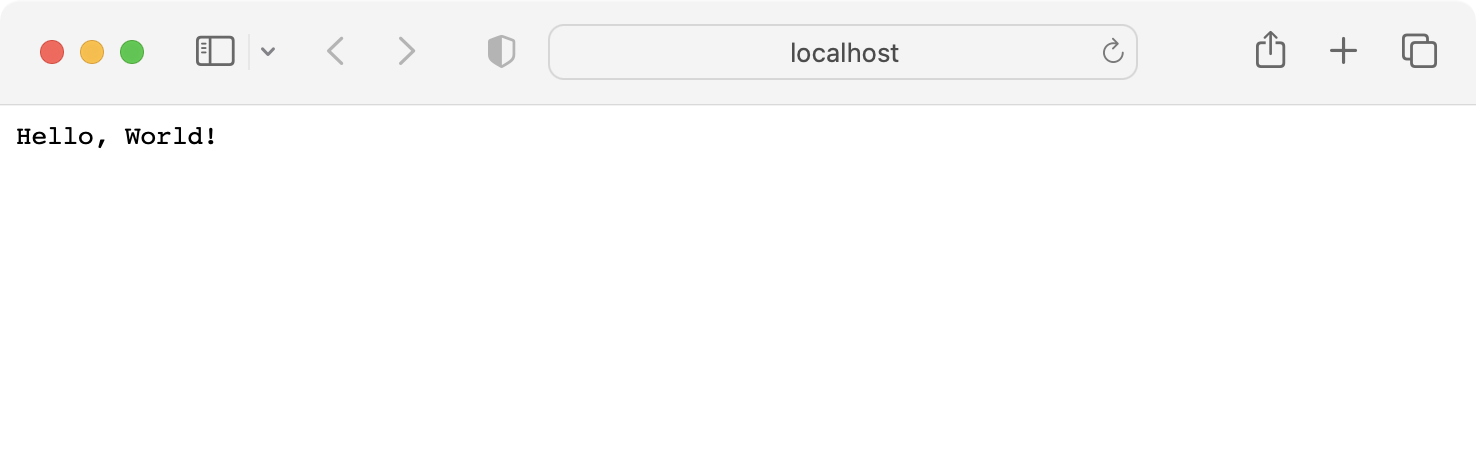
そうでない場合は、自分で URL を開いてみてください: [http://localhost:8080/RestGlassfishHelloWorld-1.0-SNAPSHOT/api/hello-world](http://localhost:8080/RestGlassfishHelloWorld-1.0-SNAPSHOT/api/hello-world) [http://localhost:8080/RestTomcatHelloWorld_war_exploded/api/hello-world](http://localhost:8080/RestTomcatHelloWorld_war_exploded/api/hello-world)
## トラブルシューティング
### Jakarta EE との互換性
`404` エラーが発生した場合は、 [プロジェクトの作成](#create-new-project)時に GlassFish のバージョンと互換性のある Jakarta EE 仕様バージョンを選択したことを確認してください。
詳細については、 [GlassFish のバージョンの互換性(英語)](https://github.com/eclipse-ee4j/glassfish#compatibility)を参照してください。
### 古い IntelliJ IDEA バージョン
IntelliJ IDEA バージョン 2020.2.2 以前を使用している場合、 新規プロジェクト ウィザードは Tomcat に必要なすべての依存関係を追加しません。 この場合、 `pom.xml` を開き、次の依存関係を追加します。
```XML
org.glassfish.jersey.media
jersey-media-json-jackson
2.31
org.glassfish.jersey.inject
jersey-hk2
2.31
```
例: バージョン 2020.2.3 では、生成された `pom.xml` は次のようになります。
```XML
4.0.0
com.example
RestTomcatHelloWorld
1.0-SNAPSHOT
RestTomcatHelloWorld
war
1.8
1.8
5.6.2
javax.ws.rs
javax.ws.rs-api
2.1.1
provided
org.glassfish.jersey.containers
jersey-container-servlet
2.31
org.glassfish.jersey.media
jersey-media-json-jackson
2.31
org.glassfish.jersey.inject
jersey-hk2
2.31
org.glassfish.jersey.core
jersey-client
2.31
org.junit.jupiter
junit-jupiter-api
${junit.version}
test
org.junit.jupiter
junit-jupiter-engine
${junit.version}
test
org.apache.maven.plugins
maven-war-plugin
3.3.0
```