Spring
Configure the Spring facet
To use Spring in you project, you need the Spring facet that comprises libraries and UI elements for configuring Spring-specific settings. IntelliJ IDEA can automatically detect Spring configuration in your code. It will inform you about missing configuration and will suggest the necessary actions.
If IntelliJ IDEA could not detect configuration files automatically, you can add the facet manually:
Press Ctrl+Shift+Alt+S to open the Project Structure dialog.
From the left-hand list, select Modules.
Select the necessary module and click
 in the middle section.
Select Spring from the list.
- You might need to set up a library when adding the facet. In this case, click Fix at the bottom of the window next to a warning message.
If you already have a Spring library, you can use it as is, or create a new library using JAR files on your computer. In this case, select the Use library option.
If you do not have a library, select Download.
If the Spring facet is configured correctly, you will see Spring gutter icons marking each component, bean, etc. To configure gutter icons, press Ctrl+Alt+S and go to .
Create an application context
Spring application context is a way of grouping configuration files in IntelliJ IDEA. When you create a context, you let IntelliJ IDEA understand relationship between configuration files included into this context.
You can create as many application contexts as you need; any configuration file may be included in more than one context.
Press Ctrl+Shift+Alt+S and select Facets.
Select the Spring facet from the list and click
 in the right-hand section.
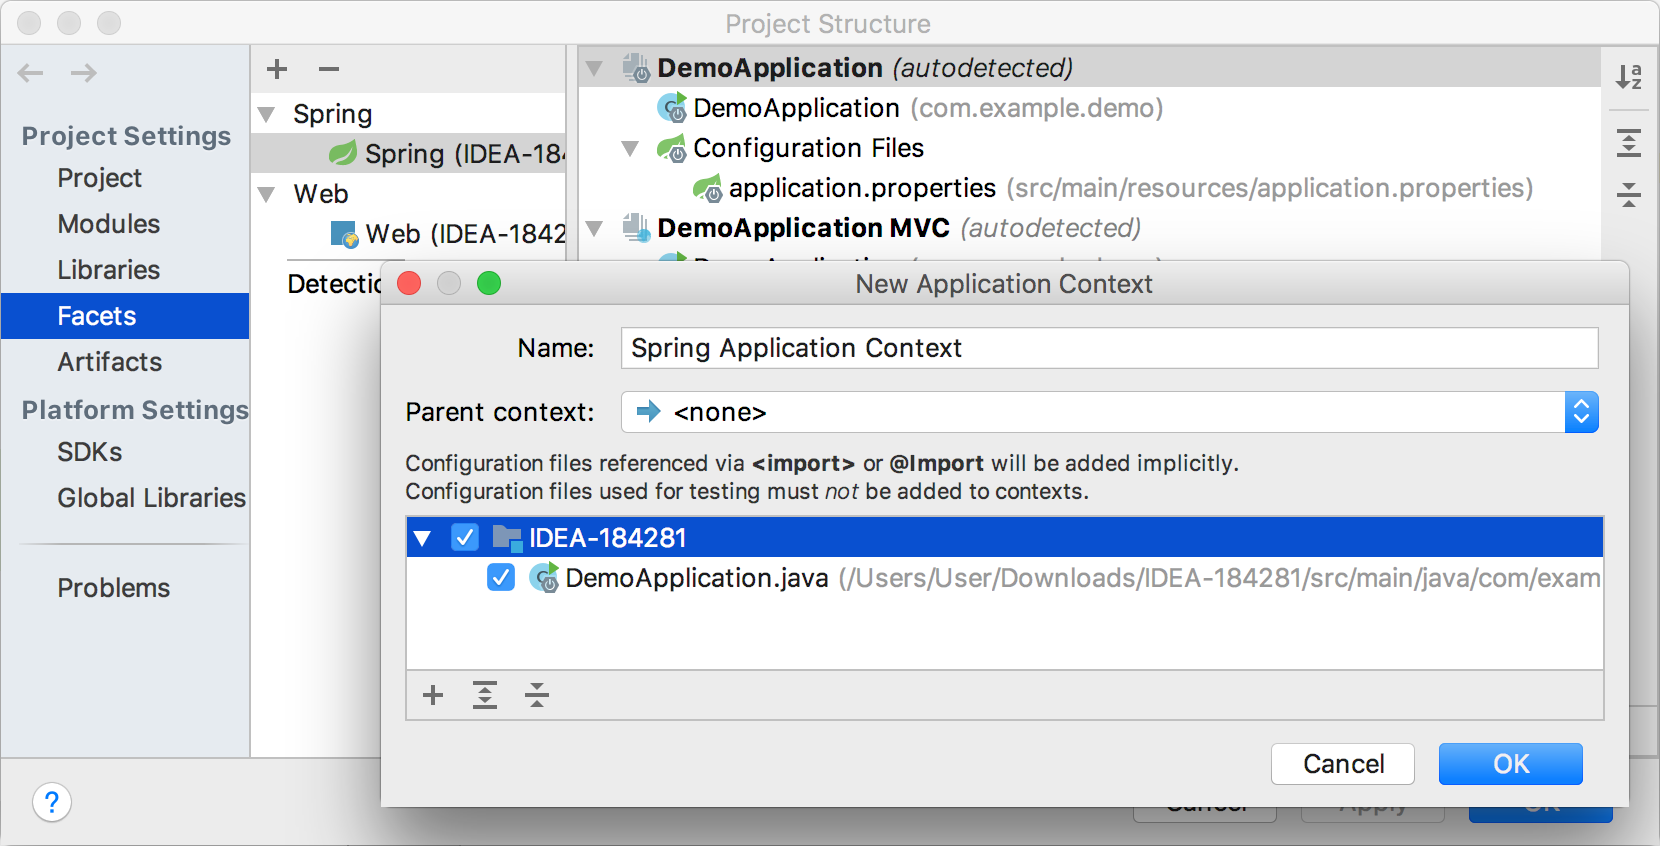
In the New Application Context dialog, enter a name, and select files you want to include in the context.
Use the ![]() and
and ![]() options to remove and edit contexts.
options to remove and edit contexts.

Configure a parent context
IntelliJ IDEA allows you to configure a parent-child relationship between contexts. Beans from a parent context are visible to beans in child contexts, but not vice versa. Therefore, beans from child contexts can use configuration from the parent context.
For example, Spring MVC applications usually have two contexts. One context belongs to web layer beans, another context is used for services and repositories. The web layer context will be a child context in this case, as you need to inject services into controllers, not other way around.
To configure a parent context, use the New Application Context dialog.
The Multiple Context panel shows up on top of the editor for files included into two or more application contexts. You can use this panel to select another active context, for example, if you want to run your application with different configuration, and change highlighting.
To disable the panel, click ![]() , and clear the Show Multiple Context panel checkbox.
, and clear the Show Multiple Context panel checkbox.
Navigate Spring dependencies
Spring diagrams help you analyze dependencies in your application. You can double-click a bean or a file on a diagram to open it in a dedicated tab in the editor.
Spring Beans Dependencies
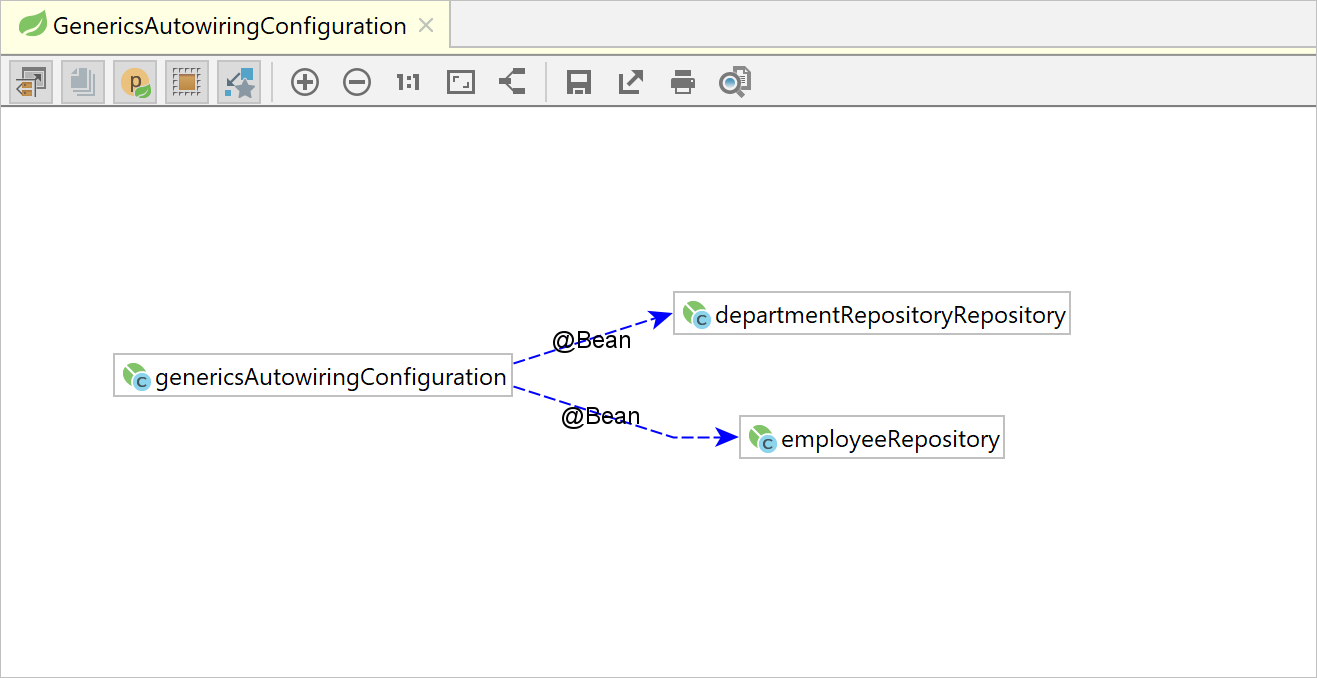
The Spring Beans Dependencies diagram lets you view and analyze dependencies between beans in your project.
To open the diagram:
Right-click the bean for which you want to build a diagram. You can also build a diagram for a class to see beans and their dependencies inside this class.
Select Diagrams from the menu.
Select Show Diagram Popup (Ctrl+Alt+U) to open the diagram in a local popup window, or Show Diagram (Ctrl+Shift+Alt+U) to open the diagram in the editor.
- Click
 Spring Beans Dependencies.
If you want to view only direct dependencies between beans on the diagram, select the Neighborhood mode
 .
.
Spring Application Context Dependencies
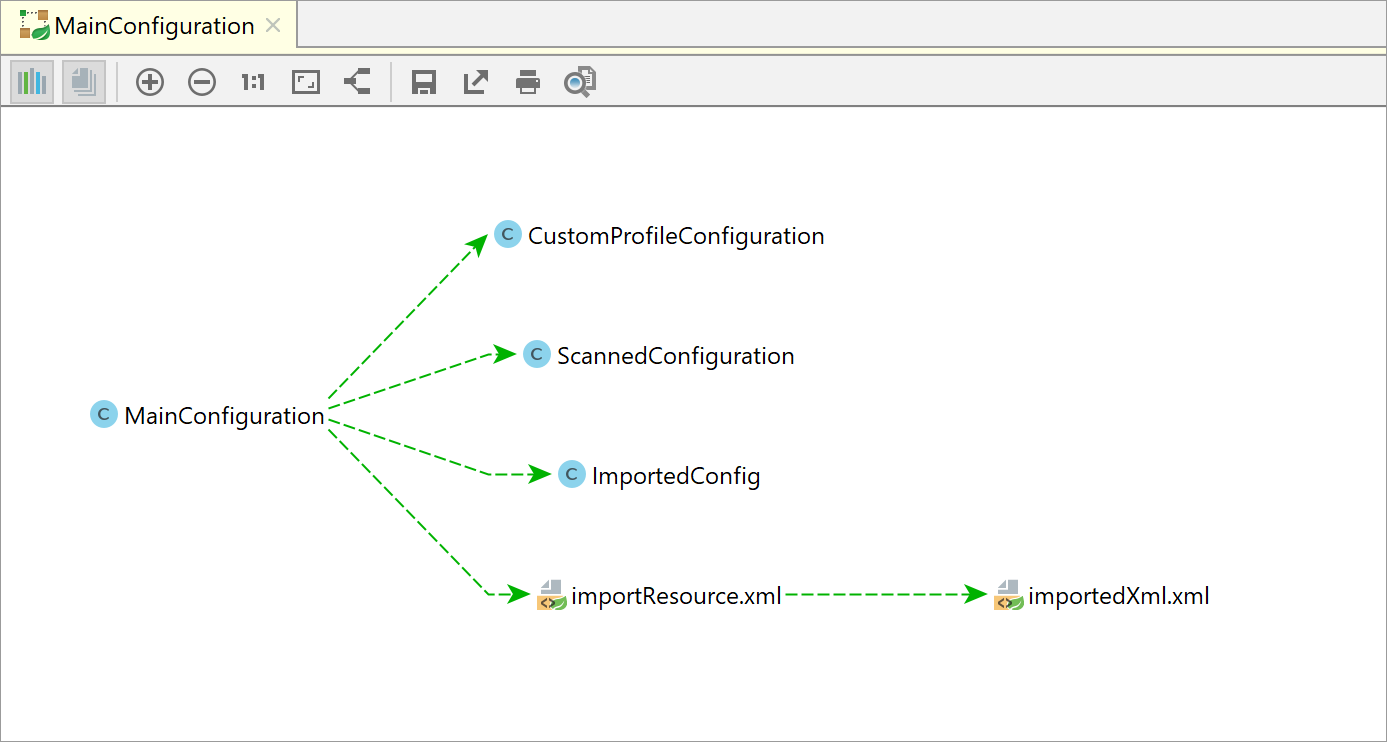
The Spring Application Context Dependencies diagram lets you view dependencies between multiple configuration files and analyze how they include and reference each other.
Red arrows on the diagram mark errors (such as circular dependencies) and allow you to easily spot and remove them from your Spring configuration.
To open the diagram:
Right-click the configuration file for which you want to build a diagram.
Select Diagrams from the menu.
Select Show Diagram Popup (Ctrl+Alt+U) to open the diagram in a local popup window, or Show Diagram (Ctrl+Shift+Alt+U) to open the diagram in the editor.
Click
 Spring Application Context Dependencies.
| A solid blue line stands for |
| A solid yellow line stands for |
| A dashed green line stands for |
| | Red lines stand for errors. |
| Dotted grey lines stand for other dependencies. |
Browse dependencies in the Spring tool window
The Spring tool window helps you navigate between Spring components and dependencies. You can view definitions for Spring beans used in your project, and see how they are related to other beans.
To access the Spring tool window, go to .

The Beans tab shows definitions for Spring beans used in your project, their documentation, and how they are related to other beans. Each bean is marked with an icon — ![]() (beans defined in XML files);
(beans defined in XML files); ![]() (auto-discoverable beans declared through
(auto-discoverable beans declared through @Component annotations); ![]() (service beans added by Spring that not defined explicitly).
(service beans added by Spring that not defined explicitly).
Use icons on the left frame to change the way beans are displayed, view documentation, or build a graph.
The MVC tab allows you to view controller mappings for the Spring MVC framework. You can also use the ![]() Request Method option to filter mappings by HTTP method.
Request Method option to filter mappings by HTTP method.
If your configuration comprises Spring Data, the Data tab will show you the list of repositories, their queries and their projection.
Change active profiles
Spring allows you to map specific contexts or beans to different profiles — for example, test or production. This way, you can activate different profiles in different environments.
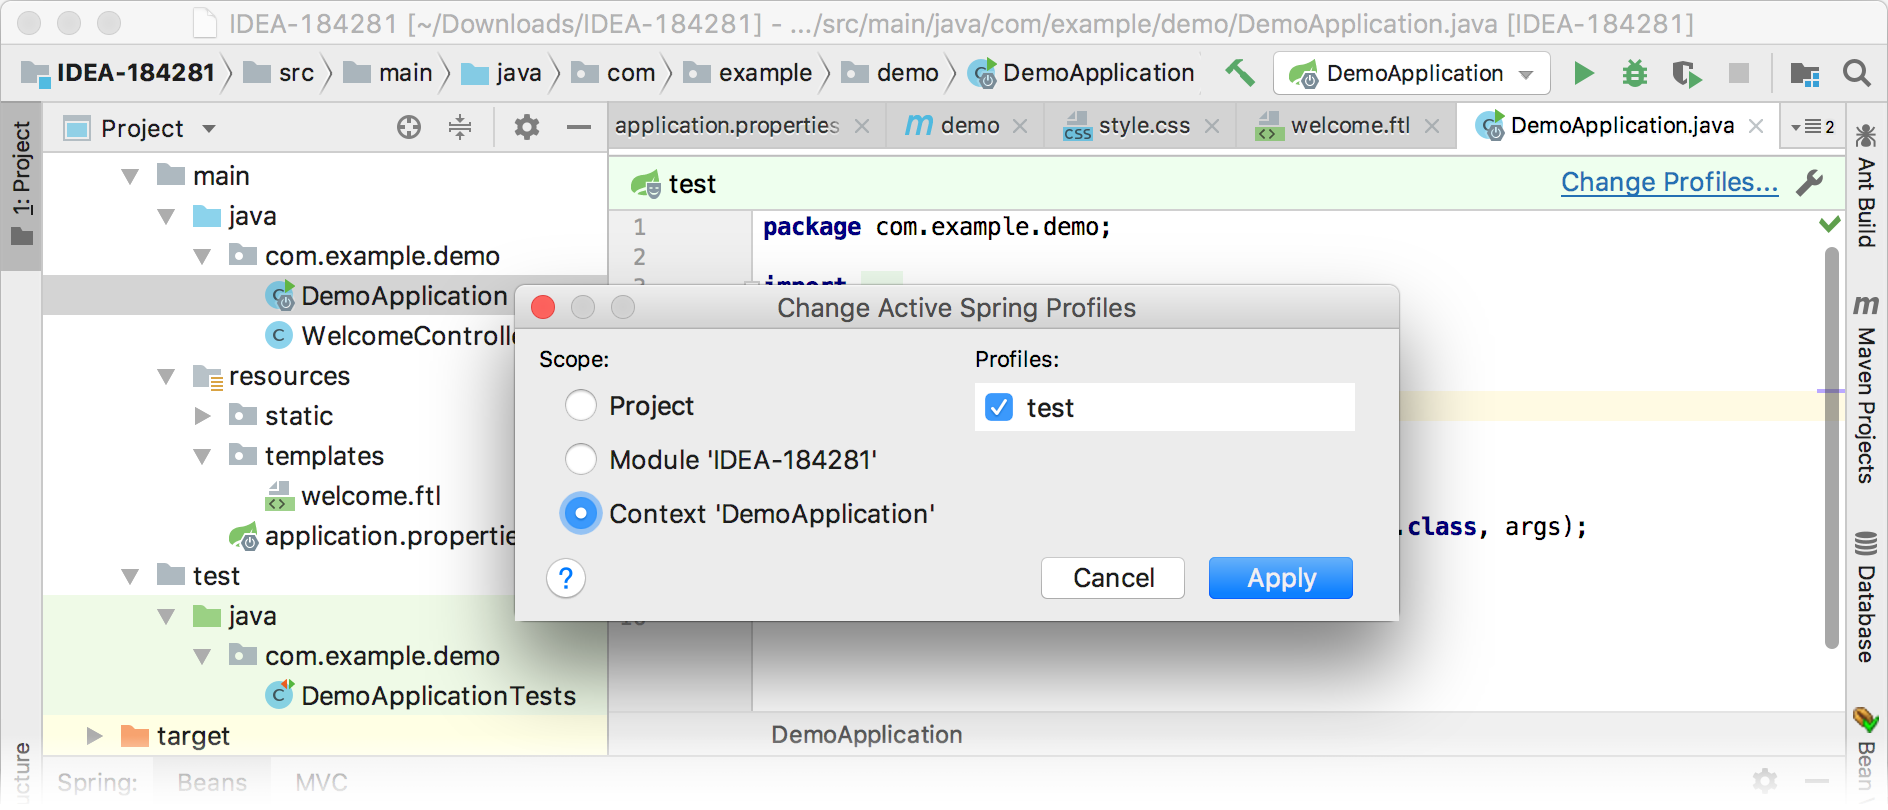
If you have defined at least one profile in your project, IntelliJ IDEA will show a special panel on top of the editor. You can use this panel to view the current profile name and to change active profiles:
Click Change Profiles on the panel.
Select the component to which you want to map the profile. This can be either an entire project, the current module, or context.
Select the profile to which you want to map this component.

If you want to hide the panel, click ![]() on it. In the next dialog, clear the Show Profiles Panel checkbox.
on it. In the next dialog, clear the Show Profiles Panel checkbox.