Sass, SCSS, Less, and PostCSS
IntelliJ IDEA integrates with compilers that translate Sass, Less, and SCSS code into CSS. To use a compiler in IntelliJ IDEA, you need to configure it as a File Watcher based on the relevant predefined template.
Before you start
Make sure you have Node.js on your computer.
Install and enable the File Watchers plugin on the Settings | Plugins page, tab Marketplace, as described in Installing plugins from JetBrains Marketplace.
Make sure the File Watchers and Less or Sass required plugins are enabled on the Settings | Plugins page, tab Installed. For more information, refer to Managing plugins.
Installing Sass/SCSS
In the embedded Terminal (Alt+F12) , type:
npm install -g sassLearn more from the Sass official website.
Installing Less
In the embedded Terminal (Alt+F12) , type:
npm install --global lessLearn more from the Less official website.
Compiling your code into CSS
To compile your code automatically, you need to install a compiler and configure a Sass, Less, or SCSS File Watcher which will track changes to your files and run the compiler.
When you open a file, IntelliJ IDEA checks whether an applicable File Watcher is available in the current project. If such File Watcher is configured but disabled, IntelliJ IDEA displays a popup that informs you about the configured File Watcher and suggests to enable it.
If an applicable File Watcher is configured and enabled in the current project, IntelliJ IDEA starts the compiler automatically upon the event specified in the New Watcher dialog.
If the Auto-save edited files to trigger the watcher checkbox is selected, the File Watcher is invoked as soon as any changes are made to the source code.
If the Auto-save edited files to trigger the watcher checkbox is cleared, the File Watcher is started upon save (, Ctrl+S) or when you move focus from IntelliJ IDEA (upon frame deactivation).
Learn more from File Watchers.
IntelliJ IDEA creates a separate file with the generated output. The file has the name of the source Sass, Less, or SCSS file and the extension .css. The location of the generated files is defined in the Output paths to refresh field of the New Watcher dialog. However, in the Project Tree, they are shown under the source file which is now displayed as a node.
Create a File Watcher
In the Settings dialog (Ctrl+Alt+S) , click File Watchers under Tools. The File Watchers page that opens shows the list of already configured File Watchers.
Click
 or press Alt+Insert. Depending on the tool you are going to use, choose the Less, Sass, or SCSS predefined template from the list.
In the Program field, specify the path to the compiler archive depending on the chosen predefined template.
lessc for Less.
sass for Sass/SCSS.
If you followed the standard installation procedure with npm, IntelliJ IDEA locates the required files itself and fills in the field automatically. Otherwise, type the path manually or click
 and choose the file location in the dialog that opens.
Proceed as described in File Watchers.
Example: compiling SCSS into CSS
Suppose your project is structured as follows:

As you can see, _grid.scss is imported in Page.scss. The example below shows how Page.scss is compiled into CSS when you save your project manually or automatically and how the changes to _grid.scss are reflected in the generated CSS file.
Create a File Watcher of the type SCSS: open the Settings dialog (Ctrl+Alt+S) , go to , click
on the toolbar, and select SCSS from the list.
In the New File Watcher dialog that opens, all the mandatory fields are already filled in.

Actually, these settings are sufficient to run the compiler successfully.
Let's change grid.scss, for example, replace
margin-left: 0;at line 31 withmargin-left: 12px;. This triggers our File Watcher and the compiler processes Page.scss. As a result, two files are generated and shown nested under Page.scss:Page.css with compiled CSS code
Page.css.map with source maps that let you step through your app during a debugging session.

Although the default settings are sufficient to run the compiler successfully, let's still take a closer look at them to see how the File Watcher's behavior can be customized.
Change the action that triggers the File Watcher
The File Watcher wakes up and launches the transpiler as soon as your project is saved manually ( or Ctrl+S) or automatically.
In general, your code is saved automatically when you move the focus from IntelliJ IDEA (on frame deactivation). With File Watchers, auto-save is also performed when you edit a file from the File Watcher's scope. As a result, the transpiler may be running all the time you type, which may cause performance issues. To solve the problem, suppress saving edited files automatically.
Press Ctrl+Alt+S to open settings and then select . Select the required File Watcher (SCSS in our example) and click ![]() on the toolbar. In the Edit File Watcher dialog, expand the Advanced Options area and clear the Auto-save edited files to trigger the watcher checkbox.
on the toolbar. In the Edit File Watcher dialog, expand the Advanced Options area and clear the Auto-save edited files to trigger the watcher checkbox.

By default, the File Watcher wakes up even when a file from its scope is edited from outside IntelliJ IDEA. To override this behavior and transpile files only on editing internally, clear the Trigger the watcher on external changes checkbox.

Change the scope
By default, IntelliJ IDEA monitors changes in all files with the .scss extension in the entire project. This works for our example. However, you can change the scope to process, for example, only uncommitted changes. In a large project, this will save time.
Press Ctrl+Alt+S to open settings and then select . Select the required File Watcher (SCSS in our example) and click ![]() on the toolbar. In the Edit File Watcher dialog, select the applicable scope from the list. Learn more from Scopes and file colors.
on the toolbar. In the Edit File Watcher dialog, select the applicable scope from the list. Learn more from Scopes and file colors.

Custom output location
By default, the generated .css and .css.map files are stored in the folder where the original file is and are shown as its children in the Project tool window (Alt+1) . You can change this default behavior to store all generated .css and .css.map files in a separate folder.
Let's start with a simple case. Suppose you have a custom_output.scss file in the project root.

Let's edit custom_output.scss, for example, replace fill-opacity: abs(50); at line 6 with fill-opacity: abs(60);. With the default File Watcher configuration, the generated files custom_output.css and custom_output.css.map will be stored in the project root and shown as children of custom_output.scss.

It would be convenient to store all the output in a separate folder, for example, css. Let's create a custom SCSS_custom_output File Watcher with the css folder as the output location.
Press Ctrl+Alt+S to open settings and then select . Then create a SCSS File Watcher as described above.
Update the default settings as follows:
In the Arguments field, type:
$FileName$:$ProjectFileDir$/css/$FileNameWithoutExtension$.cssIn the Output paths to refresh field, type:
$ProjectFileDir$/css/$FileNameWithoutExtension$.css:$ProjectFileDir$/css/$FileNameWithoutExtension$.css.map

Save the new File Watcher and make sure it is enabled.

Now, if you edit custom_output.scss, for example, replace fill-opacity: abs(50); at line 6 with fill-opacity: abs(60);, IntelliJ IDEA creates a css folder and stores the generated custom_output.css and custom_output.css.map files in it.

Custom output location: preserve the original folder structure
Let's now consider an example where .scss files are stored in a folder structure, for example:

With the default File Watcher, the generated files will be stored next to the original .scss files.

If we use the custom File Watcher as described above, all the generated files will be stored in one same css folder:

To have IntelliJ IDEA preserve the folder structure, let's create another custom File Watcher.
Press Ctrl+Alt+S to open settings and then select . Then create a SCSS File Watcher as described above.
Update the default settings as follows:
In the Arguments field, type:
$FileName$:$ProjectFileDir$/css/$FileDirRelativeToProjectRoot$/$FileNameWithoutExtension$.cssIn the Output paths to refresh field, type:
$ProjectFileDir$/css/$FileDirRelativeToProjectRoot$/$FileNameWithoutExtension$.css:$ProjectFileDir$/css/$FileDirRelativeToProjectRoot$/$FileNameWithoutExtension$.css.map

Save the new File Watcher and make sure it is enabled.

Now, if you edit custom_output_body.scss, custom_output_header.scss, or custom_output_footer.scss, IntelliJ IDEA creates a css folder with the subfolders' structure that preserves the structure of styles_structured.

Example: compiling Less into CSS
Suppose, your project is structured as follows:

The example below shows how my-styles.less is compiled into CSS when you save your project manually or automatically and how the changes to my-styles.less are reflected in the generated CSS file.
Create a File Watcher of the type Less: open the Settings dialog (Ctrl+Alt+S) , go to , click
on the toolbar, and select Less from the list.
Alternatively, click Yes in the Enable File Watcher to compile LESS to CSS? pane at the top of the editor tab with a .less file.

In the New File Watcher dialog that opens, all the mandatory fields are already filled in.

Actually, these settings are sufficient to run the compiler successfully.
Let's change my-styles.less, for example, change the value of
@colorat line 1. This triggers our File Watcher. As a result, two files are generated and shown nested under my-styles.less:my-styles.css with compiled CSS code
my-styles.css.map with source maps that let you step through your app during a debugging session.


Although the default settings are sufficient to run the compiler successfully, let's still take a closer look at them to see how the File Watcher's behavior can be customized.
Change the action that triggers the File Watcher
The File Watcher wakes up and launches the transpiler as soon as your project is saved manually ( or Ctrl+S) or automatically.
In general, your code is saved automatically when you move the focus from IntelliJ IDEA (on frame deactivation). With File Watchers, auto-save is also performed when you edit a file from the File Watcher's scope. As a result, the transpiler may be running all the time you type, which may cause performance issues. To solve the problem, suppress saving edited files automatically.
Press Ctrl+Alt+S to open settings and then select . Select the required File Watcher (Less in our example) and click ![]() on the toolbar. In the Edit File Watcher dialog, expand the Advanced Options area and clear the Auto-save edited files to trigger the watcher checkbox.
on the toolbar. In the Edit File Watcher dialog, expand the Advanced Options area and clear the Auto-save edited files to trigger the watcher checkbox.

Change the scope
By default, IntelliJ IDEA monitors changes in all files with the .scss extension in the entire project. This works for our example. However, you can change the scope to process, for example, only uncommitted changes. In a large project, this will save time.
Press Ctrl+Alt+S to open settings and then select . Select the required File Watcher (Less in our example) and click ![]() on the toolbar. In the Edit File Watcher dialog, select the applicable scope from the list. Learn more from Scopes and file colors.
on the toolbar. In the Edit File Watcher dialog, select the applicable scope from the list. Learn more from Scopes and file colors.

Custom output location
By default, the generated .css and .css.map files are stored in the folder where the original file is and are shown as its children in the Project tool window (Alt+1) . You can change this default behavior to store all generated .css and .css.map files in a separate folder.
Let's start with a simple case. Suppose you have a custom_output.less file in the project root.

Let's edit custom_output.less, for example, change the value of @color at line 1. With the default File Watcher configuration, the generated files custom_output.css and custom_output.css.map will be stored in the project root and shown as children of custom_output.less.

It would be convenient to store all the output in a separate folder, for example, css. Let's create a custom Less_custom_output File Watcher with the css folder as the output location.
Press Ctrl+Alt+S to open settings and then select . Then create a Less File Watcher as described above.
Update the default settings as follows:
In the Arguments field, type:
$FileName$ $ProjectFileDir$/css/$FileNameWithoutExtension$.css --source-mapIn the Output paths to refresh field, type:
$ProjectFileDir$/css/$FileNameWithoutExtension$.css $ProjectFileDir$/css/$FileNameWithoutExtension$.css.map

Save the new File Watcher and make sure it is enabled.

Now, if you edit custom_output.less, for example, change the value of @color at line 1, IntelliJ IDEA creates a css folder and stores the generated custom_output.css and custom_output.css.map files in it.

Custom output location: preserve the original folder structure
Let's now consider an example where .less files are stored in a folder structure, for example:

With the default File Watcher, the generated files will be stored next to the original .less files.

If we use the custom File Watcher as described above, all the generated files will be stored in one same css folder:

To have IntelliJ IDEA preserve the folder structure, let's create another custom File Watcher.
Press Ctrl+Alt+S to open settings and then select . Then create a Less File Watcher as described above.
Update the default settings as follows:
In the Arguments field, type:
$FileName$ $ProjectFileDir$/css/$FileDirRelativeToProjectRoot$/$FileNameWithoutExtension$.css --source-mapIn the Output paths to refresh field, type:
$ProjectFileDir$/css/$FileDirRelativeToProjectRoot$/$FileNameWithoutExtension$.css $ProjectFileDir$/css/$FileDirRelativeToProjectRoot$/$FileNameWithoutExtension$.css.map

Save the new File Watcher and make sure it is enabled.

Now, if you edit custom_output_body.less, custom_output_header.less, or custom_output_footer.less, IntelliJ IDEA creates a css folder with the subfolders' structure that preserves the structure of styles_structured.

Configuring syntax highlighting
You can configure Less/Sass/SCSS/PostCSS-aware syntax highlighting according to your preferences and habits.
In the Settings dialog (Ctrl+Alt+S) , go to .
Select the color scheme, accept the highlighting settings inherited from the defaults or customize them as described in Colors and fonts.
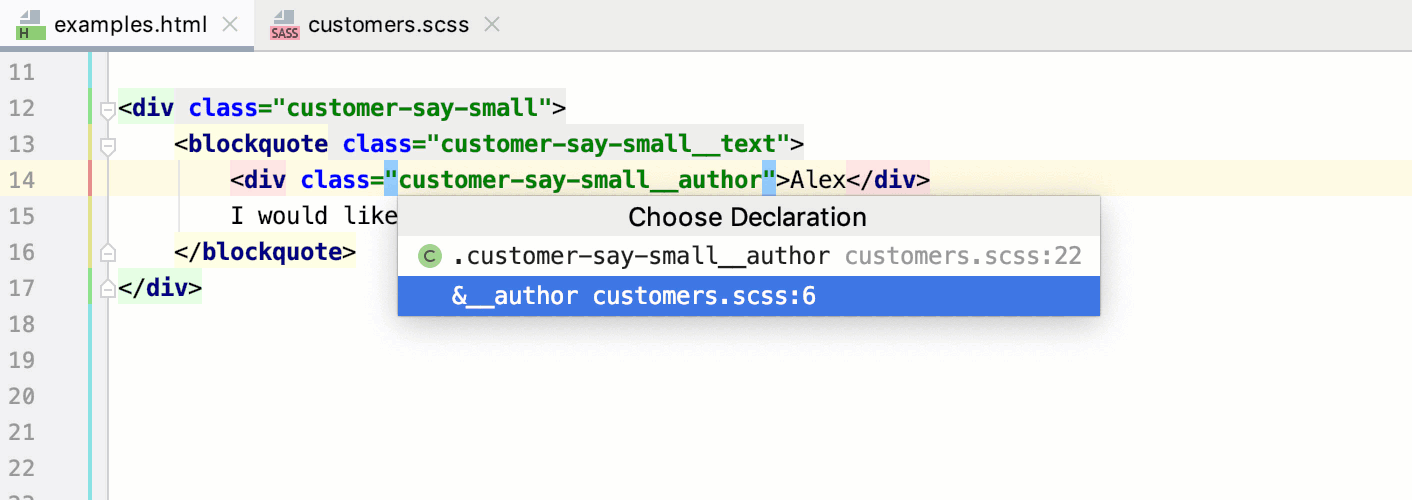
Complete Sass and SCSS selectors
IntelliJ IDEA provides completion for Sass and SCSS selectors - including nested selectors and selectors created with an ampersand (&).

Cloud Completion and Full Line completion
IntelliJ IDEA provides Cloud Completion and Full Line completion in Sass/SCSS, Less, and PostCSS code.
The Full Line code completion feature uses a locally run deep learning model to suggest entire lines of code. It is available in IntelliJ IDEA with the Ultimate subscription out of the box and does not require an additional license.
Enable Full Line code completion
Press Ctrl+Alt+S to open settings and select Editor | General | Inline Completion.
Select the Enable local Full Line completion suggestions checkbox and make sure the CSS-like checkbox is selected.

Cloud completion powered by AI Assistant can autocomplete single lines, blocks of code, and even entire functions in real time based on the project context.
Cloud Completion suggests syntactically acceptable solutions taking the context into account and runs various code inspections in advance to reject the variants that result in errors.
Enable Cloud Completion
Press Ctrl+Alt+S to open settings and select Editor | General | Inline Completion.
Select the Enable cloud completion suggestions checkbox and make sure the HTML checkbox is selected.

Search and navigation
Documentation look-up
For properties and pseudo-elements, IntelliJ IDEA can show you a summary from the corresponding MDN article. This summary is displayed in the Documentation popup which shows a brief description of the property and its values, as well as its Web platform Baseline status.


For selectors, IntelliJ IDEA also shows their specificity.

View documentation for a property
Position the caret at the property and press Ctrl+Q or select from the main menu.
When you hover over a property, IntelliJ IDEA immediately displays the reference for it in the Documentation popup.
You can turn off this behavior or configure the popup to appear faster or slower, refer to Configuring the behavior of Documentation popup below.
Configure the behavior of the Documentation popup
To turn off showing documentation automatically when you hover over code symbols, Click
 in the popup and disable the Show on Mouse Move option.
To have the Documentation popup shown faster or slower, open the Settings dialog (Ctrl+Alt+S) , go to , then select the Show the documentation popup checkbox and specify the delay time.
Open the MDN documentation in the browser
In the Documentation popup Ctrl+Q, click the link at the bottom.
Press Shift+F1 or select from the main menu.
Formatting
With the IntelliJ IDEA built-in formatter, you can reformat fragments of Style Sheet code as well as entire files and folders to meet the language-specific code style requirements. The formatter also wakes up automatically when you generate or refactor your code.
To configure formatting for a Style Sheet language, open the Settings dialog (Ctrl+Alt+S) , go to , and configure the language-specific settings for tabs and indents, spaces, wrapping and braces, hard and soft margins, and so on.
As you change the settings, the Preview area shows how the changes affect formatting.
In the CSS, SCSS, and Less context, IntelliJ IDEA by default uses double quotes for generated string literals in
importstatements and URLs. To use single quotes, open the Other tab, and select Single from the Quote marks list.To apply the chosen style to the entire file after reformatting, select the Enforce on format checkbox below the list.
To reformat a code fragment, select it in the editor and press Ctrl+Alt+L.
To reformat a file or a folder, select it in the Project tool window (Alt+1) and press Ctrl+Alt+L. See Reformat and rearrange code for more details.
Alternatively, you can use Prettier (Ctrl+Alt+Shift+P).
Refactoring
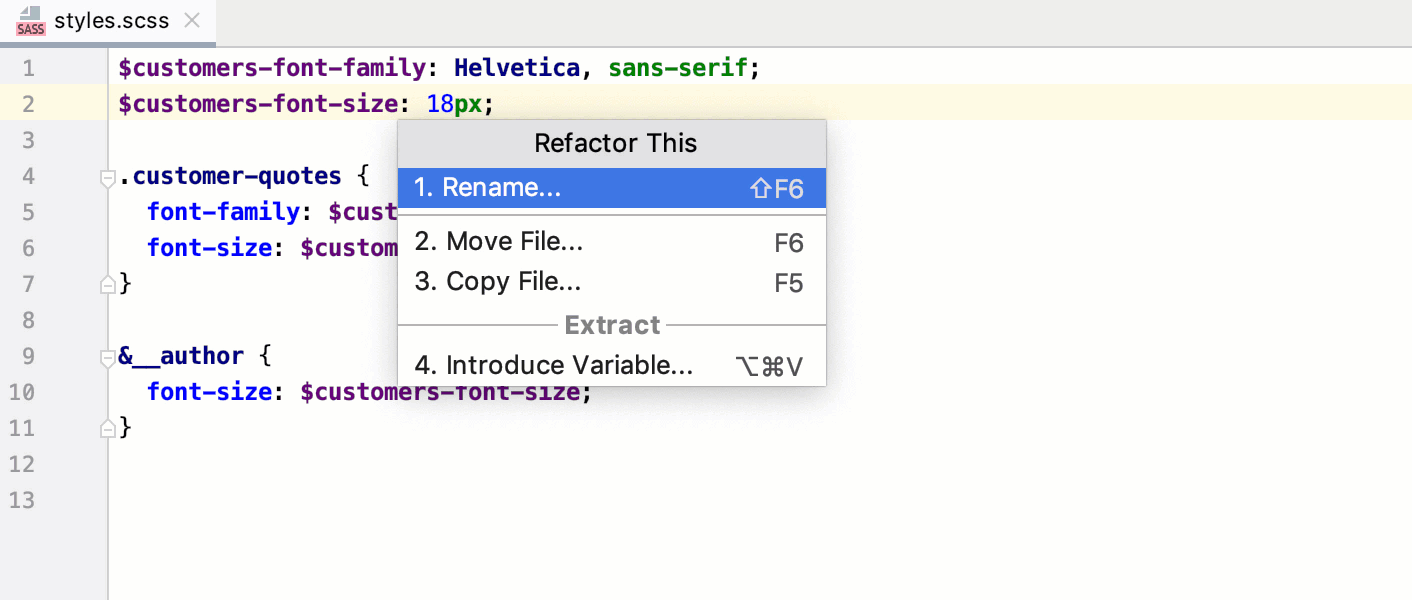
With IntelliJ IDEA, you can convert expressions in Style Sheets into variables and introduce these variables using the var(--var-name) syntax in .css files or the $ syntax in .scss and .sass files.
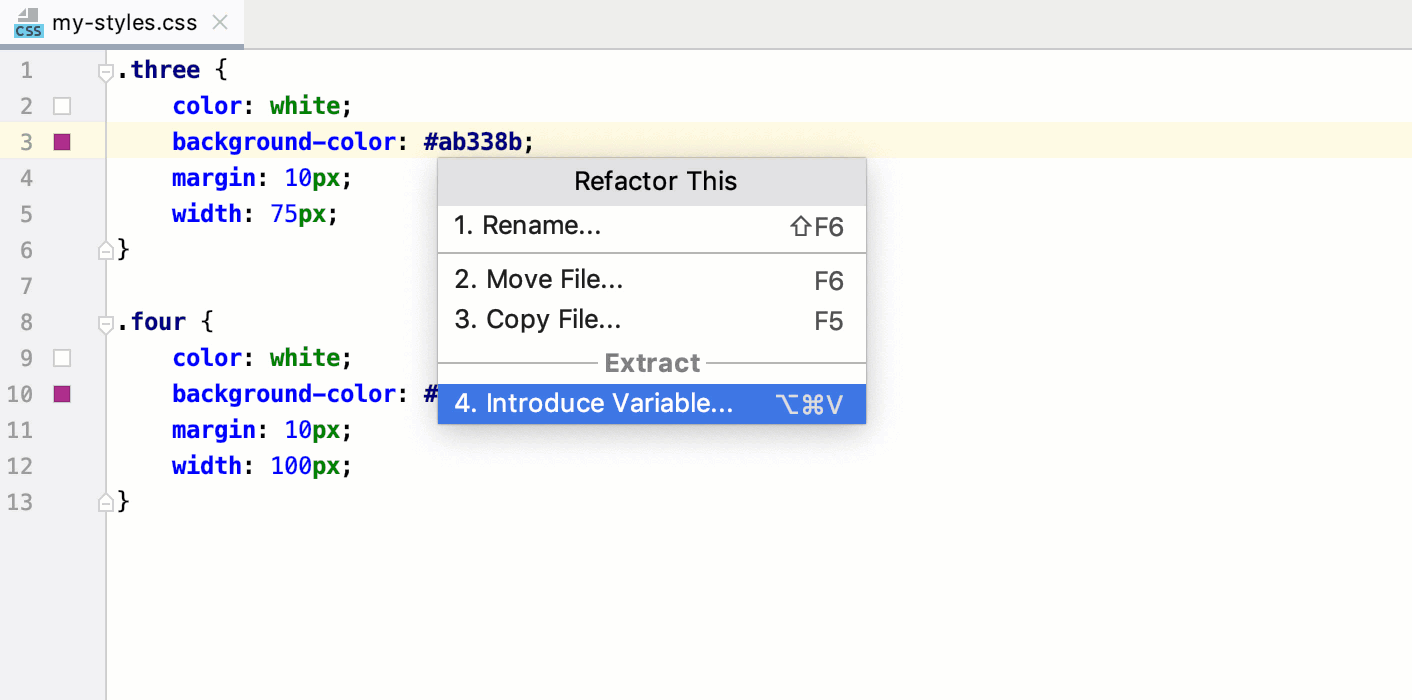
Introduce variables
In the editor, place the caret at the expression to convert into a variable and press Ctrl+Alt+V or select from the context menu or from the main menu.
If more than one occurrence of the selected expression is found, select Replace this occurrence only or Replace all occurrences from the Multiple occurrences found list.
For .scss, and .sass, select the global or local scope for the variable.
In the field with red borders, accept the suggested variable name or specify a custom name. Press Enter when ready.
With IntelliJ IDEA, you can create new rulesets from existing declarations in CSS, SCSS, Sass, or Less files and even move entire rulesets between files using refactoring and intention actions.
Introduce rulesets
Select the declarations to introduce. If you need only one declaration, just place the caret inside it.
Press Alt+Enter and select Introduce ruleset from the list.
IntelliJ IDEA creates a new ruleset with the same selector and moves the selected declarations to it. If the selection contains comments, nested selectors, and so on, they are also moved to the new ruleset.
Move rulesets to other files
Place the caret anywhere in the ruleset to move and press F6.
In the dialog that opens, specify the file to move the ruleset to. If the specified file does not exist, IntelliJ IDEA will suggest creating it.
By default, IntelliJ IDEA automatically opens the file where the ruleset is moved. To change this behavior, clear the Open in editor checkbox.
Common refactorings, such as Copy, Move, or Rename, are also available.
Checking compatibility with browsers
Besides looking up in the documentation popup, you can check Style Sheet properties for compatibility with specific browsers on the fly. This inspection is based on the MDN Browser Compatibility Data and shows you a warning every time a property is not supported in one of the targeted browsers.

Turn on compatibility check
In the Settings dialog (Ctrl+Alt+S) , go to .
Expand the CSS node and select the Property is incompatible with selected browsers. In the Options area, select the browsers you want to target and the minimum versions for them.
In the Options area, select the browsers to check the availability of properties against. Specify the target versions of the selected browsers.

Managing colors
IntelliJ IDEA provides support for CSS color management, including code completion, quick documentation lookup, and color preview. Coding assistance is provided for absolute, relative, and mixed colors.

Specify a color
Place the caret at a
colorproperty, press Ctrl+Space, and then select the desired color value or choose color... to pick a custom one.
To use a code instead of a human-readable color name, press Alt+Enter and select Convert color to <color code system> from the list, where <color code system> is HEX, HSL, HWB, RGB, lch, oklch, or oklab.

Change color
Click a color icon in the gutter and pick the desired color in the popup.

Alternatively, place the caret at a color property, press Alt+Enter, select Change color from the list, and then pick the desired color in the popup.

Toggle color preview
IntelliJ IDEA shows preview for absolute, relative, and mixed colors.

By default, IntelliJ IDEA displays color preview as icons in the gutter. To show color preview in the background, open the Settings dialog (Ctrl+Alt+S) , go to and select the Show CSS color preview as background checkbox.

To restore the color preview gutter icons, open the Settings dialog (Ctrl+Alt+S) , go to and select the Color preview checkbox in the Common area.

Viewing the styles applied to a tag
In HTML, XHTML, JSP and JSPX files, IntelliJ IDEA can show you all the styles applied to an arbitrary tag.

From the context menu of a tag, select .
IntelliJ IDEA opens the CSS Styles tool window with two panes, the left-hand pane shows the styles for the tag and the right-hand pane shows their definitions. For each tag, IntelliJ IDEA opens a separate tab.
From the tool window, you can navigate to tags and definitions of properties in your source code.
To jump to the tag, click
 on the toolbar of the left-hand pane.
To jump to the definition of a property, select it in the left-hand pane and click
on the toolbar of the right-hand pane.