Create source code using live templates
Live templates are ReSharper's far more intelligent version of Visual Studio's code snippets. Unlike code snippets, ReSharper's templates can predict from the context, which variables, fields, and types can be used. In most cases you do not need to type anything yourself — just choose from a list of suggested values.
ReSharper provides plenty of predefined live templates for all supported languages. The list of predefined templates includes templates for iterating through collections, writing assertion methods, creating new arrays, outputting values, coding LINQ queries, generating auto-properties, and more.
Create a code fragment using live template
In the editor, place the caret where you want to insert a code fragment from a live template.
Do one of the following:
Type a template shortcut or its initial letters. For example, in a C# method, type
itarto invoke the iterate an array template.Press Control+J or choose from the main menu, choose a template from the suggestion list, and press Tab or Enter.
If the template has editable parameters (that is, requires user input), ReSharper deploys a hot spot session in the editor and sets the input position at the first parameter. Then you can do the following:
If ReSharper suggests some values for the current parameter, use Up and Down arrow keys to navigate through the list of suggested values, or just type in a desired value.
Press Tab or Enter to accept the value and move to the input position of the next parameter. If this is the last parameter, the hot spot session completes and the caret moves to the end position defined for the session.
Press Shift+Tab to move the input focus to the input position of the previous parameter.
Press Esc to exit the hot spot session. In this case, all session parameters will be initialized with default values.
Below are several examples that show how live templates are commonly applied.
Apply a template with a shortcut
Type psvm (the shortcut for the public static void Main template) where you want to place the Main method:

Press Tab to expand the template:

Select a template from the suggestion list
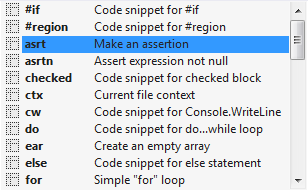
Place the caret at a position where inserting an assertion method is appropriate and press Control+J:

After selecting asrt in the suggestion list, press Enter or Tab:

Reduce the suggestion list
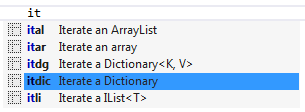
Press Control+J, and then type it and select the desired template whose shortcut starts with 'it':

Apply a template with editable parameters
itar (Iterate an array) is the shortcut for a template that contains code for iterating over an array. Type this shortcut where such iteration is appropriate:

When you press Tab (the template invocation key), the template expands replacing itar with the template code. Note that ReSharper calculates suggested values based on the context and inserts them in the corresponding template parameters:

Keep in mind that itar has editable parameters so ReSharper deploys a hot spot session in the editor to guide you through them. You can recognize it by the highlighted index parameter, which is the first input position in this template. ReSharper automatically suggested i as the name for the index variable. If you want to change the suggested value, just type a new name. All references to the variable within the expanded template will change simultaneously as you type the new name. Let's name the index variable idx instead of i:

Regardless of whether you have changed the suggestion at the current input position, pressing Tab or Enter moves the caret to the input position of the next editable parameter of the template:

ReSharper has automatically detected all array variables in the scope, and suggested selecting one of them (namely, the last declared one). Had there been only one array element in the scope, ReSharper would have inserted its name automatically (without popping up a list). You can control pop-up suggestion lists using the following keys:
Use Up and Down arrow keys to navigate through the list.
Use Esc to close the list and enter, for example, your own
getArray()method call into this position.Press Tab or Enter to apply the selected/specified option and move to the input position of the next parameter.
ReSharper detects changes to the type of the array elements. It automatically updates the type of the variable holding the current array element, and suggests a suitable name for it:

After filling up the last input parameter, press Tab or Enter to get the caret moved to the specified end position of the template:

In many cases, default values suggested by ReSharper may be accepted, thus you can immediately proceed to writing the loop body after very few keystrokes.
This feature is supported in the following languages and technologies:
The instructions and examples given here address the use of the feature in C#. For more information about other languages, refer to corresponding topics in the ReSharper by language section.