Move to Folder refactoring
This refactoring helps you move one or several types or files to another project or folder anywhere in your solution. If necessary, the refactoring will create the new target folder for you. All imports that the moved type(s) require are fixed in the new location. All imports that are no longer necessary are removed from the original file(s).
Notes:
This refactoring is not available for nested types.
If you are moving types to another project, there may be missing project references for namespaces used in the moved types. In this case, you will have to add the missing references manually.
Move types or files to another folder
Select types that you want to move in one of the following ways:
In the editor, place the caret at the name of a type.
Select one or several types and/or files and/or folders in the Solution Explorer.
Select a type in the File Structure window window.
Select one or several types in the Class View.
Select a type in the Object Browser.
Select a type or folder(s) in the type dependency diagram.
Do one of the following:
Press F6 and then choose Move To Folder
Press Control+Shift+R and then choose Move To Folder.
Right-click and choose Refactor | Move To Folder from the context menu.
Choose from the main menu.
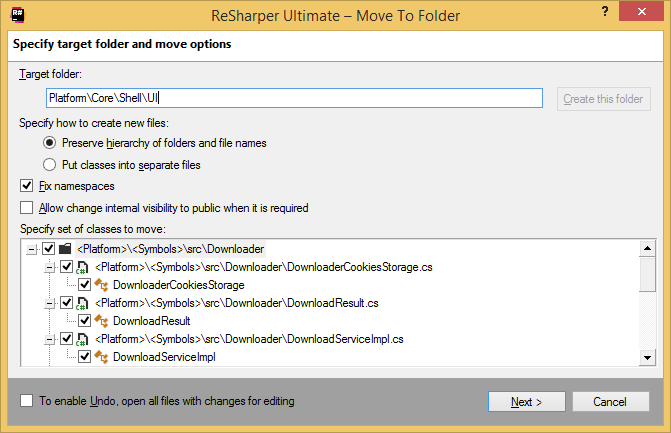
The Move To Folder dialog will open.
In the Target folder field, specify the folder where the selected items should be moved:
Start typing the name of the target folder or the target project and use the completion suggestions to select it.
If the target destination is not valid, for example, other language is used in the target project, or a solution folder is selected, then the red icon appears. This means that you need to change the destination.
If you need to create a new folder in the selected destination, type \[folder name] and click Create this folder.
If you move several types, you can select Preserve hierarchy of folders and file names to leave the structure of original files folders "as is" during the refactoring, or select Put classes into separate files to put each type into a separate file with the appropriate name.
The namespace imports in the moved items are fixed automatically according to the new location. If you want to adjust namespaces manually, clear the Fix namespaces checkbox.
Select Allow change internal visibility to public when it is required to change the private, protected and internal visibility restrictions so not to break the existing type usages.
By default, all types from all selected items will be moved. If necessary, you can clear checkboxes for the types that you want to leave in the original location.
To apply the refactoring, click Next.
If no conflicts are found, ReSharper performs the refactoring immediately. Otherwise, it prompts you to resolve conflicts.

This feature is supported in the following languages and technologies:
The instructions and examples given here address the use of the feature in C#. For more information about other languages, refer to corresponding topics in the Languages and frameworks section.