Refactorings for C++
Perform a refactoring
Place the caret at a symbol, select a code fragment that you want to refactor, or select an item in a tool window.
Do one of the following:
From the main menu, choose , and then select a desired refactoring. The list of refactorings available in this menu depends on the current context. If ReSharper cannot suggest any refactorings for the context, the entire menu is disabled.
In the editor, File Structure window, or other ReSharper window, right-click the item you want to transform, choose Refactor from the context menu, and then select the required refactoring.
From the main menu, choose , or press Control+Shift+R to display the list of applicable refactorings, then select one of them. You can also choose Refactor This in the context menu of a selection.
Use default keyboard shortcuts assigned to specific refactorings, or assign custom shortcuts to your favorite refactoring commands.
If the selected refactoring requires user input, the refactoring wizard opens. Note that the wizard's dialogs are not modal, so you can edit the code while the wizard is open.
To roll back refactoring actions, the wizard provides the option To enable Undo, open all files with changes for editing. If you select this option, ReSharper opens all modified files in new editor tabs and enables you to roll the refactoring back. In this case, you will need to save the changes yourself. If this option is not selected, ReSharper saves modified files automatically, without opening them.
If a refactoring operation would cause code conflicts (such as duplicate names, visibility conflicts, and so on), the wizard displays the list of conflicts on the last step, before you apply the refactoring. For some conflicts, the wizard can also suggest quick-fixes. For more information, refer to Resolve conflicts in refactorings.
Some refactorings are available immediately after you modify code in the editor. For more information, refer to Inplace refactorings
Change Signature
The Change Signature refactoring allows you to make one or more different modifications to the signatures of a function. All usages, implementations, and overrides of the function will be updated accordingly.
You can also invoke this refactoring with the dedicated shortcut Control+F6.

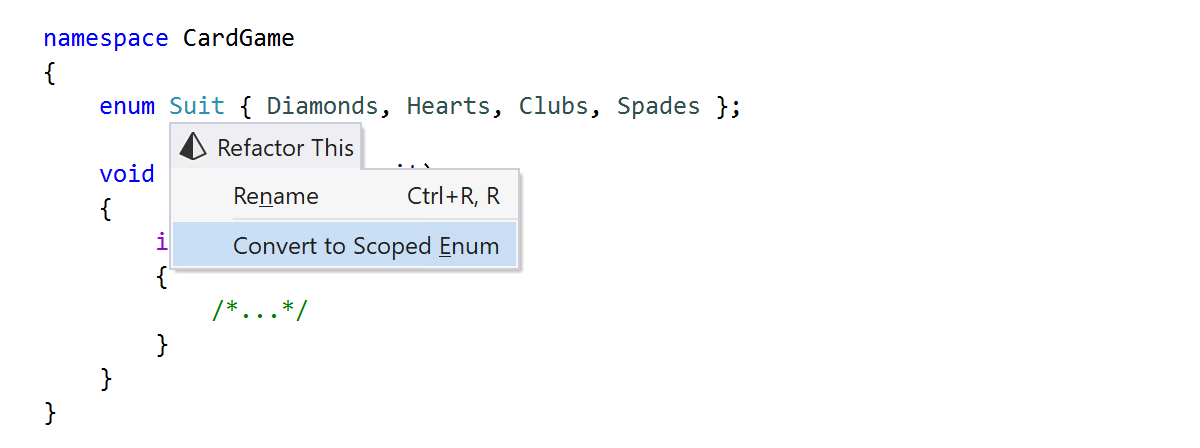
Convert to Scoped Enum
The Convert to Scoped Enum refactoring helps you convert a C-style enumeration declaration into a C++11 scoped enumeration. To invoke it, place the caret at an enumerator and select Convert to Scoped Enum from the Refactor This menu, or choose from the main menu:
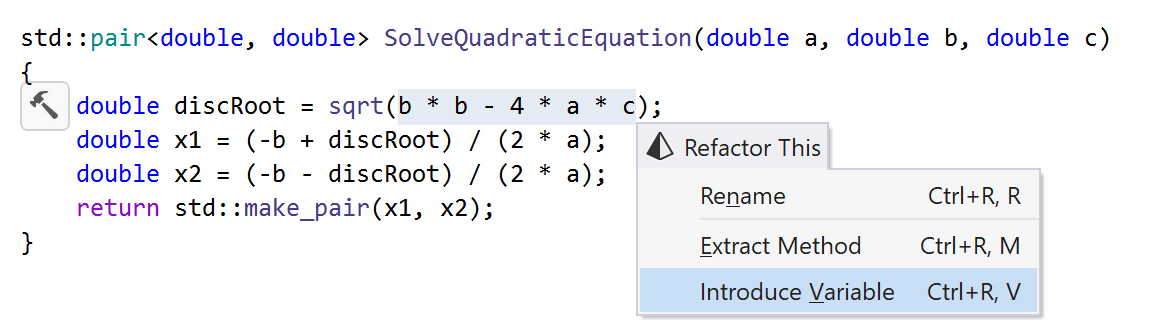
Extract Method
This refactoring allows you to create a new method based on the selected code fragment. ReSharper analyzes the selected statements and detects variables that can be converted into method parameters or represent its return value.
You can also invoke this refactoring with the dedicated shortcut Control+Alt+M.
Suppose that you want to extract the logic of calculating a discriminant to a separate method:

In the Extract Method dialog, you can pick method arguments, choose a return value and preview the resulted method:

As soon as you click Next, the new method is created and the selected expression is replaced with the method call.

Introduce Field
This refactoring allows you to create a new field based on a selected expression, initialize it with the expression or from the constructor, and replace occurrences of the expression in the current type with references to the newly introduced field.
You can also invoke this refactoring with the dedicated shortcut Control+Alt+D.
In the example below, we use this refactoring to replace two occurrences of the same string with a new private field and initialize it from the existing constructor:
Introduce Namespace Alias
This refactoring helps you create a namespace alias for a namespace usage and replace the currently selected usage or all usages in the current document with the alias. Depending on the selected usages, the namespace alias is declared in the closest possible scope to the usages.
To invoke this refactoring, place the caret at a namespace usage and Control+Shift+R or choose from the main menu, and then select Introduce namespace alias in the Refactor This popup. If there are multiple occurrences of the namespace usage in the document, you will be able to choose whether to replace the current usage or all usages.
In the example below, we use this refactoring to add a namespace alias for the SpaceOne::SpaceTwo namespace.
Introduce/Inline typedef
The Introduce typedef refactoring lets you quickly create a typedef for the selected data type and replace the selected data type and optionally, all occurrences of this data type in the current file, with the newly created typedef.
The Inline typedef refactoring makes exactly the opposite - it removes the selected typedef and replaces all its usages with the declared data type.
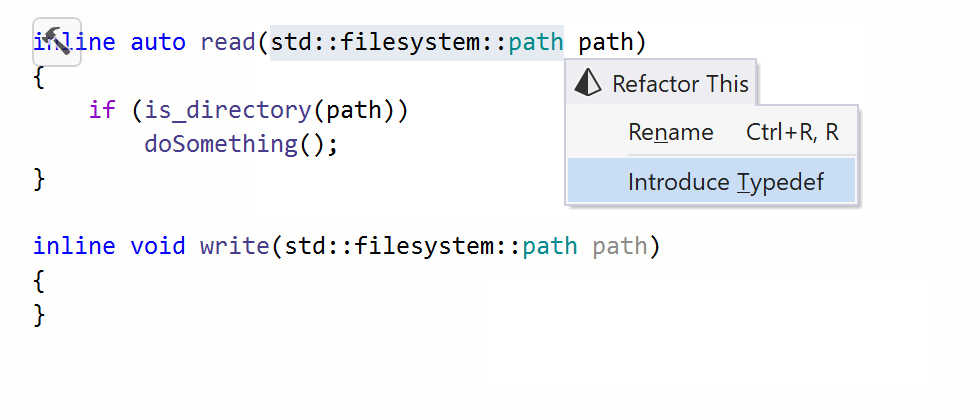
If you want the Introduce typedef refactoring to use type alias instead of typedef, select the corresponding checkbox on the page of ReSharper options Alt+R, O. For more information, refer to Aliases and typedefs (C++) on Microsoft Docs.
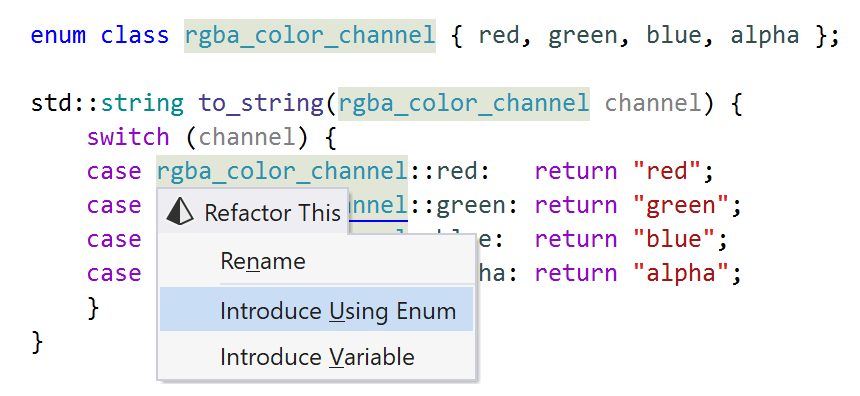
Introduce Using Enum
The C++20 using enum syntax allows you to add all the enumerators from the target enumeration. As a result, you can omit repetitions of the enumeration name when using its member enumerators.
The Introduce Using Enum refactoring helps with adding using enum statements. To invoke this refactoring, place the caret at an enumerator and press Control+Shift+R or choose from the main menu, and then select Introduce Using Enum in the Refactor This popup. If there are multiple occurrences of the enumeration usage in the document, you will be able to choose whether to replace the current usage or all usages.
Introduce Variable
This refactoring allows you to create a new local variable based on a selected expression, initialize it with the expression, and finally replace all occurrences of the expression in the method with references to the newly introduced variable.
You can also invoke this refactoring with the dedicated shortcut Control+Alt+V.
Inline Variable
This refactoring allows you to replace all occurrences of a variable in the code with its initializer. Note that the refactoring should be only applied if the variable value stays unchanged after initialization.
You can also invoke this refactoring with the dedicated shortcut Control+Alt+N.
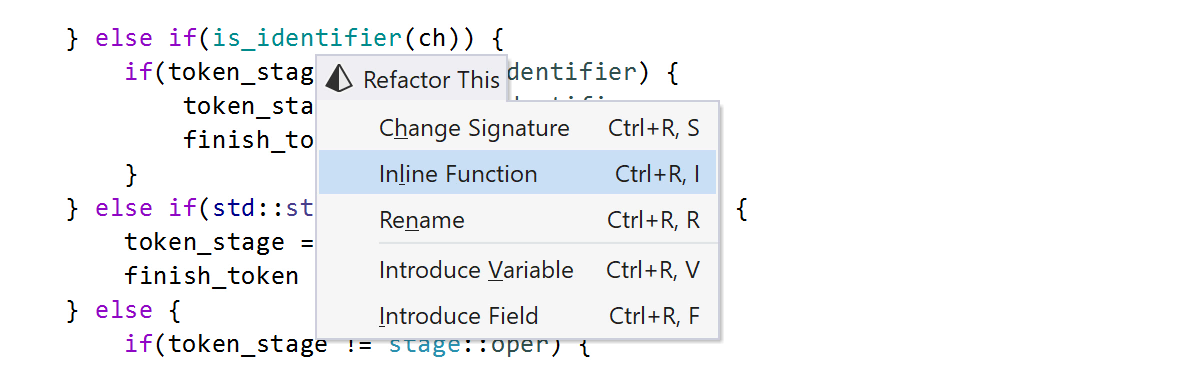
Inline Function
This refactoring allows you to replace a function call with the body of the function. ReSharper will perform the necessary transformations, handle all the name conflicts, and reformat the resulting code, or show you a short pop-up message explaining why it’s not a good idea to try inlining some method.
You can also invoke this refactoring with the dedicated shortcut Control+Alt+N.
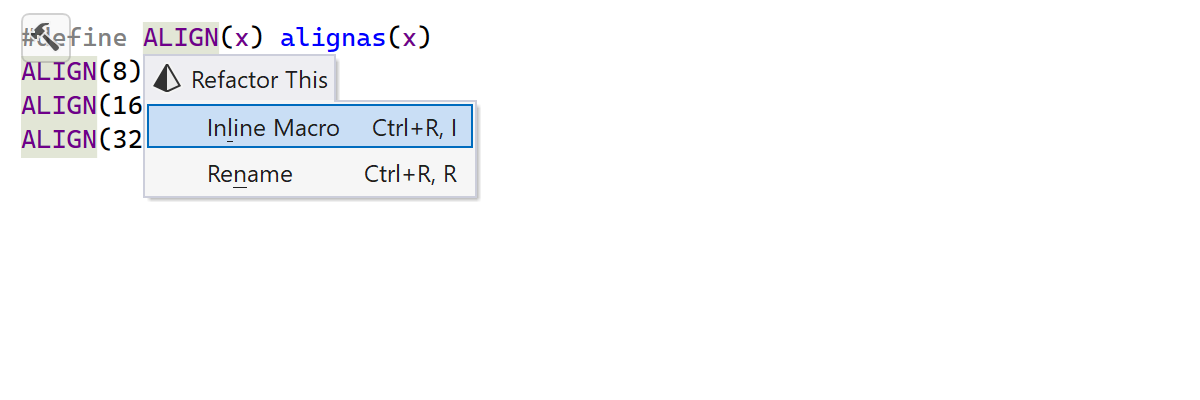
Inline Macro
This refactoring allows you to substitute all usages of a macro in your code. The refactoring will also report potential usages in macro bodies and macro arguments that need to be manually reviewed.
You can also invoke this refactoring with the dedicated shortcut Control+Alt+N.
Rename
One of the most time-consuming refactorings is supported for C++. Modifying the name of a symbol can cause many problems if you try to do it manually. When you invoke the Rename refactoring (also available with the dedicated F2 shortcut), all checks are done by ReSharper. Either all modification are performed smoothly if no conflicts exist, or you get the list of conflicts that you can resolve manually to be sure that only necessary and appropriate changes are made.

When you use this refactoring to rename a class, ReSharper will automatically rename corresponding files (source and header).
You can also invoke this refactoring on a file in the Solution Explorer. As soon as you provide a new name for the file, ReSharper will update all its usages in includes.