Vue.js
Vue.js is a framework for developing user interfaces and advanced single-page applications. RubyMine provides support for the Vue.js building blocks of HTML, CSS, and JavaScript with Vue.js-aware code completion for components, including components defined in separate files, attributes, properties, methods, slot names, and more.
With the built-in debugger, you can debug your Vue.js code right in RubyMine, which can automatically generate the necessary run/debug configurations you need: an npm configuration that launches the development server and starts your application in the development mode and a JavaScript Debug configuration that launches a debugging session.
Before you start
Download and install Node.js.
Make sure a local Node.js runtime is configured in your project: open the Settings dialog (Ctrl+Alt+S) and go to . The Node runtime field shows the default project Node.js runtime. Learn more from Configuring a local Node.js interpreter.
Make sure the JavaScript and TypeScript, JavaScript Debugger, and Vue.js required plugins are enabled on the Settings | Plugins page, tab Installed. For more information, refer to Managing plugins.
Create a new Vue.js application
The recommended way to create a new Vue.js app is the create-vue official Vue project scaffolding tool, which RubyMine downloads and runs for you using npx.
You can still use Vue CLI, if you choose this option RubyMine also downloads and runs it with npx.
Of course, you can download any of these tools yourself or create an empty RubyMine project and bootstrap it with Vue.js and other tools, such as Vite, babel, webpack, ESLint, etc.
Click New Project on the Welcome screen or select from the main menu. The New Project dialog opens.
In the left-hand pane, choose Vue.js.
In the right-hand pane:
Specify the path to the folder where the project-related files will be stored.
In the Node runtime field, specify the Node.js runtime to use. Select a configured runtime from the list or choose Add to configure a new one.
From the Vue CLI list, select npx create-vue (recommended) or npx --package @vue/cli vue.
Alternatively, for npm version 5.1 and earlier, install the package yourself by running
npm install --g create-vueornpm install --g @vue/cliin your command-line shell or in the Terminal Alt+F12. When creating an application, select the folder where the package is stored.To bootstrap your application with babel and ESLint, select the Use the default project setup checkbox.
When you click Create, RubyMine generates a Vue.js-specific project with all the required configuration files and downloads the necessary dependencies. You can view the progress in the Run tool window.
Create an empty RubyMine project
Click New Project on the Welcome screen or select from the main menu. The New Project dialog opens.
In the left-hand pane, choose Empty Project.
Specify the path to the folder where the project-related files will be stored.
When you click Create, RubyMine creates and opens an empty project.
Install Vue.js in an empty project
Open the empty project where you will use Vue.js.
In the embedded Terminal (Alt+F12) , type:
npm install vue
Start with an existing Vue.js application
To continue developing an existing Vue.js application, open it in RubyMine and download the required dependencies.
Open the application sources that are already on your machine
Click Open on the Welcome screen or select from the main menu. In the dialog that opens, select the folder where your sources are stored.
Check out the application sources from your version control
Click Clone Repository on the Welcome screen.
Alternatively, select or or from the main menu.
Instead of Git in the main menu, you may see any other Version Control System that is associated with your project. For example, Mercurial or Perforce.
In the dialog that opens, select your version control system from the list and specify the repository to check out the application sources from. For more information, refer to Check out a project (clone).
Download the dependencies
Click Run 'npm install' or Run 'yarn install' in the popup:

You can use npm, Yarn 1, or Yarn 2, refer to npm and Yarn for details.
Alternatively, select Run 'npm install' or Run 'yarn install' from the context menu of package.json in the editor or in the Project tool window (Alt+1) .
Project security
When you open a project that was created outside RubyMine and was imported into it, RubyMine displays a dialog where you can decide how to handle this project with unfamiliar source code.
Select one of the following options:
Preview in Safe Mode: in this case, RubyMine opens the project in a preview mode. It means that you can browse the project's sources but you cannot run tasks and script or run/debug your project.
RubyMine displays a notification on top of the editor area, and you can click the Trust project… link and load your project at any time.
Trust Project: in this case, RubyMine opens and loads a project. That means the project is initialized, project's plugins are resolved, dependencies are added, and all RubyMine features are available.
Don't Open: in this case, RubyMine doesn't open the project.
Learn more from Project security.
Write and edit your code
In .vue files, RubyMine recognizes script, style, and template blocks. You can use JavaScript and TypeScript inside script tags, Style Sheet languages inside style tags, and HTML and Pug inside template tags.
When you use TypeScript inside a script tag, RubyMine invokes the TypeScript language service for type checking and shows detected errors in the Errors and Compile errors tabs of the TypeScript tool window. Alternatively, you can use TsLint as described in Linting TypeScript in Vue.js components using TSLint
Vue.js components
RubyMine recognizes the .vue file type and provides a dedicated .vue file template for Vue.js components.
Create a Vue.js component
In the Project tool window (Alt+1) , select the parent folder for the new component, and then choose Vue Component from the list.
In the New Vue Component popup, enter the name of the component file and select the component type: Composition API or Options API.

You can also extract a new Vue.js component from an existing one without any copying and pasting but using a dedicated intention action or refactoring. All the data and methods used in the newly extracted template stay in the parent component. RubyMine passes them to the new component with properties and copies the related styles.
Extract components
Select the template fragment to extract and invoke component extraction:
To use the intention action, press Alt+Enter, and then choose Extract Vue Component from the list.
To use the refactoring, choose from the main menu or from the context menu of the selection.
Type the name of the new component. If this name is already used or invalid, RubyMine shows a warning. Otherwise, a new single-file component is created and imported into the parent component.

Code completion
Complete code inside script, style, and template blocks
By default, RubyMine provides code completion for ECMAScript 6 inside
scriptblocks and for CSS insidestyleblocks.
Inside the
templatetag, code completion Ctrl+Space and navigation to the definition Ctrl+B for Vue.js components and attributes is available.
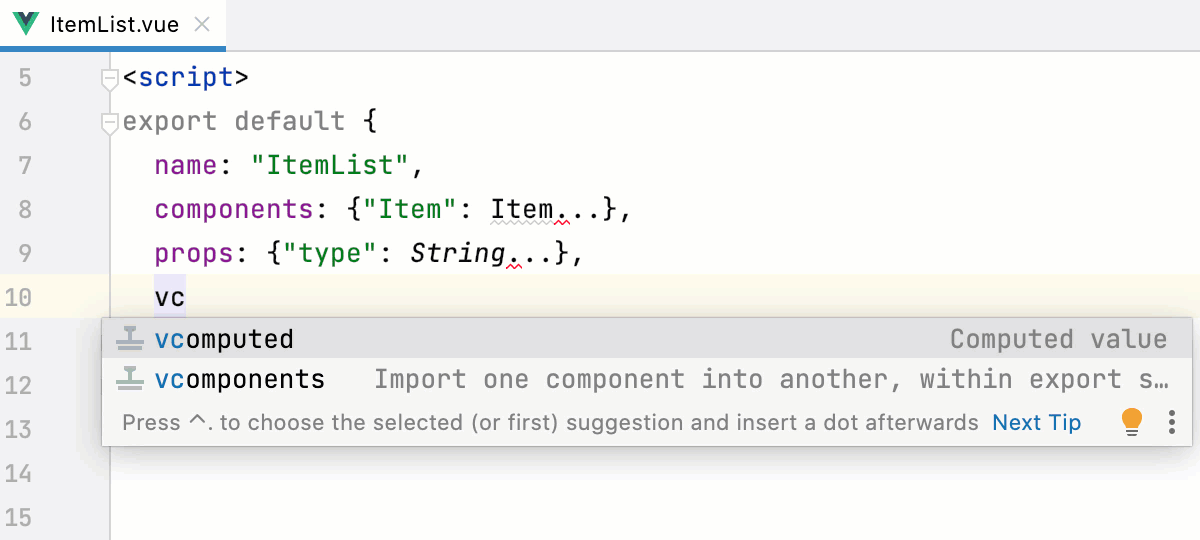
Complete Vue.js properties and methods
RubyMine also suggests completion for Vue.js properties, properties in the
dataobject, computed properties, and methods.
Complete slot names
RubyMine provides completion for the names of slots from library components and from components defined in your project.
If your project contains a component with named slots, RubyMine shows suggestions for these names in the
v-slotdirective of atemplatetag.If you’re using Vuetify, Quasar, or BootstrapVue, code completion for slot names is also available.
Complete components defined in separate files
If a component is defined in several files, RubyMine recognizes the links between the parts of the component and provides proper code completion for properties, data, and methods.
For example, if the parts of your component are defined in separate JavaScript and stylesheet files that are linked in the vue file through the
srcattribute, properties defined in JavaScript are properly completed in the template as methods do.Templates inside template literals in the
templateproperty of a component get completion just as if this code were inside atemplatetag.Completion is also available if a template is defined in a separate HTML file and then linked to the
templateproperty.
Complete code inside Vue.js injections
Within Vue.js injections inside HTML files, RubyMine recognizes Vue.js syntax and highlights your code accordingly. You can also get completion for symbols from Vue.js libraries that are linked from a CDN in an HTML file without adding these libraries to your project dependencies.

Open the HTML file with a CDN link to an external Vue.js library. RubyMine highlights the link.
To enable completion for the library, press Alt+Enter on the link and select from the list. Alternatively, hover over the link and click Download library.
The library is added to the list of JavaScript libraries on the page. For more information, refer to Configuring a library added via a CDN link.
Cloud Completion
RubyMine provides Cloud completion for slots, props, import statements, tags in templates, etc.
Cloud completion powered by AI Assistant can autocomplete single lines, blocks of code, and even entire functions in real time based on the project context.
Cloud Completion suggests syntactically acceptable solutions taking the context into account and runs various code inspections in advance to reject the variants that result in errors.
Slots
setupfunctionsDefinitions of
propsProperties in Vue Data Bindings

Component properties

Enable Cloud Completion
Press Ctrl+Alt+S to open settings and select Editor | General | Inline Completion.
Select the Enable cloud completion suggestions checkbox. and select the Universal completion checkbox.

Vuex store
RubyMine resolves references to the Vuex store and provides highlighting and completion for them.

Assets
RubyMine resolves all references to assets stored in the static folder in the <img src='/logo.png/> format.
Parameter hints
Parameter hints show the names of parameters in methods and functions to make your code easier to read.
Configure parameter hints
Open the Settings dialog (Ctrl+Alt+S) and go to .
Expand Vue under Parameter names.
Specify the context in which you want parameter hints shown by selecting the corresponding checkboxes.
The preview shows how the changes you make in the settings affect the code appearance.
For some methods and functions, RubyMine does not show parameter hints in any context. Click Exclude list... to view these methods and functions, possibly enable parameter hints for them, or add new items to the list.
To hide parameter hints for any value type in any context, clear the Vue template checkbox under Parameter names.
Navigate with component usages
Use inlay hints to jump from a component to its usages. If a component is used more than once, RubyMine shows a list of detected usages. Select the relevant usage to jump to it.
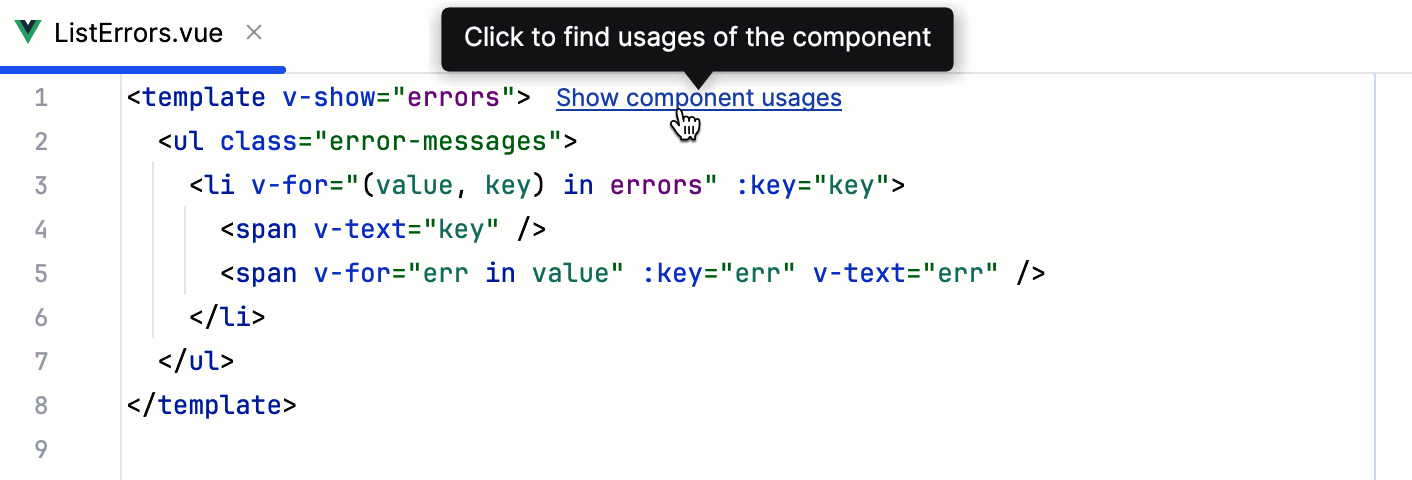
Show component usages hints are displayed by default. To turn them off, press Ctrl+Alt+S to open settings and select Editor | Inlay Hints. Then clear the Component usages checkbox under Code vision.
Alternatively, right-click a Show component usages hint in the editor and select Hide 'Code Vision: Component usages' Inlay Hints.

Vue.js live templates
With RubyMine, you can use a collection of Live templates for Vue.js adapted from the collection created by Sarah Drasner.
Type the abbreviation of the template to use or press Ctrl+J and select it from the list of available templates.
To expand the template, press Tab.
To move from one variable to another inside the template, press Tab again.
TypeScript in Vue.js applications
If your Vue.js project is written in TypeScript, you need to choose the service to get coding assistance for .ts and .vue files from. That can be RubyMine integration with the TypeScript Language Service, or the Vue Language Server (Volar), or the internal RubyMine parser and code inspections, or a combination of the above.
The Vue Language Server (Volar) is used by default, but you can always switch to the classic TypeScript language service.
In the Settings dialog (Ctrl+Alt+S) , go to .
In the Vue Language Server field, specify the Vue Language Server version to use.
Accept the suggested default version.
If you have another version of
@vue/language-serverpackage installed, this version appears on the list. You can select it or accept the default version.
Alternatively, click Select or
 and specify the path to a custom
 @vue/language-serverpackage.
Specify the service to use.
By default, the Auto option is chosen, which means that the Vue Language Server (Volar) is used by default.
Select Classic TypeScript Service to always use the TypeScript Language Service in .ts and .vue files.
Note that the TypeScript language service does not work with TypeScript version 5.0.0 and later. Therefore, if your project is using one of these versions, error highlighting will be provided through the RubyMine internal code inspections.
Select Disabled to turn both the TypeScript language service and the Vue Language Server off and get coding assistance from the RubyMine internal support.
Select the Enable service-powered type engine checkbox to evaluate types of symbols based on the data from the Vue Language Server.
By default, the checkbox is cleared, so type evaluation, resolution, code inspections and refactorings are based on the type information from the RubyMine internal TypeScript engine.
This default behavior may result in performance issues and in bugs in type resolution because the type evaluation algorithm that the RubyMine internal TypeScript engine uses differs from the algorithm of the Vue Language Server. Selecting the checkbox may help avoid these problems.
Configure memory handling
Although RubyMine strives at providing slick integration with language services, there may still arise out-of-memory errors induced by a language service rather than by RubyMine itself.
To prevent out-of-memory errors or have them solved seamlessly, thus ensuring stable operation of language services, you can configure memory handling. Learn more from Language Services
Memory handling settings for the Vue language service are always inherited from the TypeScript language service.
Configure memory handling for TypeScript language service
Open settings by pressing Ctrl+Alt+S and navigate to .
In the Language Services Memory area, choose the memory handling mode:
Select Automatically increase memory, if available to have memory increased and language services restarted silently.
Alternatively, select Set memory limit and specify the maximum memory to use by a language service.
If the specified memory size exceeds the available RAM, RubyMine suggests an appropriate value in a tooltip.
Formatting in Vue.js applications
Configure indentation
By default, code within top-level tags is indented uniformly, in the Vue.js-specific style. You can configure this indentation to depend on the language used, for example, be HTML or Pug-specific.
In the Settings dialog (Ctrl+Alt+S) , go to , and open the Tabs and Indents tab.
By default, the contents of all top-level tags are indented uniformly, in the Vue.js-specific style. Accept the default indentation settings or customize them using the controls on the page. As you change the settings, the Preview in the right pane shows how the changes affect code formatting.
To have the code inside top-level tags indented with regard to its language, select Specific to the language in the block.
In the Indent children of top-level tag field, specify the top-level tags where the code should have initial indentation.
By default, only the code inside
templatetags has initial indentation. If necessary, add other tags using commas as separators. For example, if you specifyscriptin the field, the code inside allscripttags gets initial indentation as shown in the Preview pane.
Configure spaces
By default, RubyMine automatically inserts spaces after the opening curly brace (
{) and before the closing one (}) in Vue.js text interpolations with Mustache syntax.To suppress inserting spaces automatically, open the Settings dialog (Ctrl+Alt+S) , go to , then open the Spaces tab and clear the Interpolations checkbox.
By default, when you enclose a code fragment in a block comment, the text starts right after the opening
/*characters without any spaces. Before the closing*/characters no space is inserted either.This default code style may conflict with some linters' rules, for example, ESLint. To improve the code style, configure enclosing block comments in leading and trailing spaces.
In the Settings dialog (Ctrl+Alt+S) , go to or , open the Code Generation tab, and configure the spaces and formatting in the Comments area.
Configure wrapping and braces
In the Settings dialog (Ctrl+Alt+S) , go to , and open the Wrapping and Braces tab.
If a JavaScript expression inside a Vue.js interpolation has line breaks, RubyMine automatically starts this JavaScript expression from a new line and adds a new line after it.
Clear the New line after '{{' and the New line before '}}' checkboxes to change this default behavior.
Configure multiple right margins as described in Vue.js code style: Visual guides.
Configure wrapping in interpolations as described in Wrapping options.
Reformat Vue.js code with Prettier
You can configure Prettier to reformat specific files every time such file is changed and the changes are saved automatically or manually, refer to Run Prettier automatically on save.
Also, Prettier can be set as default formatter for specific files. It will run against such files every time you reformat your code with Ctrl+Alt+L.
For more information, refer to Reformat code with Prettier.
Reformat code with Prettier
In the editor, select the code fragment to reformat. To reformat a file or a folder, select it in the Project tool window (Alt+1) . Then select Reformat with Prettier from the context menu.
To run Prettier automatically against specific files, open the Settings dialog (Ctrl+Alt+S) , go to , and use the On code reformatting and On save checkboxes to specify the actions that will trigger Prettier.
For more information, refer to Run Prettier automatically on save and Set Prettier as default formatter.
RubyMine can apply the key code style rules from the Prettier's configuration to the RubyMine Code Style settings so that generated code (for example, after refactoring or quick-fix) and the code that is already processed with Prettier are formatted consistently.
Apply Prettier code style rules
In the project where Prettier is enabled, open package.json and click Yes in the pane at the top of the tab.

To re-apply the Prettier code style (after you've clicked No in the pane or modified the code style), press Ctrl+Shift+A and select Apply Prettier Code Style Rules from the Find Action list.
Linting TypeScript in Vue.js components using TSLint
You can lint TypeScript code in your Vue.js single file components using typescript-tslint-plugin.
Because typescript-tslint-plugin works only with TypeScript that is installed in the current project, make sure the typescript package from your project node_modules folder is selected in the TypeScript field on the TypeScript page of the Settings dialog (Ctrl+Alt+S) .
Install and configure typescript-tslint-plugin
In the embedded Terminal (Alt+F12) , type:
npm install --save-dev typescript-tslint-pluginIn the
pluginsproperty of your tsconfig.json file, type:{ "compilerOptions": { "plugins": [{"name": "typescript-tslint-plugin"}] } }When you are using
typescript-tslint-plugin, TSLint is running via the TypeScript language service so you can disable the TSLint integration with RubyMine to avoid duplicate error reporting.To do that, open the Settings dialog (Ctrl+Alt+S) , go to , and select Disable TSLint.
Run a Vue.js application
Сlick
 in the gutter next to the
 devscript in package.json, or execute thenpm run devcommand in the Terminal Alt+F12, or double-click thedevtask in the npm tool window ().Wait till the application is compiled and the development server is ready.
The Run tool window or the Terminal shows the URL at which your application is running. If your application was generated with create-vue, the default URL is http://localhost:5173/. Click this link to view the application.

Run a Vue.js application via a run/debug configuration
For applications created with create-vue in the RubyMine New Project wizard as described above, RubyMine generates an npm configuration with the default name dev. This configuration runs the vite command that launches the development server and starts your application in the development mode.
In other cases, you need to create a run/debug configuration with the actual settings, such as, host, port, etc., manually.
Create an npm run/debug configuration
Go to . Alternatively, select Edit Configurations from the Run widget on the toolbar.

In the Edit Configurations dialog that opens, click the Add button (
 ) on the toolbar and select npm from the list.
 In the Configuration tab of the Run/Debug Configurations: npm dialog that opens, specify the location of the package.json, the Node.js runtime, and the package manager to use.
In the Command field, select run from the list and then select the script to run from the Scripts list. Most likely it will be the default
devscript but you can configure another one in your package.json, for example, to run the application on a custom port.
Optionally:
To open the application in the browser, update the configuration as follows: in the Browser / Live Edit tab, select the After launch checkbox, select the browser to open the application in, and specify the URL address at which the application wil run.
If you are going to debug the application, select Google Chrome or another Chromium-based browser.

Run an application
From the list in the Run widget on the toolbar, select a run configuration of the type npm and click
next to it. This can be the autogenerated dev configuration or a custom one that you created yourself as described above.
Wait till the application is compiled and the development server is ready.
The Run tool window or the Terminal shows the URL at which your application is running. If your application was generated with create-vue, the default URL is http://localhost:5173/. Click this link to view the application.
Alternatively, enable RubyMine to open the application on start as described above.
Debug a Vue.js application
You can start a debugging session either by launching a run/debug configuration or from the Run tool window that shows the URL at which your application is running in the development mode.
Start debugging via a run/debug configuration
To debug your Vue.js application you need two run/debug configurations:
An npm configuration to start your application in the development mode, as described above.
A JavaScript Debug configuration to attach the debugger to the application that is running in the development mode.
You can create a JavaScript Debug configuration within the npm configuration to launch them at once, as described in Run and debug a Vue application with an npm run/debug configuration.
Alternatively, launch an npm and a JavaScript Debug run/debug configurations separately, as described in Start debugging with a JavaScript Debug run/debug configuration.
Run and debug a Vue.js application with a single npm run/debug configuration
Set the breakpoints in your code.
Create an npm configuration as described above.
If you generated your application with
create-vue, RubyMine has already created an npm configuration with the default name npm dev. The configuration is available from the Run widget and in the Run/Debug Configurations dialog.In the Configuration tab of the Run/Debug Configurations: npm dialog that opens, specify the location of the package.json, the Node.js runtime, and the package manager to use.
In the Command field, select run from the list and then select the script to run from the Scripts list. Most likely it will be the default
devscript but you can configure another one in your package.json, for example, to run the application on a custom port.In the Browser / Live Edit tab, select the After launch checkbox, select Google Chrome or another Chromium-based browser from the list, select the with JavaScript debugger checkbox, and then specify the URL at which your application will run.

Click Run.
To re-run the configuration, select it from the list in the Run widget and click
 next to it.
RubyMine runs the application in the development mode and at the same time launches a debugging session.

When the first breakpoint is hit, switch to the Debug tool window and proceed as usual: step through the program, stop and resume program execution, examine it when suspended, explore the call stack and variables, set watches, evaluate variables, view actual HTML DOM, and so on.
Start debugging with a JavaScript Debug run/debug configuration
Set the breakpoints in your code.
Start the application in the development mode as described above and wait till the application is compiled and the development server is ready.
The Run tool window or the Terminal shows the URL at which your application is running. Copy this URL to specify it later in the JavaScript Debug configuration.
Create a JavaScript Debug configuration. To do that, go to in the main menu, click
, and select Javascript Debug from the list.If you generated your application with
create-vue, RubyMine has already created a JavaScript Debug run/debug configuration with the default name Debug Application and the default URLhttp://localhost:5173. Select this run/debug configuration from the list under the JavaScript Debug node.
In the Run/Debug Configurations: JavaScript Debug dialog that opens, specify the name of the configuration and the URL address at which the application is running in the development mode. You can copy this URL in the Run tool window or in the Terminal, as described above.

Click Debug.
To re-run the configuration, select it from the list in the Run widget and click
 next to it.
When the first breakpoint is hit, switch to the Debug tool window and proceed as usual: step through the program, stop and resume program execution, examine it when suspended, explore the call stack and variables, set watches, evaluate variables, view actual HTML DOM, and so on.
Start debugging from the Run tool window or from the built-in Terminal
If your application is running in the development mode on localhost, in particular, if it was generated with create-vue, you can launch a debugging session right from the >Run tool window or from the built-in Terminal.
Set the breakpoints in your code.
Start the application in the development mode as described above and wait till the application is compiled and the development server is ready.
The Run tool window or the Terminal shows the URL at which your application is running. Hold Ctrl+Shift and click this URL link. RubyMine starts a debugging session with an automatically generated Debug Application configuration of the type JavaScript Debug.
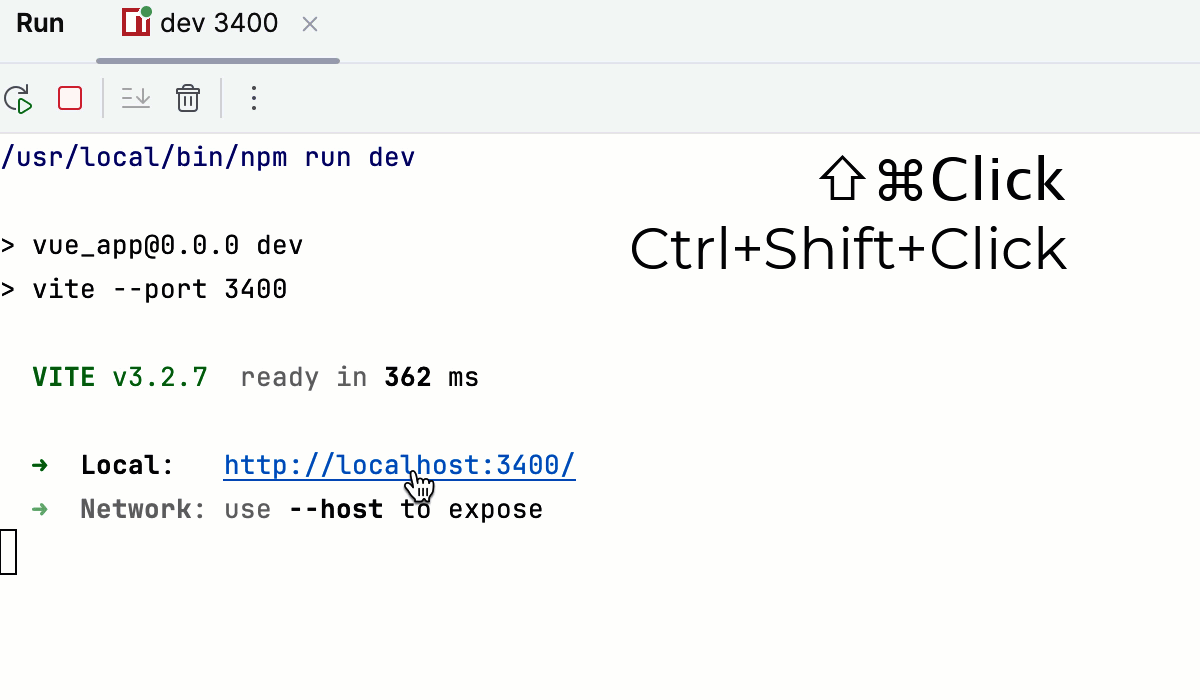
If you launched your application in the development mode from the New Terminal, you can just click the Start debugging in browser button next to the link.

When the first breakpoint is hit, switch to the Debug tool window and proceed as usual: step through the program, stop and resume program execution, examine it when suspended, explore the call stack and variables, set watches, evaluate variables, view actual HTML DOM, and so on.
Troubleshooting for Node.js 17+
If you are using Nuxt in the application and your Node.js version 17 or later, during a debugging session, you may face network connectivity issues. That may result in problems with attaching the debugger or with loading sourcemaps.
The workaround is to pass --host 127.0.0.1 to the server by updating the dev script in your package.json as follows:
Use several frameworks within a project
Sometimes you may need to use other frameworks within one Vue.js project.
To get context-aware coding assistance in each file, create a configuration file .ws-context and specify which framework should be used in each particular file or folder. The settings from this file will override the default configuration.
In the project root, select New | File from the context menu and specify
.ws-contextas the file name.In
.ws-context, use two types of properties:<context-name>with the context value stringA GLOB pattern with a context details object
Use the following context values:
framework:vue,angular,react,svelte,astroangular-template-syntax:V_2,V_17nextjs-project:nextjsastro-project:astrovue-store:vuex,piniavue-class-component-library:vue-class-component,vue -property-decorator,vue-facing-decoratorjsdoc-dialect:jsdoc-typescript,jsdoc-closure
Use path nesting for simplicity.
The last segment of a GLOB path is the file name pattern, it only supports the
*wildcard.If the last segment is a
**it matches all nested directories and files.Top level context properties should have the
/**pattern.
When several patterns match the same file name, the following rules are used for disambiguation:
Choose the pattern with maximum number of path segments, excluding
**segments.Choose the pattern that is a pure file name pattern, which means that it does not end in
**or/.Choose the pattern that was defined first.
Example
Suppose you have a project with a number of frameworks used in various folders.

To get context-aware assistance for each file in the project, add the following code to .ws-context: