Installation
Here's a high-level overview of the steps required for installing YouTrack using a Docker container:
Each step is described in more detail below.
Prepare Your Environment
Ensure that you have Docker installed on the server or virtual machine where you want to install YouTrack. You can download and install Docker from the official website or use a package manager specific to your server's operating system.
When installing software on a server, it's generally recommended to use a user account with administrative or superuser privileges. In Unix-like operating systems, this user is often referred to as "root." In Windows, it's typically an account with administrative rights. Be sure that the account you use to access the server has permission to create folders and files in this environment.
If you're working in a Linux environment, you can usually proceed with the instructions provided here. Just make sure to install Docker on the machine where you want to host the application if it hasn't been installed already.
Our Windows Docker image is based on and supported for Windows Server 2019 and available as an application that is compatible with a Windows container. To learn how to prepare your environment to run a Docker container, please refer to the official Windows documentation.
Because Windows Server containers are tightly coupled to the host operating system version, running this image on newer hosts like Windows Server 2022 or 2025 can produce the error:
The container operating system does not match the host operating system
To run the 2019-based image on newer Windows Server versions, start the container in Docker’s Hyper-V isolation mode by adding --isolation=hyperv to your Docker run command.
Example: docker run -it --isolation=hyperv...
Ensure the Hyper-V feature is enabled on the OS level and that nested virtualization is supported and enabled. A reboot may be required after enabling these features.
To learn more, see Nested virtualization on Azure : A step-by-step guide
Enable Hyper-V to start automatically with bcdedit /set hypervisorlaunchtype auto. Next, restart the system Restart-Computer -Force and then run the hyperV-powershell script mentioned in the article above.
Create and Configure Directories
The YouTrack image is a stateful container. This allows the databases, log files, configuration files, and application data to be stored and maintained even if the container is restarted or moved to a different host.
Before starting the container, you need to provision directories on the host machine to store these files. These directories are then mapped to the YouTrack container as volumes during startup.
The YouTrack application uses the following directories:
Directory | Description |
|---|---|
data | The directory where YouTrack stores its database. For a new installation, this directory must be empty. |
conf | The directory where YouTrack stores configuration files that contain environment settings, JVM options, YouTrack integration settings, and so on. |
logs | The directory where YouTrack stores its log files. |
backups | The directory where YouTrack stores backups. For more details about backups, see Database Backup. |
These directories must be accessible to the user account that runs YouTrack service inside the container. YouTrack uses the non-root account 13001:13001 (group:id, respectively).
Specific instructions for provisioning storage resources vary by operating system. To make sure you see information that is relevant to your installation, select the tab that corresponds with the operating system used in your host environment.
If the host machine runs on Linux, you can execute the following commands to create the required directories on the host machine and apply the required access permissions:
mkdir— this is the command to create directories in Linux.-p— tells the operating system to create parent directories as needed. If any directories in the specified paths do not exist, they are created along with the specified directories.-m 750— sets the permissions (file mode) of the directories to750. In Unix-like systems, file mode permissions are represented as three octal digits, where each digit represents permissions for owner, group, and others (in that order). With750, the owner has read, write, and execute permissions (7), the group has read and execute permissions (5), and others have no permissions (0).<path to <name> directory>— these are placeholders for the actual paths to the directories you want to create. Replace these with the actual paths where you plan to store YouTrack application data and other files.chown— changes ownership of the created directories.-R— tells the operating system to perform this action recursively, changing ownership for the specified directories and all their contents.13001:13001— specifies the user and group to which ownership is being changed. In this case, it changes the ownership to user ID 13001 and group ID 13001.<path to <name> directory>— these are placeholders for the actual paths to the directories whose ownership is updated. As with themkdircommand, you need to replace these with the actual paths where you plan to store YouTrack application data and other files.
If the host machine runs on Windows, you can run the following commands to create the required YouTrack directories on the host machine PowerShell:
New-Item— creates the directories with the specified paths.<path to <name> directory>— these are placeholders for the actual paths to the directories you want to create. Replace this with the actual location where you plan to store YouTrack application data and other files.
Pull a YouTrack Image
Locate the latest version of the software on Docker Hub.
Each version and build is listed by tag.
Once you have located the image that corresponds with the most recent YouTrack version, you can click to copy the pull command directly from the Docker Hub repository.
Open a CLI tool in the target environment.
Use the command to pull the image from the repository and install it on your local machine or host environment.
The command uses the following format:
docker pull jetbrains/youtrack:<version>If you didn't copy the command directly from Docker Hub, replace the
<version>variable with the full version number of a YouTrack build.
Locate the latest version of the software on Docker Hub.
Each version and build is listed by tag.
Once you have located the image that corresponds with the most recent YouTrack version, you can click to copy the pull command directly from the Docker Hub repository.
Open a CLI tool in the target environment.
Use the command to pull the image from the repository and install it on your local machine or host environment.
The command uses the following format:
docker pull jetbrains/youtrack-windows:<version>If you didn't copy the command directly from Docker Hub, replace the
<version>variable with the full version number of a YouTrack build.
Run the Docker Container
Once you have set up the directories where YouTrack stores application data as described above, you can define mappings to the directories inside the Docker container as arguments in the command you use to run the container.
Use the following command to start the container for the YouTrack service:
This command automatically creates the volumes required for storing application data and maps them to the directories provisioned in the host environment. It also specifies the port the YouTrack service uses to send and receive data on the server.
Use the following information to customize this command as needed:
-ita command-line flag that attaches both the input and output of the container to your terminal. This lets you see the output produced by the container as if it were running directly in your terminal.When the container starts, you will see the log messages generated during the initialization process as well.
Pressing Ctrl + C while the terminal is attached to a container's output sends an interrupt signal to the container's running process. This is similar to how you would stop a regular process in your terminal. This command causes the container to shut down, so be cautious when using Ctrl + C in this context.
If you want to detach the terminal from the container output without interrupting the processes running in it, press Ctrl + P followed by Ctrl + Q.
For more details, please refer to the official Docker documentation.
--name youtrack-server-instancethis is an arbitrary name for the container.By default, Docker generates random and sometimes cryptic names for containers. Use the
--nameoption to give your container a more meaningful and human-readable name that makes it easier to identify and manage.-v <path to <name> directory>:/opt/youtrack/<name>these options specify the location of the storage provisioned on the host machine and map them to the corresponding/opt/youtrack/<name>directories inside the container.-p <port on host>:8080parameter that defines the port mapping. This tells the host machine to listen for traffic on the<port on host>port and propagate all traffic to port8080inside the container.The listen port must be accessible to end users or to the reverse proxy server, if one is in use. This may require explicitly opening access to this port through the firewall.
The YouTrack service starts on {0.0.0.0:8080} inside the Docker container, and port 8080 is mapped to the specified <port on host>. This way the service can be accessed from any machine that has network access to the <port on host> of your host machine. For instance, if the fully qualified domain name (FQDN) of the host machine is host.mydomain.com and the <port on host> is 7777, the service will be available at http://host.mydomain.com:7777.
Configure YouTrack
At this point, the application is installed with the default configuration. To ensure that YouTrack is set up properly to work in your server environment, you need to confirm and fine-tune its configuration.
On the first run, the YouTrack service starts with a web-based Configuration Wizard. The wizard is accessible from the web address where the service is hosted.
The Configuration Wizard is secured with a one-time access token, which you need to copy from the log output from Docker. For example:
Using the example from the previous section, the Configuration Wizard would be available from http://host.mydomain.com:7777//?wizard_token=FOT8QIzHuktzvxtiT1Ax
To finalize the installation, open the URL for the Configuration Wizard in your web browser and continue with the instructions below.
To configure the new Docker installation:
In the Configuration Wizard, click Set up.
On the Confirm Settings page, confirm or change the basic system settings.
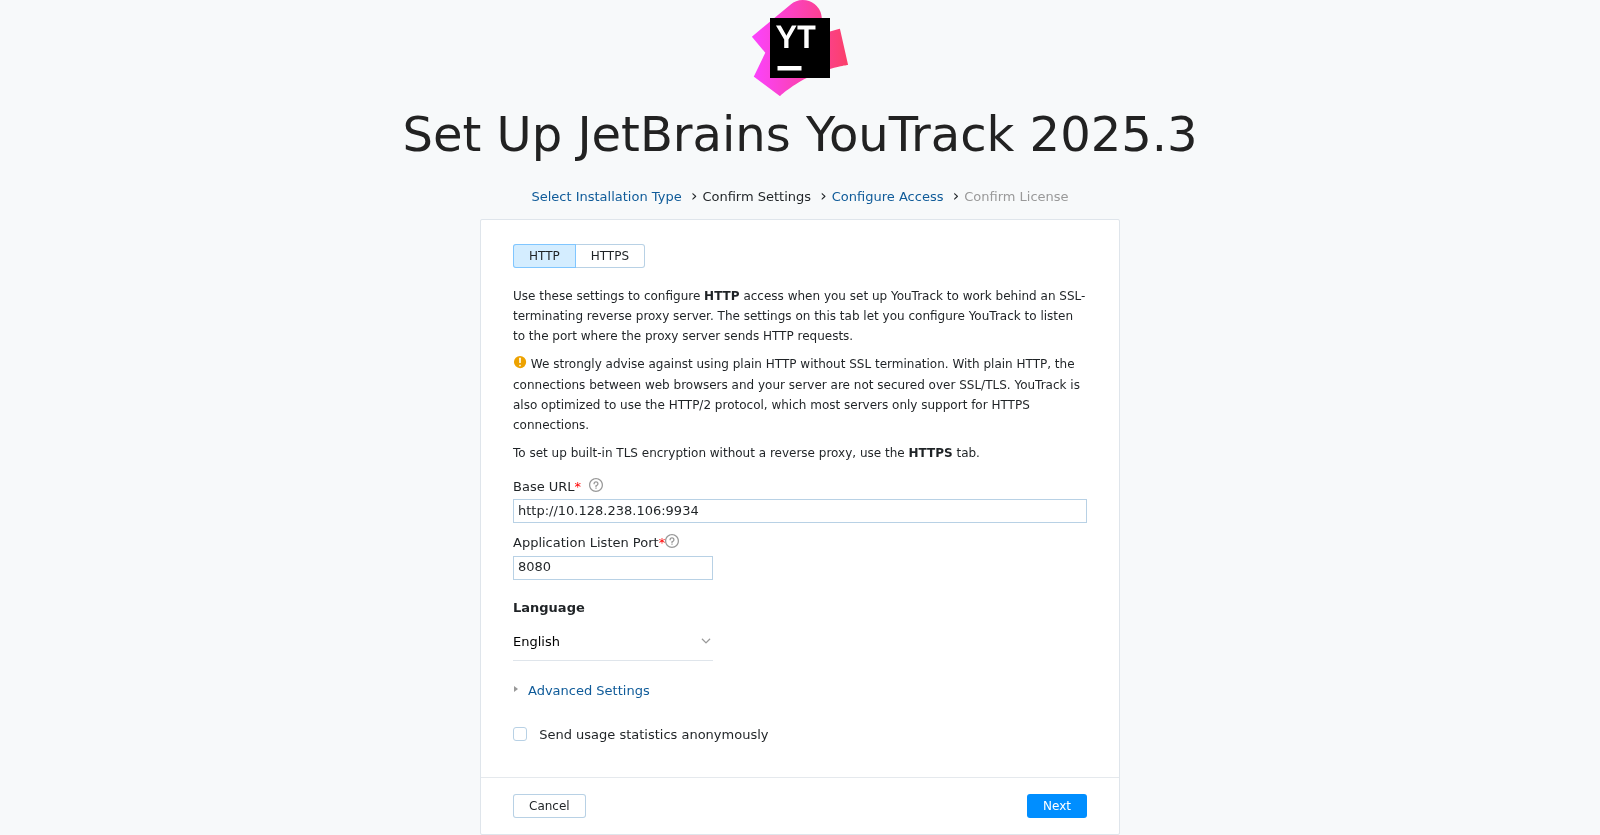
Here, you can also enable the built-in TLS to secure the network connection for the server. For detailed instructions, see Enable HTTPS during Installation.
Setting
Description
HTTP | HTTPS
Lets you enable or disable the built-in TLS and configure the secure network connection to your server. If you enable HTTPS, the TLS-specific settings are displayed.
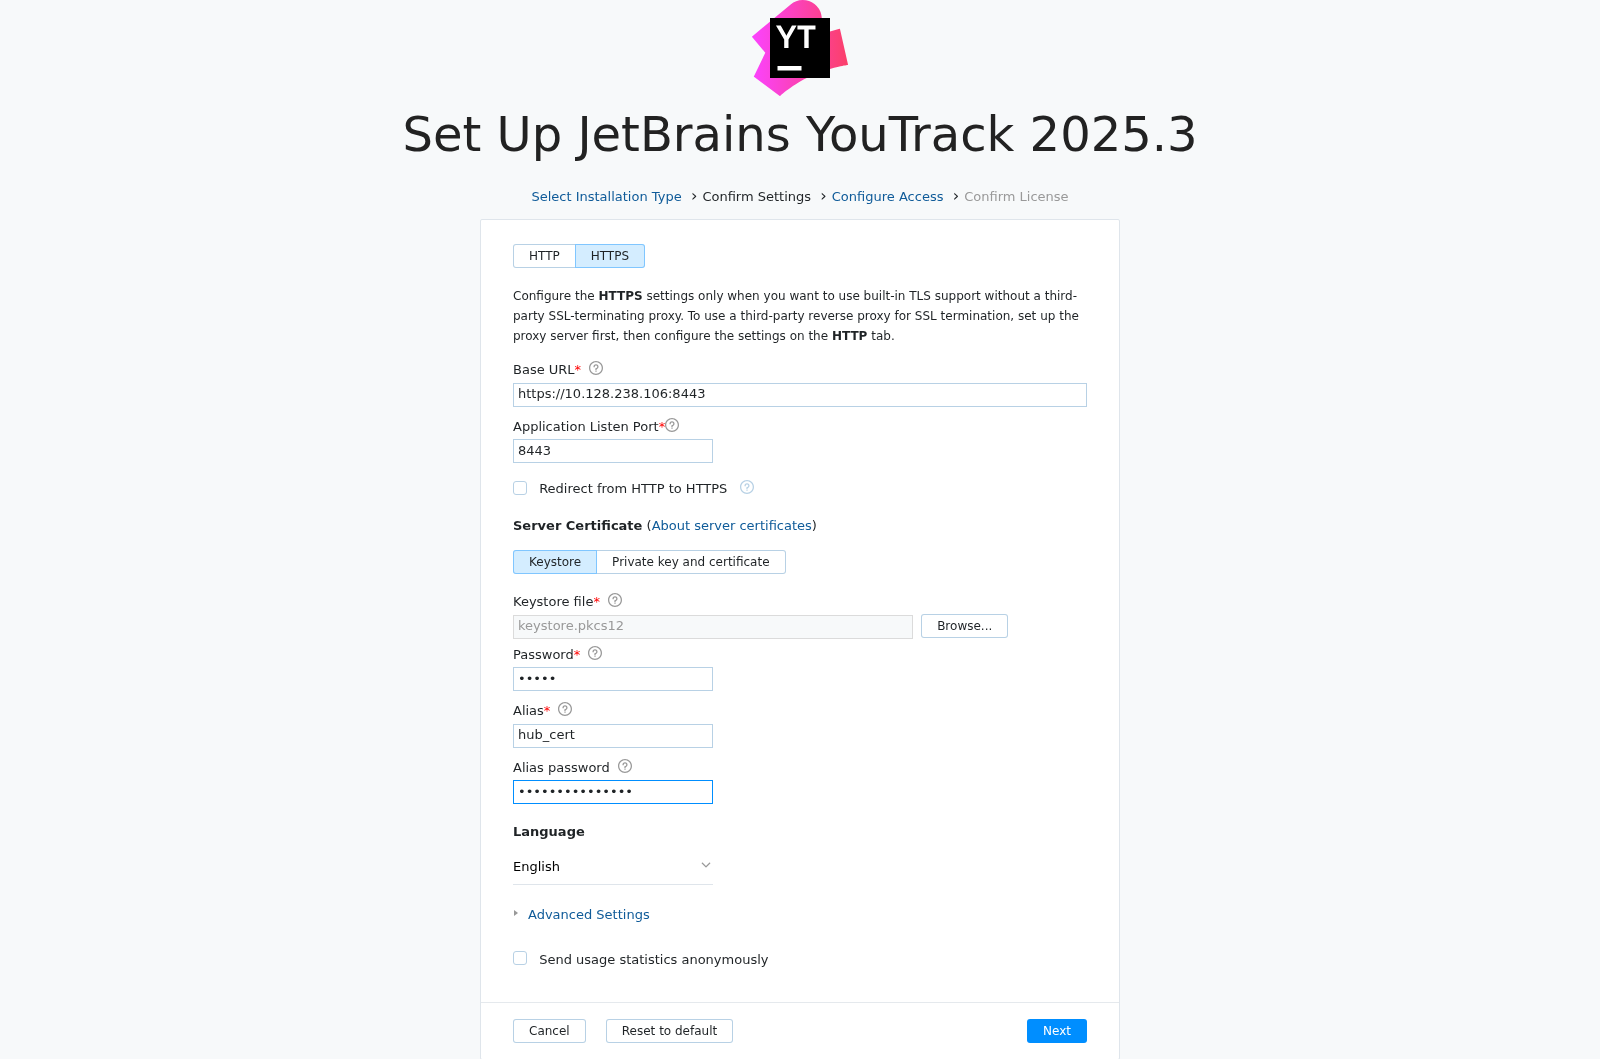
For details, see TLS Settings.
Base URL
The URL where end users access YouTrack Server.
Application Listen Port
The port your YouTrack Server server listens to after installation.
Language
The default language that is shown in the user interface.
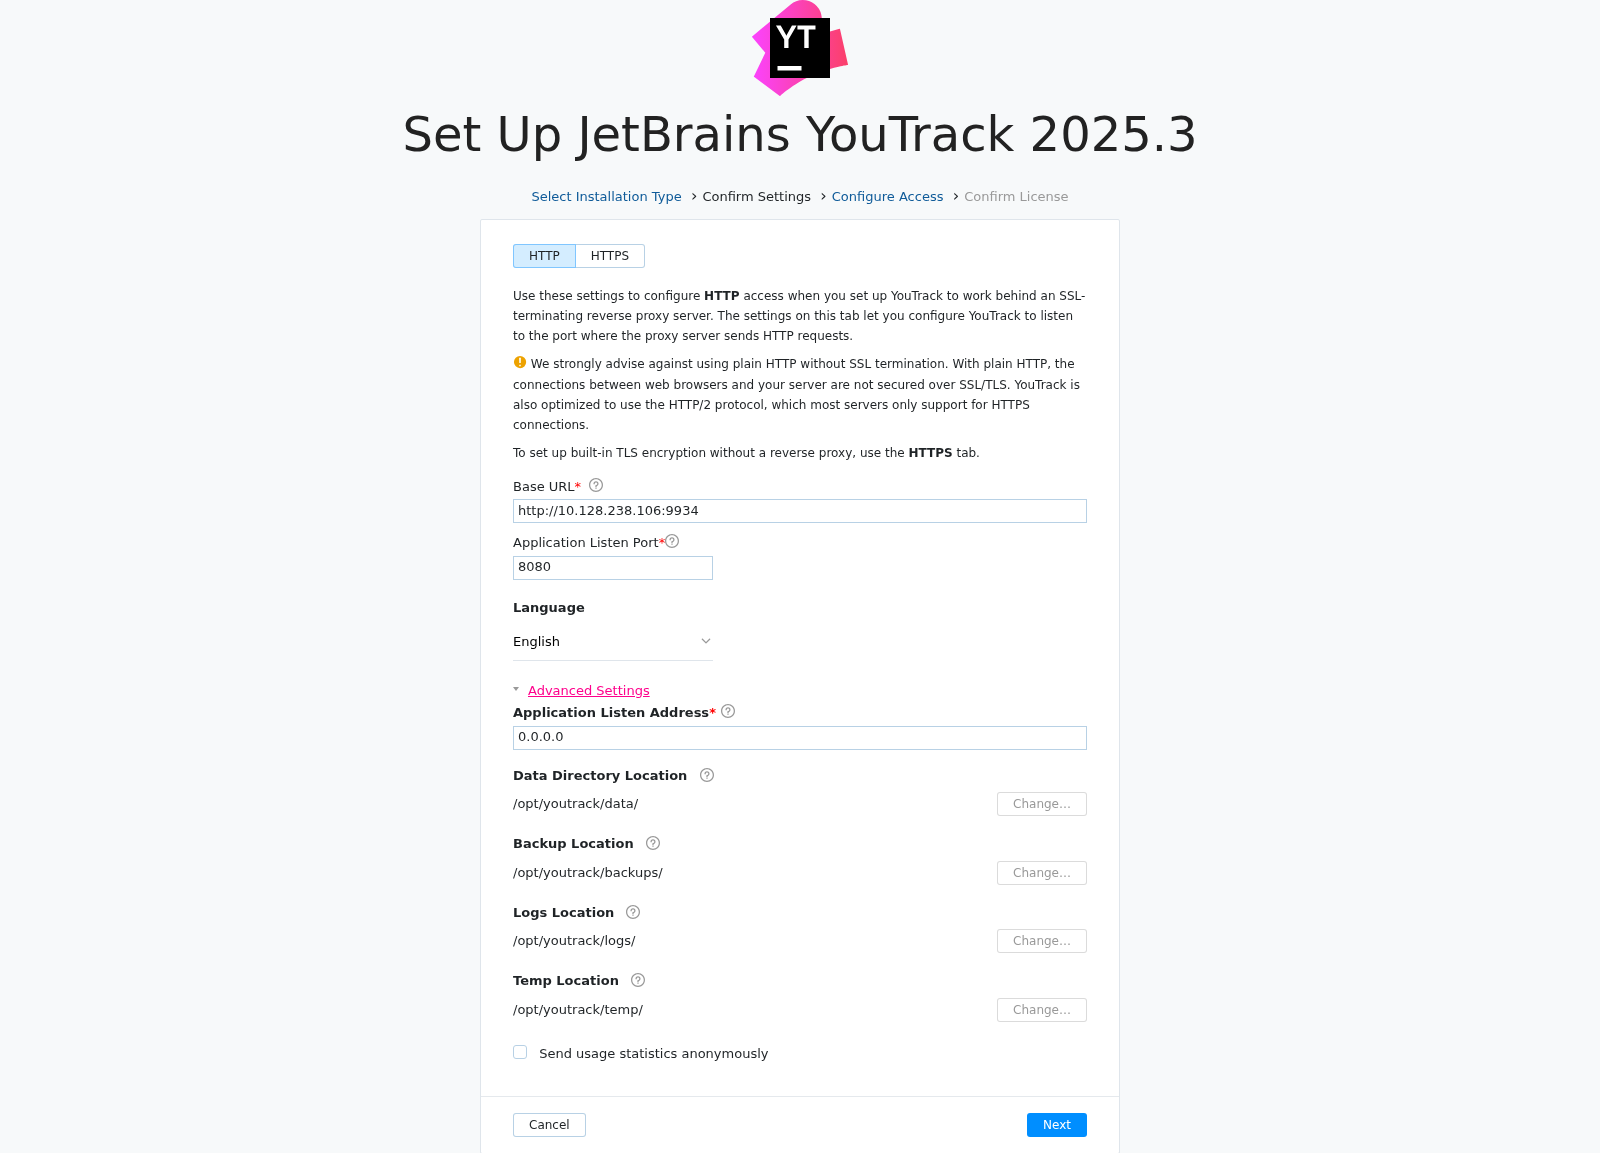
Expand the Advanced Settings section to review the locations where YouTrack Server stores product data.
Setting
Description
Data Directory Location
The directory where YouTrack Server stores content data.
Backup Location
The directory where YouTrack Server stores backups of the database.
Logs Location
The directory where YouTrack Server stores log files.
Temp Location
The directory where YouTrack Server stores product-specific temporary files.
Given that you just created these directories during the installation, you shouldn't need to update them at this point.
If you were to change the location for any of these files, you need to change bindings between the folders on a hosted machine and YouTrack-specific directories inside the container. For details, see Change Database Location.
To share usage statistics with JetBrains, keep the Send usage statistics anonymously option enabled. This feature helps JetBrains track usage statistics to make YouTrack Server better. We never share collected data with any third party.
When done, click Next.
On the Configure Access page, configure the following settings:
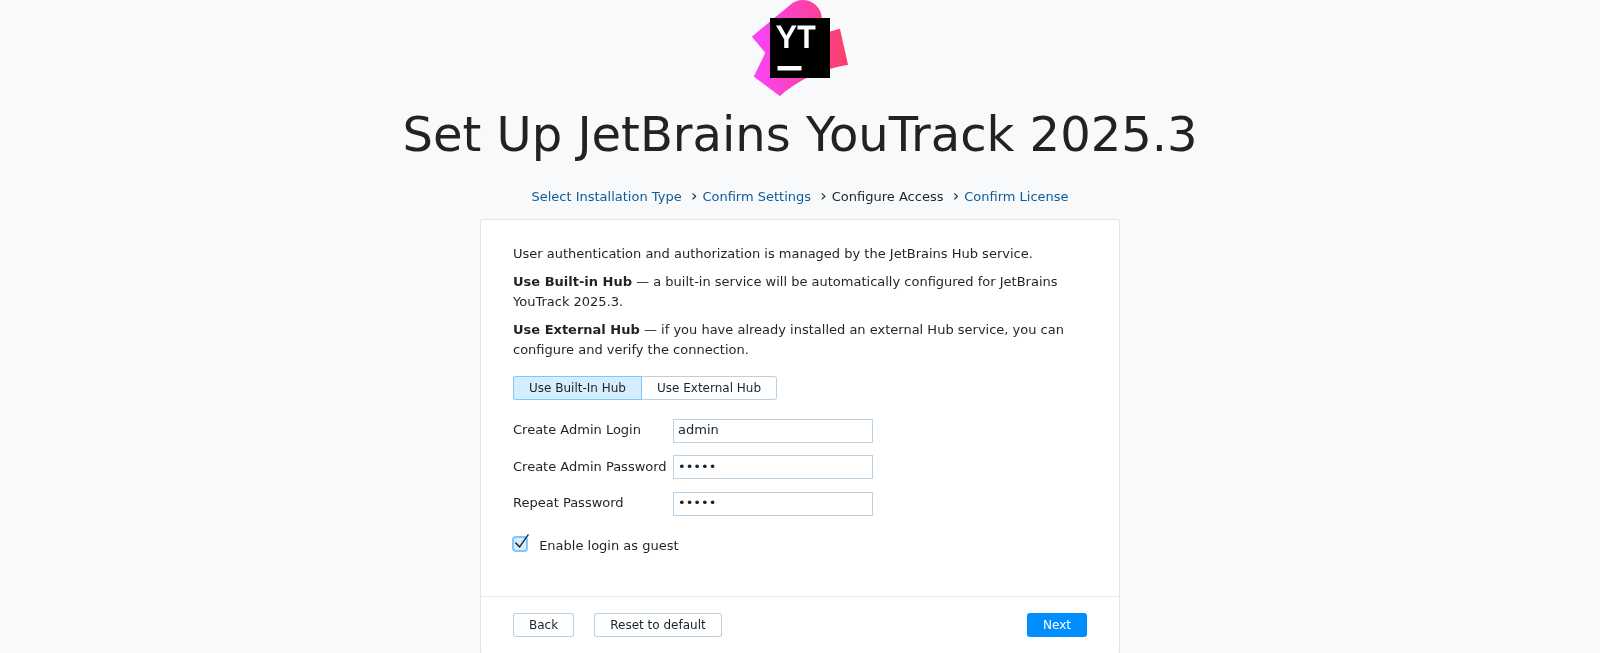
Enter and confirm the password for the default system administrator account
admin. To assign a different username to the administrator account, edit the Create Admin Username setting.Deselect the Enable login as guest option to ban the guest user account.
When done, click Next.
On the Confirm License page, verify the license name and key.

When done, click Finish.
The configuration is applied to your YouTrack Server server.
Do not close the page in the browser until the setup is complete. When the YouTrack Server server is ready:
If you switched off the option to log in as a guest, you are redirected to the login page.
If you left the Enable login as guest option enabled, you are redirected to the Dashboard.
That's it. Your YouTrack Server service is installed and ready for use.
Troubleshooting
If you experience problems installing YouTrack, see if any of the following conditions apply.
Condition — You restart your container and all of your data is lost.
Condition — You encounter the following error message when restarting the container:
Cause | Solution |
|---|---|
These conditions indicate that the container was started without provisioning directories on the host machine to store application files. | As long as you haven't removed the container, your data should still be available inside the container's writable layer. Follow these steps to recover your data:
If successful, your data is restored and running in a new container. Since it's now safely mounted on your host, you can restart and update your installation without losing data. |