Change Field Type
You can convert most fields that store simple types to another type that stores similar data. The following field type conversions are supported:
Fields that store data as a
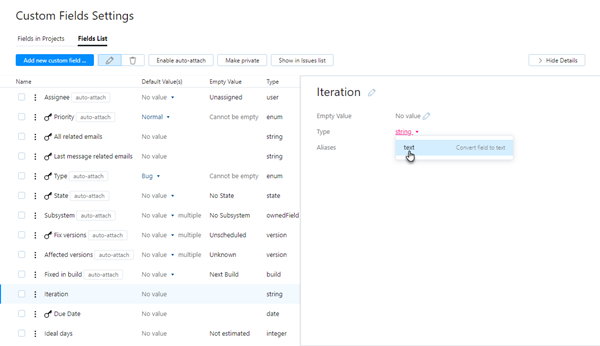
stringcan be converted to storetext. You cannot converttextfields tostring.Fields that store a
datecan be converted to storedate and time, and vice versa.For fields that store data as an
integer,period, orfloat, you can convert the data to a target format within this set of types. For example, you can convert anintegertype to aperiodtype. Here, you have the option to convert the value that is stored as an integer to a number of hours or number of days.
For enumerated field types, the type is set when the field is created and cannot be changed.
Field type is a global property and cannot be modified on a per-project basis.
To change a field's type:
From the Core Features section of the Administration menu, select Custom Fields.
Select the Fields List tab.
Select the field that you want to change in the list.
If the sidebar is hidden, click the Edit button in the toolbar or click the Show Details button.

Select the desired type from the Type list.
If you want to replace an existing custom field with a field that uses a different type, you can't use the Replace operation. Instead, you need to add a custom field that stores values in the desired type to the project and migrate the data manually from the original field.
To migrate data from one custom field to another custom field:
From the Edit Project page, select the Fields tab.
Click the Add field to project button.
Use the settings to define a custom field or select an existing field that stores values in the desired type.
If the new custom field stores enumerated values, add values to the new custom field that are used in the existing custom field.
- When finished, update the values that are stored in the custom fields for your project:
From the Issues list, enter a search query that finds all of the issues that contain a specific value in the original custom field. For enumerated types, start with the first value in the set. For example:
In #{Project} Status: Submitted.Select all of the issues that are returned by the search query. Use the keyboard shortcut Ctrl + A (⌘ + A on OS X) to select all of the issues that are returned by the query.
Use a command to update all of the selected issues and assign them a value in the new custom field. For example:
Secondary State Submitted. To minimize notification spam, apply the commands silently.Repeat this step until you have migrated all of the data that was stored in the original custom field to the new custom field.
- Return to the page and remove the original custom field from the project.
The field and its related values are deleted from the project.
All of the values that were previously stored in the original custom field are now stored in the new custom field.