What’s New in IntelliJ IDEA 2024.3
IntelliJ IDEA 2024.3 introduces a range of powerful new features to elevate your development experience. The IDE now offers a representation of your code’s logical structure, streamlines the debugging experience for Kubernetes applications, provides cluster-wide Kubernetes log access, and officially moves K2 mode out of Beta. Explore this page for detailed updates across all areas of the IDE.
Key highlights
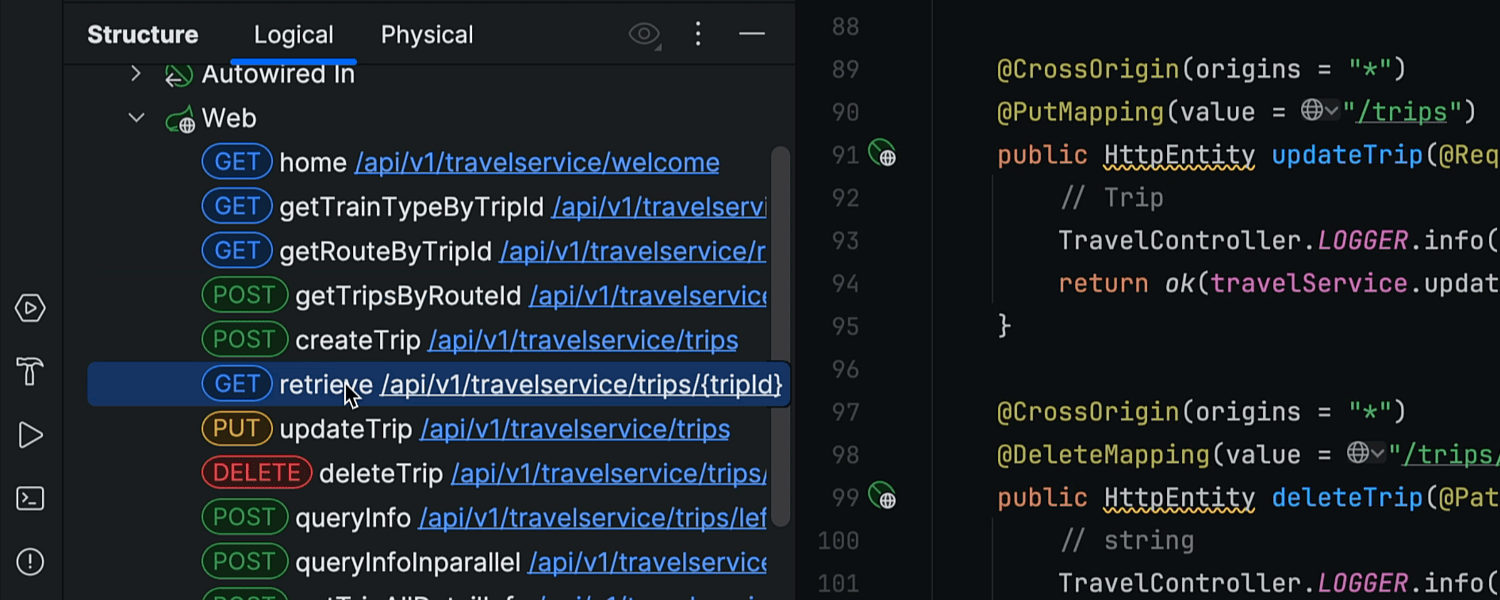
Logical code structure in the Structure tool window
Ultimate
The Structure tool window now includes a Logical code structure alongside the familiar Physical structure. This allows you to view not only classes, methods, and fields but also the links and interactions between components in your project. For example, when you open a controller in a Spring Boot application, you can see its endpoints and the autowired application components. This enhanced view helps you understand the project structure and allows you to navigate through the project by following both code usages and meaningful connections.
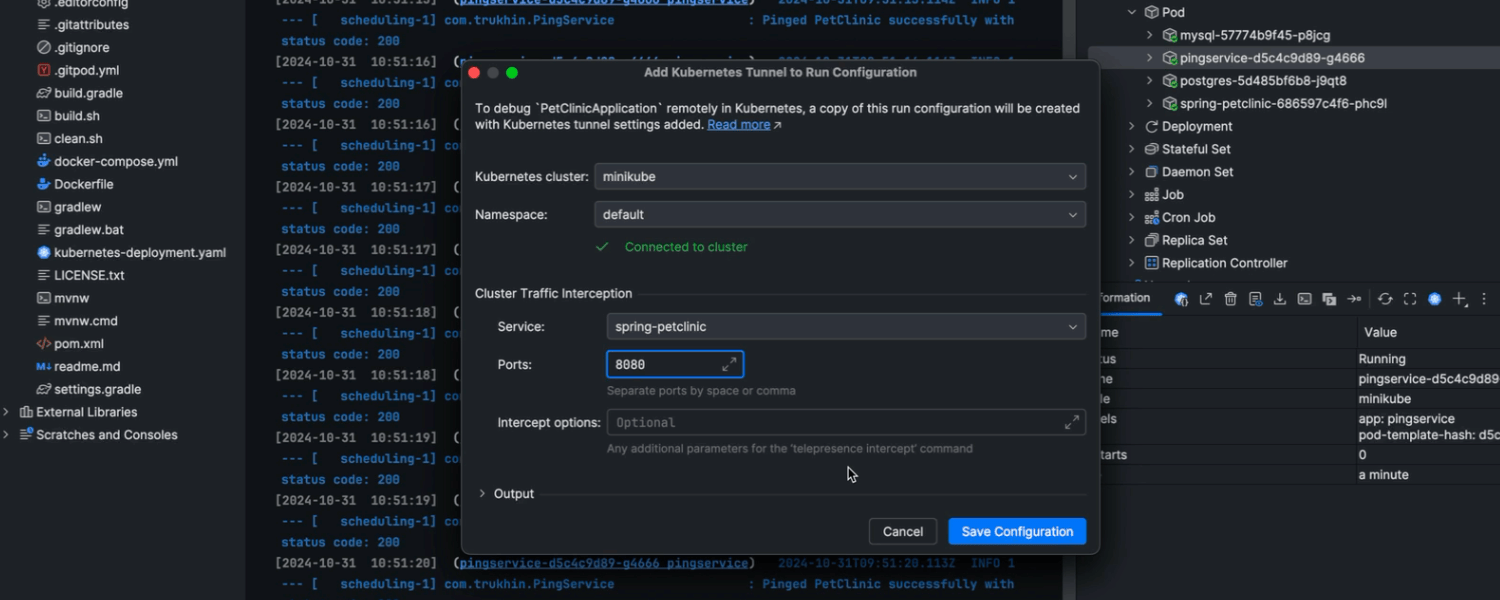
Improved Kubernetes application debugging experience
Ultimate
We've made debugging Kubernetes applications even easier. You can activate tunnel debugging simply by clicking on the ellipsis next to the Debug button and selecting Add Tunnel for Remote Debug. This makes your workstation a virtual part of the Kubernetes cluster, allowing you to swap in a pod and debug microservices locally with your preferred tools. Other microservices will interact with your workstation as though it's the pod you're debugging, with full network access to the rest of the cluster. Even non-Kubernetes-aware debuggers work flawlessly. Additionally, the new Forward Ports section in the Kubernetes UI under the Services tool window simplifies port forwarding.
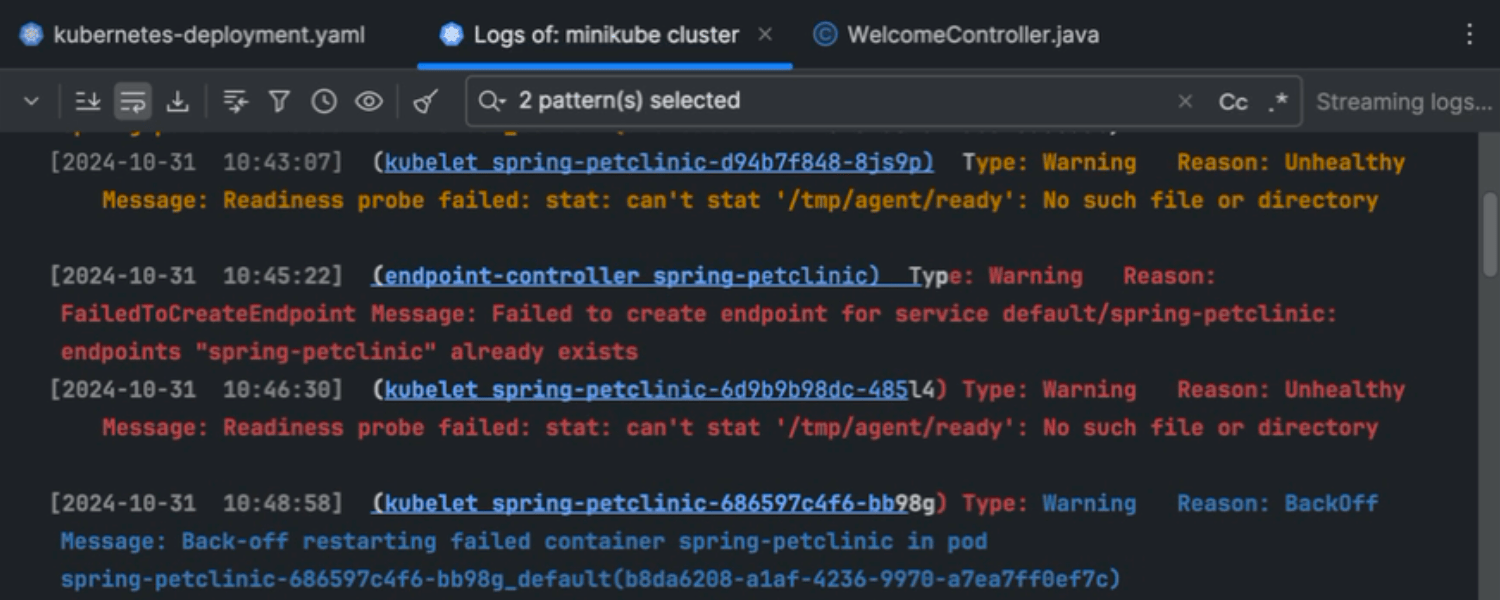
Kubernetes cluster logs
Ultimate
IntelliJ IDEA now offers cluster-wide Kubernetes log access with streaming and pattern matching – essential tools for developers, as well as DevOps and SRE teams. This feature provides a centralized view of all events across pods, nodes, and services, helping you quickly identify issues without manually checking each log. Real-time streaming enables immediate diagnostics, while pattern matching automates the detection of key events and errors, such as out-of-memory issues or unusual network activity. Learn more about this feature and how to use it in this blog post.
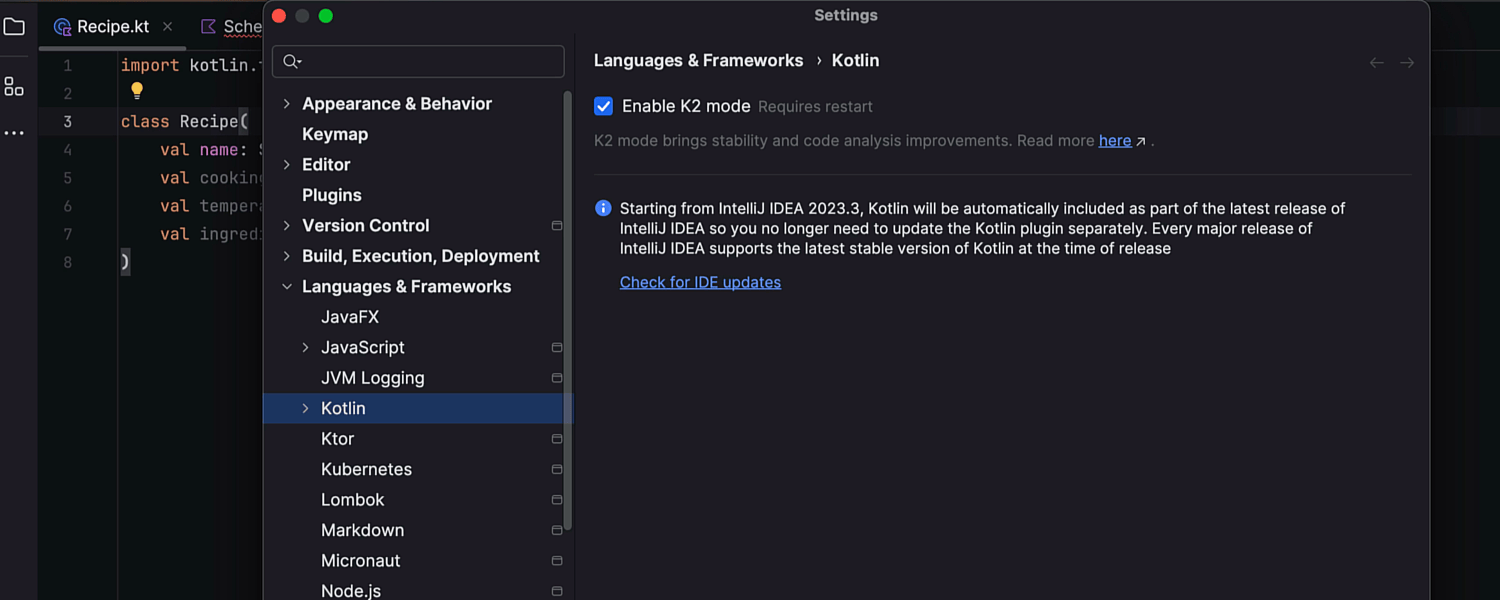
Stable Kotlin K2 mode
In IntelliJ IDEA 2024.3, K2 mode has officially moved out of Beta and is now Stable and ready for general use. K2 mode significantly improves Kotlin code analysis stability, memory consumption efficiency, and the IDE’s overall performance. K2 mode now offers improved feature-parity with Java, and support for all Kotlin 2.1 features. To explore its capabilities, go to Settings/Preferences | Languages & Frameworks | Kotlin.
AI Assistant
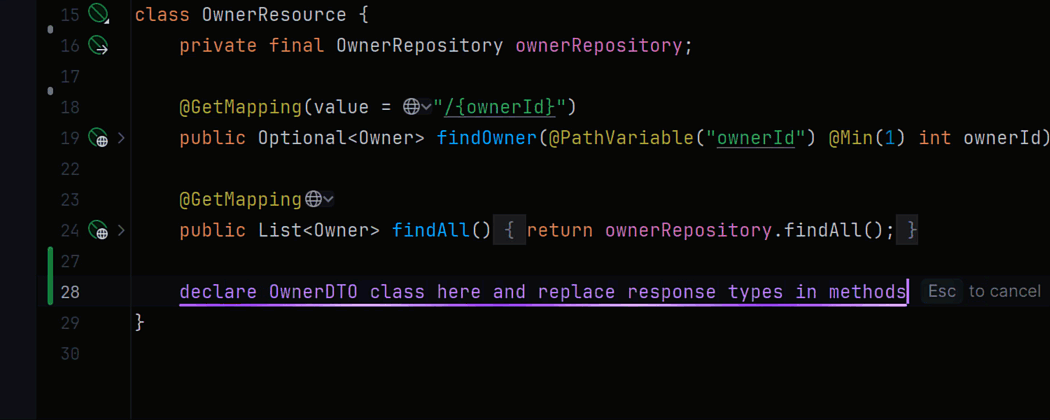
Inline AI prompts
IntelliJ IDEA 2024.3 introduces inline AI prompts, offering a seamless way to interact with AI Assistant directly in the editor. You can type requests in natural language, which AI Assistant instantly interprets and converts into code changes, marked with purple in the gutter for easy tracking. Inline AI prompts are context-aware, automatically including related files and symbols for more accurate code generation. This feature supports Java, Kotlin, Scala, Groovy, JavaScript, TypeScript, Python, JSON, and YAML file formats, and is available to all AI Assistant subscribers.
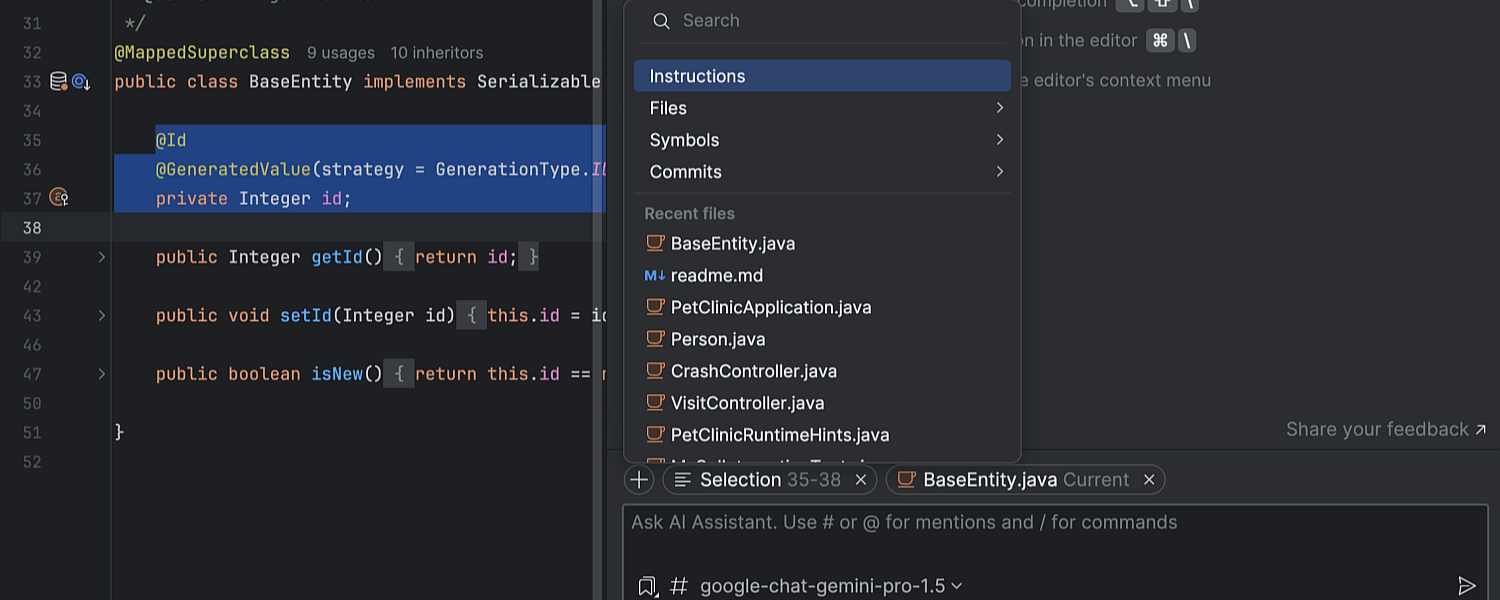
Improved context management
In this update, we’ve made managing the context AI Assistant takes into account with its suggestions more transparent and intuitive. A revamped UI lets you view and manage every element included as context, providing full visibility and control. The open file and any selected code within it are now automatically added to the context, and you can easily add or remove files as needed, customizing the context to fit your workflow. Additionally, you can attach project-wide instructions to guide AI Assistant’s responses throughout your codebase.
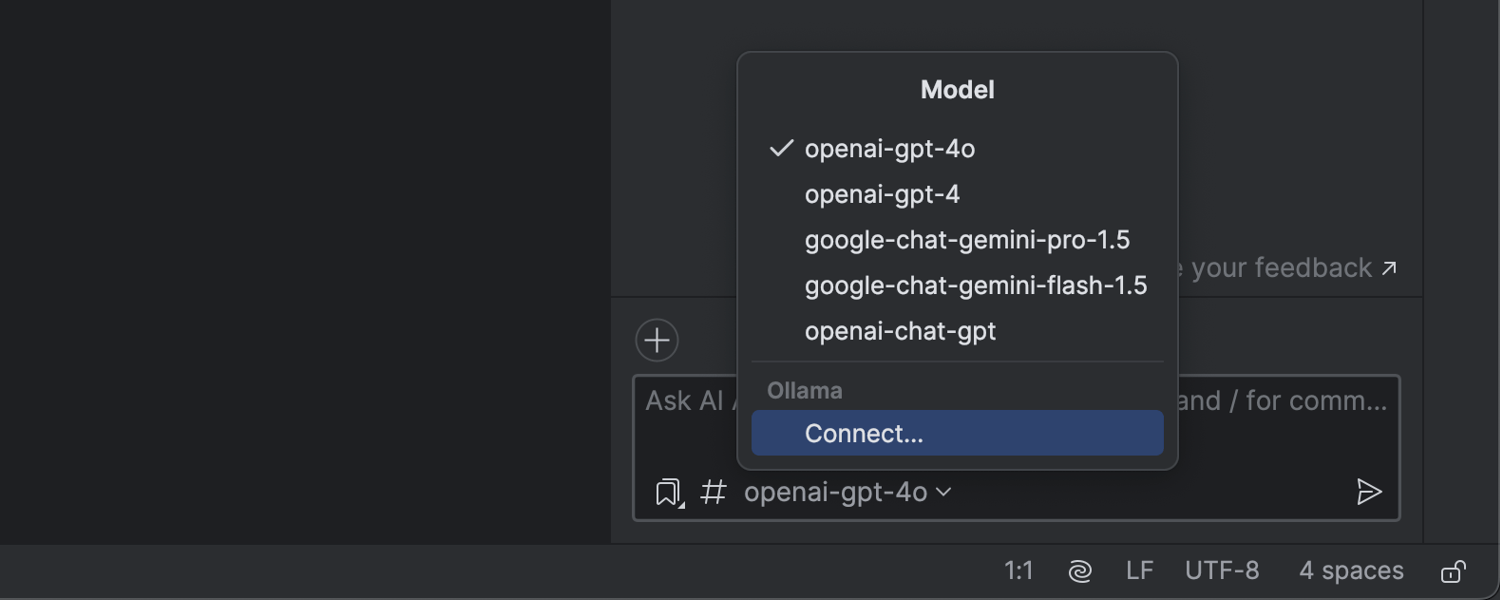
Option to choose a chat model provider
You can now select your preferred AI chat model, choosing from Google Gemini, OpenAI, or local models on your machine. This expanded selection allows you to customize the AI chat’s responses to fit your specific workflow, offering a more adaptable and personalized experience.
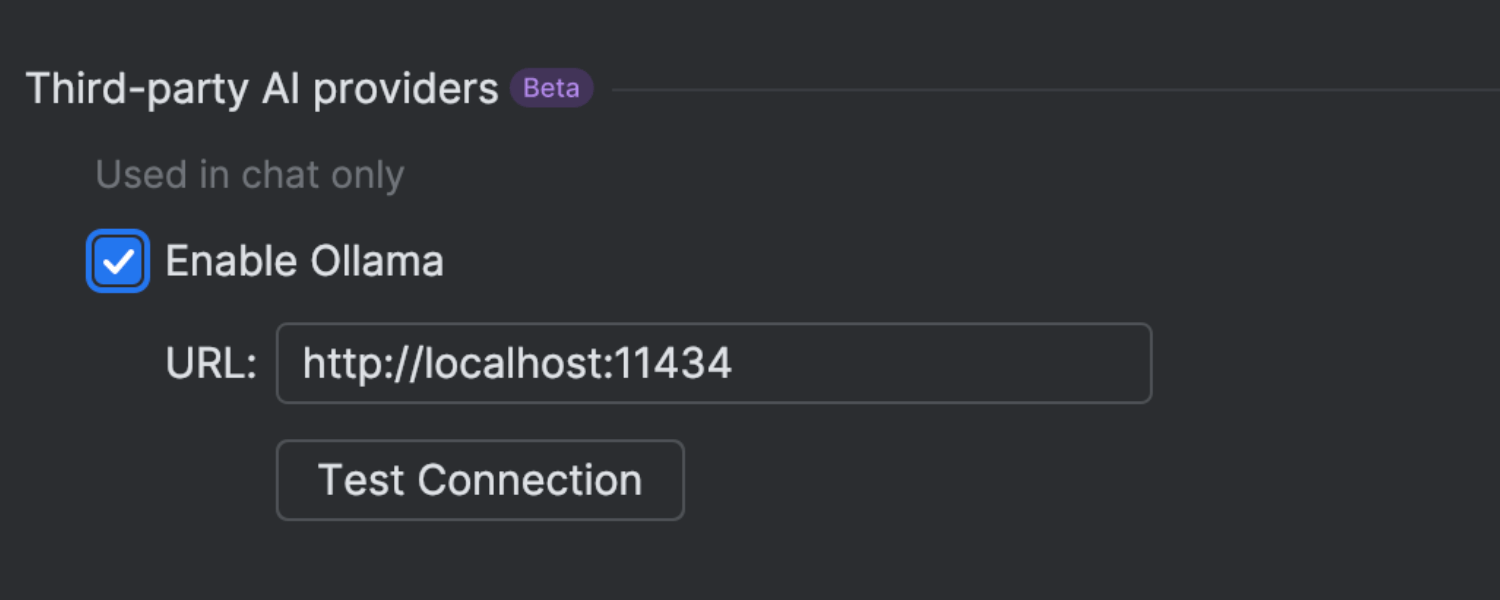
Local model support via Ollama
In addition to cloud-based models, you can now connect the AI chat to local models available through Ollama. This is particularly useful for users who need more control over their AI models, offering enhanced privacy, flexibility, and the ability to run models on local hardware.
To add an Ollama model to the chat you need to enable Ollama support in AI Assistant’s settings and configure the connection to your Ollama instance.
Java and Kotlin


Improvements in constant conditions
In version 2024.3, IntelliJ IDEA’s data flow engine handles aliasing cases more accurately, leading to fewer false positives in inspections and a more reliable coding experience. This enhancement applies to both Kotlin and Java, allowing for improved analysis in scenarios where references may point to the same instance.
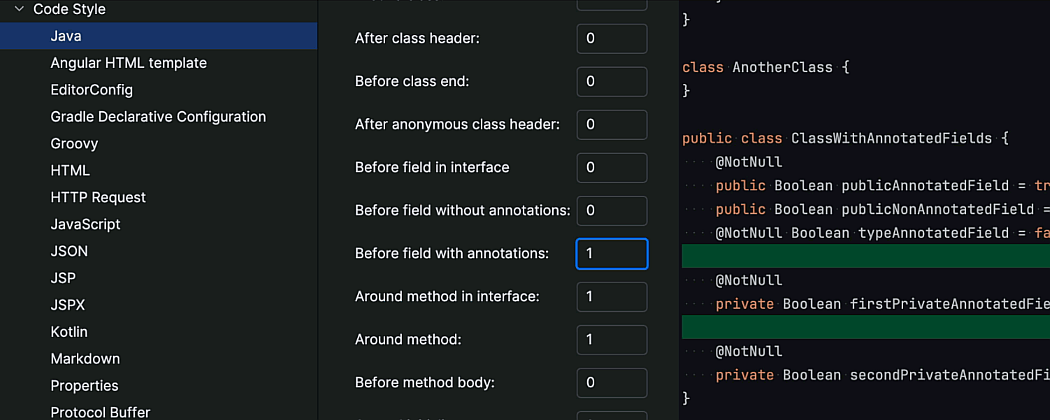
Java code formatter improvements
IntelliJ IDEA’s code formatter now allows you to retain blank lines between annotations and field declarations, a style that is commonly used in JPA entities to enhance readability. Previously, the formatter removed these lines by default. The new option to control this behavior can be found under Settings | Editor | Code Style | Java | Blank Lines.
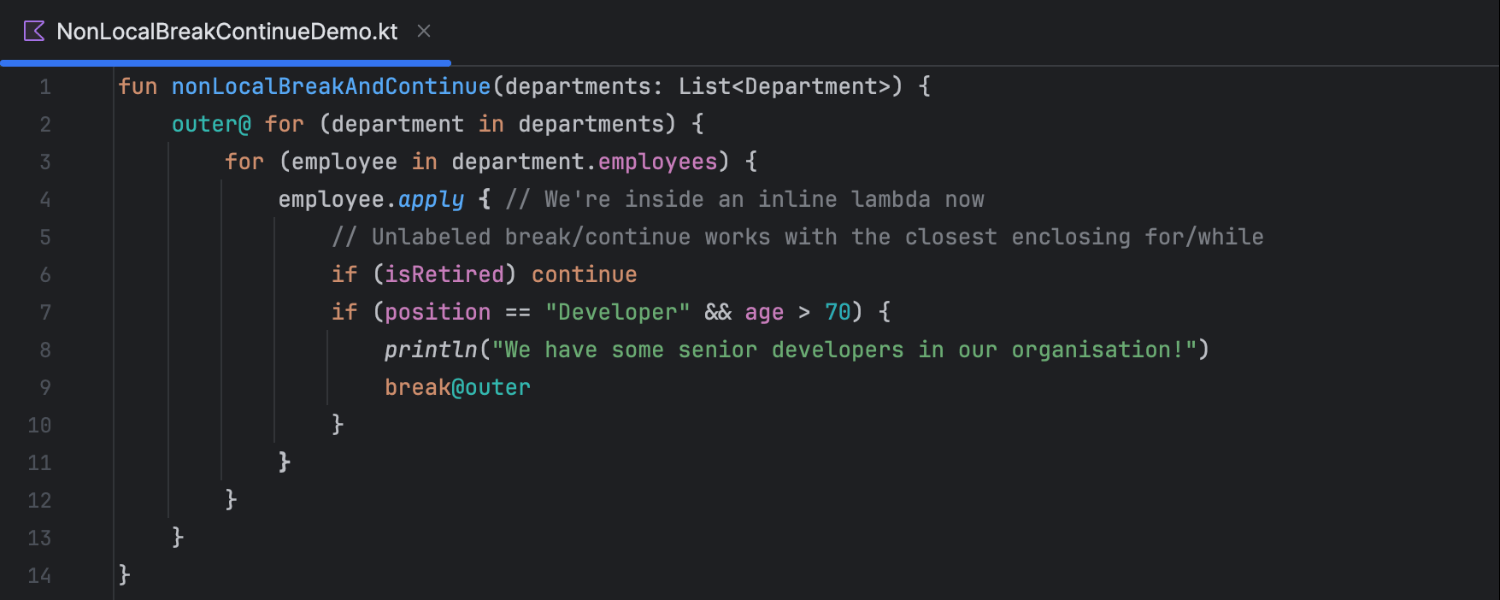
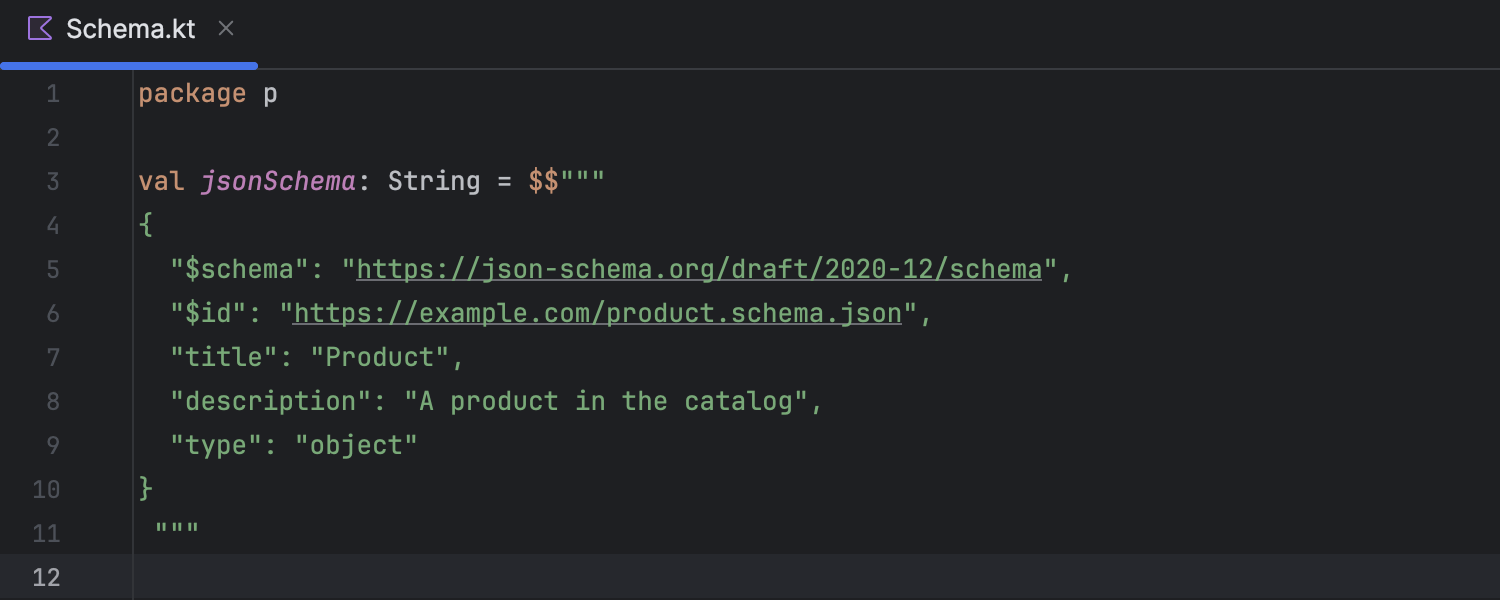
Support for Kotlin 2.1 experimental features
With K2 mode enabled, IntelliJ IDEA supports a pair of experimental language features
of Kotlin 2.1. First, you can now use non-local break and
continue statements inside lambdas being passed as arguments to inline
functions. The other newly supported feature is multi-dollar interpolation, which
makes it easier to work with strings that include literal $ symbols and eliminates
the need for workarounds like ${'$'}. This is particularly practical
when declaring JSON schemas in your code, for example.
Scala

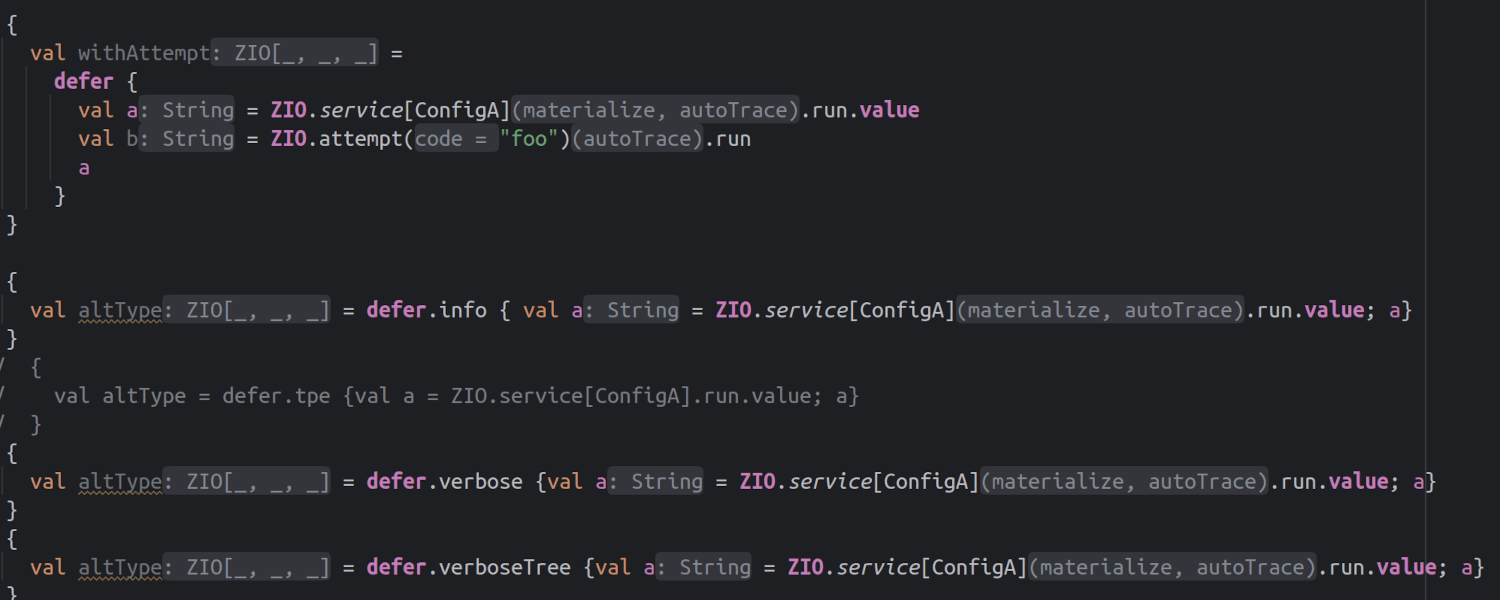


Scala 3 support
IntelliJ IDEA now gives you the option to use compiler-based type inference for transparent inline method calls in Scala 3. This enhancement improves support for libraries that rely on macros, unlocking all type-based features (such as code completion, navigation, type hints, etc.) for macro-based code. The feature is currently experimental.
IntelliJ IDEA 2024.3 offers full support for named tuples, a new experimental feature in Scala 3.5 that will become a standard feature in Scala 3.6. As the title suggests, named tuples allow you to name the components of a tuple so that they can be accessed with readable names.
Additionally, IntelliJ IDEA is better at recognizing opaque types. It was already able
to recognize the opaque keyword, but in practice, IntelliJ IDEA has
handled opaque types just like standard (i.e. transparent) type aliases. Opaque types
are now handled as abstract types, hiding their underlying definitions.

Scala CLI
When you open a folder that contains a project.scala file with your
project’s configuration, IntelliJ IDEA will now recognize that it’s a Scala CLI
project. You can also create a new BSP-based Scala CLI project in the
New Project wizard and add new Scala files to it, just as you can for
sbt-based projects.

New project model for sbt projects
IntelliJ IDEA’s project model now represents sbt projects more accurately, separating production and test sources into distinct modules. The new model improves dependency handling and provides the ability to configure separate compiler options for different scopes. This feature is currently in Beta.
Improved compiler-based highlighting
We reduced the number of cases when multiple compilations were necessary. For example, in instances where refactorings that affect multiple files result in many compilation requests. In the new release, IntelliJ IDEA analyzes and batches these requests and then issues a single request with a wider compilation scope. This reduces CPU resource utilization and optimizes the compiler’s highlighting experience.
We’ve also fixed some edge cases where duplicated parser errors are shown, both from the IntelliJ IDEA Scala parser and from the compiler.
User experience
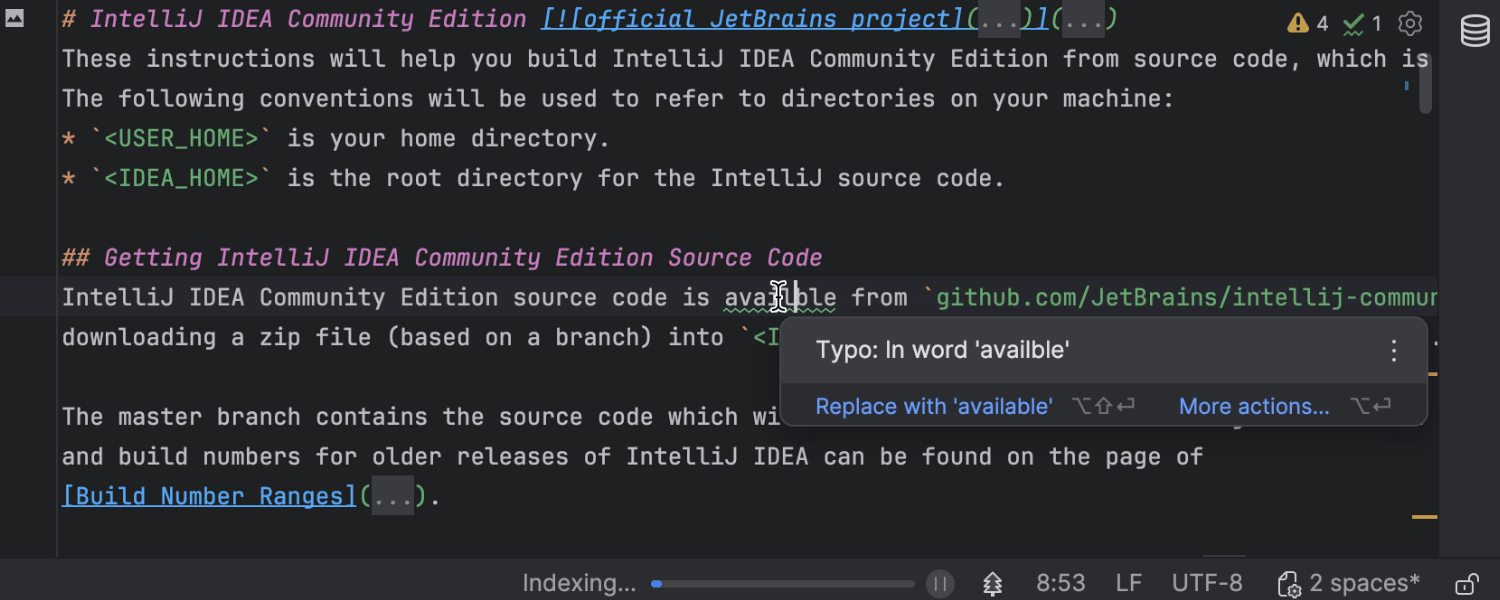
Spelling and grammar checks during indexing
Building on the progress made in the 2024.2 release, we’re increasing the number of essential features that are available while the project model is being built and indexed. In version 2024.3, spelling and grammar checks are accessible even while indexing is in progress. This allows you to catch errors, such as those in Markdown documents and documentation tags, without waiting for indexing to finish.
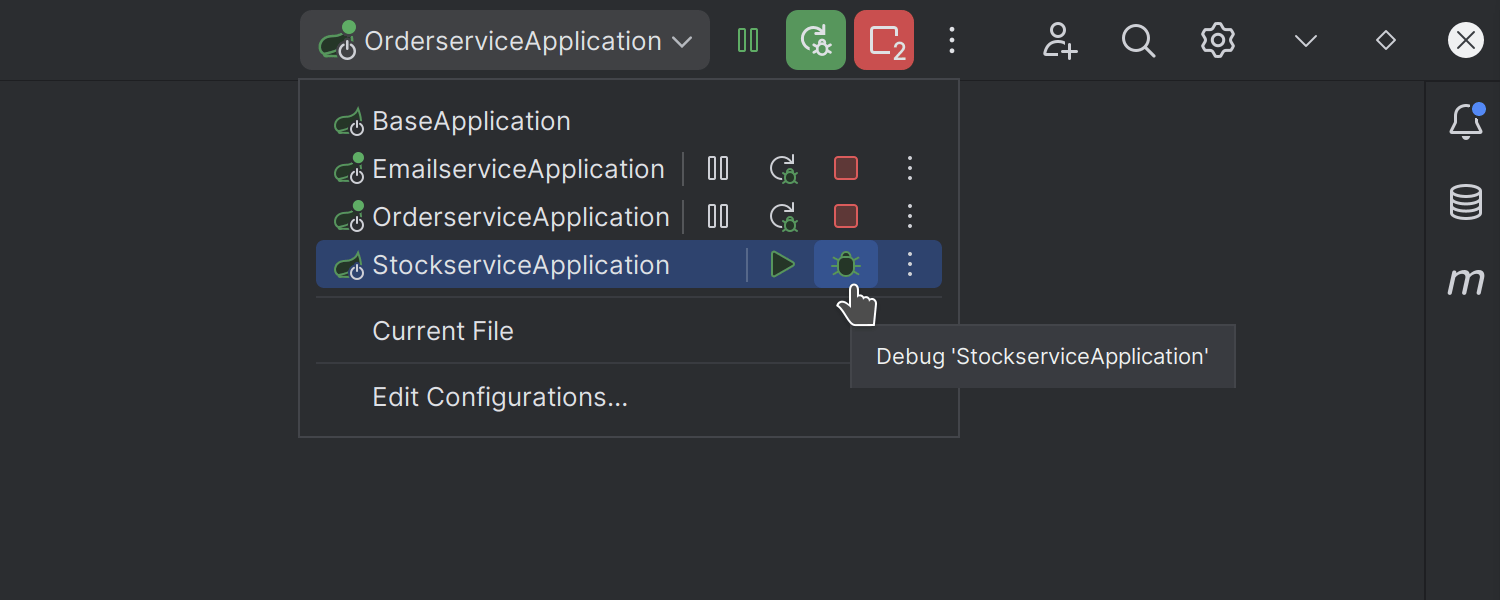
Run widget: Option to launch multiple configurations simultaneously
The updated Run widget lets you launch multiple configurations simultaneously by holding Ctrl and clicking the Debug icon in the popup. Additionally, the widget displays controls for all running configurations, providing a clear overview of their statuses and simplifying management.

Increased default tab limit
We’ve increased the default tab limit in the editor to 30. This means you can now keep more tabs open before the IDE starts closing the ones used least recently. You can control this setting in Settings | Editor | General | Editor Tabs.


Optimized placement for the Rename action
We’ve optimized the placement of the Rename action in the context menu when called on elements in the editor and the Project tool window. The action is now at the top level, making it easier for users who frequently rely on the mouse to quickly rename files, variables, and other elements.


Highlighting for all occurrences of selected text
By default, IntelliJ IDEA will now automatically highlight all instances of the text you select within a file. This makes it easier to track where the selected text appears throughout your code. If you prefer the previous behavior, you can disable this feature in Settings | Editor | General | Appearance.
New icon for messages and i18n files
We’ve made it easier to distinguish messages and i18n files thanks to new dedicated icons. This update helps you quickly locate and manage localization files in your projects, making them easier to differentiate from configuration files.

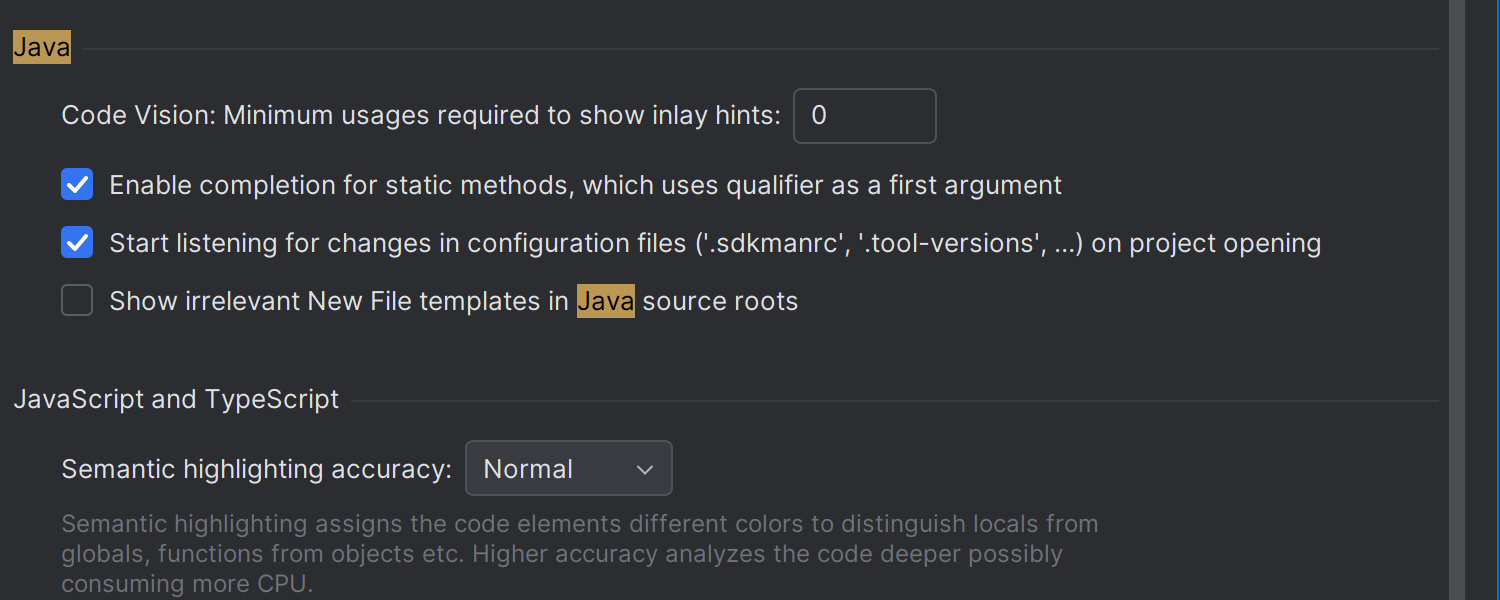
Updated New popup for Java source roots
The New popup for adding files to Java source roots now displays only the most relevant options, reducing clutter and streamlining your workflow. If you prefer the previous extended list of templates, you can easily restore it by going to Settings | Advanced Settings | Java.
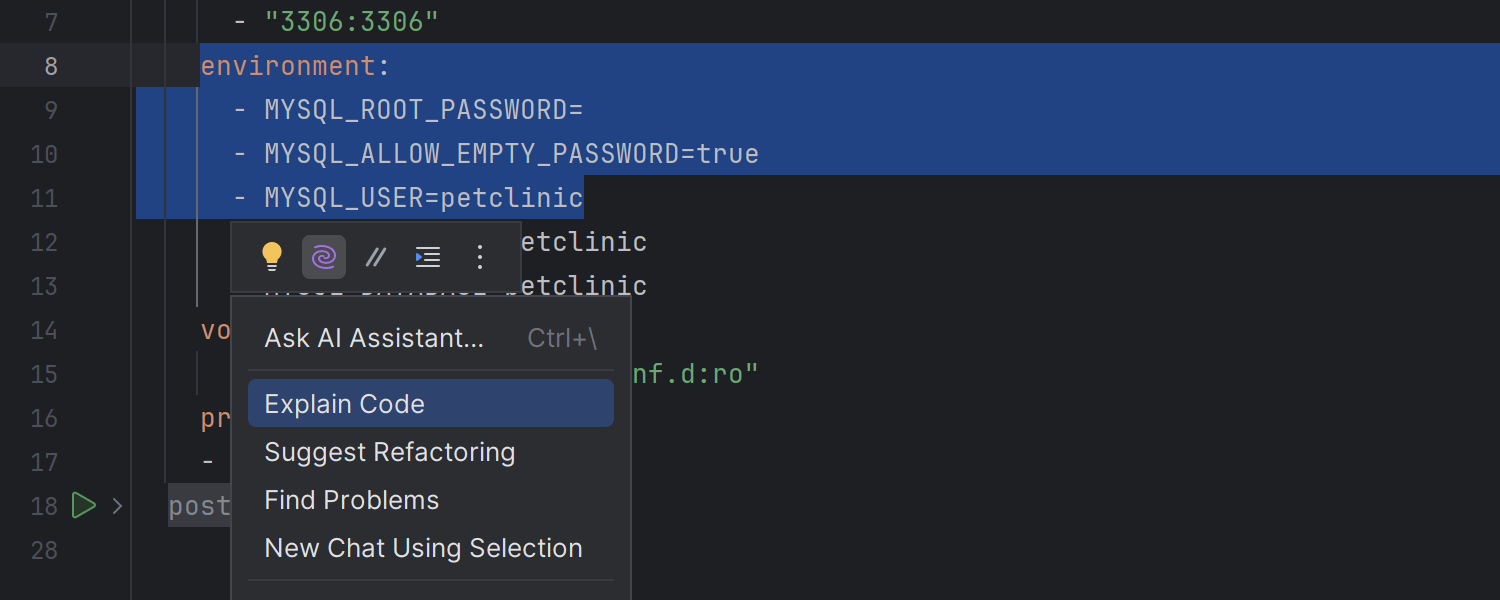
Floating toolbar for JSON, XML, and YAML files
We’ve enabled the floating toolbar for JSON, XML, and YAML files, which makes accessing context-based and AI-driven actions easier. Simply select any piece of code, and the toolbar will appear with available actions.
Terminal
New terminal improvements
Beta
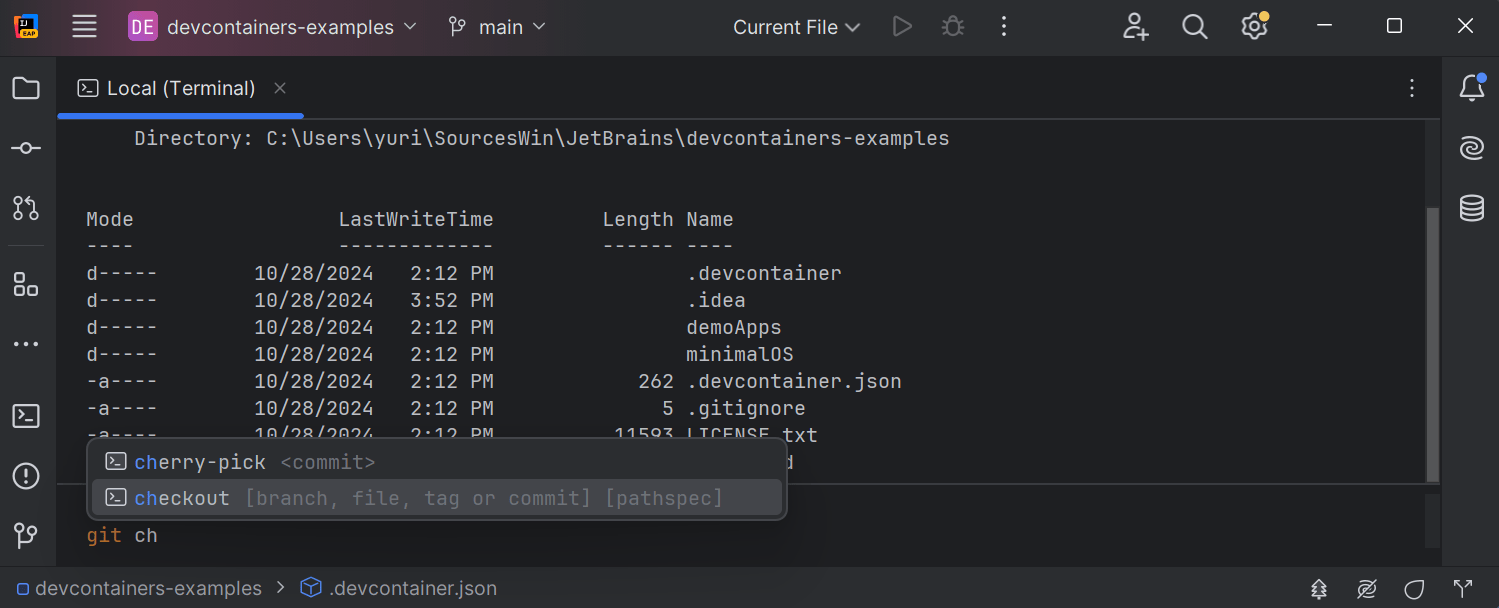
The new terminal now offers enhanced command processing, and the alignment of its UI has been refined, delivering a smoother, more intuitive experience. The terminal is now more responsive and processes prompts faster. Session switching is now seamless, with consistent state retention across tabs to ensure your workflow is not interrupted. Autocompletion accesses command names, flags, and paths more quickly, reducing manual input. We've also introduced additional customization options, including for prompt styles, session names, and environment variables, giving you greater control over your terminal environment.
Version control systems

Efficient option to commit changes from the editor
Committing changes directly from the editor is now faster and easier. After editing a line of code, click the marker in the gutter. In the popup that appears, you can amend the change or make a new commit, and you even have the option to add a commit message right there.
Title and description generation for pull and merge requests
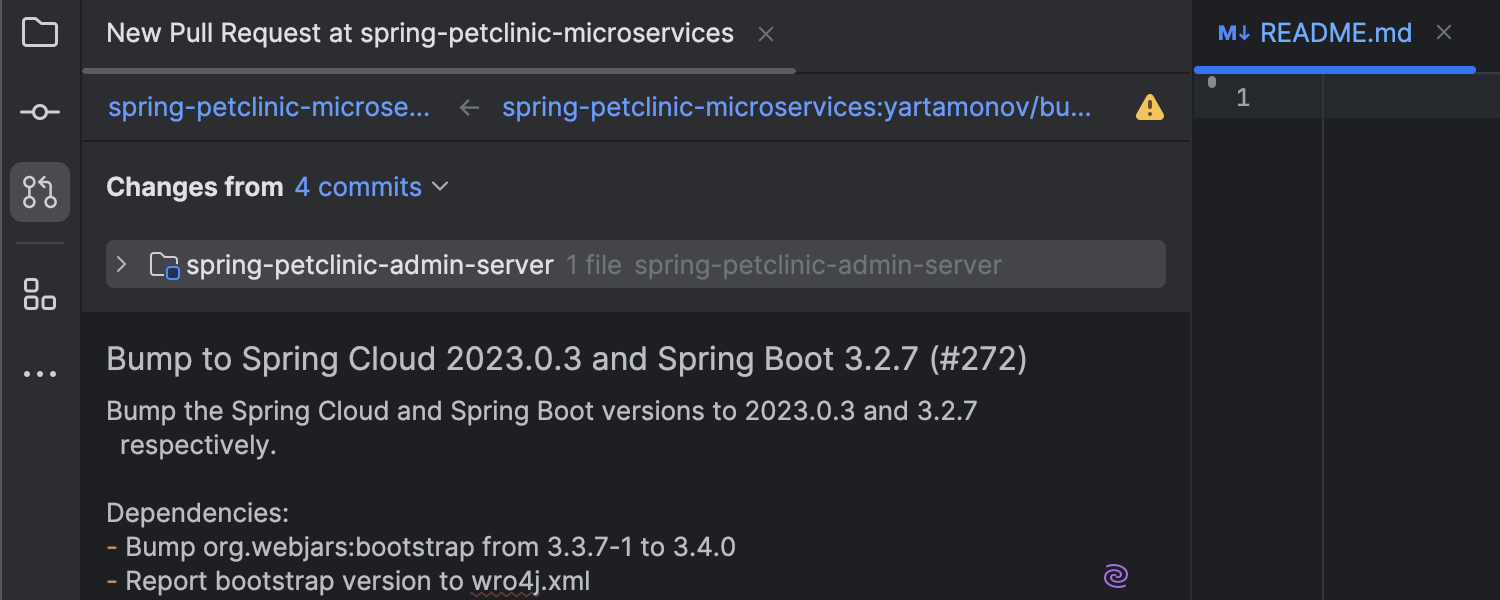
AI Assistant now helps generate accurate titles and descriptions for your pull and merge requests directly from the IDE, streamlining your workflow and ensuring your descriptions are clear and concise.
Updates to Find in Files
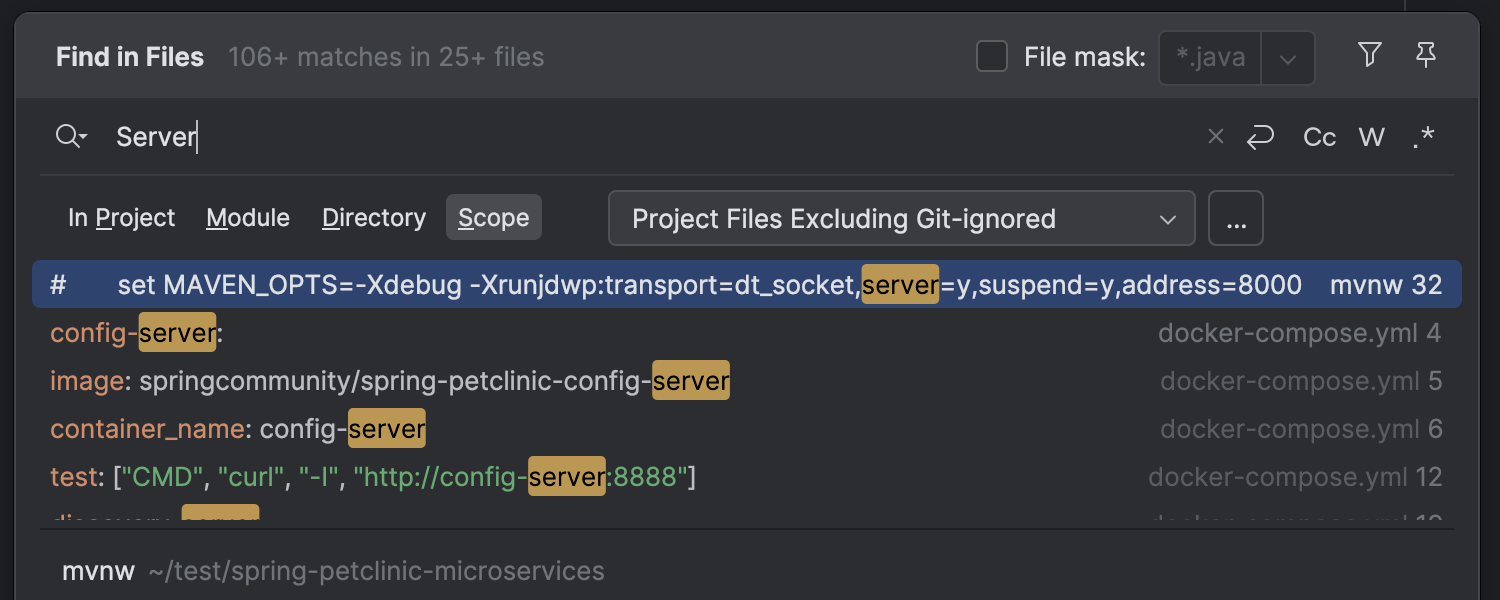
The Find in Files feature has been enhanced with a new search scope,
Project Files Excluding Git-Ignored. This option excludes any files ignored
in .gitignore files from your search results, helping you focus only
on the relevant code when searching through your project.
Option to disable background pre-commit checks
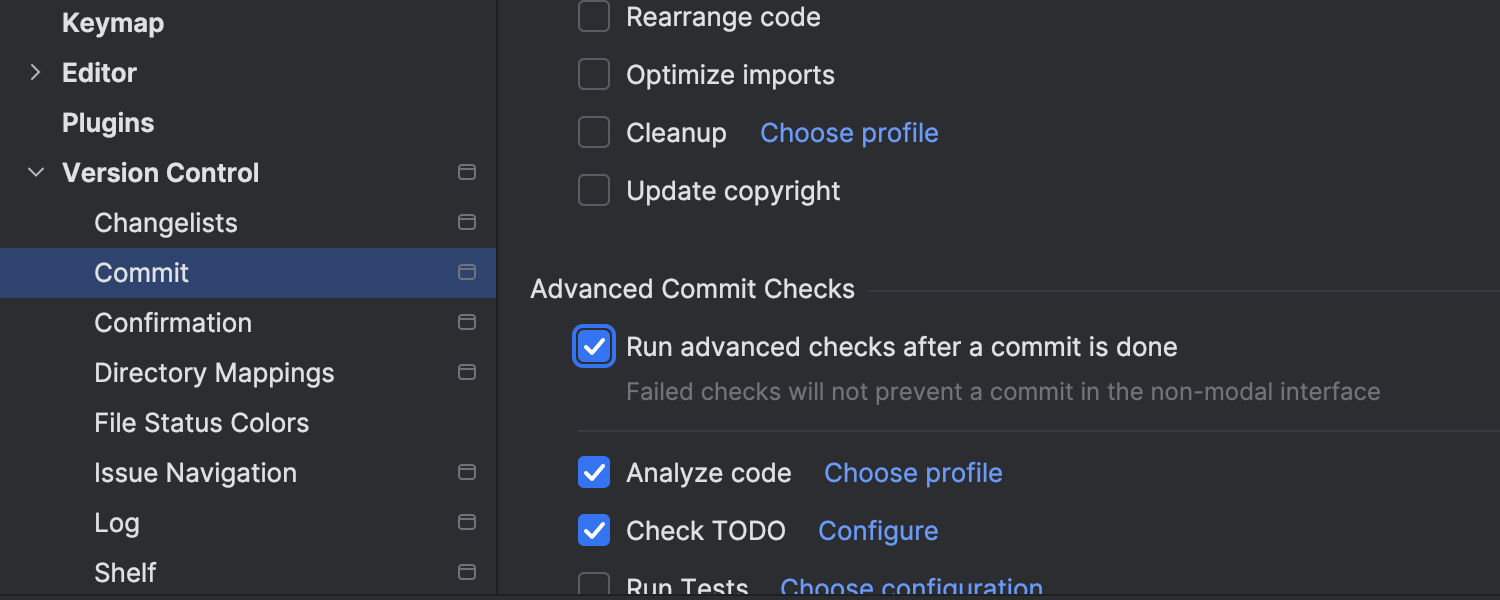
You can now manage background checks during the commit process with a new Run advanced checks after a commit is done option under Settings | Version Control | Commit. This setting lets you decide if tests and inspections should run after making a commit. If you want these checks to be completed before the commit happens, simply disable it.
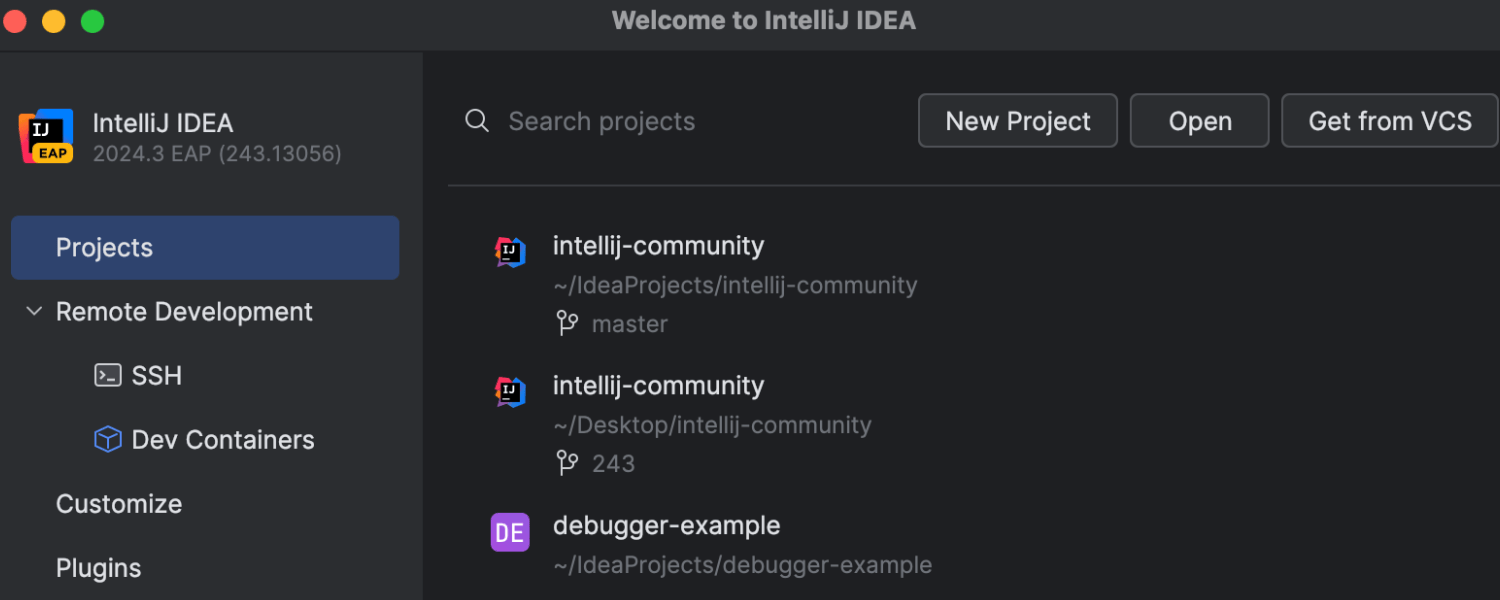
Branch name on the Welcome screen
The Welcome screen now shows the branch name, helping you stay organized when handling multiple project versions and allowing you to easily switch between working directories.
Debugger
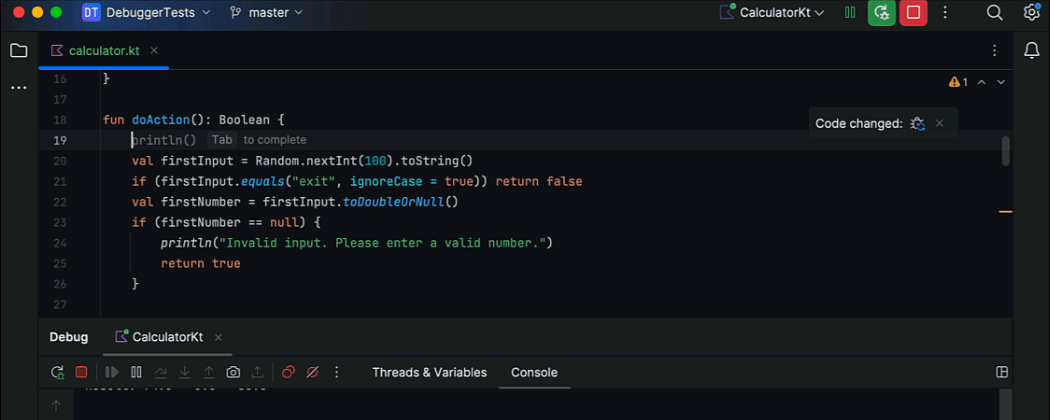
Enhanced UX for the HotSwap feature
We’ve made using the HotSwap feature easier and more intuitive. This feature allows you to reload modified classes during a debugging session without restarting the application. Now, when you edit code with an active debugger session, IntelliJ IDEA automatically detects the changes and prompts you to reload them via a convenient button in the editor. This streamlines the development process by enabling real-time code updates. Keep in mind that HotSwap has some limitations, particularly with structural changes. You can learn more about them here.
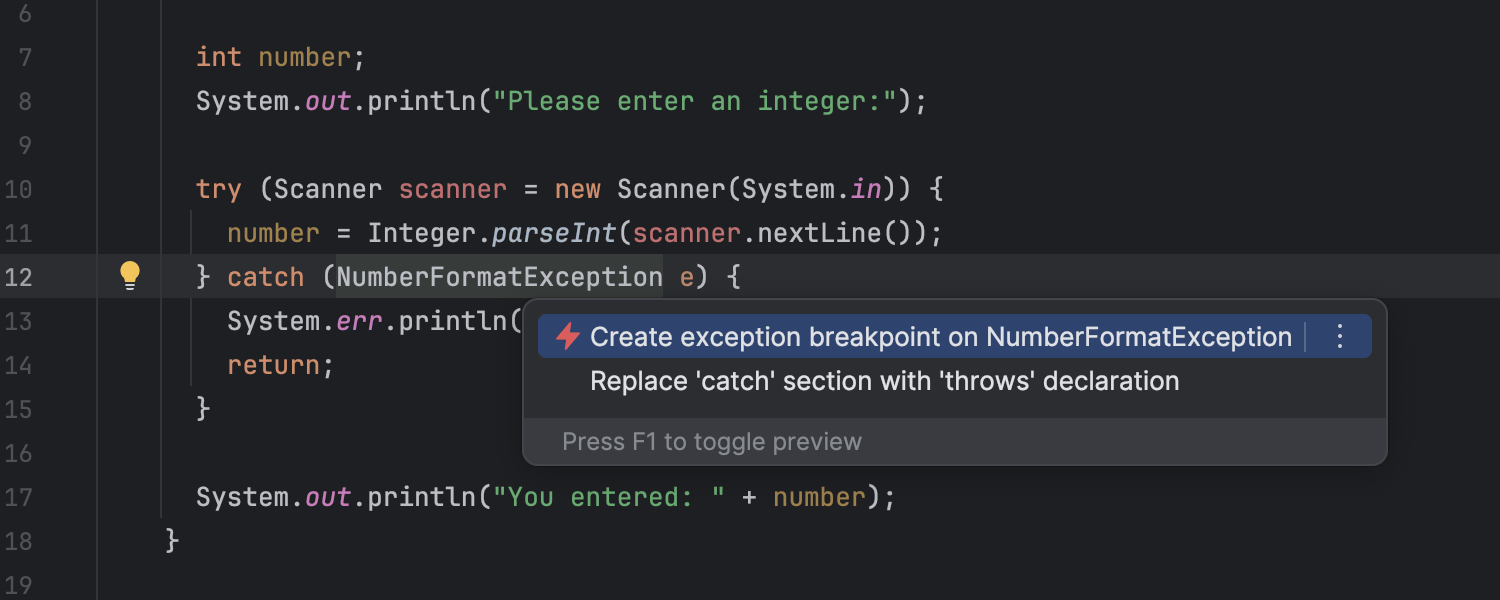
Intention action for creating exception breakpoints
You can now set exception breakpoints from the editor. While at the throw or catch site, open the context menu via ⌥↩ on macOS or Alt+Enter on Windows/Linux, and then select Enable exception breakpoint. This new feature makes setting exception breakpoints more convenient, as you don’t need to open the Breakpoints dialog or browse the stack trace in the console.

Line execution time hints
IntelliJ IDEA 2024.3 eliminates the need to clutter your code with logs and timers when you want to measure the execution time for a bunch of lines. After invoking the Run to Cursor action, you will see the execution times for each line right in the editor’s gutter. For deeper analysis, use the same hints in the gutter to drill down to the called methods, whose respective lines will also be accompanied by execution time data.
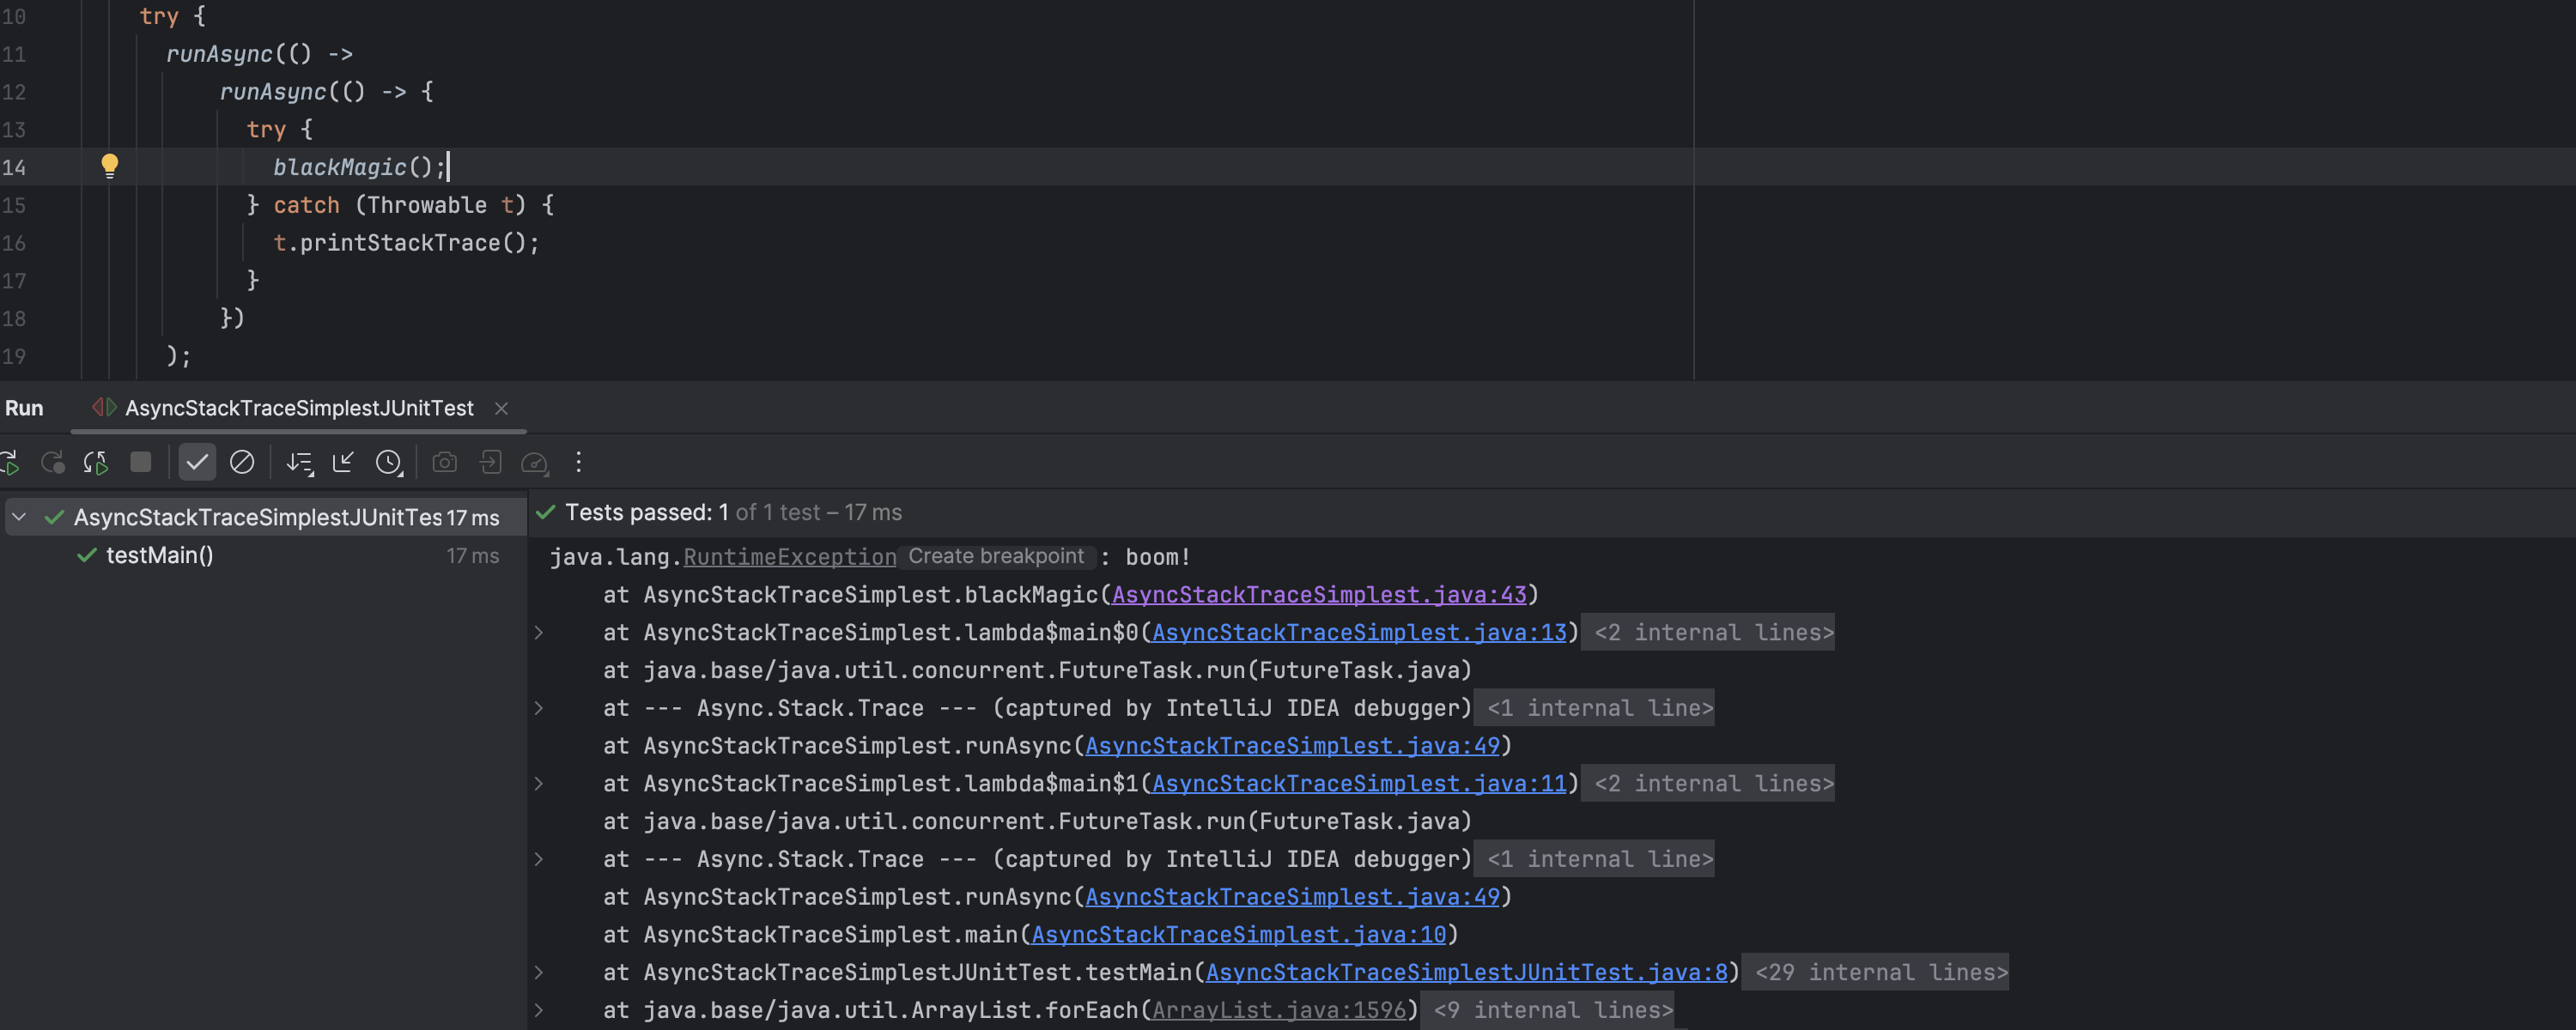
Merged stack trace for async code
IntelliJ IDEA 2024.3 addresses the challenges of troubleshooting asynchronous code, where tasks are scheduled in one thread and executed in another, with each maintaining its own stack trace. The IDE now prints a merged stack trace in the console instead of only the worker’s stack trace, making it easier to trace the flow of execution. This enhancement is enabled by default for tests.
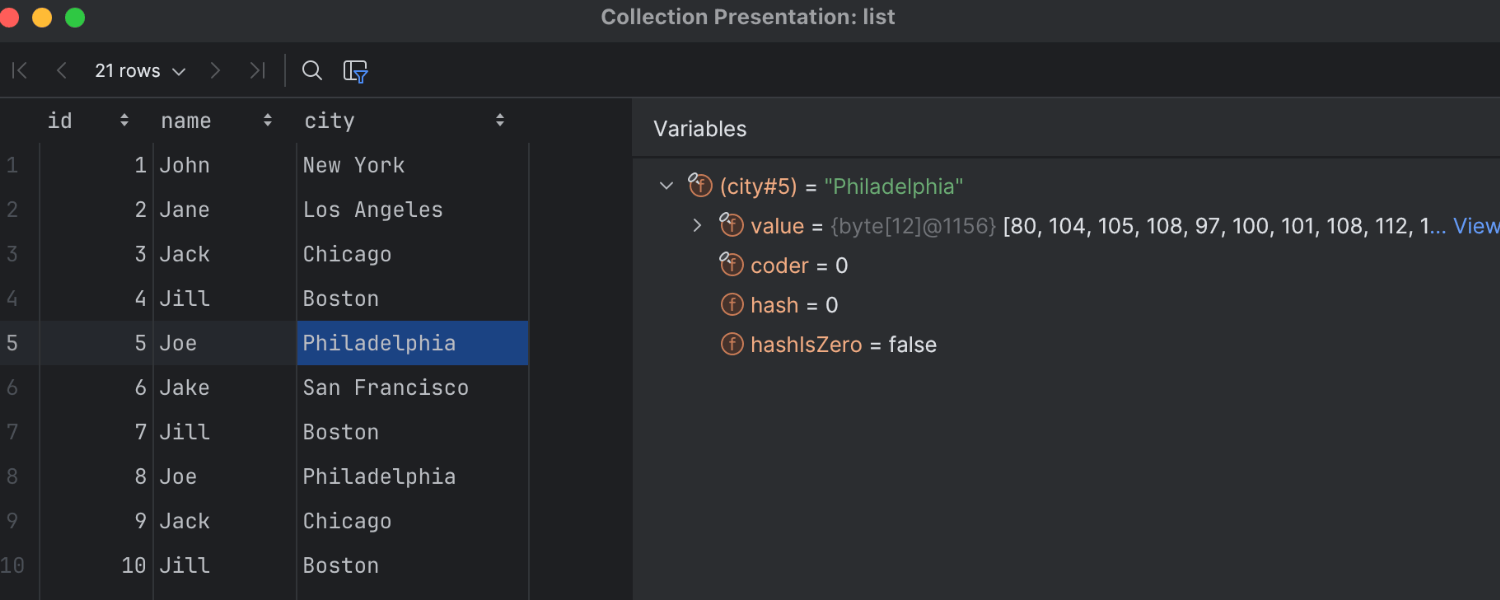
Collection visualization in the debugger
In IntelliJ IDEA 2024.3, you can now browse collections while debugging. In the Variables view or in the editor, click View near a collection object to see a paginated list of entries and a structure view for inspecting individual objects.
Profiler

Heap memory usage graph
Ultimate
The profiler has been enhanced with a heap memory usage graph, which is displayed in the Timeline tab above the thread lanes. This new visualization helps you link memory allocations with thread activity, providing valuable insights that can reveal potential memory leaks and performance bottlenecks.
Build tools
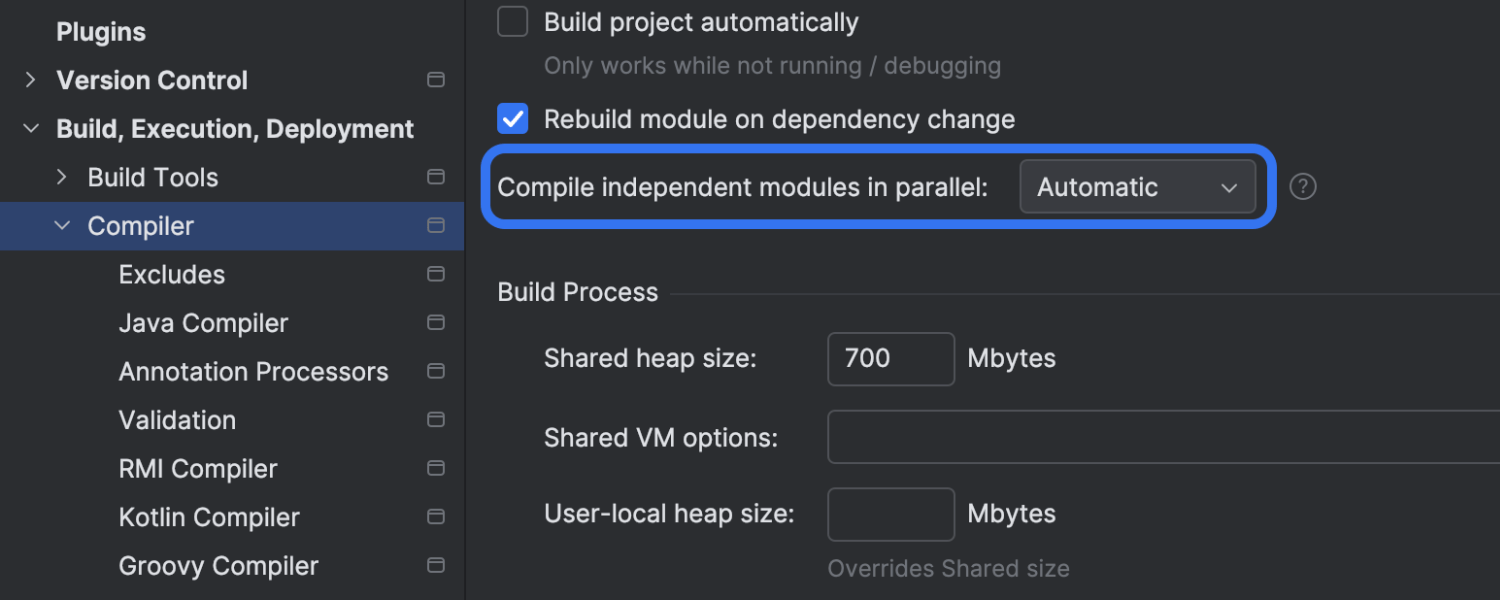
Faster compilation for multi-module projects
We’ve made parallel compilation the default in IntelliJ IDEA 2024.3. In previous versions, project modules were compiled one at a time, which wasn’t the fastest approach for large projects. Now, you will see faster compilation times for all Maven-based projects compiled by the IDE, with optimized CPU and memory consumption.
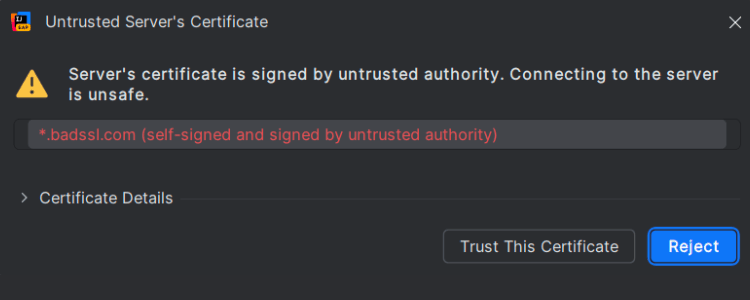
Seamless handling of untrusted SSL certificates
IntelliJ IDEA now automatically detects SSL-related issues during Maven syncs and builds. If an untrusted certificate is the cause, the IDE will offer to resolve it by trusting the certificate – no manual steps required. This update eliminates the guesswork of combing through logs to find cryptic SSL errors and removes the need for tedious manual certificate management in the JDK’s trusted store.
Support for Maven’s split local repositories
We’ve added full support for Maven’s split local repositories – a feature introduced in Maven 3.9. It allows you to separate local repositories according to your needs. You can group them by remote repository, store locally installed artifacts in a dedicated folder, or even categorize artifacts by branch using specialized prefixes. Previously, enabling split repositories in Maven could cause sync failures in IntelliJ IDEA, leading to build or dependency issues. Now, full support ensures smooth syncing and efficient repository management.
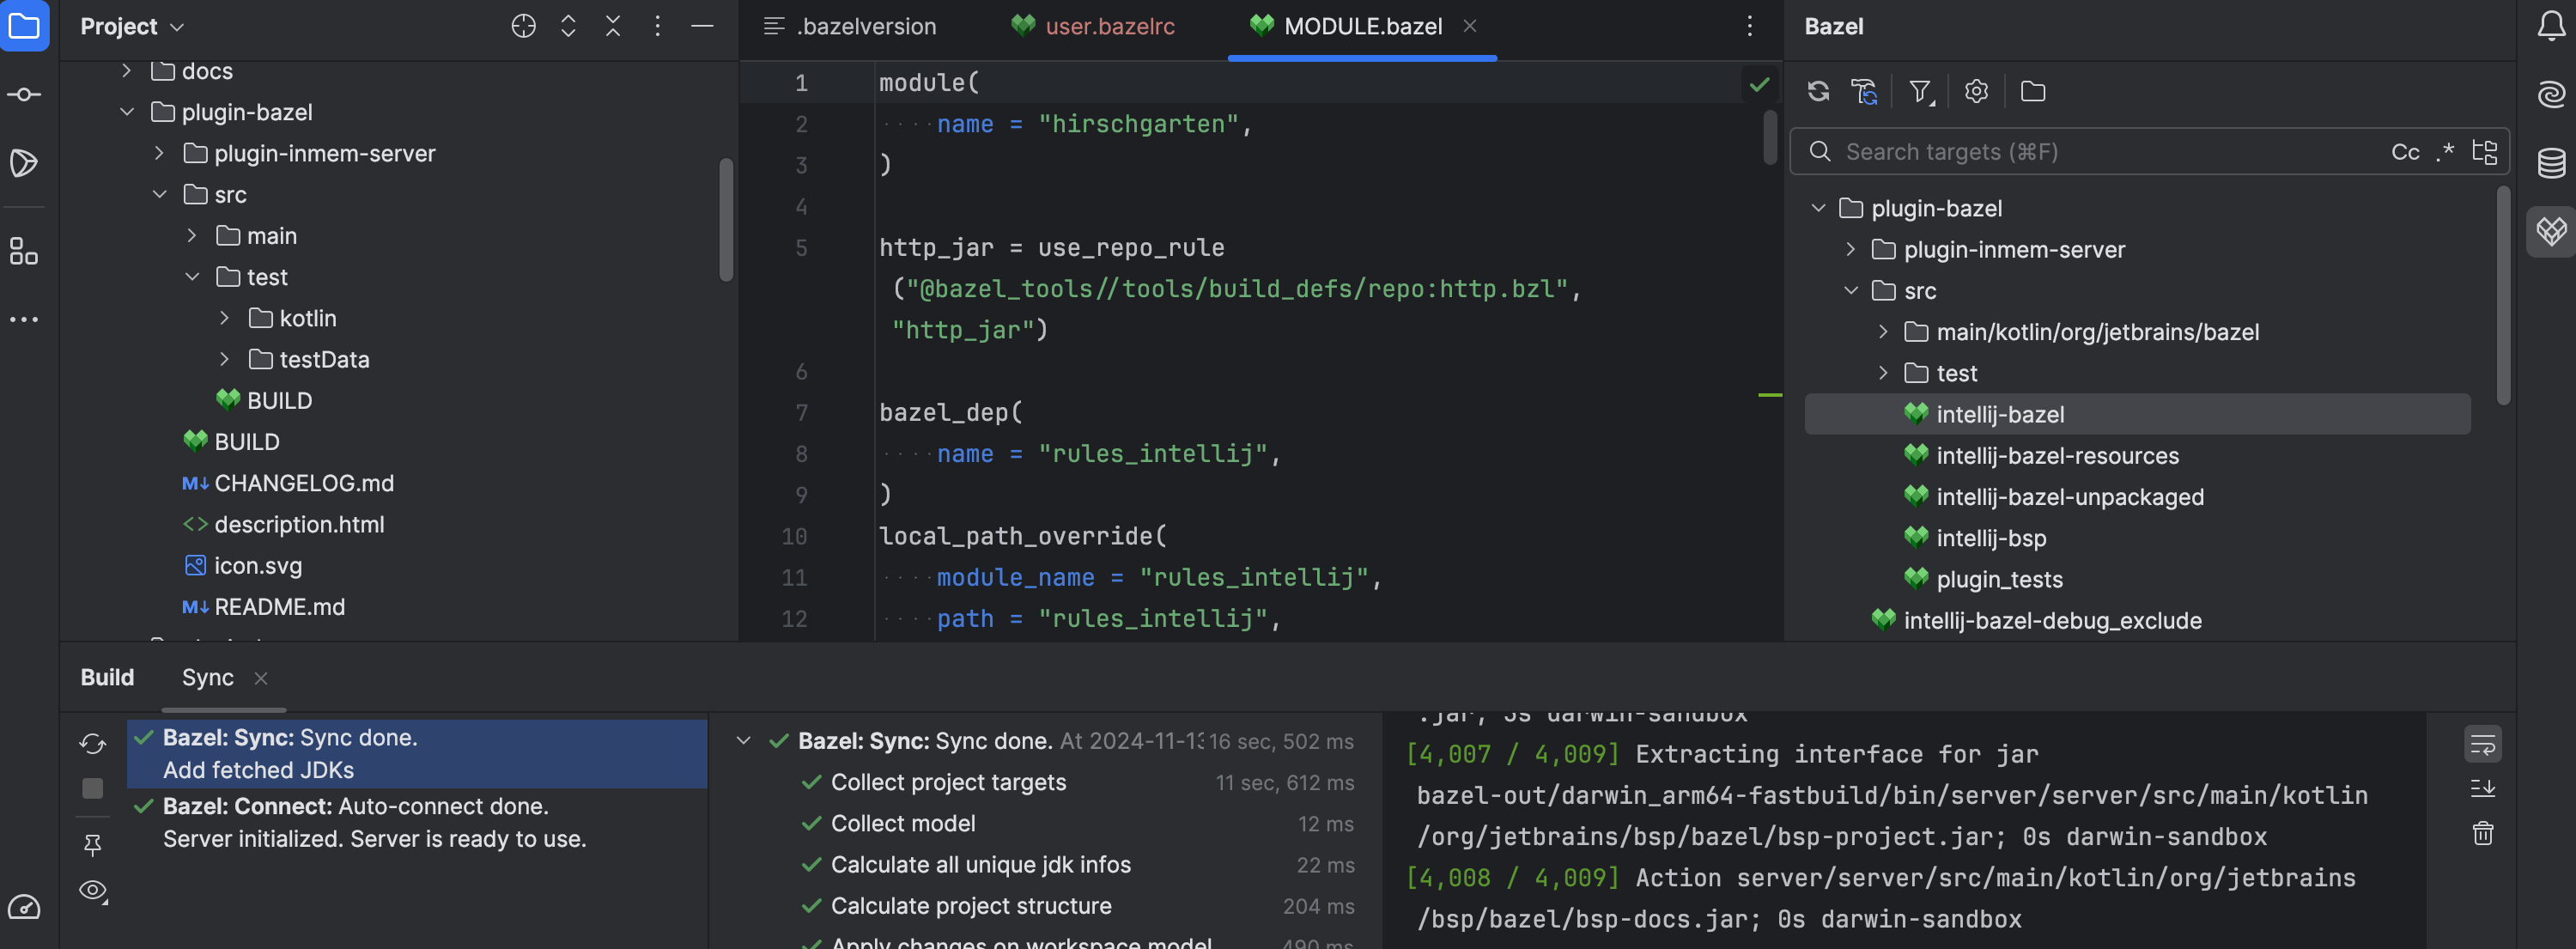
Bazel plugin for IntelliJ IDEA
EAP
The first public EAP release of our new Bazel plugin for IntelliJ IDEA is now available. The plugin currently lets you open Bazel projects for Java and Kotlin, supports building, testing, running, and debugging Bazel targets, and offers Starlark syntax, completion, navigation, and debugging support.
Frameworks and technologies
Derived method generation for Spring Data repositories
Ultimate
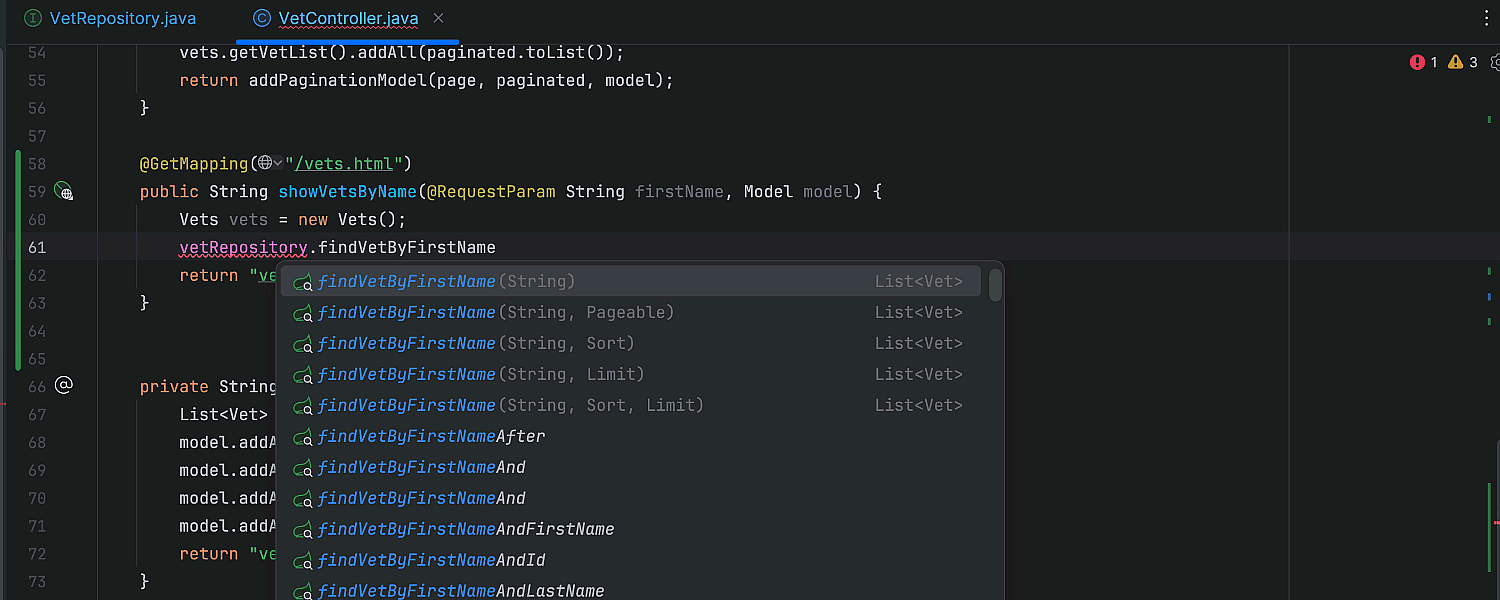
IntelliJ IDEA can now automatically generate derived query methods in Spring Data repositories. If you need a derived query method, you no longer have to update the repository source code manually. Just start typing the method name where it’s needed, and IntelliJ IDEA will suggest possible method names, provide the proper method signature and return type, and update the repository code for you.
Spring Boot Actuator improvements
Ultimate
IntelliJ IDEA now offers improved support for Spring Boot Actuator. When Actuator is enabled, you can access more runtime information in the IDE. First, a new Environment tab in the Run/Debug tool window shows the variable values used by your application, including system properties, environment variables, and configuration properties.
Additionally, you can now see which conditions were triggered at runtime for bean instantiation, which can be especially useful when debugging an application to understand why a bean isn’t working. Furthermore, a new gutter icon highlights any specific conditions that failed, helping you identify issues more quickly.
HTTP Client updates
Ultimate
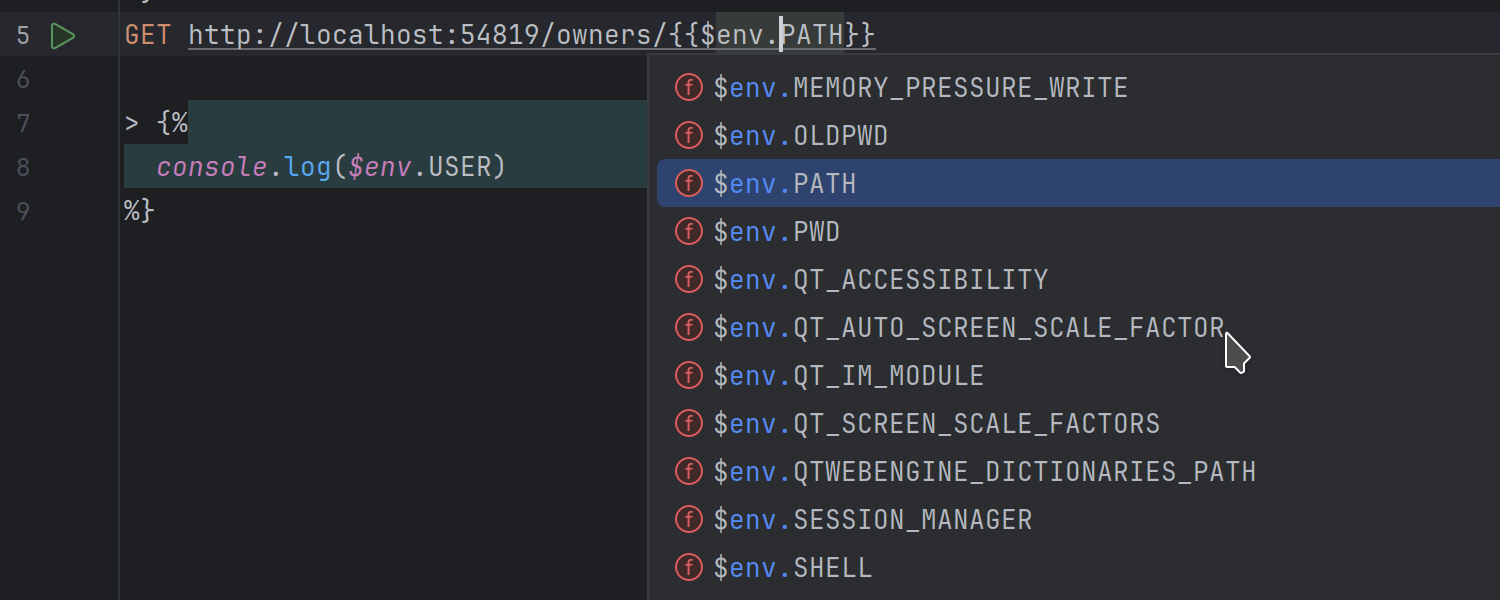
IntelliJ IDEA 2024.3 introduces the ability to access environment variables directly
within the HTTP Client using the $env.ENV_VAR syntax. This allows for
more flexibility when managing and using variables within your requests and scripts.
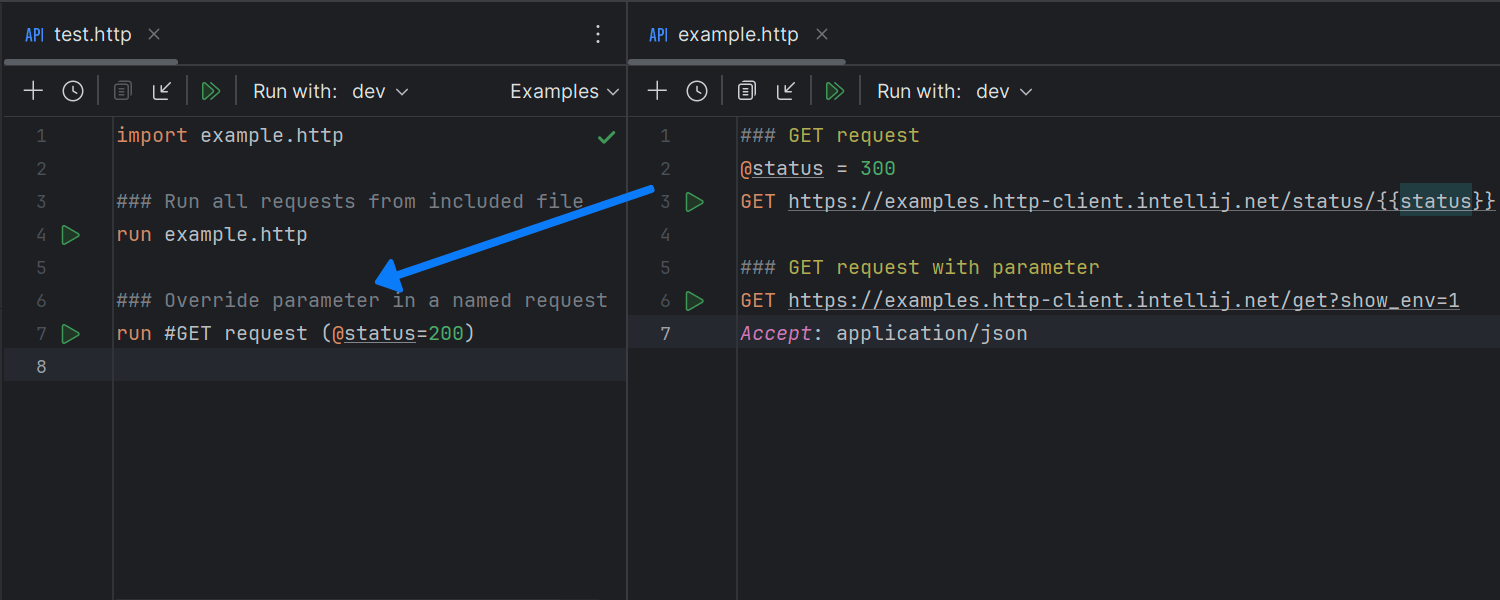
In addition, it is now possible to import and run requests – either all at once or
specific ones by name – from one .http file to another.

Ktor 3.0 release
Ultimate
Ktor 3.0, a toolkit for building server applications on the JVM with Kotlin, is out with new features and improved performance. This new version adopts Kotlin 2.0 and improves the performance of IO-related operations by switching to the kotlinx-io library. Learn more.
Streamlined debugging experience for GraalVM native images
Ultimate
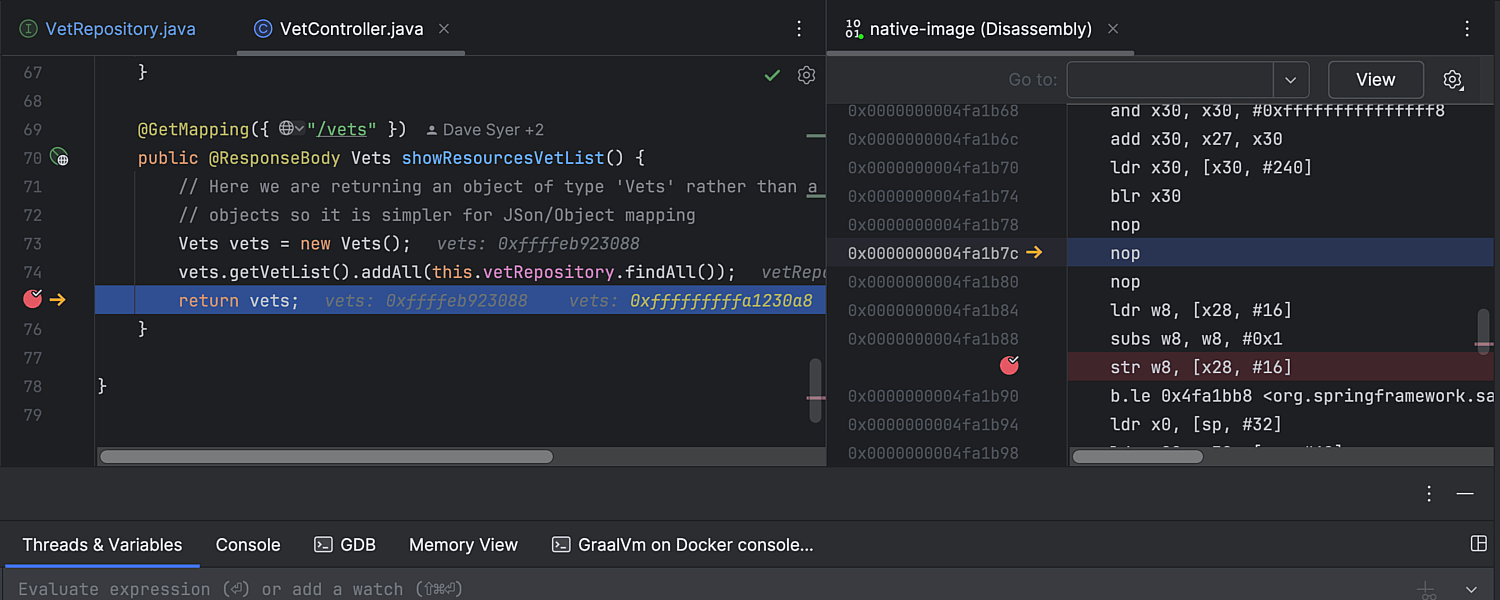
We’ve greatly simplified the experience of debugging GraalVM native images with Docker containers, which means you can now build and debug native Java applications on any platform. Simply specify one container for building your application and another for running it in the run configuration. Once the application is running, you can debug the app not only in the Java code but also at the assembler level. To make setup easier, we provide Docker images preconfigured with all the necessary software and libraries.

OpenTofu and Terraform enhancements
Ultimate
Support for OpenTofu is now available. This update includes autocompletion for encryption methods, key providers, and inspections for unknown references.
Terraform run configuration actions are accessible through Search Everywhere,
and the IDE automatically detects unused variables and locals to keep your code clean.
The controls for Init, Validate, Plan,
Apply, and Destroy have been refined, and the
Run Configuration form has been streamlined. Also, improved usage indicators
and warnings for unused resources enhance navigation and help you identify inactive
code.
Enhanced Dev Containers support
Ultimate
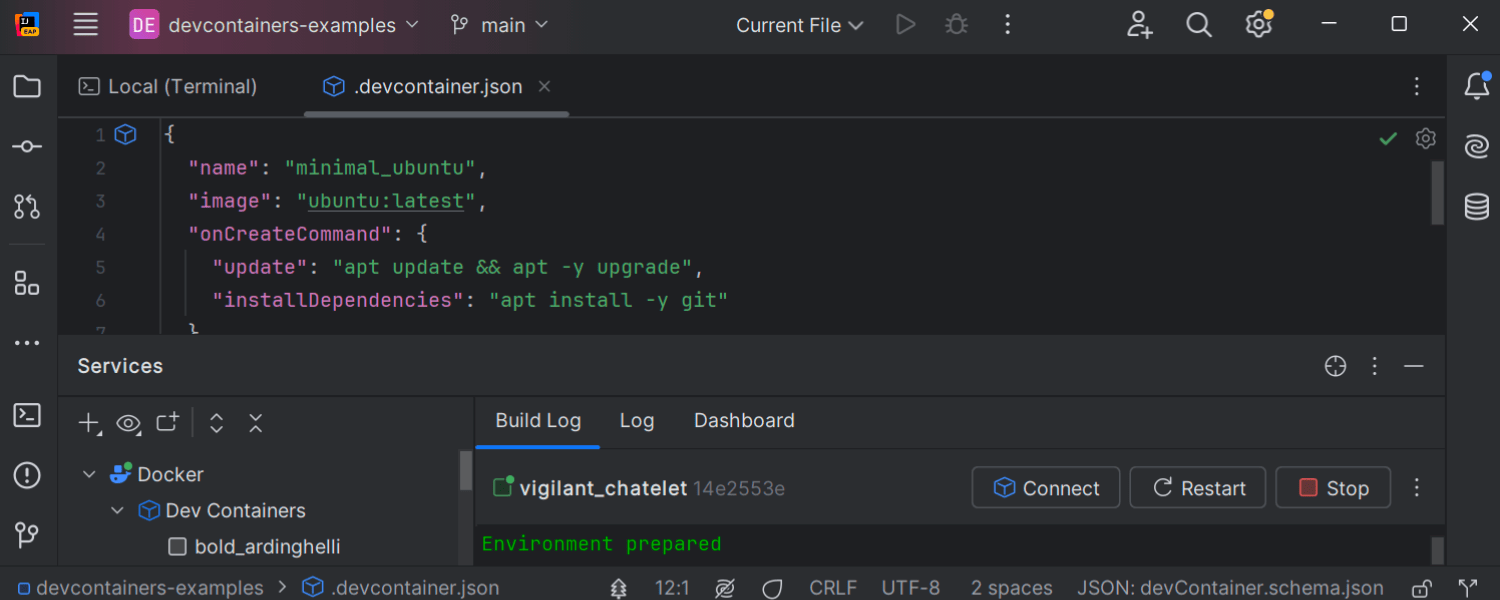
Dev Containers builds now work more smoothly on remote Docker engines, preventing errors when local directories aren’t accessible remotely. Stability in WSL has also been enhanced, with improved image builds and reliable connections.
The devcontainer.json file processes features more
consistently, and the new updateRemoteUID option avoids access conflicts
by setting the correct user identity. IDE settings in Dev Containers can be customized
through devcontainer.json files or via the
Add currently modified settings from IDE button, with autocompletion for all
available options.
Docker Compose improvements
Ultimate
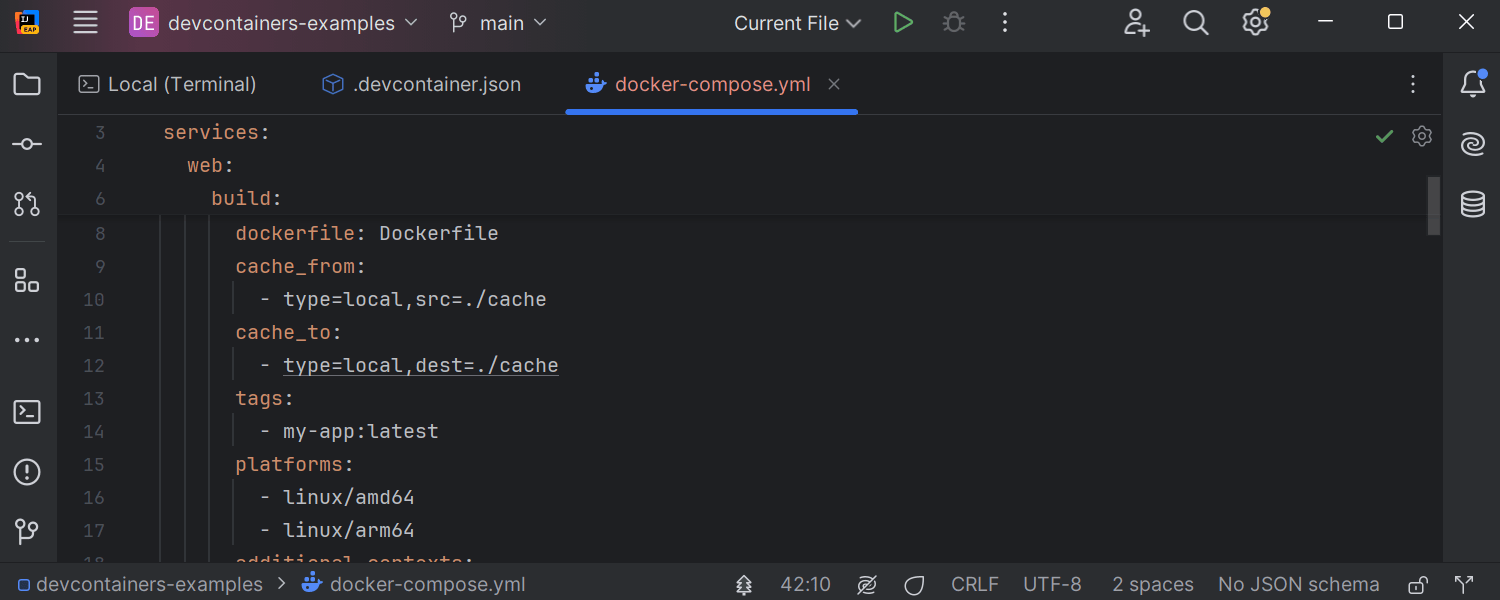
IntelliJ IDEA 2024.3 provides extended support for Docker Compose. It now prioritizes
.env files in env_file autocompletion, making environment
setup faster. New build options – cache_to, no_cache,
tags, and platforms – offer greater control over caching
and platform targeting. Enhanced handling of depends_on.required and
depends_on.restart allows for more effective management of the startup
and shutdown order of dependent containers.
New keys like deploy.placement.preferences,
deploy.resources.pids, and
deploy.resources.reservations.devices allow for flexible service
placement and resource limits. Multi-context builds and privileged builds are now
supported via build.additional_contexts and build.privileged.
Additional options include cgroup configurations, custom
extra_hosts mappings, and healthcheck.start_interval.
Enhanced port settings and secrets.environment now streamline secret
management via environment variables.
Better support for projects in WSL
Ultimate
We continue to improve the reliability of projects that are hosted in the Windows Subsystem for Linux (WSL) and opened by developers from Windows in the IDE. In particular, we’ve introduced support for symlinks and improved performance by switching to Hyper-V sockets for interaction with WSL. We are continuing to work on significant platform changes to improve performance with remote environments, including WSL.
Kubernetes

Support for network policies
Ultimate
The IDE now offers support for network policies, which are used to manage network traffic between pods in a cluster. They allow you to define which pods can send or receive traffic from other pods, services, or external sources. The primary purposes of network policies are to control and restrict network traffic, manage pod isolation, ensure security, and regulate external access.
Web development
Cleaner search results for directories
Ultimate
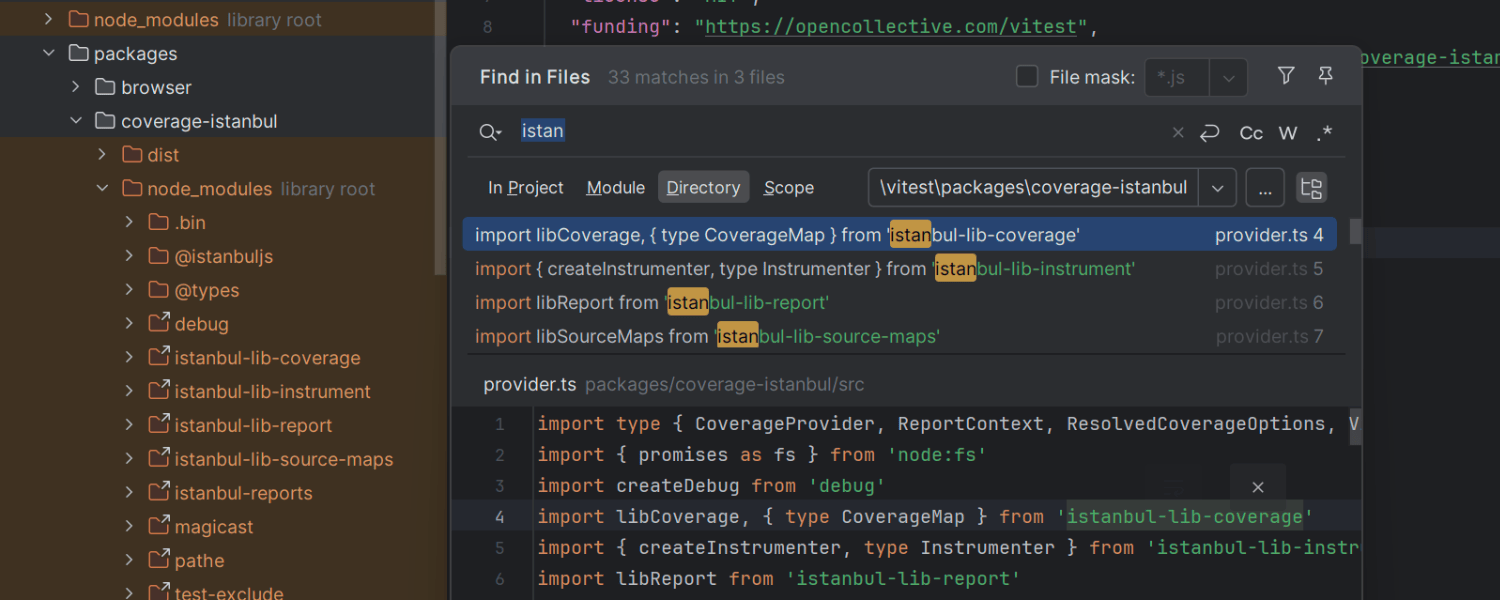
IntelliJ IDEA now excludes node_modules results by default when using
Find in Files in project directories, reducing clutter from irrelevant files.
You can restore the previous behavior by enabling the
Search in library files when “Directory” is selected in Find in Files option
under Settings | Advanced Settings.
Improved framework component navigation and renaming
Ultimate
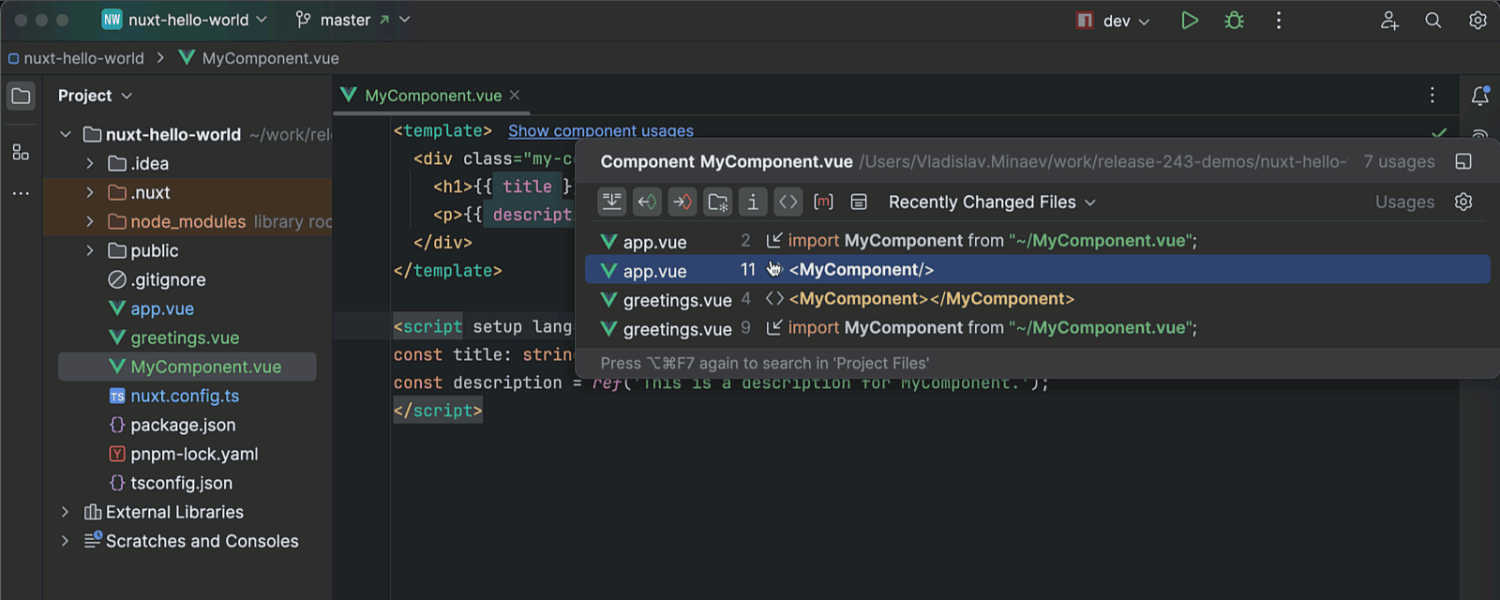
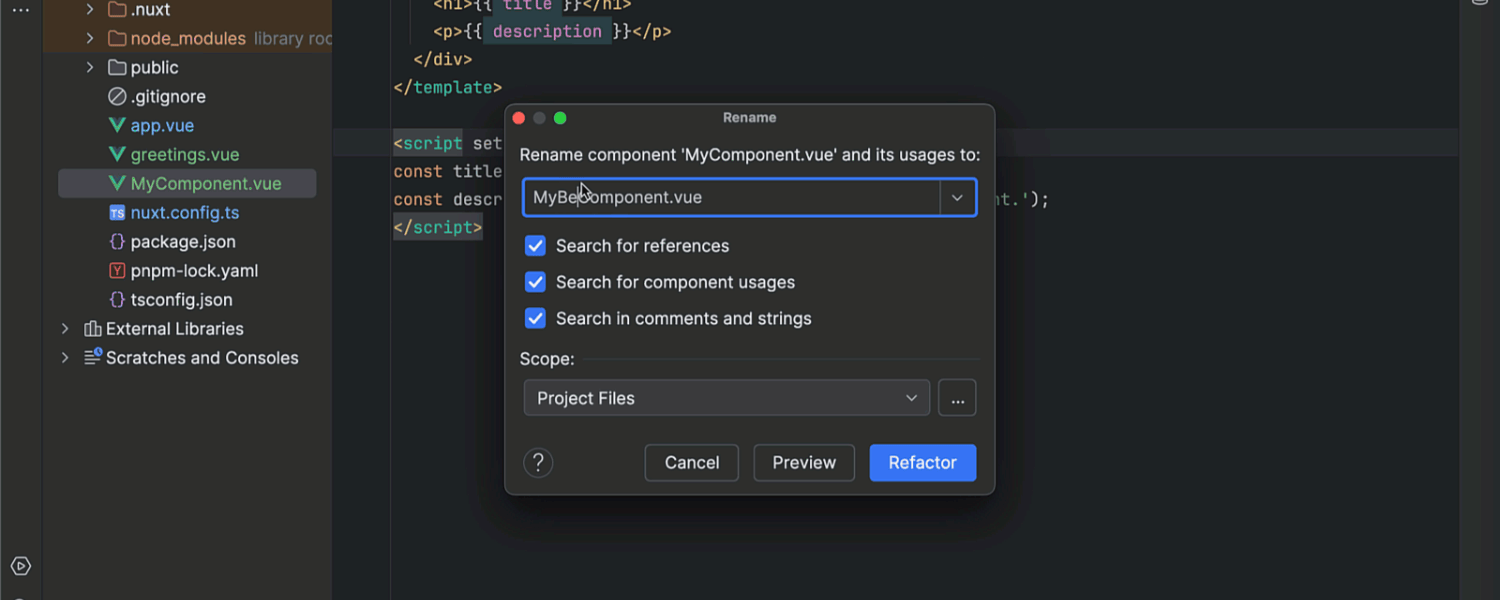
We’ve enhanced in-editor hints for Vue, Svelte, and Astro components. The Show component usages action now finds usages in both imports and markup templates. We’ve also added a Show Component Usages filter to exclude component usages when searching for regular file references. The Rename refactoring has also been updated with an option to include usages when renaming a component file.

Improvements for Angular
Ultimate
For projects with
Angular 19, IntelliJ IDEA now defaults to standalone mode
for components, directives, and pipes. Quick-fixes have been added to help convert
between standalone and non-standalone components. Unused standalone imports can be
automatically removed during code reformatting or via a new inspection. Support for
the @let syntax has also been improved.
Database tools
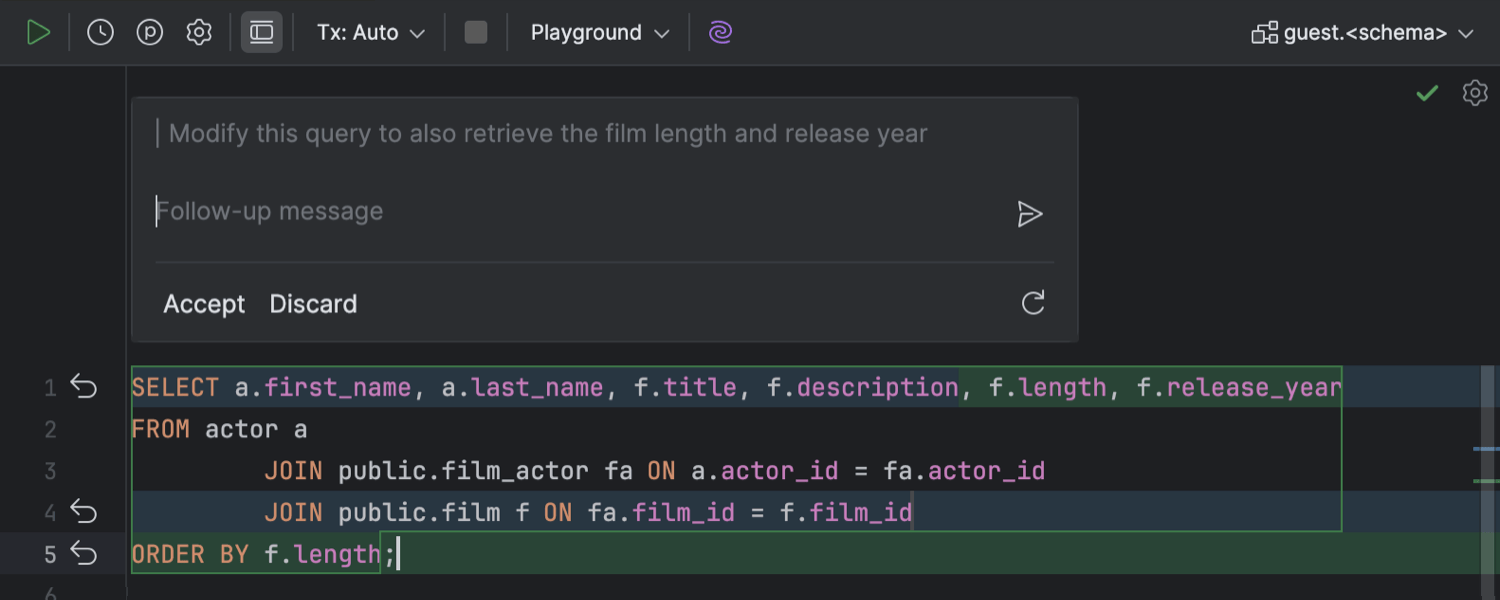
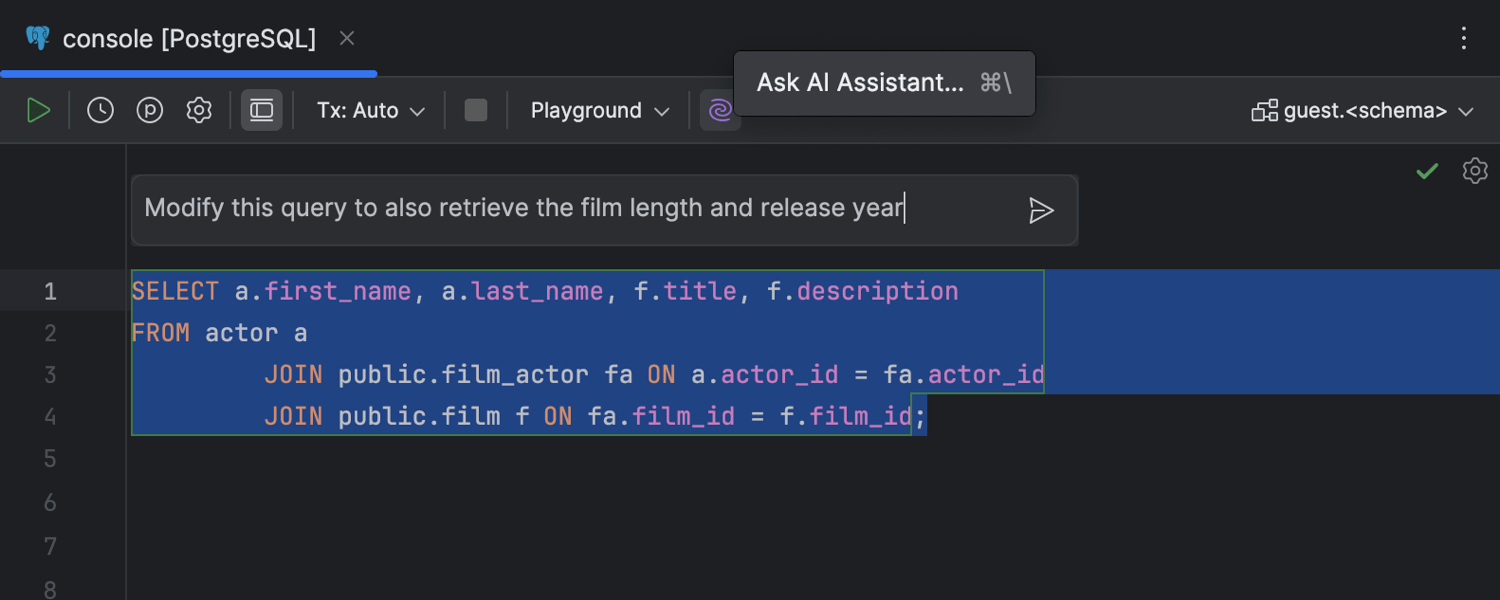
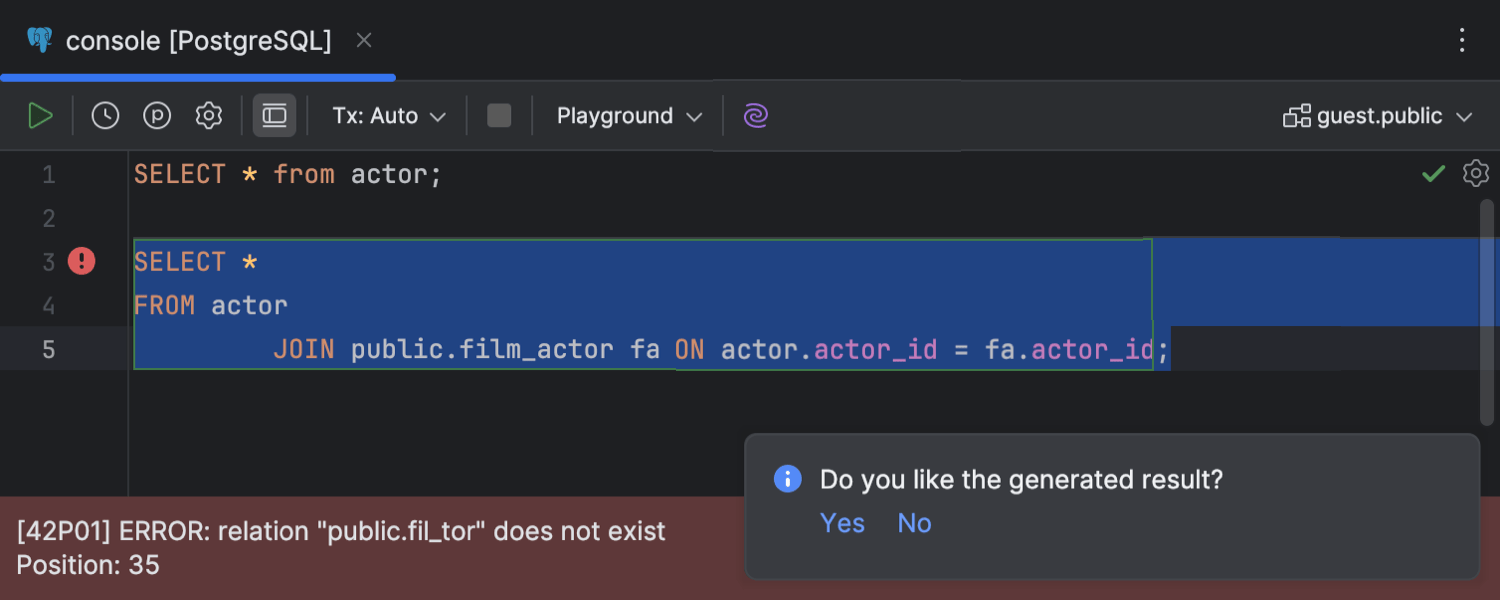
Text-to-SQL: In-editor diff for AI-generated results
Ultimate
We have improved the experience of
working with AI Assistant in the editor.
Now, when you ask AI Assistant to do something with a chunk of code, the editor area
contains a diff with both the original and the generated code. AI Assistant’s
suggestions are highlighted with a different color and marked with the Revert
icon in the gutter. You can also edit the resulting query yourself in the diff. Your
changes are highlighted the same way. For example, you can ask AI Assistant to
retrieve more data with a query and then add an ORDER BY clause to the
generated result.
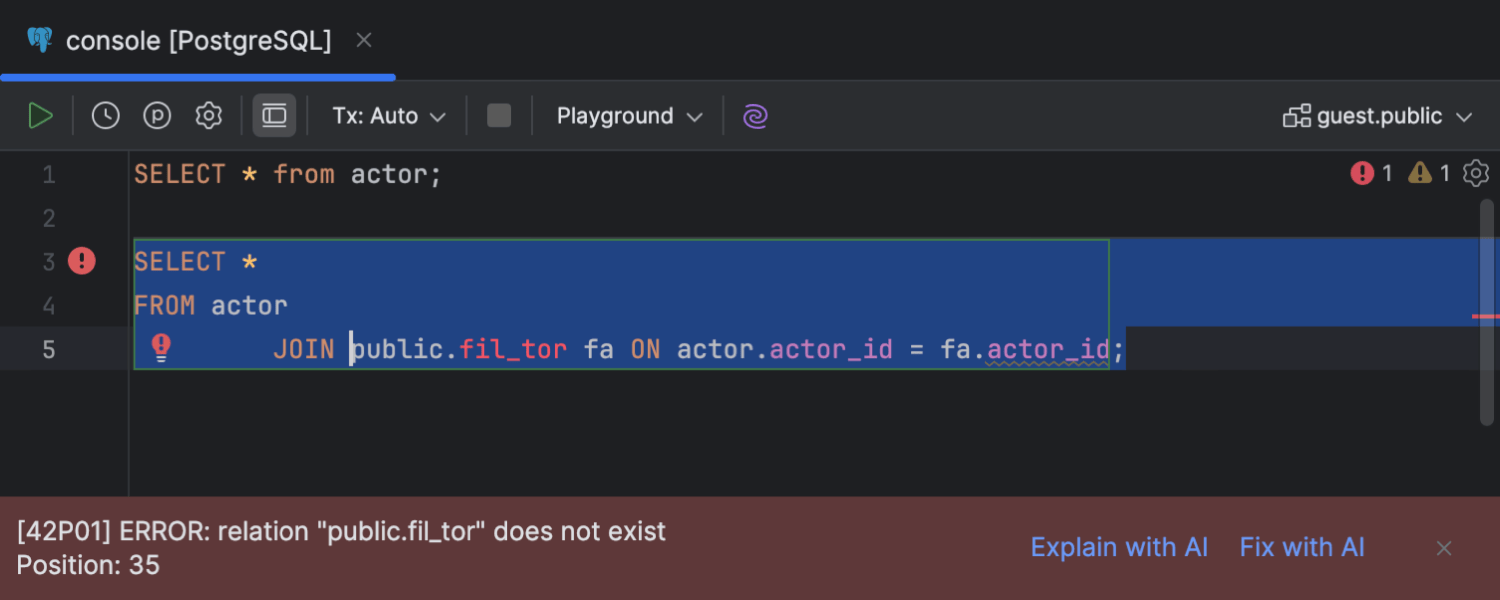
SQL error handling by AI Assistant
Ultimate
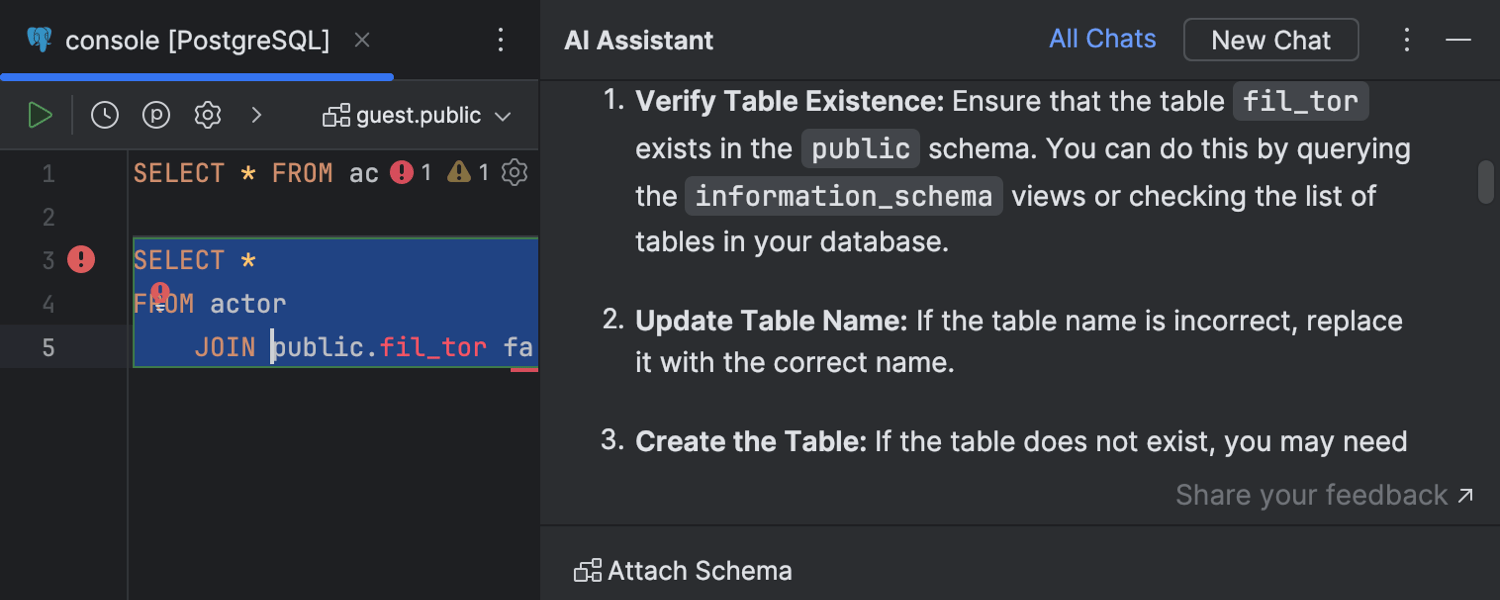
A couple of useful new actions for handling SQL query execution errors with AI Assistant are accessible in the error message area. Explain with AI opens the AI chat with a prompt automatically sent and AI Assistant’s response with an explanation of the error. The Fix with AI action generates a fix for the query execution error in the editor.

Inspection for an excessive number of JOIN clauses
Ultimate
JOIN clauses
In certain cases, running a query that contains an excessive number of
JOIN clauses is not recommended due to performance degradation. The
editor can now identify and highlight such queries. You can enable this inspection
in the IDE settings. To do so, navigate to Editor | Inspections, expand the
SQL section, and select Excessive JOIN count.
Floating pagination toolbar
Ultimate
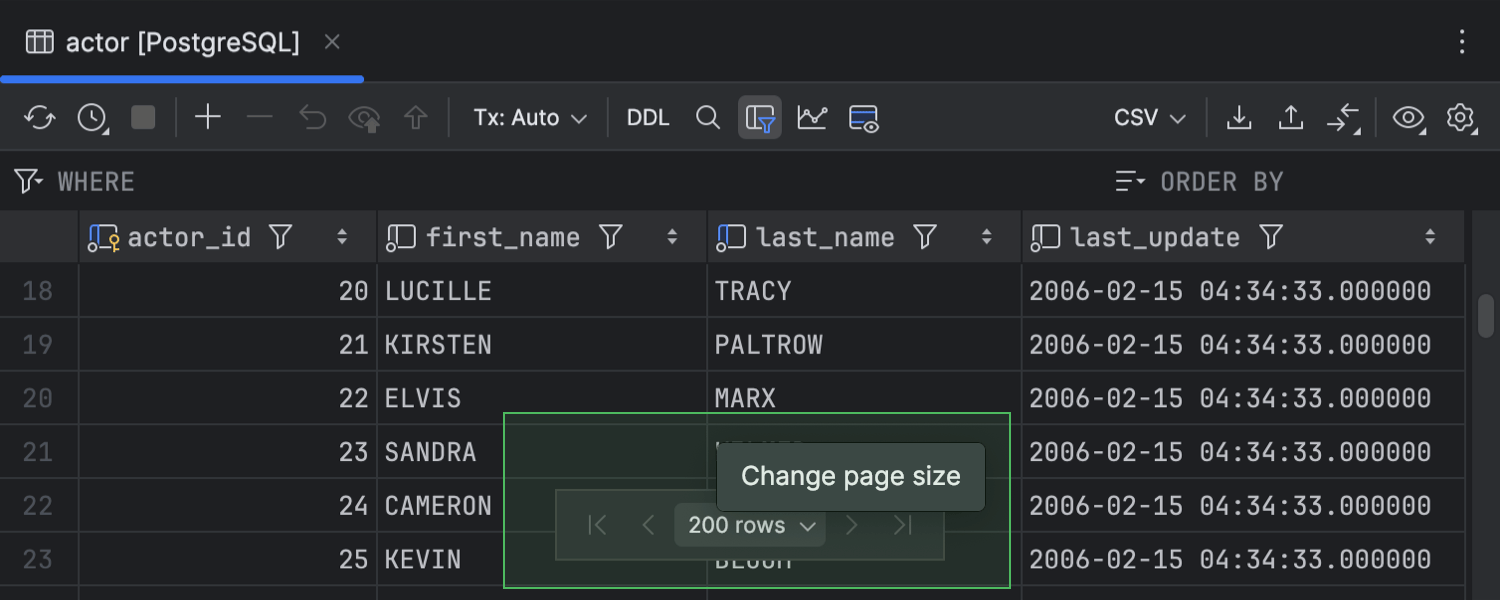
To make grid paging more noticeable in our data editor, we have moved the control for it from the toolbar to the bottom center of the data editor.
Fragment introspection and smart refresh for MySQL and MariaDB
Ultimate
IntelliJ IDEA now supports fragment introspection. Previously, the introspector could perform only a full introspection of schemas in the MySQL or MariaDB databases but not refresh the metadata of a single object. Every time a DDL statement was executed in the console and that execution could modify an object in the database schema, the IDE would start a full introspection of the entire schema. This was time-consuming and often disrupted the workflow.
Now, IntelliJ IDEA can analyze a DDL statement, determine which objects could have been affected by it, and refresh only those objects. If you select a single item in Database Explorer and call the Refresh action, only one object will be refreshed, instead of the entire schema as it was before.
Other
Discontinuation of global menu support on Linux
Linux users should note that, as of version 2024.3, global menu support has been discontinued in IntelliJ IDEA.

