Agile Boards
YouTrack supports Kanban, Scrum, and mixed approaches with flexible and powerful Agile boards. Even if you don’t follow any kind of Agile methodology, boards are a great way to plan and track projects at all levels, from individual backlogs to enterprise portfolios.
Why use Agile boards?
Visualize
Agile boards provide a great way to see the overall “size and shape” of any number of projects at a glance, regardless of which methodology you use.
The versatility of Agile boards makes them a powerful visual tool for planning, tracking, and monitoring progress on any set of tasks from one or more projects.
Organize
Swimlanes let you group your tasks for better organization and visibility.
Group by issue fields such as priority or assignee, or group using #tags for complete freedom to organize your backlog any way you like.
Track
Agile boards let you track progress in an intuitive, meaningful way. A quick look at a board is enough to tell you how many tasks your team is currently working on, how many are completed, and how many are waiting in the backlog.
Free for teams of 10
Ease of use
Create a new board with predefined settings in just a few clicks.
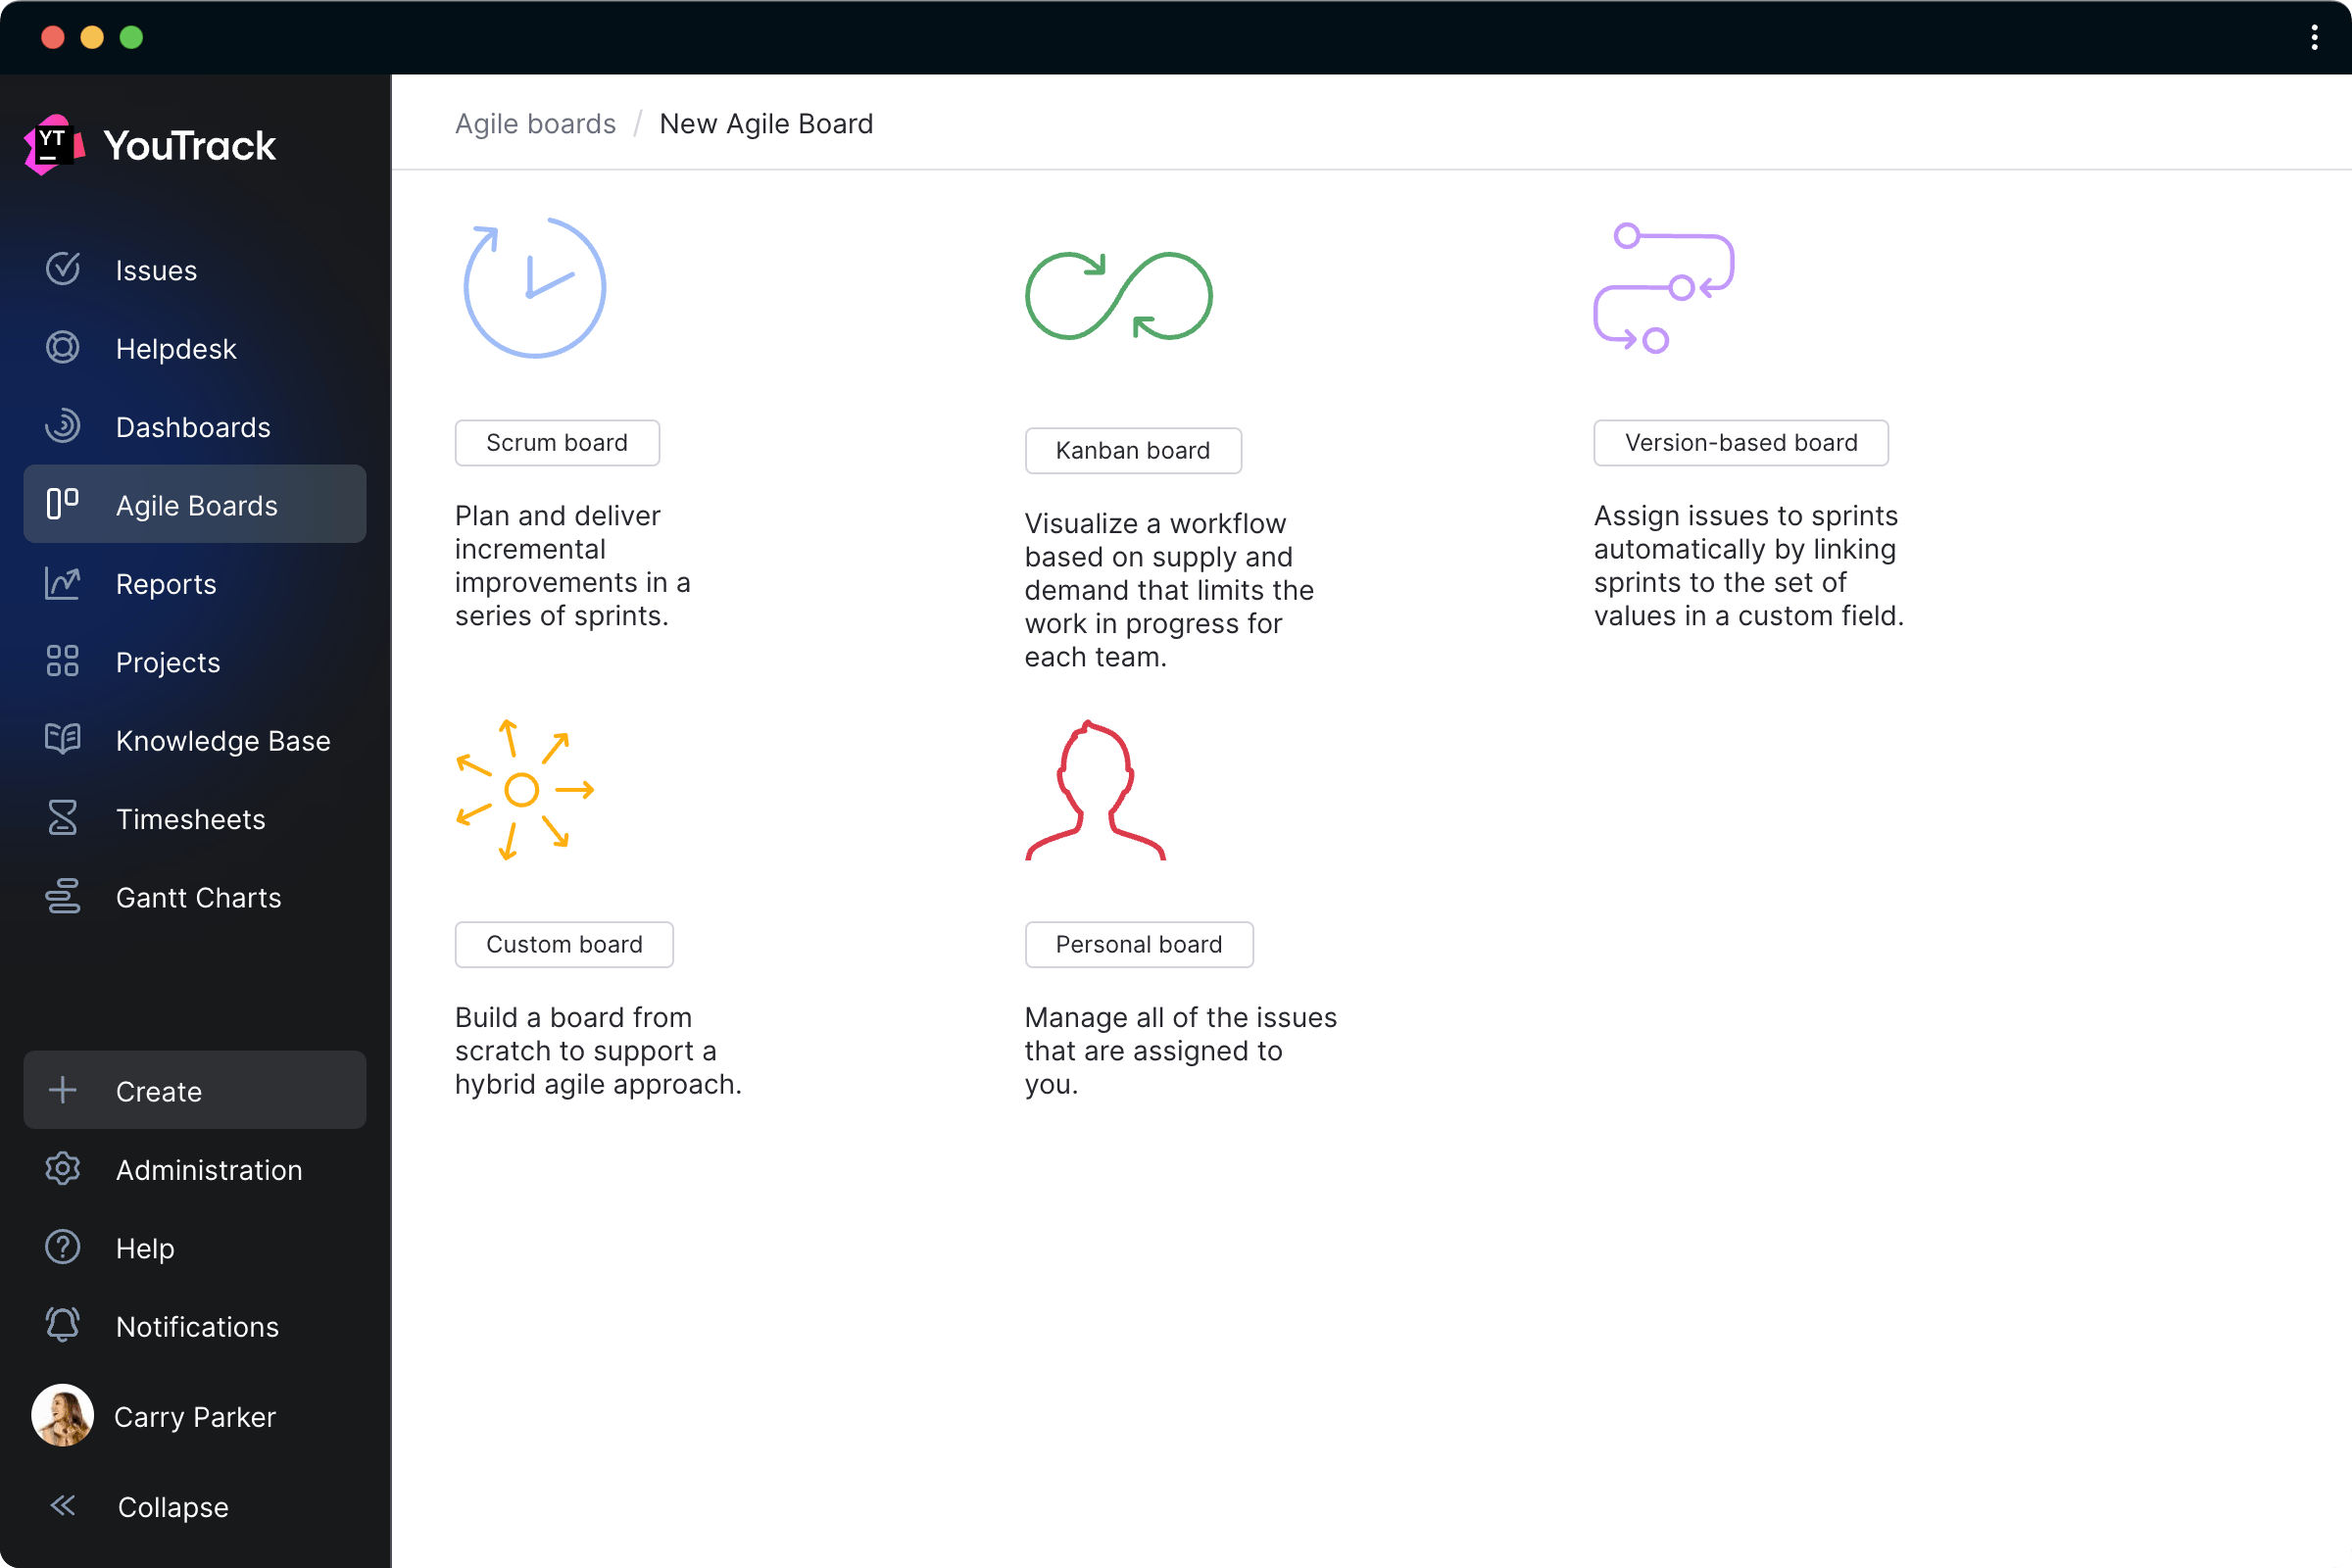
Flexible
Get started quickly with board templates for the most common Agile use cases, or configure boards from scratch to your own precise requirements.
YouTrack doesn’t force you to use Kanban, Scrum, or any other methodology – you’re free to use boards however you like.
Whether you use specific methods like Kanban or Scrum, or your own unique approach, YouTrack’s Agile boards adapt to your needs, not the other way around.
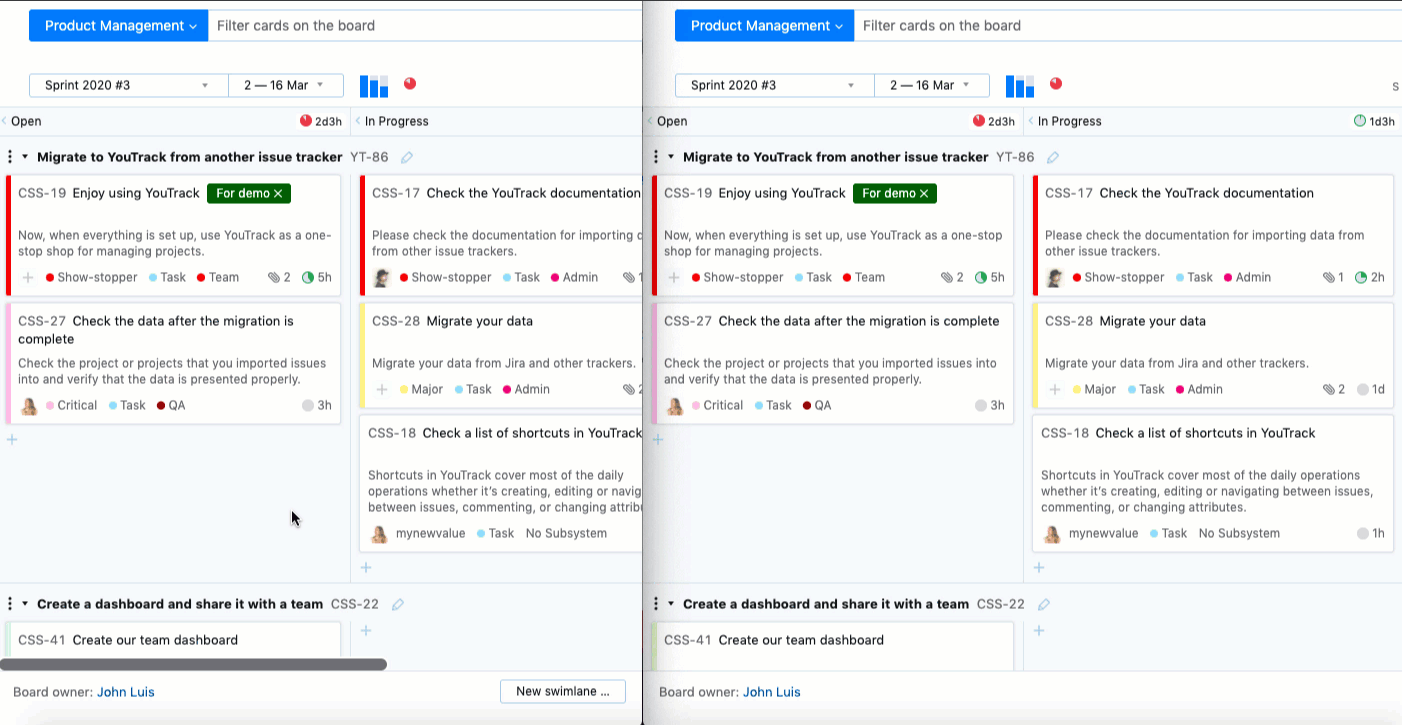
Real-time update
Agile boards are updated in real time, so changes made to an issue are immediately reflected on all boards where that issue is displayed.
When a new issue is created it will automatically appear on any boards based on a query that matches that issue.
Dragging an issue on the board from one column to another updates its workflow status.
Dragging an issue from one swimlane to another updates its value for the field that defines swimlanes on the board.
Versatile
Boards can be defined using search queries (with automatic population) or by manually selecting issues to be displayed, providing limitless possibilities for planning, tracking, and reporting.
You can create as many boards as you need to plan and track any set of projects and issues. Boards can display tasks from multiple projects with different workflows, providing clear visibility at any level.
Multi-level boards
Create as many boards as you like, with different swimlanes to provide different perspectives on the same sets of issues.
Planning, tracking, reporting
Columns
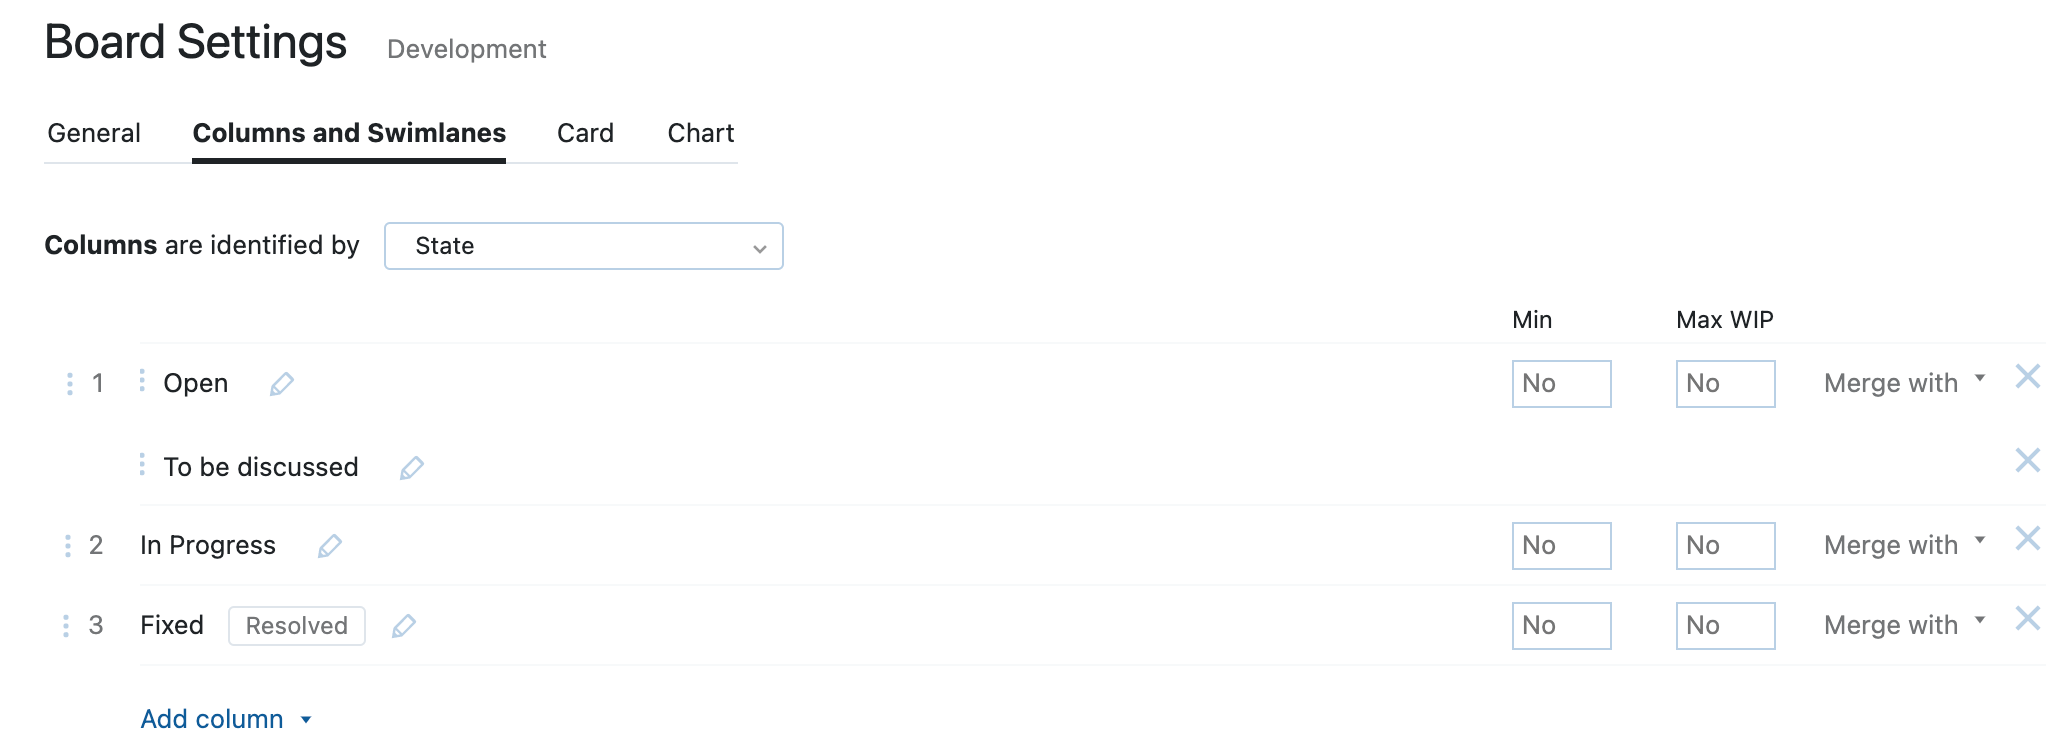
Visualize your workflow
The columns on an Agile board represent stages in the project workflow. With YouTrack, you can merge multiple workflow statuses into one column to keep your board concise and tidy, and make visualizing progress as easy as possible.
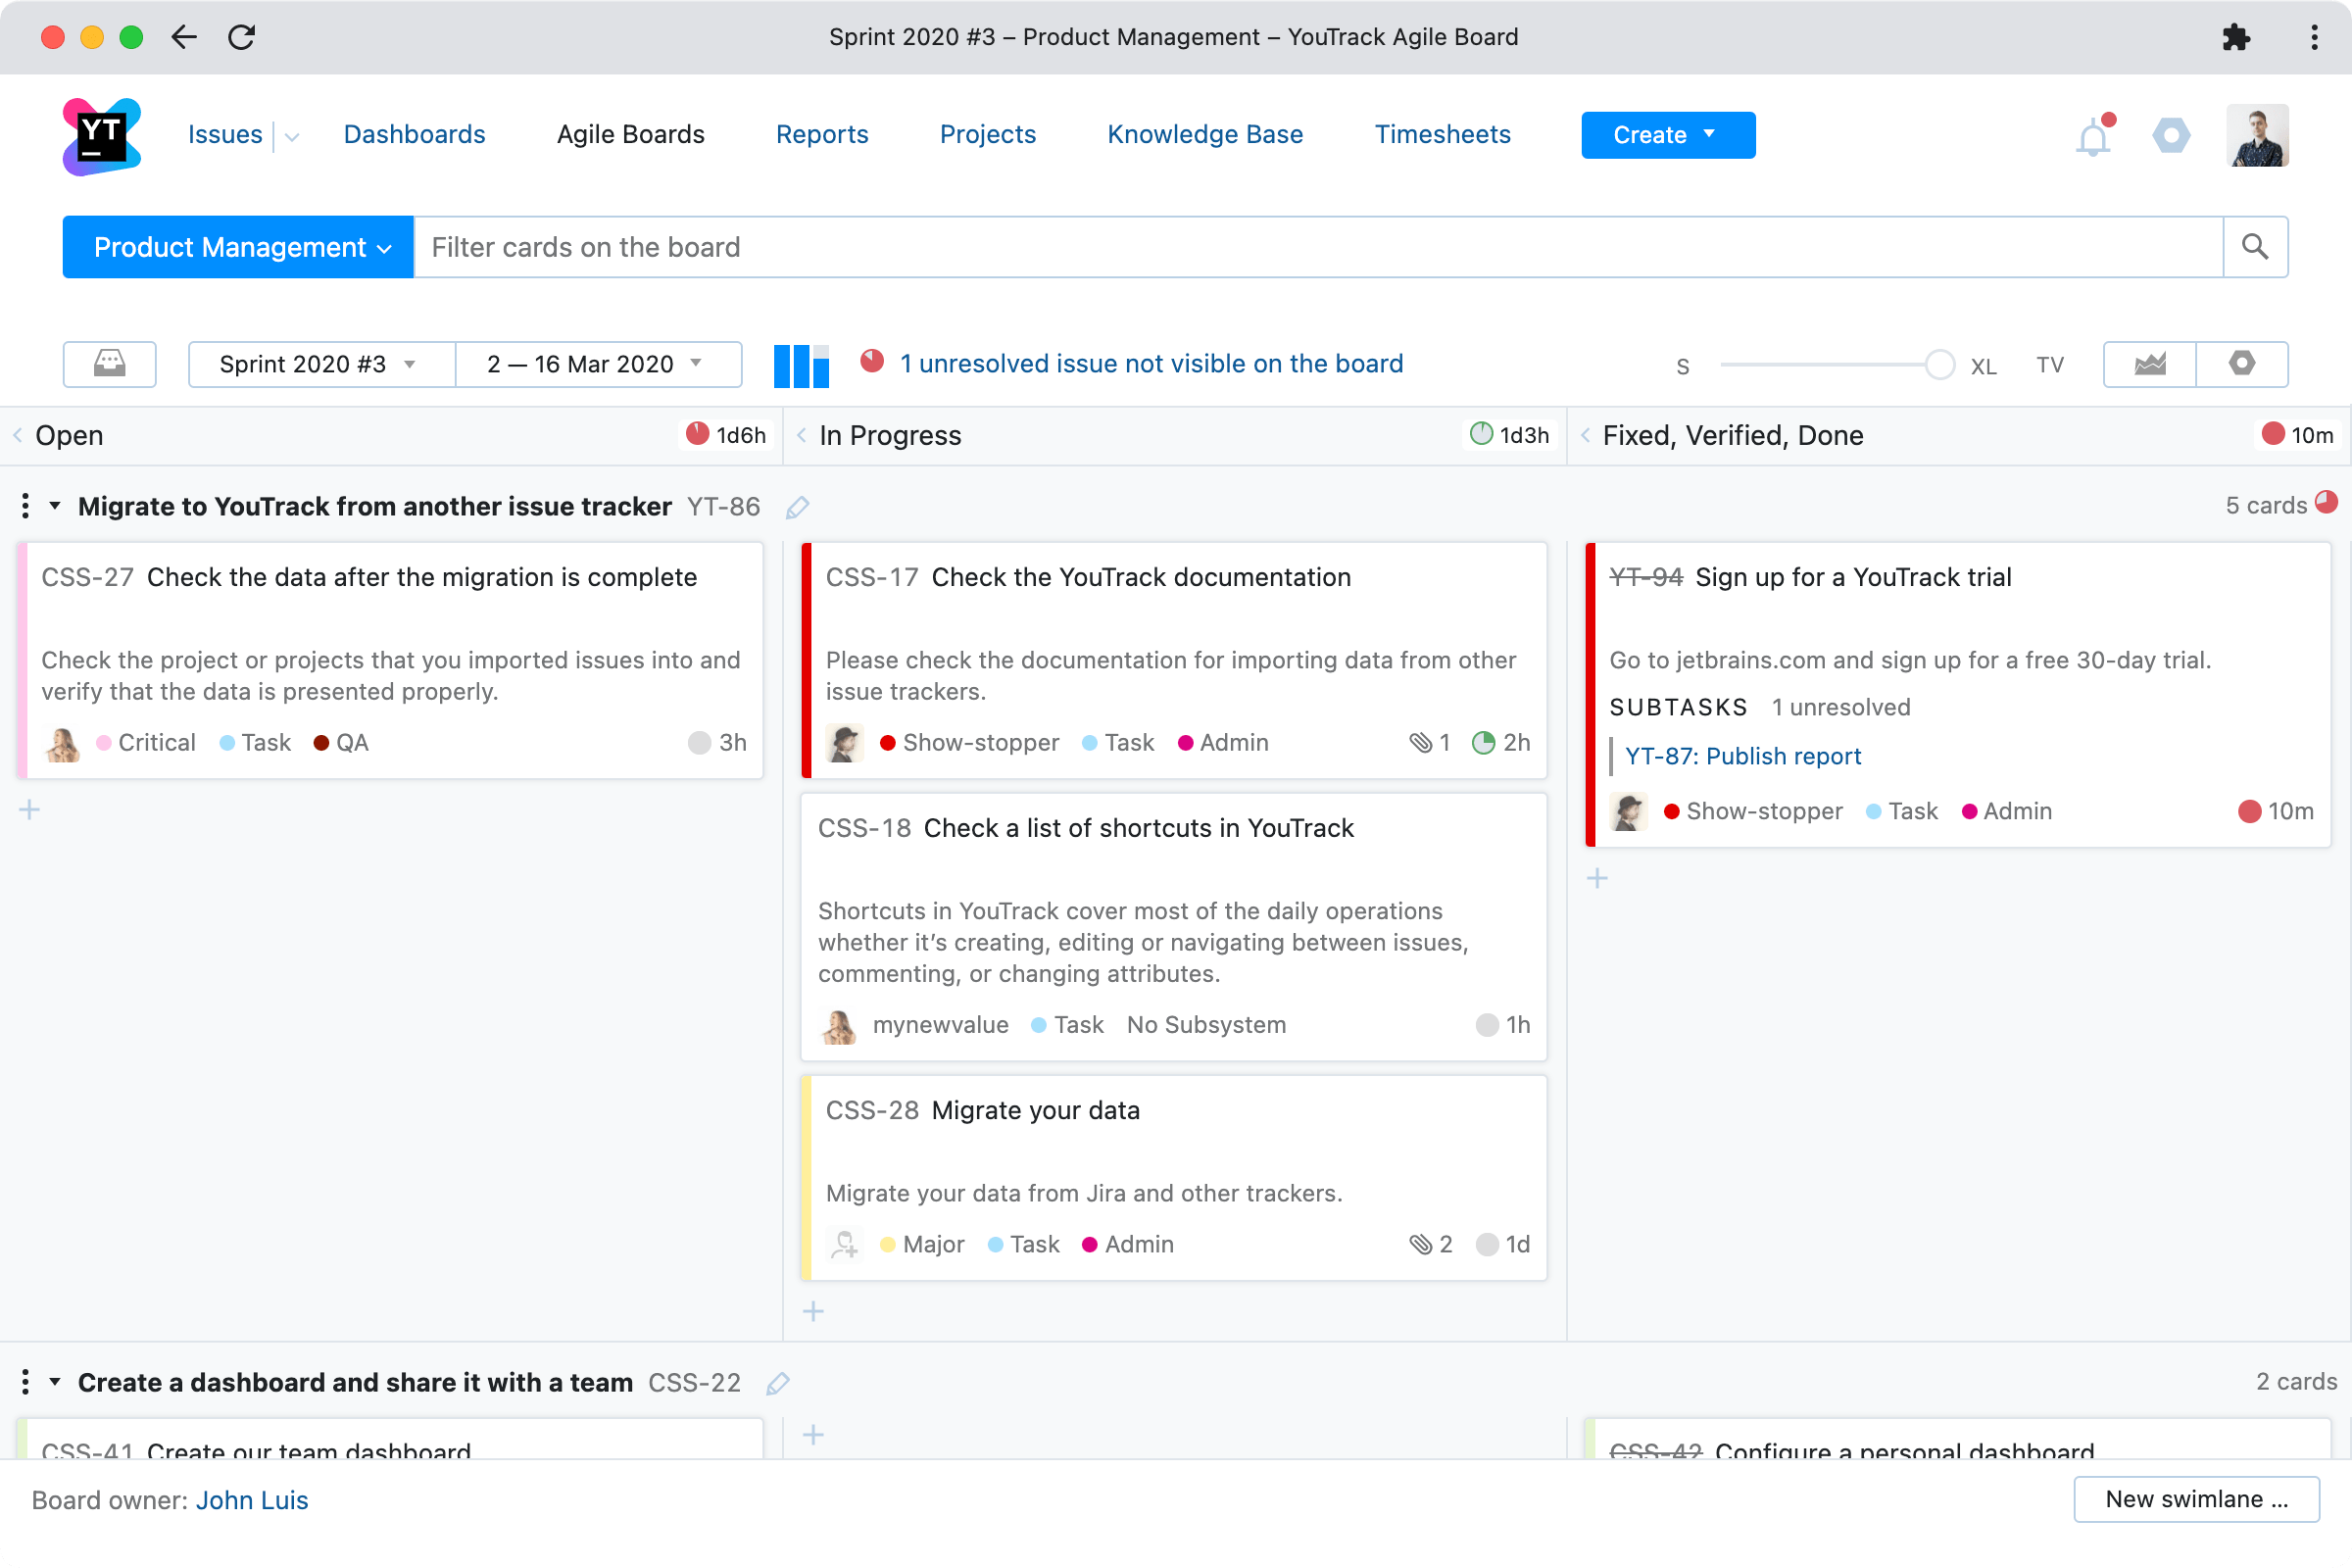
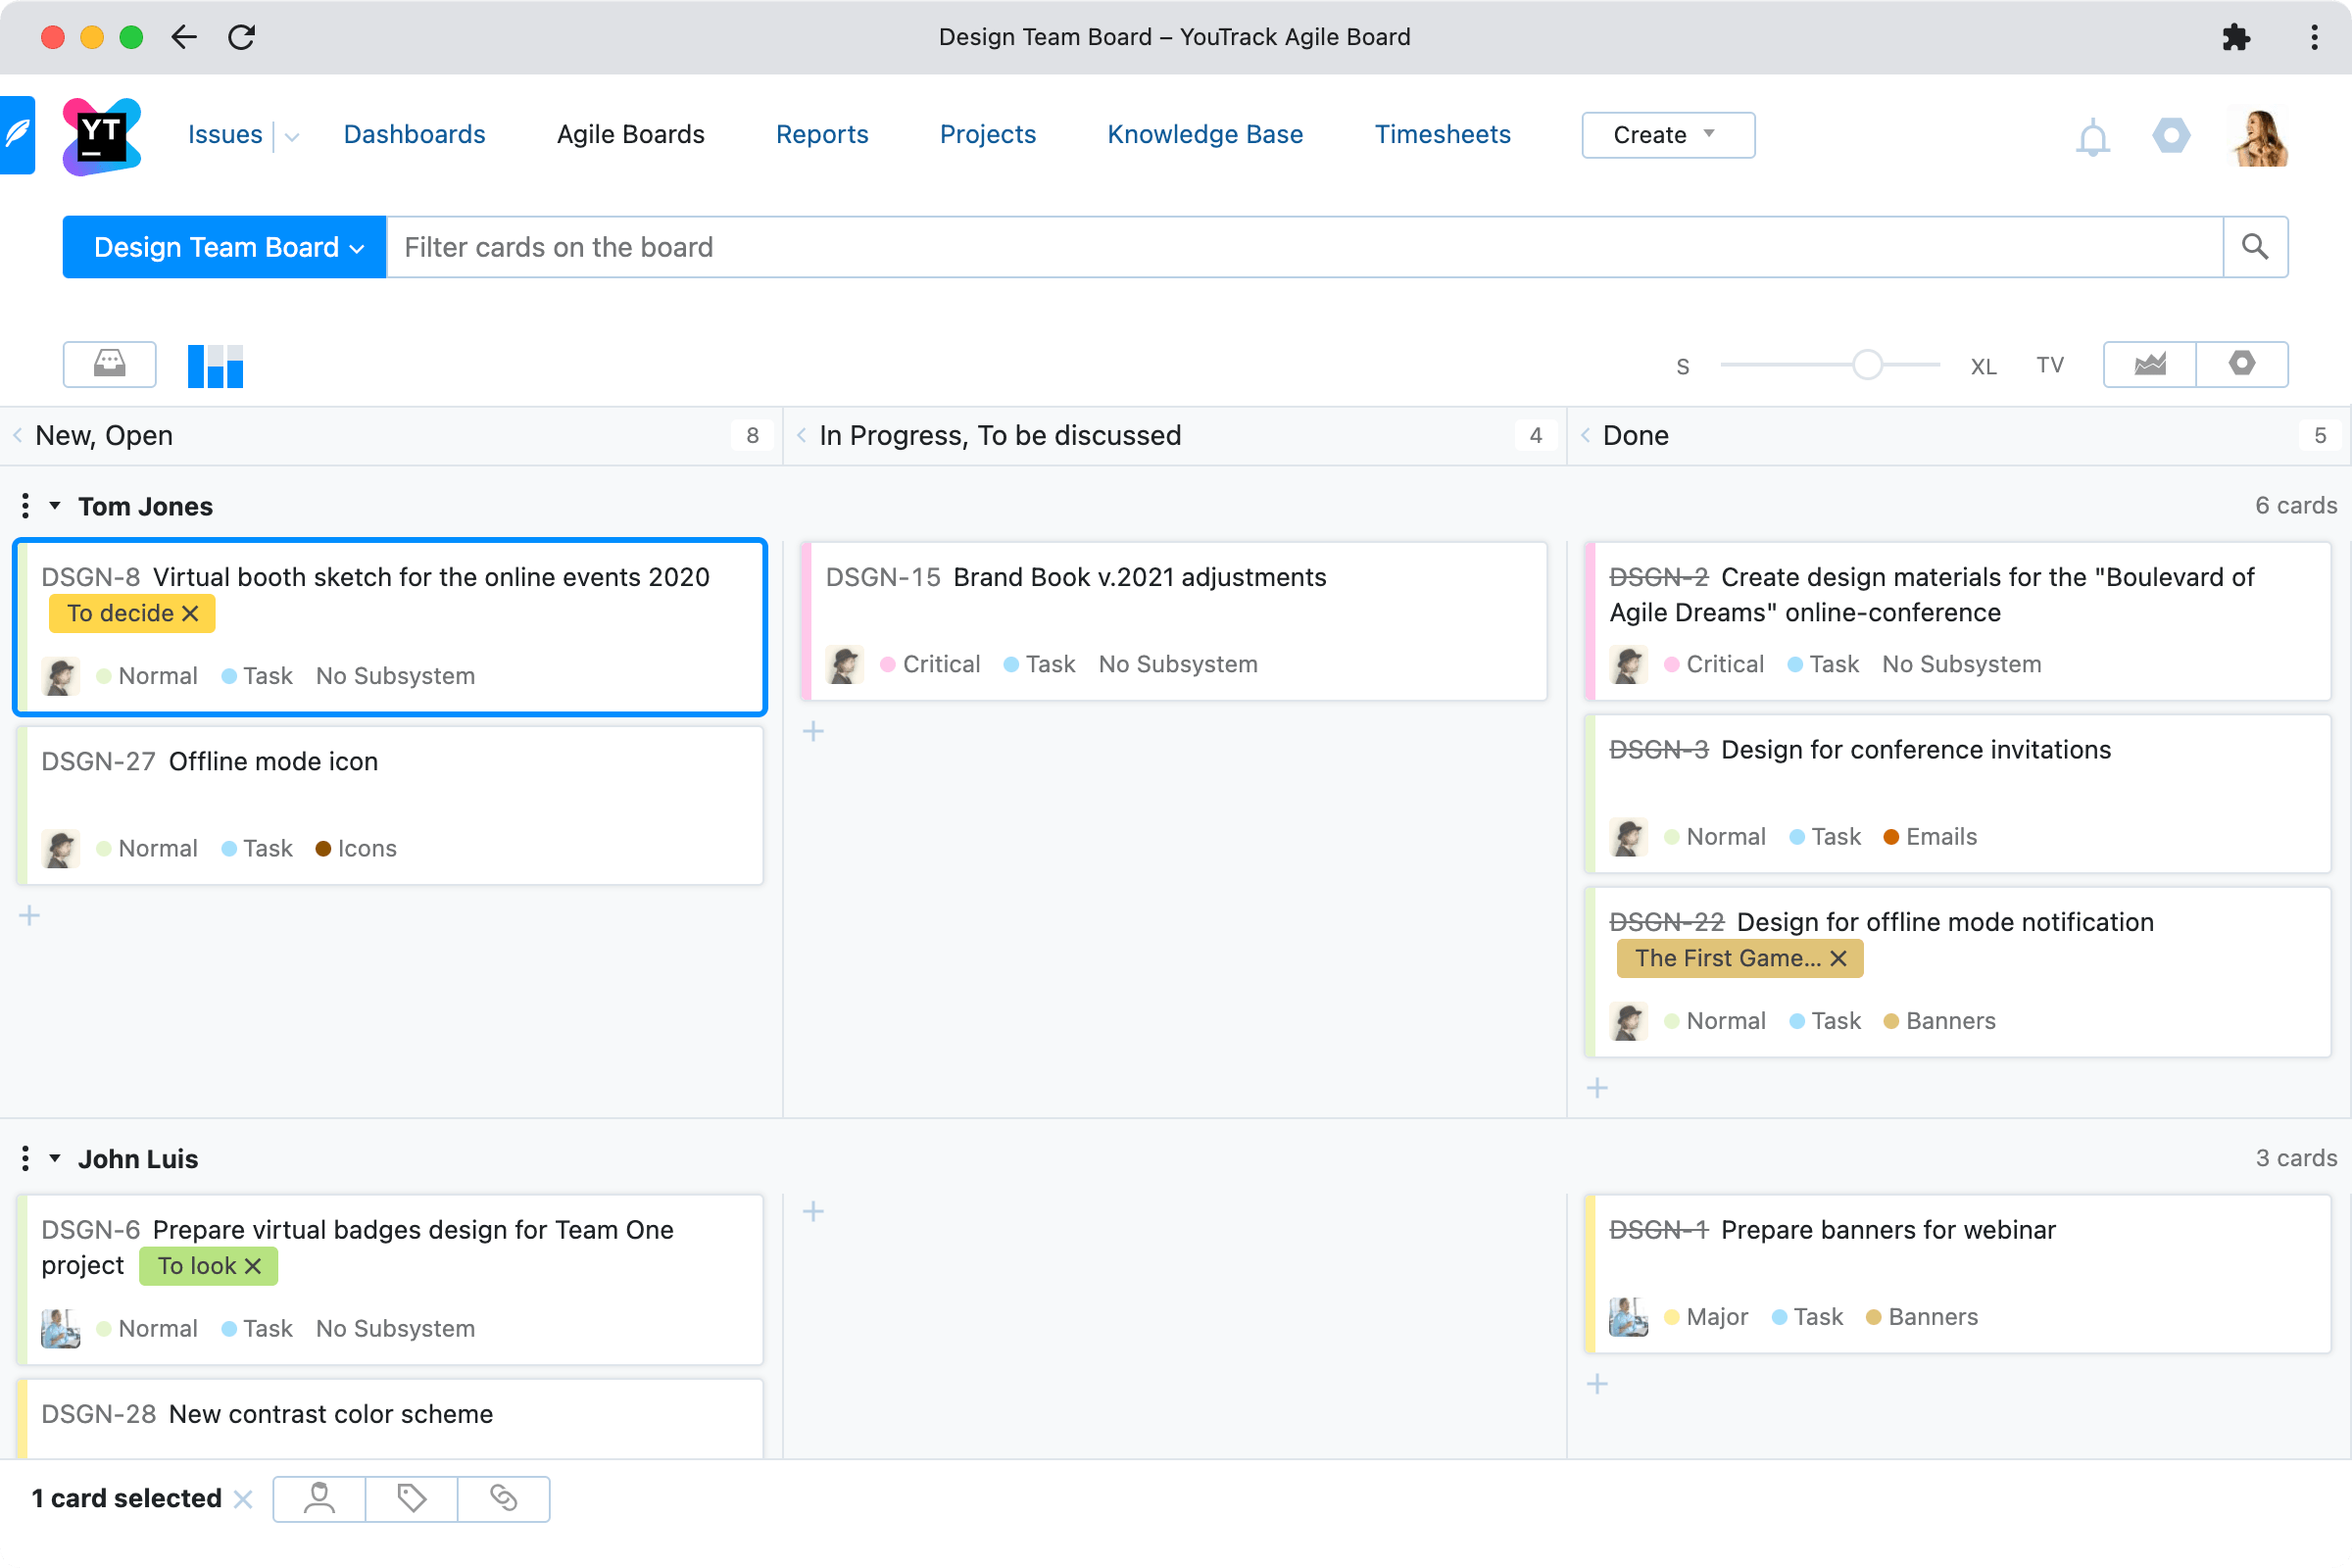
Swimlanes
Organize your workload
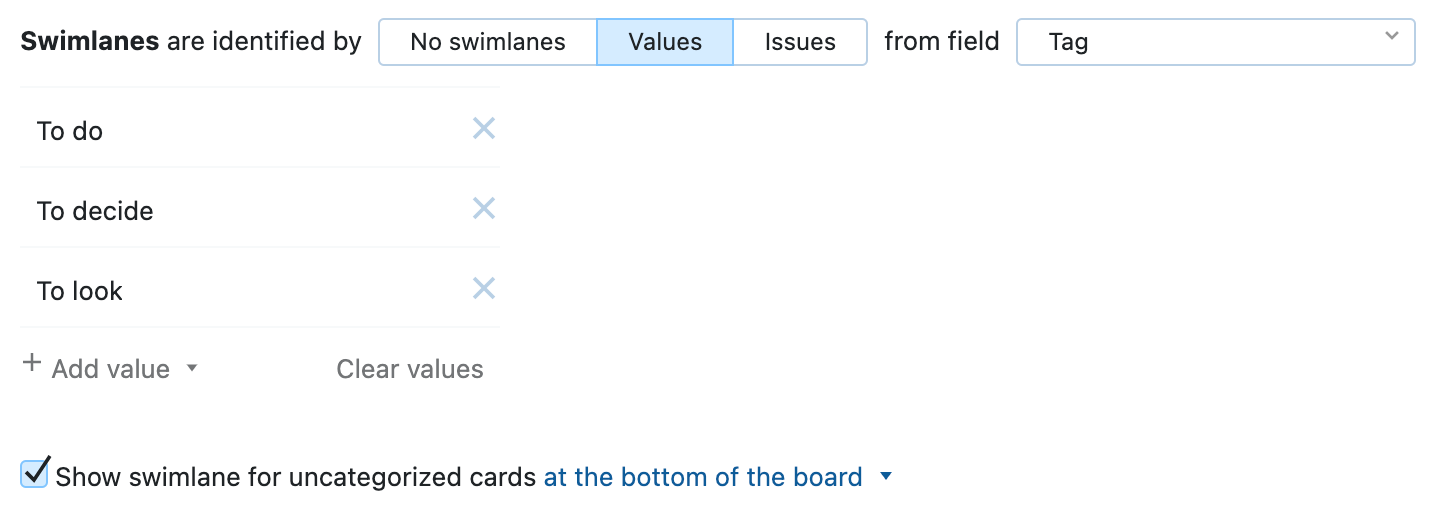
Swimlanes group issues on the board into collapsible horizontal rows and provide excellent visibility into the distribution of issues according to specific criteria.
YouTrack allows you to define swimlanes based on almost any issue field. For example:
- Use the Assignee field to create a team backlog where you can easily see how workload is distributed among team members.
- Use the Epic field to group issues on a project board and track progress at epic level.
- Use the Tag field for ad-hoc grouping.
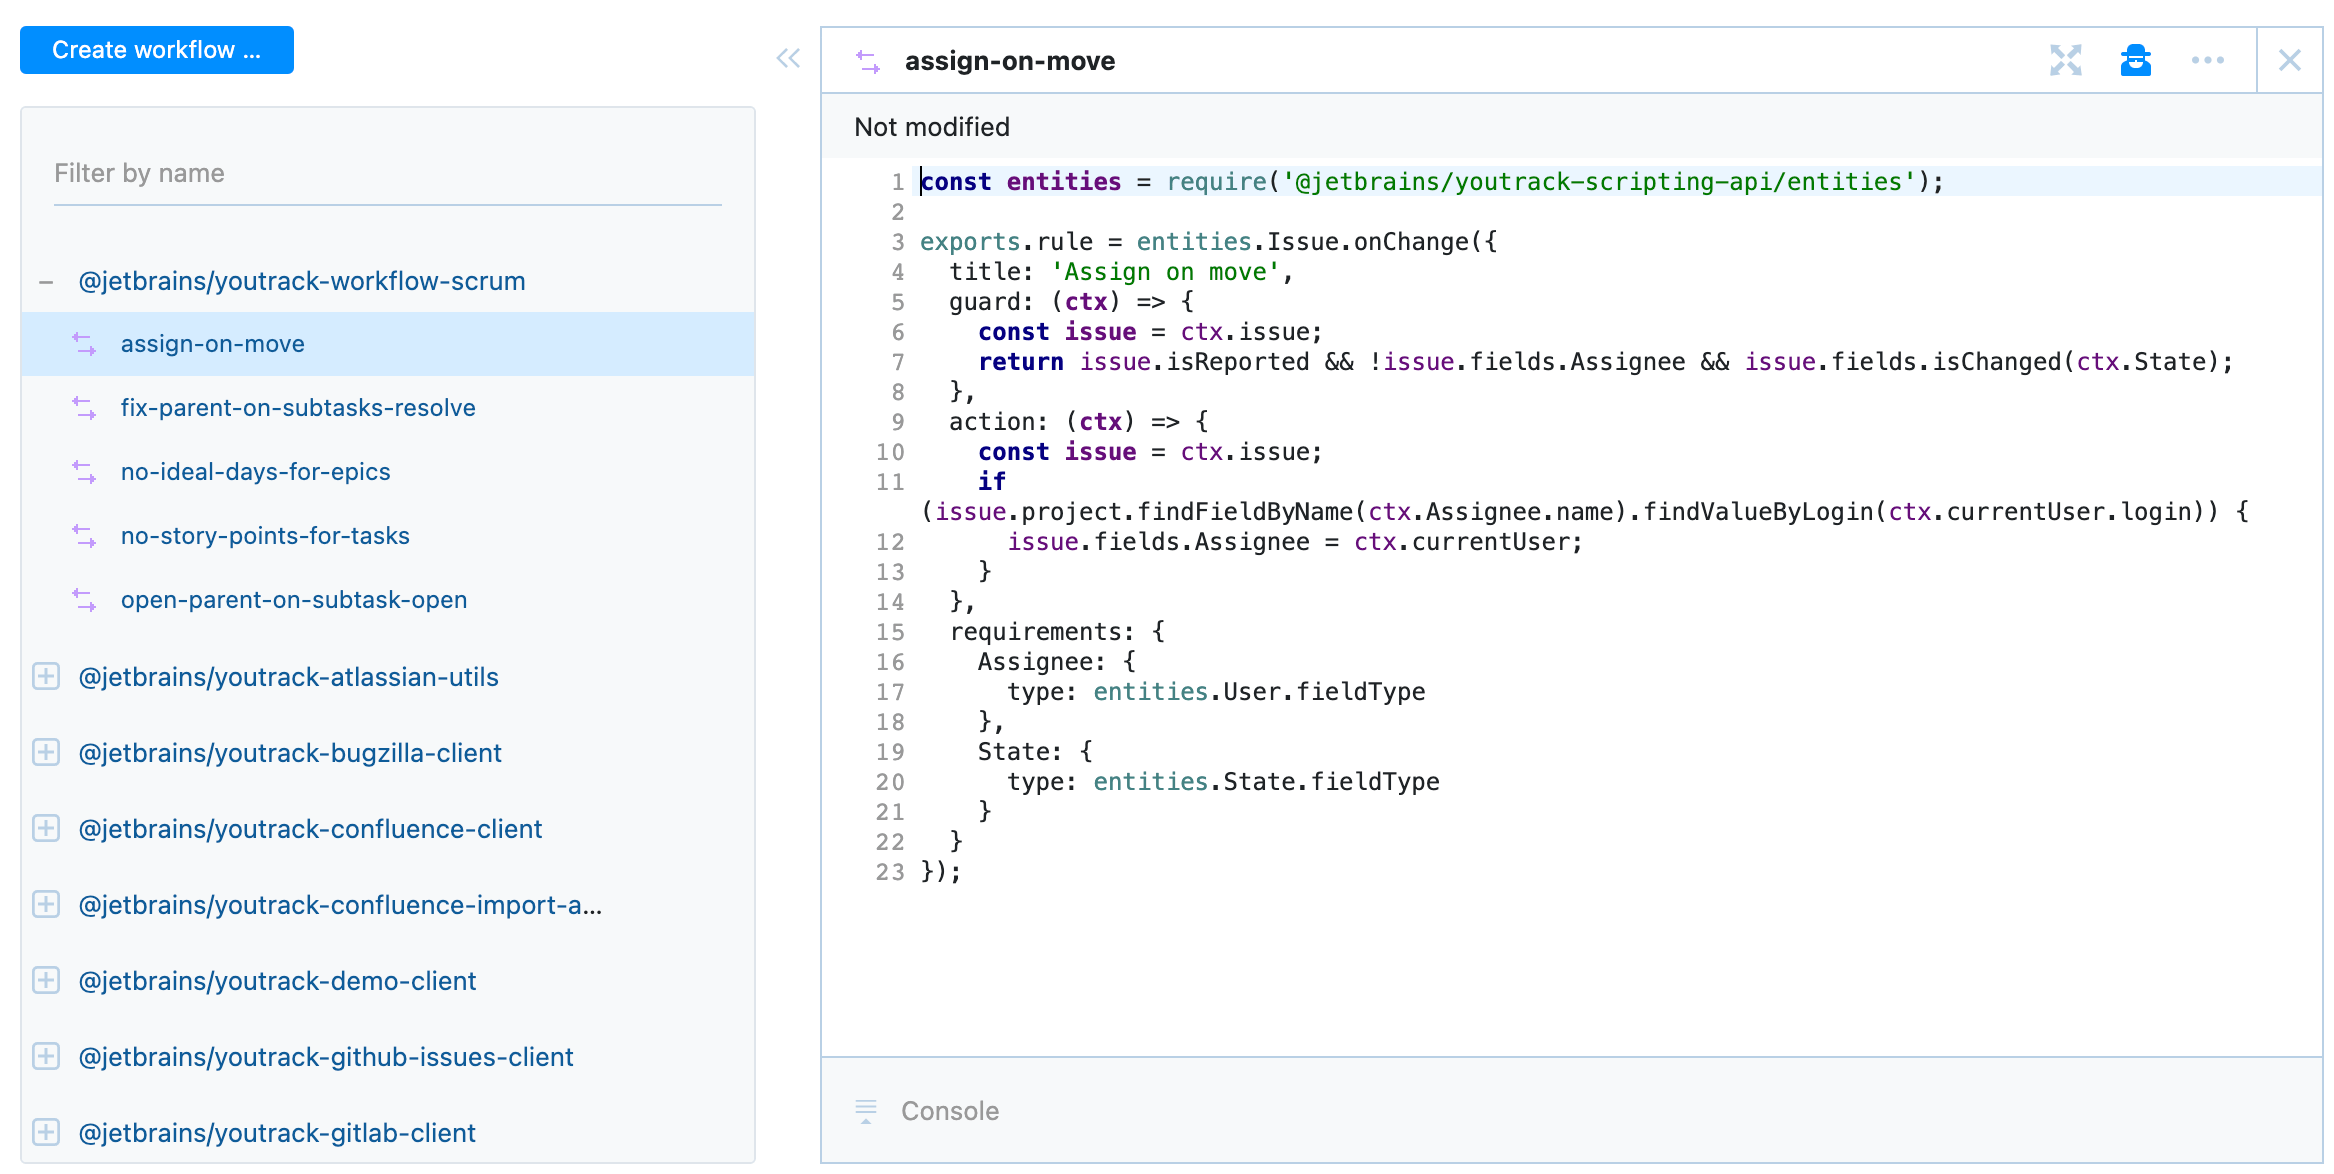
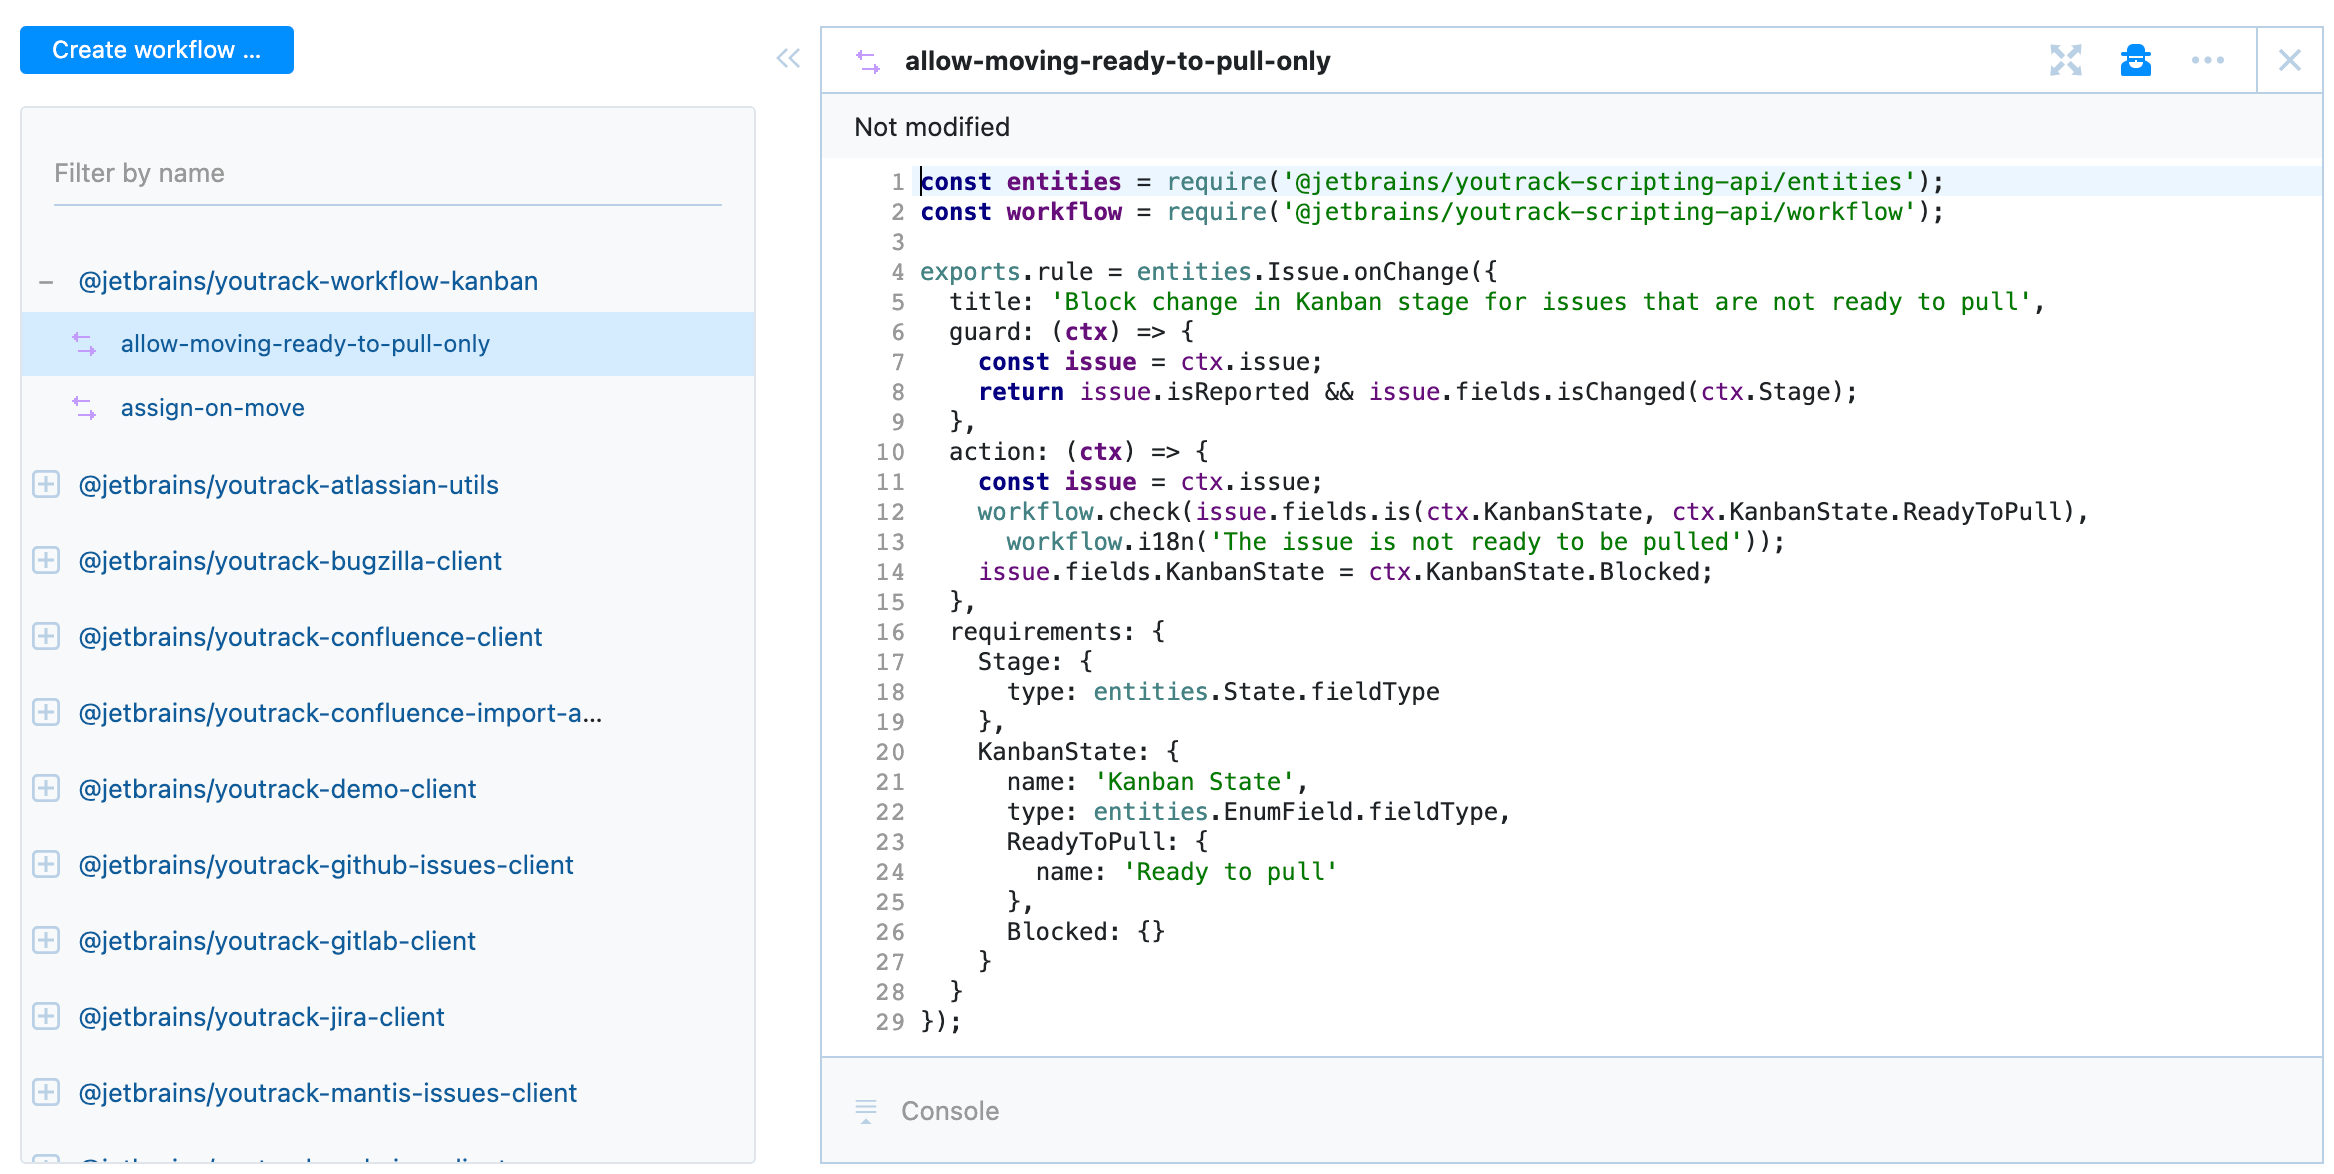
Workflow automation
Powerful scripted workflows assist in making light work of even the most complex processes.
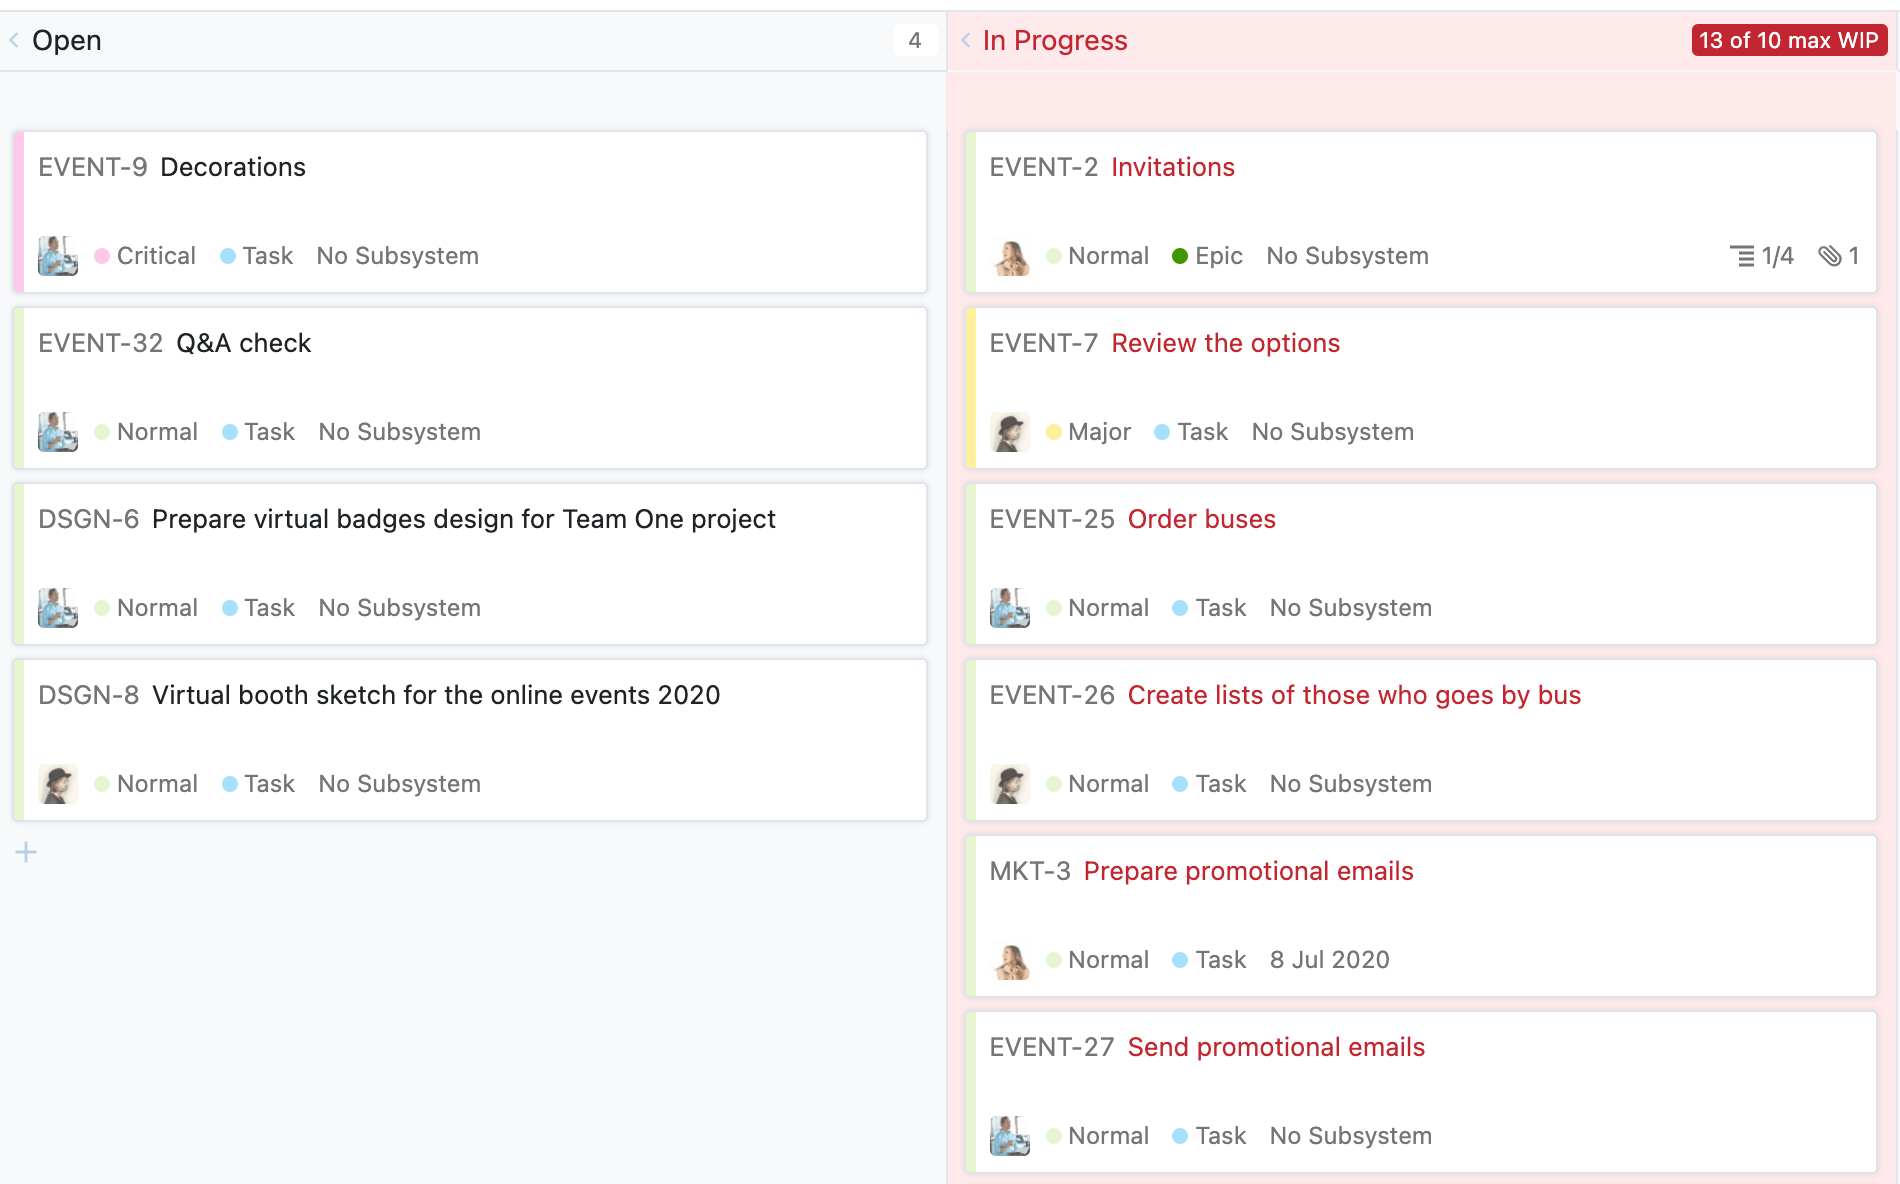
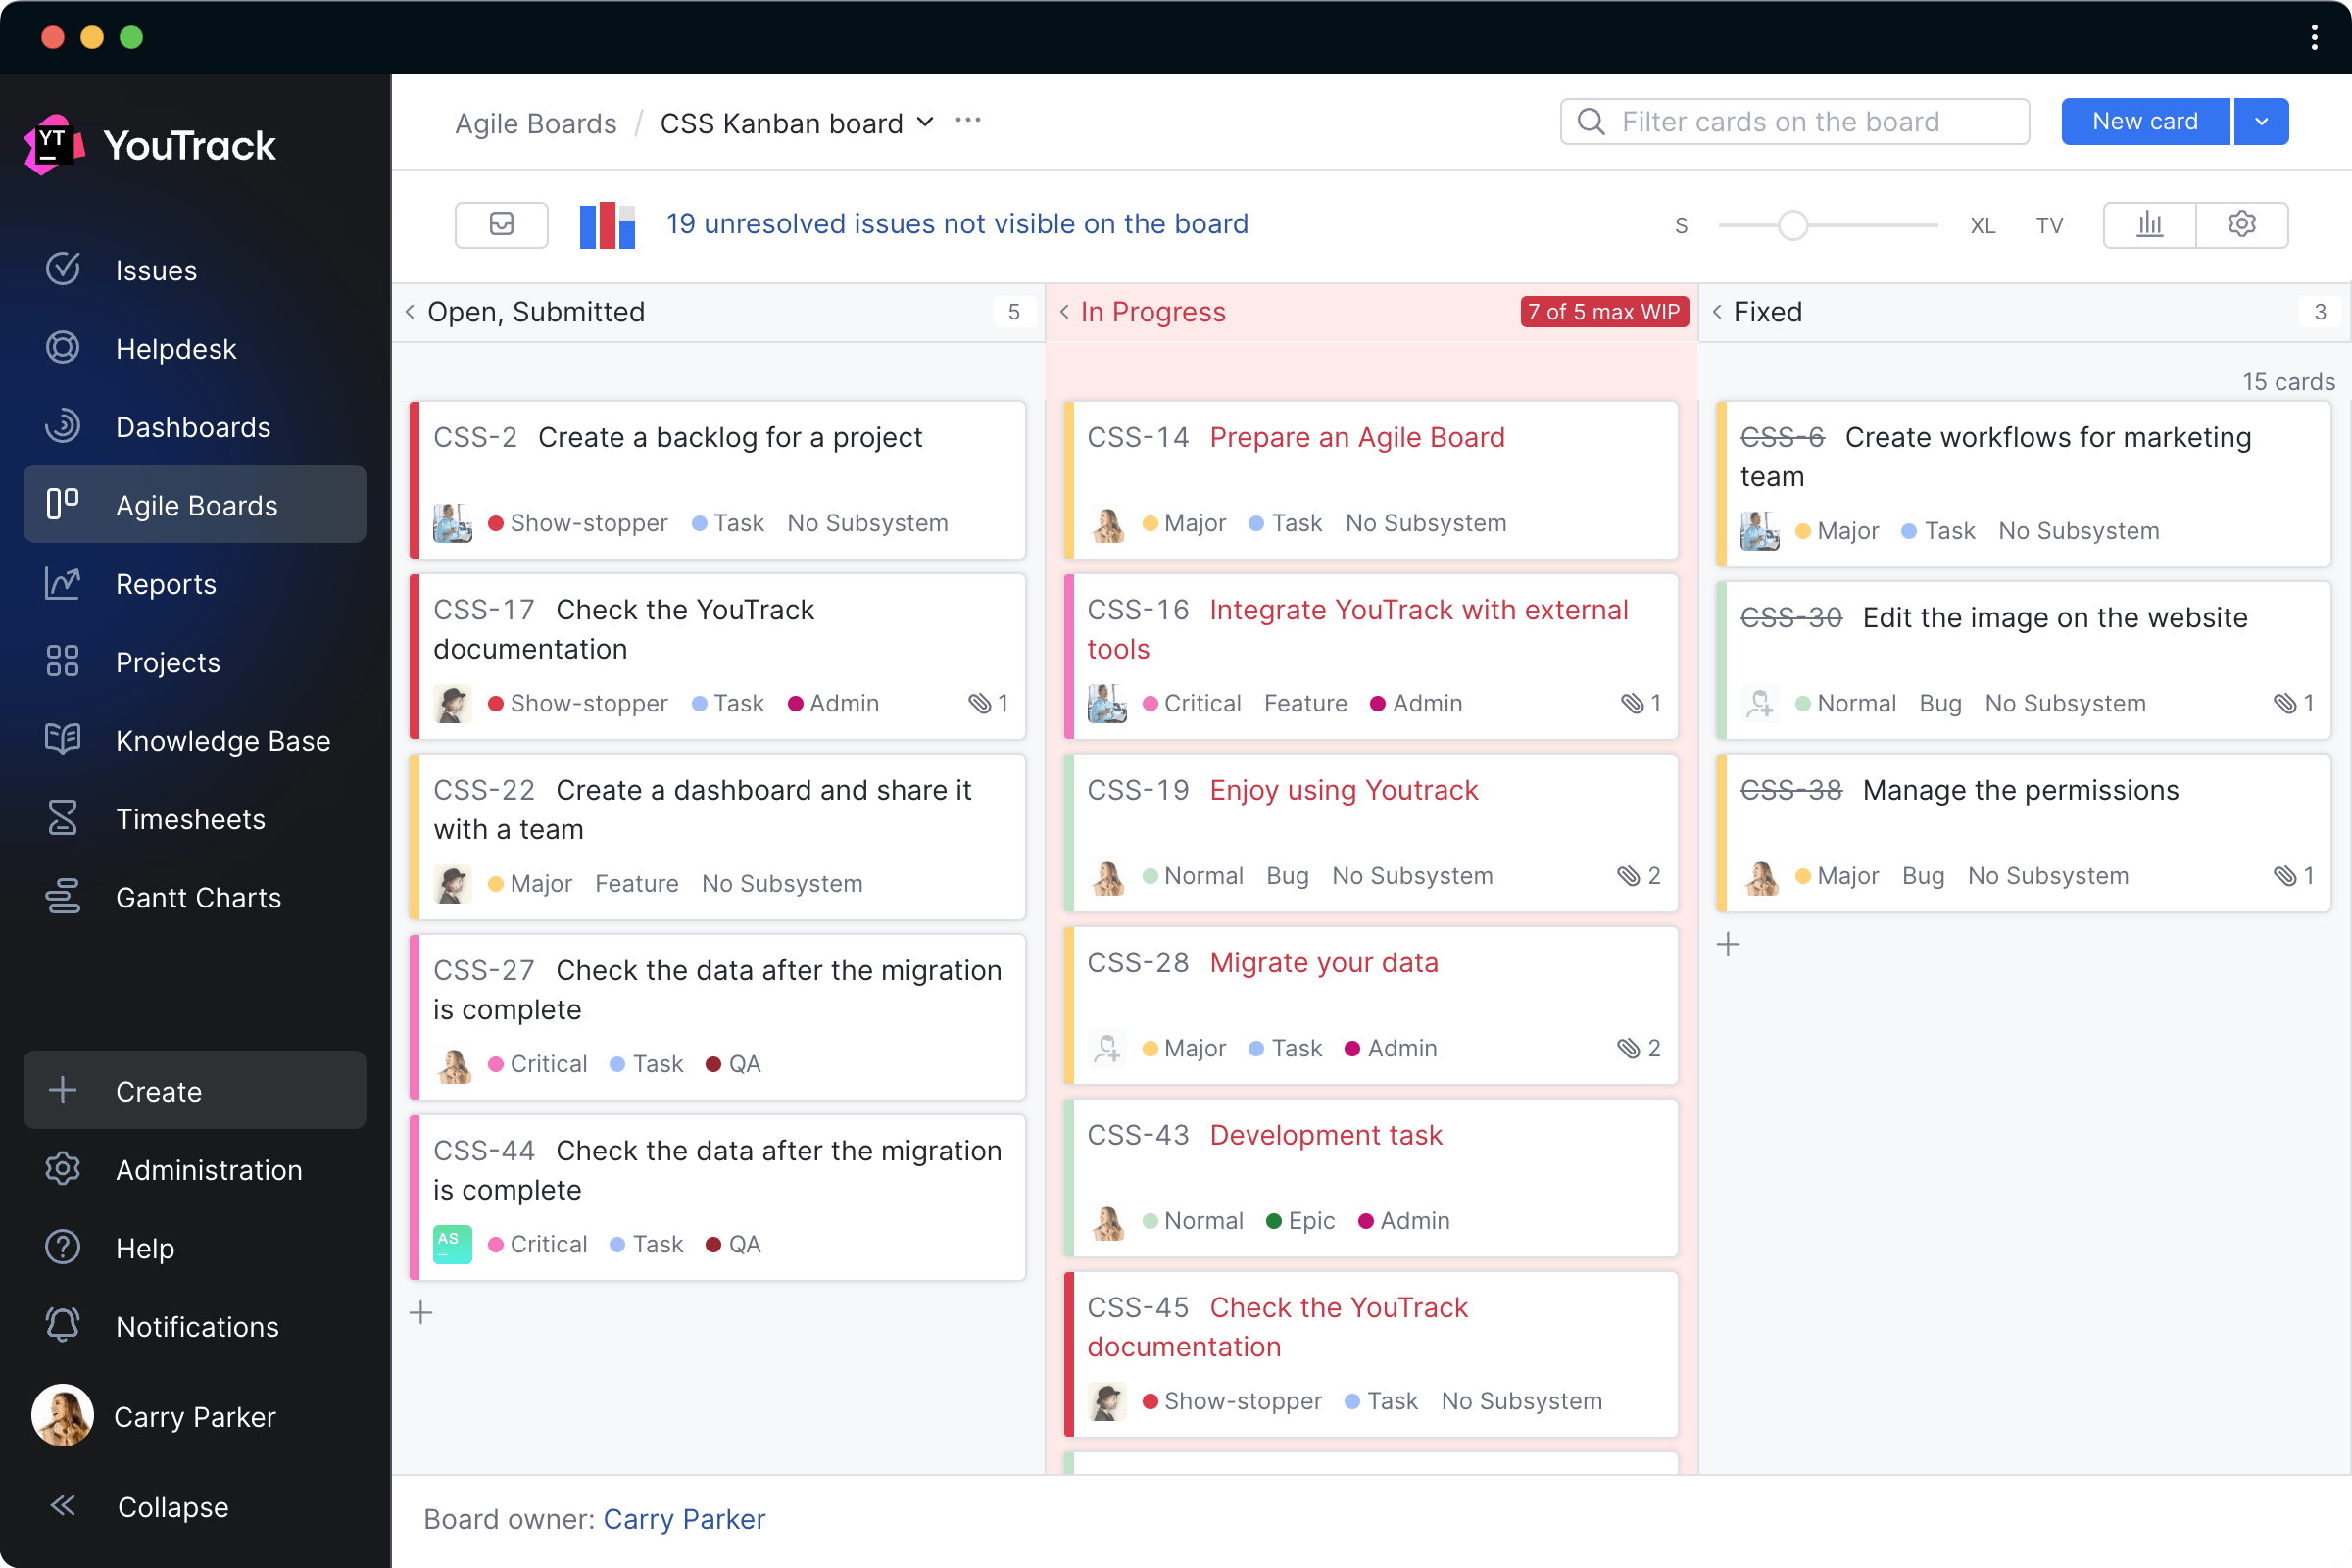
WIP
WIP (Work In Progress) is a fundamental indicator of current and planned workload on Agile boards.
YouTrack allows you to set WIP limitations for different statuses (columns) on boards, for example, to prevent too many issues being added to a sprint.
Agile and mixed project management
YouTrack provides the specific features necessary to support Scrum and Kanban workflows, but does not restrict you to follow any particular methodology – you are free to set up and use Agile boards, reports, and other features in any way you like.
Scrum
Sprint planning
Scrum teams work in sprints, where a set amount of work is planned for completion in a set period of time, typically two weeks.
Planning and prioritization is a crucial element of the Scrum approach. YouTrack’s Agile boards help you get this part right.
Configure your scrum board to add issues with a specified Fix version to the backlog automatically, or add issues manually during your sprint planning meeting.
Prioritize your backlog simply by dragging and dropping issues to move them up or down.
You can also prioritize your sprints by dragging swimlanes up and down, and prioritize issues within swimlanes in the same way.
Tasks that aren’t finished in the course of a sprint can be automatically added to the next sprint.
Scrum tracking
Keep track of overall sprint progress by following issues through the workflow on the scrum board.
Use the burndown chart to make sure you’re on target to finish all the tasks by the end of the sprint, or use the cumulative flow chart to track the overall “speed” of work and identify bottlenecks.

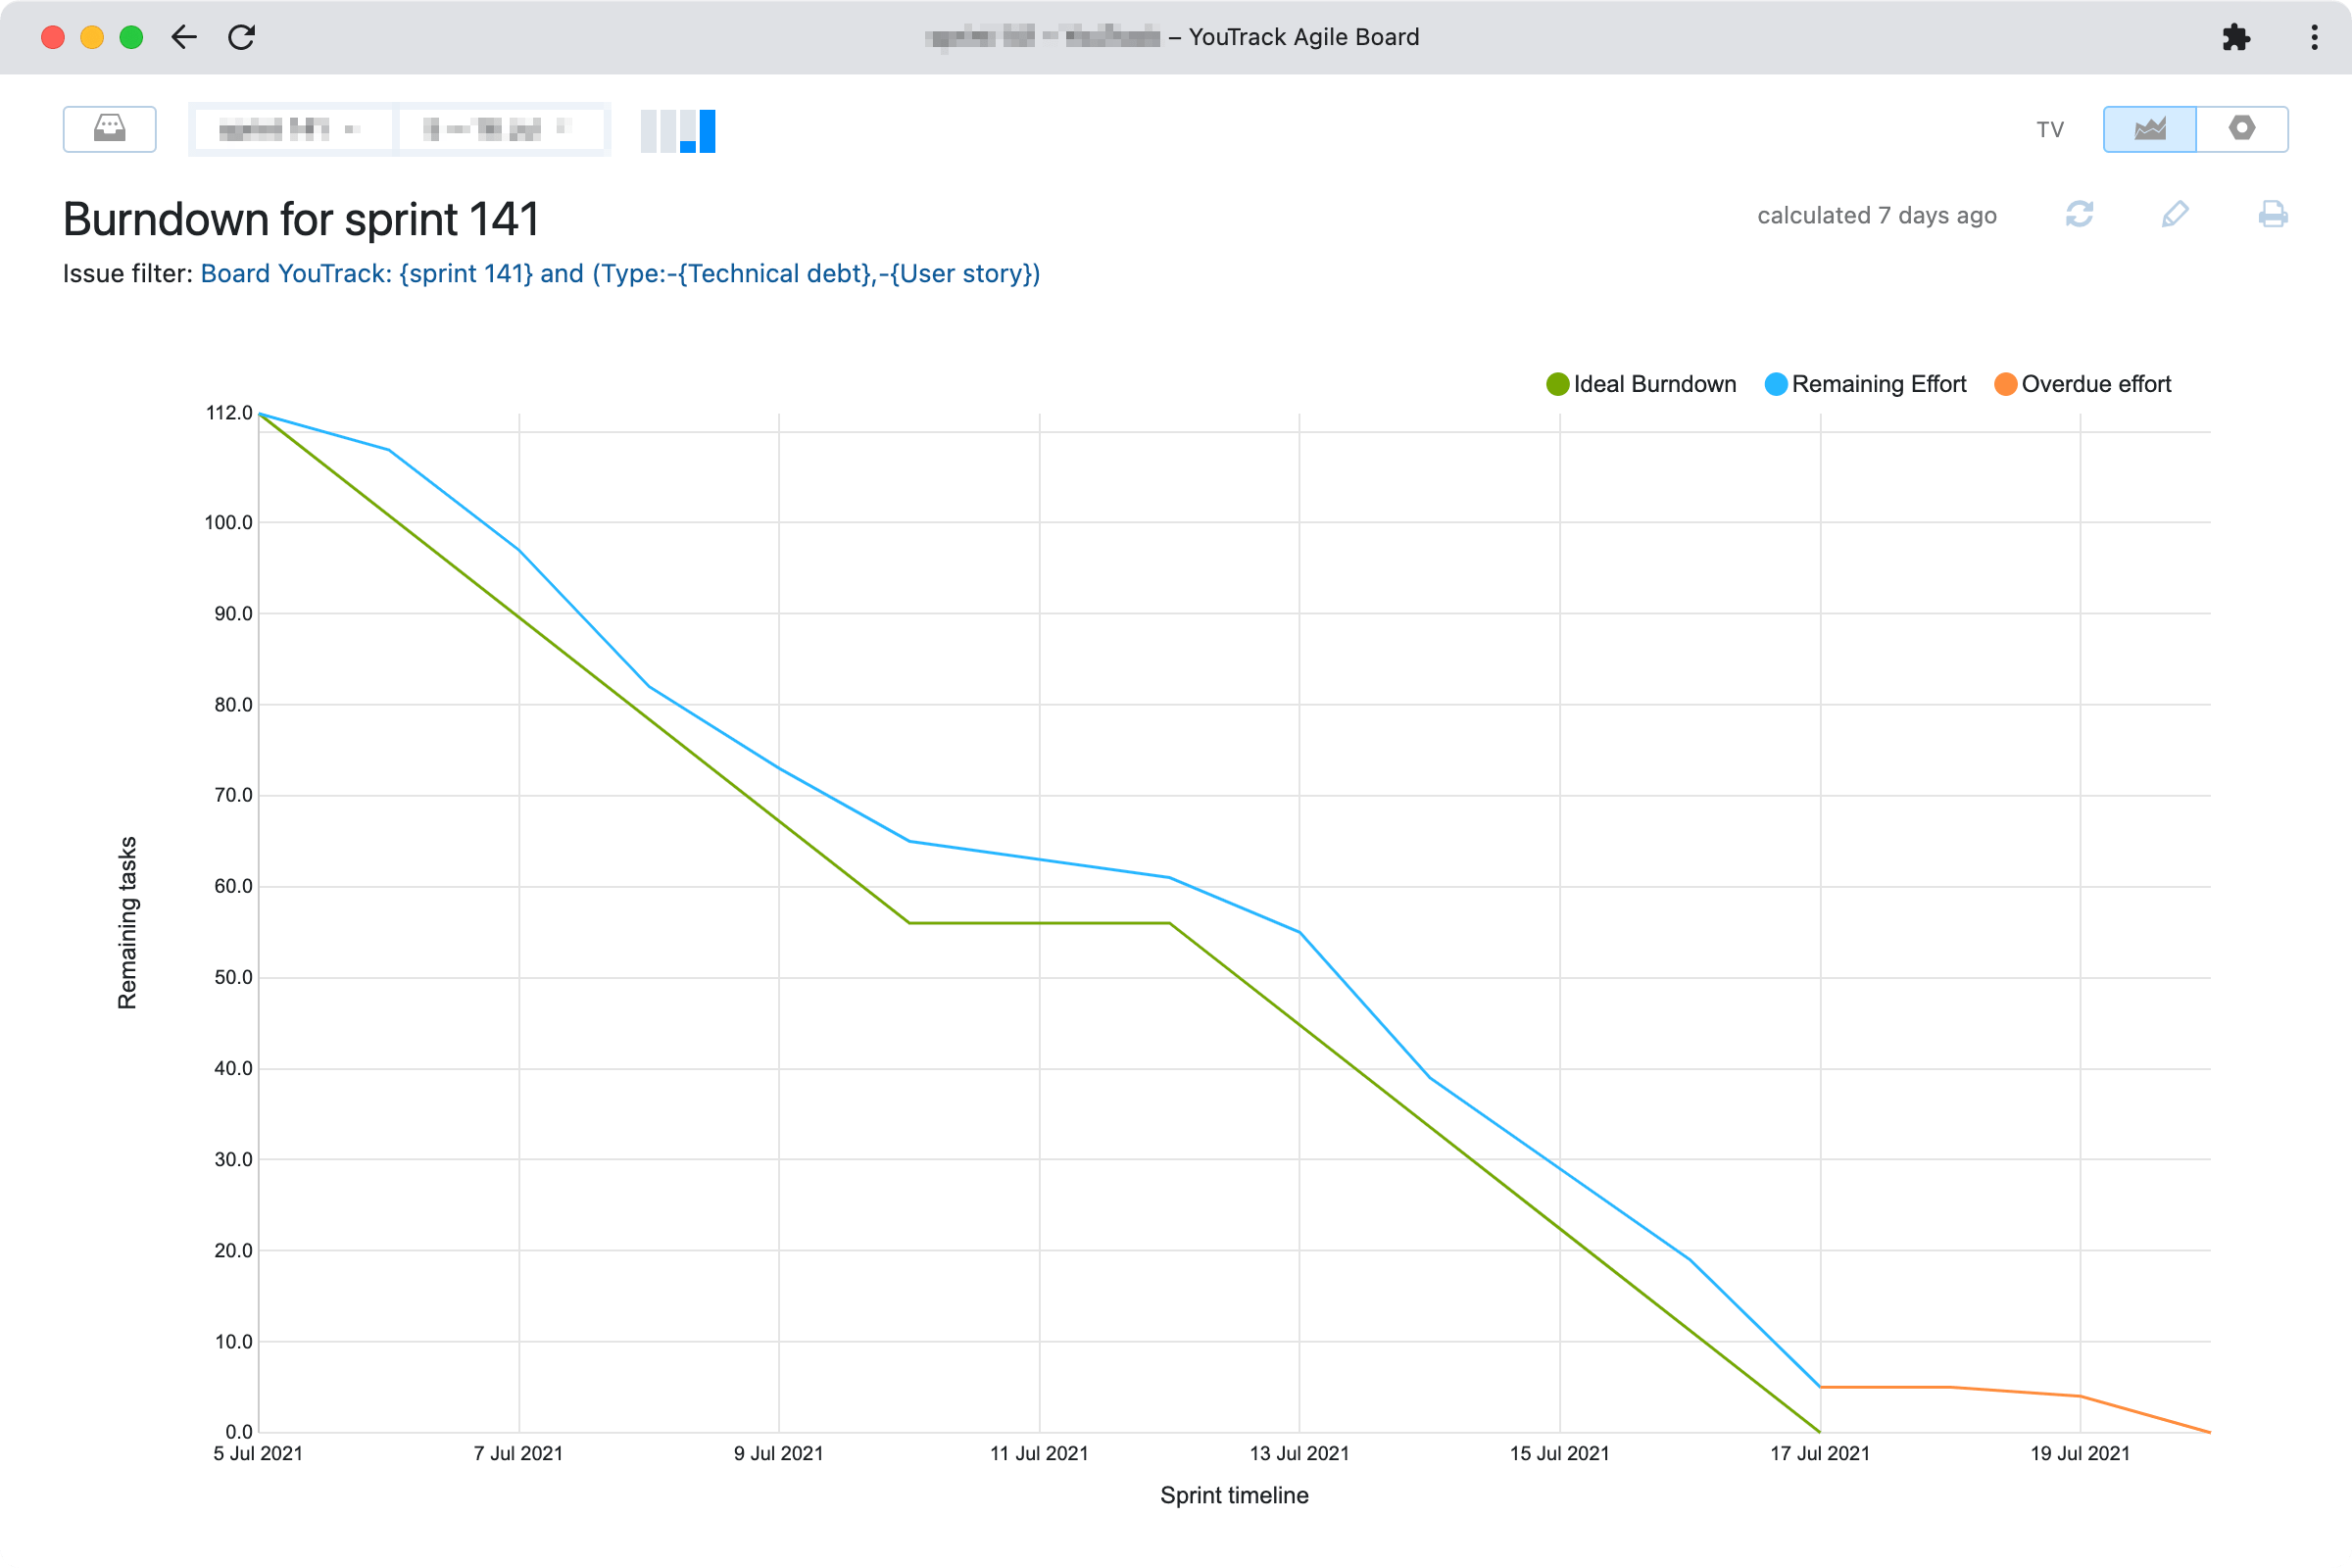
Burndown chart
The burndown chart is a line graph that compares “ideal” progress to actual progress during a sprint. It lets you see whether you’re on track to complete all the tasks on time.
You can configure the burndown chart to track progress based on swimlanes, issue count, estimations, or time tracking.
YouTrack’s burndown chart takes weekends into account.
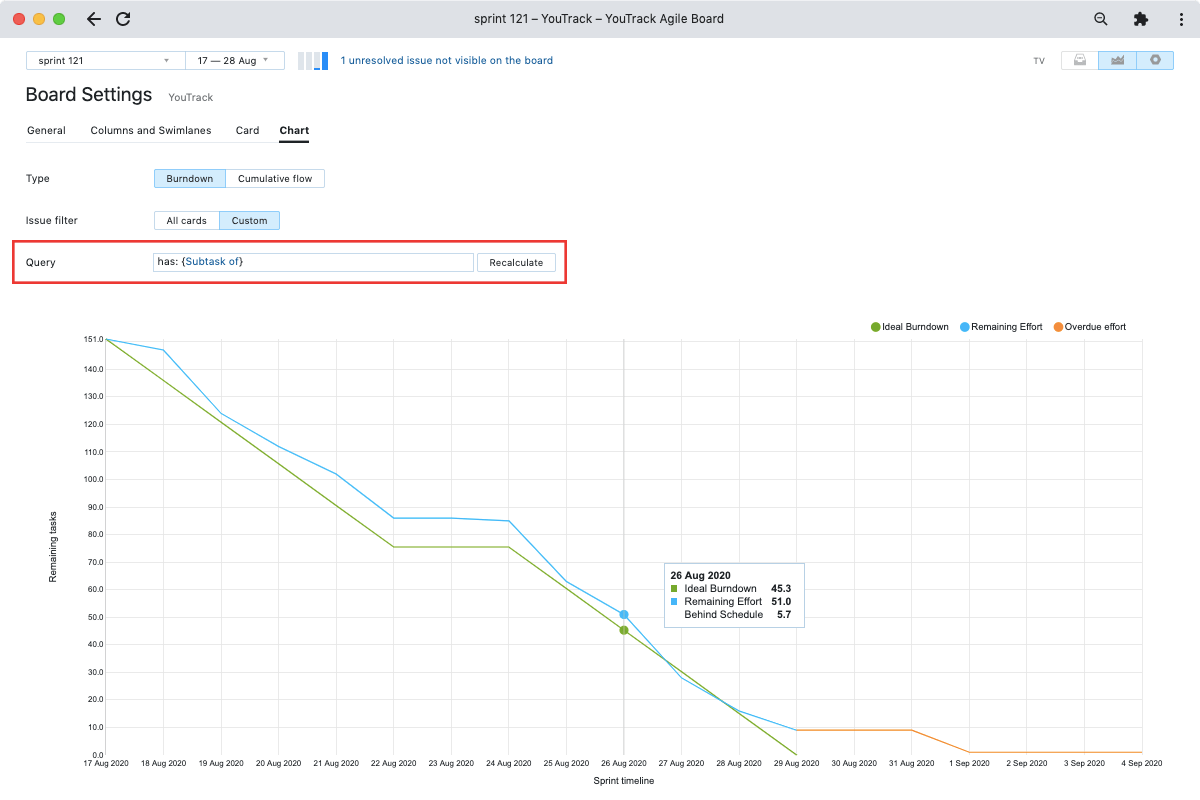
Filtered burndown chart
You can specify a search query to filter the issues that are included in the burndown.
This allows separate tracking of a subset of tasks within the sprint, for example, if you want to make sure that a particular feature will be completed on time.

Advanced scrum boards
Multi-level boards
Create an Epic board to track the overall progress of your project. Set epics as swimlanes and user stories as their tasks that move inside each swimlane. An Epic board provides a high-level overview that’s invaluable for project management.
At the lower level, create a Development board, with user stories as swimlanes containing development tasks. This board visualizes the team’s progress inside each sprint.
You can create as many boards as you like, with different swimlane configurations to provide different perspectives on the same sets of issues.
Kanban
Kanban boards
Kanban differs from Scrum in that work is done in a continuous flow, where each task has its own deadline and new tasks are continually being added to the backlog.
Managing the workflow
Kanban is more focused on maintaining a smooth, uninterrupted flow of work than on planning task execution in advance.
In addition to basic features like WIP (work in progress) limitations, YouTrack supports advanced scripted workflows that help keep tasks on track all the way through to completion.
Assigning issues to specified team members on transition, emailing alerts when tasks spend too long in one workflow state, and much more can be automated with workflows.

Tracking and reporting
Get an instant picture of the current workload with boards and dashboards, identify and eliminate bottlenecks with the cumulative flow report, and account for work done with powerful time tracking capabilities.
YouTrack provides all the tools you need to ensure that your projects are delivered on time and on budget.
Mixed methodologies
YouTrack Your Way
With YouTrack you are not limited to Scrum, Kanban, or any other specific Agile methodology.
Adapt YouTrack’s flexible Agile boards, powerful scripted workflows, and customizable reports to match your processes.

Multi-project boards
Track multiple projects in one place for a top-level view across teams, departments, or the entire organization.
Team boards
Boards are a great way for teams to visualize their backlogs and see how tasks are distributed among members.
Different boards can be configured to provide different perspectives, such as workload per team member, task severity, project components, and much more.

Personal boards
Users can easily create their own boards to keep track of their tasks. Just like team boards, personal boards can be configured to provide different perspectives.