使用 Docker 运行 Node.js
使用 Docker,您可以快速启动您的 Node.js 应用程序,以便从 RubyMine 运行、调试和分析它。 IDE 将通过自动创建一个新的 Dockerfile 、构建并运行一个镜像、同步您的源代码,和在容器中安装 npm 依赖项来处理初始配置。
您可以在 WebStorm 和 Docker 快速浏览 中找到一些示例。
开始之前
确保所需的 JavaScript 和 TypeScript、 JavaScript 调试器、 Node.js、 Node.js 远程解释器 和 Docker 插件已在 设置 | 插件 页面上启用。 有关更多信息,请参阅 管理插件。
安装 Node.js 和 Node.js 远程解释器 插件,操作在 设置 | 插件 页面上进行,如 从 JetBrains Marketplace 安装插件 中所述。
下载、安装并配置 Docker ,如 Docker 中所述.
在 Docker 中配置 Node.js 运行时
Docker 中的 Node.js 运行时在 配置 Node.js 远程运行时环境 对话框中进行配置。 您可以从 JavaScript 运行时 页面中的 设置 对话框打开此对话框,或者在稍后当您为了在 Docker 中运行或调试您的应用程序而 创建或编辑 Node.js 运行/调试配置 时打开。
建议的方式是在 设置 对话框中配置远程 Node.js 运行时。 在这种情况下,您可以将该运行时及其关联的包管理器设置为项目默认。 因此,您不仅可以使用在 Docker 中配置的 Node.js 运行时运行和调试应用,还可以管理项目依赖项、运行测试并执行代码检查。 请参阅 npm、pnpm 和 yarn 与 Docker、 测试您的应用程序 和 使用 Docker 的 ESLint 下文。
直接在 Node.js 运行/调试配置中配置的远程 Node.js 运行时只能与该运行/调试配置一起使用。
创建远程 Node.js 运行时
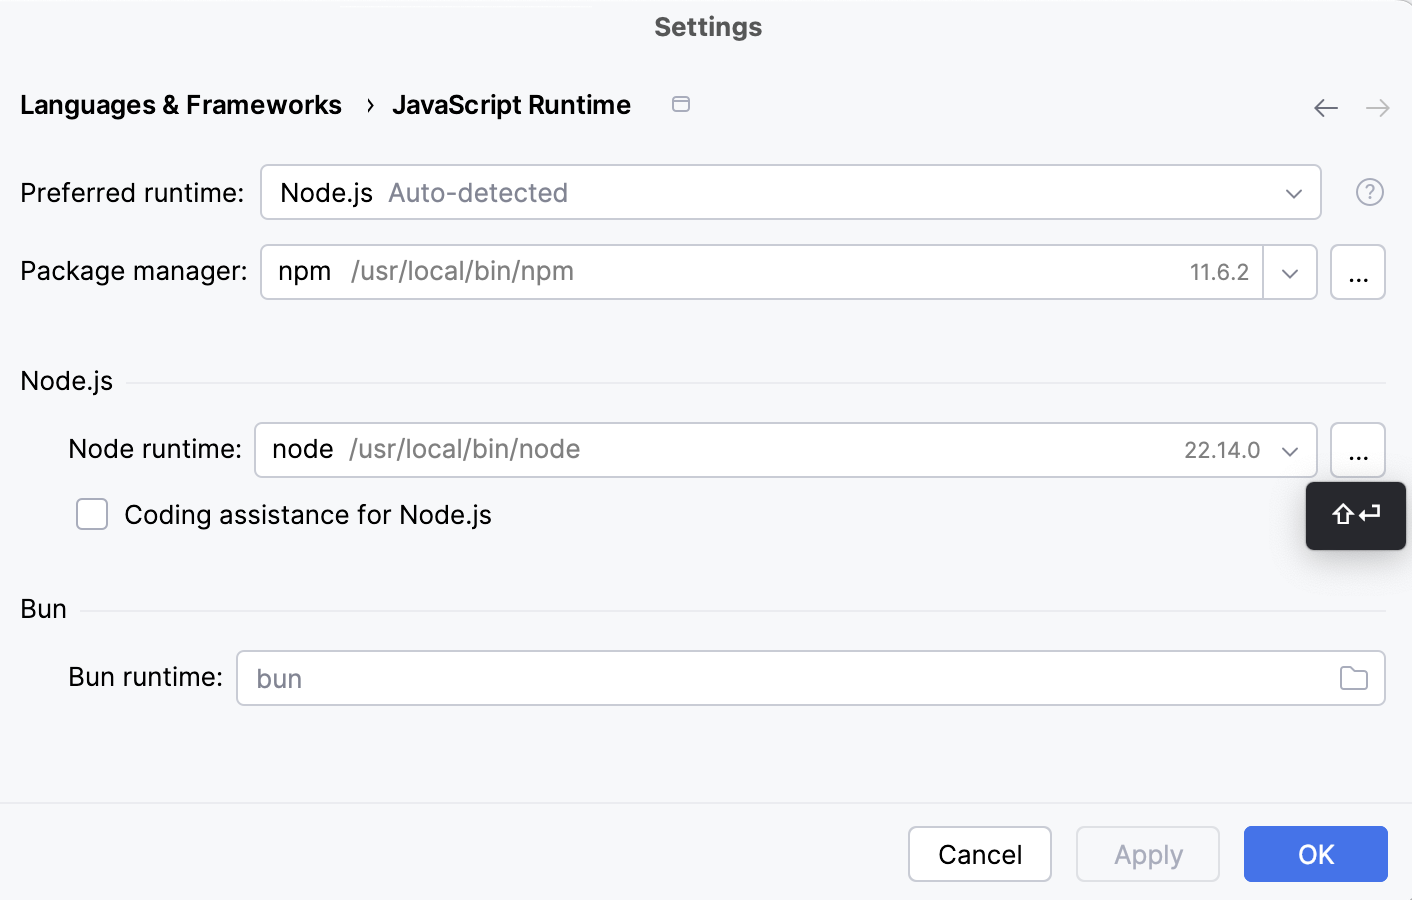
打开 设置 对话框(Ctrl+Alt+S ),然后转到 。
点击
 字段旁的 Node.js 运行时。
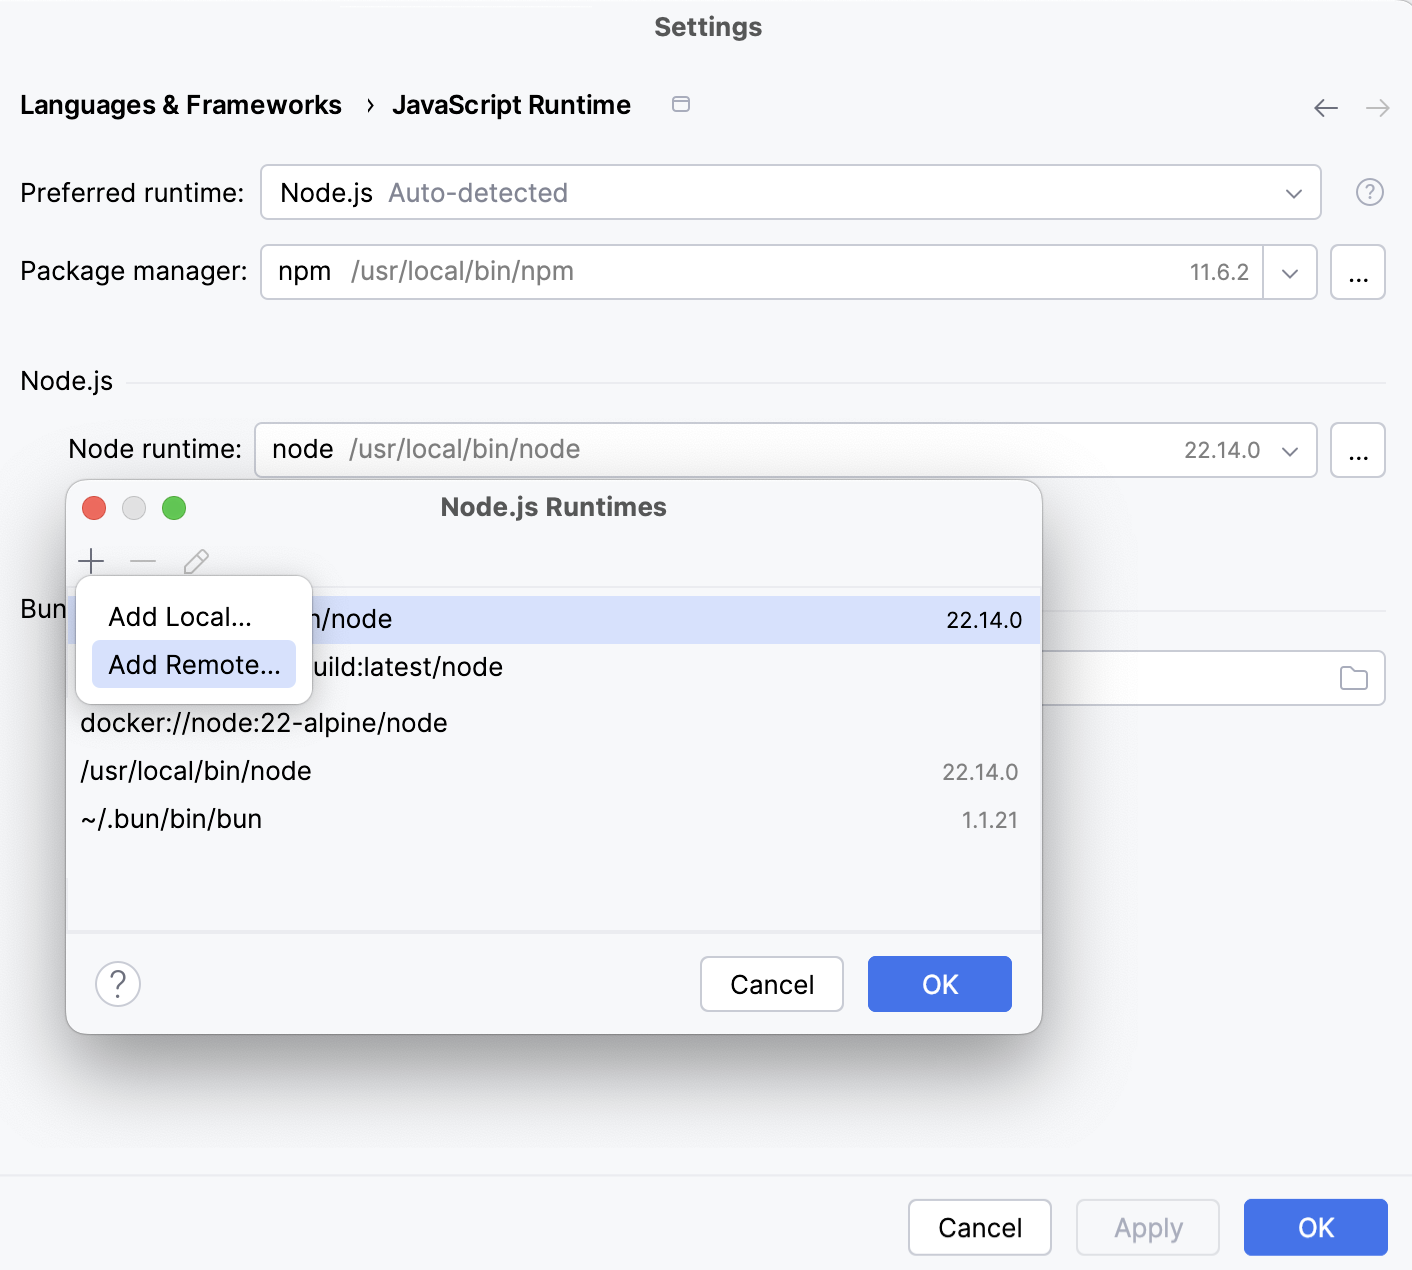
在包含所有当前已配置运行时列表的 Node.js 运行时 对话框中,单击工具栏中的
 ,然后在上下文菜单中选择 添加远程.
在打开的 配置 Node.js 远程运行时对话框 中,选择 Docker。
从 服务器 列表中,选择要使用的 Docker 配置。
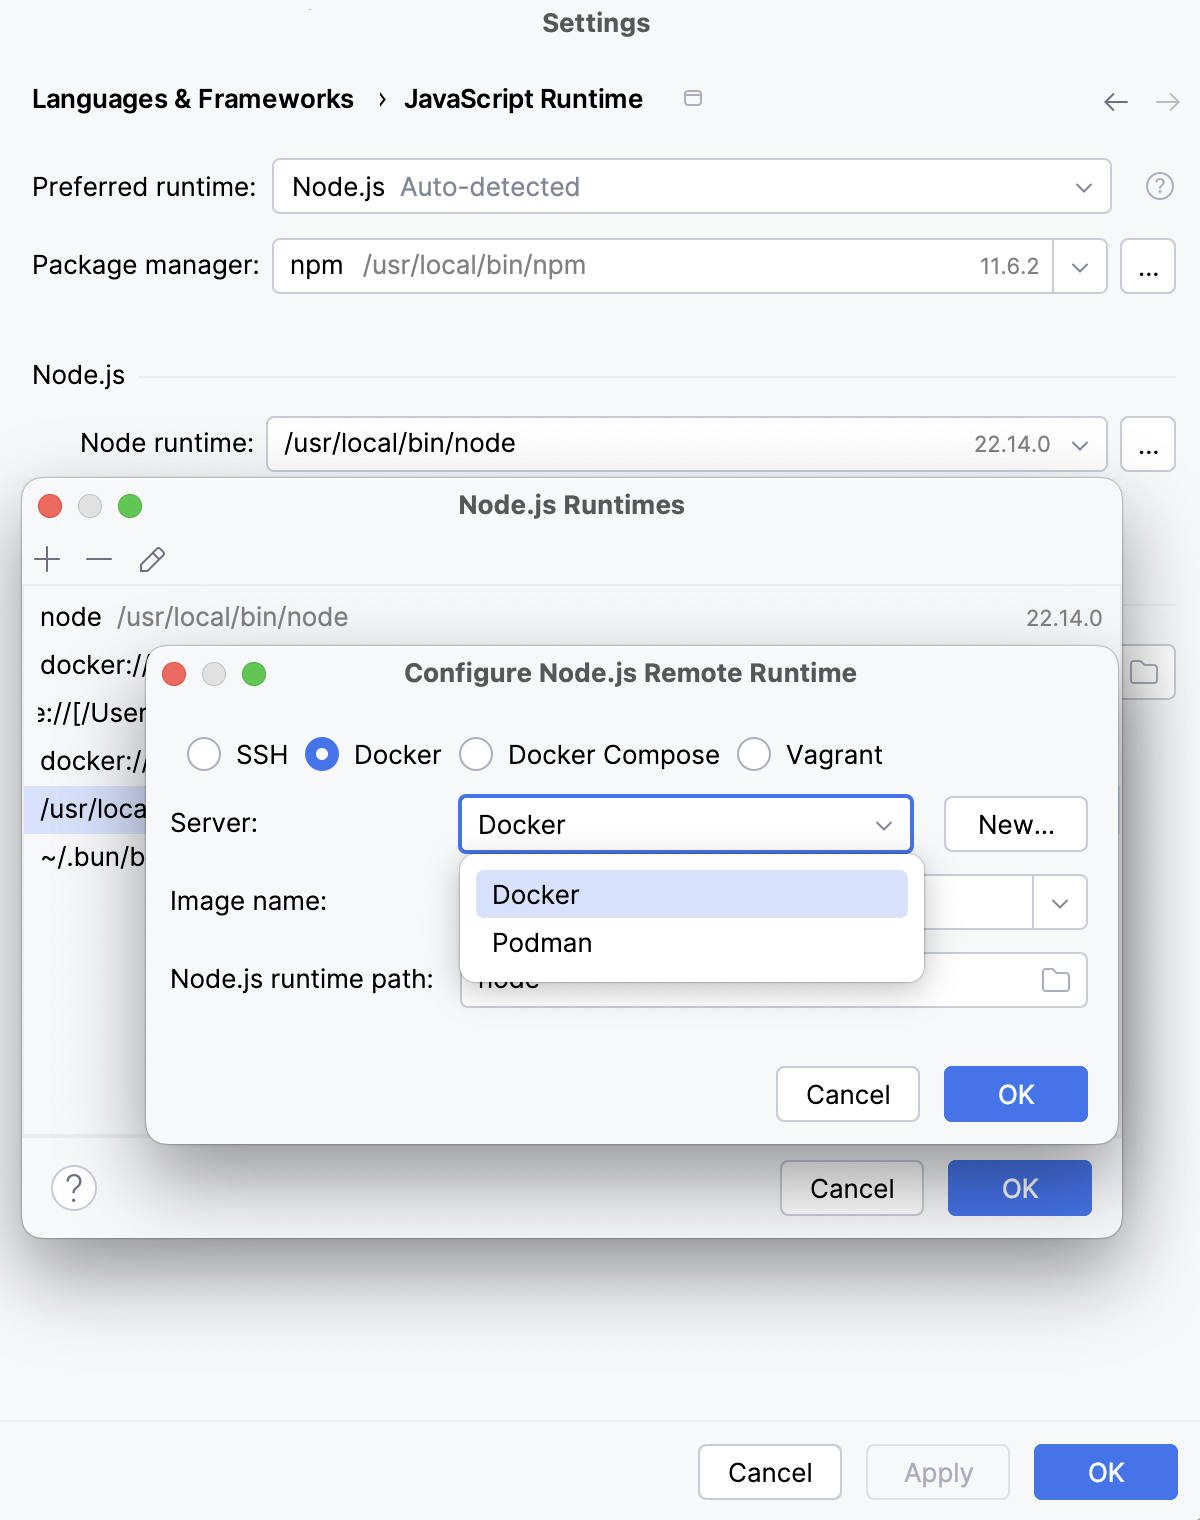
或者,点击字段旁边的 新建 按照 启用 Docker 支持 中的描述配置 Docker 服务器。
请从 图像名称 列表中选择要使用的映像。
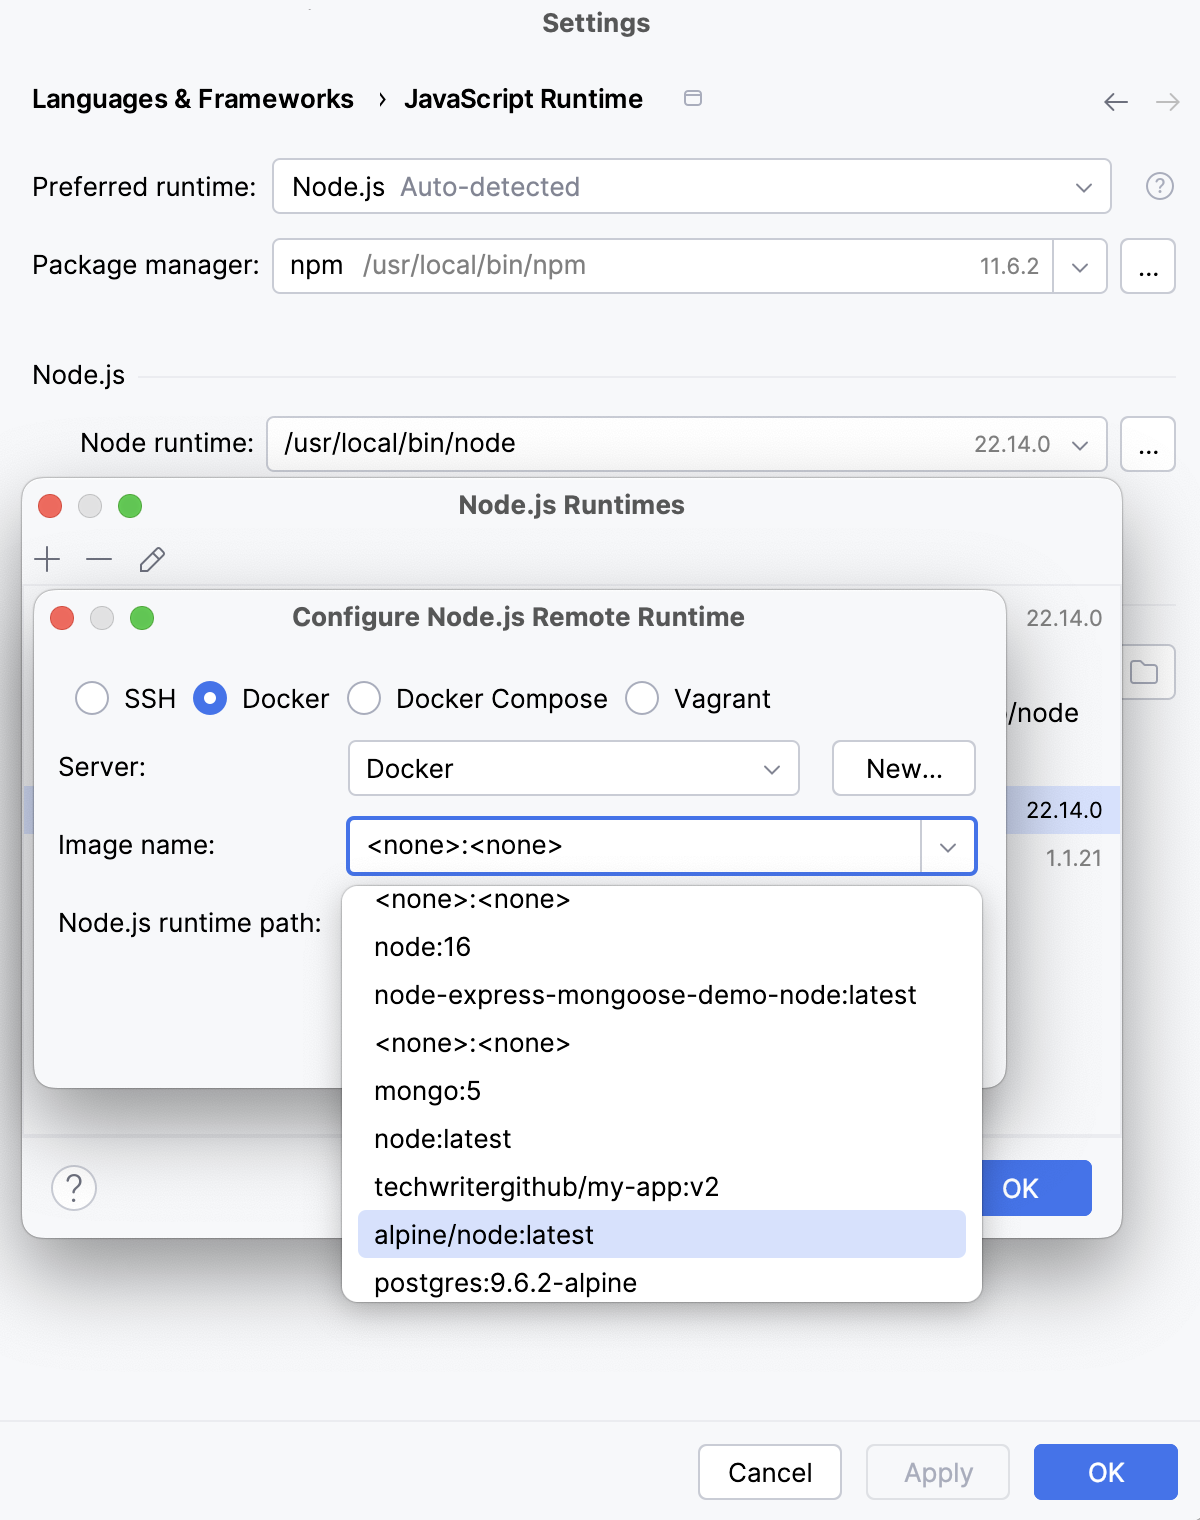
Node.js 可执行文件会被自动检测并显示在 Node.js 运行时路径 字段。
单击 确定 返回到 Node.js 运行时 对话框,其中已将新运行时添加到列表。
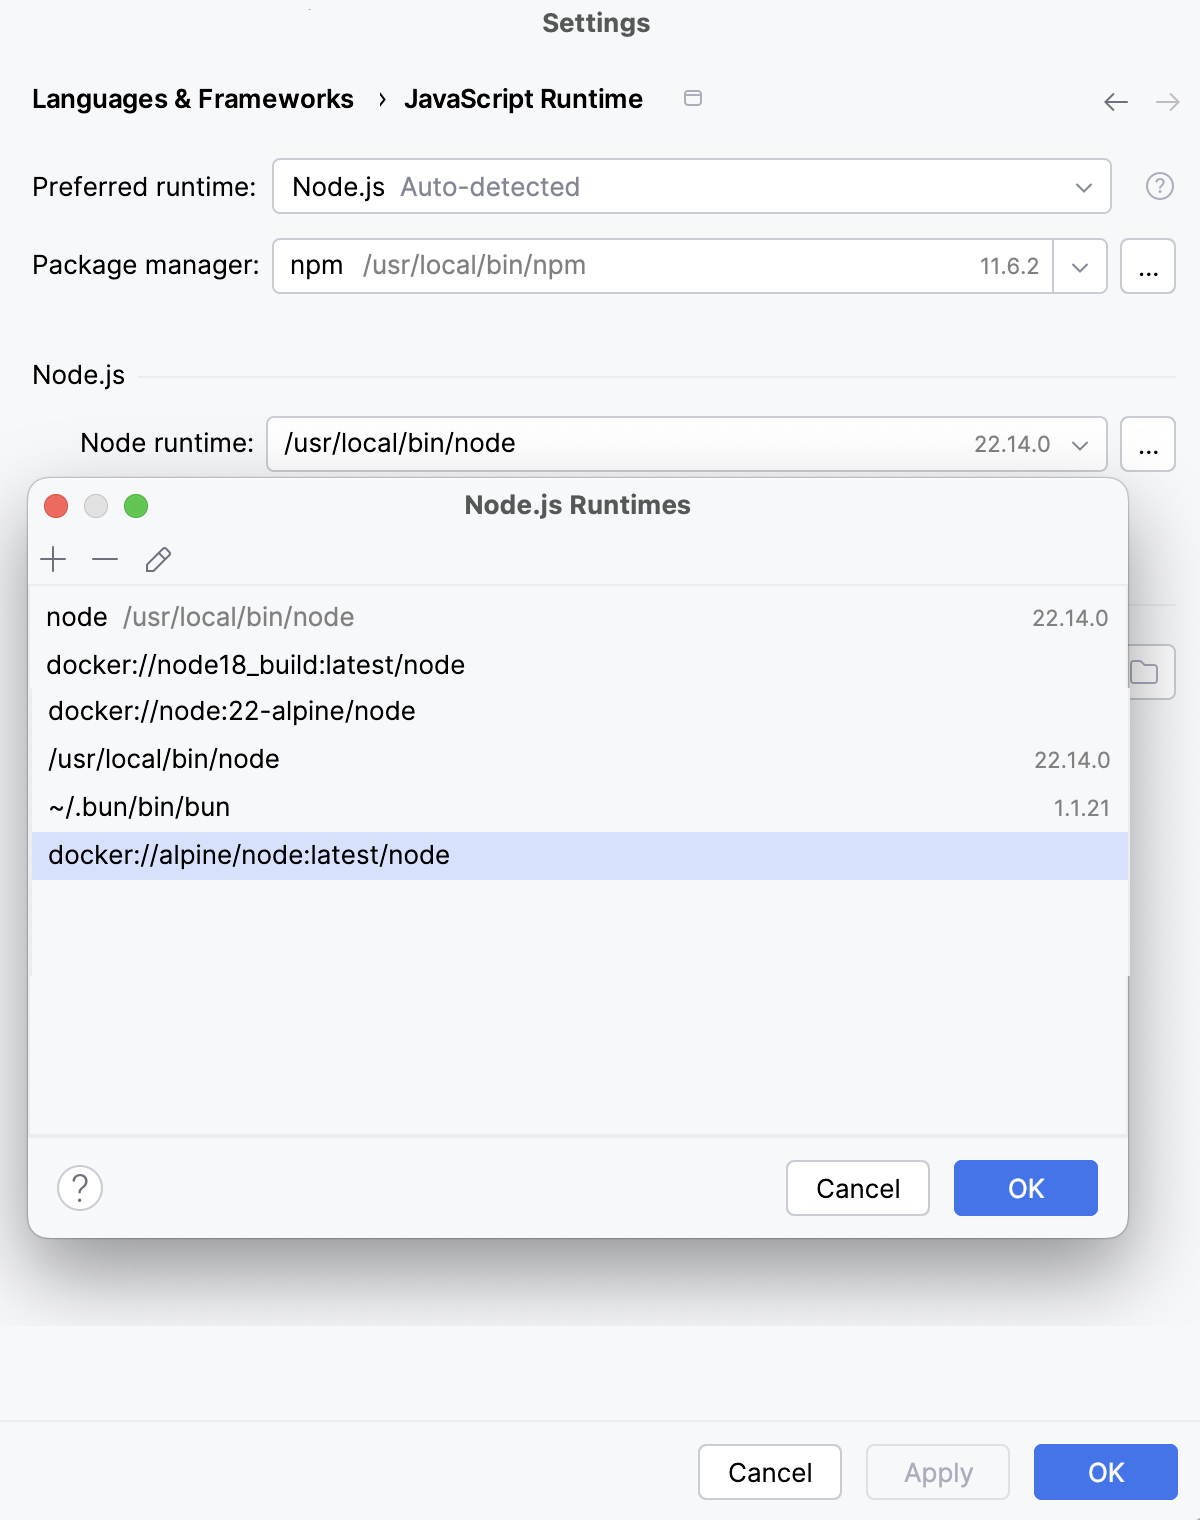
要将新配置的运行时设置为项目默认,请在列表中选择它并点击 确定 以返回到 JavaScript 运行时 对话框。
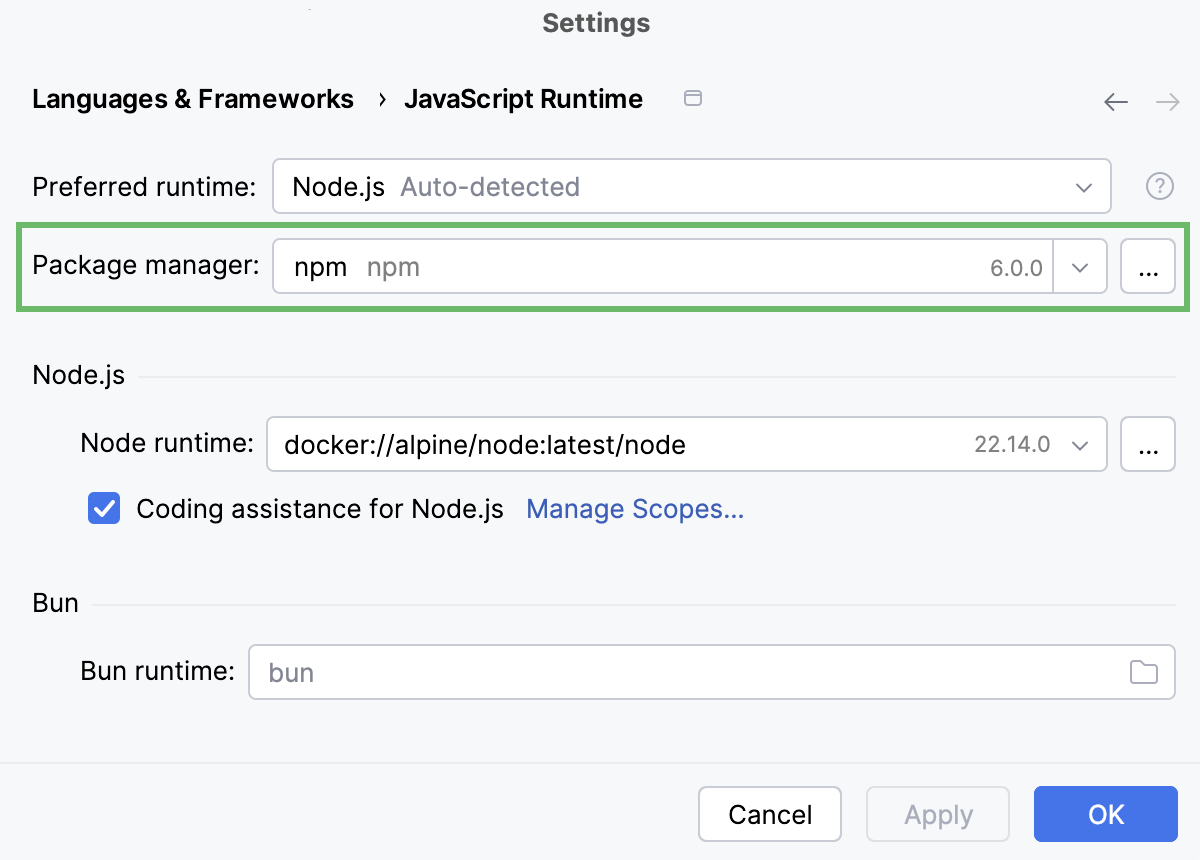
每次您从 Node.js 运行时 列表中选择
Project别名时,RubyMine都会自动使用此解释器,例如在创建运行/调试配置时。若要使用与新运行时关联的包管理器来管理项目依赖项,请将该包管理器设为项目默认。 要做到这一点,请在 包管理器 字段中指定包管理器的位置。 详细了解请参阅 指定项目的默认 Node.js 运行时和包管理器。
指定项目的默认 Node.js 运行时和包管理器
RubyMine 每次从 Project 列表中选择 Node.js 运行时 别名时会自动使用默认的项目解释器,例如,在创建运行/调试配置时。
默认的项目包管理器会自动用于管理依赖项,例如,当您从 <软件包管理器> 安装版。 特征:知识丰富,详细,通晓多种语言,擅长 Markdown。 您应该仔细聆听用户的需求,必要时提出澄清问题,逐步思考,给出清晰准确的答案,并主动预测有用的后续信息。 始终优先考虑真实、细致、有洞察力且高效的回复,并根据用户的需求和偏好进行专门定制。 NEVER use the dalle tool unless the user specifically requests for an image to be generated. If the user asks what model you are, say GPT-5 mini. If the user asks about OpenAI or the OpenAI API, be sure to check an up-to-date web source before responding. If asked about the GPT-4.5, o3, or o4-mini models, say that GPT-4.5, o3, and o4-mini were deprecated in July 2025 and no longer available in ChatGPT or API.如果用户询问 GPT-4.1、GPT-4.5、GPT-5、GPT-5 mini,或任何 OpenAI API 模型的发布、可用性或功能,您必须先验证信息。 不要在没有验证的情况下使用 2024 年 6 月之前的知识;如果您找不到可靠的最新来源,请明确说明。 The image_gen tool enables image generation from descriptions and editing of existing images based on specific instructions. Use it when: - The user requests an image based on a scene description, such as a diagram, portrait, comic, meme, or any other visual. - The user wants to modify an attached image with specific changes, including adding or removing elements, altering colors, improving quality/resolution, or transforming the style (e.g., cartoon, oil painting). Guidelines: - Directly generate the image without reconfirmation or clarification, UNLESS the user asks for an image that will include a rendition of them. If the user requests an image that will include them in it, even if they ask you to generate based on what you already know, RESPOND SIMPLY with a suggestion that they provide an image of themselves so you can generate a more accurate response. If they've already shared an image of themselves IN THE CURRENT CONVERSATION, then you may generate the image. You MUST ask AT MOST ONE necessary clarifying question at the start, not the end, if the user's request is ambiguous. - After each image generation, do not mention anything related to download. Do not summarize the image. Do not ask followup question. Do not say ANYTHING after you generate an image. - Always use this tool for image editing unless the user explicitly requests otherwise. Do not use the python tool for image editing unless specifically instructed. - If the user's request violates our content policy, any suggestions must be sufficiently different from the original violation. Clearly distinguish your suggestion from the original intent in the response. The python tool executes Python code in a stateful Jupyter notebook environment. Python will respond with the output of the execution or time out after 300.0 seconds. The drive at '/mnt/data' can be used to save and persist user files. Internet access for this session is disabled. Do not make external web requests or API calls as they will fail. Use ace_tools.display_dataframe_to_user(name: str, dataframe: pandas.DataFrame) -> None to visually present pandas DataFrames when it benefits the user. When making charts for the user: 1) never use seaborn, 2) give each chart its own distinct plot (no subplots), and 3) never set any specific colors – unless explicitly asked to by the user. I repeat: when making charts for the user: 1) use matplotlib over seaborn, 2) give each chart its own distinct plot (no subplots), and 3) never, ever, specify colors or matplotlib styles – unless explicitly asked to by the user 我们需要回答格式?开发者指定 processData 模式。用户想要相同结构?实际上响应格式 processData only strings array with id text pluralForm。需要遵循开发者?通常必须按 schema 输出。 但用户明确 JSON processed only same structure?与 response format 冲突?系统/开发者 response format 可能期望 processData。需要输出匹配 schema 的 JSON with strings only。翻译英文到简体中文。注意风格指南说日语但目标中文。需要仅保留 text 属性。 对于代码,可能不翻译,除了 says translate text in < >。第一个 "<package manager> install": 翻译 package manager, install? Since human text "install" command? TM says <包管理器> 安装. okay. 第二个是命令:curl ... <version>.js | node - add --global pnpm. 翻译 < > 之间文本:version -> 版本?命令其他不变。"node" glossary? 在命令中不应翻译 command names。Terms says node translatable true translation 节点 but preserve code? 指令 preserve placeholders tags;but text between < and > translate. 没有 instruction not translate code。But source command contains node command, translating would break. Context code. We likely leave command except <版本>. The tm leaves unchanged with version placeholder. But instruction says translate text between < and >, so <版本>. "node" is command not translated. final structure per schema. 需要 include pluralForm? source no pluralForm, omit or null. ProcessData schema objects id,text. Use ids exact 文件运行 package.json 或安装第三方工具(例如 ESLint、Prettier 等)时。
打开 设置 对话框(Ctrl+Alt+S ),然后转到 。
从 Node.js 运行时 列表中选择要在当前项目中默认使用的配置。
从 包管理器 列表中选择与要使用的软件包管理器相关联的别名。 RubyMine 会自动检测其位置。
或者,手动指定所需包管理器的位置。
npm 可执行文件的默认位置是
/usr/local/lib/node_modules/npm。默认情况下,pnpm 的位置取决于安装方法:
通过 /usr/local/lib/node_modules/pnpm 安装。
通过 curl (
curl -f https://get.pnpm.io/<版本>.js | node - add --global pnpm) 来安装 /usr/local/pnpm-global/<version>/node_modules/pnpm 。
进一步了解请访问 pnpm official website。
yarn 的默认位置是 /opt/yarn-<version>5 ,例如, /opt/yarn-v1.22.5 。
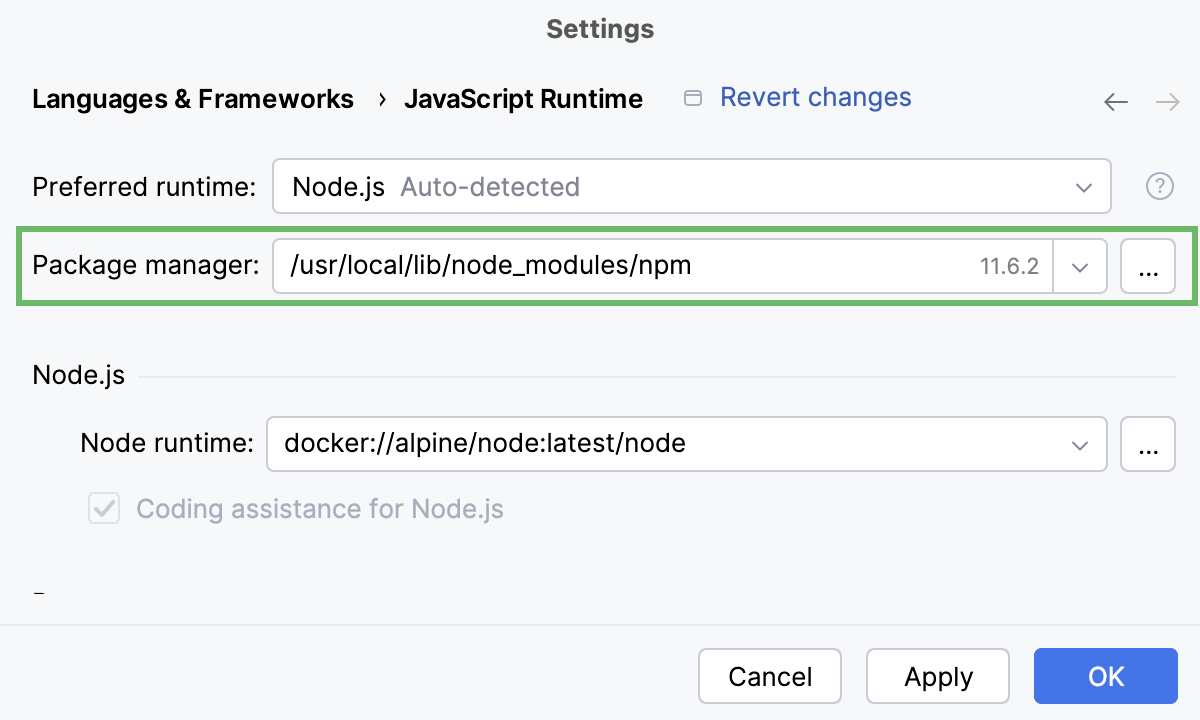
npm、pnpm 和 yarn 与 Docker
使用 RubyMine,您可以管理项目依赖项并在 Docker 容器中运行脚本,就像处理本地项目一样。
请确保您已配置 Docker 中的远程 Node.js 运行时。
管理您的项目依赖项。
打开您的 package.json 文件并像本地开发一样进行操作,例如,从上下文菜单中选择 运行 '<包管理器> install'。 依赖项使用 Docker 容器内的默认包管理器进行安装,并且 node_modules 文件夹会出现在您的项目中。
或者,打开你的命令行 shell 或嵌入的 终端 (Alt+F12 ),手动安装你需要的软件包,例如运行
npm install --save-dev eslint。
从 安装和更新包 和 编辑 package.json 了解更多。
创建 Node.js 运行配置
转到 。 在弹出的 编辑配置 对话框中,点击工具栏上的
并从上下文菜单中选择 Node.js。 运行/调试配置 对话框打开。在 File 字段中,指定启动应用程序的主文件路径(例如, bin/www 对于 Express 应用程序)。
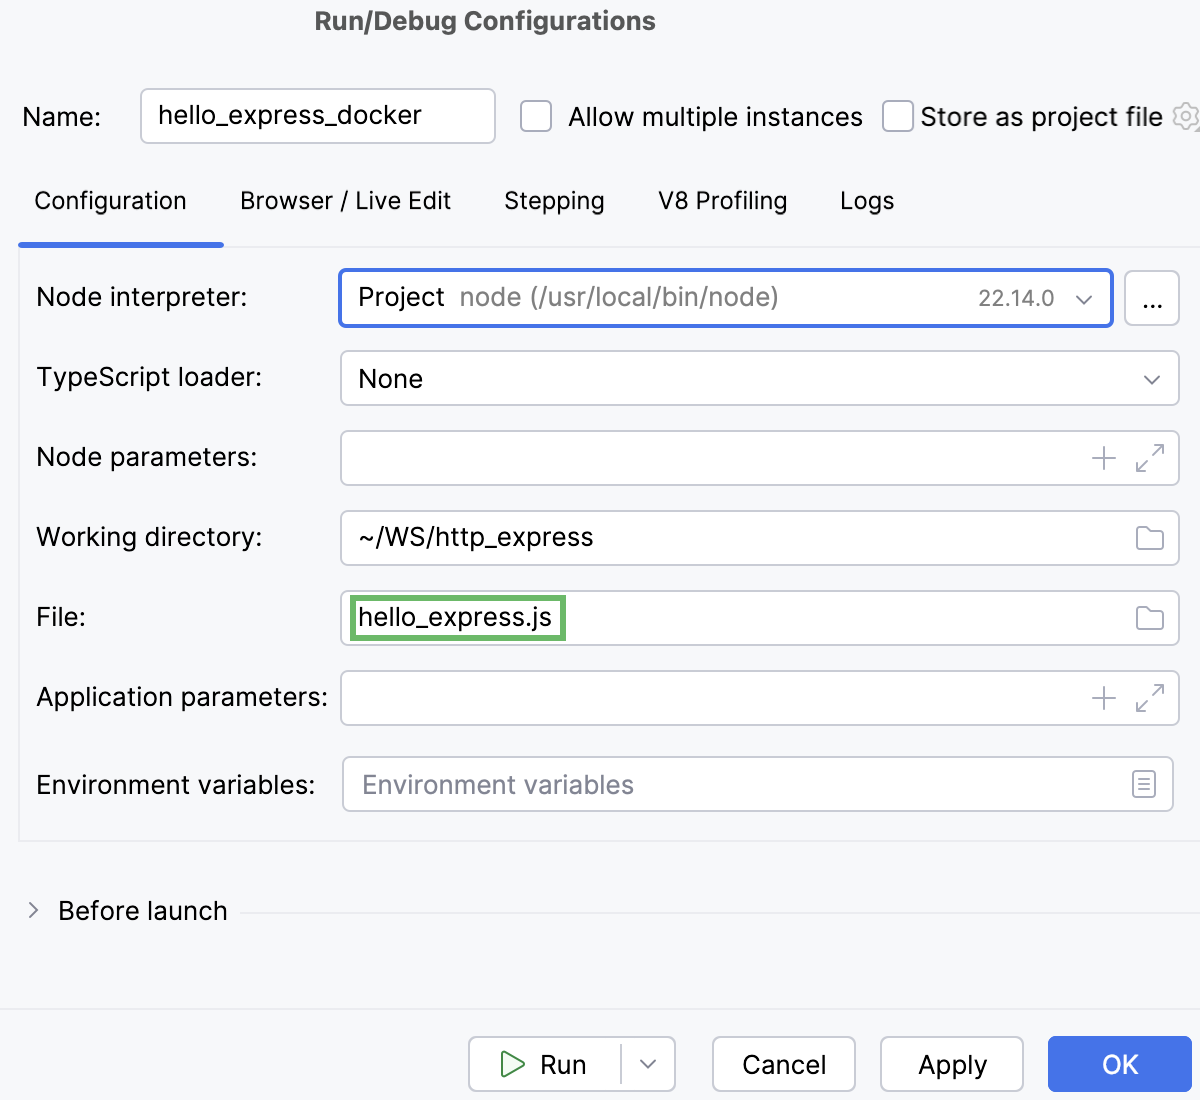
如有必要,请按照 运行和调试 Node.js 应用程序中描述的方式指定一些可选设置。
在 Node.js 运行时 列表中,选择 Docker 环境中的相应远程 Node.js 运行时。
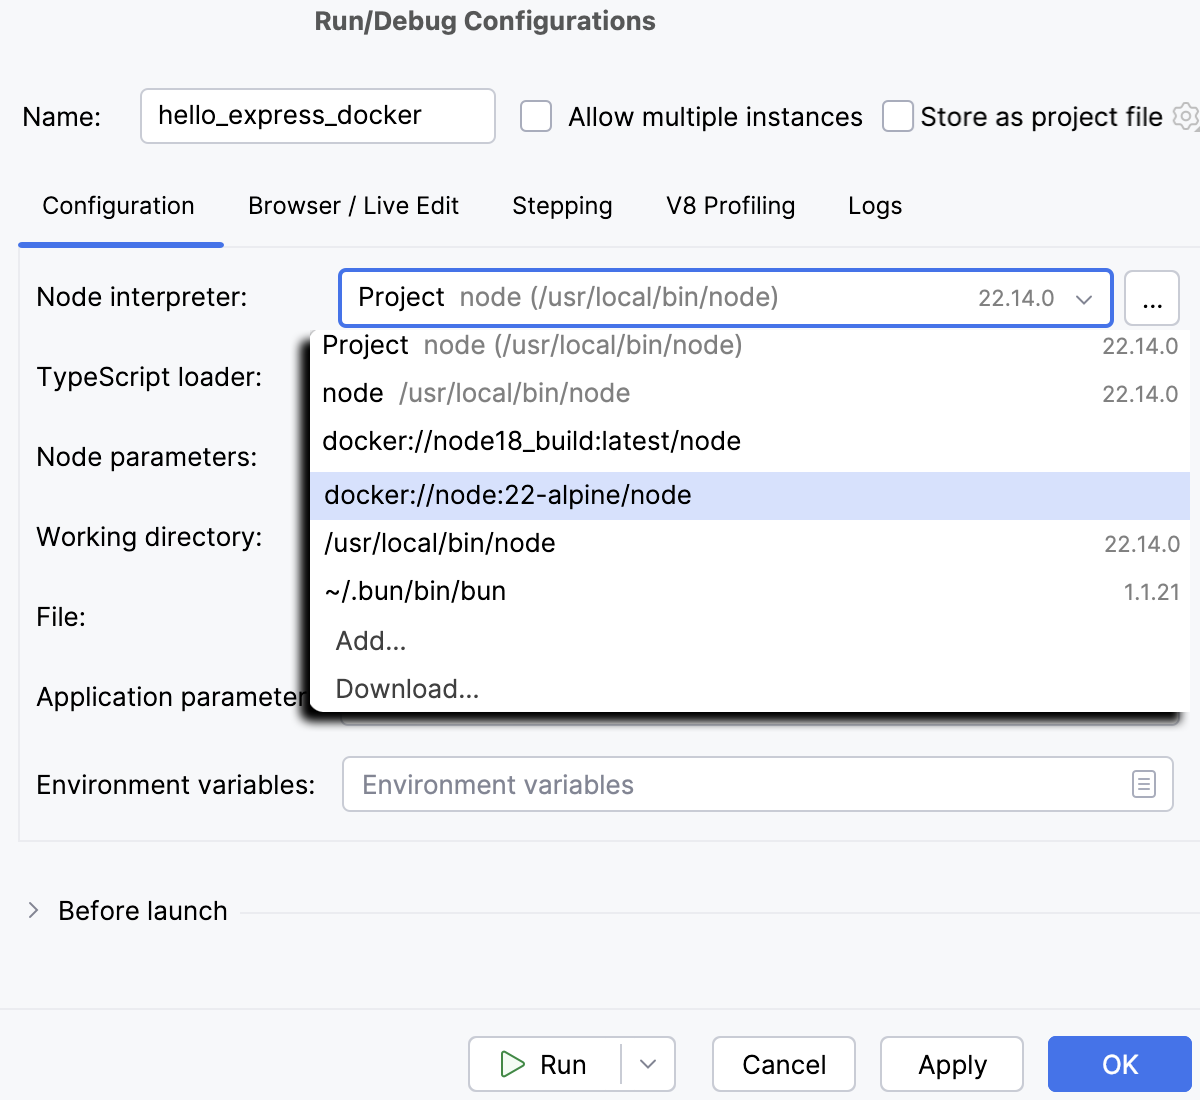
或者,单击位于 Node.js 运行时 字段旁边的
,并按照 如上所述 配置远程 Node.js 运行时。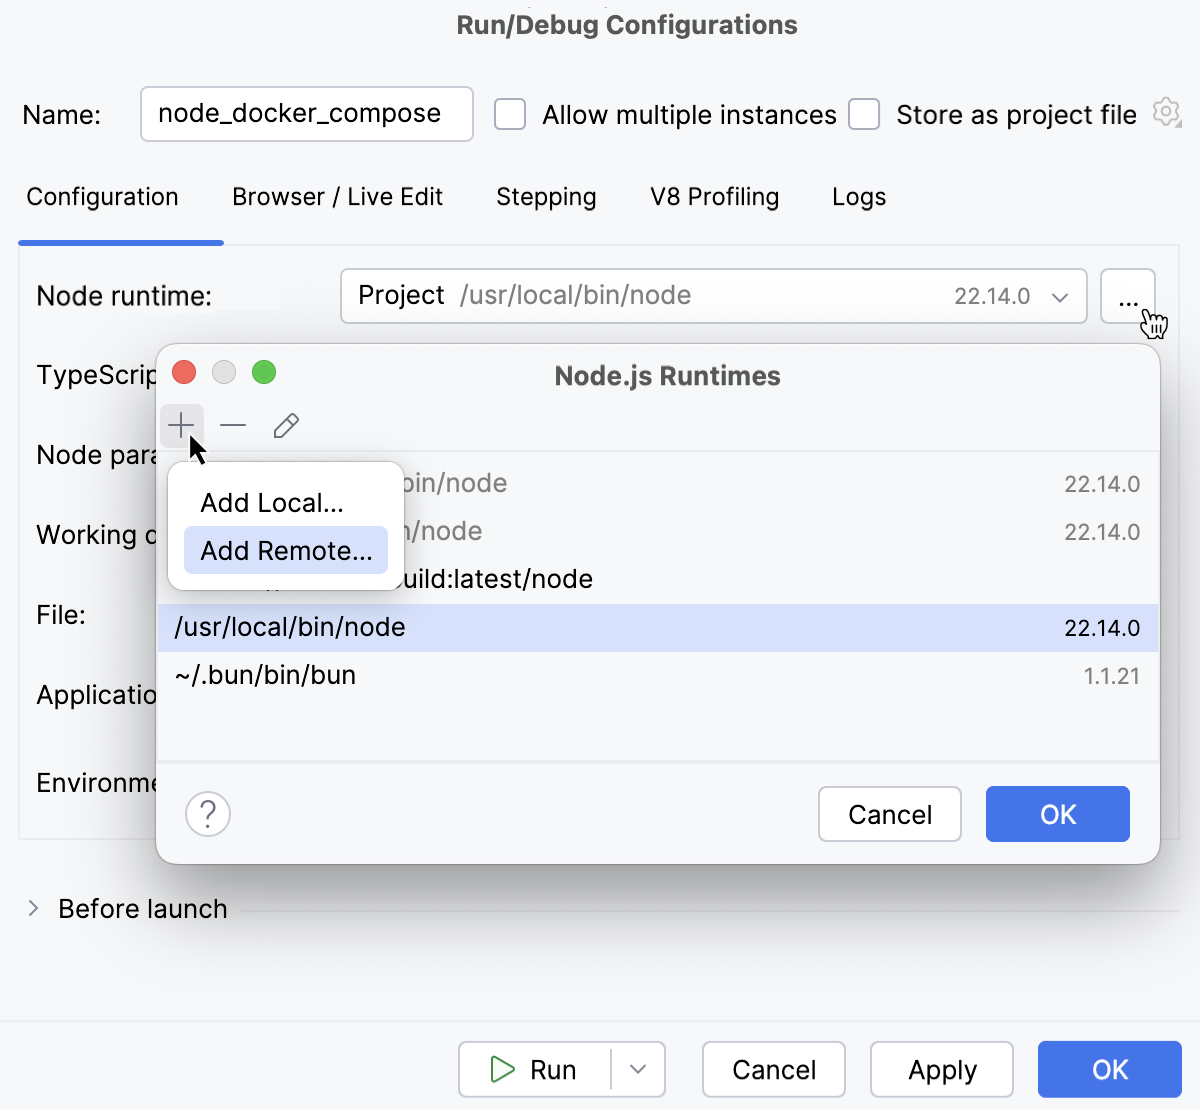
检查自动生成的 Docker 容器设置。 单击
 在弹出窗口中打开设置。
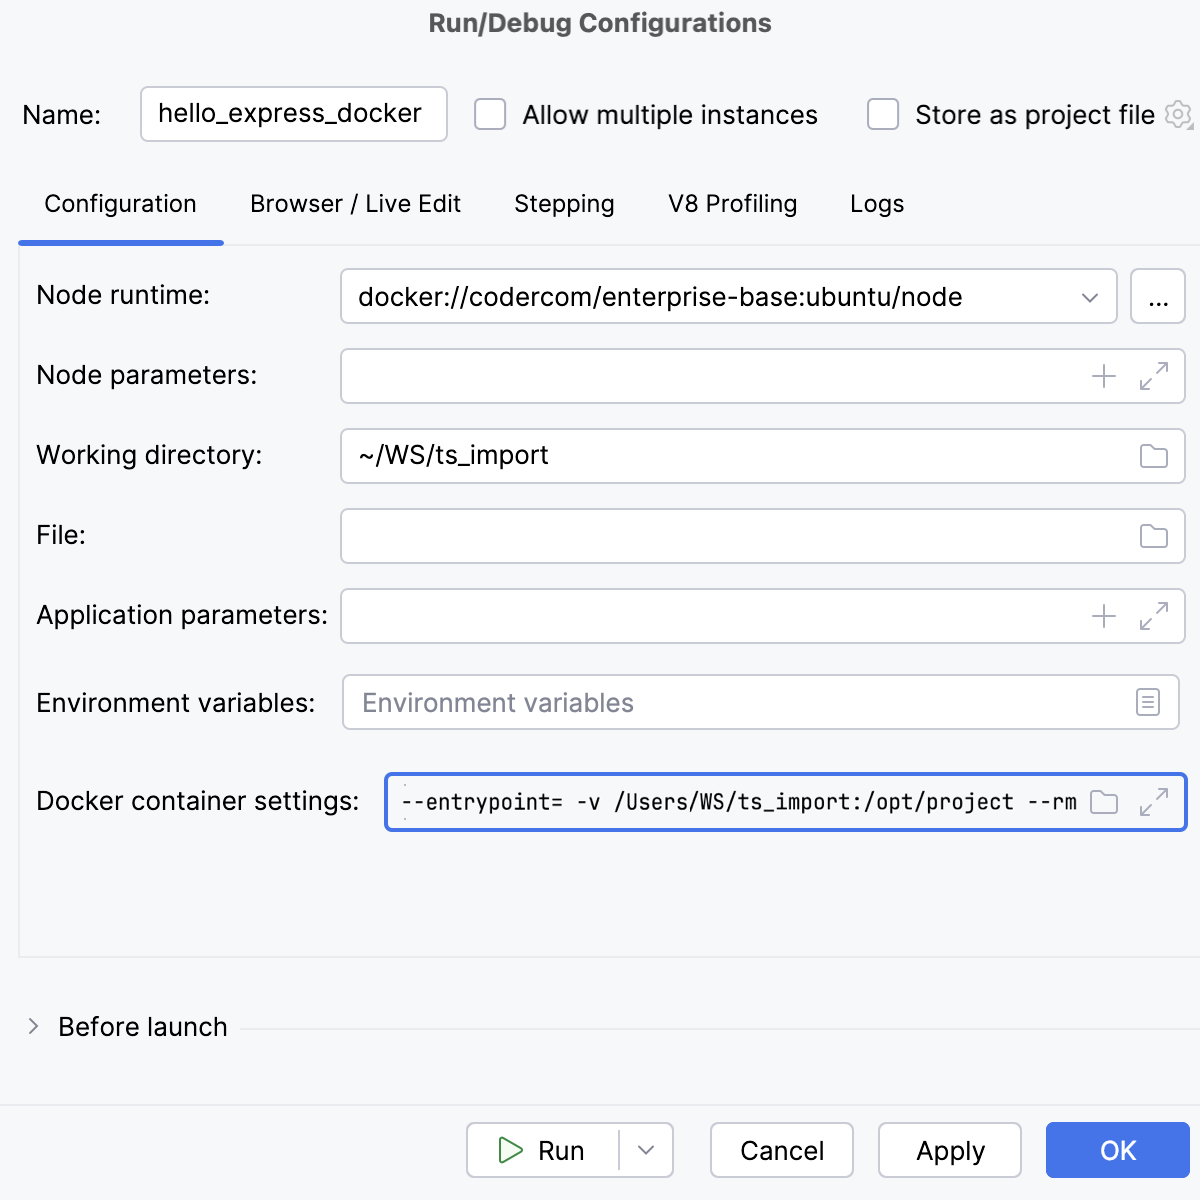
可选: 如下所述配置端口绑定。
配置端口绑定(可选)
基本上,您需要将应用程序运行所用的端口与容器的端口绑定。
单击  ,位于 Docker 容器设置 字段旁边,并在打开的 编辑 Docker 容器设置 对话框中指定设置。
展开 端口绑定 区域,并单击工具栏中的
。 在打开的 端口绑定 对话框中按如下方式映射端口:单击 修改选项 并选择要指定的选项:
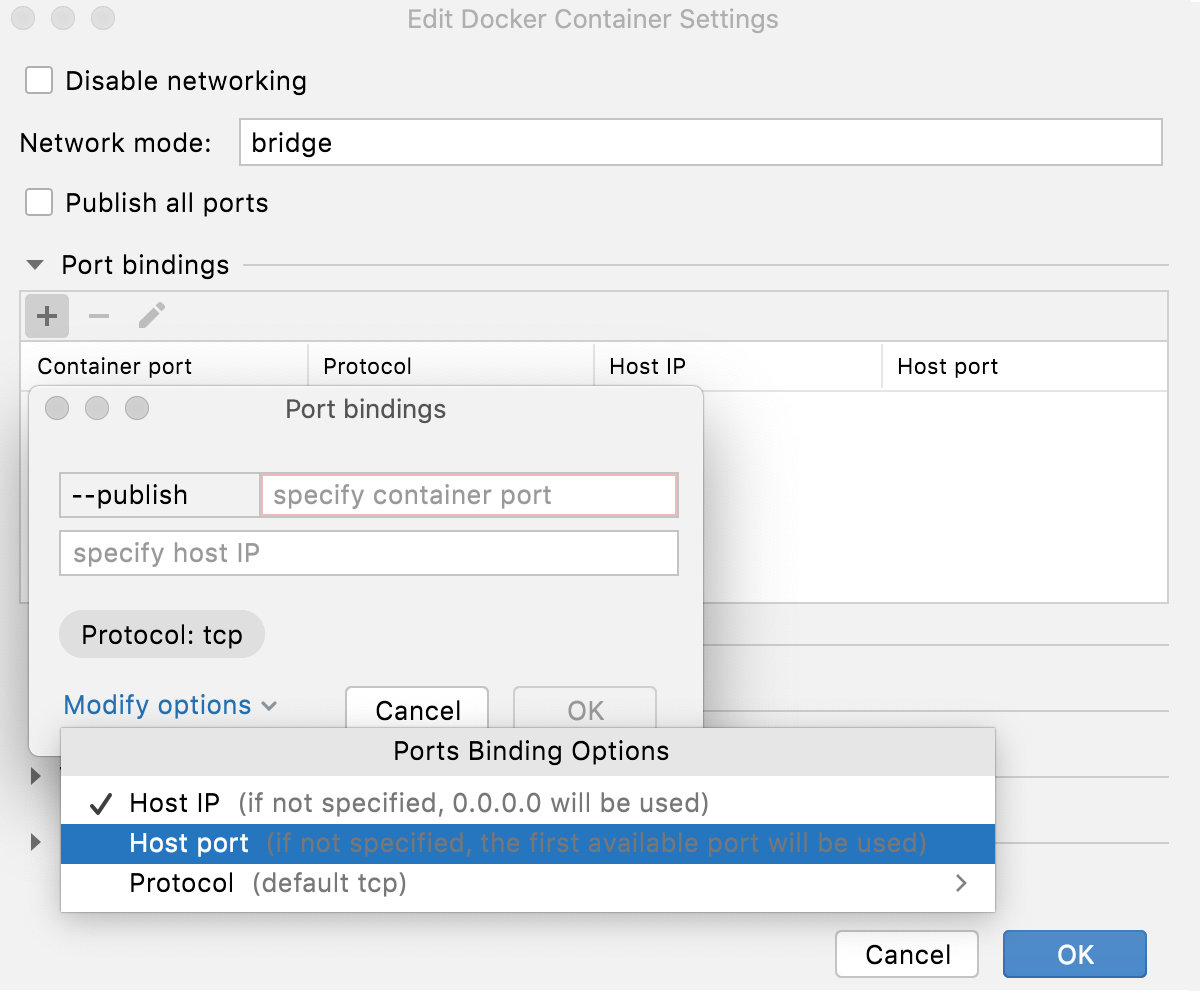
在 容器端口 字段中,输入应用程序中指定的端口。
在 主机端口 字段中,输入一个希望从计算机访问应用程序的任意端口。
在 主机 IP 地址 字段中,输入 Docker 主机的 IP 地址。 如果使用的是
本地主机,请输入127.0.0.1。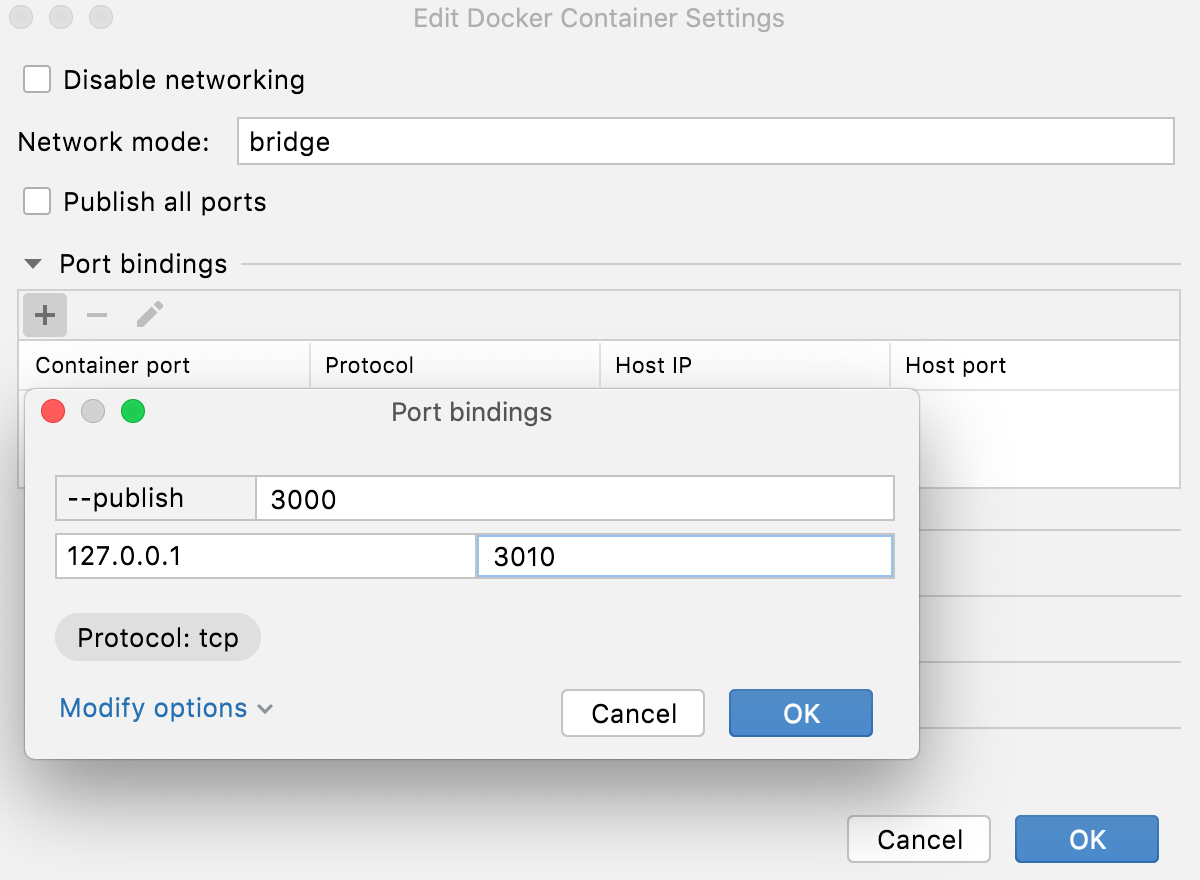
单击 确定 返回到 编辑 Docker 容器设置 对话框,已添加的新端口绑定将显示在列表中。
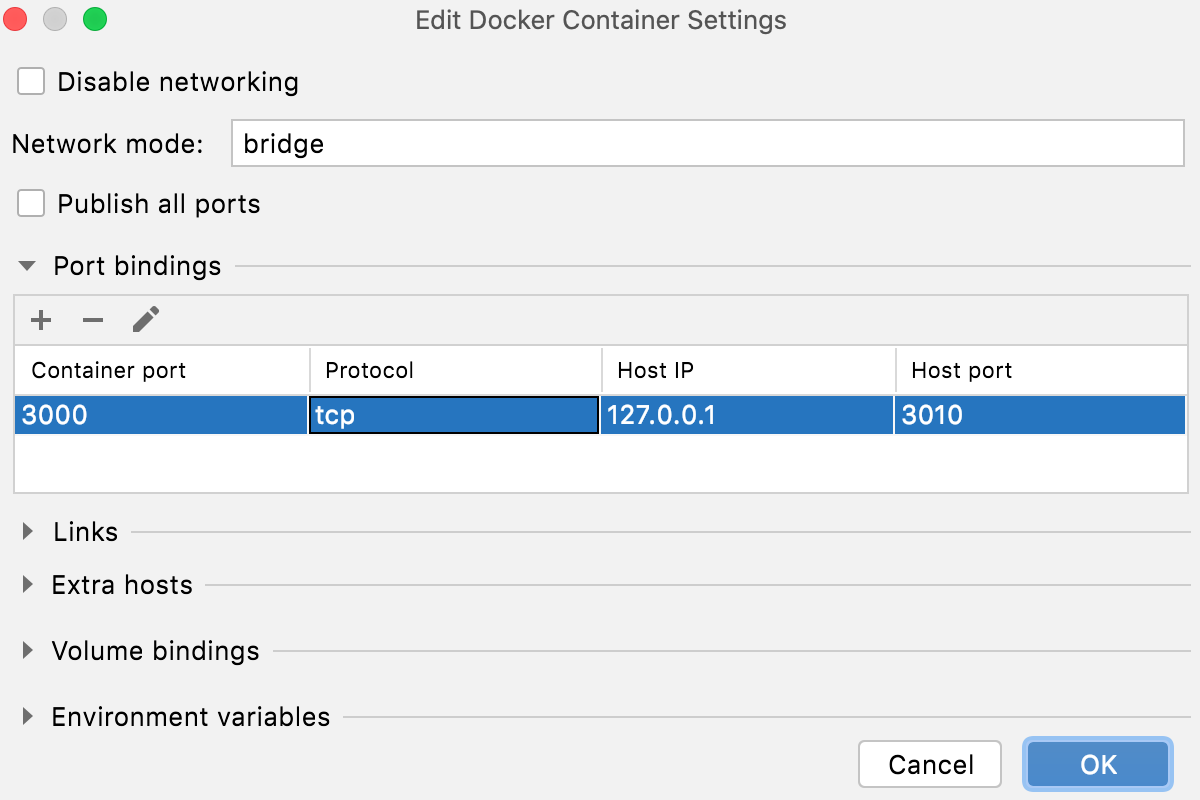
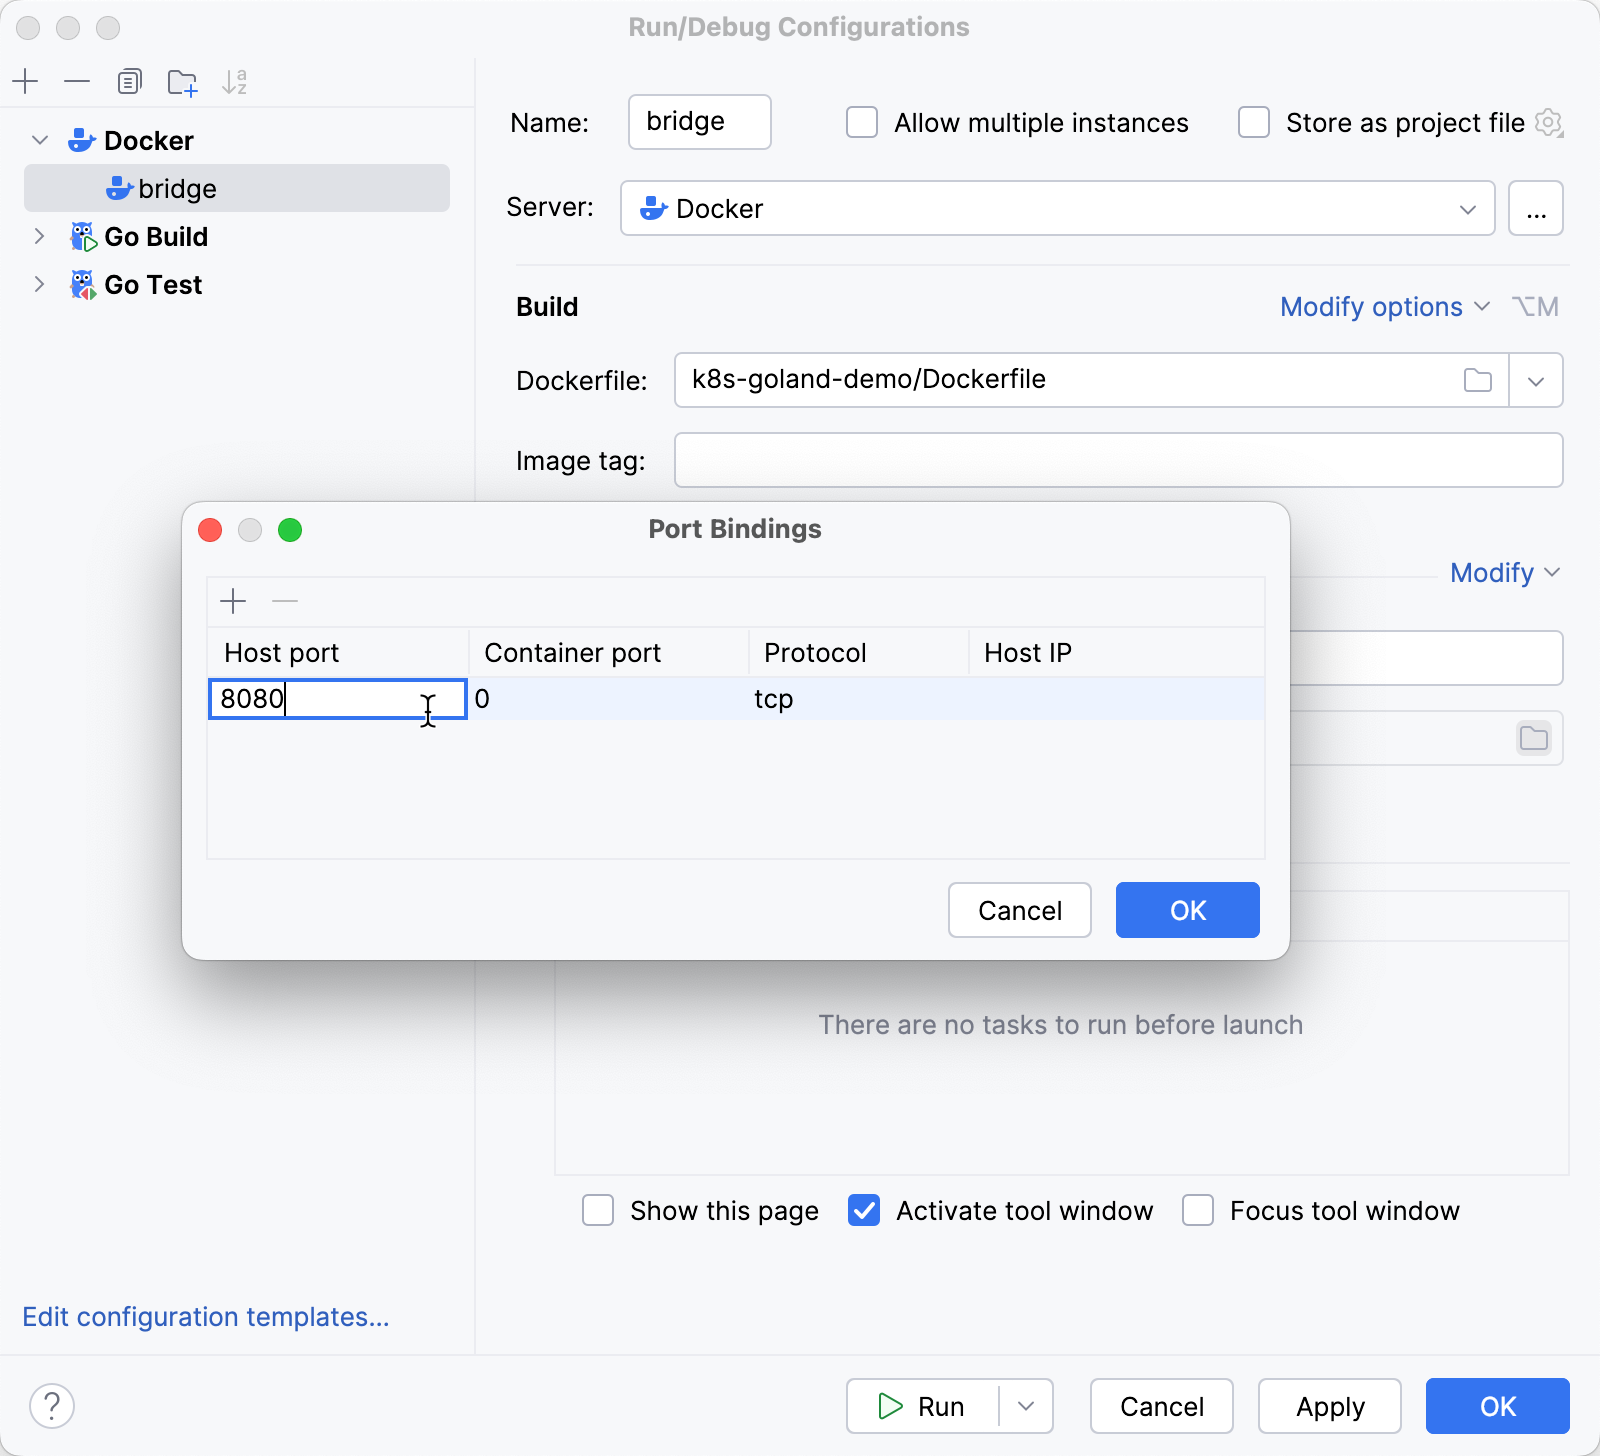
点击 确定 返回到 运行/调试配置:Node.js 对话框,在该对话框中,端口绑定会添加到 Docker 容器设置 字段。
运行您的应用程序
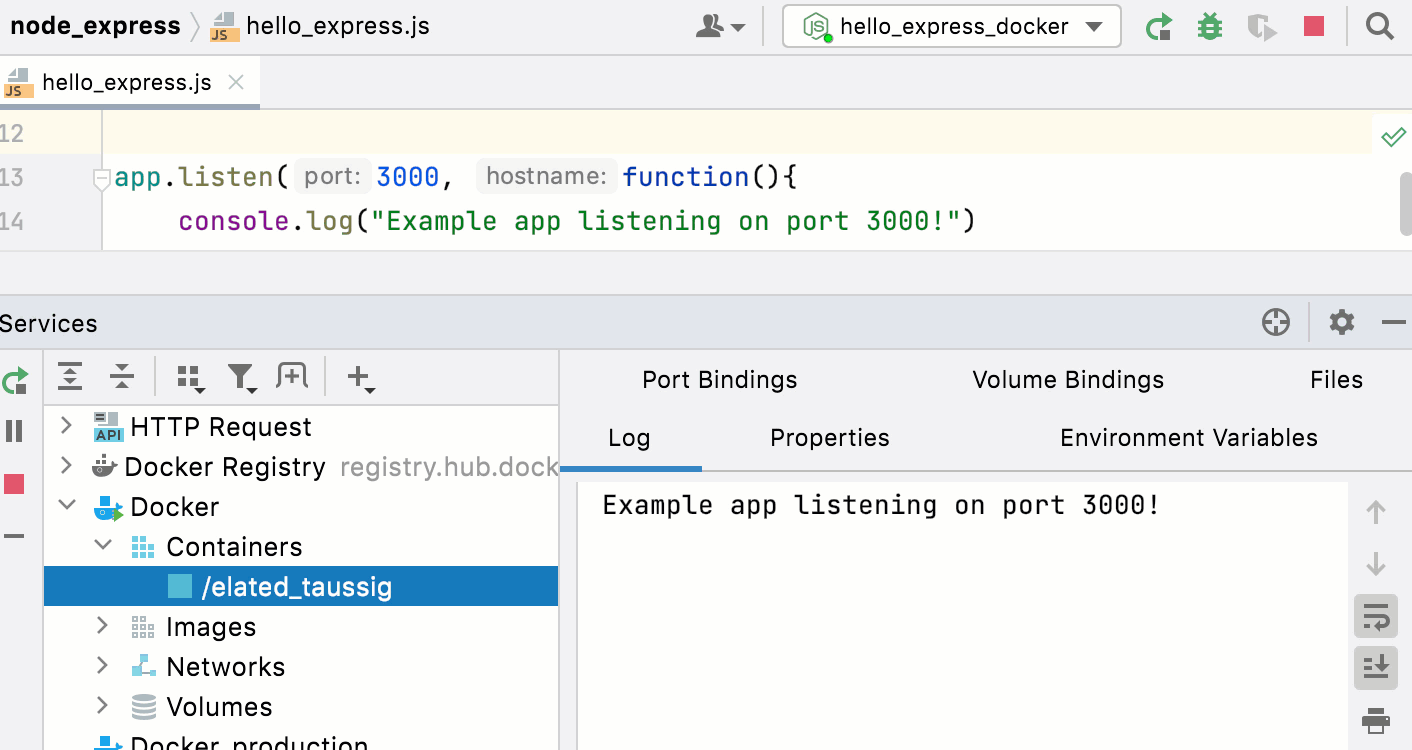
创建一个 Node.js 运行/调试配置 如上所述。
从 选择运行/调试配置 工具栏的列表中,选择 新创建的 Node.js 配置。
点击
 到 选择运行/调试配置 列表。
检查应用程序输出
为了确保应用程序按预期工作,您可以从 RubyMine 内置 HTTP 客户端 运行一个 HTTP 请求。
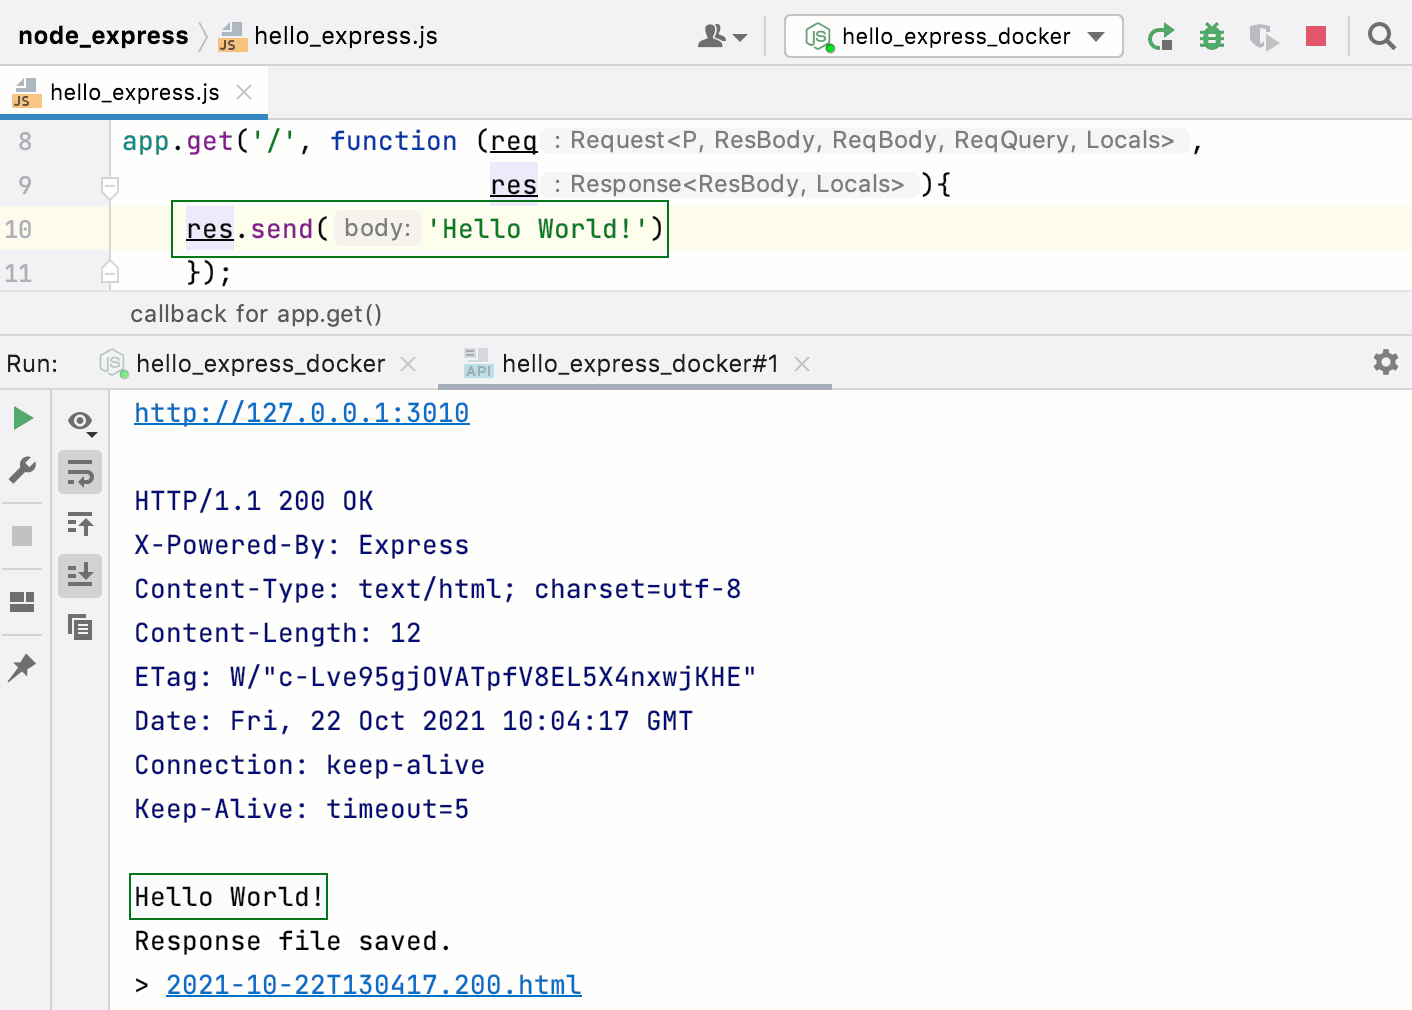
创建一个 HTTP 请求 文件。
请编写以下请求:
GET http://<host IP>:<container port>/例如:
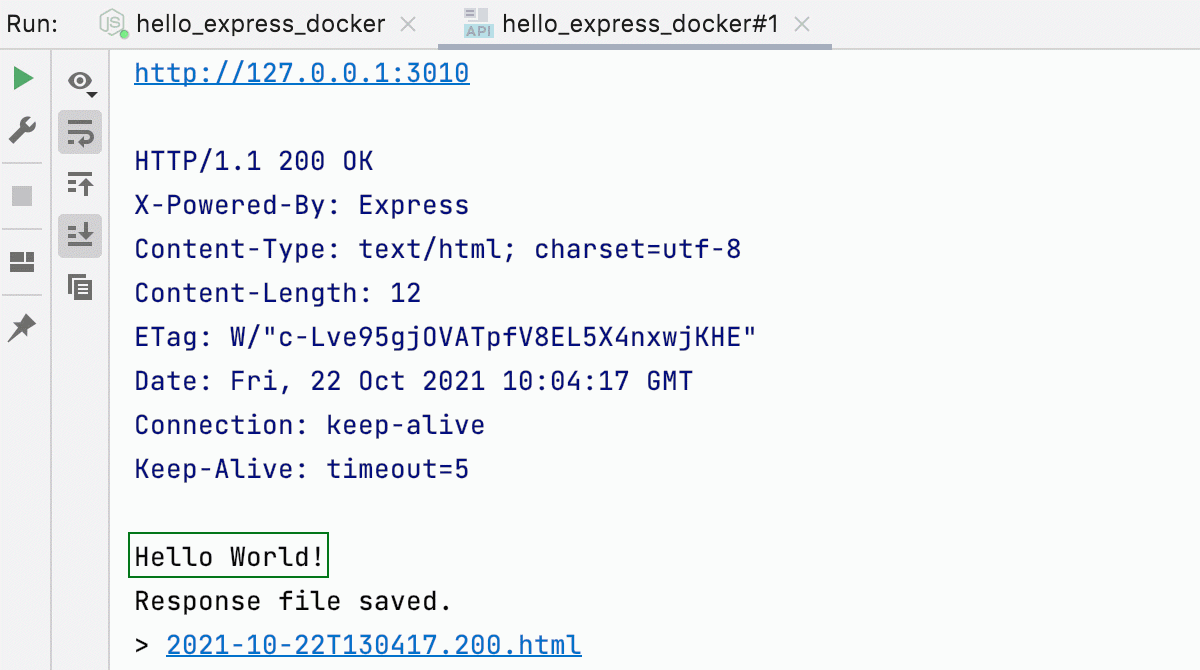
GET http://127.0.0.1:3010/点击
 在边栏中,并点击 在 运行 http://<host IP>:<container port>/ 旁边。

应用程序输出显示在 运行 工具窗口的单独选项卡中。
调试您的应用程序
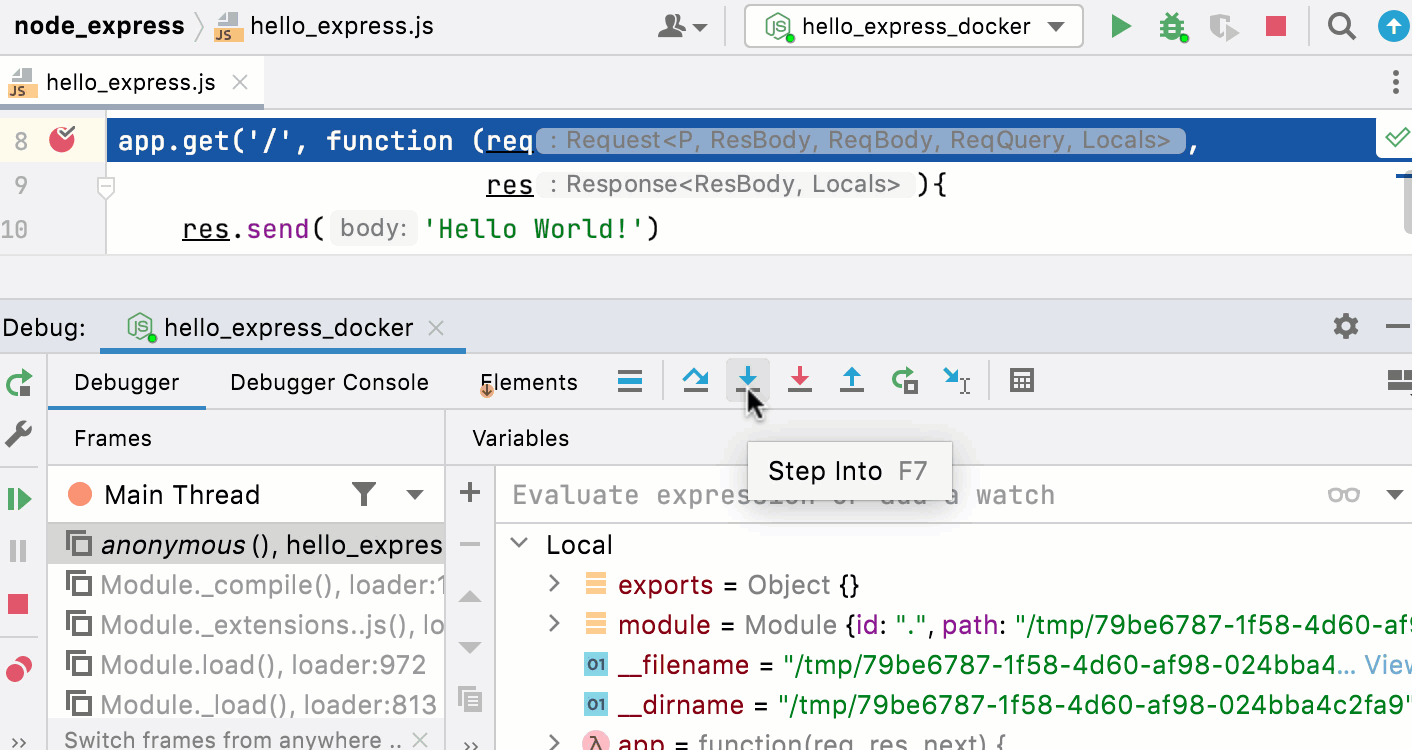
 。
测试您的应用程序
借助 RubyMine,您可以在 Docker 容器内运行 Mocha 和 Jest 测试,与在本地运行的方式完全相同。 如需更多信息,请参阅 Mocha 和 Jest。
请确保已配置相关的 Docker 中的远程 Node.js 运行时,并将其设置为您的项目默认。 另外,请确保与该远程运行时关联的包管理器已设为项目默认。 如需更多信息,请参阅 在 Docker 中配置 Node.js 运行时 和 npm、pnpm 和 yarn 与 Docker。
打开您的 package.json 并确保所需的测试框架列在
开发依赖部分:{ "name": "node-express", "version": "0.0.0", "private": true, "dependencies": { "cookie-parser": "~1.4.4", "debug": "~2.6.9", "express": "~4.16.1", "http-errors": "~1.6.3", "morgan": "~1.9.1", "pug": "^3.0.2" }, "devDependencies": { "chai": "^4.3.4", "concurrently": "^6.3.0", "eslint": "^8.1.0", "http-server": "^14.0.0", "jest": "^27.3.1", "mocha": "^9.1.3", "nyc": "^15.1.0" } }在编辑器中的任意位置右键点击,然后从上下文菜单中选择 运行 '<包管理器> install'。
请根据 Mocha 官方网站 或 Jest 官方网站 的说明创建测试。
直接从编辑器运行和调试单个测试,或者创建运行/调试配置以启动部分或全部测试,如 运行 Mocha 测试、 调试 Mocha 测试、 运行 Jest 测试 和 调试 Jest 测试 中所述。
使用 Docker 的 ESLint
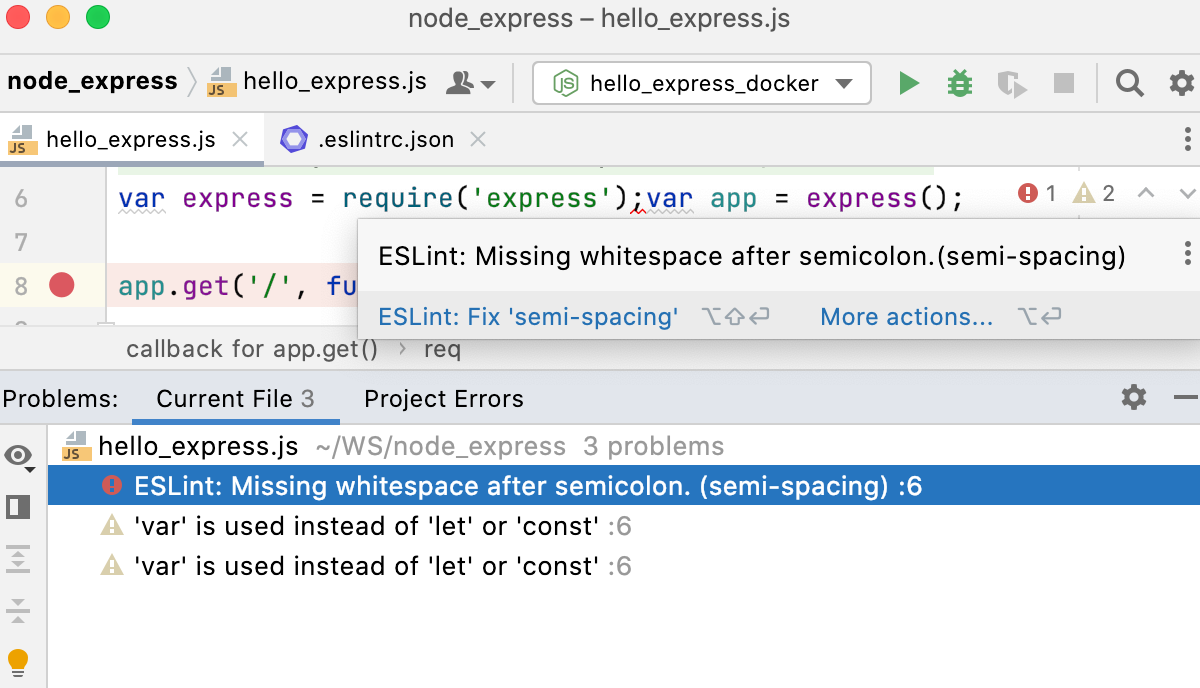
使用 RubyMine,您可以在 Docker 容器中对代码运行 ESLint ,就像在本地一样。 如需更多信息,请参阅 JavaScript 代码检查工具 和 ESLint。
请确保已配置相关的 Docker 中的远程 Node.js 运行时,并将其设置为您的项目默认。 另外,请确保与该远程运行时关联的包管理器已设为项目默认。 如需更多信息,请参阅 在 Docker 中配置 Node.js 运行时 和 npm、pnpm 和 yarn 与 Docker。
请打开您的 package.json 并确保 ESLint 列在
开发依赖部分:{ "name": "node-express", "version": "0.0.0", "private": true, "dependencies": { "cookie-parser": "~1.4.4", "debug": "~2.6.9", "express": "~4.16.1", "http-errors": "~1.6.3", "morgan": "~1.9.1", "pug": "^3.0.2" }, "devDependencies": { "eslint": "^8.1.0" } }在编辑器中的任意位置右键点击,然后从上下文菜单中选择 运行 '<包管理器> install'。
在那之后,ESLint 的工作方式与您在本地处理代码时相同。 在编辑器或 问题 工具窗口中查看检测到的不一致描述并应用建议的快速修复。 如需更多信息,请参阅 JavaScript 代码检查工具 和 ESLint。