Migrate from Eclipse to IntelliJ IDEA
Switching from Eclipse to IntelliJ IDEA, especially if you've been using Eclipse for a long time, requires understanding some fundamental differences between the two IDEs, including their user interfaces, compilation methods, shortcuts, project configuration and other aspects.
Import an Eclipse project to IntelliJ IDEA
You can import either an Eclipse workspace or a single Eclipse project. To do this, click Open on the Welcome Screen or select in the main menu.
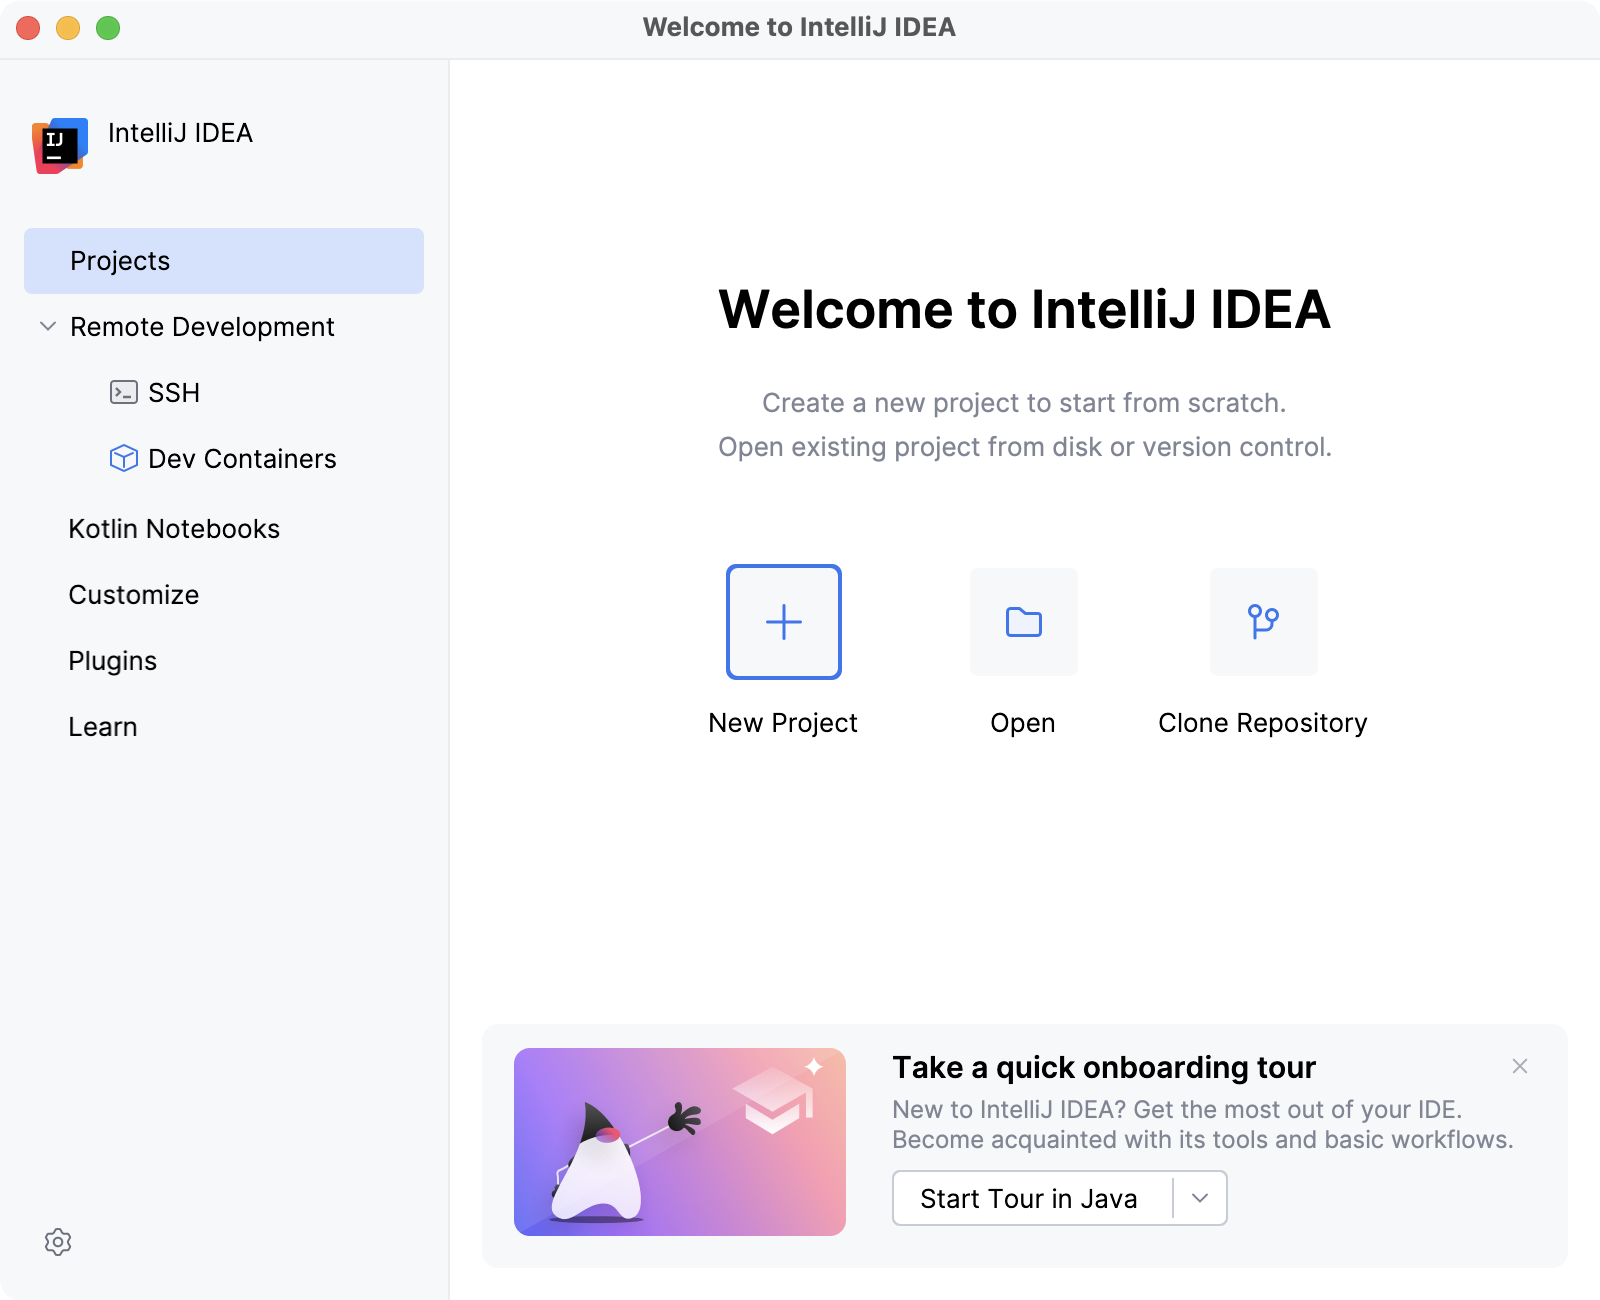
If your project uses a build tool such as Maven or Gradle, we recommend selecting the associated build file pom.xml or build.gradle when importing the project. For more information about importing a project, refer to Import a project from Eclipse.
If you'd like to import your existing run configurations from Eclipse, consider using this third-party plugin.
Differences in user interfaces
No workspace
The first thing you will notice when launching IntelliJ IDEA is that it has no workspace concept. This means that you can work with only one project at a time. While in Eclipse you normally have a set of projects that may depend on each other, in IntelliJ IDEA you have a single project that consists of a set of modules.
If you have several unrelated projects, you can open them in separate windows.
If you still want to have several unrelated projects opened in one window, as a workaround you can configure them as modules.
IntelliJ IDEA vs Eclipse terminology
The table below compares the terms in Eclipse and IntelliJ IDEA:
Eclipse | IntelliJ IDEA |
|---|---|
Workspace | Project |
Project | Module |
Facet | Facet |
Library | Library |
JRE | SDK |
Classpath variable | Path variable |
No perspectives
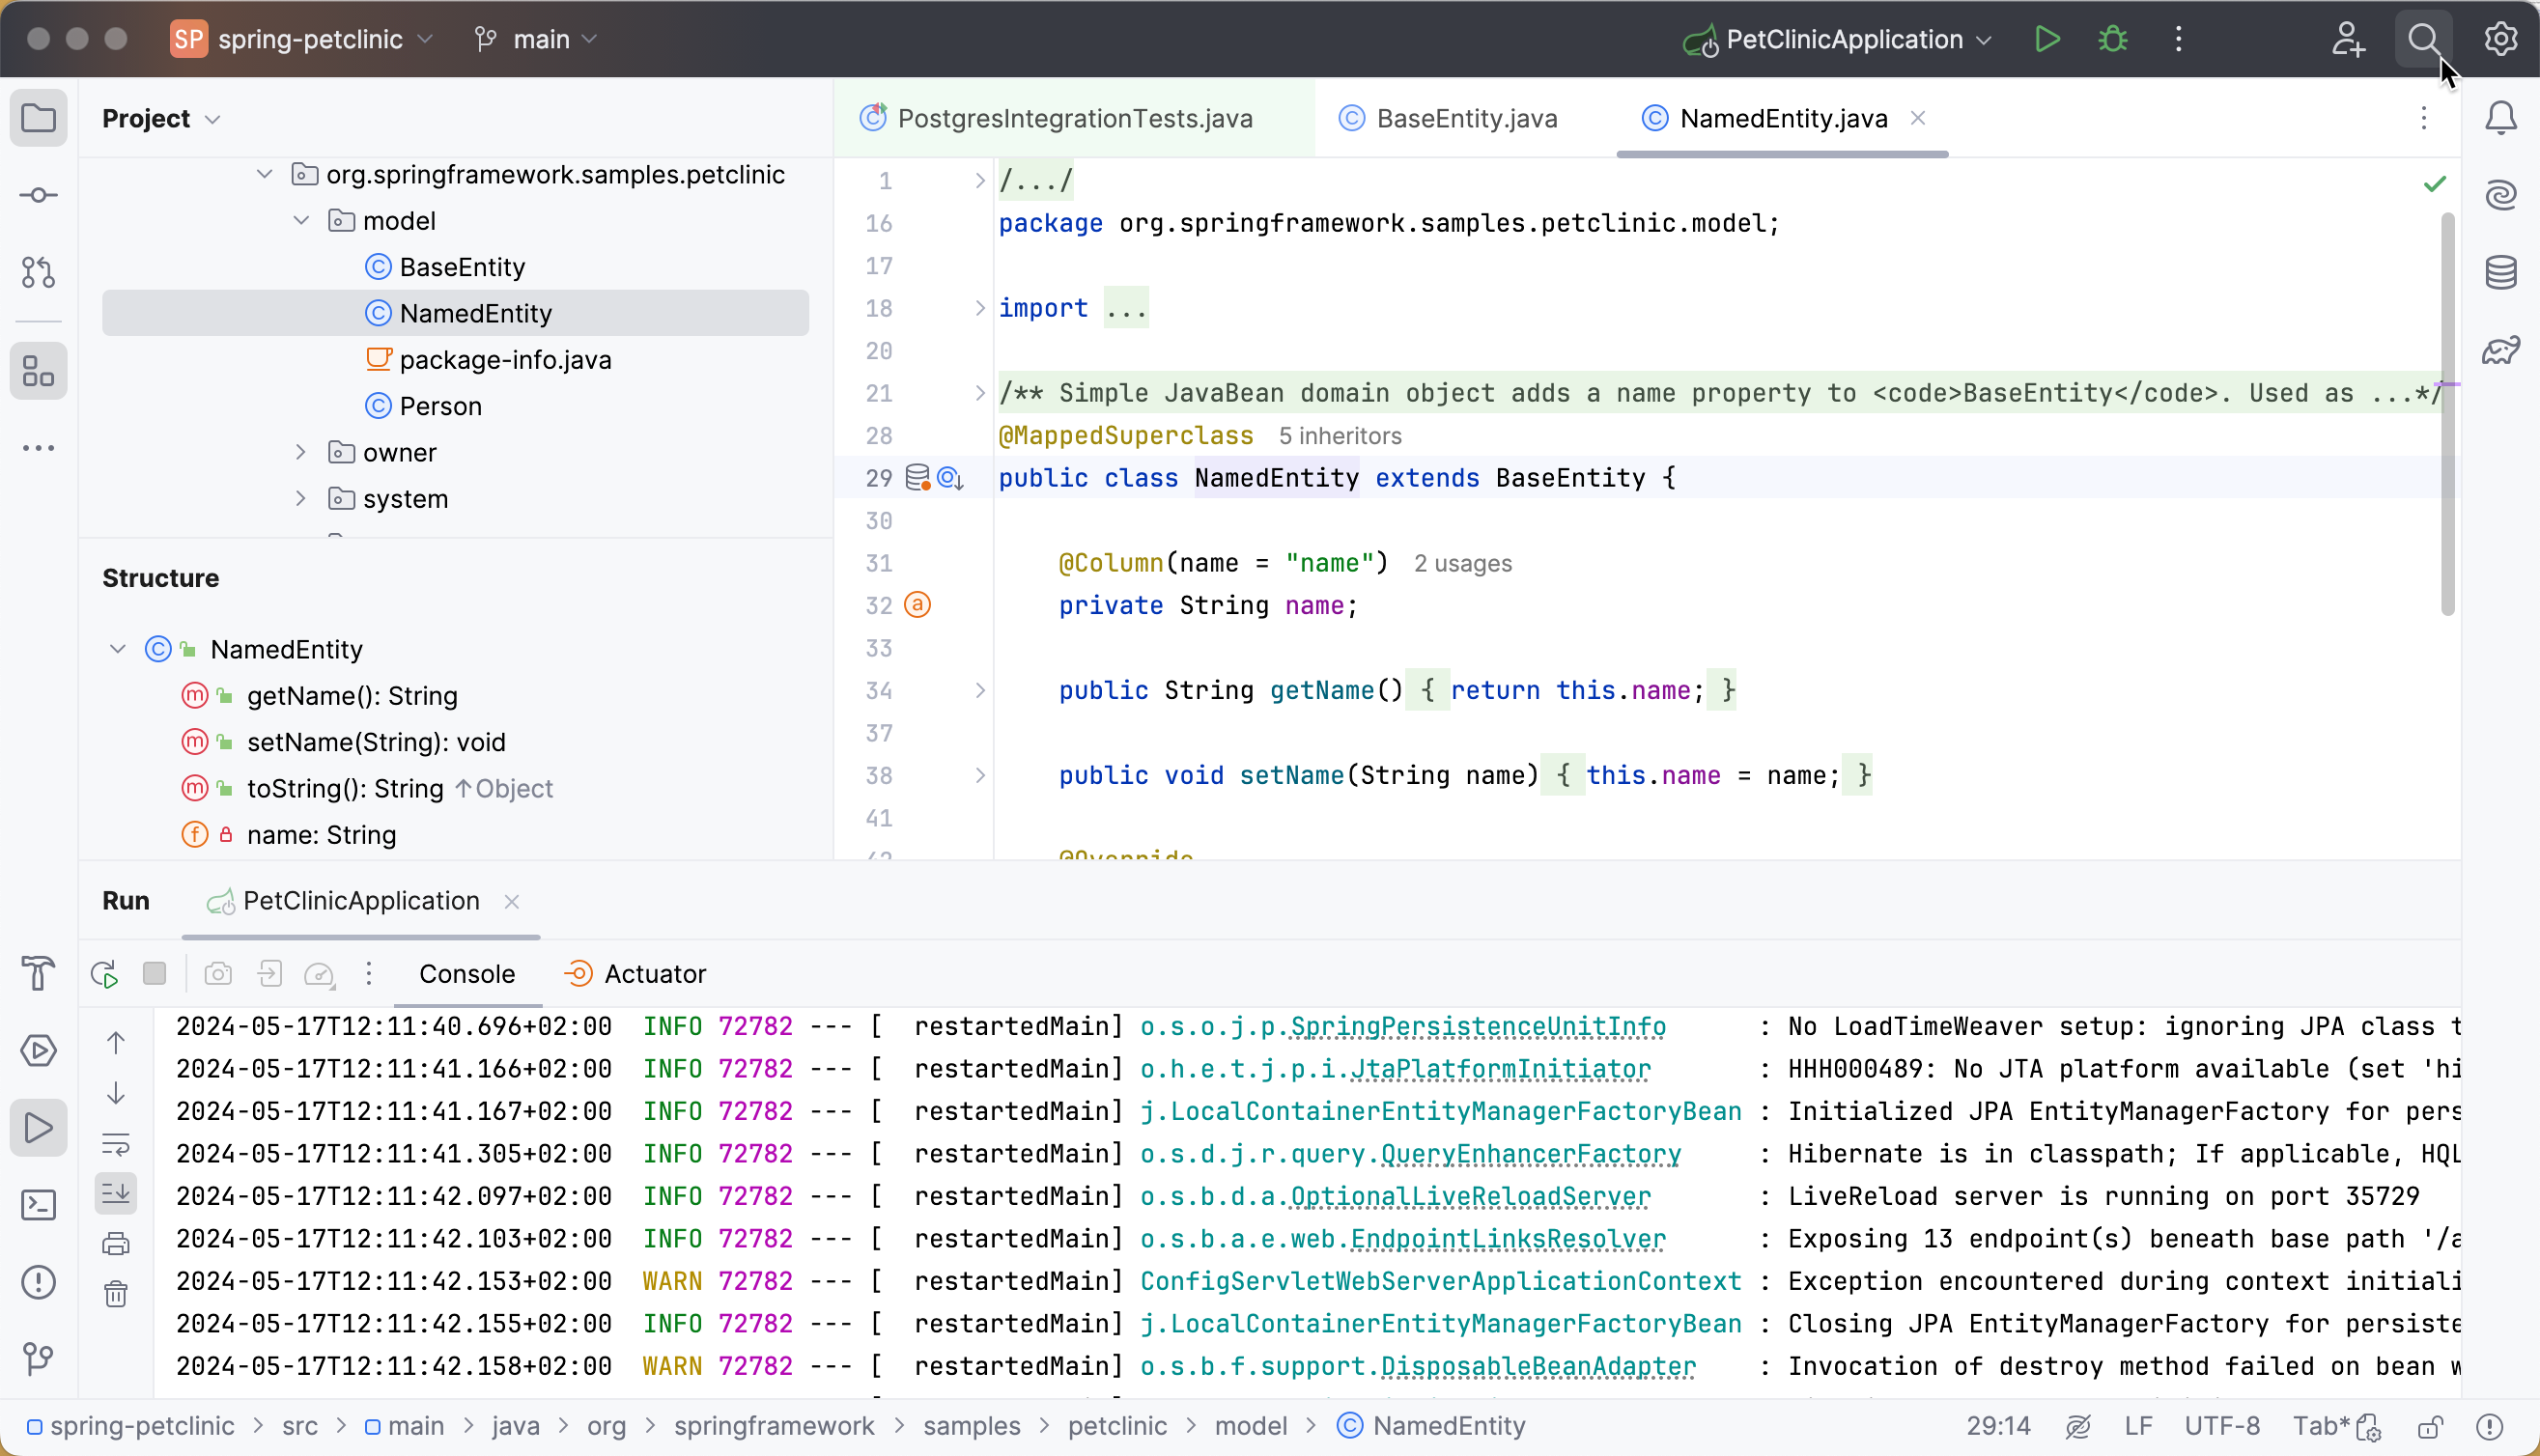
The second big surprise when you switch to IntelliJ IDEA is that it has no perspectives.
It means that you don't need to switch between different workspace layouts manually to perform different tasks. The IDE follows your context and brings up the relevant tools automatically.
Tool windows
Just like in Eclipse, in IntelliJ IDEA you also have tool windows. You can find a full list of all available tool windows at . Selecting a tool window will open it. Tool windows are also accessible from the tool window buttons on the tool window bars.
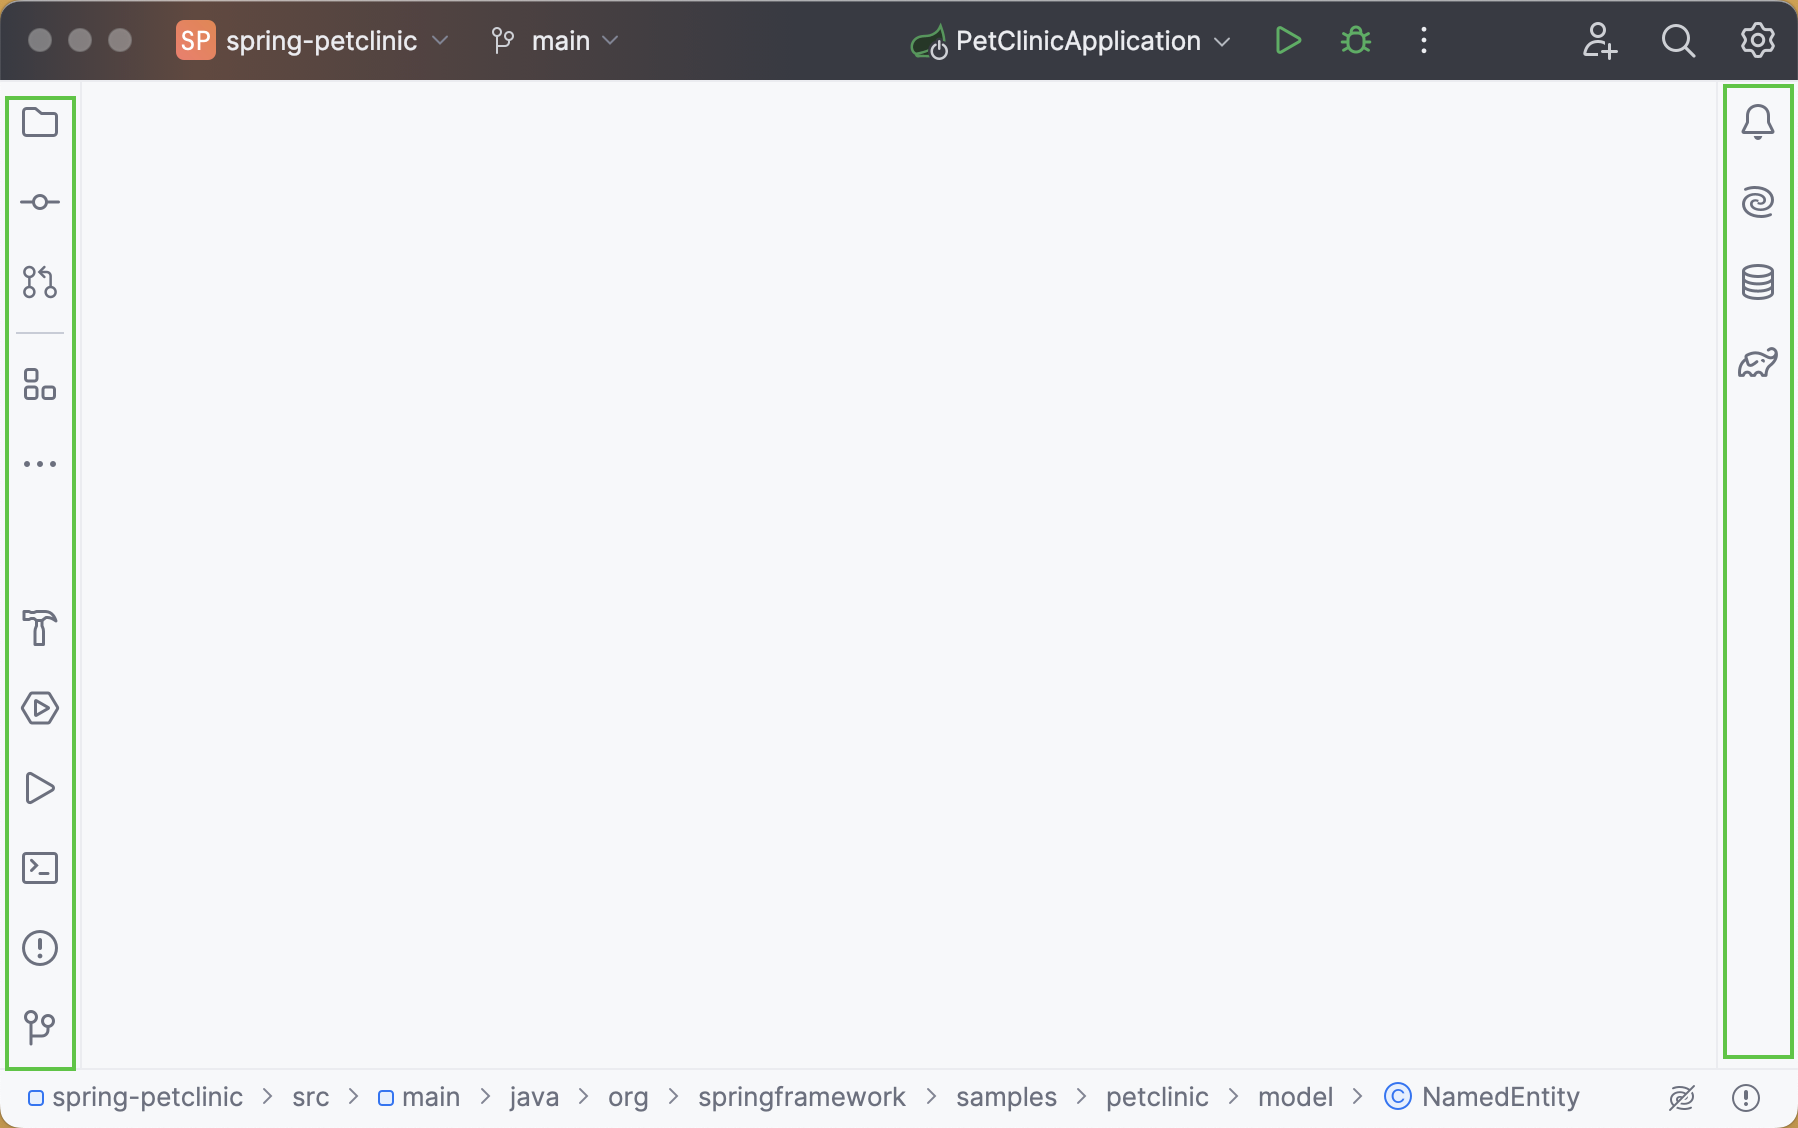
If you do not want to use the mouse, you can always switch to any toolbar by pressing the shortcut assigned to it. The most important shortcuts to remember are:
Project: Alt+1
Commit: Alt+0
Terminal: Alt+F12
Another thing about tool windows is that you can drag, pin, unpin, attach and detach them:
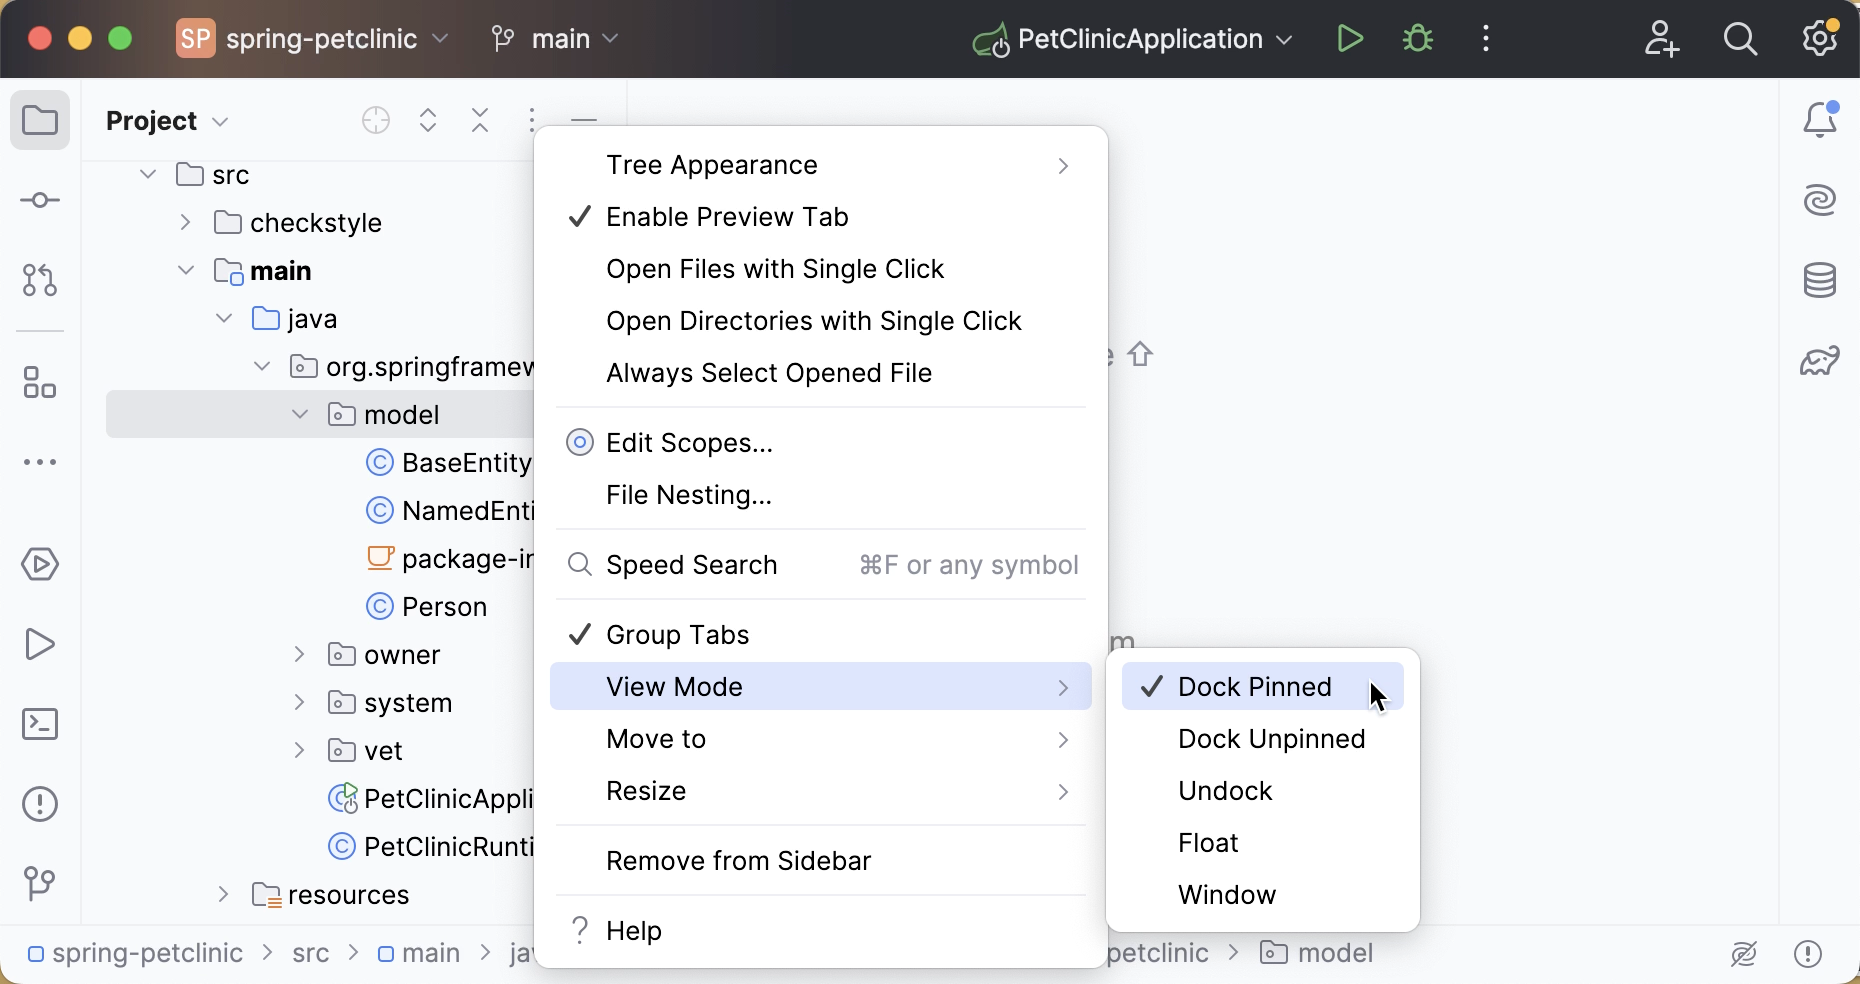
For more information, refer to Arrange tool windows and Tool window view modes.
To help store/restore the tool windows layout, there are several useful commands:
: save the arrangement as a new layout.
: reset changes in your current layout. (also available via Shift+F12)
For more information, refer to Layouts.
Multiple windows
Windows management in IntelliJ IDEA is slightly different from Eclipse. You cannot open several windows with one project, but you can detach any number of editor tabs into separate windows. To move the tab to a separate window, right-click the tab and select Move Tab to New Window (or press Shift+F4).
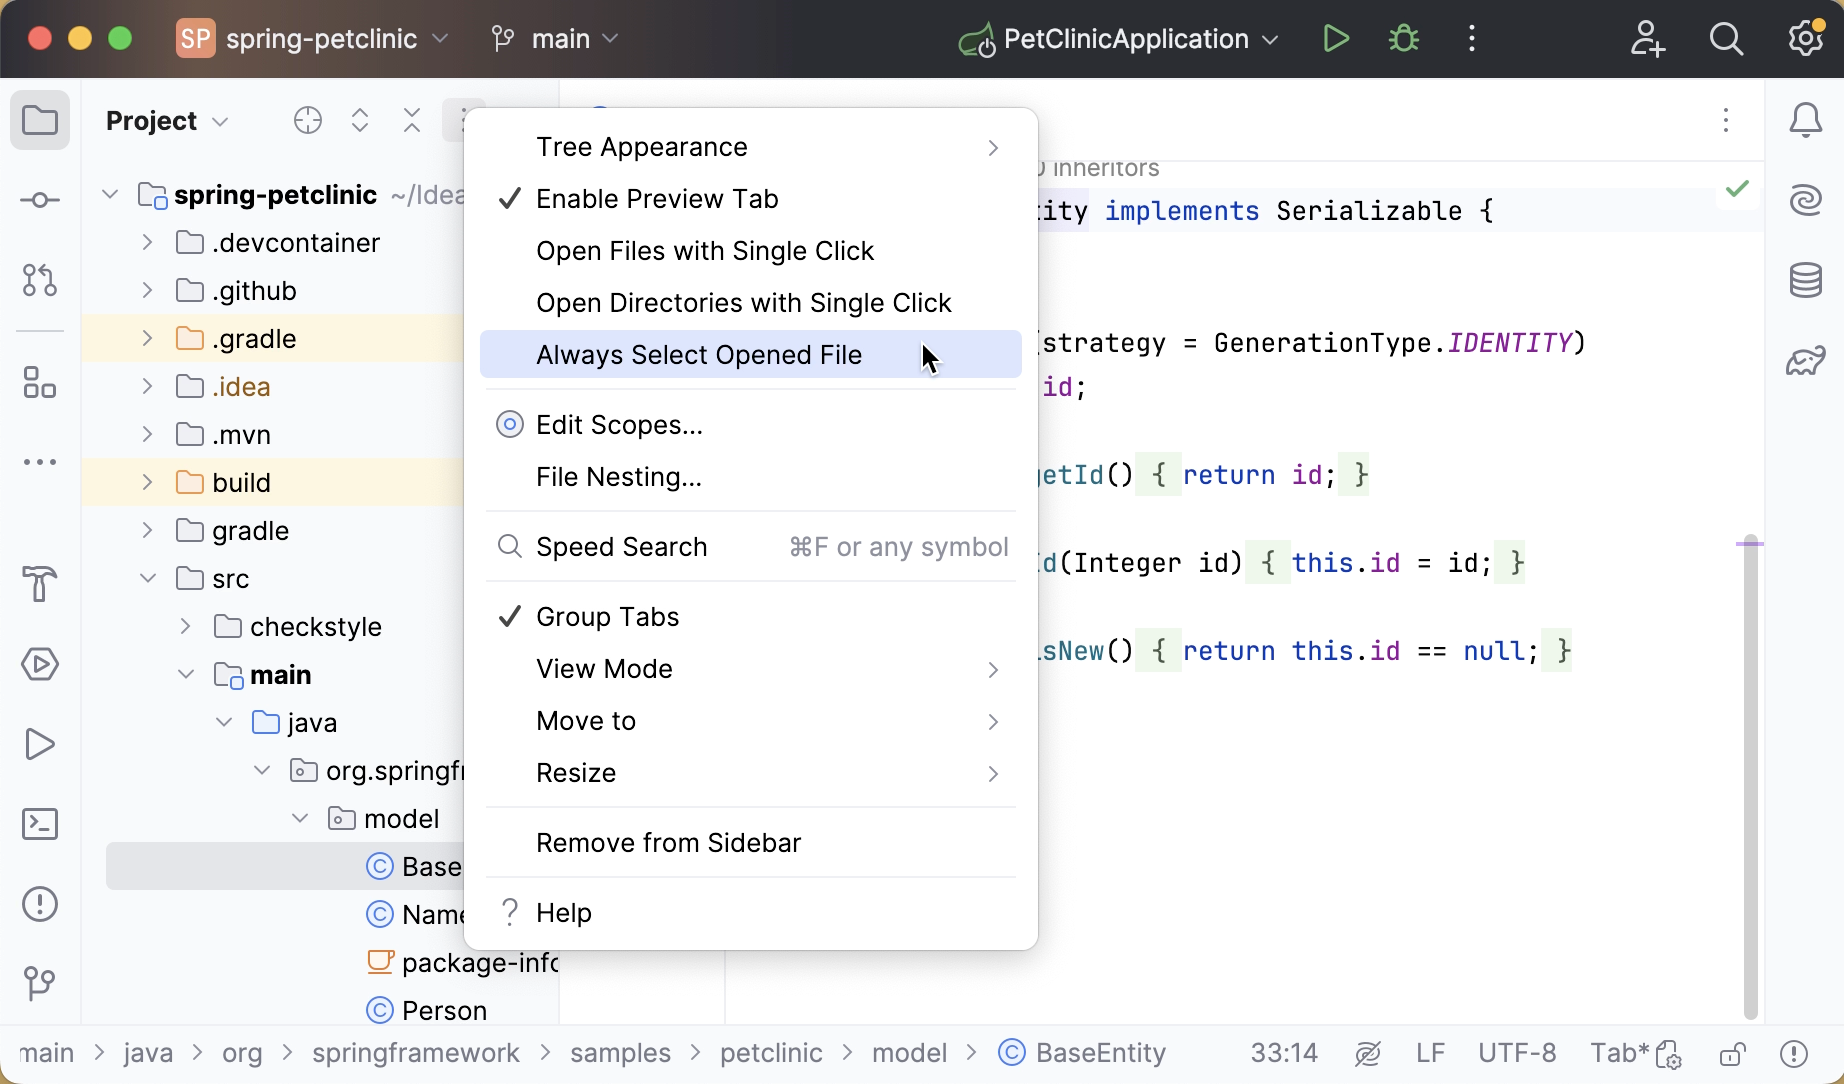
Always select opened files
By default, IntelliJ IDEA does not navigate to the file in Project tool window when you switch between editor tabs. However, you can enable it in the Project tool window settings:
General workflows
No 'save' button
IntelliJ IDEA has no Save button. Since in IntelliJ IDEA you can undo refactorings and revert changes from Local History, it makes no sense to ask you to save your changes every time.
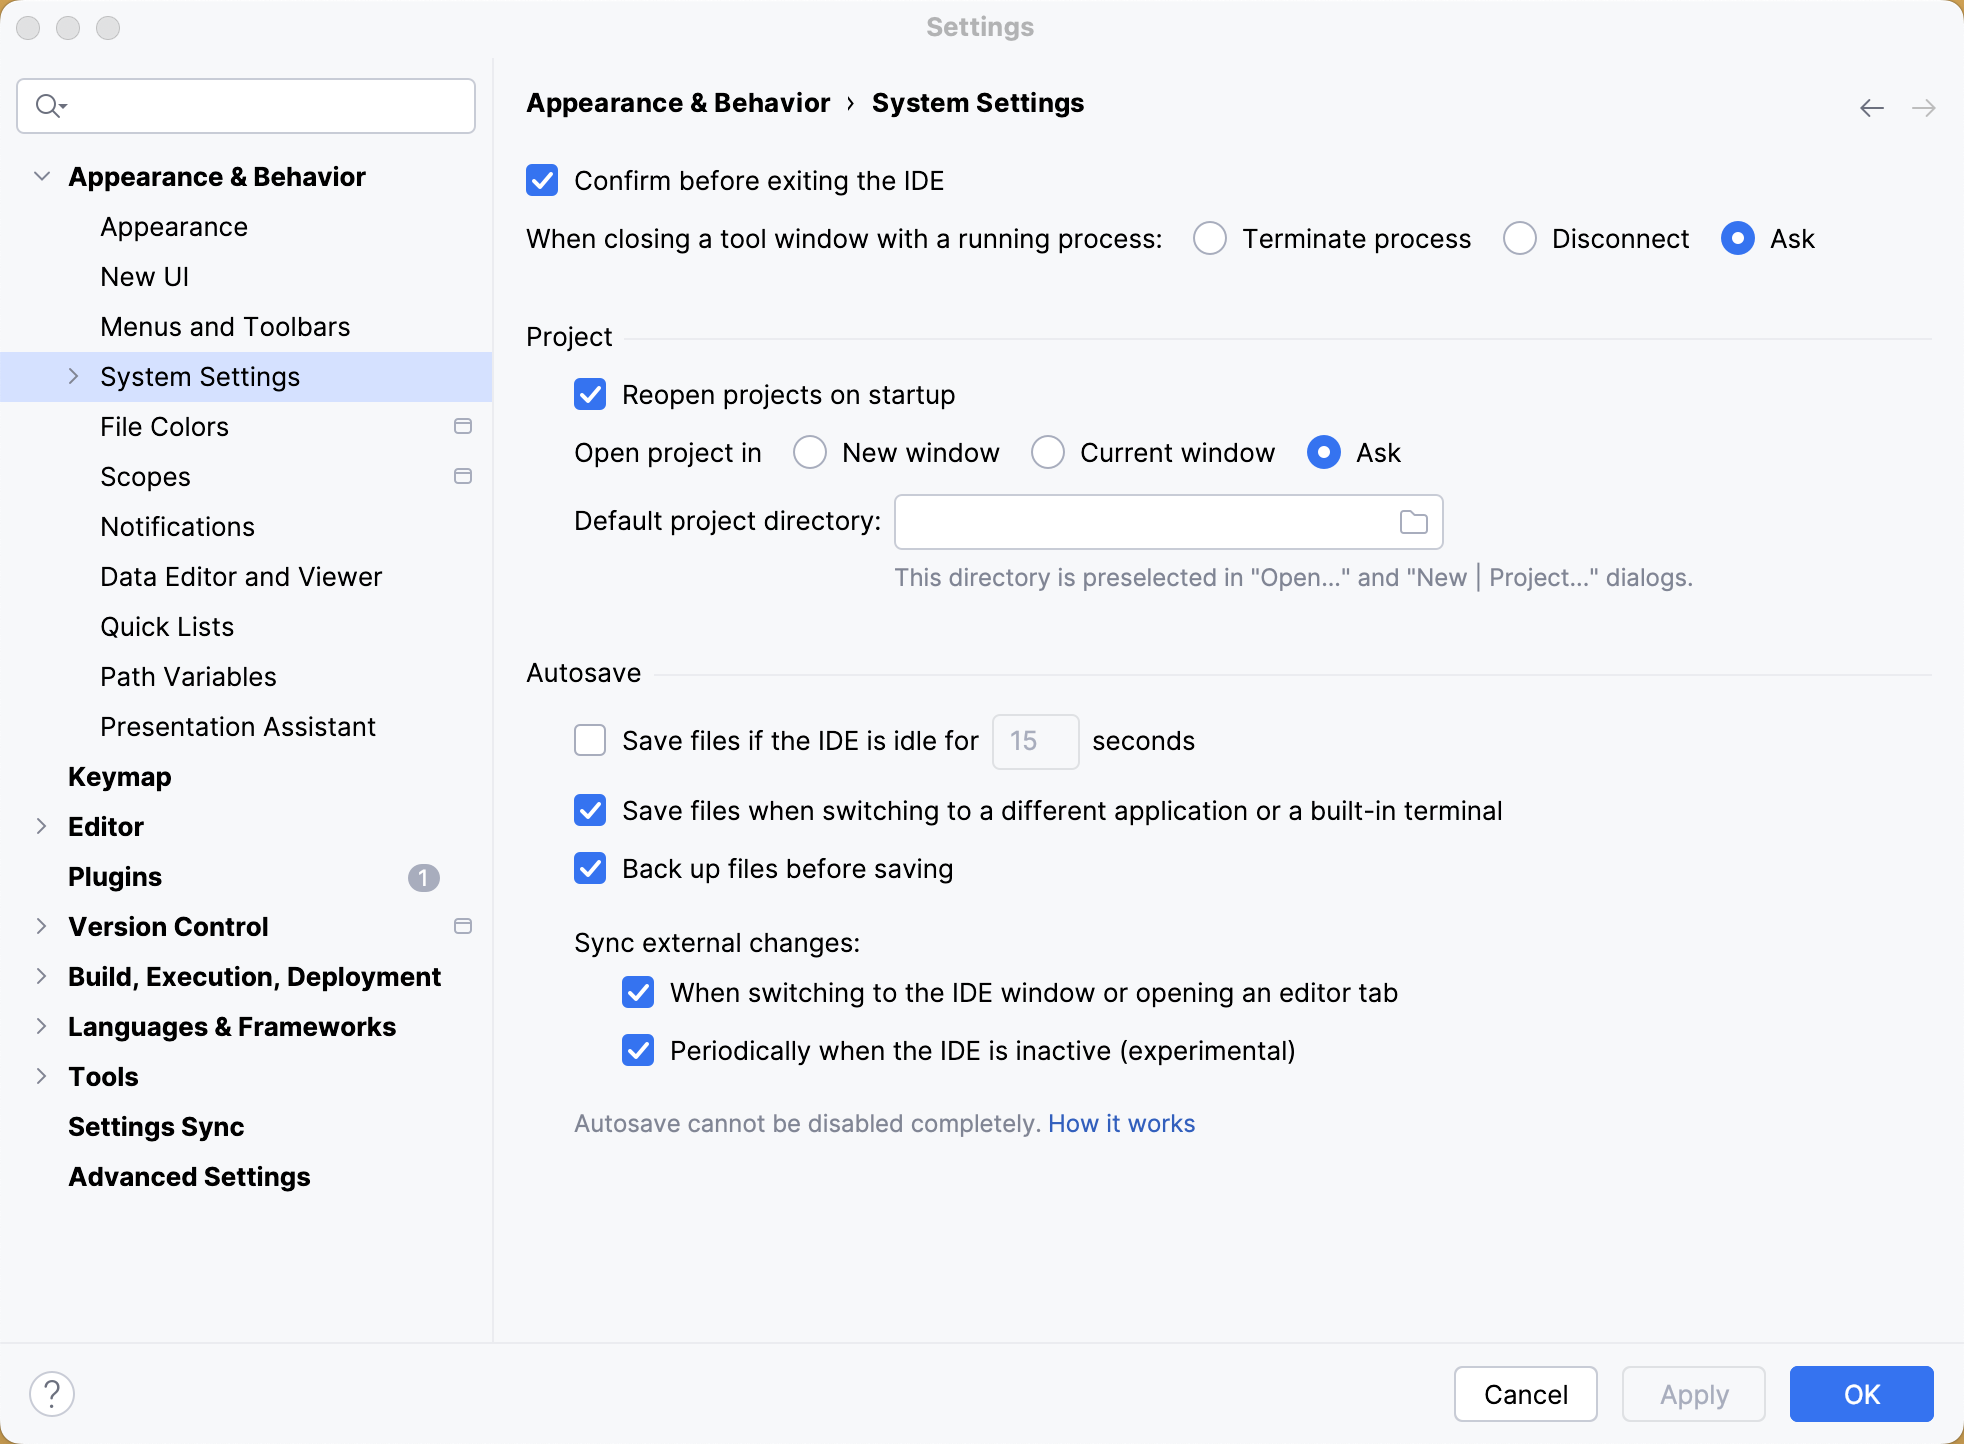
Still, it is worth knowing that physical saving to disk is triggered by certain events, including compilation, closing a file, switching focus out of the IDE, and so on. To change the autosave behavior, open settings by pressing Ctrl+Alt+S and navigate to . On the System Settings page, find the Autosave section.
Save actions
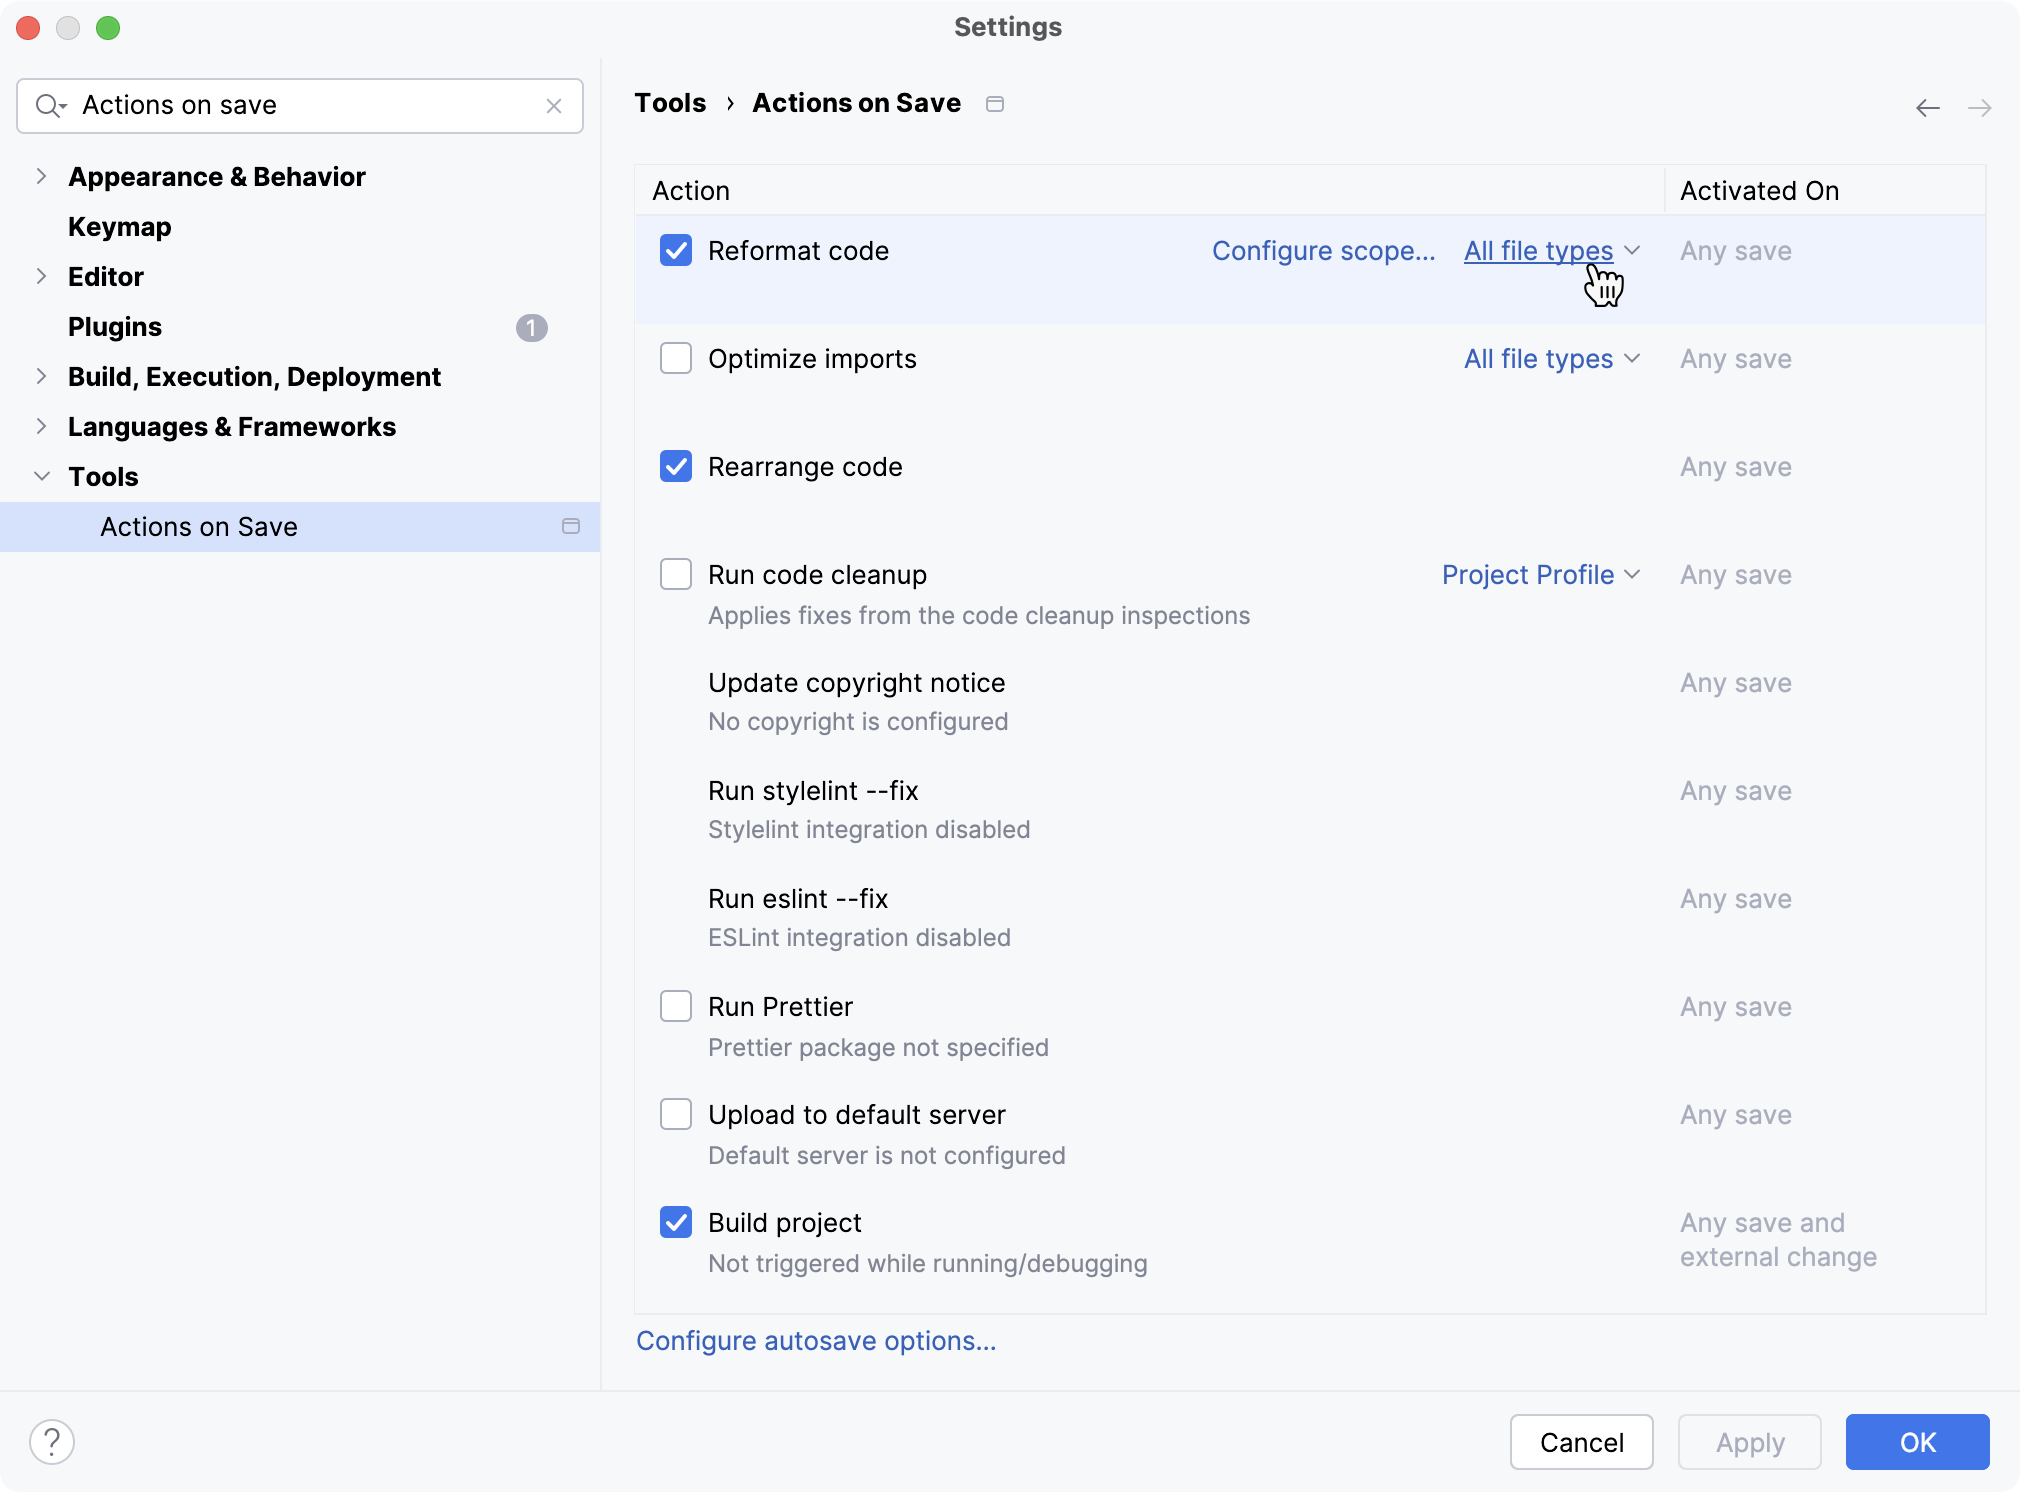
If you are an experienced Eclipse user, you are familiar with save actions: the actions triggered automatically on save, such as reformatting code, organizing imports, and so on.
IntelliJ IDEA also features save actions that you can find and enable in .
Actions on commit
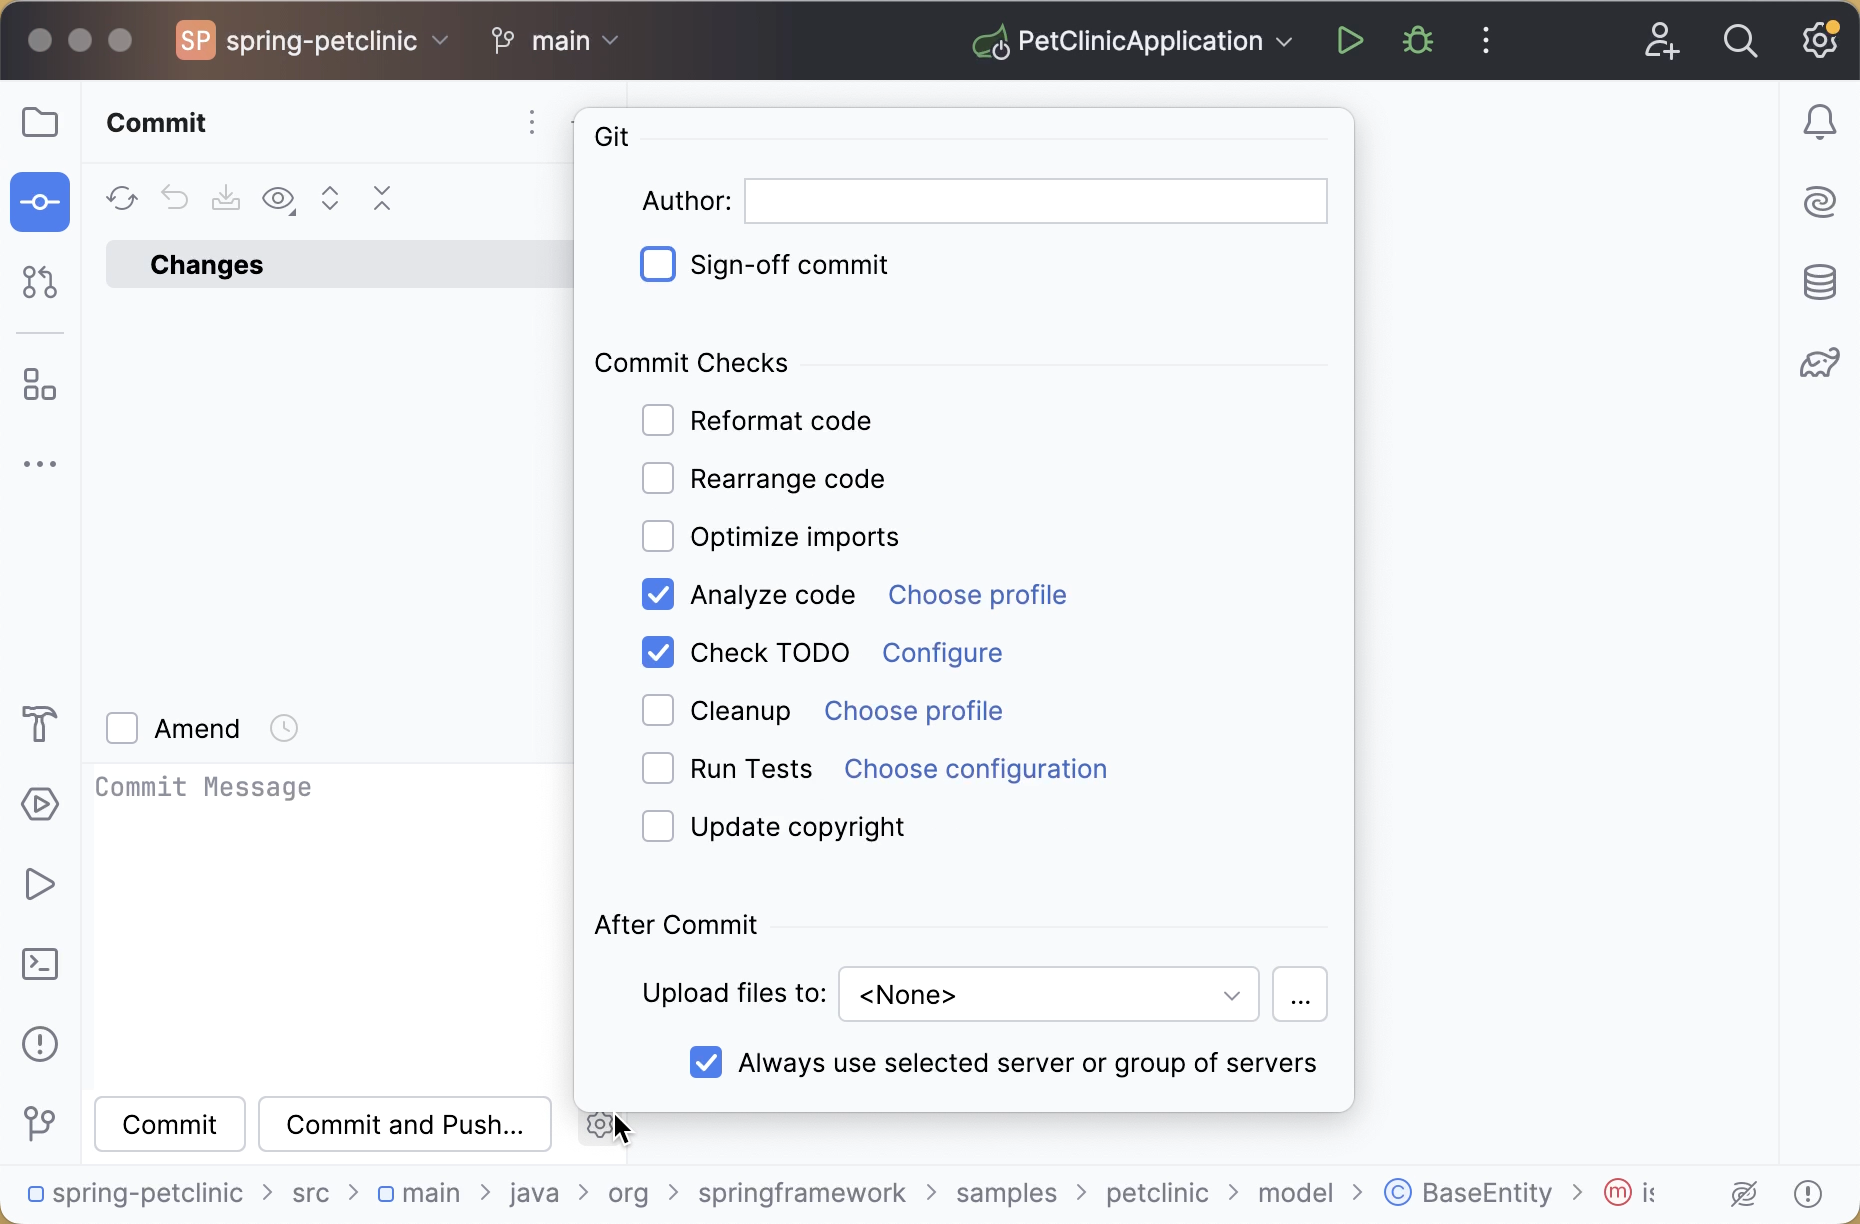
When you commit your changes, you can run various actions automatically. For example, you can automatically run tests, reformat your code, optimize imports, and so on.
Compilation
The way IntelliJ IDEA compiles projects is different from Eclipse in a number of ways.
Auto-compilation
By default, IntelliJ IDEA doesn't automatically compile projects on saving because normally we don't invoke the save action explicitly in IntelliJ IDEA.
If you want to mimic the Eclipse behavior, you can invoke the Build Project action Ctrl+F9 - it will save the changed files and compile them.
You can also enable the Build project save action in .
Note that automatic compilation in IntelliJ IDEA differs from that in Eclipse. In Eclipse it's not fully automatic, as it is triggered by the save action invoked by the user explicitly, whereas in IntelliJ IDEA it is invoked implicitly when you type in the editor.
This is why, even if the Build project option is enabled, IntelliJ IDEA doesn't perform automatic compilation if at least one application is running: it will reload classes in the application implicitly. In this case you can call Ctrl+F9.
Eclipse compiler
While Eclipse uses its own compiler, IntelliJ IDEA uses the javac compiler bundled with the project JDK. If you must use the Eclipse compiler, navigate to and select it as shown below:
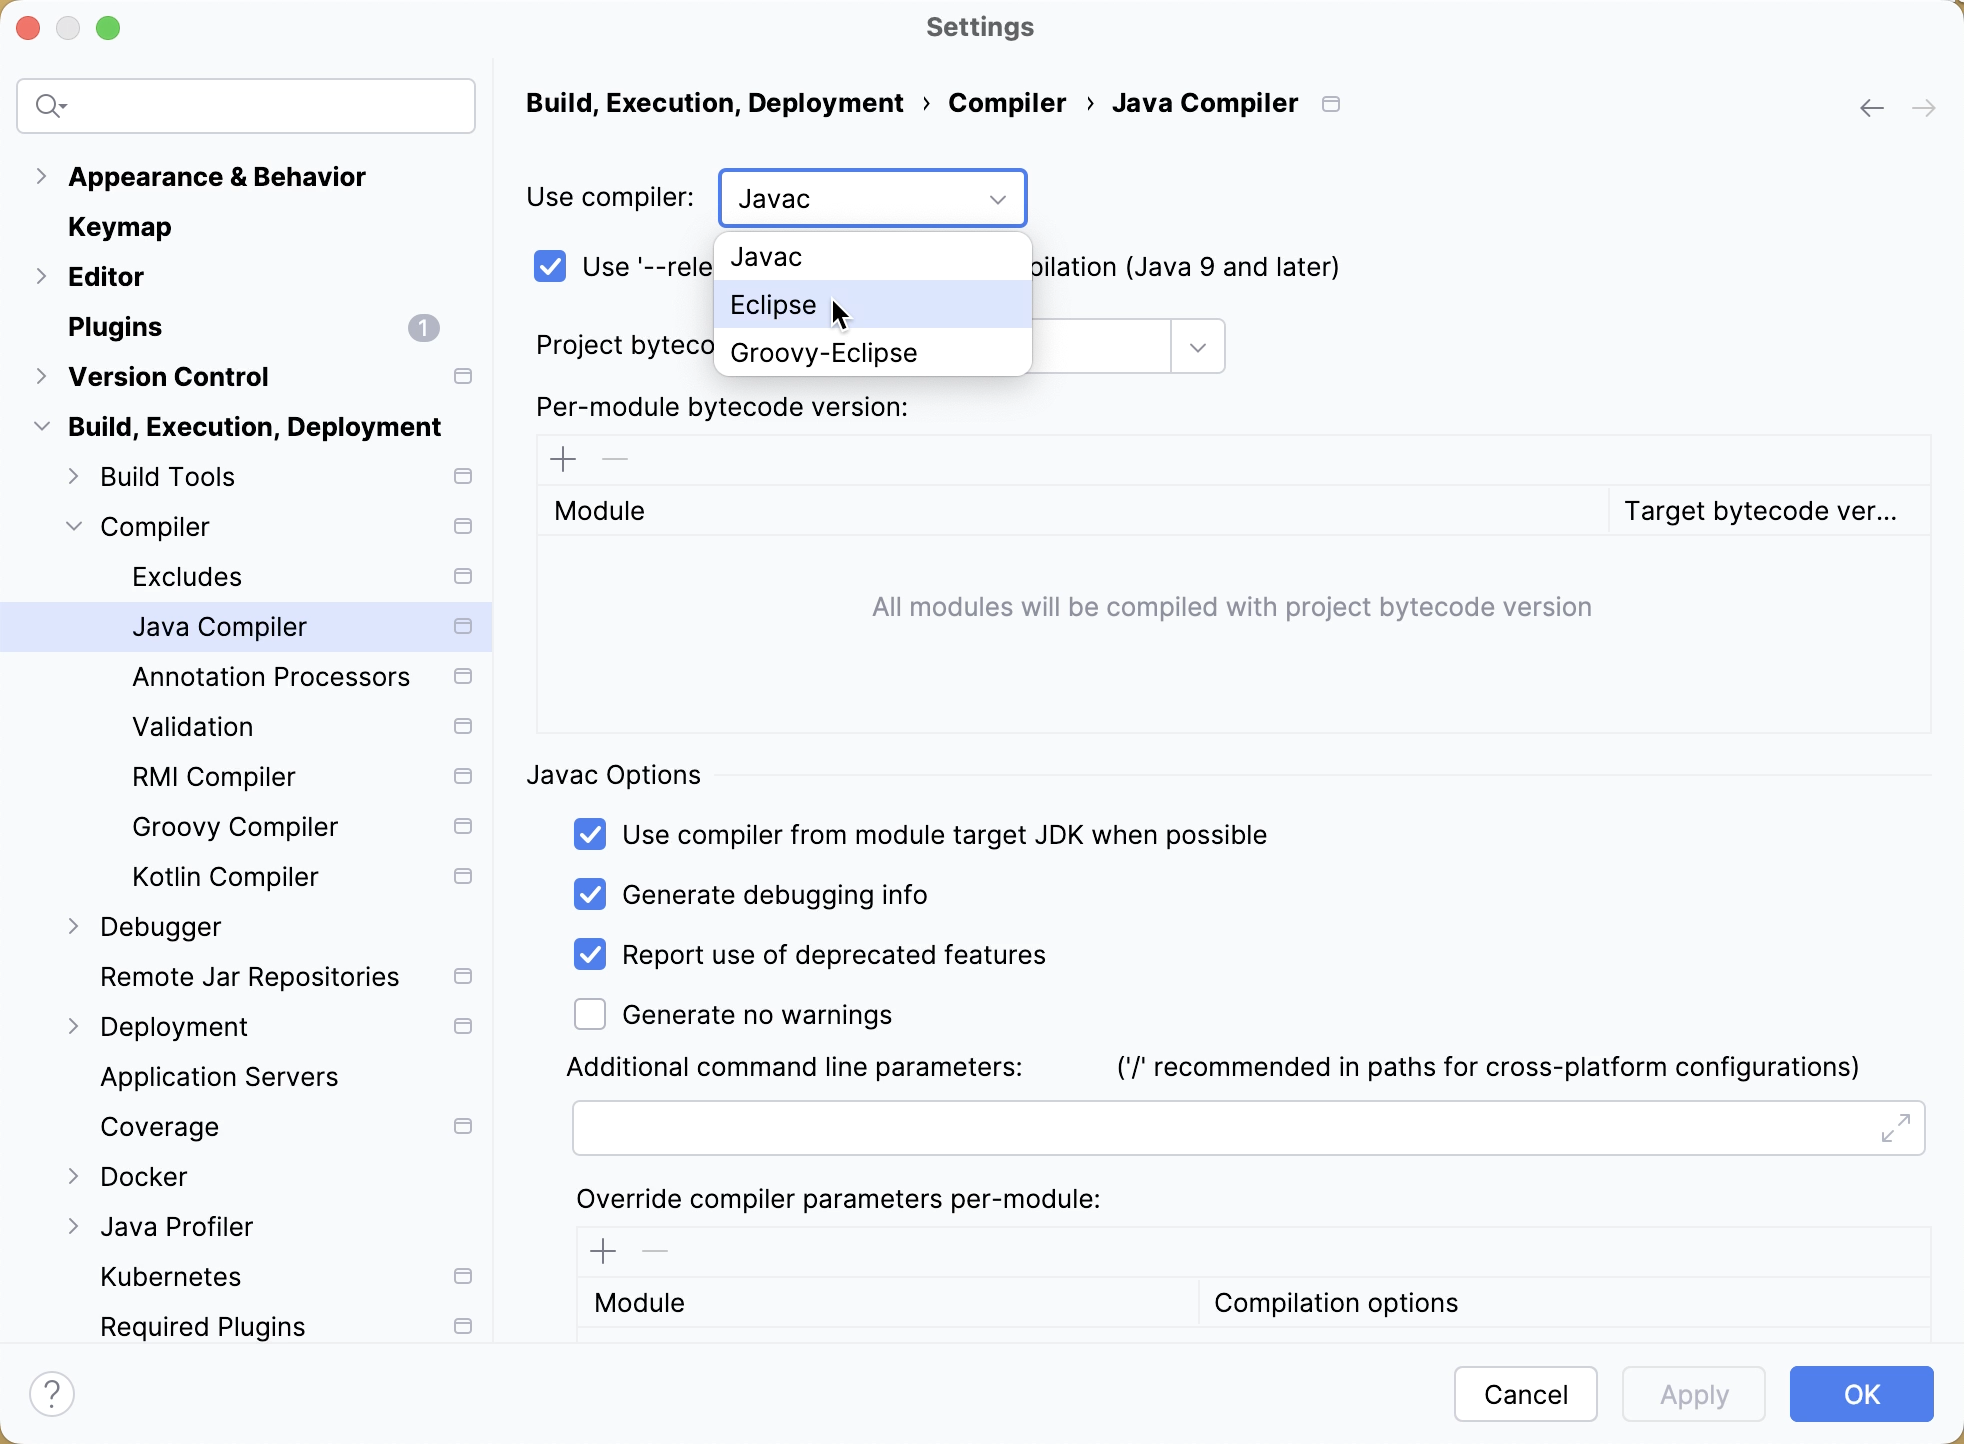
The biggest difference between the Eclipse and javac compilers is that the Eclipse compiler is more tolerant to errors, and sometimes lets you run code that doesn't compile.
In situations when you need to run code with compilation errors in IntelliJ IDEA, replace the Build option in your run configuration with Build, no error check by editing the run configuration and selecting :
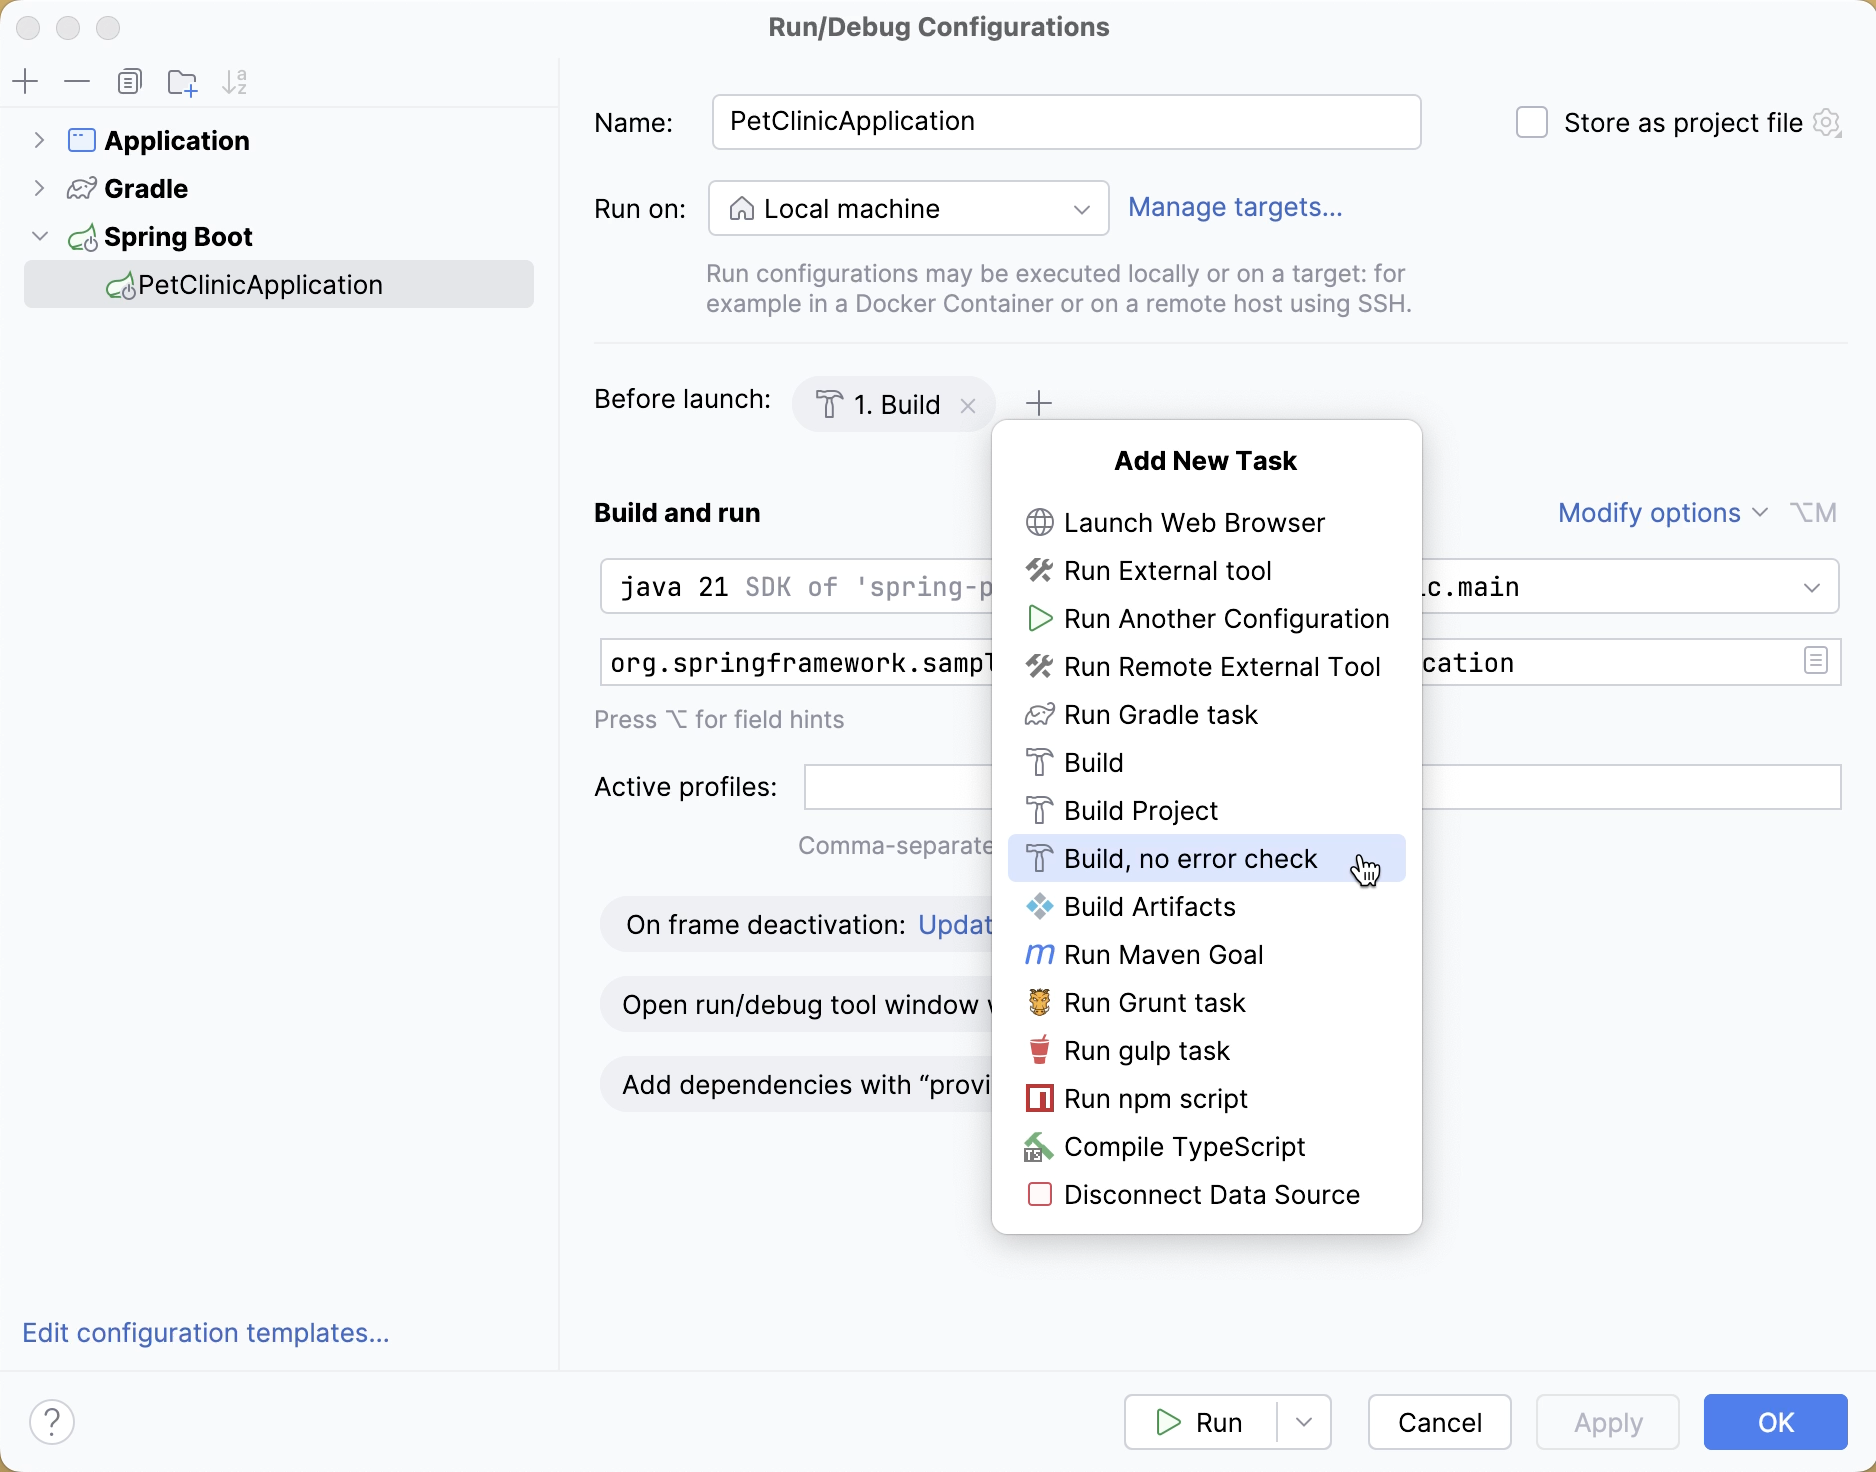
Shortcuts
IntelliJ IDEA shortcuts are completely different from those in Eclipse.
The table below shows how the top Eclipse actions (and their shortcuts) are mapped to IntelliJ IDEA (you may want to print it out to always have it handy).
Eclipse | IntelliJ IDEA | ||
|---|---|---|---|
Action | Shortcut | Action | Shortcut |
Code completion | Ctrl+Space | Basic completion | Ctrl+Space |
- | - | Type-matching completion | Ctrl+Shift+Space |
- | - | Statement completion | Ctrl+Shift+Enter |
Quick access | Ctrl+3 | Search everywhere | Double Shift |
Maximize active view or editor | Ctrl+M | Hide all tool windows | Ctrl+Shift+F12 |
Open type | Ctrl+Shift+T | Navigate to class | Ctrl+N |
Open resource | Ctrl+Shift+R | Navigate to file | Ctrl+Shift+N |
- | - | Navigate to symbol | Ctrl+Alt+Shift+N |
Next view | Ctrl+F7 | - | - |
- | - | Recent files | Ctrl+E |
Quick outline | Ctrl+O | File structure | Ctrl+F12 |
Move lines | Alt+Up/Down | Move lines | Alt+Shift+Up/Alt+Shift+Down |
Delete lines | Ctrl+D | Delete lines | Ctrl+Y |
Quick fix | Ctrl+1 | Show intention action | Alt+Enter |
Quick switch editor | Ctrl+E | Switcher | Ctrl+Shift+Tab |
- | - | Recent files | Ctrl+E |
Quick hierarchy | Ctrl+T | Navigate to type hierarchy | Ctrl+H |
- | - | Navigate to method hierarchy | Ctrl+Shift+H |
- | - | Show UML popup | Ctrl+Alt+U |
Last edit location | Ctrl+Q | Last edit location | Ctrl+Shift+Backspace |
Next editor | Ctrl+F6 | Select next tab | Alt+Right |
Run | Ctrl+Shift+F11 | Run | Shift+F10 |
Debug | Ctrl+F11 | Debug | Shift+F9 |
Correct indentation | Ctrl+I | Auto-indent lines | Ctrl+Alt+I |
Format | Ctrl+Shift+F | Reformat code | Ctrl+Alt+L |
Surround with | Ctrl+Alt+Z | Surround with | Ctrl+Alt+T |
- | - | Surround with live template | Ctrl+Alt+J |
Open declaration | F3 | Navigate to declaration | Ctrl+B |
- | - | Quick definition | Ctrl+Shift+I |
Open type hierarchy | F4 | Navigate to type hierarchy | Ctrl+H |
- | - | Show UML popup | Ctrl+Alt+U |
References in workspace | Ctrl+Shift+G | Find usages | Alt+F7 |
- | - | Show usages | Ctrl+Alt+F7 |
- | - | Find usages settings | Ctrl+Alt+Shift+F7 |
Open search dialog | Ctrl+H | Find in Files | Ctrl+Shift+F |
Occurrences in file | Alt+Ctrl+U | Highlight usages in file | Ctrl+Shift+F7 |
Copy lines | Ctrl+Alt+Down | Duplicate lines | Ctrl+D |
Extract local variable | Ctrl+Alt+L | Extract variable | Ctrl+Alt+V |
Assign to field | Ctrl+2/Ctrl+F | Extract field | Ctrl+Alt+F |
Show refactor quick menu | Ctrl+Alt+T | Refactor this | Ctrl+Alt+Shift+T |
Rename | Ctrl+Alt+R | Rename | Shift+F6 |
Go to line | Ctrl+L | Navigate to line | Ctrl+G |
Structured selection | Alt+Shift+Up/Alt+Shift+Down | Select word at caret | Ctrl+W/Ctrl+Shift+W |
Find next | Ctrl+K | Find next | F3 |
Show in | Ctrl+Alt+W | Select in | Alt+F1 |
Back | Ctrl+[ | Back | Ctrl+Alt+Left |
Forward | Ctrl+] | Forward | Ctrl+Alt+Right |
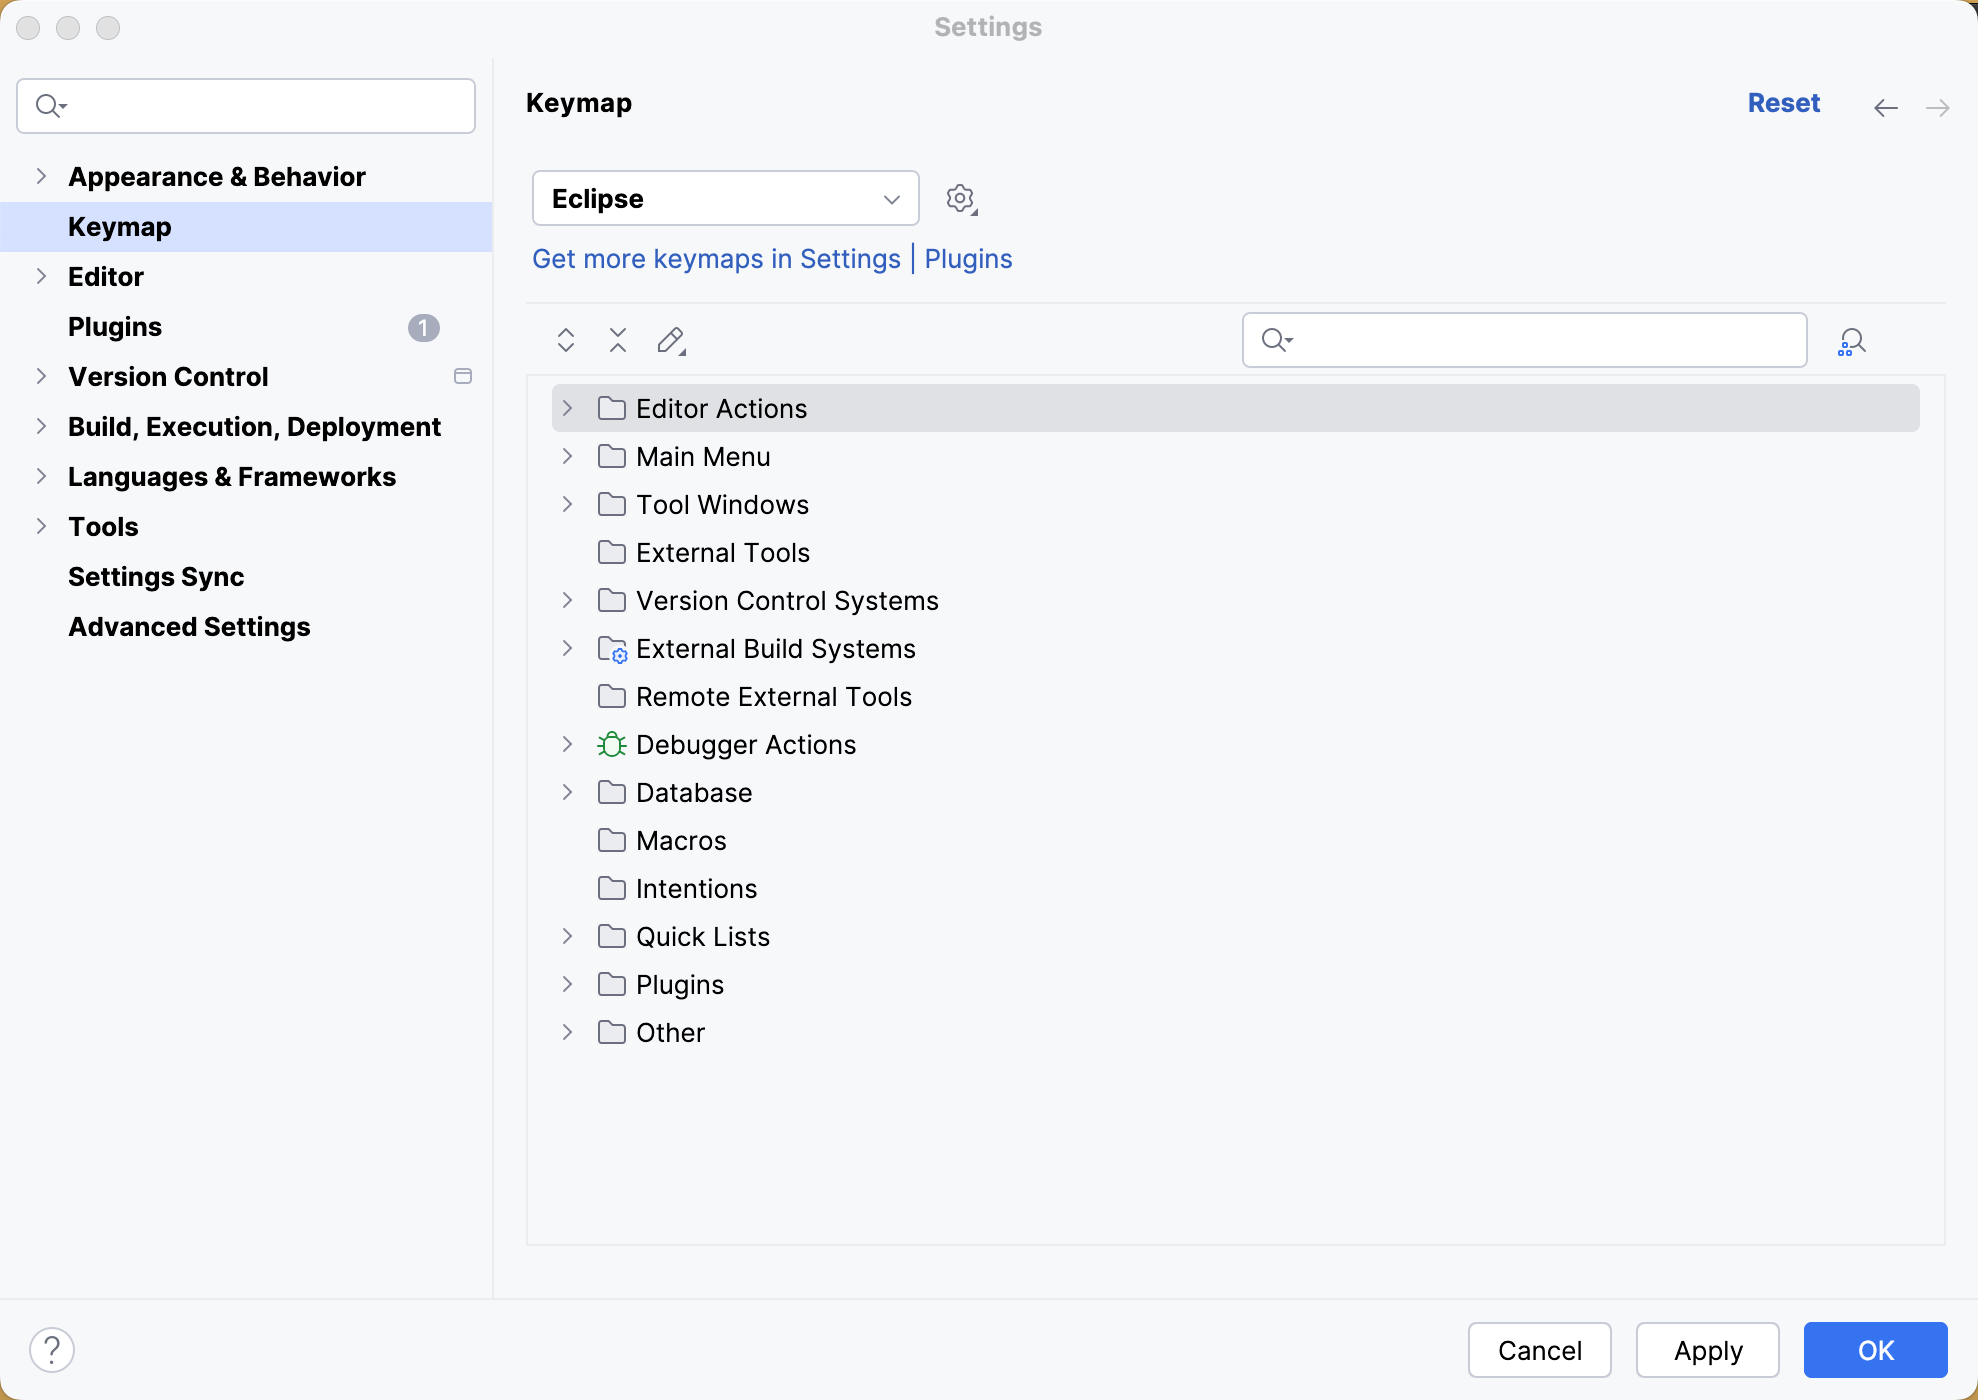
Eclipse keymap
In , you can choose to use the Eclipse keymap which closely mimics Eclipse shortcuts, in case you don't want to learn new shortcuts:
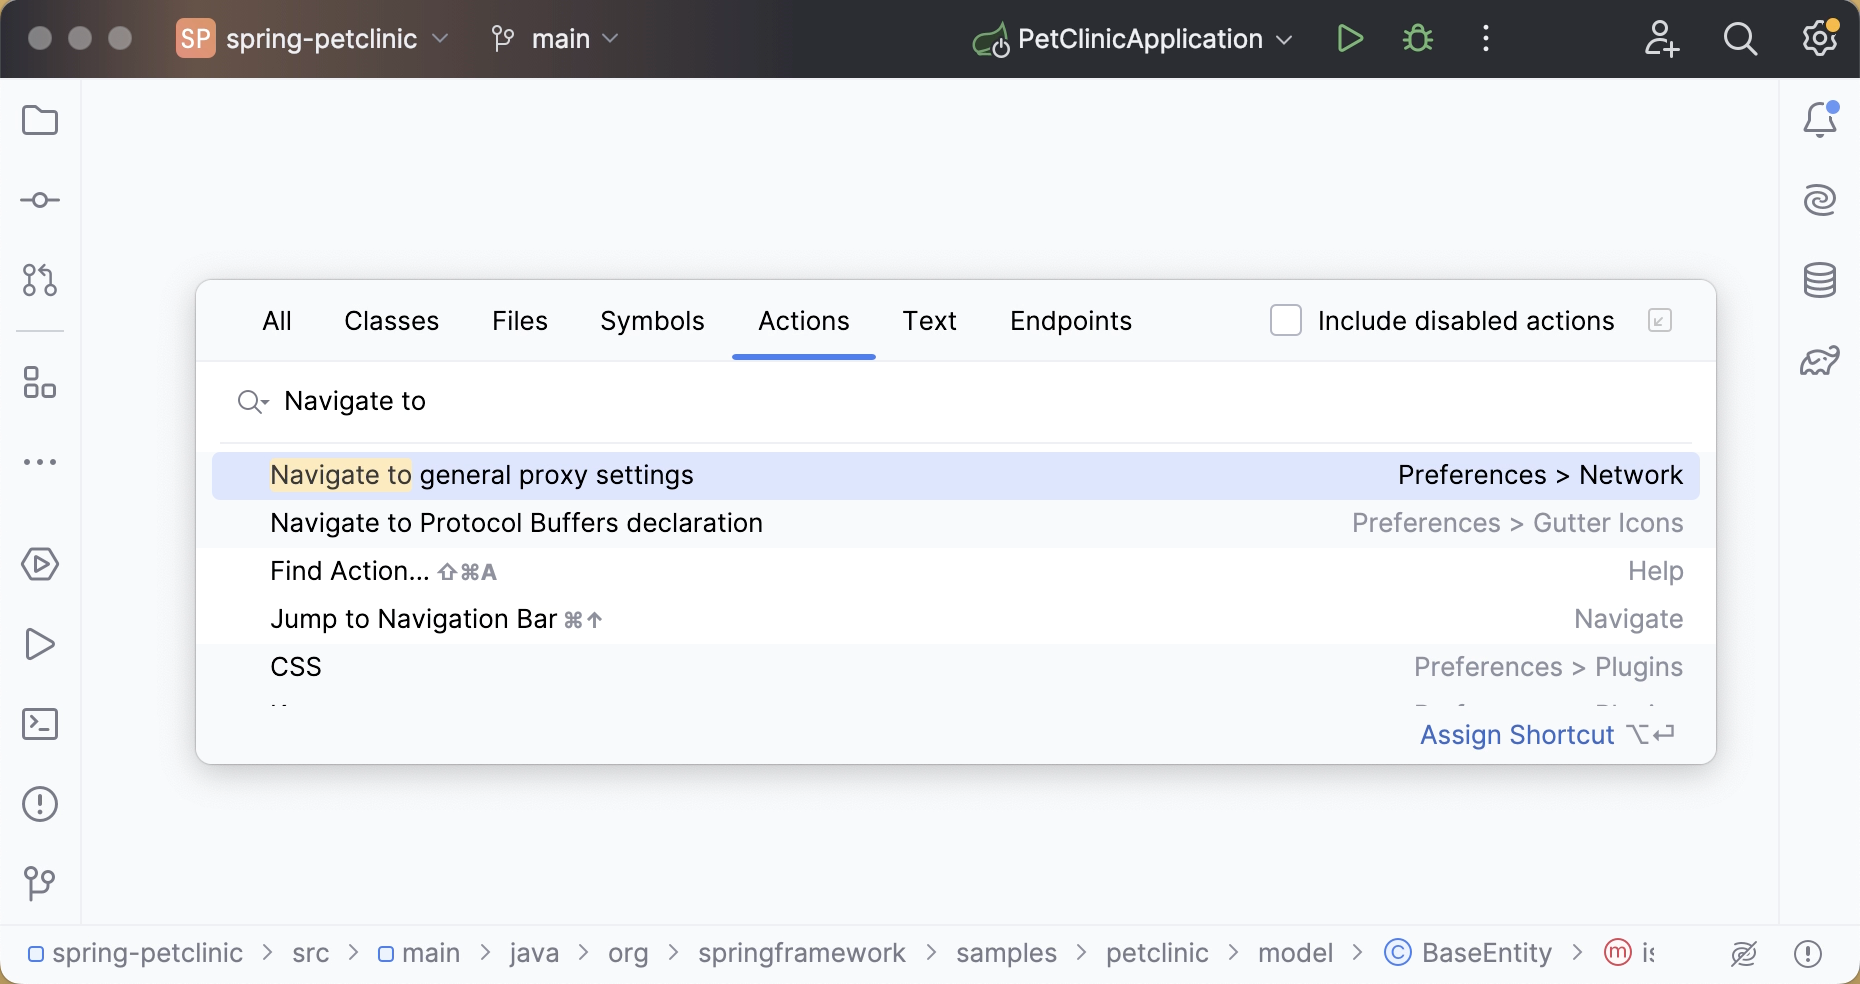
Find action
When you don't know the shortcut for some action, try using the Find action feature available via Ctrl+Shift+A. Start typing to find an action by its name, see its shortcut, or call it:
Coding assistance
Both Eclipse and IntelliJ IDEA provide coding assistance features, such as code completion, code generation, quick-fixes, live templates, and so on.
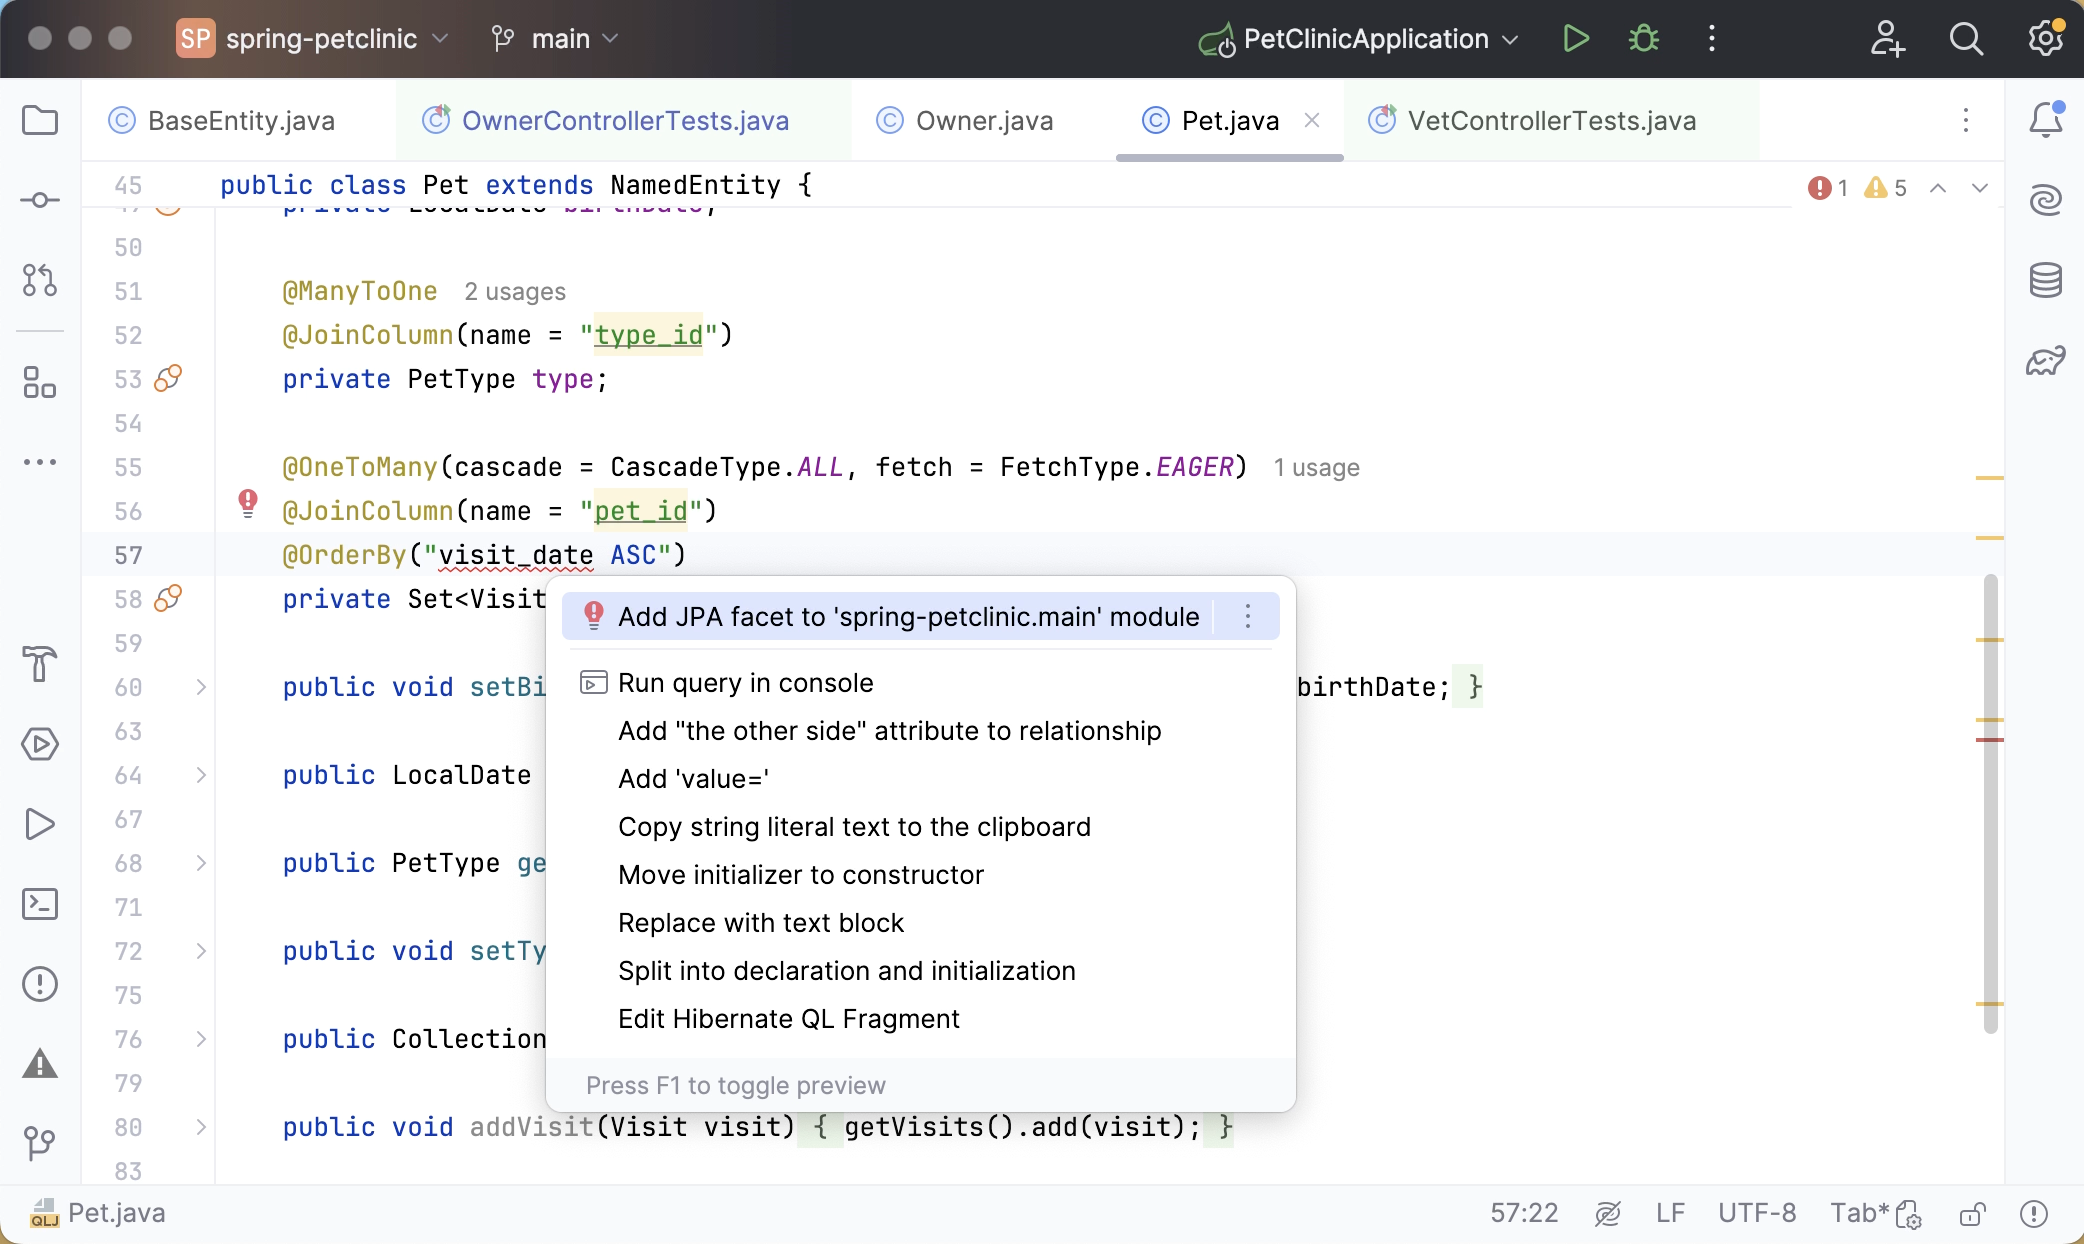
Quick-fixes
To apply a quick-fix in IntelliJ IDEA, press Alt+Enter:
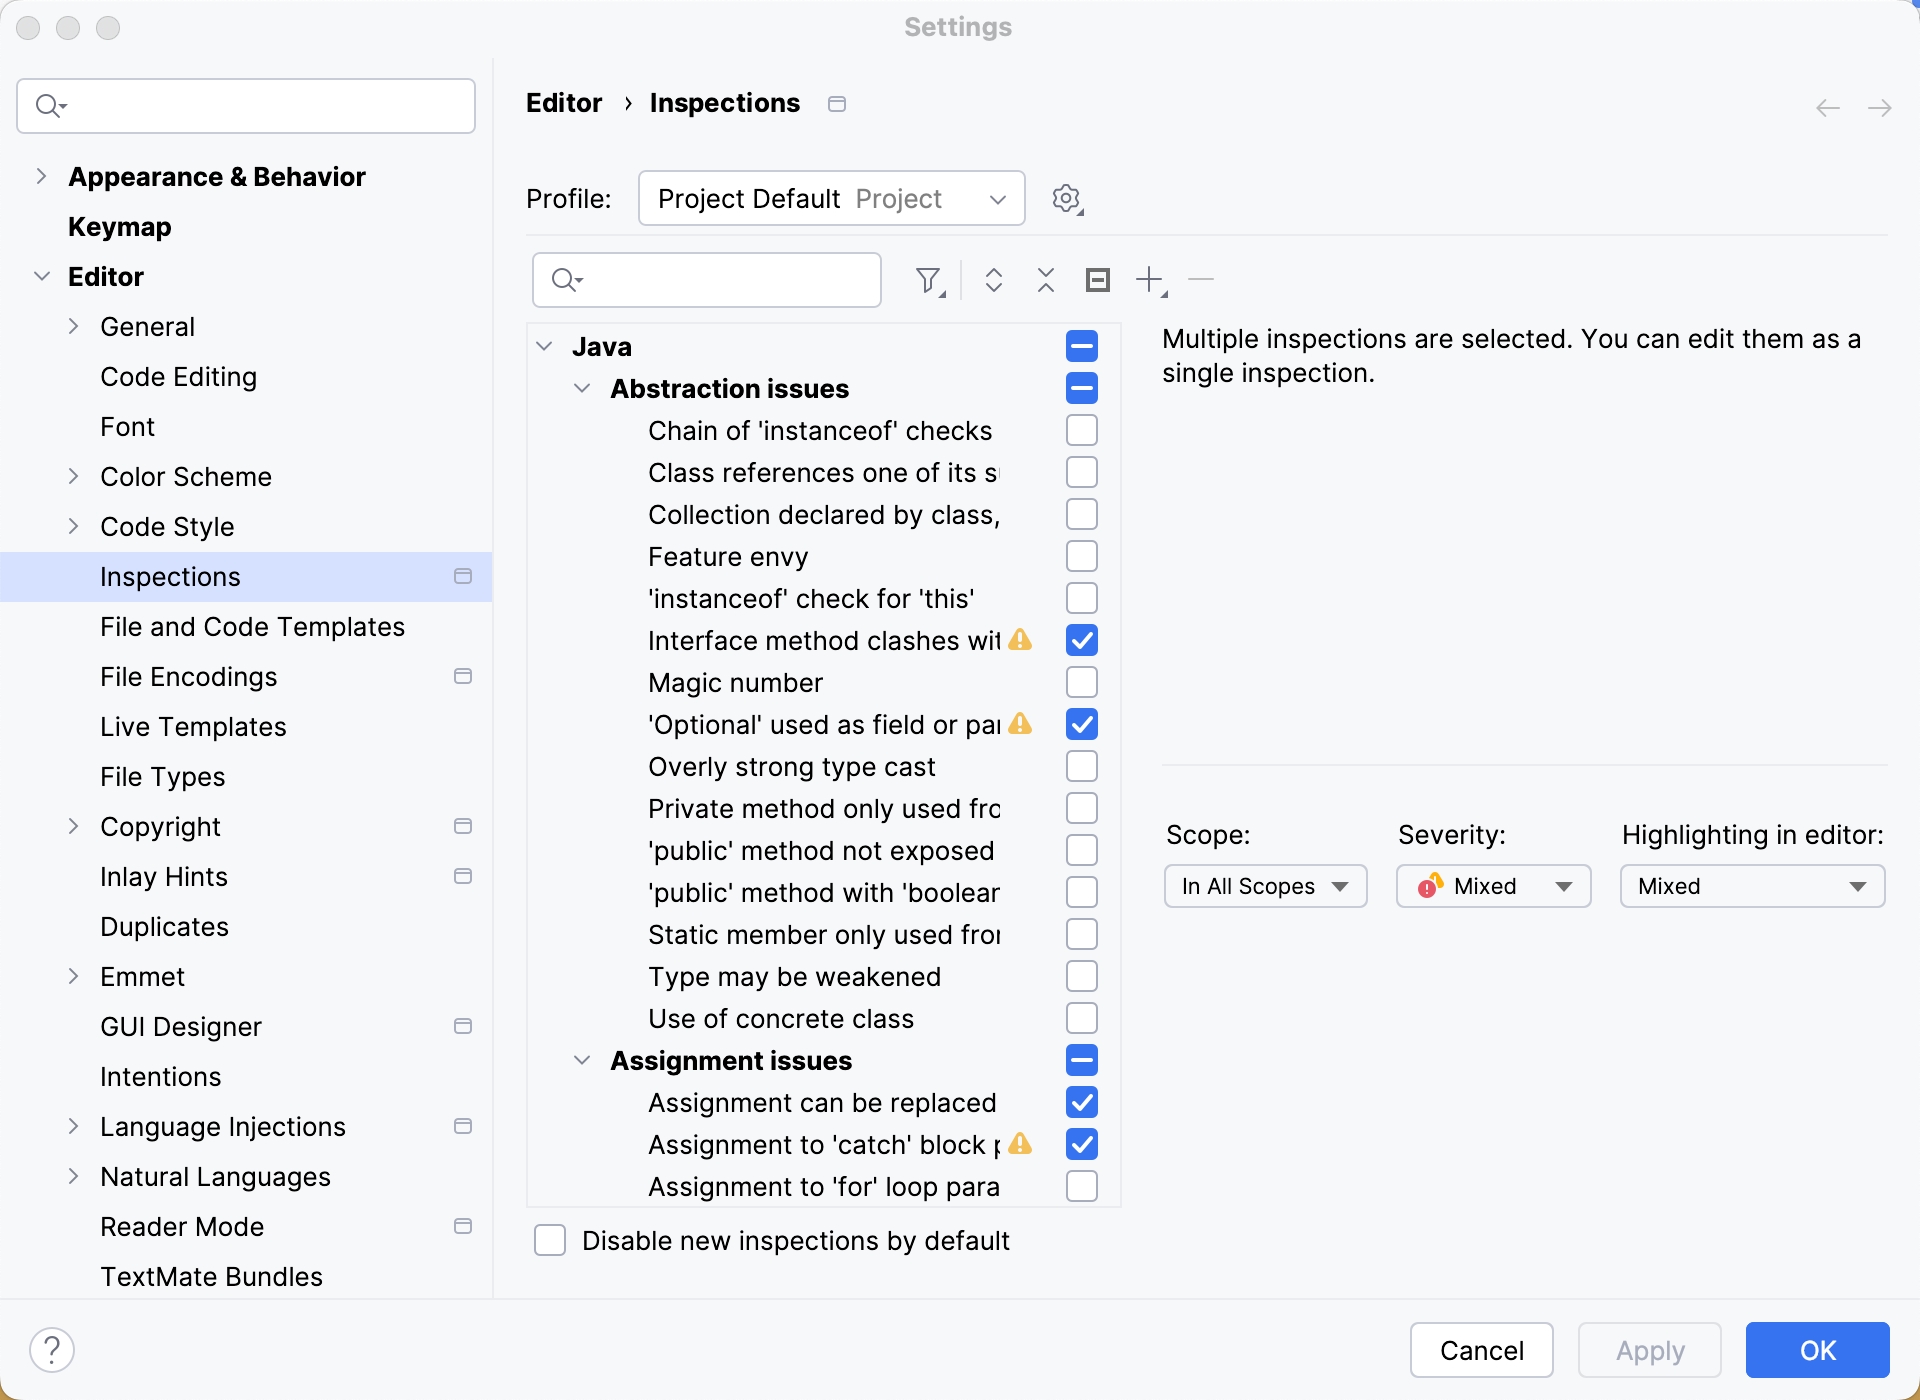
All quick-fixes are based on inspections configured in :
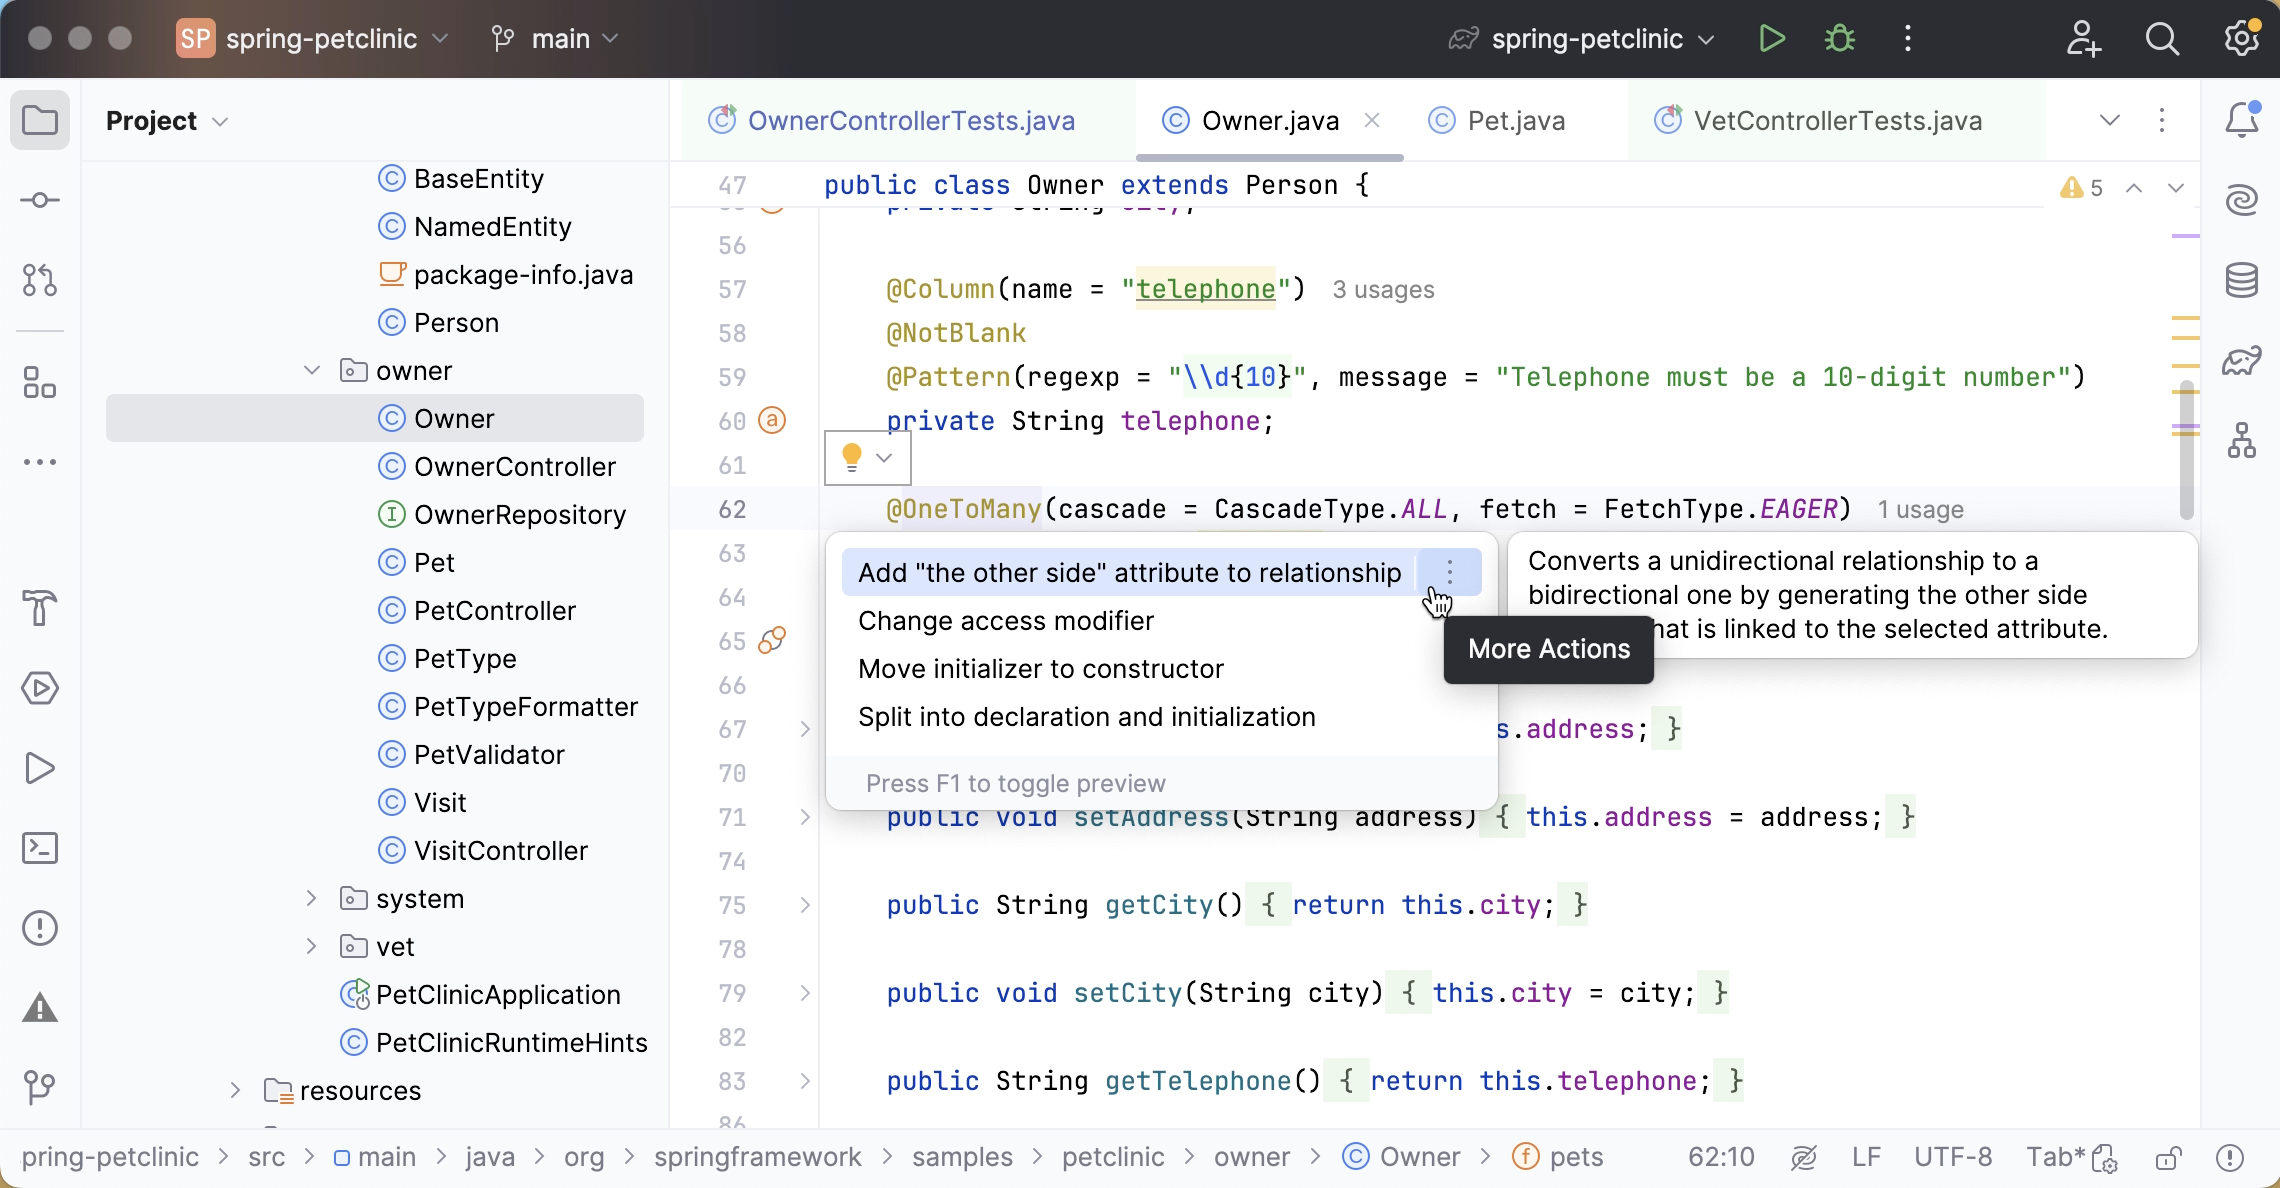
Apart from outright problems, IntelliJ IDEA also recognizes code constructs that can be improved or optimized via the so-called intentions (also available with Alt+Enter):
Eclipse | IntelliJ IDEA | ||
|---|---|---|---|
Action | Shortcut | Action | Shortcut |
Quick fix | Ctrl+1 | Show intention action | Alt+Enter |
Code completion
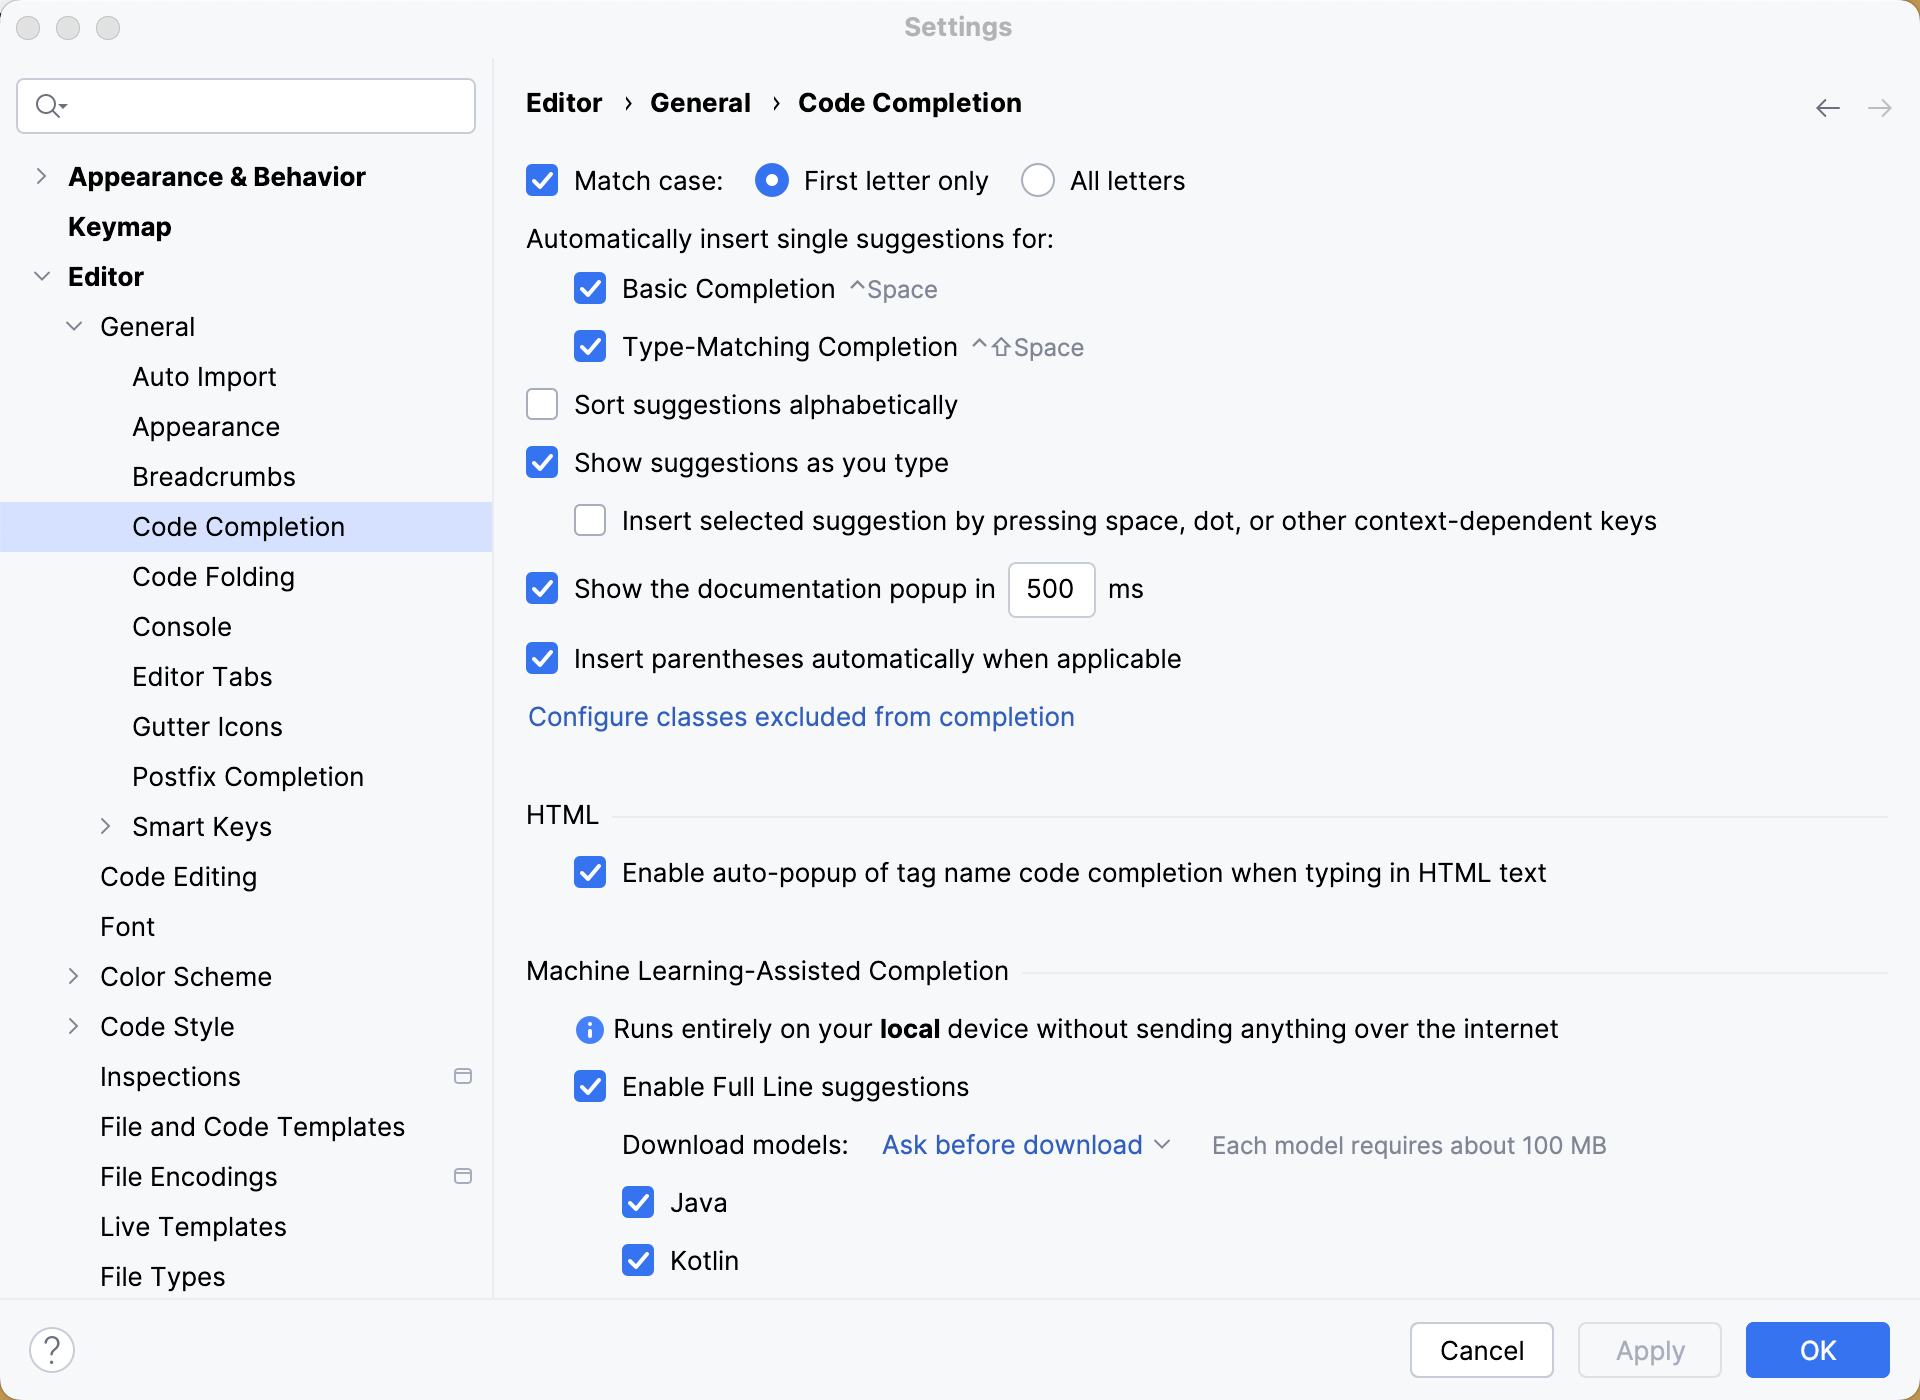
IntelliJ IDEA provides different types of code completion, which include:
Basic completion
Second basic completion
Type-matching completion
Second type-matching completion
Statement completion
For more information about the differences between these completion types, refer to the Code Completion blog post.
Eclipse | IntelliJ IDEA | ||
|---|---|---|---|
Action | Shortcut | Action | Shortcut |
Code completion | Ctrl+Space | Basic completion | Ctrl+Space |
- | - | Type-matching completion | Ctrl+Shift+Space |
- | - | Statement completion | Ctrl+Shift+Enter |
Templates
You may be used to typing main in the editor and then calling code completion to have it transformed into a main method definition. However, IntelliJ IDEA templates are a little different:
Template | Eclipse | IntelliJ IDEA |
|---|---|---|
Define a main method |
|
|
Iterate over an array |
|
|
Iterate over a collection |
|
|
Iterate over a list |
|
|
Iterate over an iterable using foreach syntax |
|
|
Print to System.out |
|
|
Print to System.err |
|
|
Define a static field |
|
|
The list of available templates can be found in . There you can also add your own templates or modify any existing ones.
Postfix templates
In addition to 'regular' templates, IntelliJ IDEA offers the so-called postfix templates. They are useful when you want to apply a template to an expression you've already typed. For instance, type a variable name, add .ifn and press Tab. IntelliJ IDEA will turn your expression into a if (...==null){...} statement.
To see a complete list of available postfix templates, go to .
Surround with live template
The surround with templates is another addition that works similarly to live templates but can be applied to the selected code with Ctrl+Alt+J.
To define your own surround with template, go to and use $SELECTION$ within the template text:
Refactorings
The following table maps the shortcuts for the most common refactorings in Eclipse with those in IntelliJ IDEA:
Eclipse | IntelliJ IDEA | ||
|---|---|---|---|
Action | Shortcut | Action | Shortcut |
Extract local variable | Ctrl+Alt+L | Extract variable | Ctrl+Alt+V |
Assign to field | Ctrl+2 | Extract field | Ctrl+Alt+F |
Show refactor quick menu | Alt+Shift+T | Refactor this | Ctrl+Alt+Shift+T |
Rename | Ctrl+Alt+R | Rename | Shift+F6 |
For more information about many additional refactorings that IntelliJ IDEA offers, refer to Top 20 Refactoring Features in IntelliJ IDEA
Undo
Sometimes, refactorings may affect a lot of files in a project. IntelliJ IDEA not only takes care of applying changes safely, but also lets you revert them. To undo the last refactoring, switch the focus to the Project tool window and press Ctrl+Z.
Search
Below is a map of the most common search actions and shortcuts:
Eclipse | IntelliJ IDEA | ||
|---|---|---|---|
Action | Shortcut | Action | Shortcut |
Open search dialog | Ctrl+H | Find in Files | Ctrl+Shift+F |
References in workspace | Ctrl+Shift+G | Find usages | Alt+F7 |
- | - | Show usages | Ctrl+Alt+F7 |
- | - | Find usages settings | Ctrl+Alt+Shift+F7 |
Occurrences in file | Alt+Ctrl+U | Highlight usages in file | Ctrl+F7 |
Navigation
The table below maps the navigation actions available in Eclipse with those in IntelliJ IDEA:
Eclipse | IntelliJ IDEA | ||
|---|---|---|---|
Action | Shortcut | Action | Shortcut |
Quick access | Ctrl+3 | Search everywhere | Double Shift |
Open type | Ctrl+Shift+T | Navigate to class | Ctrl+N |
Open resource | Ctrl+Shift+R | Navigate to file | Ctrl+Shift+N |
- | - | Navigate to symbol | Ctrl+Alt+Shift+N |
Quick switch editor | Ctrl+E | Switcher | Ctrl+Tab |
- | - | Recent files | Ctrl+E |
Open declaration | F3 | Navigate to declaration | Ctrl+B |
Open type hierarchy | F4 | Navigate to type hierarchy | Ctrl+H |
- | - | Show UML popup | Ctrl+Alt+U |
Quick outline | Ctrl+O | File structure popup | Ctrl+F12 |
Outline view | Alt+Shift+Q, O | File structure tool window | Alt+7 |
Back | Ctrl+[ | Back | Ctrl+Alt+Left |
Forward | Ctrl+] | Forward | Ctrl+Alt+Right |
Later, when you get used to these navigation options and need more, refer to Top 5 Navigation Keyboard Shortcuts in IntelliJ IDEA Shortcuts.
Call hierarchy
Both IntelliJ IDEA and Eclipse provide features that allow you to examine the hierarchy and explore the structure of source files. For example, the Call Hierarchy feature shows you all the callers and callees of the selected method.
In Eclipse, you access it by pressing Ctrl+Alt+H. In IntelliJ IDEA, use the Ctrl+Alt+H shortcut.
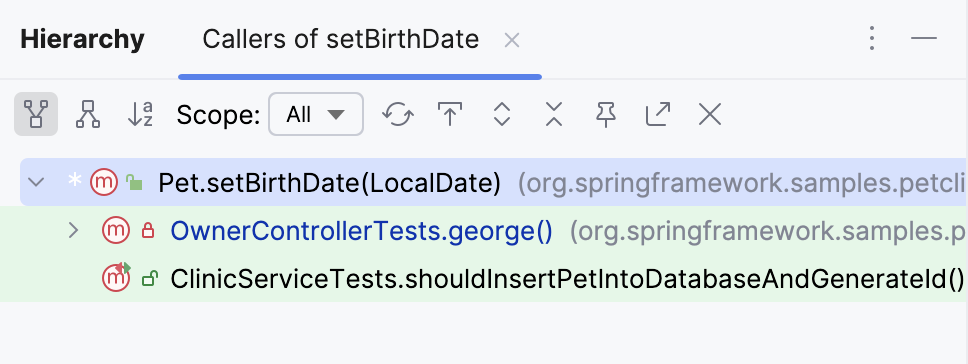
Apart from call hierarchies, IntelliJ IDEA can also build method hierarchies (Ctrl+Shift+H) and type hierarchies (Ctrl+H). You can find more information in Source code hierarchy.
Code formatting
IntelliJ IDEA code formatting rules (available via ) are similar to those in Eclipse, with some minor differences. You may want to take note of the fact that the Use tab character option is disabled by default, the Indent size may be different, etc.
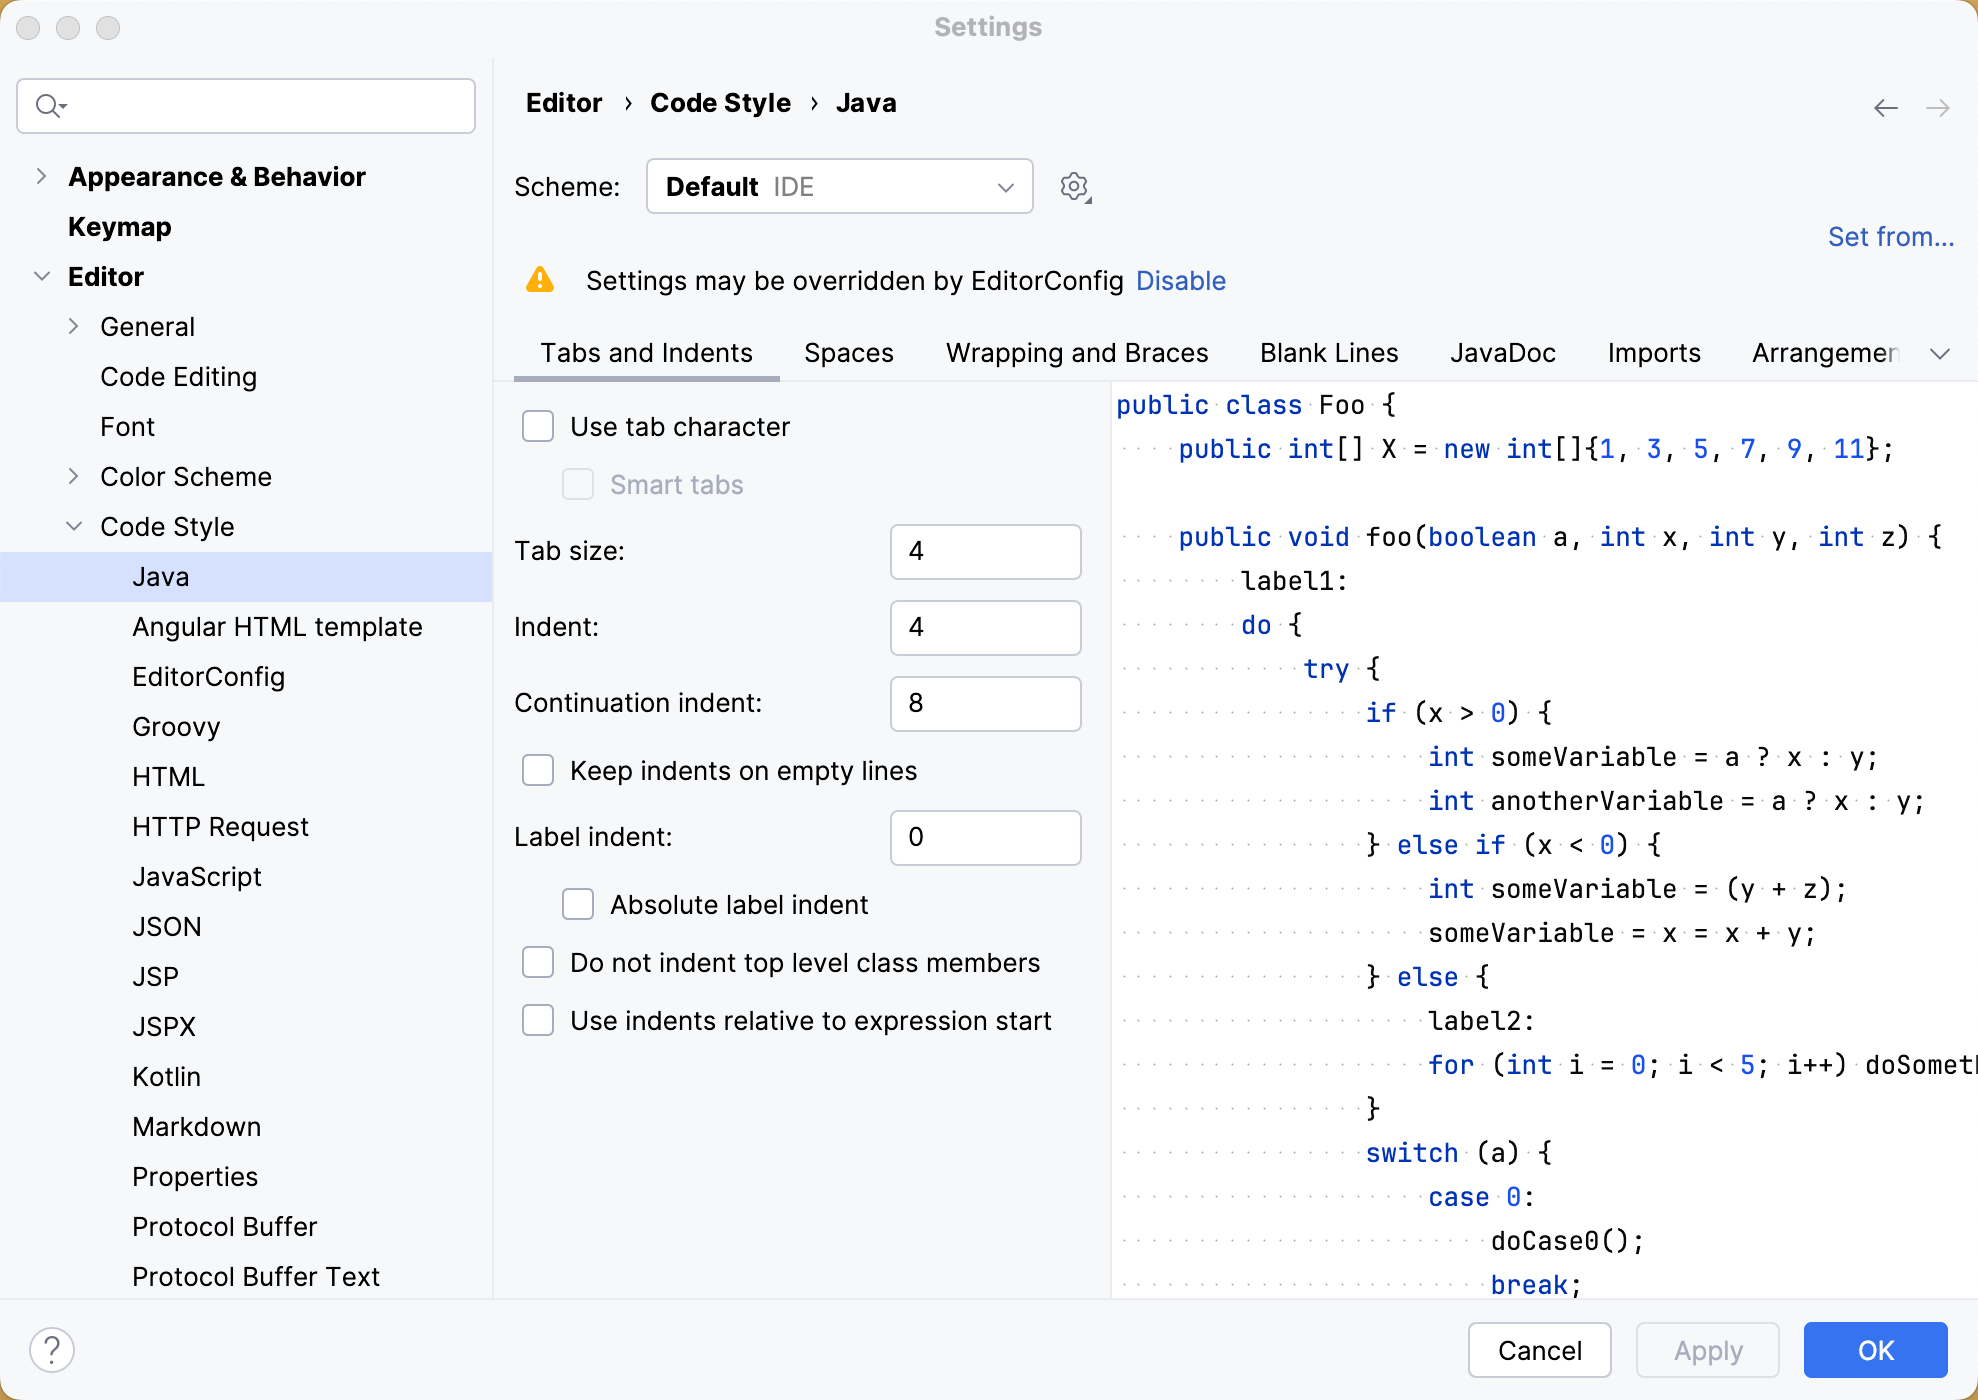
If you would like to import your Eclipse formatter settings, go to , click , click Import Scheme and select the exported Eclipse formatter settings (an XML file).
Note that there may be some discrepancies between the code style settings in IntelliJ IDEA and Eclipse. For example, you cannot tell IntelliJ IDEA to put space after (but not before). If you want IntelliJ IDEA to use the Eclipse formatter, consider installing the Eclipse code formatter plugin.
Eclipse | IntelliJ IDEA | ||
|---|---|---|---|
Action | Shortcut | Action | Shortcut |
Format | Ctrl+Shift+F | Reformat code | Ctrl+Alt+L |
Run and reload changes
Similarly to Eclipse, IntelliJ IDEA also has Run/debug configurations dialog that you can access either from the main toolbar, or the main menu. Compare the related shortcuts:
Eclipse | IntelliJ IDEA | ||
|---|---|---|---|
Action | Shortcut | Action | Shortcut |
Run | Ctrl+Shift+F11 | Run | Shift+F10 |
Debug | Ctrl+F11 | Debug | Shift+F9 |
- | - | Make | Ctrl+F9 |
- | - | Update application | Ctrl+F10 |
As mentioned before, by default IntelliJ IDEA doesn't compile changed files automatically (unless you configure it to do so). That means the IDE doesn't reload changes automatically. To reload changed classes, call the Build action explicitly via Ctrl+F9. If your application is running on a server, in addition to reloading you can use the Update application action via Ctrl+F10:
Debug
The debuggers in Eclipse and IntelliJ IDEA are similar but use different shortcuts:
Eclipse | IntelliJ IDEA | ||
|---|---|---|---|
Action | Shortcut | Action | Shortcut |
Step into | F5 | Step into | F7 |
- | - | Smart step into | Shift+F7 |
Step over | F6 | Step over | F8 |
Step out | F7 | Step out | Shift+F8 |
Resume | F8 | Resume | F9 |
Toggle breakpoint | Ctrl+Shift+B | Toggle breakpoint | Ctrl+F8 |
Evaluate expression | Ctrl+Shift+I | Evaluate expression | Alt+F8 |
Application servers
Deploying to application servers in IntelliJ IDEA is more or less similar to what you are probably used to in Eclipse.
Deploy your application to a server
Configure your artifacts via Project Structure | Artifacts (done automatically for Maven and Gradle projects).
Configure an application server via Settings | Application Servers.
Create a run configuration and then specify the artifacts to deploy and the server to deploy to.
For more information, refer to Application servers.
Build and rebuild your artifacts via .
Build tools
IntelliJ IDEA doesn't provide visual forms for editing Maven and Gradle configuration files. Once you've imported or created your Maven or Gradle project, you can edit its pom.xml or build.gradle files directly in the editor. Later, you can synchronize the project model with the changed files on demand, or automatically import changes to the new build files. Any changes to the underlying build configuration will eventually need to be synced with the project model in IntelliJ IDEA.
For operations specific to Maven or Gradle, IntelliJ IDEA provides the Maven Project tool window and the Gradle tool window. Apart from your project structure, these tool windows provide a list of goals or tasks plus a toolbar with the relevant actions.
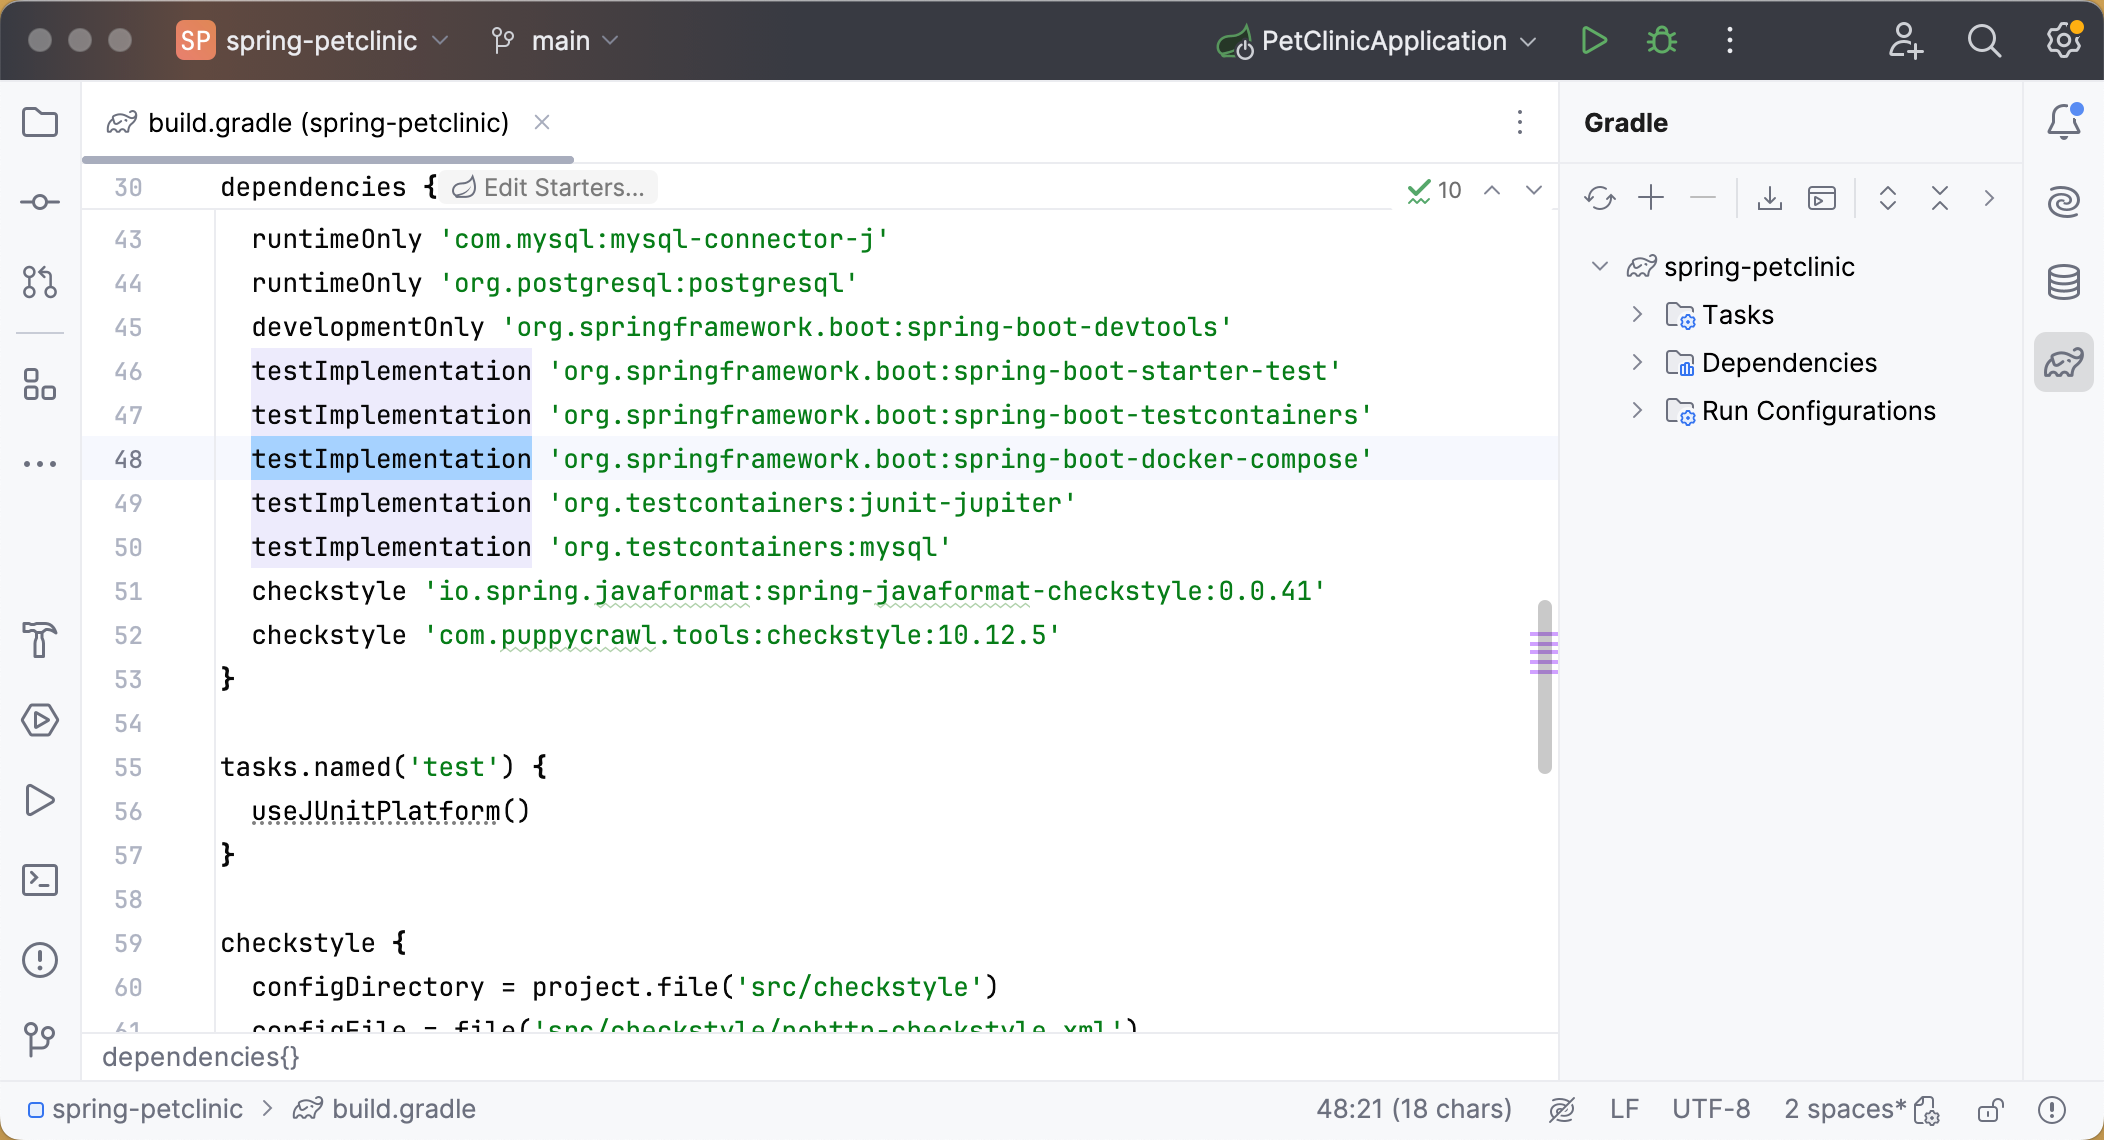
For manual synchronization, use the corresponding action on the Maven or Gradle tool window toolbar: .
Run goals/tasks
Use the Maven or Gradle tool window to run any project goal or task. When you do, IntelliJ IDEA creates the corresponding run configuration, which you can reuse later to run the goal or task quickly.
It's worth mentioning that any goal or task can be attached to a run configuration. This may be useful when your goal or task generates specific files needed by the application.
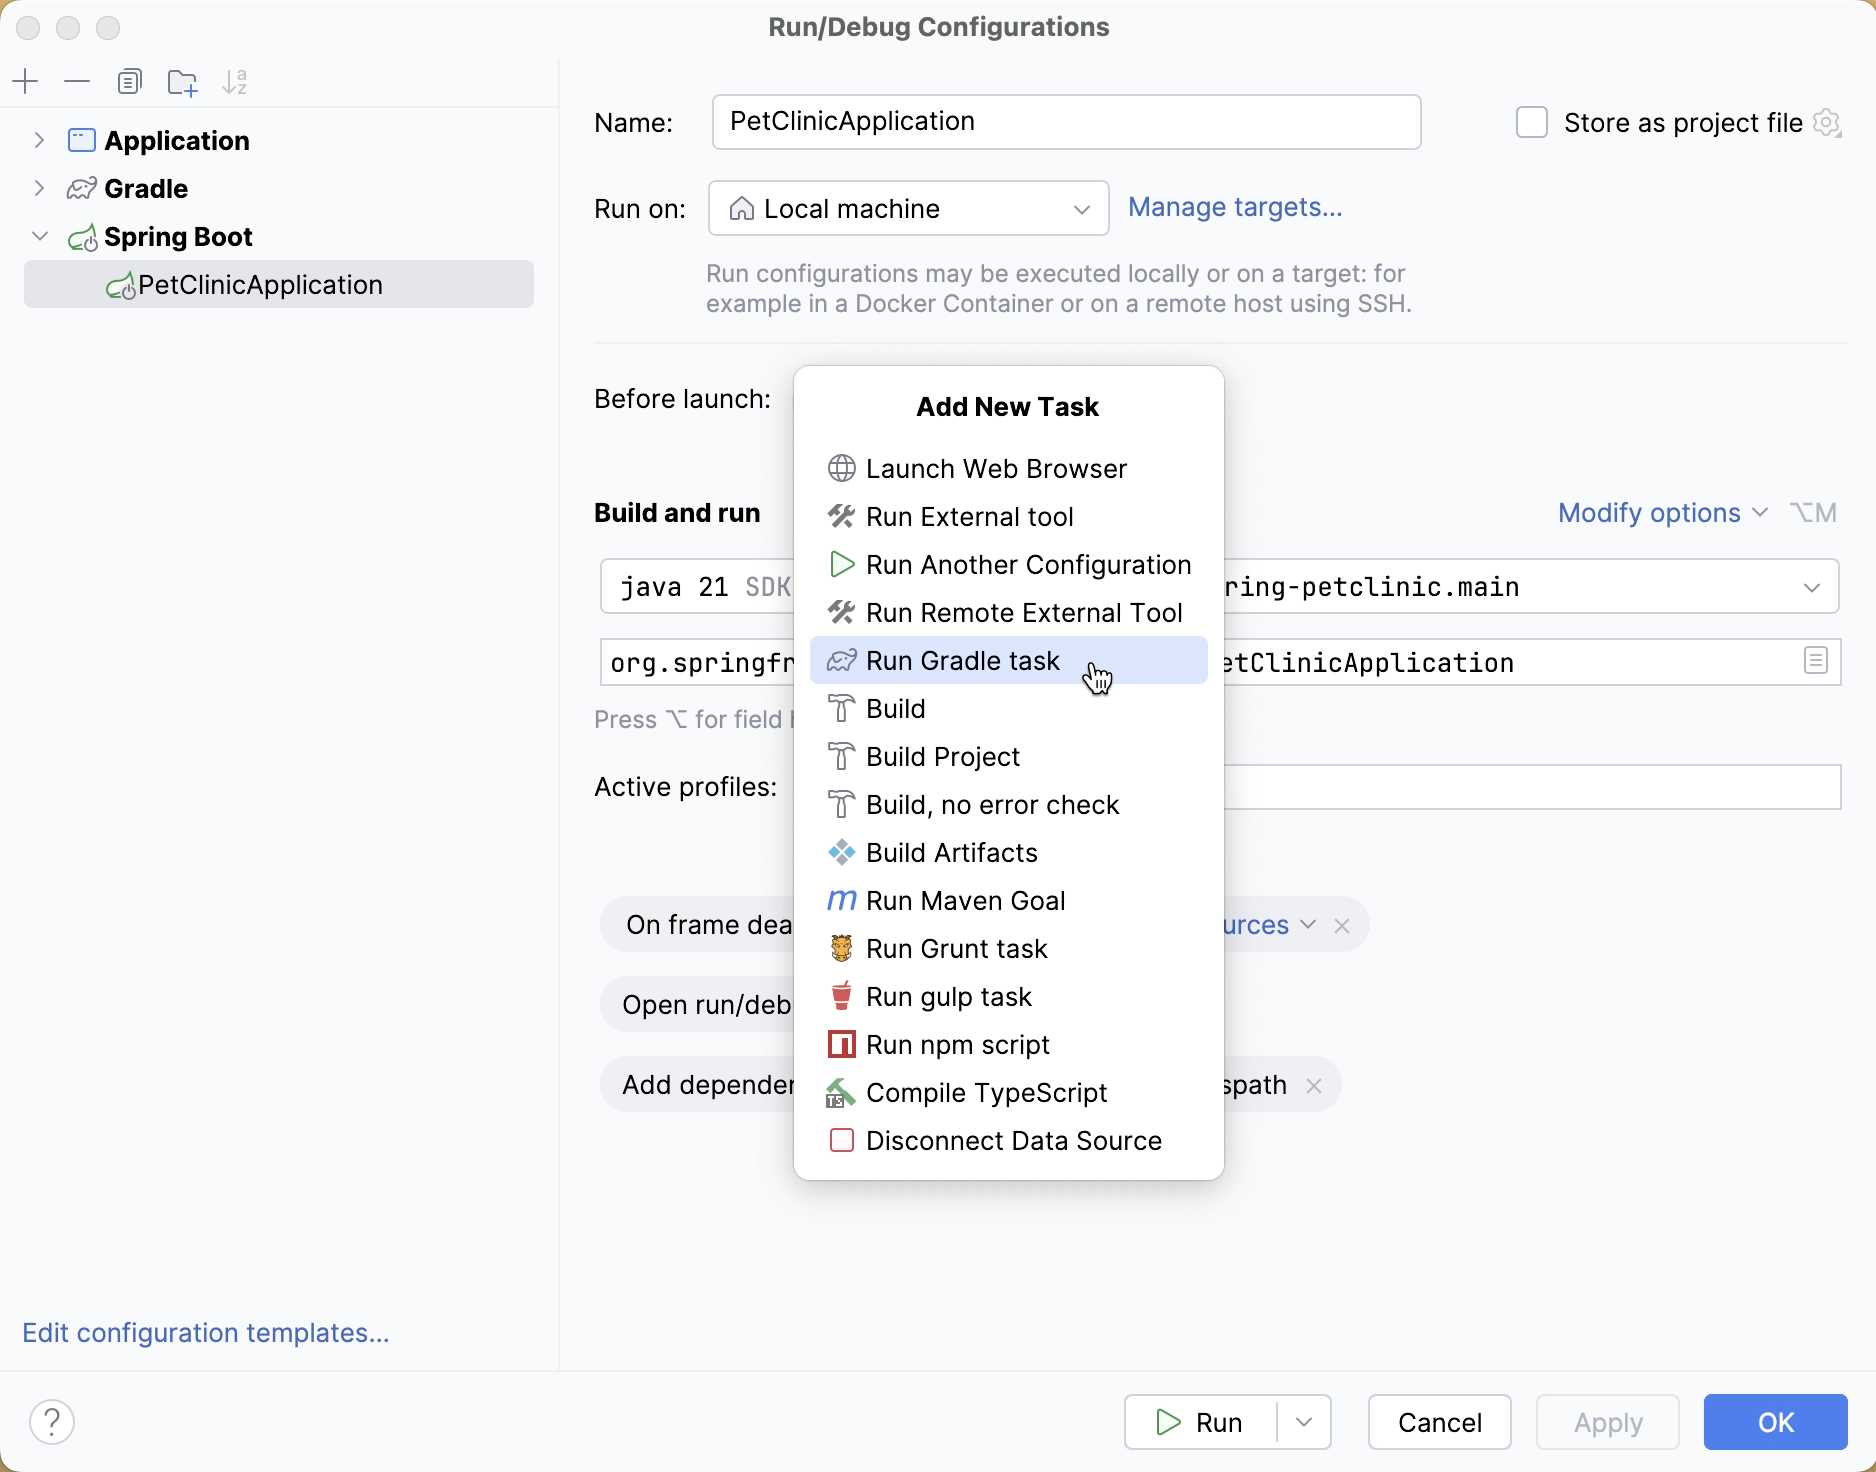
Both the Maven and Gradle tool windows provide the Run Task action. It runs a Maven or Gradle command similarly to how you'd run it using the console.
Configure artifacts
If you have a WAR artifacts configured in your pom.xml or build.gradle file, IntelliJ IDEA automatically configures the corresponding artifacts in .
Note that when you compile your project or build an artifact, IntelliJ IDEA uses its own build process which may be faster but is not guaranteed to be 100% accurate. If you notice inconsistent results when compiling your project with Build in IntelliJ IDEA, try using a Maven goal or a Gradle task instead.
Version control systems
IntelliJ IDEA supports Git, Mercurial, Subversion, Perforce and other version control systems (VCS).
Configure VCS roots
When you open a project located under a VCS root, IntelliJ IDEA automatically detects this root and suggests adding it to the project settings.
To change version control-related project settings (or manually add a VCS root), go to Settings | Version Control.
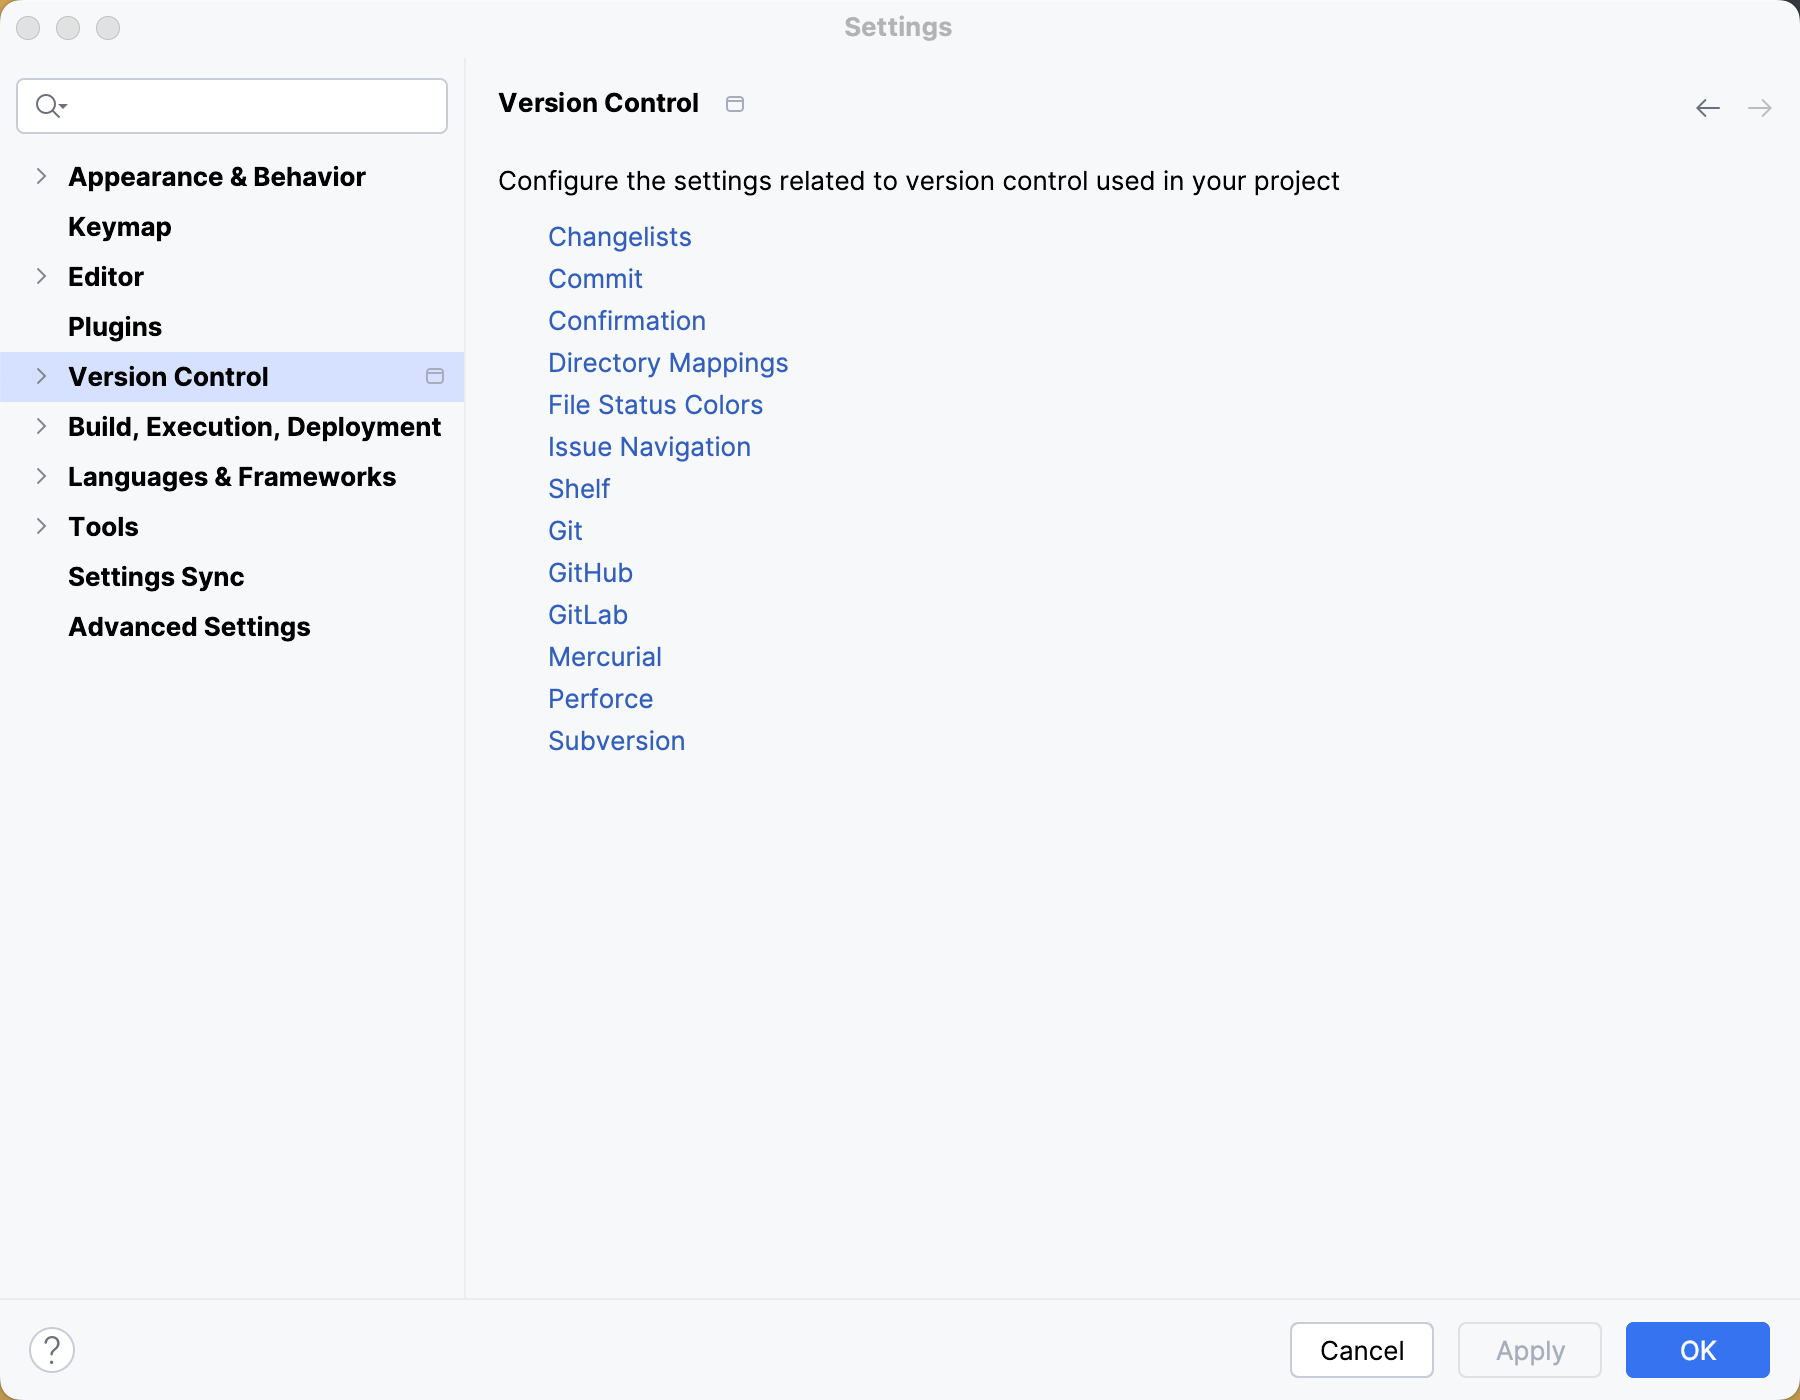
IntelliJ IDEA works perfectly with multi-repository projects. Just map your project directories to VCS, and the IDE will take care of the rest. For Git and Mercurial, the IDE will even offer you synchronized branch control, so that you can perform branch operations on multiple repositories simultaneously. For more information, refer to Manage Git branches.
Edit VCS settings
Every VCS may require specific settings, for example, Path to Git executable, GitHub/Perforce credentials, and so on:
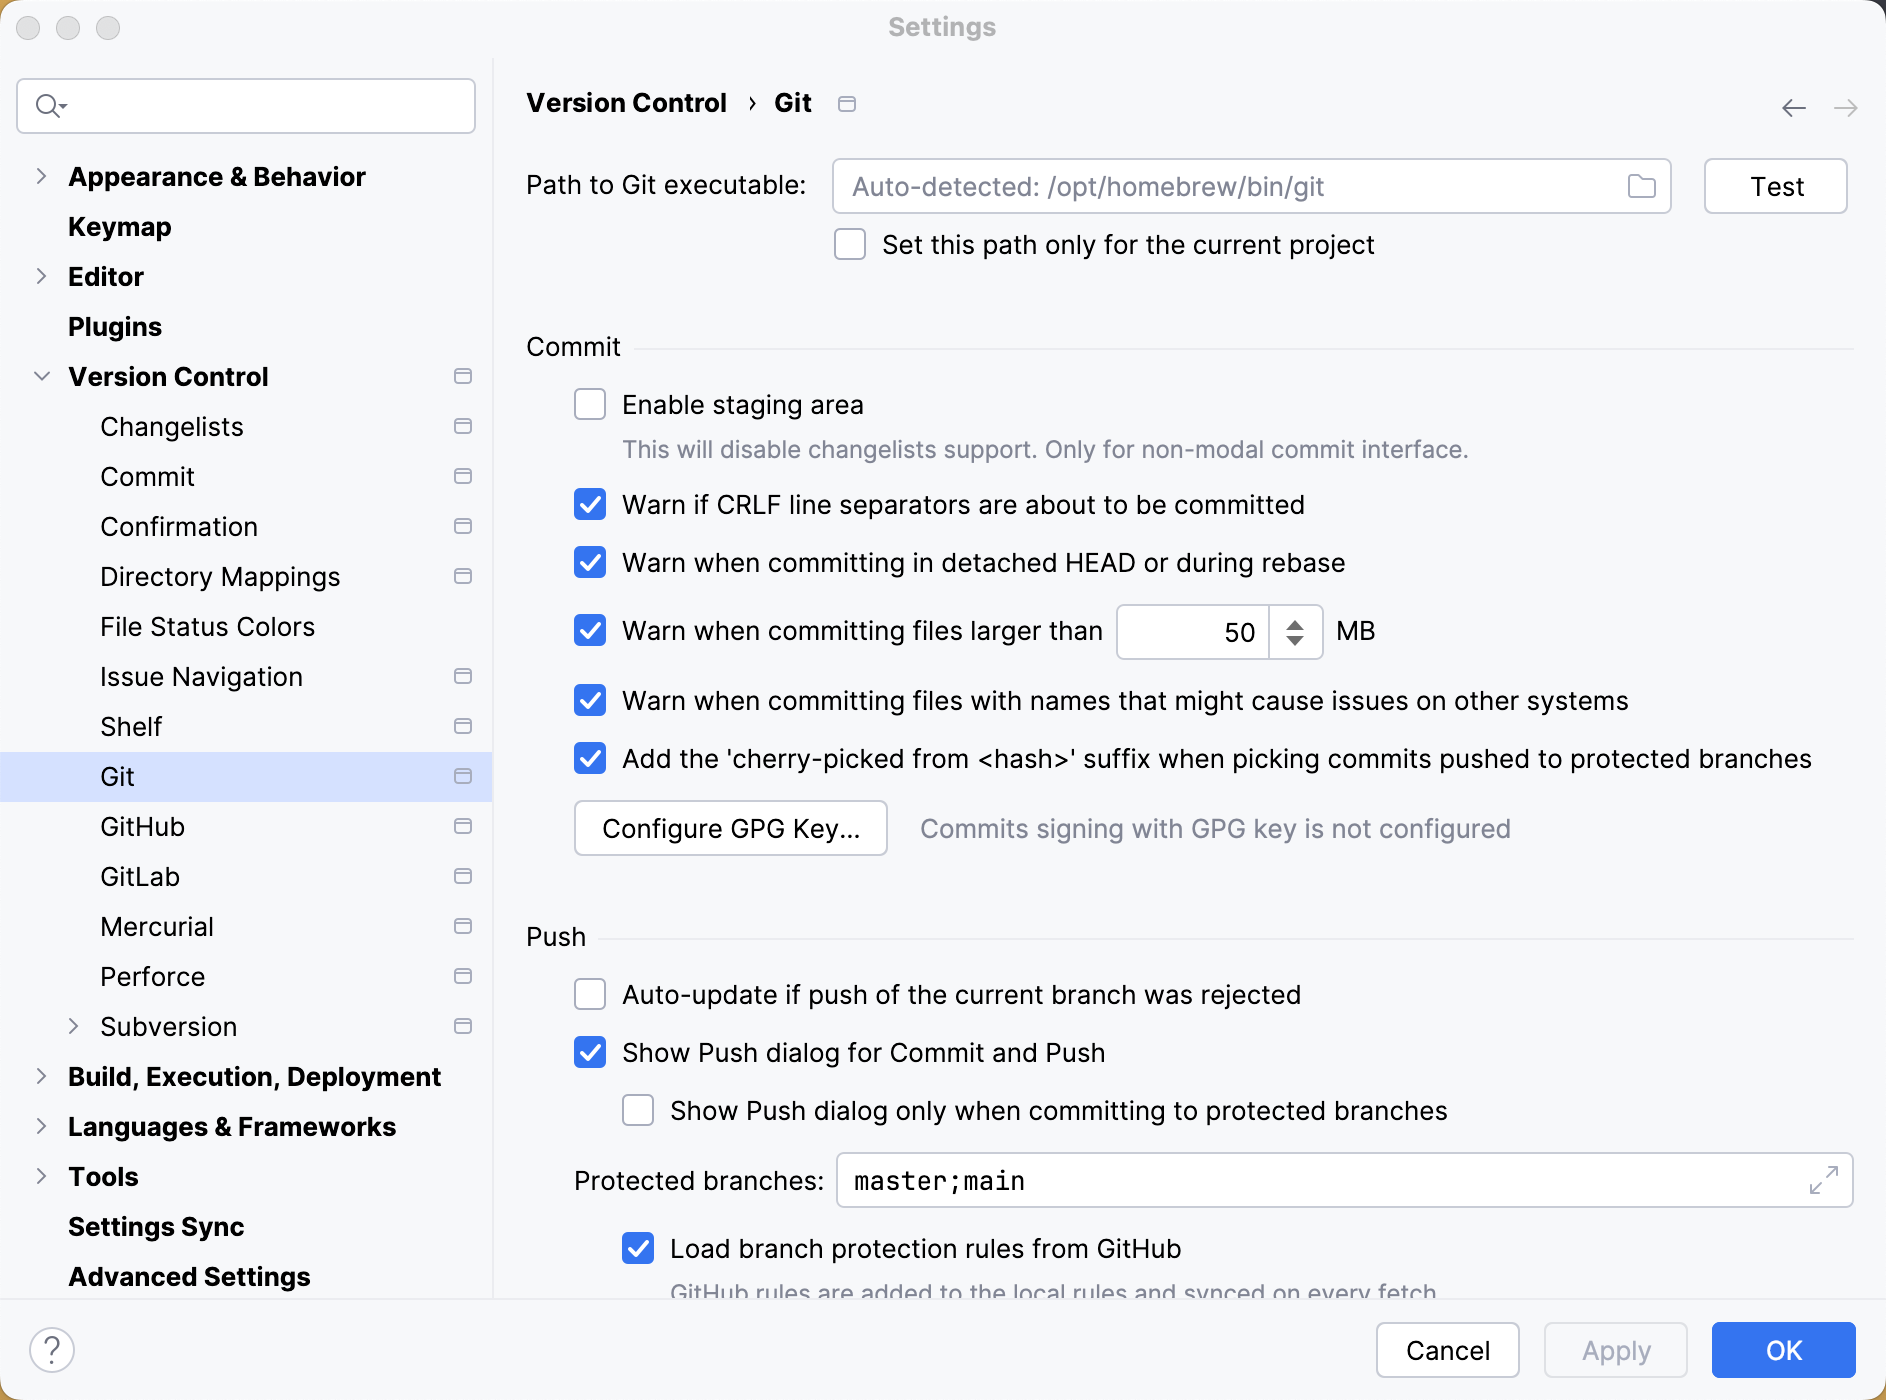
Once you've configured the VCS settings, you'll see the Version Control tool window Alt+9.
Checking projects out
To check out a project from a VCS, click Get from Version Control on the Welcome Screen, or in the main VCS menu.
Working with local changes
The Commit window shows your local changes: both staged and unstaged. To simplify managing changes, all changes are organized into changelists. Any changes made to source files are automatically included in the active changelist. You can create new changelists, delete the existing ones (except for the Changes one), and move files between changelists.

Right-click the unversioned file or folder you want to ignore in the Local Changes tab of the Version Control tool window Alt+9 or in Project tool window and select or .
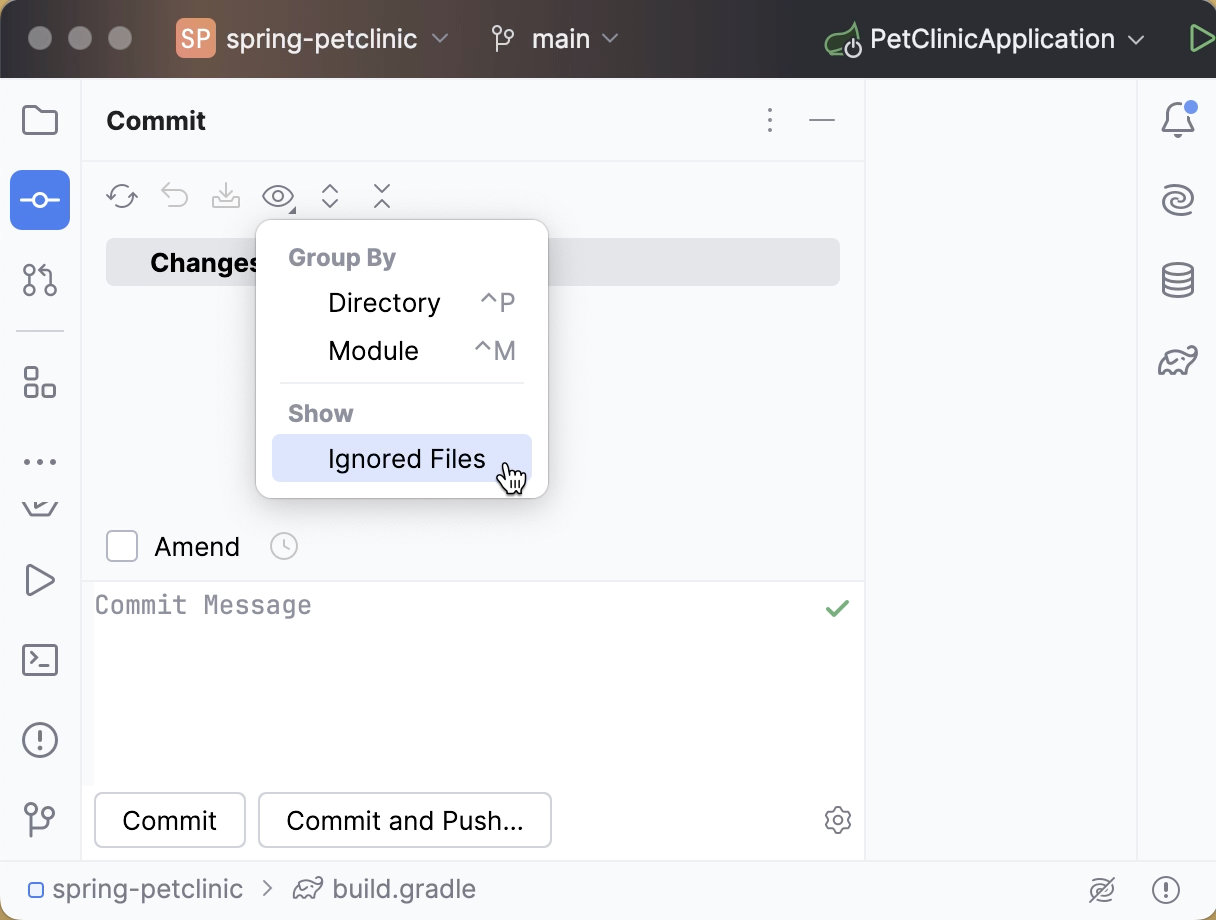
If you want ignored files to be also displayed in the Local Changes view, click on the toolbar and select Ignored Files.
Working with history
The Log tab of the Git tool window lets you see and search through the history of commits. You can sort and filter commits by the repository, branch, user, date, folder, or even a phrase in the description. You can find a particular commit, or just browse through the history and the branch tree:

Working with branches
IntelliJ IDEA lets you create, switch, merge, compare and delete branches. To access these operations, you can click the Git widget with the name of the branch that is currently checked out:
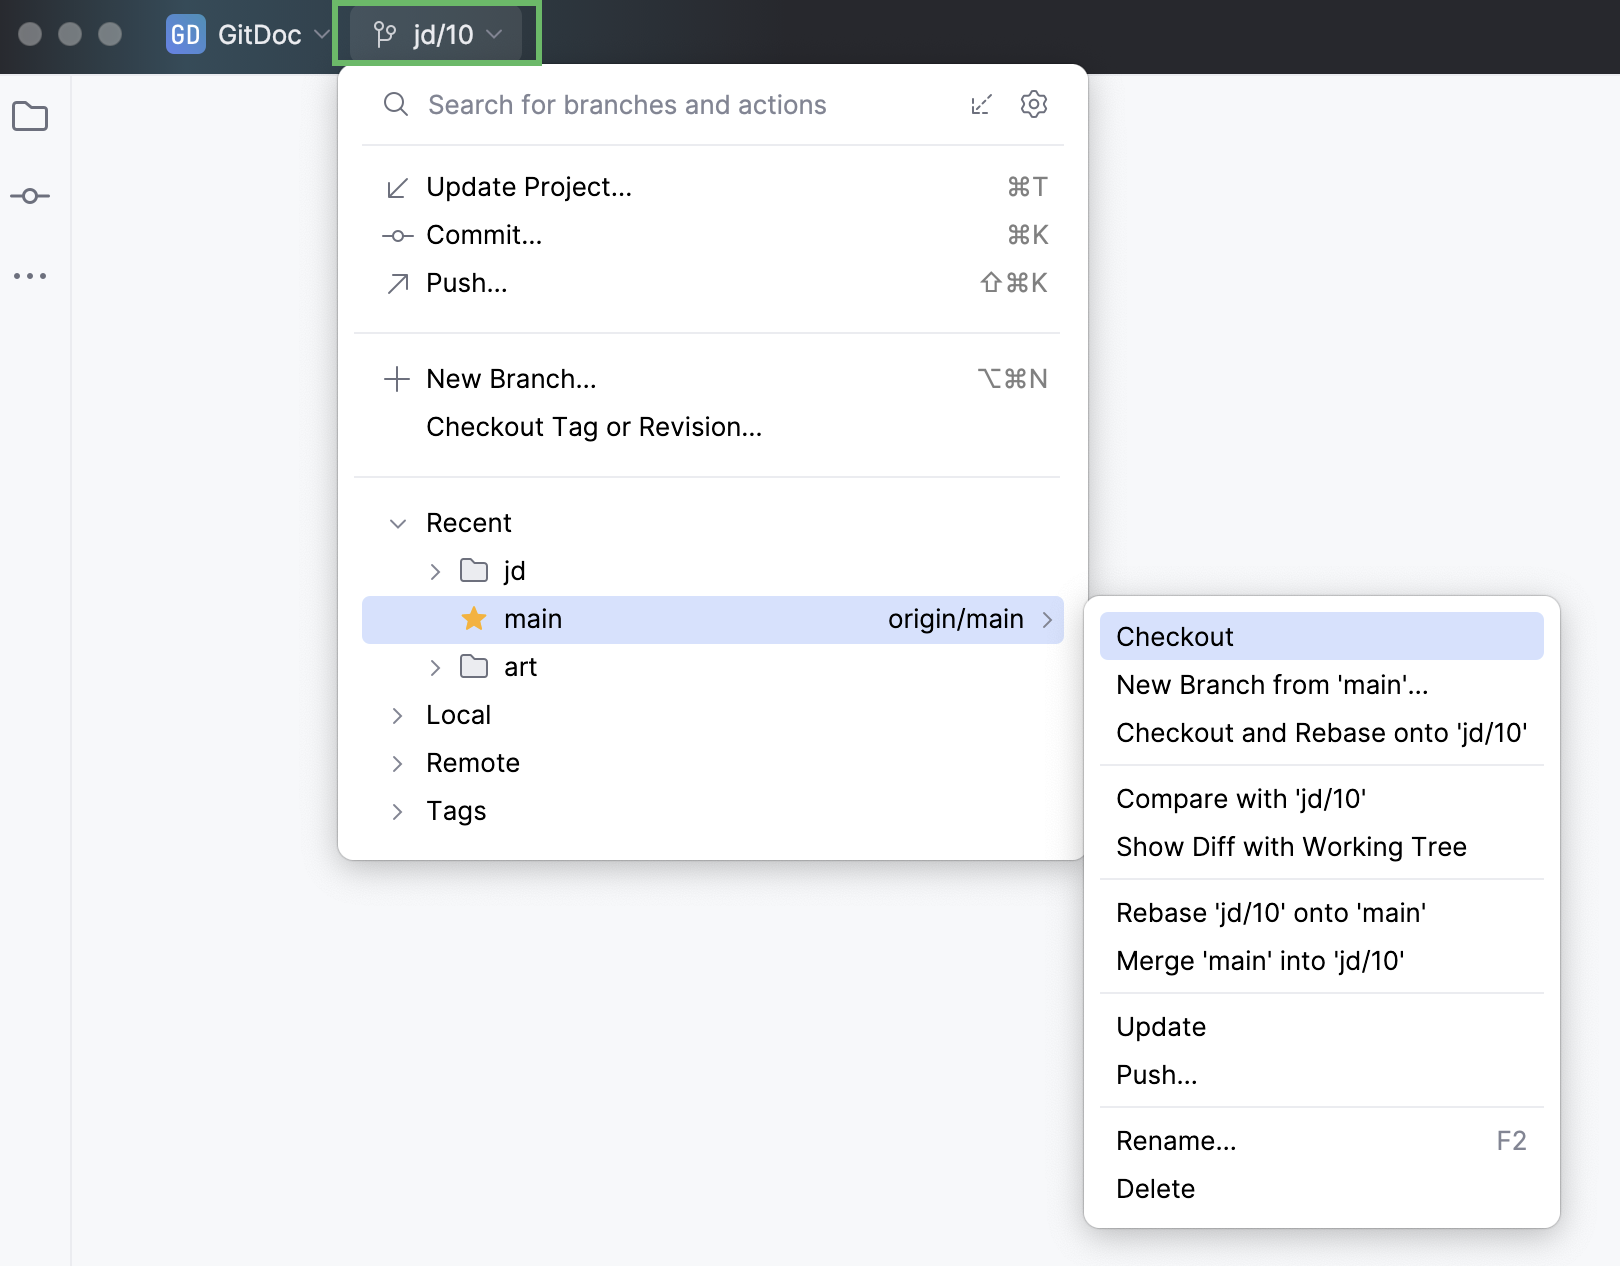
All VCS operations are available from the VCS main menu:
Action | Shortcut |
|---|---|
Version Control tool window | Alt+9 |
VCS operations popup | Alt+` |
Commit changes | Ctrl+K |
Update project | Ctrl+T |
Push commits | Ctrl+Shift+K |