Create and run your first Django project
Enable the Django plugin
This functionality relies on the Django plugin, which is bundled and enabled in PyCharm by default. If the relevant features are not available, make sure that you did not disable the plugin.
Press Ctrl+Alt+S to open settings and then select .
Open the Installed tab, find the Django plugin, and select the checkbox next to the plugin name.
In this tutorial, we will create a basic to-do application.
Before you start
Make sure that the following prerequisites are met:
You are working with PyCharm version 2022.2 or later. If you still do not have PyCharm, download it from this page. To install PyCharm, follow the instructions, depending on your platform.
This tutorial has been created with the following assumptions:
Python 3.11
Django 4.2.
Creating a new project
Go to , or click the New Project button in the Welcome screen. The New Project dialog opens.

In the New Project dialog, do the following:
Specify project type Django.
If required, change the default project location.
Keep the default Project venv interpreter type.
Click
 More Settings, and specify todo in the Application name field.
Click Create.
Exploring project structure
The newly created project contains Django-specific files and directories.
The structure of the project is visible in the Project tool window (Alt+1):

myDjangoProject directory is a container for your project. It is denoted with bold font.
The nested directory myDjangoProject is the actual Python package for your project.
myDjangoProject/__init__.py: This empty file tells Python that this directory should be considered a Python package.
myDjangoProject/settings.py: This file contains configuration for your Django project.
myDjangoProject/urls.py: This file contains the URL declarations for your Django project.
myDjangoProject/wsgi.py: This file defines an entry-point for WSGI-compatible web servers to serve your project. For more information, refer to How to deploy with WSGI.
templates directory is by now empty. It will contain Django templates.
The nested directory todo contains all the files required for developing a Django application:
Again, todo/_init_.py tells Python that this directory should be considered a Python package.
todo/models.py: In this file, we'll create models for our application.
todo/views.py: In this file, we'll create views.
The nested directory migrations contains by now only the package file _init_.py, but will be used in the future to propagate the changes you make to your models (adding a field, deleting a model, and so on) into your database schema. Read the migrations description here.
manage.py is a command-line utility that lets you interact with your Django project. For more information, refer to the Django documentation.
Launching Django server
The Django server run/debug configuration is created automatically. If required, you can edit it by selecting the Edit Configurations command in the run/debug configuration list on the main toolbar:

For example, you can choose to open a browser window automatically when the configuration is launched:

Run the myDjangoProject configuration by clicking ![]() . If a browser window does not open automatically, click the link in the Run tool window.
. If a browser window does not open automatically, click the link in the Run tool window.
The following page opens:

Creating a model
Django models define the fields and behaviors of your data. They are represented by Python classes, which are subclasses of the django.db.models.Model class.
Let's create a ToDoItem model for our to-do app. To do that, open todo/models.py, and fill it with the following code:
The model has two class variables represented by instances of field classes:
text: an instance of theCharFieldclass, we will use it to store the description of what should be done.due_date: an instance of theDateFieldclass, we will use it to store the deadline for the to-do.
For more information about model fields, refer to the Django documentation.
Running migrations
By default, PyCharm automatically creates an SQLite database for a Django project. We need to create tables in the database for the todo application and the ToDoItem model. In Django, that's done by using migrations. Migrations are human-editable files, in which changes to data models are stored.
Do one of the following:
In the main menu, go to
Press Ctrl+Alt+R
Open the terminal (Alt+F12), click
 New Predefined Session in the Terminal tool window toolbar and select manage.py.

The manage.py utility starts in a terminal tab.
Type
makemigrationsfollowed by Enter.You should see
Process finished with exit code 0in the console output. The todo/migrations directory now contains the migration file 0001_initial.py:
Type
migrateand press Enter to apply changes and create tables in the database for the two new models:
Writing a view
Django views are functions or classes that specify how web requests are processed and which web responses are returned. By convention, views are defined in <app_dir>/views.py, where <app_dir> is the Django application directory.
Open todo/views.py and fill it with the following code:
Here we've defined the AllToDos class which inherits from the Django ListView basic view class. We'll use this view to display all available to-do's.
Creating a template
A Django template is basically an html file with the elements of the Django template language in it. Templates are used to generate html pages according to the context provided by views.
You can see that todo/index.html in views.py is highlighted as an unresolved reference:

PyCharm suggests a quick-fix: if you hover over index.html or press Alt+Enter, you can choose to create the corresponding template file in the templates folder:

PyCharm also creates the directory todo where this template should reside. Confirm this operation:

PyCharm creates and opens todo/index.html. To fill it with some basic html code, type html:5 followed by Tab:

Let's add the content with the Django template language elements to the template. Paste the following code between the body tags:
There's an h1 heading and a table. We're using a for cycle to iterate through the items of object_list which will be passed from the AllToDos view. For each item, Django will render a row in the table containing the values of text and due_date.
Configuring urls
Now we need to configure the way how we will access the AllToDos view in the browser.
In the todo directory, create the file urls.py and fill it with the following code:
from django.urls import path from . import views urlpatterns = [ path("", views.AllToDos.as_view(), name="index") ]Next, open the file myDjangoProject/urls.py (which PyCharm has already created for you) and configure it to include the paths from todo/urls.py. You should end up with the following code:
from django.contrib import admin from django.urls import path, include urlpatterns = [ path("todo/", include("todo.urls")), path("admin/", admin.site.urls), ]Don't forget to import
django.urls.include!Open the page http://127.0.0.1:8000/todo/ in your browser. You should see the following text:

There's a heading, but no to-do's yet. Let's use the Django admin interface to add tasks.
Using Django admin
Admin sites allow adding, editing, and otherwise managing the content. By default, PyCharm enables Django admin interface for a new Django project automatically.
Setting up an admin site
Firstly, we need to create a superuser. To do that, type
createsuperuserin the manage.py console (Ctrl+Alt+R), specify your email address, and password.Now go to
/admin/on your Django server, for example, http://127.0.0.1:8000/admin/. You should see the following login page:
After you log in, the administration page is displayed. It has the Authentication and Authorization (Groups and Users) section, but there's no way to add to-do's. To be able to do that, we must register the ToDoItem model in the admin interface.
Adding content
Open the file todo/admin.py, and type the following code:
from django.contrib import admin from .models import ToDoItem admin.site.register(ToDoItem)Refresh the page in the browser. The TODO section with To do items should appear:

Click Add to create a to-do:

When you a ready, click SAVE.
The newly created to-do appears in the list as ToDoItem object (1). Such naming makes content management complicated, as you have to open each task to read its description.
Let's fix that by adding a __str__() method to the ToDoItem model. Open todo/models.py and add the following:
You should end up with the following:
The list of to-do's now provides all the required information:

Providing features
Now, as you've added some to-do's, go to http://127.0.0.1:8000/todo/ again. The list of tasks should be there:

What about filtering to display only the tasks that should be completed today? Let's add this feature to our application.
Go to views.py and add the TodayToDos class with the following code:
This class is very similar to AllToDos, except that it uses another template (which we will create later) and implements the get_queryset method to return only those ToDoItem objects whose due_date is today.
date should be highlighted with a red squiggly line. Hover over it, click Import this name, and select datetime.date to add the corresponding import statement at the beginning of the file.
We need to create the today.html template. To avoid copy-pasting from index.html and having duplicated code in the project, we'll use Django template inheritance.
Create base.html in myDjangoProject/templates by right-clicking templates in the Project tool window and selecting from the context menu.
Copy the code from index.html into base.html, and then replace everything between the
<body>tags with the following:{% block content %}{% endblock %}This is what myDjangoProject/templates/base.html should look like:
<!doctype html> <html lang="en"> <head> <meta charset="UTF-8"> <meta name="viewport" content="width=device-width, user-scalable=no, initial-scale=1.0, maximum-scale=1.0, minimum-scale=1.0"> <meta http-equiv="X-UA-Compatible" content="ie=edge"> <title>Document</title> </head> <body> {% block content %}{% endblock %} </body> </html>Go to index.html, remove everything except the contents of the
<h1>and<table>tags, and then enclose them in the Django template language elements as follows:{% extends "base.html" %} {% block content %} <h1>Things to do:</h1> <table> {% for item in object_list %} <tr> <td>{{ item.text }}</td> <td>{{ item.due_date }}</td> </tr> {% endfor %} </table> {% endblock %}Create myDjangoProject/templates/todo/today.html and fill it with the following code:
{% extends "base.html" %} {% block content %} <h1>Things to do today:</h1> <table> {% for item in object_list %} <tr> <td>{{ item.text }}</td> </tr> {% endfor %} </table> {% endblock %}Note that we don't need due dates here, because this page display only those to-do's whose due dates are today.
We've created a base template base.html which contains all common html tags. index.html and today.html are child templates which inherit the common elements, but have specific contents.
We also need to configure the way we will access the today's tasks in the browser. Go to myDjangoProject/todo/urls.py and add path("today/", views.TodayToDos.as_view(), name="today") to urlpatterns to get the following:
Let's make sure that everything works as expected. Go to http://127.0.0.1:8000/admin/ and add a couple of to-do's setting the Due date to today. Then go to http://127.0.0.1:8000/todo/today/ and make sure that you see the newly added to-do's:

Improving the experience
At this stage our to-do application does what it was meant to:
Displays the list of all to-do's
Show what should be done today
Allows adding new tasks by using Django admin interface
But it doesn't look very nice and is not very comfortable to use. Let's fix that!
The easiest way to improve the look of an html page is to implement CSS. For example, we can use Simple CSS. Open base.html and put the following line anywhere between the <head> tags:
Go to http://127.0.0.1:8000/todo/ in your browser to see the new look of our application:

Since we are using a base template, the look of http://127.0.0.1:8000/todo/today/ changes as well:

Now let's add some navigation elements to avoid typing addresses in the browser's address bar. In base.html, paste the following code after the opening <body> tag:
Here's the result:
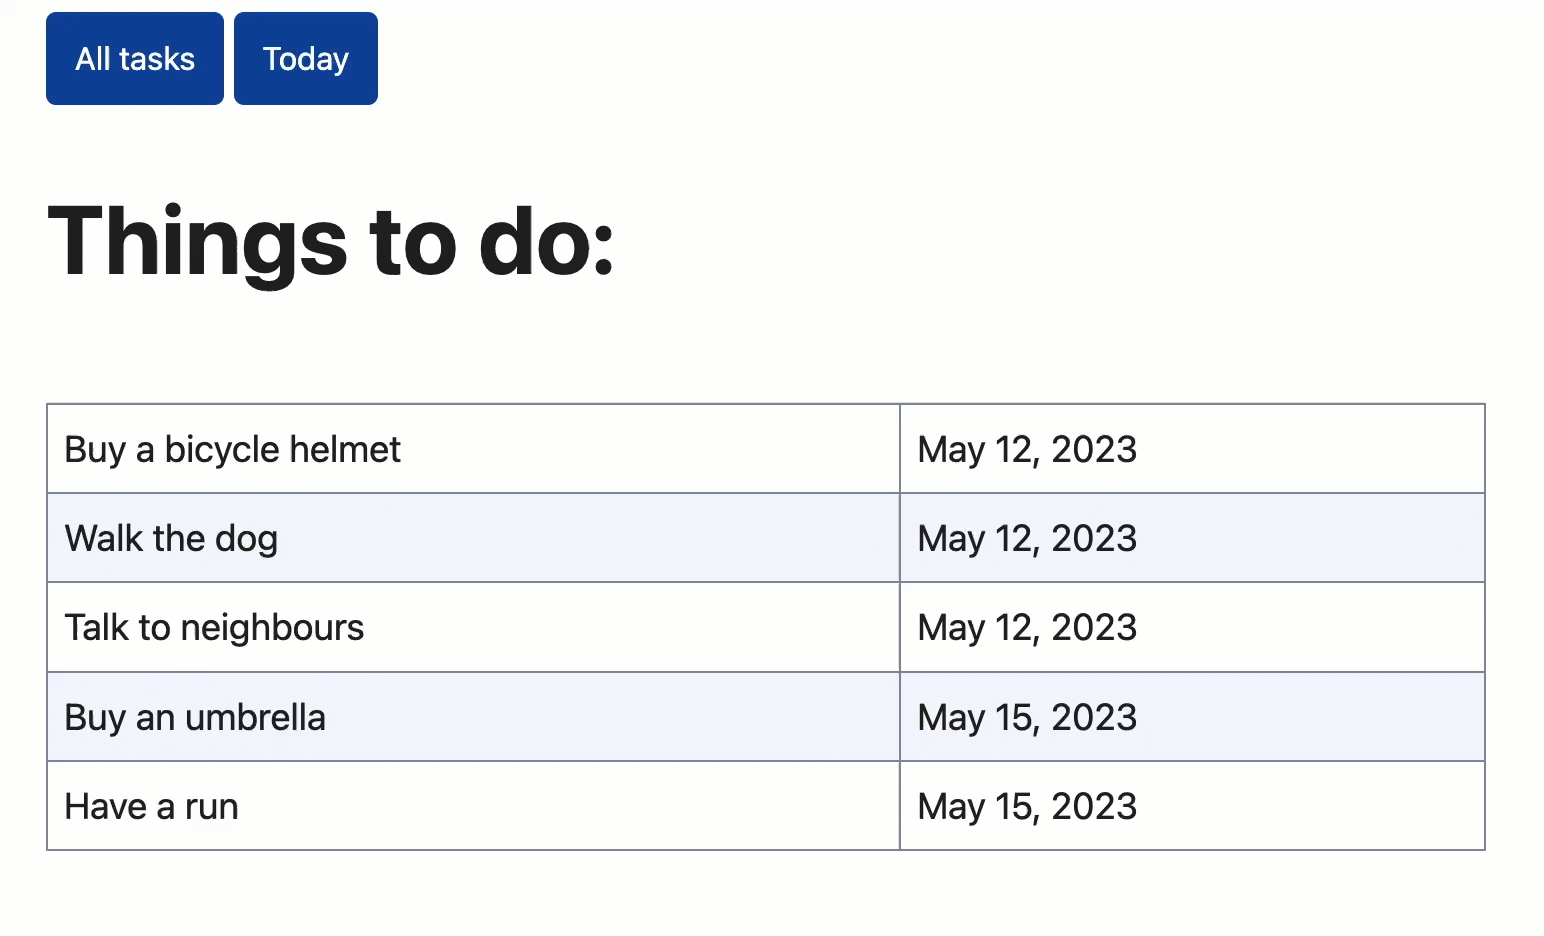
Testing the application
You might have noticed that a few to-do's on the application's "All tasks" page are due on May 12. These tasks are actually past due, and we don't need to display them. Such oversights can be avoided by introducing tests while developing applications.
In the myDjangoProject/todo directory, there is the tests.py file. It is intended for Django tests. Let's write a test to check if to-do's are rendered correctly on the home page of our application depending on their due dates:
Here, create_todo is a shortcut function to create a to-do and AllToDosViewTest is a test class with 3 methods: test_today, test_last_week, test_next_week. Each method creates a task with the corresponding due date, and then checks if the task is rendered on the application's home page. The task whose due date was 7 days before the current date shouldn't be displayed.
To run this test, right-click the background of the file tests.py in the editor, choose the option Run, or just press Ctrl+Shift+F10.
The test results are show in the Test Runner tab of the Run tool window:

You can see that test_last_week has failed, because the created to-do is added to the list of items that will be displayed on the home page despite being past due.
Let's fix it by adding the get_queryset method to the AllToDos class:
The method will filter the objects, so that the view returns only those tasks whose due dates are greater than or equal to today's date (this is what __gte stands for).
Rerun the test by clicking ![]() on the toolbar of the Run tool window. Now all tests pass successfully:
on the toolbar of the Run tool window. Now all tests pass successfully:

Summary
This tutorial is over. You have successfully created, launched, and tested a simple Django application. Let's sum up what you have done with the help of PyCharm:
Created a Django project with an application
Launched a Django server
Created models, views and templates
Configured urls
Launched the application
Created and executed a test