First steps with ReSharper
ReSharper is ready to use right after installation. When you run Visual Studio after you've installed ReSharper, you need to specify your license information and you're ready to get started.
For new users, ReSharper offers a 30-day free evaluation period. During this period, you can enjoy the full functionality of the product and decide whether it suits your needs. The License Information dialog will show how many days are left on your evaluation.
This topic will help you quickly get started with ReSharper, learn how to discover commands it offers, and become familiar with its most frequently used features.
The first step
ReSharper is a keyboard-centric product. Most actions have default keyboard shortcuts, which you can customize.
As soon as ReSharper is ready, it prompts you to choose one of the two default keyboard shortcut schemes:
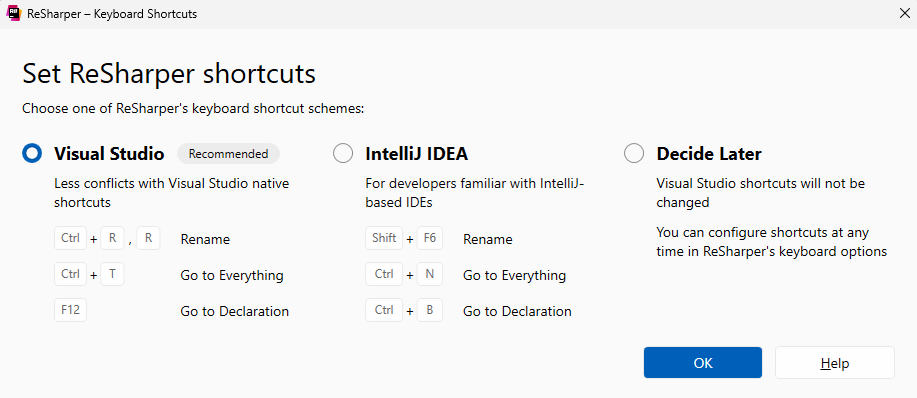
You can change the selected scheme later by using the corresponding selector on the page of ReSharper options Alt+R, O.
For more information, refer to Configure keyboard shortcuts
Look around
When ReSharper is installed in Visual Studio, you will see the following changes:
The ReSharper menu that appears in the Visual Studio Extensions menu. It contains all commands except those that are only available in context, such as context actions or quick-fixes.
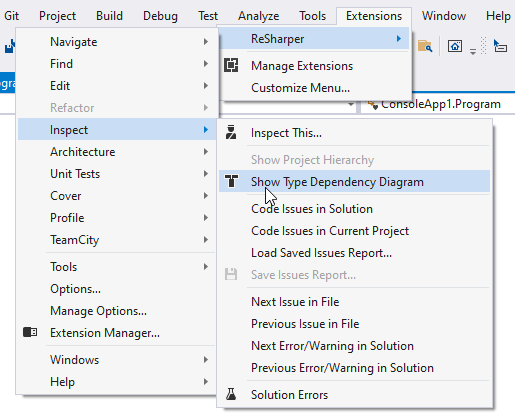
Note that the Cover and Profile submenus will appear only if JetBrains dotCover and JetBrains dotTrace are installed together with ReSharper.
A number of tool windows that appear after specific commands. All ReSharper tool windows are also available in the menu.
ReSharper's commands are available in the context menu of the editor, Solution Explorer, and other Visual Studio windows.
Note that by default, ReSharper also hides the Visual Studio items it overrides (such as refactoring and navigation commands) in these menus. If you want to preserve the original Visual Studio menu items, clear the Hide overridden Visual Studio menu items checkbox on the page of ReSharper options Alt+R, O.
The ReSharper page in Visual Studio options, which allows you to suspend and resume ReSharper at any time. Normally, you do not need to do this. However, if you experience performance problems when working with large solutions, suspending ReSharper may help.
A lot of changes in the editor and the status bar:
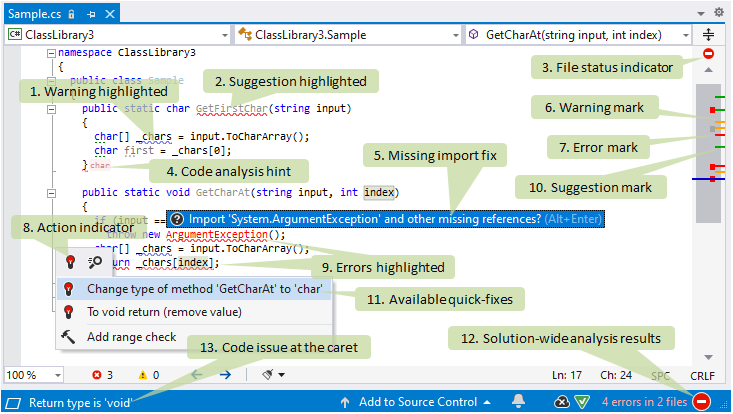
A medium-priority code issue (in this case, a warning about a symbol name that does not match the naming style) is highlighted with a curly underline.
A low-priority code issue (in this case, a suggestion related to an unused public member) is greyed out.
Status indicator helps you to quickly see whether the current file has any code issues.
Code analysis hints make missing function returns, missing breaks in switch statements, and disposed resources easier to notice.
A fix popup that appears for non-imported types. Simply press Alt+Enter or click this popup to have ReSharper add the missing directive for all types in the file. For more information, refer to Import missing namespaces.
A marker corresponding to a warning is displayed on the marker bar.
A marker corresponding to an error is displayed on the marker bar.
Action indicator that appears to the left of the caret position if ReSharper has anything to suggest there.
High-priority code issues (in this case, errors related to an unresolved symbol and an incorrect return type) are highlighted with red text and a red curly underline.
A marker corresponding to a suggestion is displayed on the marker bar.
The action list, which can be opened by pressing Alt+Enter or clicking the action indicator, contains a list of quick-fixes for the issue at the caret.
If solution-wide analysis is enabled, ReSharper allows you to see even more code issues. In this example, it detects the unused public member and notifies you of errors in other files in your solution. Click the solution-wide analysis icon to explore the detected issues.
A short description of the issue at the caret appears in the status bar.
You can also use the Quick Launch box to find and execute ReSharper commands:

Navigate and search
ReSharper provides a lot of navigation and search features. Let's look at some of the most useful ones.
Jump to declaration
Press the Ctrl key and hover over your code. You will see that all symbols defined elsewhere become underlined when in focus. You can click any symbol while holding down the Ctrl key to navigate directly to its declaration. If the symbol is defined in the current solution, ReSharper opens the corresponding file and brings the caret to the declaration. If the symbol is defined in a compiled library, ReSharper opens it according to your preferences.

For more information, refer to Go to Declaration.
Find usages
To navigate in the opposite direction, that is to find all places in your solution where the symbol is used, press Alt+F7. ReSharper will quickly find and display all usages of the symbol. For more information, refer to Find Usages.
Check available navigation actions
Another handy navigation shortcut is Control+Shift+G. When you press it on any symbol, ReSharper will show you all available navigation options:
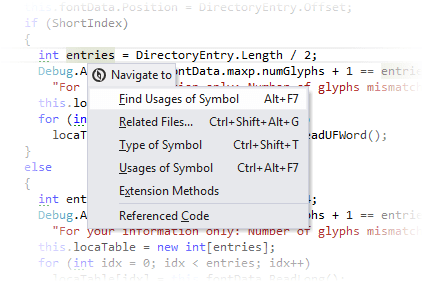
For more information, refer to Navigate To.
Find anything in your solution
If you need to find anything in your solution, press Control+N. The list of suggestions appears as soon as you invoke this feature and initially includes your recent files and navigated items. You can start typing to find types, symbols, files, recent edits, recent files, and recently viewed methods. For more information, refer to Search Everywhere/Go to Type.
Locate current file in the solution tree
When a navigation command brings you to a new file, you may want to see where it is in the Solution Explorer. Just press Alt+Shift+L and the Solution Explorer will scroll to the current file and highlight it. For more information, refer to Locate current document in Solution/Assembly Explorer
Code in the editor
When you are working in the editor, many code editing helpers are at hand. Here are a couple of them.
Code completion (IntelliSense)
ReSharper complements and extends Visual Studio's native code completion (IntelliSense) with more advanced capabilities. For example, it narrows down the list of suggestions based on your typing, automatically imports selected types and extension methods, adds parentheses when completing method names, suggests variable and field names depending on their types, and so on.

If necessary, you can always go back to the Visual Studio's native IntelliSense by choosing the corresponding option on the page of ReSharper options Alt+R, O.
ReSharper's IntelliSense works automatically by default, but you can always invoke ReSharper's code completion features explicitly, either after you have typed something or even instead of typing, wherever any meaningful code is allowed:
Pressing Control+Shift+Space invokes type-matching completion, which provides more intelligent suggestions based on the expected type of the expression.
Pressing Control+Alt+Space invokes import symbol completion, which displays all types that match a given prefix regardless of what namespace they belong to. It also inserts appropriate namespace import directives to the current file if necessary.
Select and move code blocks
Wherever your caret is, try pressing Control+W/Control+Shift+W. These shortcuts allow you to successively select a symbol, line, or block of code so that you can easily select any desired expression for copying, cutting, or moving. For more information, refer to Extend/shrink selection.
If you need to move the selected code block, press Ctrl+Shift+Alt and then use the arrow keys to move the block to any allowed position. For more information, refer to Rearrange code elements
The power of Alt+Enter
Very often you will see one of many different action indicators in the left part of the editor. You can press Alt+Enter to see what ReSharper has to suggest at the current caret position:
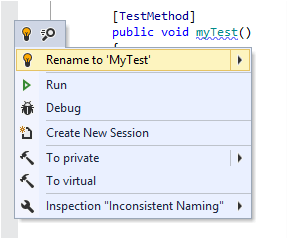
Here are a couple of examples:
If you see a red bulb
.png) or a yellow bulb
or a yellow bulb .png) icon, this means ReSharper has detected an error or other code issue and it can help you fix it. Press Alt+Enter to take advantage of this. For more information, refer to Quick-fixes for code issues.
icon, this means ReSharper has detected an error or other code issue and it can help you fix it. Press Alt+Enter to take advantage of this. For more information, refer to Quick-fixes for code issues.A hammer
.png) icon means an opportunity to quickly modify the code at the caret. It is entirely optional. If you do want to make changes, press Alt+Enter to see context actions available to help you quickly change symbol visibility, add code that iterates over a collection, and more.
icon means an opportunity to quickly modify the code at the caret. It is entirely optional. If you do want to make changes, press Alt+Enter to see context actions available to help you quickly change symbol visibility, add code that iterates over a collection, and more.Even if there are no action indicators in view, can also press Alt+Enter to quickly find and execute any ReSharper action in scope. Just start typing and choose from the matches that appear:
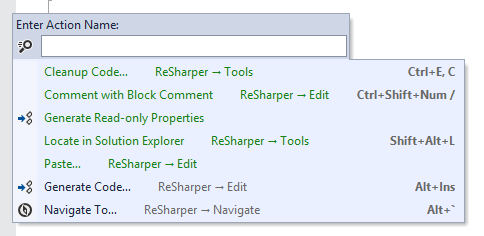
Refactor code
ReSharper provides many more refactorings than Visual Studio does, but even more importantly, its refactorings are significantly more usable and wider in scope while still being safe to use.
Memorizing all the refactorings and their shortcuts is not an easy task, but luckily you don’t have to. You can simply press Control+Shift+R on any symbol in your code to see which refactorings are available for that symbol.
Generate code
To help you focus on non-trivial tasks, ReSharper provides a lot of features for generating boilerplate code automatically. For example, you can call a non-existent method and ReSharper will create this method based on the call, taking into account the return type and the types of arguments.
Generate type members
When your caret is anywhere within a type declaration, press Alt+Insert. In the popup menu that opens, select an item that you want to generate for the type. ReSharper can create constructors, properties, overriding members, and more. For more information, refer to Code generation.
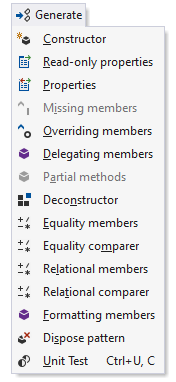
Apply code templates
When you are about to write a typical code block, such as a for or foreach loop, a safe type cast, or an assertion, press Control+J and choose the corresponding live template instead. For more information, refer to Create source code using live templates.
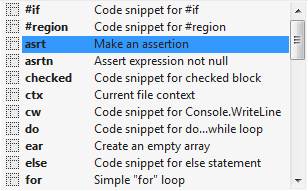
Using a similar technique, you can surround existing code blocks with typical code constructs, such as if...else or try...catch. In this case, press Alt+Control+J or Alt+Enter over the selection. For more information, refer to Surround code fragments with templates.
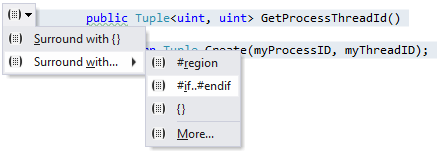
If you find ReSharper's code templates useful, you may also be interested in adding new files from templates and creating your own code templates.
Code style matters
With ReSharper, you can control most of the style aspects in your code, including naming standards, formatting rules, order of members in files and types, file header style, and many other tiny things (such as order of modifiers or whether to use the 'var' keyword).
The default values of ReSharper code style features reflect Microsoft guidelines and numerous best practices. At the same time, you can adjust every tiny aspect of code style to fit your personal or corporate preferences.
To apply code style rules, press Control+Alt+F. ReSharper will run code cleanup with one of the default profiles (Full Cleanup, Reformat & Apply Syntax Style and Reformat Code) .
What's next
Check out the ReSharper Workshop on GitHub — a Visual Studio solution that provides step by step code exercises for navigation, editing, inspections, refactoring and more.