Navigation and Search in C++
Navigation by name
ReSharper can bring you to any code item or file in a few keystrokes. The scope of the navigation includes symbols and files in your entire solution as well as all symbols and files in standard and libraries and external dependencies.
Find code items in your solution by name
To use the unified access to all search results, press Control+N to display a popup where you can start typing and find code items in your solution that matches your input.
If you want to limit your search to types (classes, interfaces, structs or enums), press Control+N twice .
If you want to find anything by a plain textual match, press Control+N three times.
If you want to search symbols (types, methods, properties, fields, and so on) - press Shift+Control+Alt+N.
You can also only search for files by pressing Shift+Control+N.
ReSharper also lets you jump to types and type members in the current file by typing their names after pressing Control+F12.
After invoking any of the above commands, start typing the target item, its CamelHumps abbreviation, and/or wildcards. The list of matched items will narrow down as you type and the most probable candidates are shown closer to the top of the list.
As soon as the target item appears in the list, you can choose it to open it in the editor. To view and analyze the list of matched items in the Find Results window, click Show in Find Results
.png) , press Shift+Enter or + on the numeric keypad .
, press Shift+Enter or + on the numeric keypad .
ReSharper can remember the last input that you used to find something with Search Everywhere/Go to Type, Go to Symbol, Go to File, and Go to Text actions. To enable or disable this behavior, use the Remember last search checkbox on the page of ReSharper options. When this option is selected, ReSharper will also use your current selection in the editor as the initial search query. For example, you can select a filename in a string and then press Shift+Control+N to search for files in your solution that match this name.
Go to declaration
Use this command to navigate to the declaration of a symbol from any symbol usage. You can invoke this command from the Solution Explorer, File Structure window, and other tool windows.
To navigate in the opposite direction (symbol usages) you can invoke the Go to Declaration command when you are already on the symbol declaration, or you can use the Go to Usages of Symbol command.
To go to symbol declaration, press Control+B, choose in the main menu, or click the symbol holding down the Ctrl key.
Go to declaration works on non-dependent decltype specifiers and lambdas (jumping to the lambda body). You can jump from a declaration to a definition with unmatched signature (for example, from a changed declaration of a member function to its definition with old signature), and also vice-versa. Go to declaration also works during the initial project indexing.
Go to declaration also works on unresolved identifiers, in comments and macro bodies. ReSharper will find all symbols with the matching name and let you navigate to them.
In unsupported C++ files (for example, C++/CX) Go to declaration automatically falls back to the corresponding Visual Studio navigation action.
Go to file member
Use this command to quickly navigate to a particular class, function, or field in the current document.
To navigate to a file member, Press Control+F12 or choose from the main menu.
Go to type of symbol
While the Go to Declaration command navigates you to the place where a symbol is declared, the Type of Symbol command navigates to the declaration of the type of the currently selected symbol. For example, if you have a variable Foo myVar = new Foo(); and invoke this command on a usage of myVar, it will bring you to the declaration of the class Foo. If you invoke this command on a function, it navigates to the function's return type.
This command also works for typedefs. You can invoke this command from the Solution Explorer, File Structure window, and other tool windows.
To navigate to the type of the symbol, Press Control+Shift+T or choose from the main menu.
Go to usages of symbol
This command allows you to quickly navigate to a specific usage of a symbol from its declaration or any other usage. You can invoke this command from the Solution Explorer, File Structure window, and other tool windows. The opposite navigation is available with the Go to Declaration command.
The list of usages that you get with this command is the same as that of Find Usages. But this command is more convenient for symbols with a limited number of usages, in cases when you are looking for a specific usage and want to get to this usage without opening the Find Results window.
You can configure ReSharper behavior for the cases when a single usage is discovered. By default, the usage is displayed in a popup. If you want ReSharper to jump tho the single usage in these cases, select the corresponding option (Go to Usage: if there is only one result, navigate without displaying the list) on the page of ReSharper options Alt+R, O.
To go to usages of symbol, Press Control+Alt+F7 or choose from the main menu.
Go to base symbols
This command allows you to navigate up the inheritance hierarchy to a base type or method of the current symbol. You can invoke this command from the Solution Explorer, File Structure window, and other tool windows.
Navigation in the opposite direction is available with the Go to Derived Symbols and Go to Implementation commands.
To navigate to base symbols, Press Control+U or choose from the main menu.
For types that inherit from other types or implement interfaces and for members that override, implement, or hide members from base types, ReSharper displays special gutter icons (for example, ![]() ). Hover over the icon to see the base symbols and to navigate up the inheritance hierarchy.
). Hover over the icon to see the base symbols and to navigate up the inheritance hierarchy.
Go to implementation
This command helps you find actual implementations of types and members — in other words, to locate the source code they execute. For example, from a base type or member, you can jump to any of its end implementations bypassing intermediate steps in the inheritance chain; from a usage of an interface member, you can get to all places where the member is implemented.
You can invoke this command from the Solution Explorer, File Structure window, and other tool windows. If necessary, you can navigate in the opposite direction with the Go to Base Symbols command.
To navigate to implementations, Press Control+Shift+Alt+B or choose from the main menu.
Go to derived symbols
This command gets the list of all derived symbols for a type or a member and lets you navigate directly to one of them, down the inheritance hierarchy. If you are looking for actual implementations and not interested in intermediate steps of the inheritance chain, use Go to Implementation.
To navigate to derived symbols, Press Alt+Control+B or choose from the main menu.
Switching between header and source
For all symbols that have separate declarations and definitions, ReSharper displays the Navigate to declaration/definition ![]() action indicator on the left. You can click this indicator or press Alt+Enter to quickly switch between declaration and definition of the symbol.
action indicator on the left. You can click this indicator or press Alt+Enter to quickly switch between declaration and definition of the symbol.
There are more ways to switch between a header and the corresponding source file and vice versa:
Press Alt+O.
Press Control+Shift+G or choose from the main menu, and then select Switch Header/Source in the Navigate To popup.
Ctrl - click the symbol name.
Go to primary template/specializations
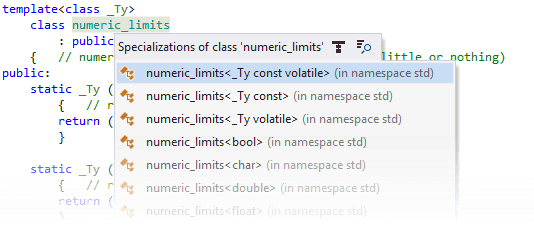
If a class or function template has multiple specializations, ReSharper allows you to switch between the primary template/specializations.
When you caret is at the primary template or at one of the specializations, there are two ways of navigating between specializations:
Press Alt+Enter and choose Navigate to specializations
.png) in the action list.
in the action list.Press Control+Shift+G or choose from the main menu, and then select Specializations in the Navigate To popup.
In either way, a popup with all specializations appears where you can choose the desired one:

Find usages
This command allows finding all usages of one or more symbols in the solution and referenced assemblies. You can start the search from the declaration of the symbol or from any other usage. You can invoke this command from the Solution Explorer, File Structure window, and other tool windows.
If there are more than one usage, ReSharper helps you analyze the results in the Find Results window.
You can change the default behavior so that even the single found usage is also displayed in the Find Results window. To do so, clear the Go to Usage: if there is only one result.... checkbox on the page of ReSharper options Alt+R, O.
To find usages of the current symbol, Press Alt+F7 or choose from the main menu.
Find usages of related entities
This command allows you to locate usages of entities that are related to the selected symbol in some way (such as textual occurrences, dynamic references, etc.) within a specified scope. You can invoke this command from the Solution Explorer, File Structure window, and other tool windows.
To find usages of the current symbol and related entities, Press Shift+Alt+F7 or choose from the main menu.
Highlight usages in file
The editor automatically highlights usages of a symbol at caret, which is very convenient in short files and for locals in small contexts. However, this kind of highlighting does not always work well in larger contexts because the selection is only there as long as the caret stays at the symbol.
There is also a caret-independent highlighting that stays until you press Esc and applies different configurable colors to read and write access usages. You can toggle this highlighting for a single item or for several different items simultaneously, and then use shortcuts to jump between the highlightings.
To find usages of the current symbol and related entities, Press Control+Shift+F7 or choose from the main menu.
Go to containing declaration
When your caret is anywhere in the body of a type or a function, you can jump to the declaration of that type or function with a single shortcut.
To go to the containing declaration, press Control+[ or choose from the main menu.
Go to next/previous member
With the Next/Previous Member commands, you can quickly navigate between neighboring members and nested types in code files or between neighboring tags in markup files.
To invoke these commands, press Alt+Down/Alt+Up or choose in the main menu.
Go to related files
To go to related files, Press Control+Alt+Shift+G or choose from the main menu.
Locate in Solution Explorer
This handy navigation feature lets you expand the tree in the Solution Explorer, auto-scroll and highlight the item corresponding to the current document. It is especially useful when you have a massive solution, or a limited screen area that forces you to shrink the Solution Explorer window to the limit.
To go to related files, press Alt+Shift+L or choose from the main menu .
Navigating to recent locations
ReSharper keeps track of your actions and navigation history, and offers some commands that let you navigate to places where you have edited or just studied the code.
Go to Recent Files Control+E
Go to Recent Edits Alt+Shift+Control+Back
Go to Previous Edit Shift+Control+Back
Navigating file structure
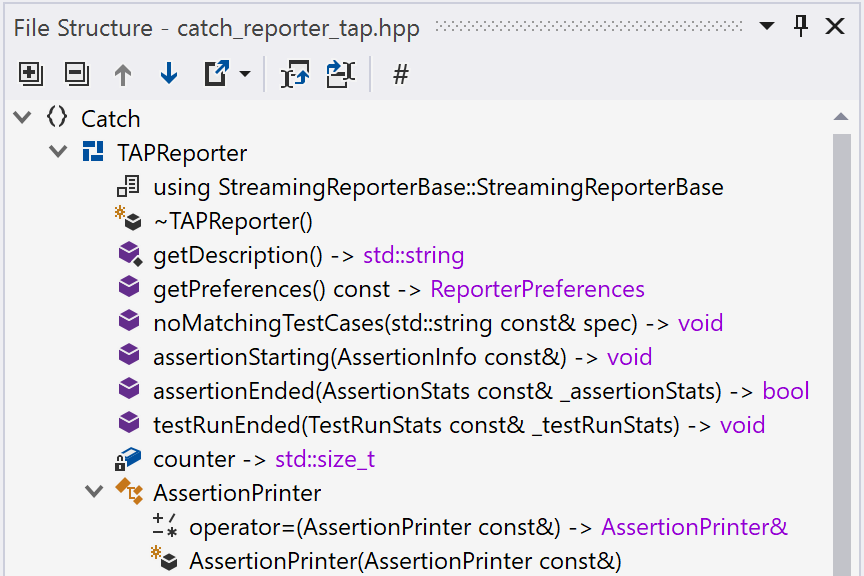
With ReSharper, you can navigate the structure of the current document using the File Structure window, which greatly simplifies navigation in large files. The window is synchronized with the editor: as you switch to another editor tab, the window displays the structure of the corresponding file.
To open the File Structure window, press Control+F11 or choose from the main menu.

Navigate to action
ReSharper helps you quickly find and apply any of its actions, without digging through the menu. By an action, we mean an executable command available for the current caret position or any global command, for example, a command that opens a tool window.
You can also search for and navigate to options pages.
To find and execute a ReSharper action, Press Control+Shift+A or choose from the main menu.
Breakpoints navigation
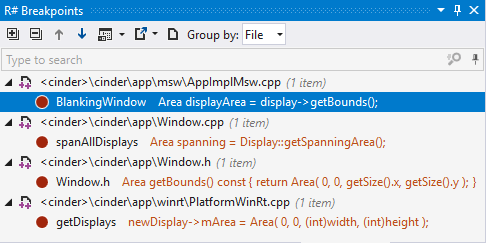
With ReSharper, you can quickly jump to any breakpoint/tracepoint in your solution and study all breakpoints in a dedicated tool window, which features grouping, search, preview, and symbol names.
To jump to any breakpoint, press Control+Alt+F9 or choose from the main menu
ReSharper also brings its own R# Breakpoints window, which you can use as an alternative to the Visual Studio's native window — you can start typing to search for a breakpoint or use context menu to enable/disable or remove breakpoints. You can check how the both differ from each other on the screenshot below.

To display the R# Breakpoints window, open the Breakpoints popup as described above, and then click Show in Breakpoints window ![]() , press Shift+Enter or + on the numeric keypad.
, press Shift+Enter or + on the numeric keypad.
Bookmarks
If you want to return to some place in your code later, you can mark any code line in your solution or in library code with a bookmark.
There are two kinds of bookmarks that you can use:
Bookmarks with mnemonics — are most useful for marking code lines that you often refer to, like top 10 places in your current solution. You can have up to 10 numbered bookmarks simultaneously. They are indicated by the following icons on the left editor gutter:
.png)
Use dedicated shortcuts for this kind of bookmarks: Ctrl+Shift+[digit] toggles the bookmark with this digit; Ctrl+[digit] navigates to the bookmark with this digit.
Anonymous bookmarks— are allowed in unlimited numbers so you can mark any line, which you think is worth returning to at some time in the future. They are indicated by the following icon on the left editor gutter:
.png)
You can toggle bookmarks of this kind and navigate them from the bookmarks popup.
For more information, refer to Bookmarks
To-do explorer
ReSharper provides an easy way to track tasks and technical debt in your code — code items (comments, string literals, or identifiers) matching a specific pattern can be easily located in the editor as well as in the whole solution using the To-do Explorer window.
For more information, refer to To-do lists