Agents and models
You can run tasks with different AI providers. In the Air app, providers are listed in Settings as AI Providers, and you select one in the Chat tool through the agent selector.
In the browser, the agent selector on the new task page lists the agents your organization enabled, and there's no acp.json to add your own – see Work with a task in the browser.
The following agents and providers are currently available:
Your own ACP-compatible agent. See Add your own agent.
If you use JetBrains as a provider, you can use all supported agents (except your own agents) from one subscription. Your tasks consume AI credits based on the agent and model you select.
Select an agent and model for a new task
Open the Chat tool and create a new task.
The task toolbar appears at the bottom of the Chat tool. It contains selectors for the agent, model, and permission mode.
Click the model selector (for example, Sonnet 4.5 or GPT 5.2 Codex).
A menu opens where you can choose the agent and the model.
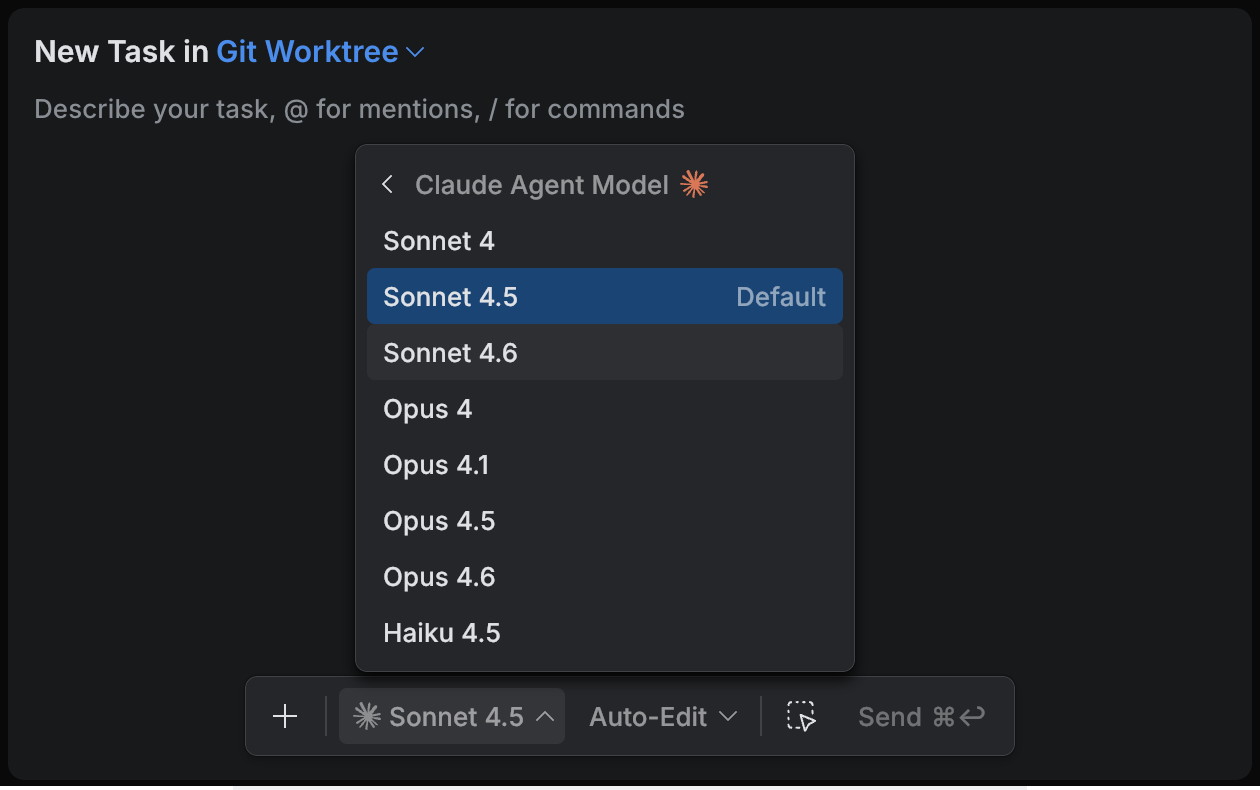
To switch the agent, select the agent group (for example, Claude Agent or Codex).
Then select a model from the list. The selected model becomes the default for the current task.
The model you choose affects cost. More capable models usually use more tokens, which increases the cost for API billing accounts and consumes more of your available quota.
Change the model for an existing task
Open the task in the Chat tool.
In the task toolbar, click the model selector.
Select another model in the current provider group.
If you are not logged in to a provider, the model selector shows the Add Agent action. Use it to connect an account.
Add an agent
Click the model selector in the task toolbar.
Click Add Agent.
The Air app opens Settings at .
Connect the provider, then return to the Chat tool and select the agent and model.
Add your own agent
If you want to use an agent that isn't in the list, you can add it yourself via an acp.json file. Any agent that supports the Agent Client Protocol (ACP) works in the Air app like the built-in agents. The agent must already be installed on your machine.
Agents added through acp.json use their own subscriptions.
If an agent supports local models, the Air app respects that agent's model settings.
Add an ACP-compatible agent
In the task toolbar, click the agent selector, then click Add ACP Agent.
The Air app opens the
acp.jsonfile. The file is stored in the Air app configuration folder and applies globally, so the agents you add are available for all tasks on your machine.Add an entry for each agent under
agent_servers, then save the file. For example:{ "agent_servers": { "Goose": { "command": "goose", "args": ["acp"], "env": {} }, "Copilot": { "command": "copilot", "args": ["--acp"] } } }For each agent, specify:
The name (the key, such as
Goose) – the label shown in the agent selector.command– the command that runs the agent.args– the arguments that start the agent's ACP server.env– optional environment variables passed to the agent.
To edit
acp.jsonagain later, press Ctrl+Shift+K to open Go to Action, then run the Edit ACP JSON File action.The agents you added appear in the agent selector.
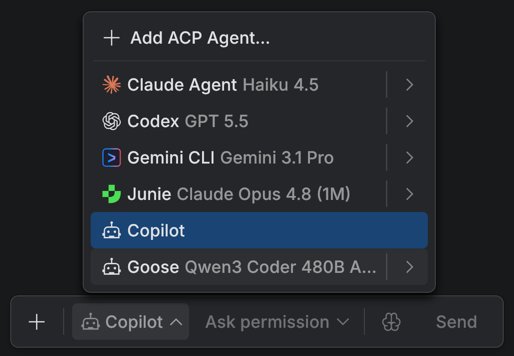
Select the agent for a task. If you are already logged in to the agent, it works right away. If not, the agent prompts you to log in, either through a browser or with a command you run in the terminal.