Use Fleet for Multiplatform development — tutorial
This article shows the basics of working with Kotlin Multiplatform projects in JetBrains Fleet.
Fleet is a code editor for any language that can transform into a powerful development tool for any language. It strives to provide a superior experience for Kotlin Multiplatform. As the first step, Fleet brings Kotlin Multiplatform to macOS.
With Fleet, you can quickly open and run multiplatform projects targeting Android, iOS, web, and desktop platforms. Fleet's Smart Mode automatically selects the appropriate code-processing engine.
When targeting iOS, navigation, refactoring, and debugging are available across all languages used in the project. This makes it easier to manage a mixed-language codebase. Fleet fully supports Swift out of the box, so you can extend and maintain the native parts of your application.
Prepare your development environment
Install JetBrains Toolbox app.
The Toolbox app provides an easy upgrade path to new versions as they become available. You can also manage multiple versions of JetBrains products, working with stable releases while exploring experimental ones.
Log into Toolbox with your JetBrains account.
Click Install next to the Fleet icon.
Check your version of the JDK. Currently, Fleet requires the Java Development Kit 17.0 and later to be installed for Kotlin Multiplatform development. To do that, run the following command in your command-line tool:
java -versionInstall Android Studio and Xcode so that you can run your app on Android and iOS simulators.
See Set up an environment for more details on these prerequisites and information on how to use the KDoctor tool to verify your setup.
To ensure the installation is complete, open both Android Studio and Xcode at least once. It may also be necessary to reopen Android Studio and Xcode following an update.
To run and debug Android applications on the current machine, you'll need to create a virtual device in Android Studio.
If you experience problems running an iOS project, verify that you can run the embedded project in the
iosAppfolder from Xcode on this destination. Then restart Fleet.
Get started with Fleet
When using Fleet, you can create a Multiplatform project by:
Using the Kotlin Multiplatform wizard.
Cloning an existing Git repository with the Clone from Git option on the Fleet welcome screen.
Create a project
In this tutorial, you'll create a new project with the web wizard:
Open the Kotlin Multiplatform wizard.
On the New project tab, change the project name to "SampleProject" and use "com.example.project" as the project's ID.
Select the Android, iOS, and Desktop options as your platforms.
For iOS, make sure that the Share UI option is selected.
Click Download and unpack the resulting archive.

Enable Smart Mode
Launch Fleet.
On the welcome screen, click Open File or Folder or select File | Open in the editor.
Navigate to the unpacked "SampleProject" folder and click Open.

Fleet detects the project type and opens it for you.
When opening a folder with a build file, Fleet gives you the option to enable Smart Mode. Click Trust and Open:

At the top of the window, you'll see messages from Fleet as the project is imported and indexed.
When Smart Mode is enabled, Fleet offers language-related features such as code completion, navigation, debugging, and refactoring. When Smart Mode is disabled, Fleet works as a simple code editor. You can quickly open files and make changes, but without most of the advanced language-related features.
Under the hood, Fleet chooses which backend to use to process code. When Smart Mode is enabled, the backend for Kotlin is the same code-processing engine used by IntelliJ IDEA, so the functionality you might be already familiar with is retained.
To check Smart Mode status, click the lightning bolt icon at the top:

Run your project
When opening a project, Fleet creates run configurations for the targets found in the build file. To access run configurations, you can:
Use the ⌘ R shortcut.
Select Run | Run & Debug in the main menu.
Click the
 icon at the top of the window.

Choose the iosApp configuration from the list and run it. The application will automatically be executed on the iPhone simulator.
In the build window, you'll see how the application has been compiled and launched:

Work with multiplatform code
The sample code generated by the web wizard provides a useful starting point for exploring Fleet functionality: code navigation, editing, refactoring, and debugging in multiplatform projects.
For a detailed explanation of the sample code, see the Get started with the Compose Multiplatform tutorial.
Navigating code
Let's see how cross-language navigation works in Fleet using the example of navigating from Kotlin to Swift:
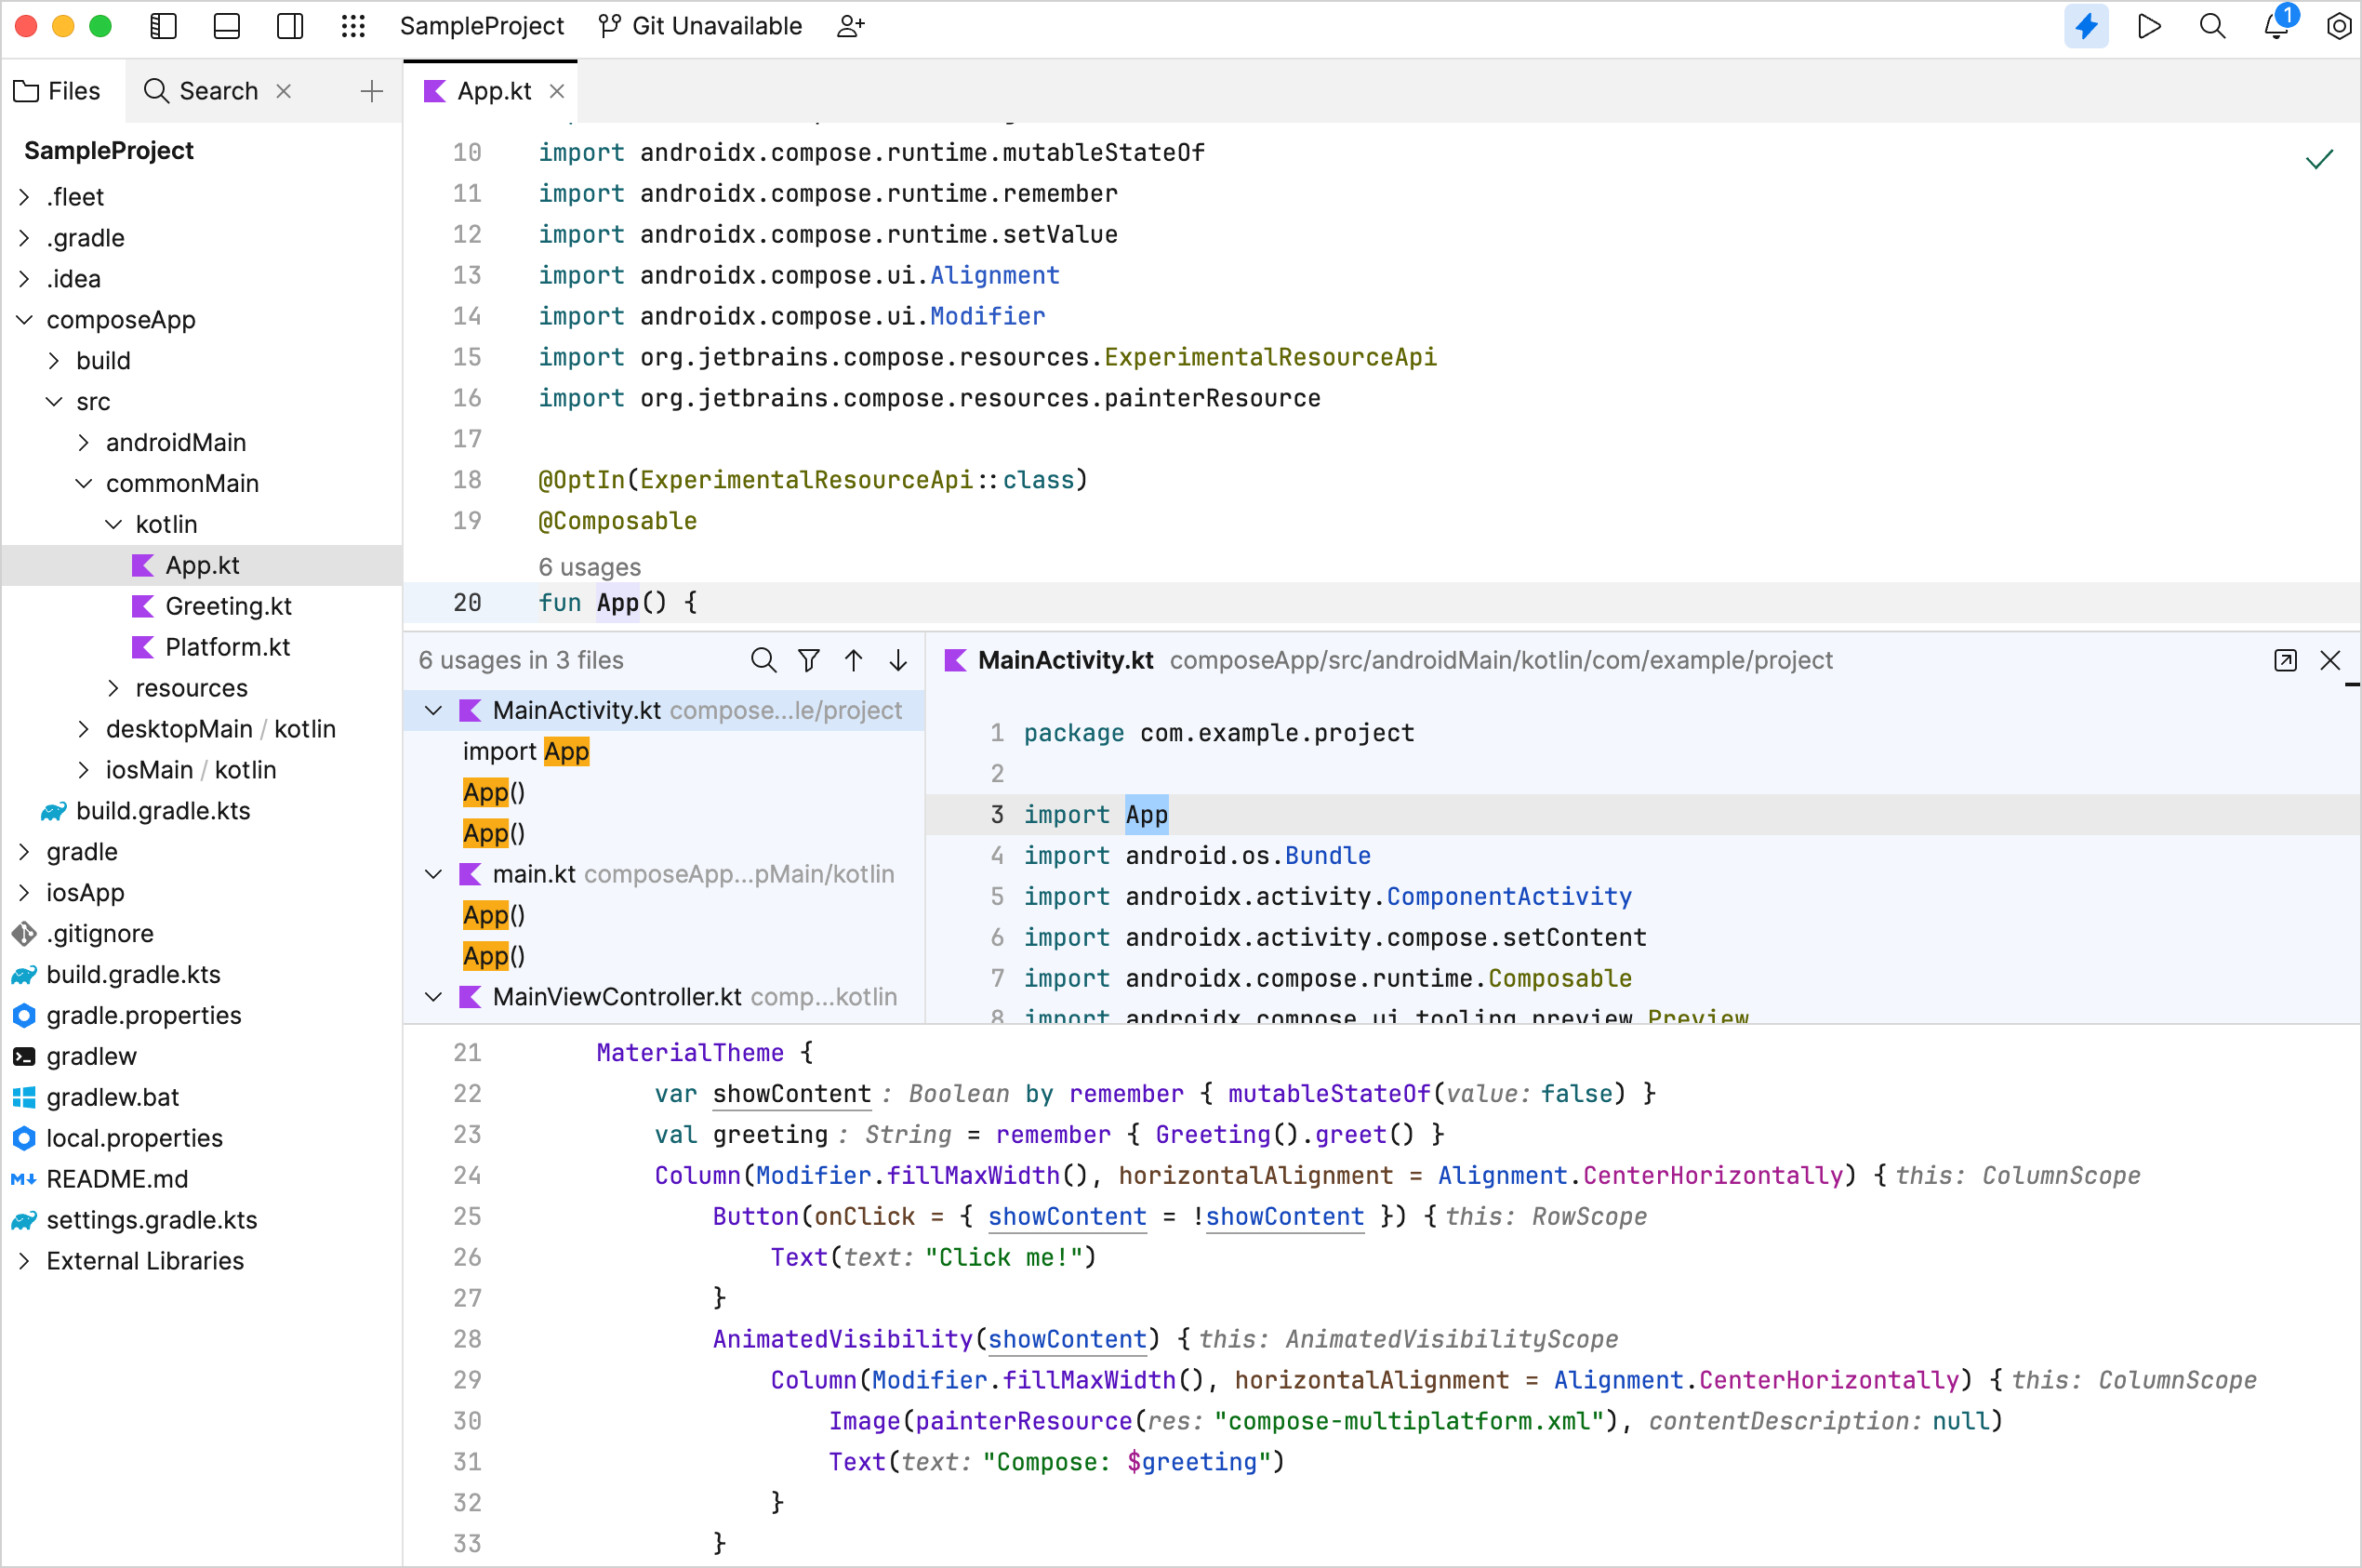
Open the
composeApp/src/commonMain/kotlin/App.ktfile. Here's theAppcomposable, the center of the sample code.Select the
App()function and run the Usages action from the context menu or with the ⌘ U shortcut. You can see it is invoked in three files:
This is where the
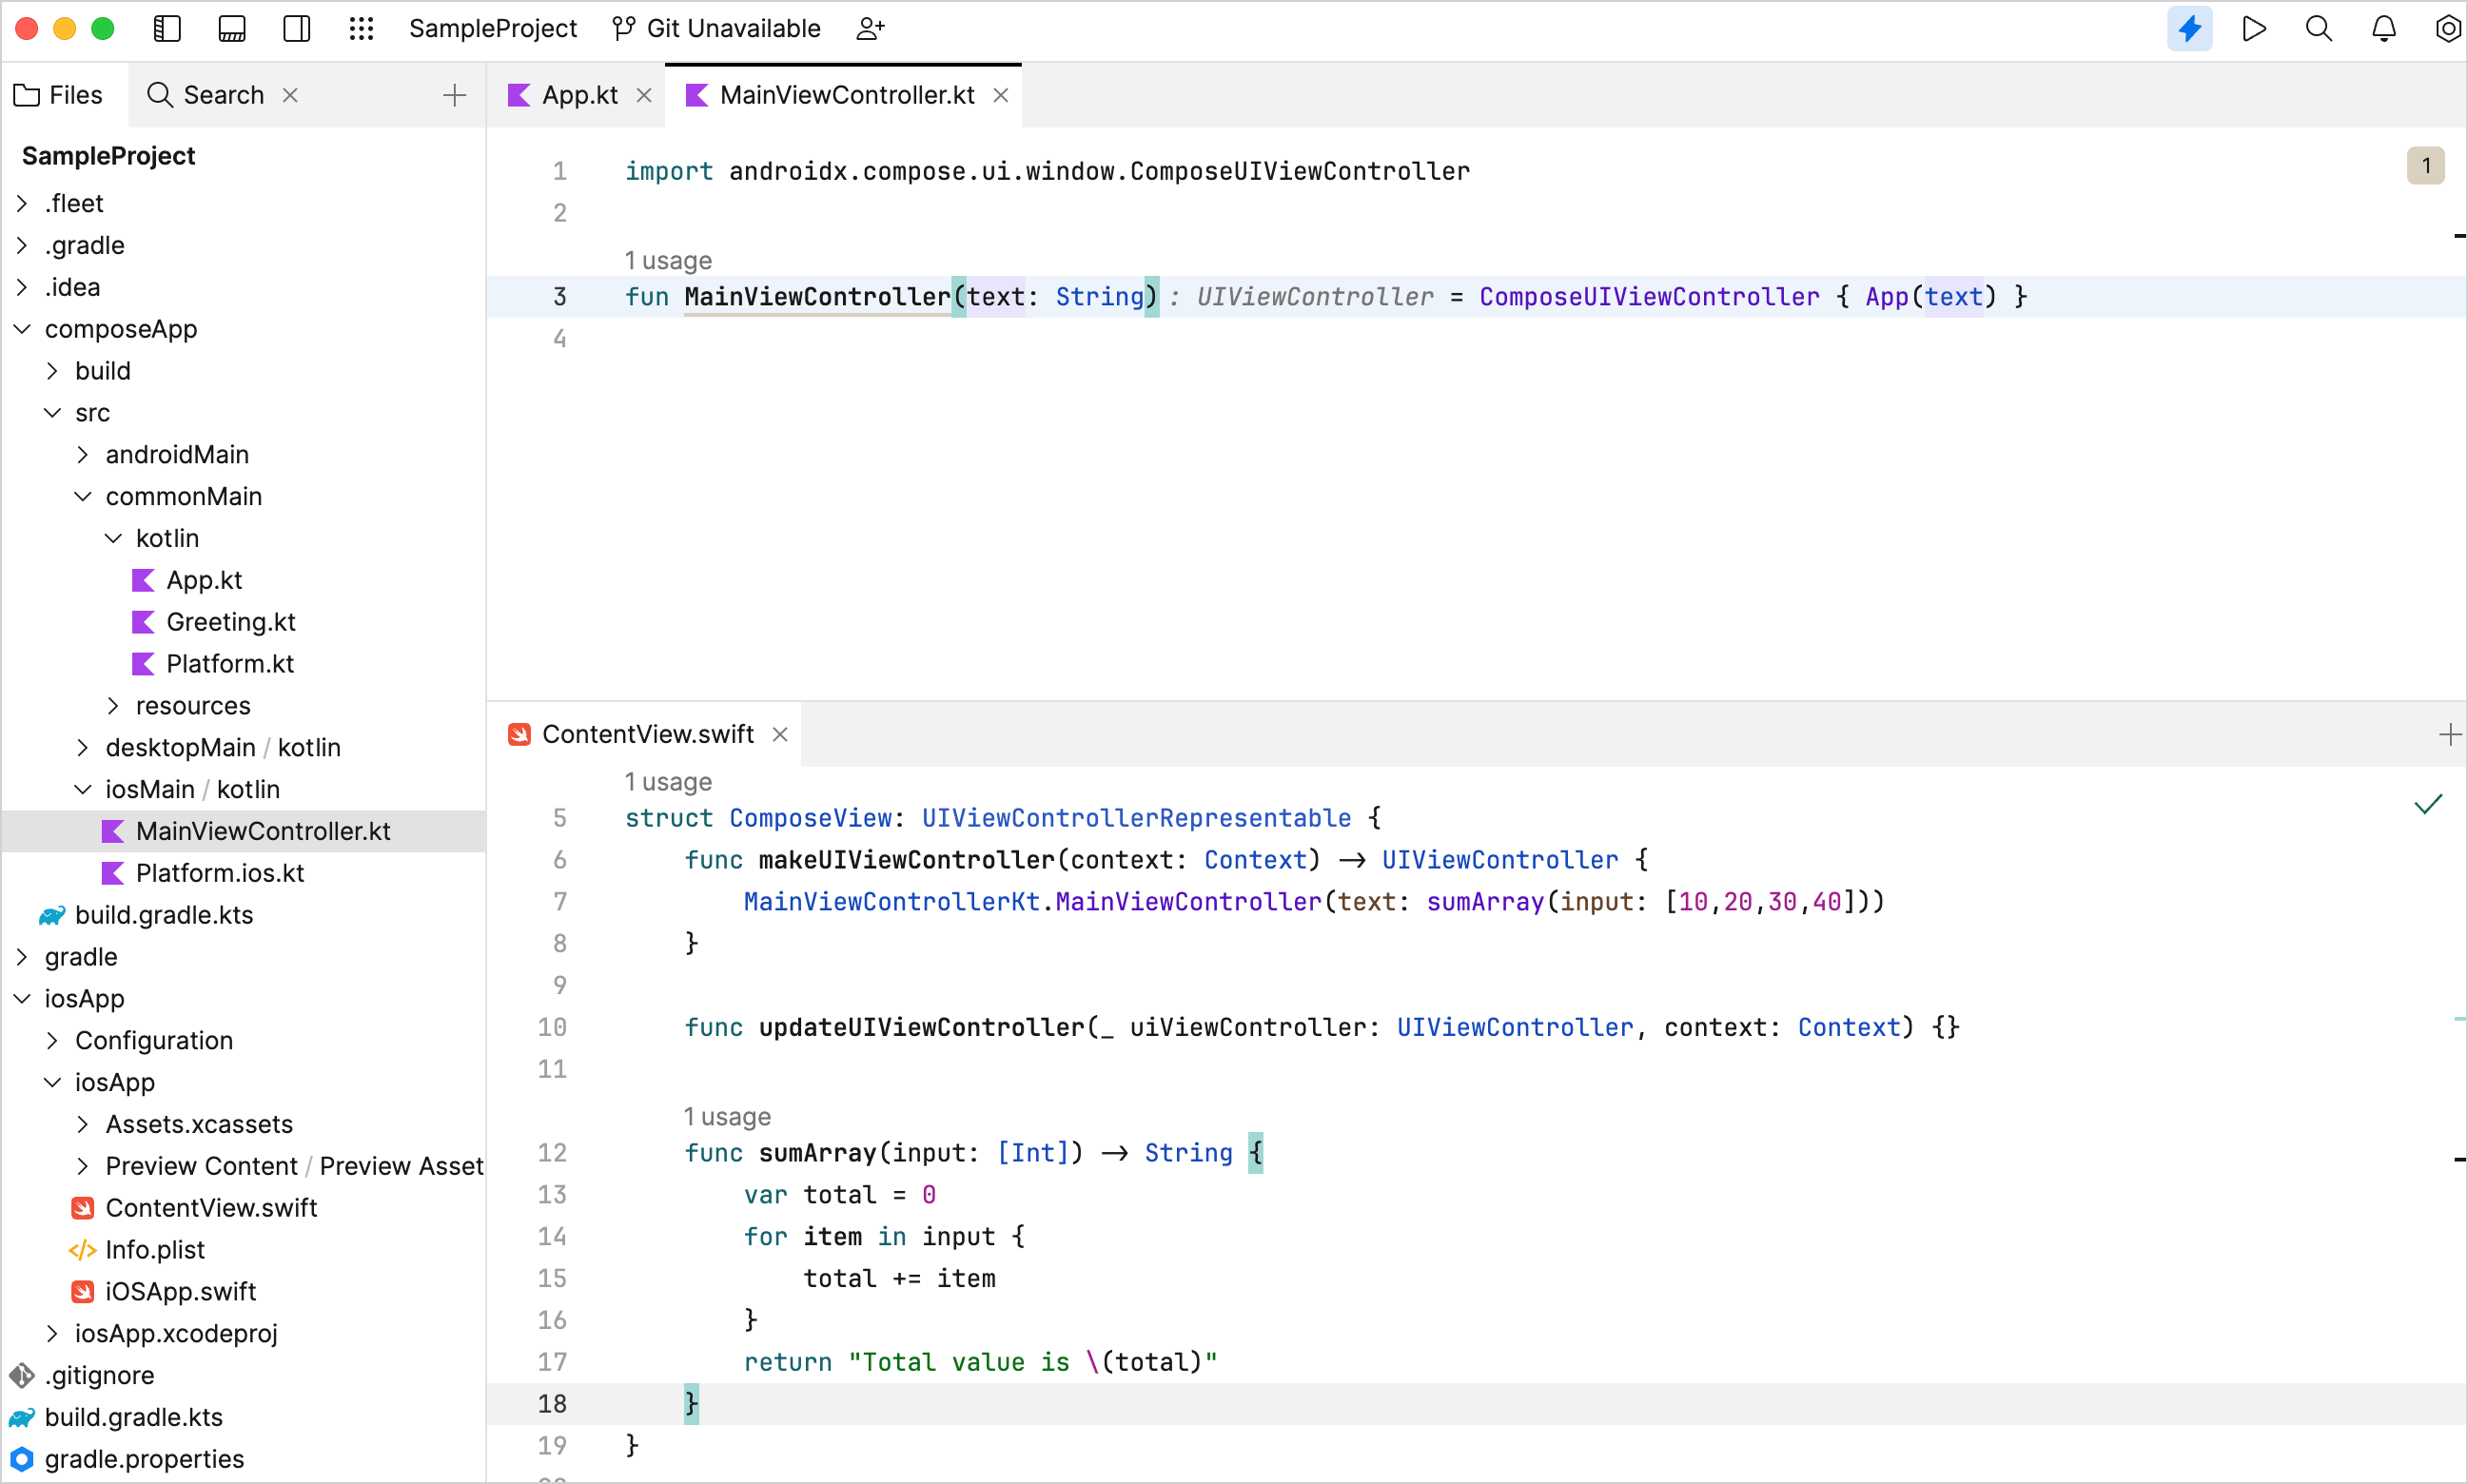
Appcomposable is used to launch the Android, iOS, and desktop targets.Select the
MainViewController.ktfile. You'll see theMainViewControllertype that is invoked from Swift code.Instead of manually browsing to find the Swift file that implements this functionality, navigate to it directly by using the Usages action again:
Because there is only one usage, Fleet automatically opens the file for you.
Editing in multiple languages
Since the ContentView.swift file is already open, you can explore Fleet support for editing Swift code:
Add a new function to the
ComposeViewtype. Fleet will provide all the expected coding assistance:struct ComposeView: UIViewControllerRepresentable { // … func sumArray(input: [Int]) -> String { var total = 0 for item in input { total += item } return "Total value is \(total)" } }The completion and code hints work in Fleet as expected. For example, if you forget the
returnkeyword, or return a value of the wrong type, Fleet will highlight the error.Update
makeUIViewController()to invoke the new function:func makeUIViewController(context: Context) -> UIViewController { MainViewControllerKt.MainViewController(text: sumArray(input: [10,20,30,40])) }Get back to the Kotlin code. Update the
MainViewController.ktfile to accommodate this change:fun MainViewController(text: String) = ComposeUIViewController { App(text) }Adjust the
Appcomposable as well:@Composable fun App(text: String? = null) { MaterialTheme { var showContent by remember { mutableStateOf(false) } val greeting = remember { Greeting().greet() } Column(Modifier.fillMaxWidth(), horizontalAlignment = Alignment.CenterHorizontally) { Button(onClick = { showContent = !showContent }) { Text(text ?: greeting) } AnimatedVisibility(showContent) { Column(Modifier.fillMaxWidth(), horizontalAlignment = Alignment.CenterHorizontally) { Image(painterResource(Res.drawable.compose_multiplatform), null) Text("Compose: $greeting") } } } } }Rerun the application on iOS:

The simulator displays the message from the new function instead of the original greeting.
Refactoring across multiple languages
Navigation is not the only feature in Fleet which is cross-language. The same applies to refactoring.
You have already seen that the MainViewController() function is declared in Kotlin but invoked from Swift.
Select the MainViewController() function and use the Rename | Refactoring action to change its name to MainSwiftUIViewController:
The function name is changed in both Kotlin and Swift files.
Debugging
One more example of cross-language functionality is debugging. The Fleet debugger can automatically step between Swift and Kotlin code.
In the
ContentView.swiftfile, set a breakpoint on the return expression of thesumArray()function on line 17.In
App.kt, set a breakpoint in theAppcomposable on line 23.Open the Run & Debug menu and click Debug next to the
iosAppconfiguration.When the breakpoint on line 17 of
ContentView.swiftis reached, in the Debug menu, use Step Out to move to line 7.To move into the
MainSwiftUIViewController()Kotlin function, use Step Into.Click Resume to move on to the breakpoint on line 23 of
App.kt.
The debugger shows that there are no errors in the code.
Leave feedback
We encourage you to try out Fleet with your multiplatform projects, share your experience (good or bad), and provide feedback on the features that matter to you. Since the Kotlin Multiplatform support in Fleet is Experimental, your feedback and comments will impact how the product grows and matures.
You can leave comments on YouTrack or in the #fleet channel in Slack.
What's next?
Learn more about JetBrains Fleet