Environments
A cloud environment is a Docker container that runs on a virtual machine in the cloud. JetBrains Air creates this environment for the task and runs the agent in it.
Use environment configuration to make the remote environment fit your project requirements. For example, you can choose the VM size, control internet access, and provide environment variables and secrets.
Create environment configurations in the web version of JetBrains Air: .

When you create a cloud task, you select either an environment configuration or a repository. If you select a repository, JetBrains Air uses the default configuration. Learn how to run cloud tasks.
Default environment
If you select only a repository when you create a cloud task – without choosing an environment configuration – JetBrains Air runs the task in the default environment.
The default configuration uses the default image and does not add any custom variables, secrets, or internet access rules. This is the simplest option and is enough for tasks that do not require project-specific setup.
The default image includes almost all common tools and frameworks.
Personal and project environments
An environment configuration is either personal or owned within a project:
Personal – you create it for yourself, and only you can use it until you share it with other users, service accounts, or user groups.
Project – you create it from a project page. It's automatically shared with every project member, and deleting the project deletes the configuration. Learn about project environments.
Create an environment configuration
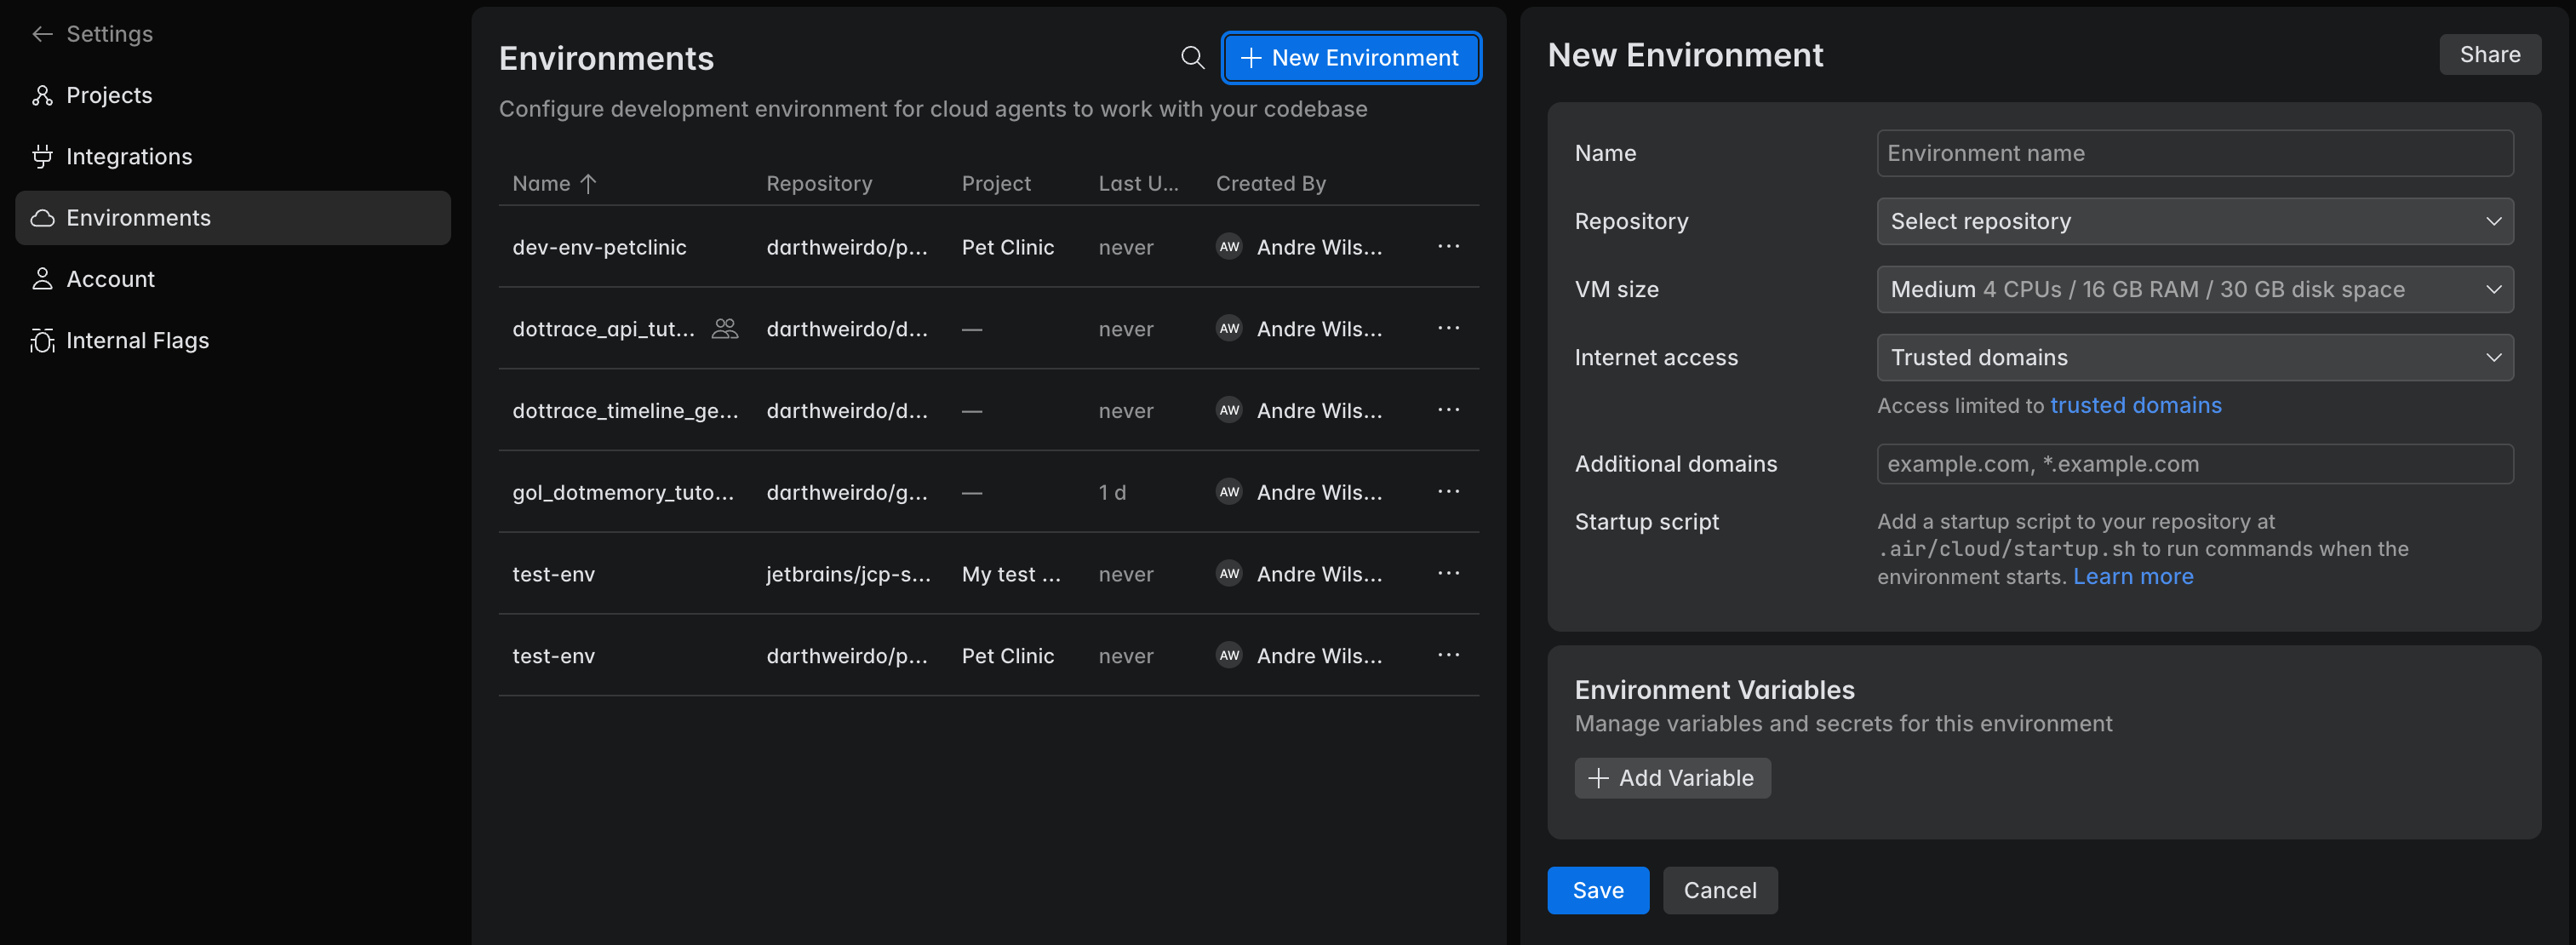
Create an environment configuration for a repository, then select it when you run a cloud task.
Create an environment configuration
Open the web version of JetBrains Air at https://air.jetbrains.cloud.
Go to .
Click New Environment.
Select the repository.
Configure the environment:
Name – a unique configuration name.
Repository – the repository this configuration applies to.
VM Size – the amount of CPU, RAM, and disk space available for the task.
Learn about VM sizesInternet access – whether the agent can access the internet, and if so, which domains it can reach.
Learn how to configure internet accessAdditional domains – extra domains that are allowed when internet access is limited.
Environment Variables – variables and secrets available to the agent in the cloud environment. Add plain-text variables, personal secrets, or shared secrets.
Learn how to add variables and secrets
Click Save.
Now you can select this configuration when you run a cloud task for this repository.
Share an environment configuration
By default, an environment configuration is personal – only you can see and use it. Share it with other users, service accounts, or user groups so they can run cloud tasks with the same setup. Service accounts and user groups come from JetBrains Central Console.
Share an environment configuration
In , open the configuration you want to share, or create a new one.
Click Share.
In Search names, emails, or user groups, find a user, service account, or user group, then click Add.
To copy a link to the configuration page, click Copy link. The link only points to the configuration in the web version of JetBrains Air – it does not grant access.

Set each person's access to Can edit or Can view.
Save the configuration.
Everyone you add appears under People with access. To change someone's access, open the access selector next to their name and choose Can edit or Can view. To revoke access, choose Remove.
Access levels
Each person with access to a shared configuration has one of these access levels.
Access level | What it allows |
|---|---|
Owner | Edit the configuration and share it with other users, service accounts, or user groups. When you create a configuration, you automatically become its owner and the configuration is tied to your account. |
Can edit | Edit the configuration and share it with other users, service accounts, or user groups. |
Can view | Run cloud tasks using the configuration. |
Secrets in a shared configuration
When you share a configuration, its plain environment variables and shared secrets become available to everyone with access. Personal secrets behave differently: they are never shared, so the people you share the configuration with don't see them and must create their own.
For details on the variable types, see Add environment variables and secrets.
Use a custom image
Custom Docker images for cloud environments are not supported yet. This functionality is planned.
Add environment variables and secrets
Under Environment Variables, store values that the agent receives as environment variables in the cloud environment, such as configuration flags, tokens, passwords, or API keys.
Add a variable or secret
Under Environment Variables, click Add Variable.
Select a Type, then enter a Name and Value.

Save the configuration.
The type controls how the value is stored and who can see it once the configuration is shared:
Type | Storage | Visible to | Use for |
|---|---|---|---|
Environment variable | Plain text | Everyone with access | Non-sensitive configuration values |
Personal secret | Encrypted | Only user | Sensitive values for personal use, e.g., a personal API token |
Shared secret | Encrypted | Everyone with access | Sensitive values the whole team shares, such as a common service token |
Limit internet access
Use Internet access to control which external sites the agent can reach from the cloud environment. Limiting internet access helps reduce the risk of unintended access to untrusted resources.
The following modes are available:
Off – no internet access.
Specified domains – access only to domains you list in Additional domains.
Trusted domains – access to a preset list of domains commonly used for downloading dependencies, plus any domains you add manually.
The preset includes common source control, package management, and dependency domains.
alpinelinux.org anaconda.com apache.org apt.llvm.org archlinux.org azure.com bitbucket.org bower.io centos.org cocoapods.org continuum.io cpan.org crates.io debian.org docker.com docker.io dot.net dotnet.microsoft.com eclipse.org fedoraproject.org gcr.io ghcr.io github.com githubusercontent.com gitlab.com golang.org google.com goproxy.io gradle.org hashicorp.com haskell.org hex.pm java.com java.net jcenter.bintray.com json-schema.org json.schemastore.org k8s.io launchpad.net maven.org mcr.microsoft.com metacpan.org microsoft.com nodejs.org npmjs.com npmjs.org nuget.org oracle.com packagecloud.io packages.microsoft.com packagist.org pkg.go.dev ppa.launchpad.net pub.dev pypa.io pypi.org pypi.python.org pythonhosted.org quay.io ruby-lang.org rubyforge.org rubygems.org rubyonrails.org rustup.rs rvm.io sourceforge.net spring.io swift.org ubuntu.com visualstudio.com yarnpkg.comAll domains – unrestricted internet access.
Add your own domains
Use Additional domains to add domains that are required for your project but are not included in the preset list.
Enter one domain per line. You can specify exact domains such as example.com and wildcard domains such as *.example.com.
Run commands before the agent session
To run commands before the agent session starts, add the file .air/cloud/startup.sh under the repository root. JetBrains Air runs this script in the cloud environment after it clones the repository but before the agent starts working on the task.
Use this script for environment setup, for example, to install tools, prepare configuration files, or initialize project-specific resources.
The list below describes how the startup script works and how to use it:
When it runs – every time JetBrains Air starts the cloud environment for the task, both when you first create the task and every time you resume it later.
Run order – the script runs after JetBrains Air clones the repository but before the agent starts. The repository is already checked out, and the script starts in the project root.
User – the script runs as the environment user with
sudorights.Access to environment variables – the script can read everything already present in the environment, including the variables and secrets from your environment configuration.
Set variables for the agent – the script runs in a separate process, so variables you
exportin it are not passed to the agent session. To make a variable available to the agent, append it to~/.bashrc. Add it only when it isn't already present so that resuming the task doesn't create duplicate entries (see below).Idempotency – make the script idempotent.
The following example installs a tool, prepares a configuration directory, and sets a variable for the agent. Each step is skipped when the work is already done, so the script does nothing on resume:
#!/bin/sh set -e # Install tools only if they are missing if ! command -v jq >/dev/null; then apt-get update apt-get install -y jq fi # Create the configuration directory if it doesn't exist mkdir -p ~/.config/my-tool # Add a variable for the agent only once grep -q MY_TOKEN ~/.bashrc || echo 'export MY_TOKEN=secret-value' >> ~/.bashrcLogs – the startup script output is included in the environment logs, which you can download for debugging.
Failure behavior – if the script exits with a non-zero code, the task still starts and the agent runs. Check the logs to confirm the script completed as expected.
Configure VM resources
The VM Size sets the amount of CPU, RAM, and disk space available for the task. Cloud environments use predefined VM sizes that you select in the environment configuration.
The following predefined VM sizes are available:
Small – 2 CPUs / 8 GB RAM / 20 GB disk space
Medium – 4 CPUs / 16 GB RAM / 30 GB disk space
Large – 8 CPUs / 32 GB RAM / 50 GB disk space
Extra Large – 16 CPUs / 64 GB RAM / 100 GB disk space
Custom VM sizes are not available yet. In a future release, you'll be able to define your own VM sizes.