
Docker Compose and Multiple Containers
Learn to use multiple containers to run a complete ASP.NET Solution.
Up to this point in the tutorial, we've created a .NET console application and an ASP.NET Core web application. That's a great start on our Docker journey, but containerization is about distributed systems, right? Let's add a database to our ASP.NET Core web application and use Docker Compose to create a logical application.
Using the application we created in the previous section, let's modify our project. We'll start by adding two NuGet packages of Dapper and System.Data.SqlClient, which will allow us to query our eventual Microsoft SQL Server instance.
<Project Sdk="Microsoft.NET.Sdk.Web">

    <PropertyGroup>
        <TargetFramework>net5.0</TargetFramework>
        <DockerDefaultTargetOS>Linux</DockerDefaultTargetOS>
    </PropertyGroup>

    <ItemGroup>
      <PackageReference Include="Dapper" Version="2.0.78" />
      <PackageReference Include="System.Data.SqlClient" Version="4.8.2" />
    </ItemGroup>

</Project>
Now, let's modify our ASP.NET Core application to register a SqlConnection instance along with using it to query our database.
using System.Data;
using System.Data.SqlClient;
using Microsoft.AspNetCore.Builder;
using Microsoft.AspNetCore.Hosting;
using Microsoft.AspNetCore.Http;
using Microsoft.Extensions.Configuration;
using Microsoft.Extensions.DependencyInjection;
using Microsoft.Extensions.Hosting;
using Dapper;

namespace HelloDockerWeb
{
    public class Startup
    {
        private IConfiguration Configuration { get; }

        public Startup(IConfiguration configuration)
        {
            Configuration = configuration;
        }

        public void ConfigureServices(IServiceCollection services)
        {
            services.AddTransient<IDbConnection>(_ => {
                var connectionString = Configuration.GetConnectionString("mssql");
                var connection = new SqlConnection(connectionString);
                connection.Open();
                return connection;
            });
        }

        public void Configure(IApplicationBuilder app, IWebHostEnvironment env)
        {
            if (env.IsDevelopment())
            {
                app.UseDeveloperExceptionPage();
            }

            app.UseRouting();

            app.UseEndpoints(endpoints =>
            {
                endpoints.MapGet("/", async context =>
                {
                    var connection = context
                        .RequestServices
                        .GetRequiredService<IDbConnection>();

                    var result = await connection
                        .QueryFirstAsync<string>("Select @@version");

                    await context.Response.WriteAsync(result!);
                });
            });
        }
    }
}
Finally, let's add a connection string to our yet-to-be-created database instance. In our appsettings.json file, we need to add a new ConnectionStrings section.
{
	"Logging": {
		"LogLevel": {
			"Default": "Information",
			"Microsoft": "Warning",
			"Microsoft.Hosting.Lifetime": "Information"
		}
	},
	"AllowedHosts": "*",
	"ConnectionStrings": {
		"mssql": "Server=mssql;Database=master;User Id=sa;Password=Pass123!;"
	}
}
Our next step is to create a docker-compose.yml file in our project. As mentioned previously, Docker Compose is a tool that allows us to define our application topology. We can configure any number of services and describe their relationship to each other. Once we've created an empty docker-compose.yml file in our project, we'll want to paste the following description.
version: "3.3"
services:
  web:
    container_name: web
    build:
      context: ..
      dockerfile: ./HelloDockerWeb/Dockerfile
    depends_on: [mssql]
    ports:
      - "8080:80"
  mssql:
    image: "mcr.microsoft.com/mssql/server"
    container_name: mssql
    hostname: mssql
    environment:
      SA_PASSWORD: "Pass123!"
      ACCEPT_EULA: "Y"
    restart: unless-stopped
    ports:
      # So we can access the database
      # From a tool like JetBrains Rider
      # Optional for this demo
      - "11433:1433"
As we can see, our Compose definition has two services.
The web application uses the Dockerfile we defined in our previous example. We can set the file context, along with what other services this container requires. Finally, we map our port 80 on the container to our host port of 8080.
The Microsoft SQL Server container uses a Linux variant of the popular database. Reading the image's documentation, we must set an administrator password and accept the end-user license agreement. We also set the hostname to mssql, which we've used in defining the connection string.
We may have noticed several run markers appearing in our editor when we pasted the compose definition. Compose allows us to start the complete description or select elements of the application. In this case, we'll select the top-most run mark, which will execute a docker-compose up command. Our Deploy Log should contain messages from both containers.
Note the message describing the creation of a network. Our containers can now communicate with each other through this virtual network.
/usr/local/bin/docker-compose -f /Users/khalidabuhakmeh/Projects/Dotnet/HelloDockerWeb/HelloDockerWeb/docker-compose.yaml up
Creating network "hellodockerweb_default" with the default driver
Creating mssql ... done
Creating web   ... done
Attaching to mssql, web
mssql    | SQL Server 2019 will run as non-root by default.
mssql    | This container is running as user mssql.
mssql    | To learn more visit https://go.microsoft.com/fwlink/?linkid=2099216.
web      | info: Microsoft.Hosting.Lifetime[0]
web      |       Now listening on: http://[::]:80
web      | info: Microsoft.Hosting.Lifetime[0]
web      |       Application started. Press Ctrl+C to shut down.
web      | info: Microsoft.Hosting.Lifetime[0]
web      |       Hosting environment: Production
web      | info: Microsoft.Hosting.Lifetime[0]
web      |       Content root path: /app
Using a web browser, we can navigate to the URL http://localhost:8080 and see the result of our application.
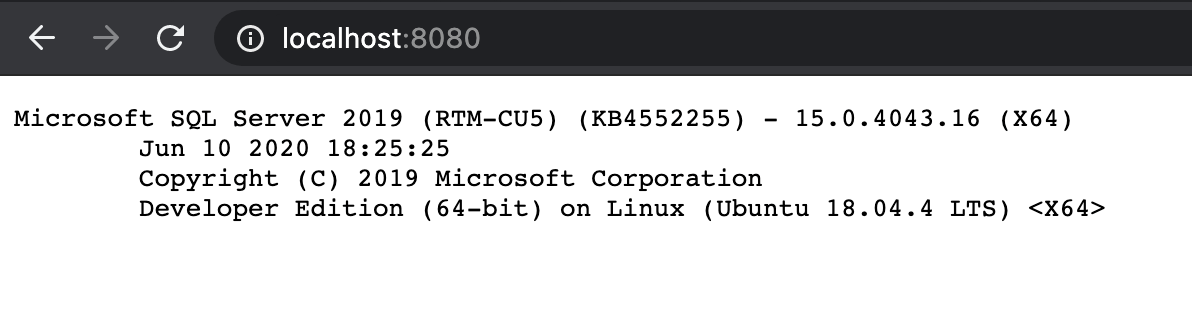
Now that's taking it to another level! The application topologies we can create are limitless and as straightforward to start and stop as a single command.
Development Caveats and Workarounds
In this example, we saw that we build our application directly into an image and ran a container instance. These container instances are long-lived and don't automatically retrieve the latest changes to our C# code. There are several recommended workarounds to this particular issue.
Develop Outside Of Docker
The Compose definition is helpful for deployment and can help us run third-party services while developing locally. We mentioned that we could selectively start services, and we could choose to stop our ASP.NET Core container. We can continue working and running our application on our host machine while accessing our application topology services.
This approach will achieve a faster development loop, although our application will no longer be part of the virtual network. We need to ensure that our configuration uses the mapped ports on the host rather than the internally exposed ports. Luckily for us, ASP.NET Core has configuration overrides that make this straightforward and convenient.
Mount The Development Directory
We've mentioned volumes in previous sections, and this is a way to create a faster development loop without restarting the container. We would effectively develop and build within our development environment while mounting the project folder as a volume.
The following service will use the dotnet/sdk image to run our application and mount our local development directory. We need the SDK to utilize the watch tool.
web_develop:
  container_name: web_development
  image: "mcr.microsoft.com/dotnet/sdk:5.0"
  depends_on: [mssql]
  volumes:
    - ./:/app
  command: dotnet watch --project ./app run --urls "http://0.0.0.0:80"
  ports:
    - "8081:80"
When we change any files on our host operating system, our container will stop the running web process and restart with updated assemblies.
Deleting and Rebuilding Containers
If we want to run everything inside a Docker environment, we can delete containers and have Docker rebuild them. To accomplish this, we'll need to edit the run configuration for our web service. Adding a docker-compose option of Build: always will ensure we rebuild our image when we restart our container.

While this technique is effective, it can be somewhat slow because we need to rebuild the container on deployment.