Automation triggers
A trigger is a run rule for the automation. It sets three things: what starts a run, which branch the run works on, and what Air Teams does with the changes the run produces. An automation can have several triggers, and each trigger can handle changes differently. It can also have none, and then it runs only when you start it manually.

You add triggers in the Triggers section when you create an automation or edit an existing one. Click Add Trigger and select a start condition. Each trigger row then has up to three parts:
Start condition – the event or schedule that starts a run. See Start conditions.
Branch – the branch the run checks out, chosen with the checkout selector. Pull request triggers don't show this selector – they run on the pull request's source branch.
What to do with the changes – whether the run commits them, opens a pull request, or reports back without touching the code. See What to do with the changes.
Start conditions
The start condition is the event or schedule that starts a run. Choose one when you add the trigger.
Schedule
Use the At time trigger to run the automation at a specific time on selected days. This is useful for recurring daily or weekly routines.
Repetitive run
Use the Repeat every trigger to run the automation on a fixed interval, for example, every 2 hours.
GitHub events
Use GitHub event triggers to start automations in response to activity in a repository. They work on repositories from GitHub and from a self-hosted GitHub Enterprise Server instance.
Once the JetBrains Air app is installed for your personal or organization account, Air Teams automatically receives notifications for repositories covered by that installation. For a GitHub Enterprise Server instance, an organization administrator registers the instance in JetBrains Console and the app is installed there. Either way, there is no separate GitHub webhook setup inside the automation itself.
Each GitHub event trigger maps to a single GitHub action, so the automation runs only when that exact action happens, not on every change to the pull request or issue.
Pull request events:
PR opened – a new pull request is created. Reopening a closed pull request doesn't fire this trigger.
PR moved out of draft – a draft pull request is marked ready for review.
PR has new changes – new commits are pushed to the pull request branch. This is the GitHub
synchronizeaction. It doesn't fire on comments, label changes, or edits to the title or description.PR merged – the pull request is merged into its target branch. Closing a pull request without merging doesn't fire this trigger.
PR review requested – a review is requested from a user or team on the pull request.
PR review received – a review is submitted on the pull request. Use the Any review selector to react only to approvals, change requests, or comments.
PR labeled – a label is added to the pull request. Enter the label in the Label name field. Removing a label doesn't fire this trigger. If you add several labels at once, the trigger fires once per label.
Issue events:
Issue opened – a new issue is created.
Issue label – a label is added to an issue. Enter the label in the Label name field. Removing a label doesn't fire this trigger. If you add several labels at once, the trigger fires once per label.
Workflow events, which rely on GitHub Actions:
Workflow failed – a GitHub Actions workflow run fails. Use this to investigate a failed build or prepare a recovery change.
Workflow job failed – a single job within a GitHub Actions workflow fails. Enter a name in the Job name field to react only to a specific job.
To make repositories and their events available, see Connect repositories.
Filters:
A GitHub event trigger can also carry filters – extra conditions the event has to meet before the trigger fires. On PR opened, for example, add PR author to run only on one person's pull requests, or Ignore drafts to skip drafts.
To add a filter, expand the trigger row, click Add Filter, and select the filter. Which filters are offered depends on the event, and a trigger with several of them fires only when all of them match.
Jira events
Use Jira event triggers to start automations from activity on a Jira issue. They work once a Jira administrator has connected your Jira instance to Air Teams – see Connect Jira. Until then, a Jira trigger can't be saved.
To add one, click Add Trigger, select , and pick the event:
Issue created – an issue is created.
Issue labeled with – a label is added to an issue. Enter the label. The trigger fires when that label is added, not on later updates to an issue that already carries it.
Issue assigned to – an issue is assigned. Enter the assignee.
Issue status changed to – an issue moves to a status. Enter the status.
Issue priority changed to – an issue's priority changes. Enter the priority.
Issue resolved – an issue gets a resolution.
Issue commented – a comment is added to an issue. Optionally, enter text the comment must contain.
Jira delivers most of these as the same generic issue-updated event, so the value you enter is what tells Air Teams which change to react to. It's required for that reason – an empty one would widen the trigger to every update to the issue.
Every Jira trigger also takes an optional project key in the in project field. Leave it empty to react to issues in any project the webhook covers.
A Jira trigger can handle its changes as either Create a PR or No code changes – see What to do with the changes.
Incoming webhooks
Use the Webhook trigger to start an automation from an external system. This is useful when another service needs to notify Air Teams about an event and trigger an automation run.
After you add the trigger and save the automation, Air Teams generates:
a webhook URL in the format
.../api/v1/events/automations/<automation-id>a permanent token used to authorize requests to this webhook
Use Copy Webhook URL and Copy Token to copy these values from the trigger section.
Configure your external system to send an HTTP POST request to the webhook URL and include the token in the Authorization header as Authorization: ApiKey <token>.
The request body is optional. You can send a webhook without any payload if the automation only needs the event itself.
If you want to pass additional input to the automation task, send a JSON payload in the request body. This payload becomes part of the task context.
For example:
What to do with the changes
Tell the trigger what Air Teams does with the changes a run produces. This decides where the result lands, so you can send an automation straight to a pull request or keep it review-only. For what you can do with a run afterward, see Work with automation run results.
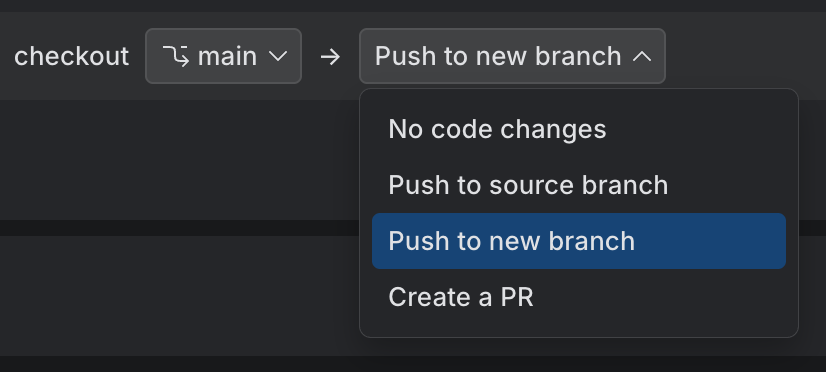
No code changes – the run doesn't commit or push anything. Use it for automations that analyze, triage, or report and return their result through the run output or a notification.
Push to source branch – commits and pushes the changes to the branch the run worked on: the checked-out branch, or the pull request's source branch. Use it to add commits to an existing pull request or update a branch in place.
Push to new branch – creates a new branch for the run's changes and pushes to it, without opening a pull request. You can open one later from the run.
Create a PR – pushes the changes to a new branch and opens a pull request automatically.