Quickstart for organizations enrolled in the partnership program
To get started with JetBrains Central Console, an organization administrator first enables AI for users. Once that organization-level configuration is done, users with AI access can run the AI-powered tools managed through JetBrains Central Console.
Enable AI in your organization
Log in to your organization's dedicated instance created for the partnership program. The URL should be in the following format:
console.jetbrains.cloud/org/<organization-UUID>.<organization-UUID>is the organization's unique identifier created specifically for the partnership program.Read and accept the Terms of Service.
Assign All Products Pack (APP) licenses to all users who will be part of the partnership program.
For more information, see Assigning licenses to users.
Enable AI for the organization or for individual users.
After completing the previous steps, users in your organization will be able to use AI-powered tools.
AI-powered tools
Once the administrator has configured AI for your organization through JetBrains Central Console, you can start using various AI-powered tools.
JetBrains Central CLI
JetBrains Central CLI is a command-line tool that lets you proxy supported AI coding agents through JetBrains Central. You will not need to authenticate directly through agent vendors to run Claude Code, Codex, Gemini CLI, and other agents. JetBrains Central handles the authentication, usage tracking, and billing.
For more information, see JetBrains Central CLI documentation.
JetBrains Air
JetBrains Air is an agentic development environment (ADE) where you delegate coding tasks to AI agents and stay in control of the workflow.
For more information, see JetBrains Air documentation.
You can run JetBrains Air as either a desktop or web application.
JetBrains Air desktop app
The JetBrains Air desktop app can work with your local codebase and run tasks in the cloud.
Download and install the latest EAP version of JetBrains Air.
EAP builds for macOS and Windows are available both through air.dev and the JetBrains Toolbox App.
Linux builds are available only through the JetBrains Toolbox App.
Log in with the account that belongs to the organization enrolled in the partnership program.
JetBrains Air web app
The web app requires access to your repositories in a VCS hosting provider and runs tasks in dedicated cloud environments.
In your browser, go to https://air.jetbrains.cloud.
Log in with the account that belongs to the organization enrolled in the partnership program.
Set up access to the repository you want to work on with cloud agents, hosted on GitHub, GitLab, or Bitbucket:
For personal repositories, follow the instructions on how to connect a repository.
For organization repositories, follow the instructions on how to set up organization repository access.
AI in JetBrains IDEs
AI in JetBrains IDEs includes a range of capabilities provided by the AI Assistant plugin. It integrates multiple coding agents out of the box and enables connecting any ACP-compatible AI agent to the IDE. In addition, it includes AI-powered assistance, such as smart in-editor code completion and next edit suggestions, context-aware actions that explain and refactor code, detect issues, generate documentation and commit messages.
For more information about AI Assistant and its capabilities, see AI Assistant documentation.
To start using AI agents and other AI-powered features through AI access provided by your organization, make sure the following conditions are met:
An organization administrator has enabled AI for the organization or for individual users in JetBrains Central Console.
You're logged in to the IDE with the account that belongs to the organization enrolled in the partnership program. This automatically logs you in to JetBrains Central and selects a workspace for you.
You can connect AI Assistant through JetBrains Central by following the instructions below.
Install AI Assistant
Download the latest version of your IDE or install it through the JetBrains Toolbox App.
After installing the IDE, open it and install AI Assistant.
Restart the IDE.
Open the AI Chat tool window.
If you are not automatically logged in to AI Assistant, click Start with JetBrains AI.
Log in with the account that belongs to the organization enrolled in the partnership program.
Use cloud agents
To offload long-running or resource-heavy tasks to the cloud while continuing your work in the IDE, you can run agent tasks remotely.
Before you can run agents in the cloud, make sure the agents you want to run are installed from the agent registry.
Select an agent that supports cloud runs in AI Chat.
A switcher for running it in the cloud appears.
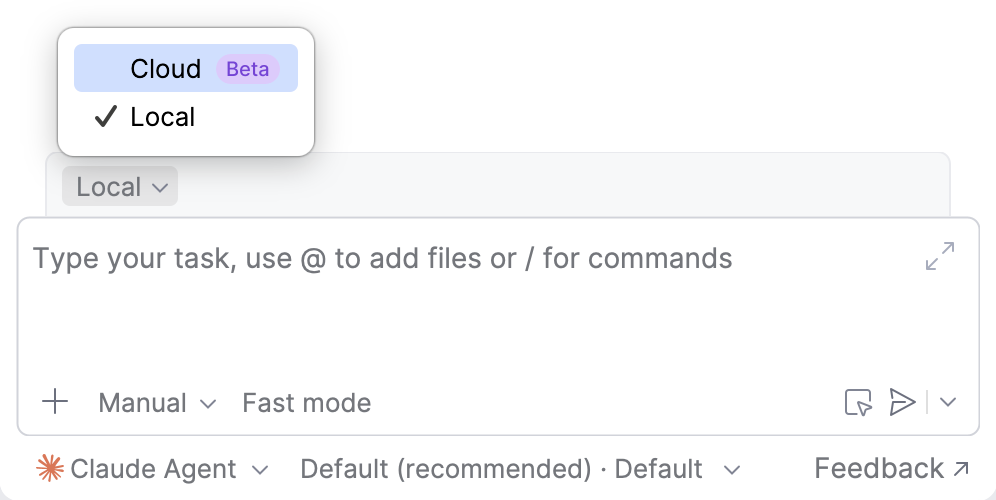
Select the Cloud mode.
Click the branch selector and choose the remote branch the agent will work on. Use the Search remote branch field to filter the list.
Select a model to process your requests.
Write a prompt describing the task and submit it.
The first time you run a cloud agent, you might be prompted to authorize the JetBrains Air GitHub App so the agent can access your repository.
The agent runs in the cloud and produces the results in a separate branch. Once the agent's work is done, you can click View commits to review the results and Merge to merge the changes it created.
Fix JetBrains AI access issues
If you experience problems with AI access provided by your organization through JetBrains Central Console, refer to the sections below for potential ways to resolve them.
Log back in to JetBrains AI
If you get logged out of JetBrains AI or need to log in with the correct organization that manages your AI access through JetBrains Central Console, follow the instructions below.
Press Ctrl+, to open the IDE settings.
Navigate to .
If you're already logged in to JetBrains AI with another organization, click Log out.
Under JetBrains AI, click Activate JetBrains AI.

This opens the starting screen in the AI Chat tool window.
Log in with the correct organization that manages your AI access through JetBrains Central Console.
Select the AI license to use in AI Assistant
Since you can have personal AI licenses or be a member of multiple organizations, you need to make sure you're using the AI access managed by your organization in JetBrains Central Console. To do this, check whether the right JetBrains AI license is selected in AI Assistant.
In the AI Chat tool window, click
 Options to open the settings.
Click Manage License.
A list of all available JetBrains AI licenses is displayed.
Select the one that is managed by your organization and click Activate. This labels the selected license as Active.
If the license you want to activate isn't in the list, click Refresh license list.