
Local .NET Development With Docker
Learn how to work with Docker and JetBrains Rider in our development environment.
At this point in the tutorial, you may be formulating ideas and thoughts around containerization, what it is, and if it is for you. This section will start using Docker with several types of .NET applications and see what the experience is like for an average .NET developer.
For the following tutorials, we'll be using JetBrains Rider and the .NET 5 SDK. We'll also need Docker Desktop installed to run our containers.
Docker Hello, World
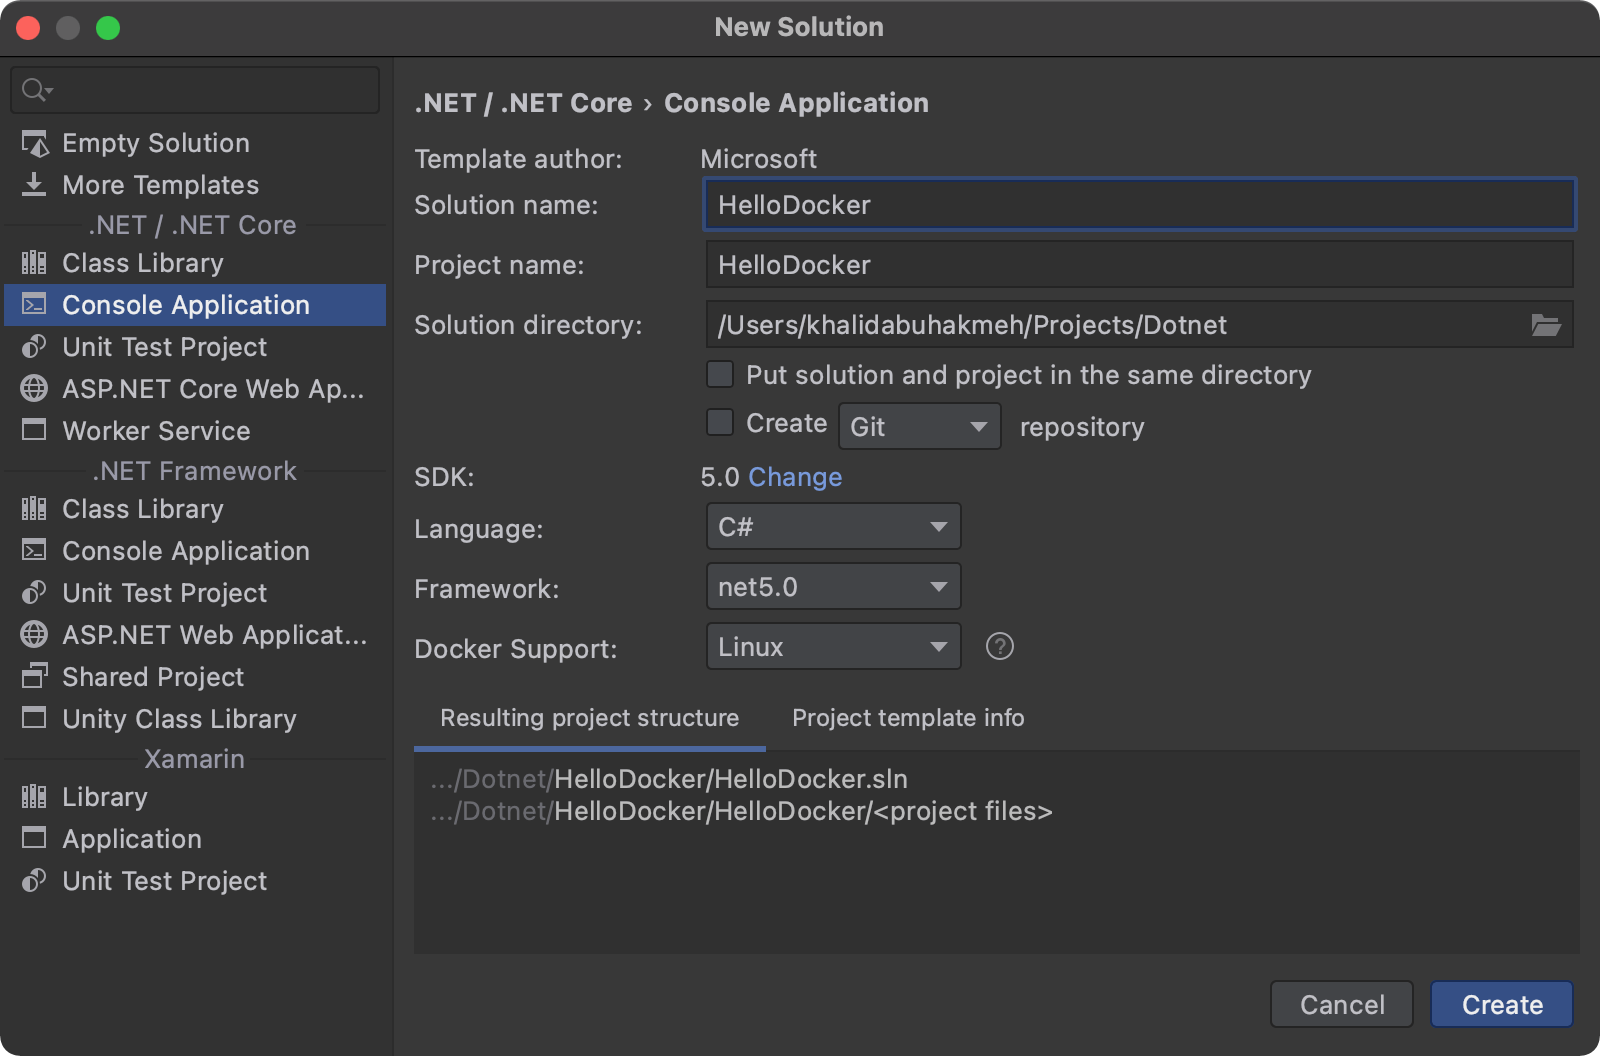
What tutorial would be complete without a "Hello, World" application? Starting from JetBrains Rider's new solution dialog, we can select Console Application from the templates. In the configuration window on the right, we need to pick the Linux option from the Docker Support selection.
Once our solution is created and loaded, we'll see three files in our new console project: Program.cs, Dockerfile, and .dockerignore. Before we look at the Dockerfile, let's change the output of our console application.
using System;
Console.WriteLine("Hello Docker!");
Now, let's open our Dockerfile and see what's happening line by line. The default Docker definition that comes with the .NET 5 templates does something familiar in the Docker ecosystem. It utilizes two images to create a final image. Our application's final image will be much smaller because it will only be using the .NET runtime rather than the entire SDK.
FROM mcr.microsoft.com/dotnet/runtime:5.0 AS base
WORKDIR /app

FROM mcr.microsoft.com/dotnet/sdk:5.0 AS build
WORKDIR /src
COPY ["HelloDocker/HelloDocker.csproj", "HelloDocker/"]
RUN dotnet restore "HelloDocker/HelloDocker.csproj"
COPY . .
WORKDIR "/src/HelloDocker"
RUN dotnet build "HelloDocker.csproj" -c Release -o /app/build

FROM build AS publish
RUN dotnet publish "HelloDocker.csproj" -c Release -o /app/publish

FROM base AS final
WORKDIR /app
COPY --from=publish /app/publish .
ENTRYPOINT ["dotnet", "HelloDocker.dll"]
The first line of the Dockerfile denotes our parent image. In this case, we are using the dotnet/runtime image for .NET 5. The second line in our Docker definition file sets our working directory of /app. In this case, we are creating the destination folder for the final build of our application.
FROM mcr.microsoft.com/dotnet/runtime:5.0 AS base
WORKDIR /app
The following section does several operations, including using a different base image of dotnet/sdk, creating a src directory, copying the project file along with the source code of our project, and then building our project into the final output directory of /app/build.
FROM mcr.microsoft.com/dotnet/sdk:5.0 AS build
WORKDIR /src
COPY ["HelloDocker/HelloDocker.csproj", "HelloDocker/"]
RUN dotnet restore "HelloDocker/HelloDocker.csproj"
COPY . .
WORKDIR "/src/HelloDocker"
RUN dotnet build "HelloDocker.csproj" -c Release -o /app/build
Note the use of the AS keyword. We're giving build steps intermediate image names so we can reference them throughout the containerization process. The next few lines will use our previous build image to publish our project, assuming it succeeded to build.
FROM build AS publish
RUN dotnet publish "HelloDocker.csproj" -c Release -o /app/publish
The final section will reuse our base image and copy our build and publish steps into our /app directory. It will also set the entry point for our container, which will run our .NET application.
FROM base AS final
WORKDIR /app
COPY --from=publish /app/publish .
ENTRYPOINT ["dotnet", "HelloDocker.dll"]
Great! Now, let's run this application inside a container. We'll go through two ways: Docker CLI and using JetBrains Rider's Docker integration.
Having stepped through the Dockerfile, a common question newcomers to Docker might ask is:
Why is the
Dockerfiledefinition runningdotnet restorewith just the project file, and only later is it runningdotnet build?
The reason lies in how Docker stores images. Each step in the Dockerfile is a separate read-only layer, and the Docker engine will only replace layers when there are changes. Updating code typically happens more than adding or updating package references, and separating the two ensures that a full package restore is only executed when that layer changes. The management of layers allows Docker to reuse and speed up image builds.
Docker CLI
We need to open a terminal window at the root of the solution, where we'll run the following command to build our Dockerfile into an image. In our case, our project name is HelloDocker, but adjust the command according to your project name. We also have a few optional build flags like --rm, which cleans up any intermediary images, and -t, which will give our new image the name hello-docker helping us find it easily.
Docker persists images on our machine long after a successful build. Persistence increase future build performance, but comes at the cost of disk space. The --rm flag is useful in short-term experiments, where we might be exploring different build configurations.
docker build -f HelloDocker/Dockerfile -t hello-docker --rm .
The . at the end tells the Docker CLI what context it should upload to our container images. If we were to forget to add the path, our Docker image build would fail because Docker will not find our project files.
Running the command, we see the following output in our terminal.
➜ docker build -f HelloDocker/Dockerfile -t hello-docker --rm .
[+] Building 4.7s (18/18) FINISHED
 => [internal] load build definition from Dockerfile                                                                 0.0s
 => => transferring dockerfile: 37B                                                                                  0.0s
 => [internal] load .dockerignore                                                                                    0.0s
 => => transferring context: 2B                                                                                      0.0s
 => [internal] load metadata for mcr.microsoft.com/dotnet/sdk:5.0                                                    0.0s
 => [internal] load metadata for mcr.microsoft.com/dotnet/runtime:5.0                                                0.0s
 => [build 1/7] FROM mcr.microsoft.com/dotnet/sdk:5.0                                                                0.0s
 => [internal] load build context                                                                                    0.0s
 => => transferring context: 6.61kB                                                                                  0.0s
 => [base 1/2] FROM mcr.microsoft.com/dotnet/runtime:5.0                                                             0.0s
 => CACHED [build 2/7] WORKDIR /src                                                                                  0.0s
 => CACHED [build 3/7] COPY [HelloDocker/HelloDocker.csproj, HelloDocker/]                                           0.0s
 => CACHED [build 4/7] RUN dotnet restore "HelloDocker/HelloDocker.csproj"                                           0.0s
 => [build 5/7] COPY . .                                                                                             0.0s
 => [build 6/7] WORKDIR /src/HelloDocker                                                                             0.0s
 => [build 7/7] RUN dotnet build "HelloDocker.csproj" -c Release -o /app/build                                       2.7s
 => [publish 1/1] RUN dotnet publish "HelloDocker.csproj" -c Release -o /app/publish                                 1.8s
 => CACHED [base 2/2] WORKDIR /app                                                                                   0.0s
 => CACHED [final 1/2] WORKDIR /app                                                                                  0.0s
 => CACHED [final 2/2] COPY --from=publish /app/publish .                                                            0.0s
 => exporting to image                                                                                               0.0s
 => => exporting layers                                                                                              0.0s
 => => writing image sha256:b8ff862ff829ece58c3ac884c5bdc895795347caeefd12e7597ce8f2e9ac3912                         0.0s
 => => naming to docker.io/library/hello-docker                                                                      0.0s
Now, let's run our image in a new container using the Docker CLI command run.
docker run hello-docker
Running the command will give us the output from our first running Docker-hosted application.
➜ docker run hello-docker
Hello Docker!
JetBrains Rider Docker Integration
Congratulations, we did it! Now, let's look at the easier way to build and run Docker containers using JetBrains Rider.
JetBrains Rider comes bundled with Docker integration, giving developers who prefer a GUI experience all the tools necessary to define, build, and deploy images. With the Dockerfile in our editor, we'll see two green chevrons in our file's top-left.

Let's set some command-line flags we had during our CLI experience. We need to click the chevrons and select the Edit HelloDocker/Dockerfile option.
![]()
From the Edit Run Configuration dialog, we'll set the Image tag to hello-docker and add the build option of --rm for this straightforward example. If we don't see the build options, we can click the Modify Options and enable the text box.

Once we've applied our changes, we can run them either from the dialog or from the editor window using the chevrons. We'll see our image along with the container in the Services tool window.

We'll talk more about the Services tool window in the following sections of this tutorial.
There we have it! We've created an image from our Dockerfile definition using the Docker CLI and JetBrains Rider's docker integration. Developers should be familiar with the CLI, but there's no beating the convenience of clicking a few buttons.