
Authentication for Go Applications: The Secure Way
This article compares the pros and cons of five different authentication methods: Basic HTTP, bearer token, JWT, OIDC, and SAML.
This tutorial was created by an external contributor, Milap Neupane.
Authentication for Go Applications: The Secure Way
Authentication verifies the identity of your system users, where a user could be another system or a person trying to access the system. Authentication is the first and most important step for system security. It helps identify your users, and once they're identified, you can check user authorization before providing access to system resources.
There are different ways you can implement authentication for your application. Choosing between single sign-on or PLAIN authentication can be confusing. Security is something you don't want to compromise on when deciding on an authentication mechanism for your application.
This article compares the pros and cons of five different authentication methods: Basic HTTP, bearer token, JWT, OIDC, and SAML. For the comparison, you'll build a simple REST API in Go and then secure the API using each method. The article also discusses some best practices to make your API as secure as possible.
Building a Simple REST API
You will be building a simple REST API that responds with a JSON object containing "data" as the name and "resource data" as the value:
{ "data": "resource data" }
To follow this article, you need to have Go installed on your computer. The following are the basic tools you'll be using to design the API:
- Go
- GoLand IDE
- The Gin HTTP web framework
- The GoLand HTTP client
Go has a simple-to-use, powerful set of standard library packages. You can also use the Go standard library net/http to build HTTP servers. However, this article focuses on using the Gin HTTP web framework to build the REST endpoints. Because Gin has wrappers for things like route registration and deserialization, it reduces boilerplate in your code and makes the code simple. Along with simplicity, Gin is still lightning fast and a good choice to build HTTP servers.
Initializing the Project
Start by creating a new project in GoLand for the service where you will be building the authenticated APIs. Navigate to File | New | Project:
Your new project will have a go.mod file where your dependencies will be managed.
Adding a /resource Endpoint
You need to create a /resource endpoint to return the resource data. Create a main.go file with the following code to run the application server, which serves the /resource endpoint:
package main

import (
  "net/http"

  "github.com/gin-gonic/gin"
)

func main() {
  r := gin.Default()
  r.GET("/resource", func(c *gin.Context) {
    c.JSON(http.StatusOK, gin.H{
      "data": "resource data",
    })
  })
  r.Run() // Listen and serve on 0.0.0.0:8080 (for Windows "localhost:8080")
}
Since Gin is a dependency, you need to add it to your project. Place your cursor on that red dependency, press Alt+Enter (⌥ ↩), and choose Sync dependencies of ….
Run the server with the following command:
> go run main.go
Testing the /resource Endpoint Using an HTTP Client
Once the service is running, you can test the endpoint using a REST HTTP client. Throughout the rest of the tutorial, you'll be using the GoLand HTTP Client to make HTTP requests to the endpoint that you're building. With the GoLand HTTP Client plugin, you can create, edit, and execute HTTP requests directly in the GoLand code editor. It's very helpful when you are developing a RESTful web service, and you want to test if the endpoint is functioning correctly.
You're going to define HTTP requests in a file called req.http. Defining an HTTP request is very simple and can be done using the following format:
###
Method Request-URI HTTP-Version
Header-field: Header-value

Request-Body
Alternatively, you can click + on top of the request's editor panel, which will pop up the menu to choose the type of request you want to add:

Type the following to create a GET /resource endpoint:
GET http://localhost:8080/resource
Accept: application/json

###
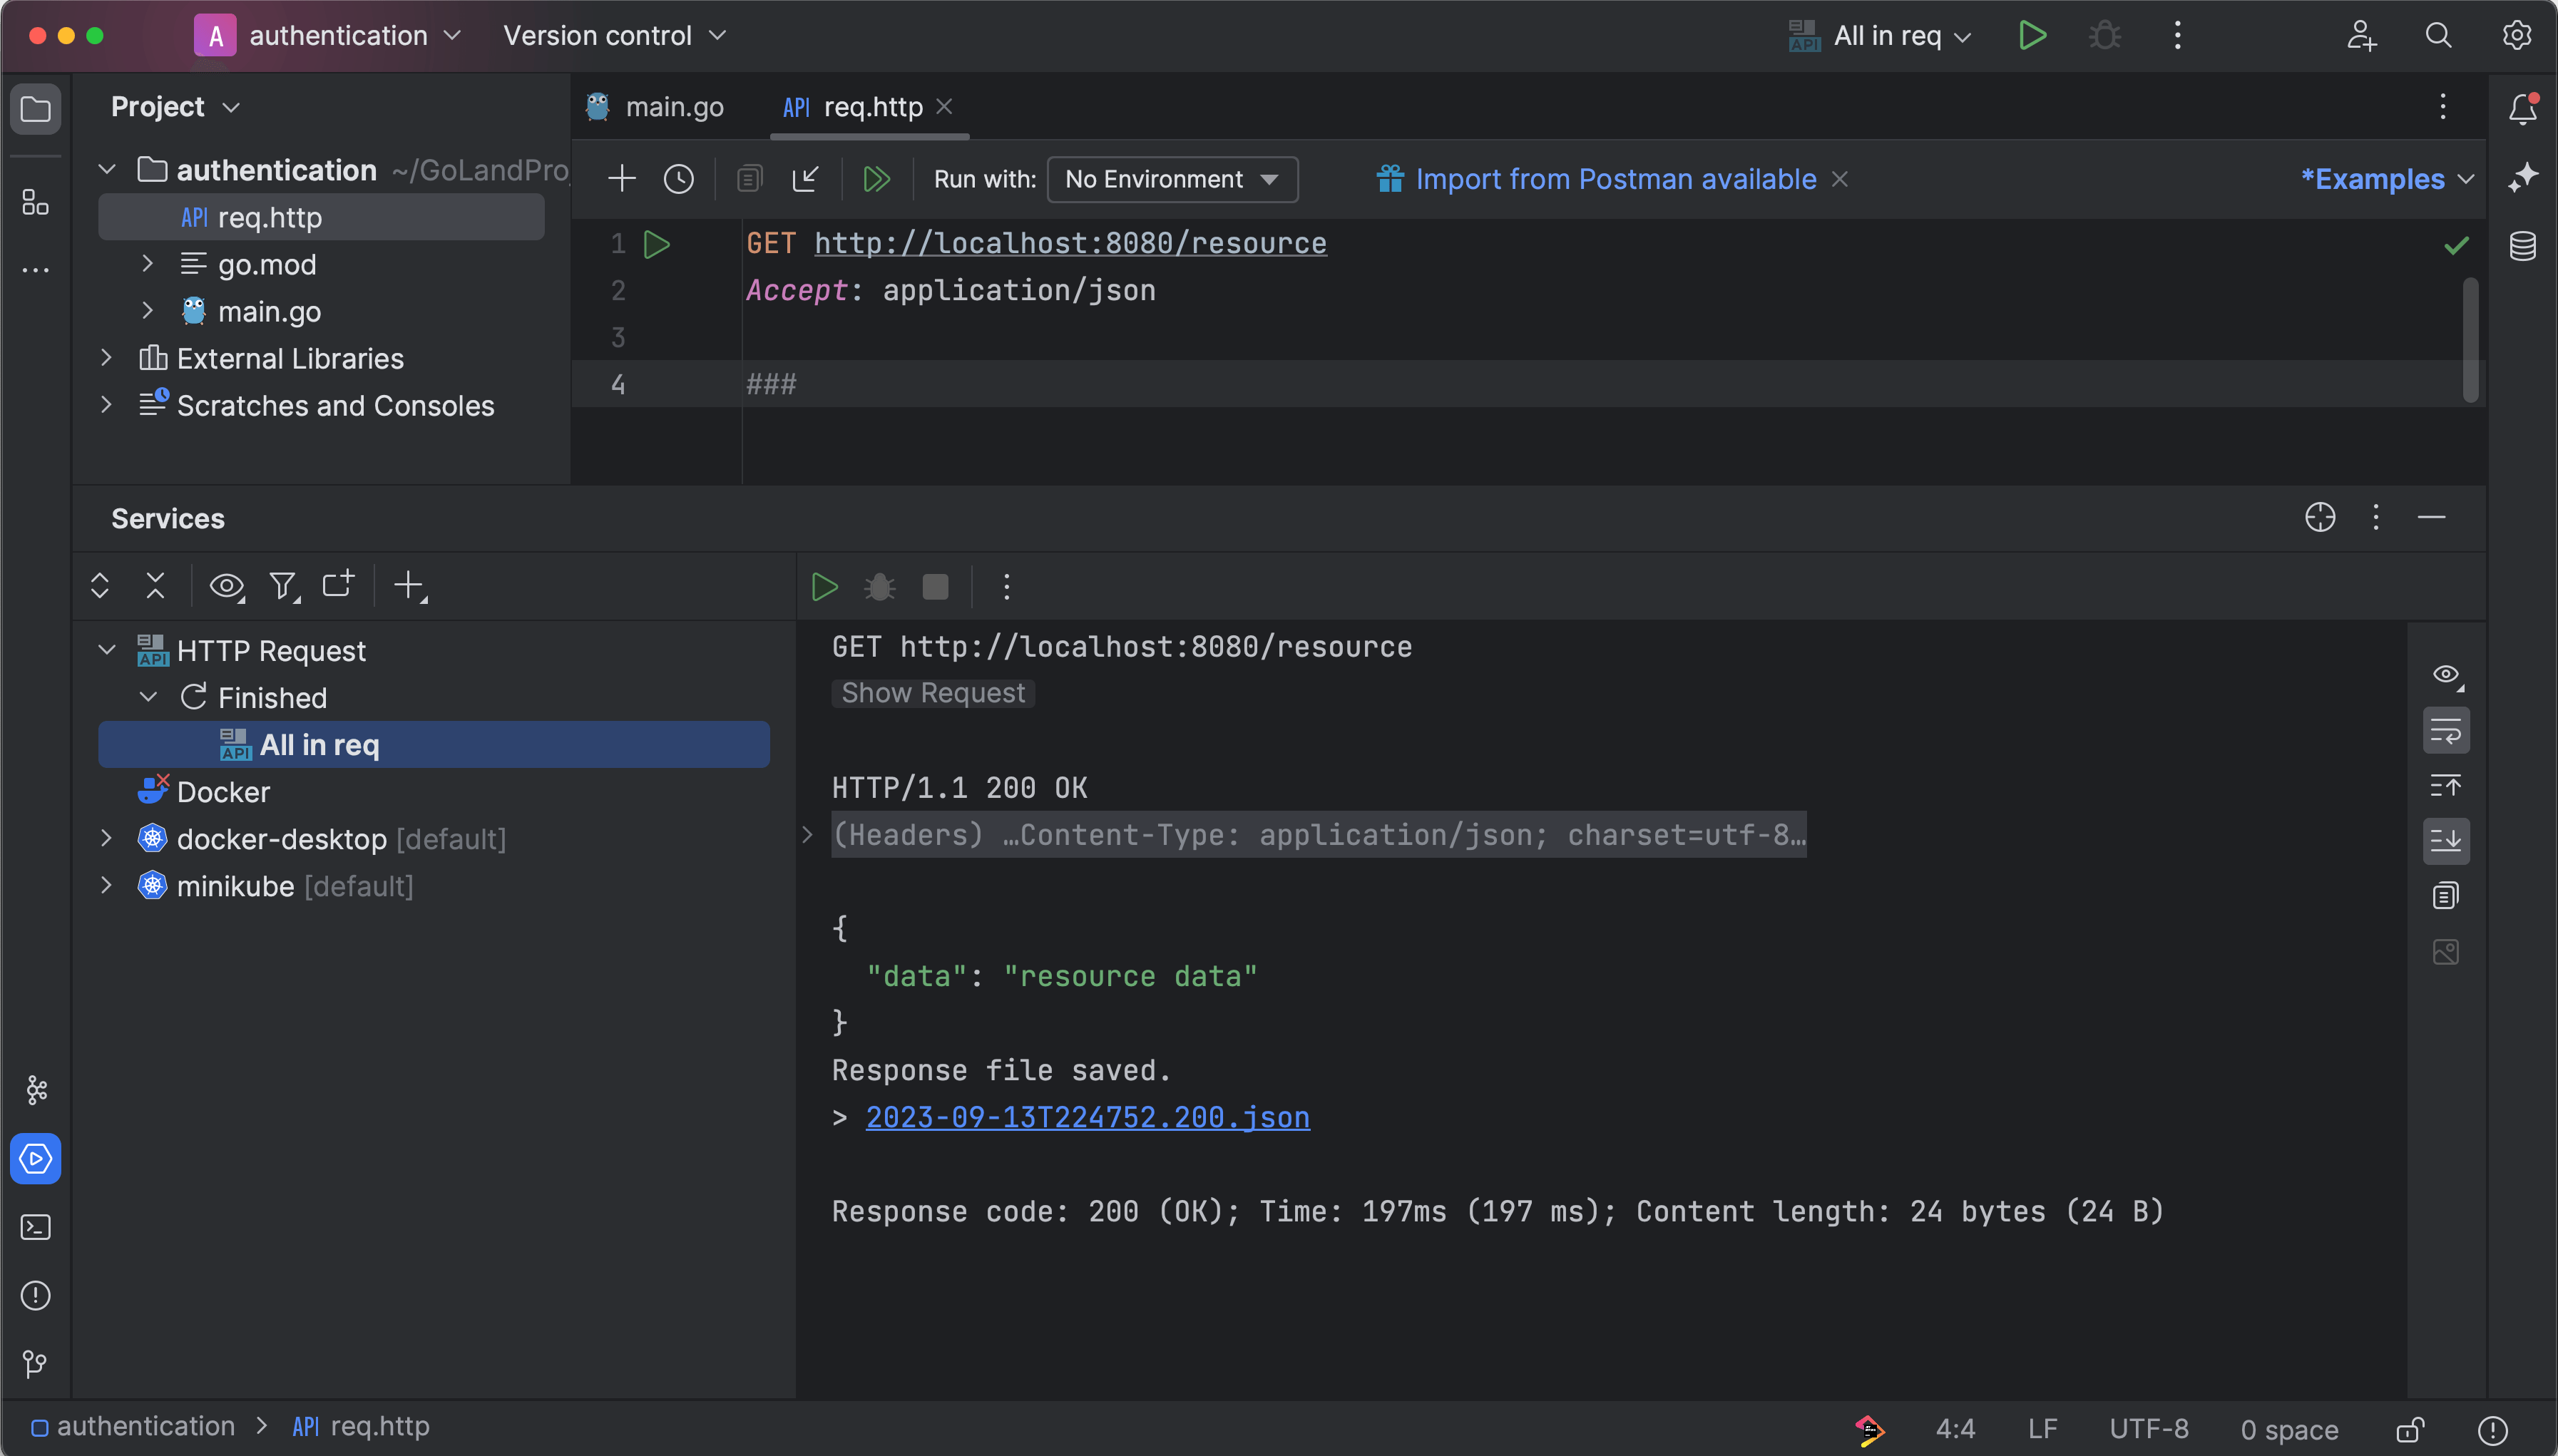
Your endpoint is now up and running. However, the resource served from the endpoint is not protected by authentication, which means your data is accessible to anonymous users. Let's dive into the article's core and examine different authentication methods in Go.
Different Methods of Authentication
Authentication allows you to secure your endpoints by only allowing authenticated users to access protected resources. It's the most important aspect of your application security, so choosing the right authentication method is essential. The following sections demonstrate five different ways you can implement authentication in Go:
- Basic HTTP authentication
- Bearer-token-based authentication
- JWT-based authentication
- OIDC
- SAML
Basic HTTP Authentication
Basic auth is a built-in HTTP protocol authentication scheme and the easiest way to authenticate your APIs. You send the word Basic followed by the Base64-encoded <username>:<password> in the standard Authorization header. In the following examples we will be using "admin" and "secret" as the username and password. One disadvantage of Basic HTTP authentication is that the username and password in the authorization header are in Base64-encoded plain text and can easily be decoded by anyone. So, it's essential to combine Basic auth together with HTTPS/SSL. The username and password are matched against the credentials stored on the server. If they match, the user can access the resource; otherwise, a 401 Unauthorized response is returned.
The Basic auth request is sent in Base64-encoded plain text, which has a high risk of MITM and other security attacks. As a best practice, you should always use HTTPS/SSL to protect against these attacks. Additionally, the relevant plain text should be excluded from your logs.
Adding Basic auth is very easy with Gin:
package main

import (
  "net/http"

  "github.com/gin-gonic/gin"
)

func main() {
  r := gin.Default()
  r.GET("/resource", gin.BasicAuth(gin.Accounts{
        "admin": "secret",
    }), func(c *gin.Context) {

    c.JSON(http.StatusOK, gin.H{
      "data": "resource data",
    })
  })
  r.Run() // Listen and serve on 0.0.0.0:8080 (for Windows "localhost:8080")
}
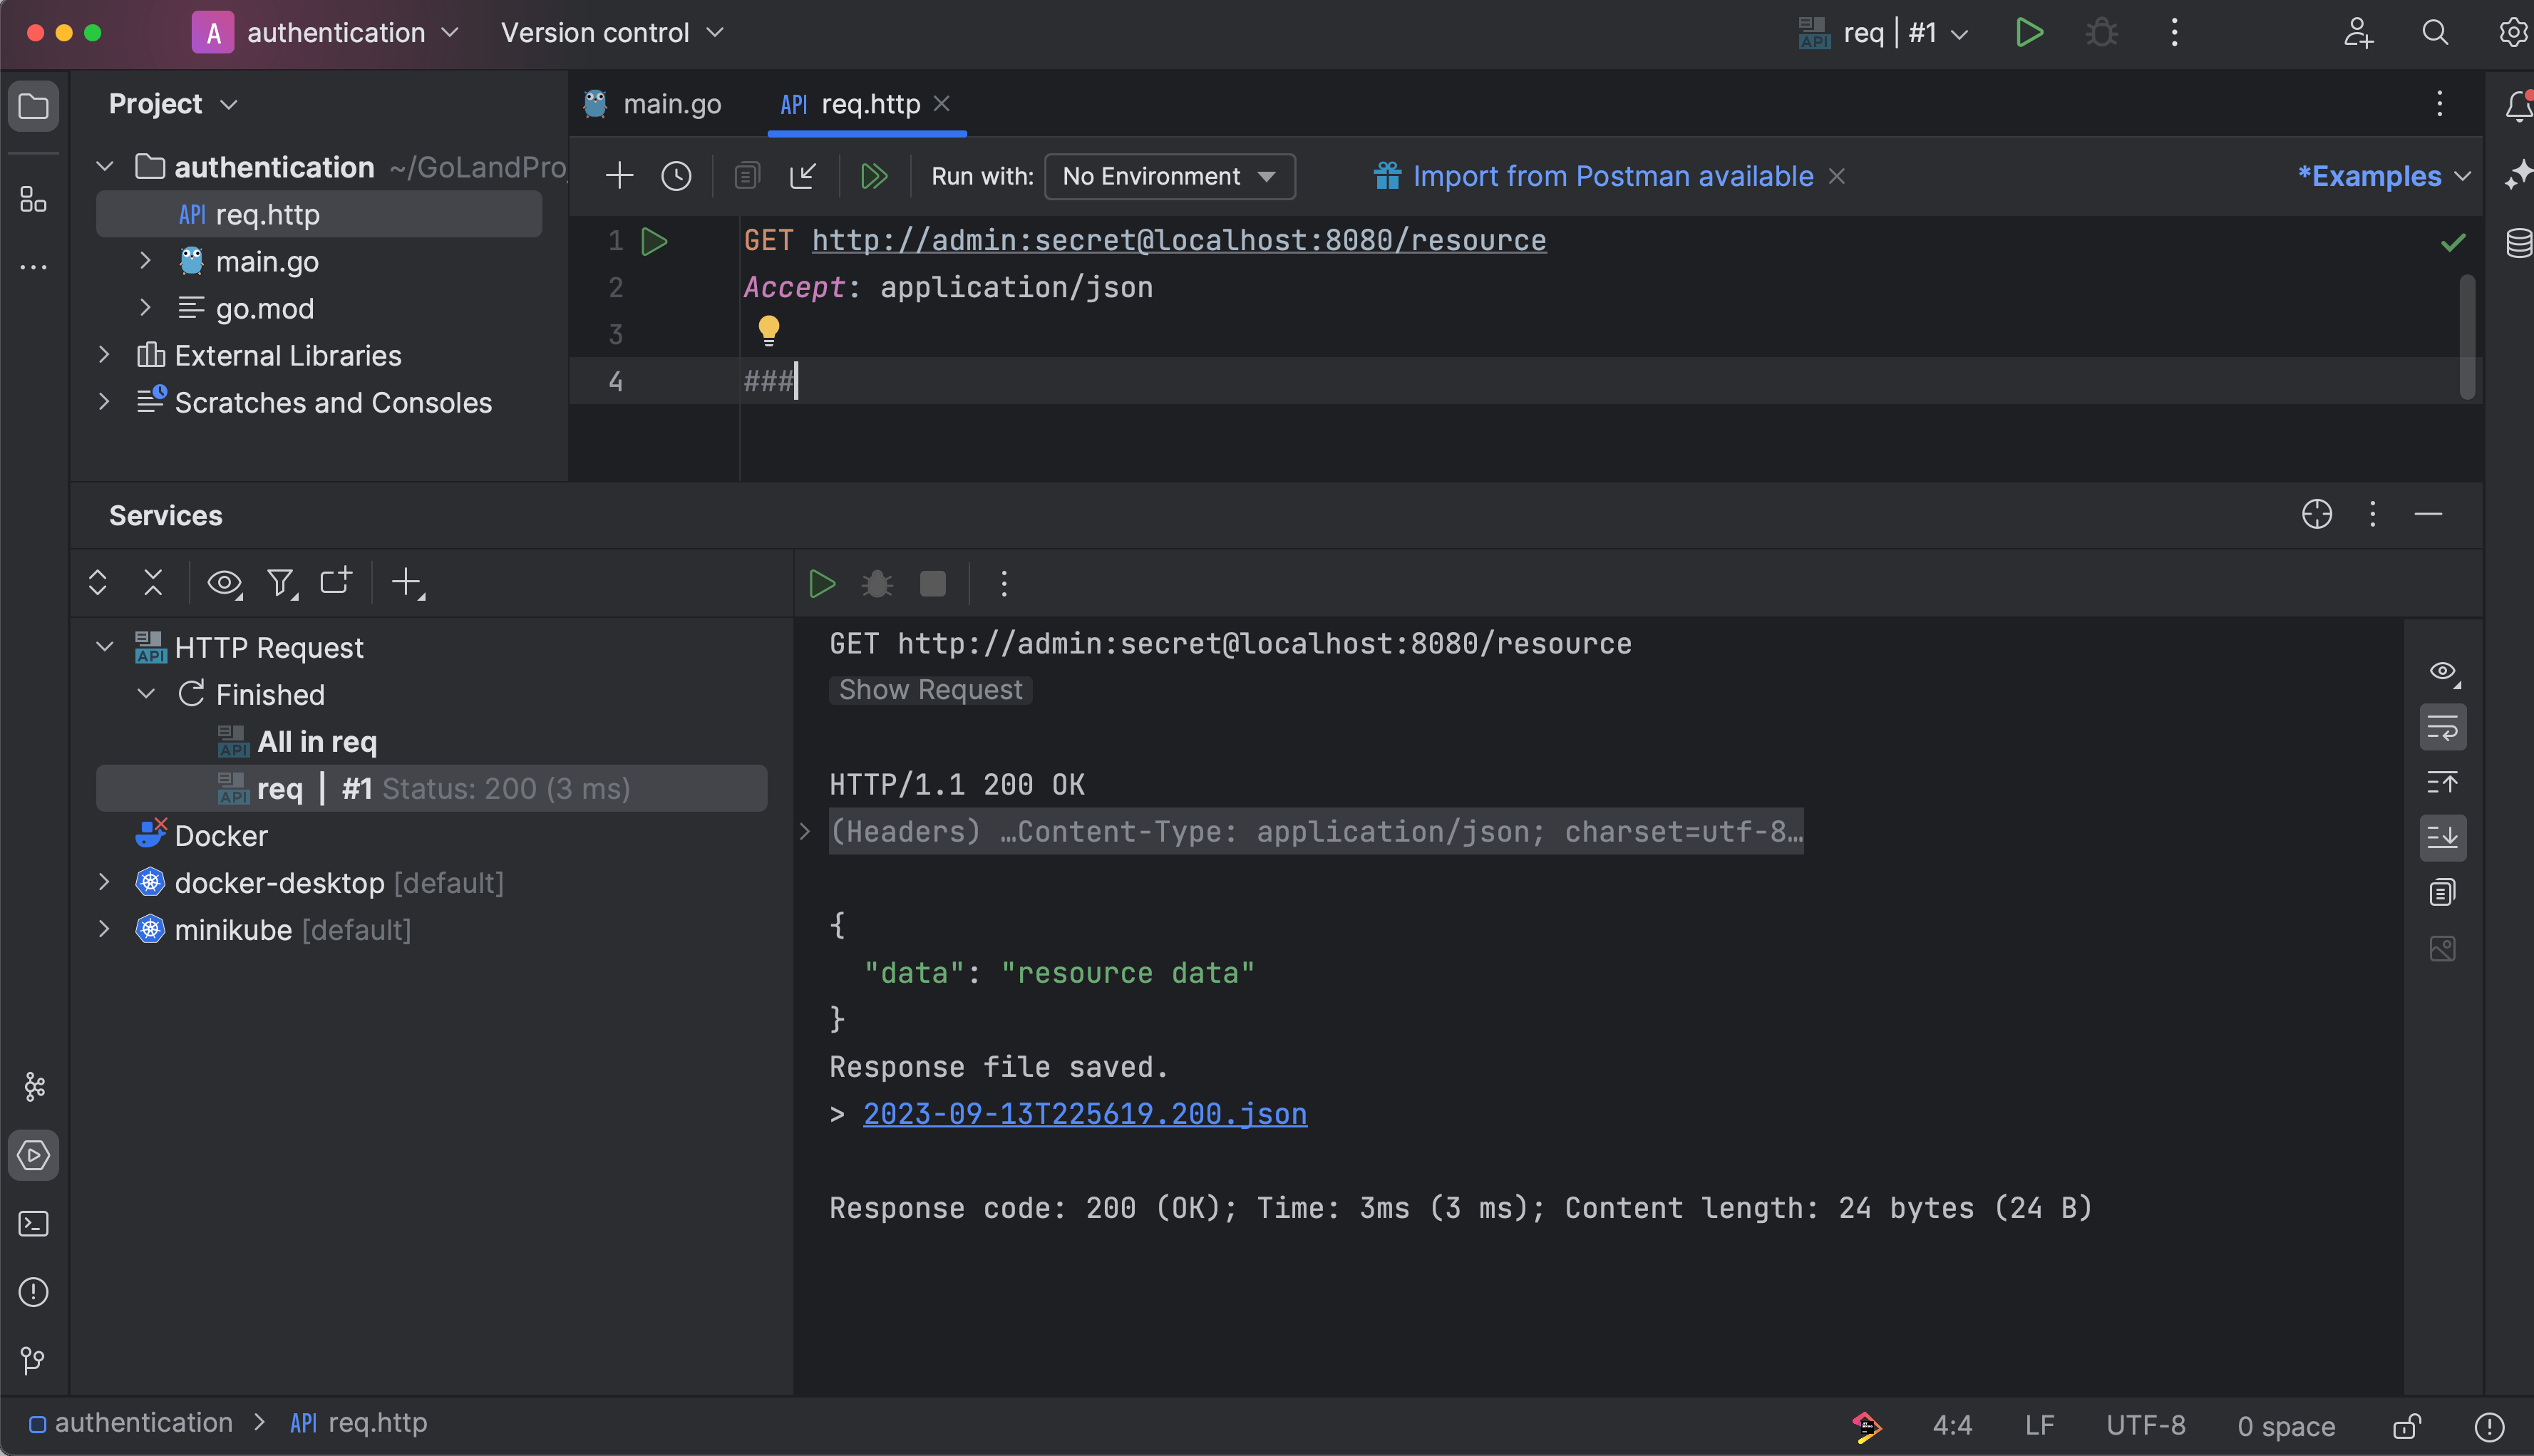
Now try the endpoint using the GoLand client, and you'll get a 401 Unauthorized response:

If you include the correct Basic authentication header in the HTTP requests, you'll get a successful response.
The Basic auth header can be added by simply following the URL pattern http://username:password@resource_url.com/:
GET http://admin:secret@localhost:8080/resource
Accept: application/json

###
Bearer-Token-Based Authentication
Bearer-token-based authentication lets you authenticate users using an access key. It's also part of the HTTP authentication scheme. The bearer token is a string that's usually generated by the server after a login request from the client. The client can then use this string to access the resource. Some servers issue a hexadecimal character string, and others generate a more structured JWT token, which is discussed in the next section.
The advantage of using bearer token authentication is that the username and password are only used once to get the token, which is more secure than sending the password each time you make a request. These tokens can be easily revoked if they are leaked, preventing malicious access to the resource.
On the flip side, the disadvantage of using this method is that the token is a randomly generated string that cannot be decoded to get any further information about the owner of the token. So, the server needs an extra query to fetch the details about the token owner.
It's always best practice to generate tokens that cannot be regenerated and that are not based on a pattern. For example, having identifying information such as a username in the token can put the token at risk of being guessed and generated by an attacker.
The code below generates a /login endpoint and a /resource endpoint. The /login endpoint will generate a token that the client can use to pass to the /resource endpoint, while the /resource endpoint reads and validates the token:
package main

import (
    "crypto/rand"
    "encoding/hex"
    "github.com/gin-gonic/gin"
    "net/http"
    "strings"
)

var tokens []string

func main() {
    r := gin.Default()
    r.POST("/login", gin.BasicAuth(gin.Accounts{
        "admin": "secret",
    }), func(c *gin.Context) {
        token, _ := randomHex(20)
        tokens = append(tokens, token)

        c.JSON(http.StatusOK, gin.H{
            "token": token,
        })
    })
    r.GET("/resource", func(c *gin.Context) {
        bearerToken := c.Request.Header.Get("Authorization")
        reqToken := strings.Split(bearerToken, " ")[1]
        for _, token := range tokens {
            if token == reqToken {
                c.JSON(http.StatusOK, gin.H{
                    "data": "resource data",
                })
                return
            }
        }
        c.JSON(http.StatusUnauthorized, gin.H{
            "message": "unauthorized",
        })
    })
    r.Run() // Listen and serve on 0.0.0.0:8080 (for Windows "localhost:8080")
}

func randomHex(n int) (string, error) {
    bytes := make([]byte, n)
    if _, err := rand.Read(bytes); err != nil {
        return "", err
    }
    return hex.EncodeToString(bytes), nil
}
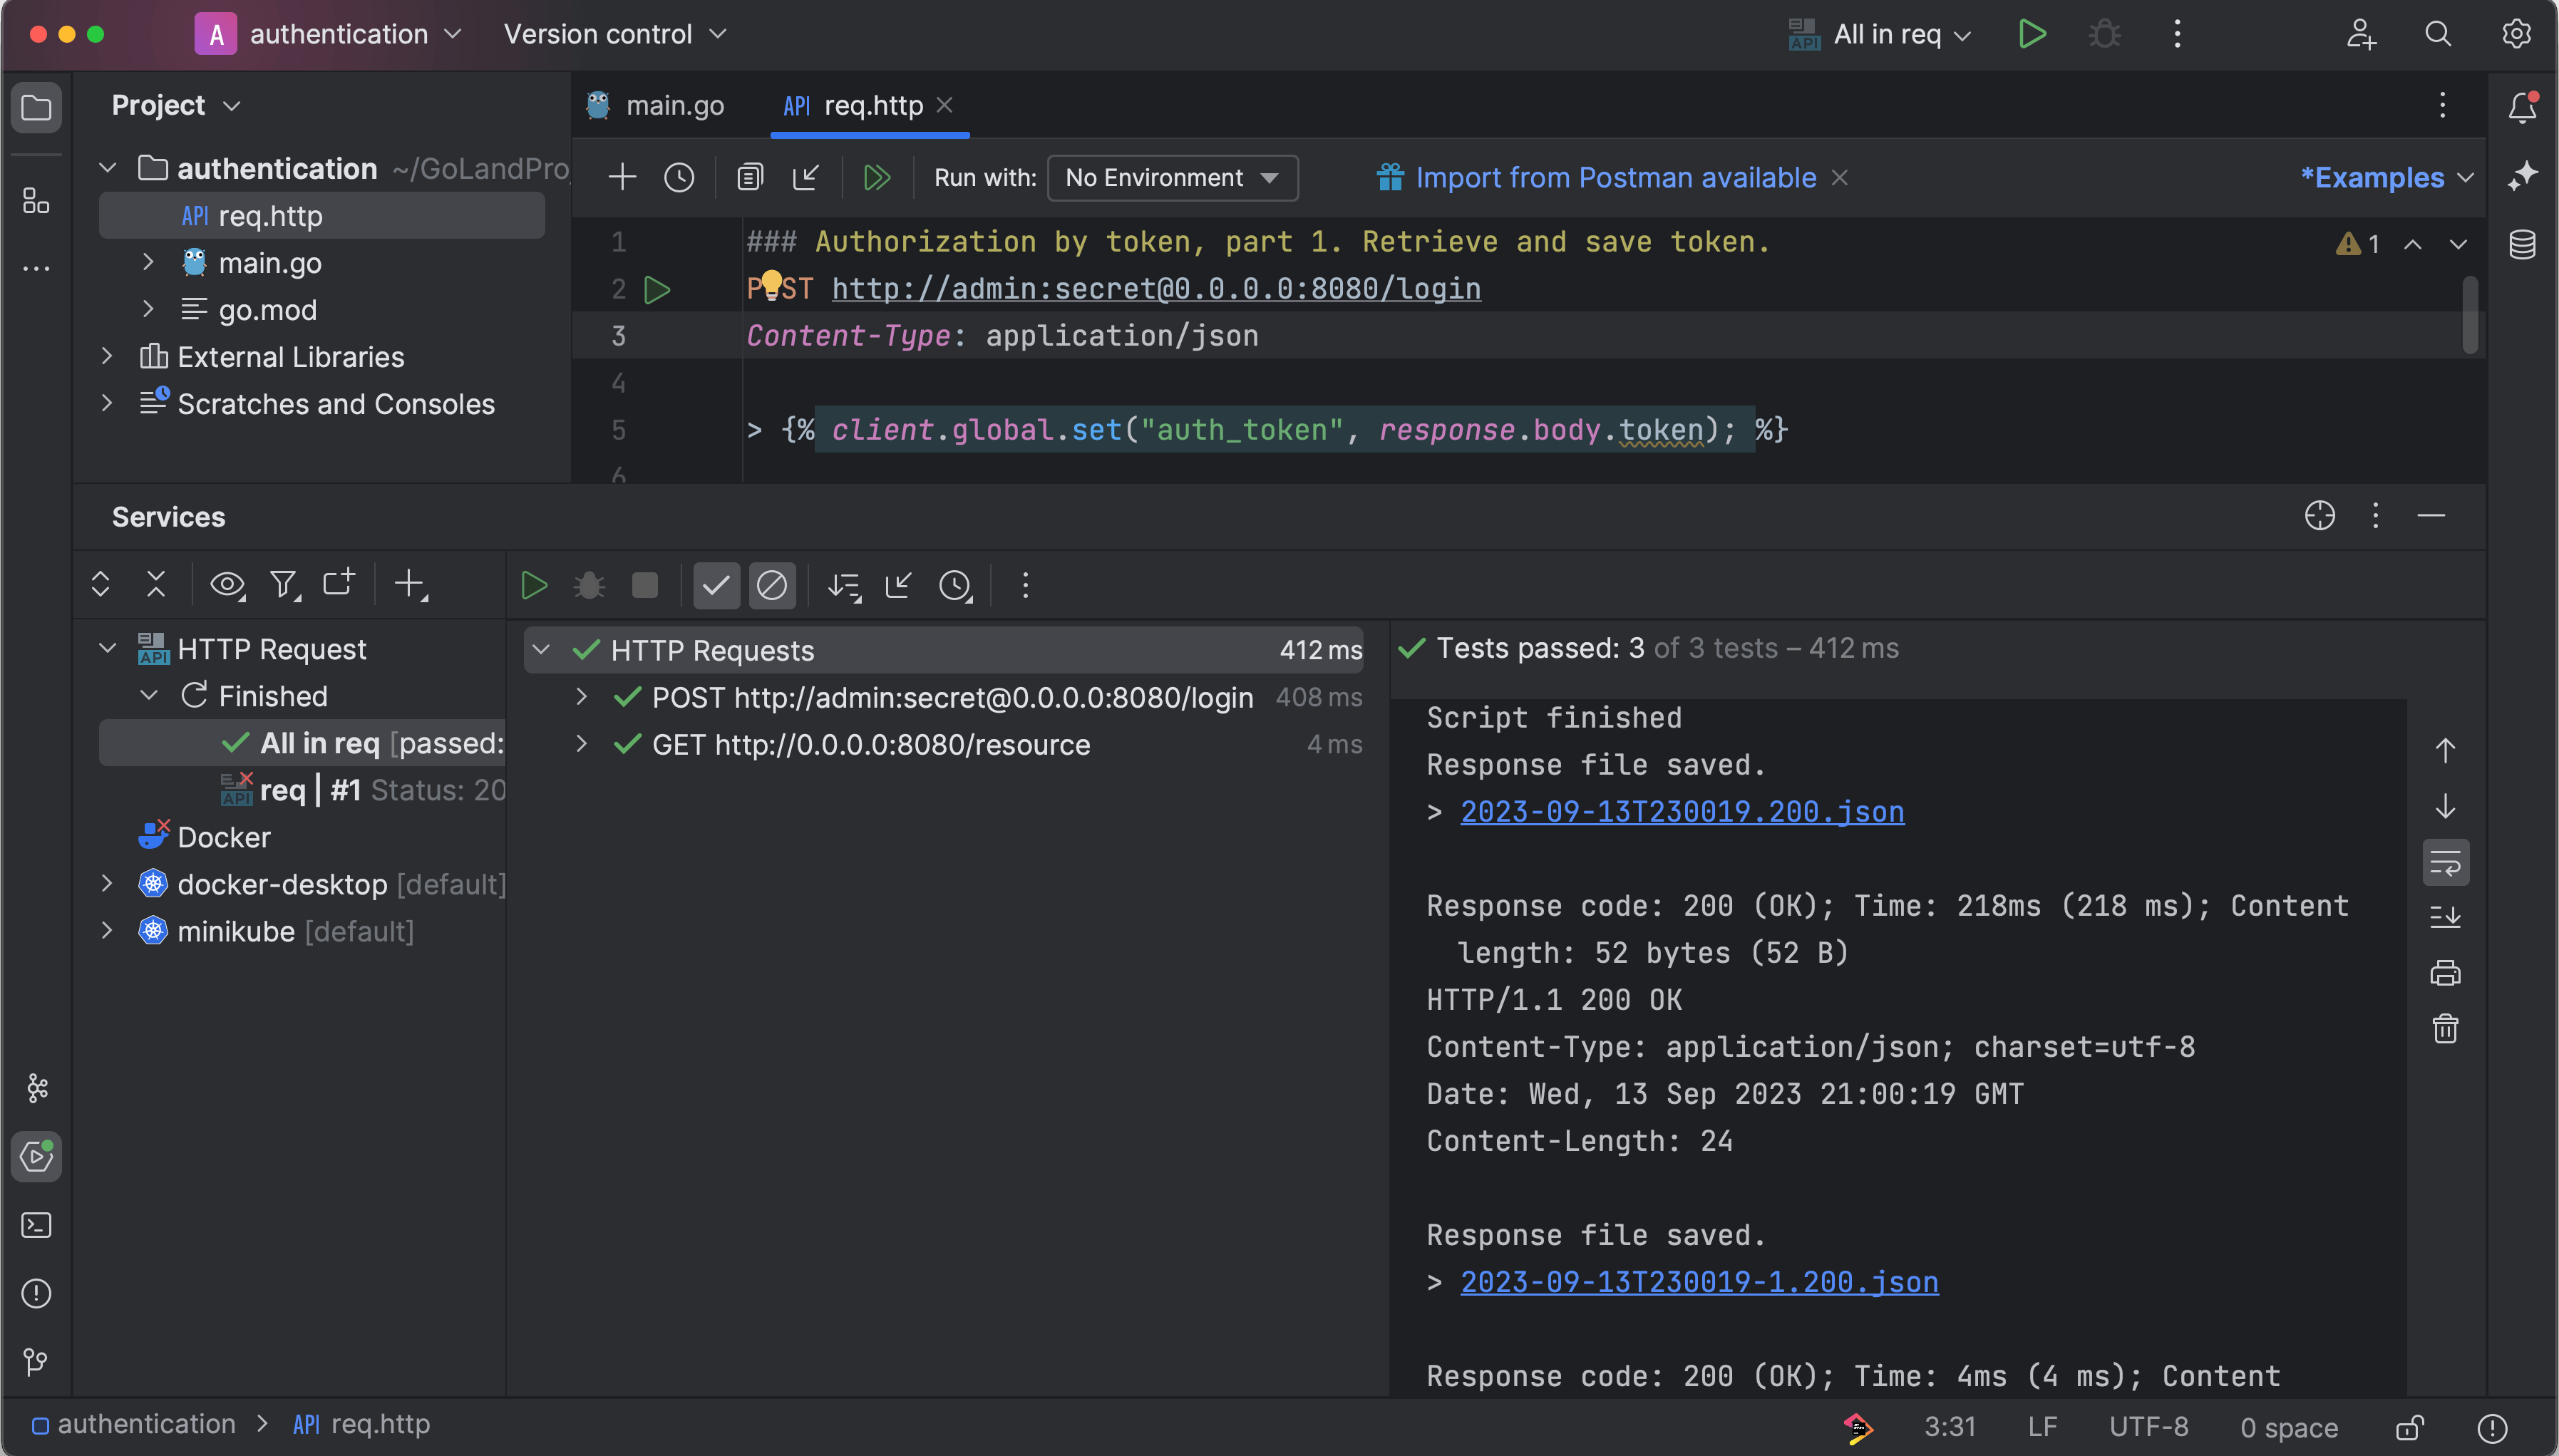
Now you can test these two endpoints using the GoLand HTTP Client:
### Authorization by token, part 1. Retrieve and save token.
POST http://admin:secret@0.0.0.0:8080/login
Content-Type: application/json

> {% client.global.set("auth_token", response.body.token); %}

### Authorization by token, part 2. Use token to authorize.
GET http://0.0.0.0:8080/resource
Authorization: Bearer {{auth_token}}
There are two parts to this request:
- Part one makes a POST request to the
/loginendpoint to retrieve the token, which you save using the response handler script written in JavaScript ECMAScript 5.1 - Part two uses the saved token to request the resource by adding the token to the header
JWT-Based Authentication
JSON Web Token (JWT) is an open standard for securely transferring information between two parties as a JSON object. JWT tokens are digitally signed and can be verified and trusted to be received from the provider. JWT tokens are a popular way to authenticate your application. Similar to bearer token authentication, in JWT-based authentication, you send the JWT token as an authentication request header.
The main advantage of JWT-based authentication is that it is secure and reliable, as the server can verify the integrity of the request and is protected from tampering. Another advantage is that the token is a JSON-based object, which can contain identity information about the owner. This makes the token self-sufficient and fast to authenticate.
Signature-based verification can be a bit complicated to implement, so if your application does not need authorization or any user information, there's no need to complicate your system. Once issued, JWT tokens cannot be revoked, so it's best practice to set a short expiry time. The JWT token can be generated using various algorithms, but you should always use a secure RSA-based signature.
The official documentation is the best place to learn about JWT in general, but this article focuses on building JWT authentication in Go.
The implementation of JWT-based authentication is similar to bearer token authentication. However, the way the token is generated and how it's verified are different. Use the golang-jwt package to generate and verify the JWT token:
package main

import (
    "github.com/gin-gonic/gin"
    "github.com/golang-jwt/jwt/v4"
    "net/http"
    "strings"
    "time"
)

var jwtKey = []byte("my_secret_key")
var tokens []string

type Claims struct {
    Username string `json:"username"`
    jwt.RegisteredClaims
}

func main() {
    r := gin.Default()
    r.POST("/login", gin.BasicAuth(gin.Accounts{
        "admin": "secret",
    }), func(c *gin.Context) {
        token, _ := generateJWT()
        tokens = append(tokens, token)

        c.JSON(http.StatusOK, gin.H{
            "token": token,
        })
    })

    r.GET("/resource", func(c *gin.Context) {
        bearerToken := c.Request.Header.Get("Authorization")
        reqToken := strings.Split(bearerToken, " ")[1]
        claims := &Claims{}
        tkn, err := jwt.ParseWithClaims(reqToken, claims, func(token *jwt.Token) (interface{}, error) {
            return jwtKey, nil
        })
        if err != nil {
            if err == jwt.ErrSignatureInvalid {
                c.JSON(http.StatusUnauthorized, gin.H{
                    "message": "unauthorized",
                })
                return
            }
            c.JSON(http.StatusBadRequest, gin.H{
                "message": "bad request",
            })
            return
        }
        if !tkn.Valid {
            c.JSON(http.StatusUnauthorized, gin.H{
                "message": "unauthorized",
            })
            return
        }

        c.JSON(http.StatusOK, gin.H{
            "data": "resource data",
        })
    })
    r.Run() // Listen and serve on 0.0.0.0:8080 (for Windows "localhost:8080")
}

func generateJWT() (string, error) {
    expirationTime := time.Now().Add(5 * time.Minute)
    claims := &Claims{
        Username: "username",
        RegisteredClaims: jwt.RegisteredClaims{
            ExpiresAt: jwt.NewNumericDate(expirationTime),
        },
    }

    token := jwt.NewWithClaims(jwt.SigningMethodHS256, claims)

    return token.SignedString(jwtKey)

}
You can test this endpoint using the GoLand HTTP Client again:
### Authorization by token, part 1. Retrieve and save token.
POST http://admin:secret@0.0.0.0:8080/login
Content-Type: application/json

> {% client.global.set("auth_token", response.body.token); %}

### Authorization by token, part 2. Use token to authorize.
GET http://0.0.0.0:8080/resource
Authorization: Bearer {{auth_token}}
Single Sign-On Authentication
Single sign-on (SSO) enables users to authenticate to multiple applications using a single credential.
There are two popular ways to implement SSO: OIDC and SAML. Implementing OIDC and SAML servers can be a long and complicated process, which is beyond the scope of this article.
The following section is a basic guide to these methods and does not demonstrate their complete implementation.
The crewjam/saml README is a good resource if you want to implement a SAML server, and the OpenID Certified Implementations are good to reference for OIDC.
Before we go any further, here are some articles that might help you better understand SSO:
- How Does Single Sign-On Work?
- OpenID Connect Explained in Plain English
- An Illustrated Guide to OAuth and OpenID Connect
- How SAML Authentication Works
- SAML Explained in Plain English
OIDC
OpenID Connect (OIDC) is a layer on top of OAuth 2.0 that allows users to verify their identity in multiple applications based on the authentication performed by an authorization server.
In the past, if you wanted one of your services to access information in another, you had to give the service the username and password of the other service it was accessing. However, these credentials give the service full permission to access anything within the other service. The OAuth protocol was created to solve this problem. It defines a standard way of accessing information between two services. An authorization server provides an authentication token, which has an expiry time and can only be used to access a limited resource from the server.
OIDC allows the applications to obtain basic identifying information about the user during authentication. It's designed for modern applications and can be used in web applications, SPAs, and mobile applications. As it's a centrally managed authentication system, it's also secure. There are many popular OIDC providers, including Google and Facebook, which you can integrate for federated login. OIDC is a newer framework than SAML; it's simpler to implement, but it has less security customization.
One downside of OIDC is that it can be challenging to build it yourself. The OIDC specification has several recommended implementation, security, privacy, and IANA settings, and it's easy to miss something if you're implementing it from scratch, so using a library might be a better option. You should also make sure that the password submission is always over HTTPS and that you use a specific URL rather than a flexible one, as attackers can manipulate the flexibility and compromise the system.
You can build an OIDC server in Go using an OpenID Connect client and server library written for Go and certified by the OpenID Foundation.
OIDC requires client- and server-side implementation. There are other alternatives, like go-oidc and Fosite, which you can use for client-side implementation.
OIDC supports different types of authentication flows, called grants:
- Authentication (or Basic) Flow is the basic type of flow, which is used by apps with a backend service.
- Implicit Flow is used by applications that do not have a backend service, like JavaScript apps.
- Device Authorization Flow is commonly used by services that do not have the option to provide input for users. These devices ask users to follow a link to authorize the device.
- Client Credentials Grant is used when one application wants to communicate with another without a direct request from a user.
As an example, in a Client Credentials Grant, a user is granted an access token using the following steps:
- Client requests
/tokenendpoint withclient_idandclient_secret - Server validates the
client_idand theclient_secret - Client gets the token
- The token is used to get access to the resource
### OIDC client Credential Grant, part 1. Retrieve and save token.
POST http://admin:secret@0.0.0.0:8080/token?client_id=123&client_secret=secret_key
Content-Type: application/json

> {% client.global.set("access_token", response.body.access_token); %}

### OIDC client Credential Grant, part 2. Use token to get access to the resource.
GET http://0.0.0.0:8080/resource
Authorization: Bearer {{access_token}}
SAML
Security Assertion Markup Language (SAML) enables users to access multiple applications using a single credential by passing authentication information in a particular format between two parties. It's based on the Extensible Markup Language (XML) format. The two parties authenticating are called the identity provider (IDP) and the service provider (SP). An IDP is a service that authenticates users, whereas an SP delegates authentication to an IDP.
With SAML, you don't need to maintain account information in multiple places, so no synchronization is required, and it's cost-efficient. It's also highly secure, as it ensures that the information is only transferred between IDP and SP, which makes it a popular choice for enterprise software.
SAML uses the XML format for data exchange, which is comparatively more difficult to understand than JSON. It's an older framework and supports fewer authentication types than OIDC. It's best to use SAML with enterprise applications.
To implement SAML in Go, you can use the crewjam/saml package, which helps you with both IDP and SP implementation.
You can create an HTTP server protected by SAML authentication using the crewjam/saml package. To protect the endpoints, initialize the metadata of the IDP and create a SAML SP with the metadata. Finally, use the SP to protect your endpoints:
    // Initialize the IDP URL
    idpMetadataURL, err := url.Parse("https://samltest.id/saml/idp")
    if err != nil {
        panic(err)
    }
    // Initialize metadata of the IDP
    idpMetadata, err := samlsp.FetchMetadata(context.Background(), http.DefaultClient,
        *idpMetadataURL)
    if err != nil {
        panic(err)
    }

    rootURL, err := url.Parse("http://localhost:8000")
    if err != nil {
        panic(err)
    }
    // Create SAML SP with the metadata of IDP
    samlSP, _ := samlsp.New(samlsp.Options{
        URL:            *rootURL,
        Key:            <rsa.PrivateKey>,
        Certificate:    <Cert>,
        IDPMetadata: idpMetadata,
    })
    app := http.HandlerFunc(hello)
    // Use the samlSP to protect your endpoint
    http.Handle("/hello", samlSP.RequireAccount(app))
    http.Handle("/saml/", samlSP)
    http.ListenAndServe(":8000", nil)
If you need both Oauth 2.0 and OIDC and want to use a single library, casdoor is a popular open-source Identity and Access Management tool that you can use.
Conclusion
Authentication is a crucial component of your system. In this article, you learned about different methods of authentication, including Basic auth, bearer token, JWT, SAML, and OIDC. They all have their pros and cons, and you need to use them based on the kind of application you are building.
If you don't choose the right authentication and follow best practices, you might be compromising your data. How you implement authentication and how you authenticate to services are both important. For example, an HTTP client might have SSL disabled, which will put you at risk. Therefore, you should always use a secure tool or client to authenticate to your service.